



Long hair is made for big nights. Weddings, proms, galas, date nights, and red-carpet-style parties all call for a look with more polish than everyday hair, and long lengths give you the most to build with: cascading waves, high-shine ponytails, intricate braids, and updos with real presence. The 63 ideas below are strictly glamorous-event styles, each one photo-ready and built to last through the night.
Every wedding season brings the same question: how do you make long hair look fancy without it falling flat by midnight? The answer is structure: pinned shapes, set curls, and accessories placed where the light hits. Every style below includes a styling tip plus difficulty and cost notes so you can plan around your schedule and budget. Whenever a curling iron, flat iron, or hot rollers appear, apply a heat protectant first, since long hair shows heat damage at the ends before anywhere else. If prom is the event on your calendar, our prom hairstyle ideas guide collects looks designed for that night.
Quick Takeaways
- Glamour comes from finish, not complexity. Smooth roots, set curls, and a pass of shine spray make even a simple ponytail read fancy under event lighting.
- Updos outlast down styles. If you will be dancing or hugging all night, pinned buns, twists, and braided crowns stay put far longer than loose waves.
- Match the hair to the neckline. High necklines and detailed backs pair best with hair worn up, while strapless and off-the-shoulder dresses suit down styles and half-up looks that frame the collarbone.
- Accessories do heavy lifting. Jeweled pins, pearl combs, fresh flowers, and tiaras turn a basic bun or braid into an event look in seconds.
- Do a trial run. Long hair is heavy, so test the full style once with the same pins and products to learn how it holds and how long it takes.
1. Hollywood Waves
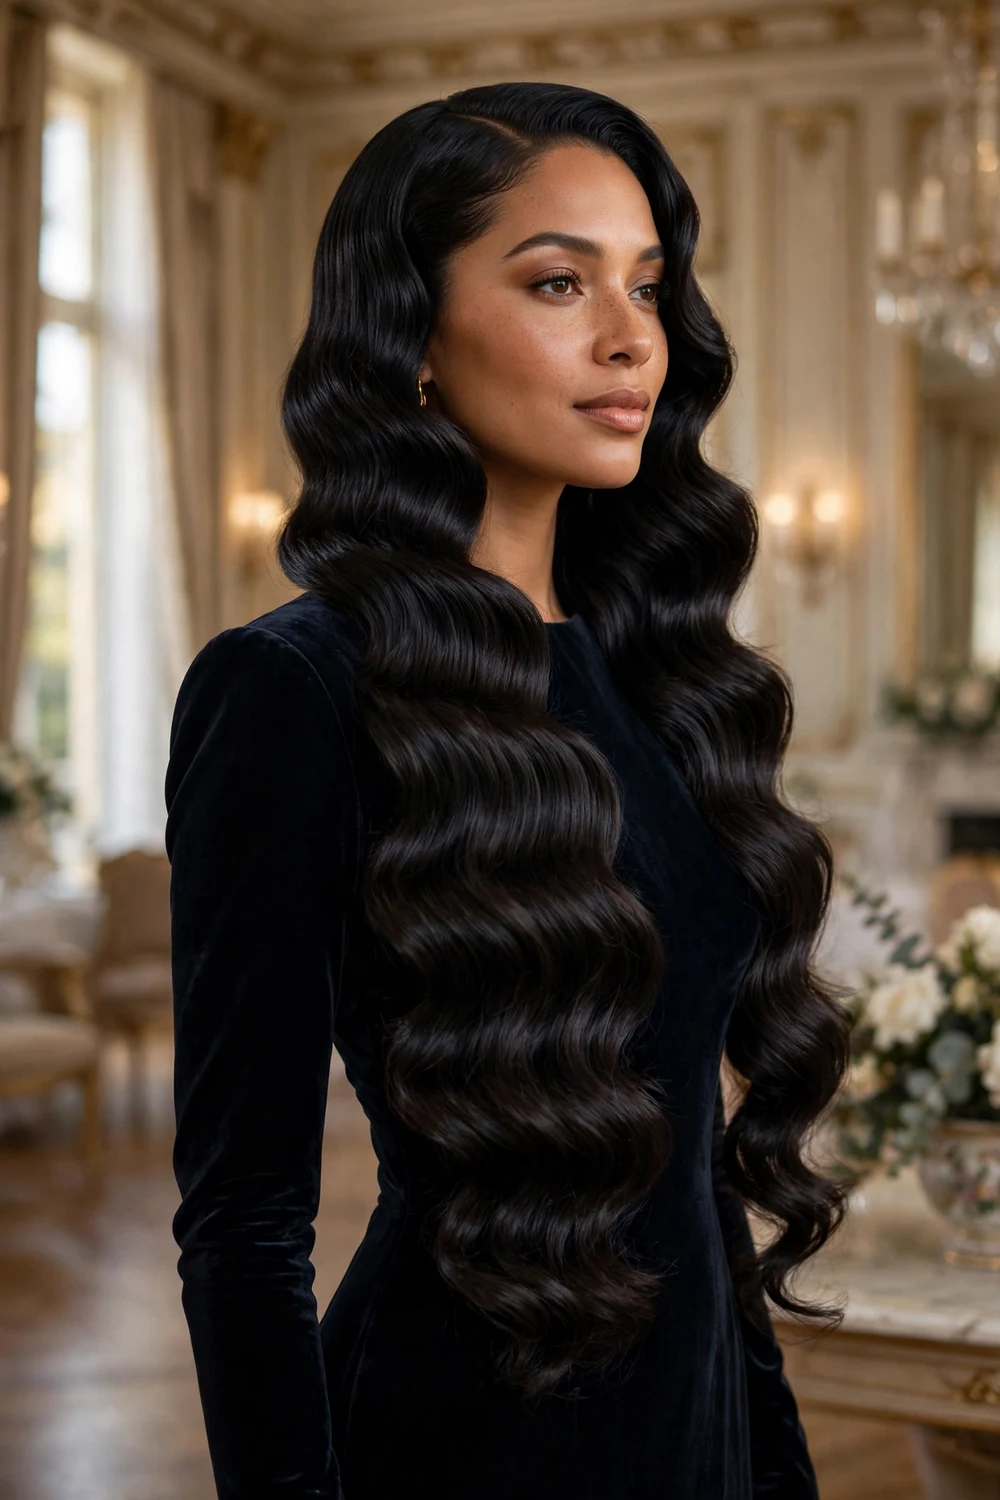
Hollywood waves are the classic fancy down style: uniform, glossy S-waves with a deep side part, all falling in the same direction. Set the hair in sections with a 1-inch curling iron (heat protectant first), pin each curl to cool, then brush through gently so the curls merge into waves. Long hair is almost required for the full effect, since the waves need length to form. Finish with shine spray for the mirror-like surface.
Try this: curl every section toward the face on both sides so the waves stack neatly instead of fighting each other.
Difficulty: Hard · Cost: $0–$15 (salon: $70–$130)
2. Sleek Waves
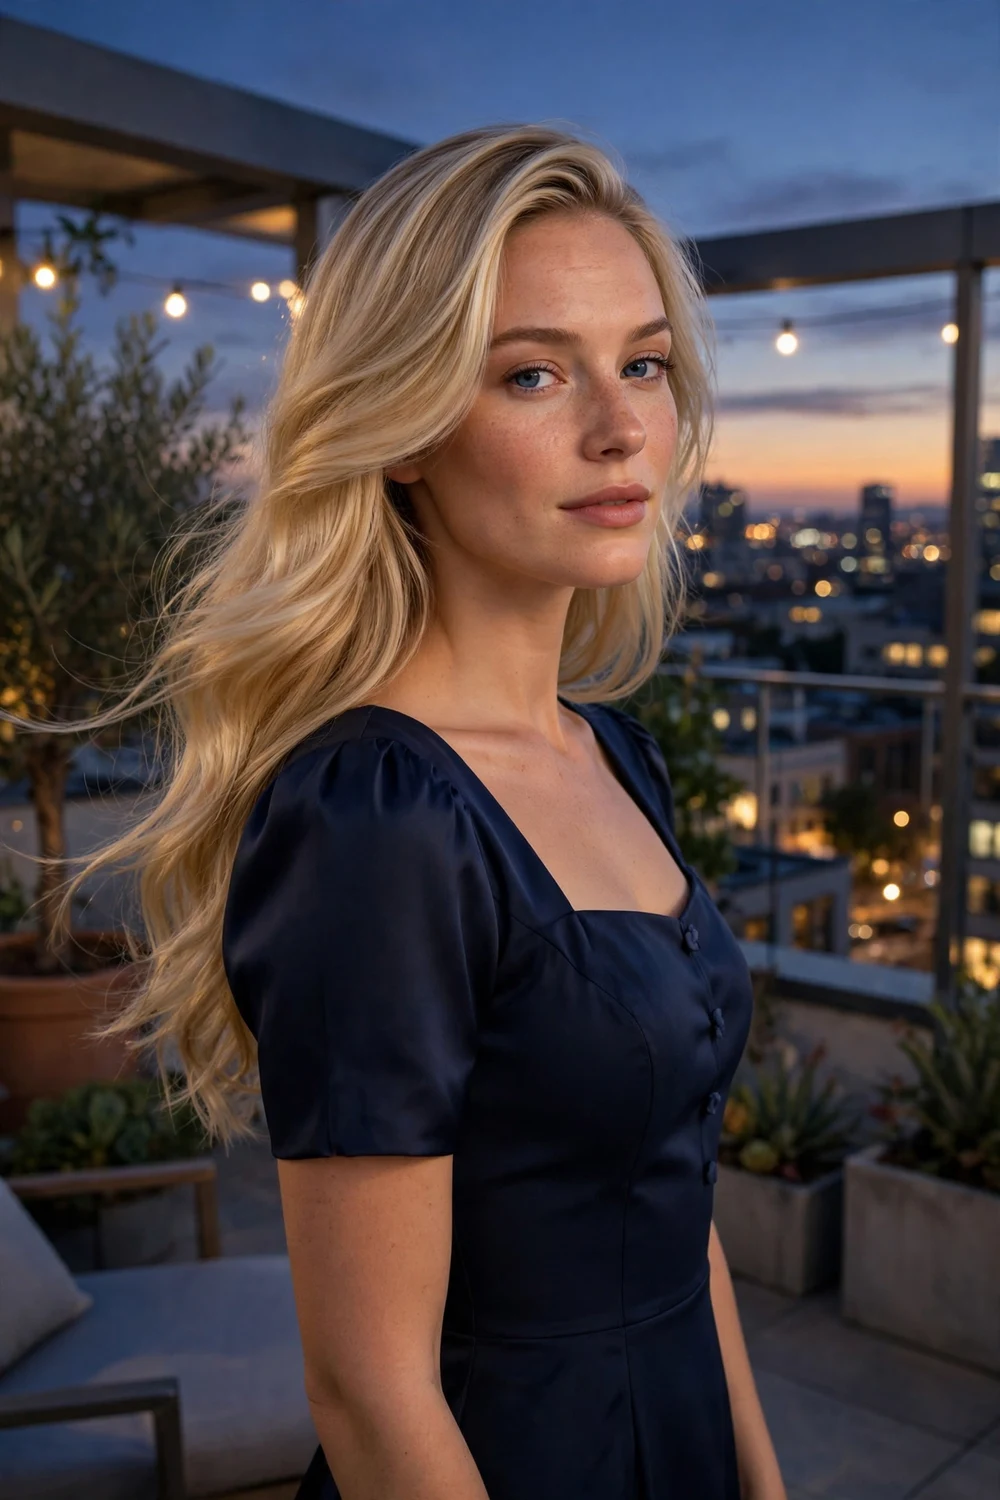
Sleek waves are Hollywood waves with the edges softened: smooth, glossy bends that flow instead of holding a rigid S-pattern. Create loose bends with a flat iron or large-barrel iron (heat protectant first), then brush through with a paddle brush until the waves look fluid. The result reads expensive and understated, which makes it a strong choice when the dress or jewelry is the statement piece. It also holds up better in humidity than tighter curl patterns.
Try this: brush the waves in the same direction three or four times, then set with a light flexible-hold spray so they move naturally.
Difficulty: Medium · Cost: $0–$12 (salon: $50–$100)
3. Middle-Part Glam Curls
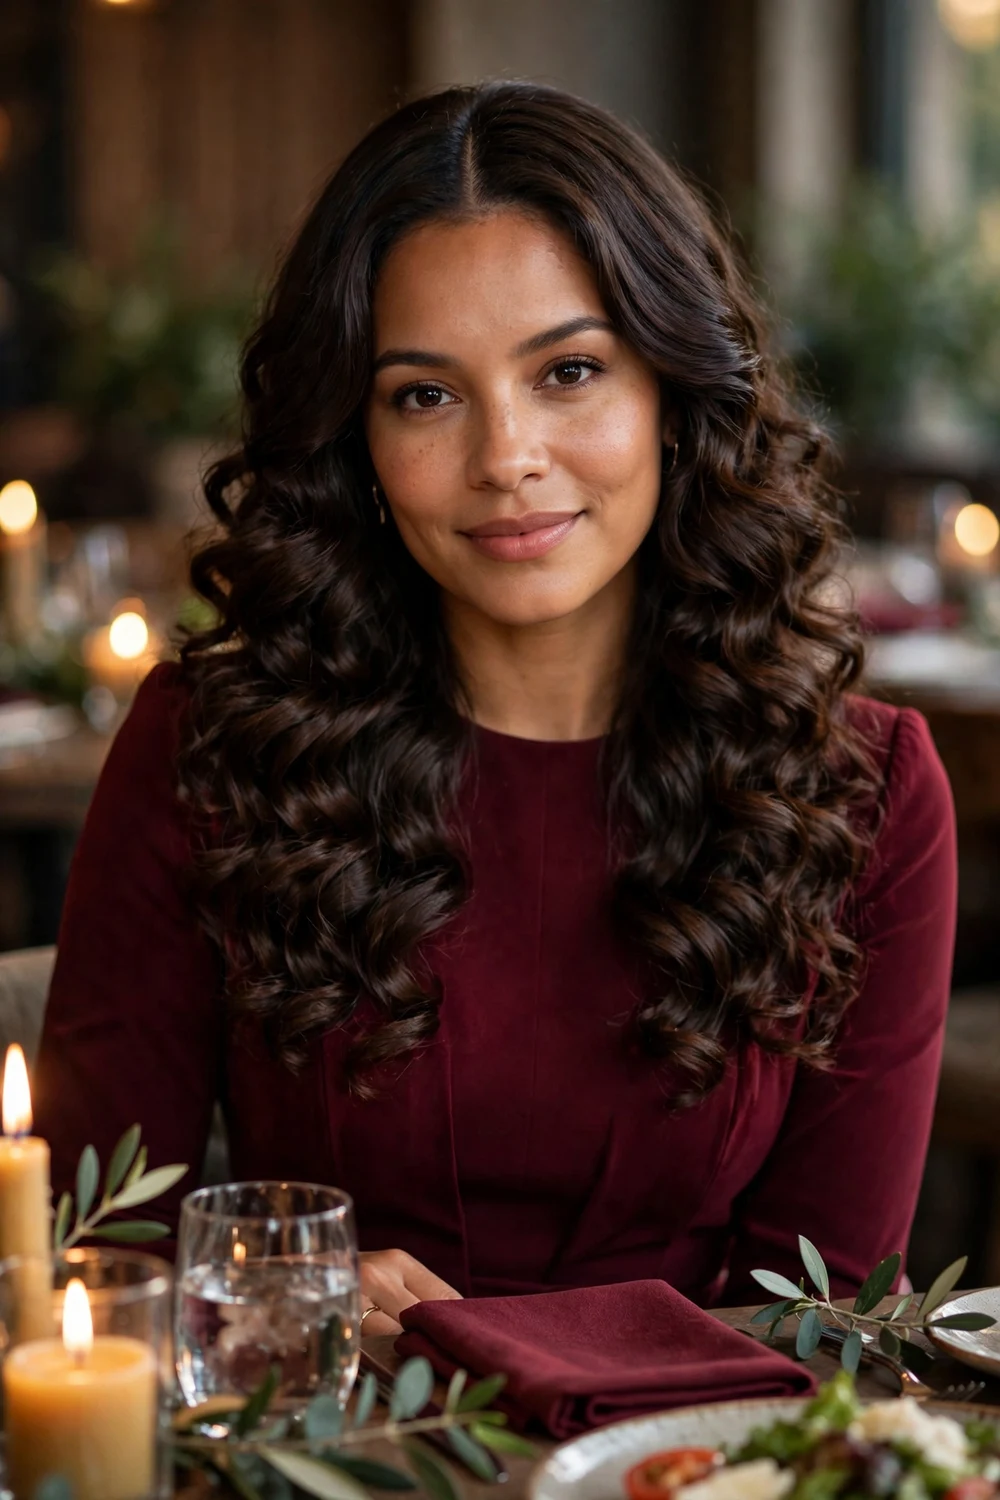
Middle-part glam curls split long hair down the center and build defined, bouncy curls from the mid-lengths to the ends. The symmetry frames the face and keeps the look balanced in photos from the front. Use a 1.25-inch curling wand with heat protectant, alternating the curl direction for natural-looking separation. Keep the roots smooth so the contrast between sleek top and full ends does the talking.
Try this: clip the crown sections up while they cool so the roots keep their lift instead of going flat under the curl weight.
Difficulty: Medium · Cost: $0–$12 (salon: $60–$110)
4. Pinned Curls
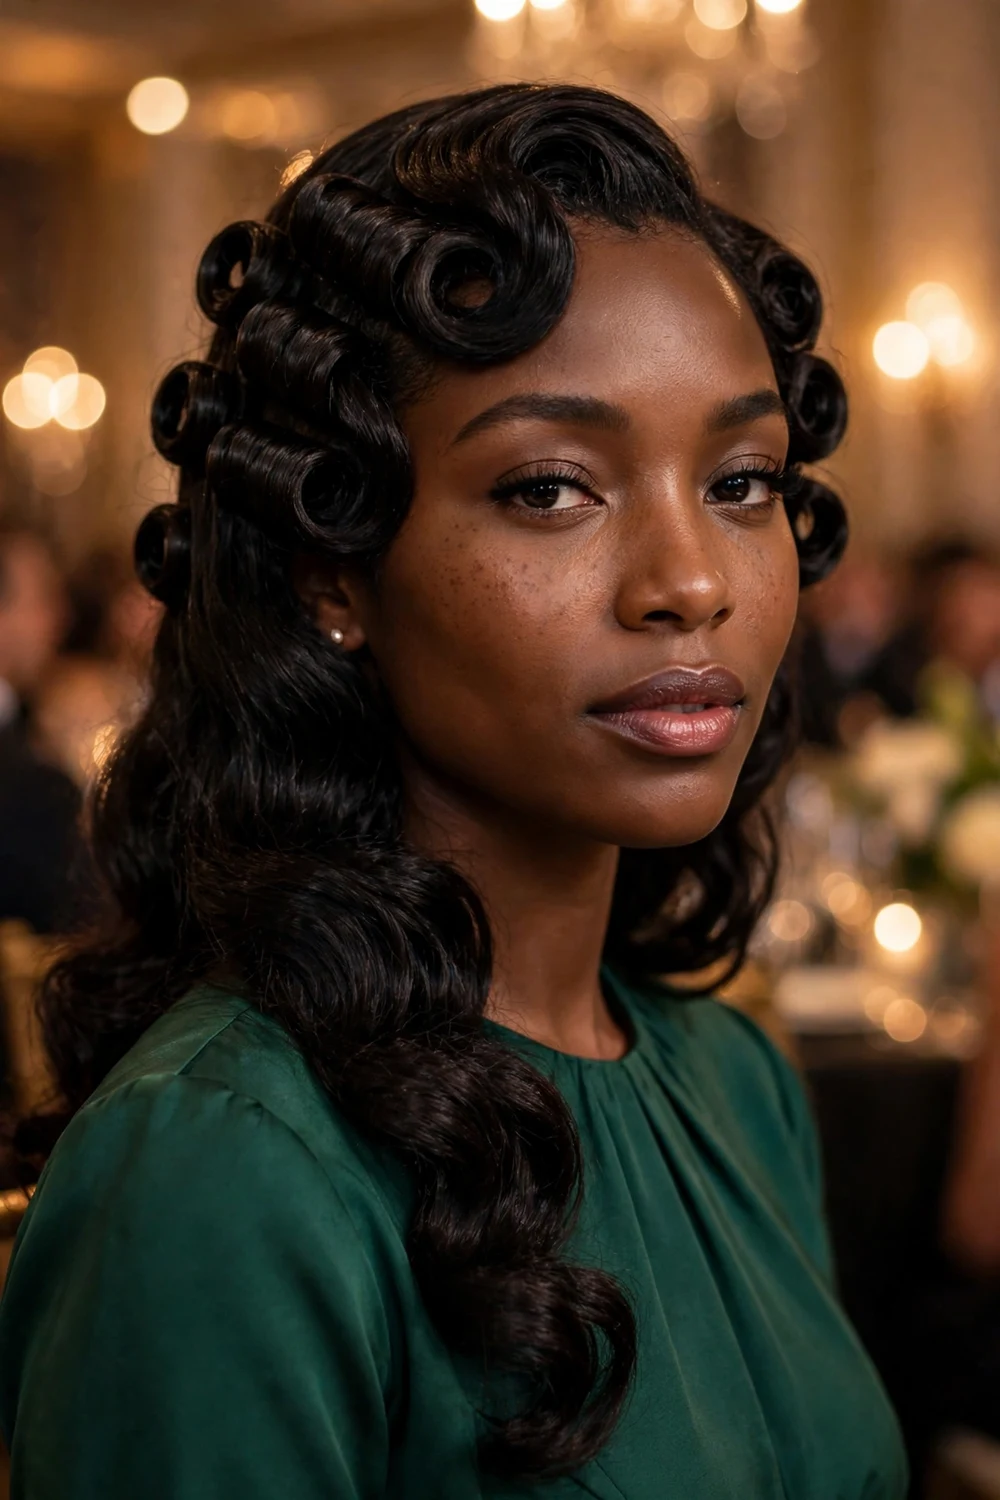
Pinned curls give long hair a vintage red-carpet finish: sculpted curls set close to the head in neat rows. Curl small sections with a 3/4-inch iron (heat protectant first), then pin each curl flat against the scalp with duckbill clips and let them cool completely. Removing the clips reveals uniform, glossy curls with serious staying power. The structured pattern holds its shape in photos and lasts through long events without touch-ups.
Try this: mist each section with setting spray before curling so the pattern sets firmly and survives dancing.
Difficulty: Medium · Cost: $0–$8 (salon: $55–$100)
5. Retro Curls with Front Roll
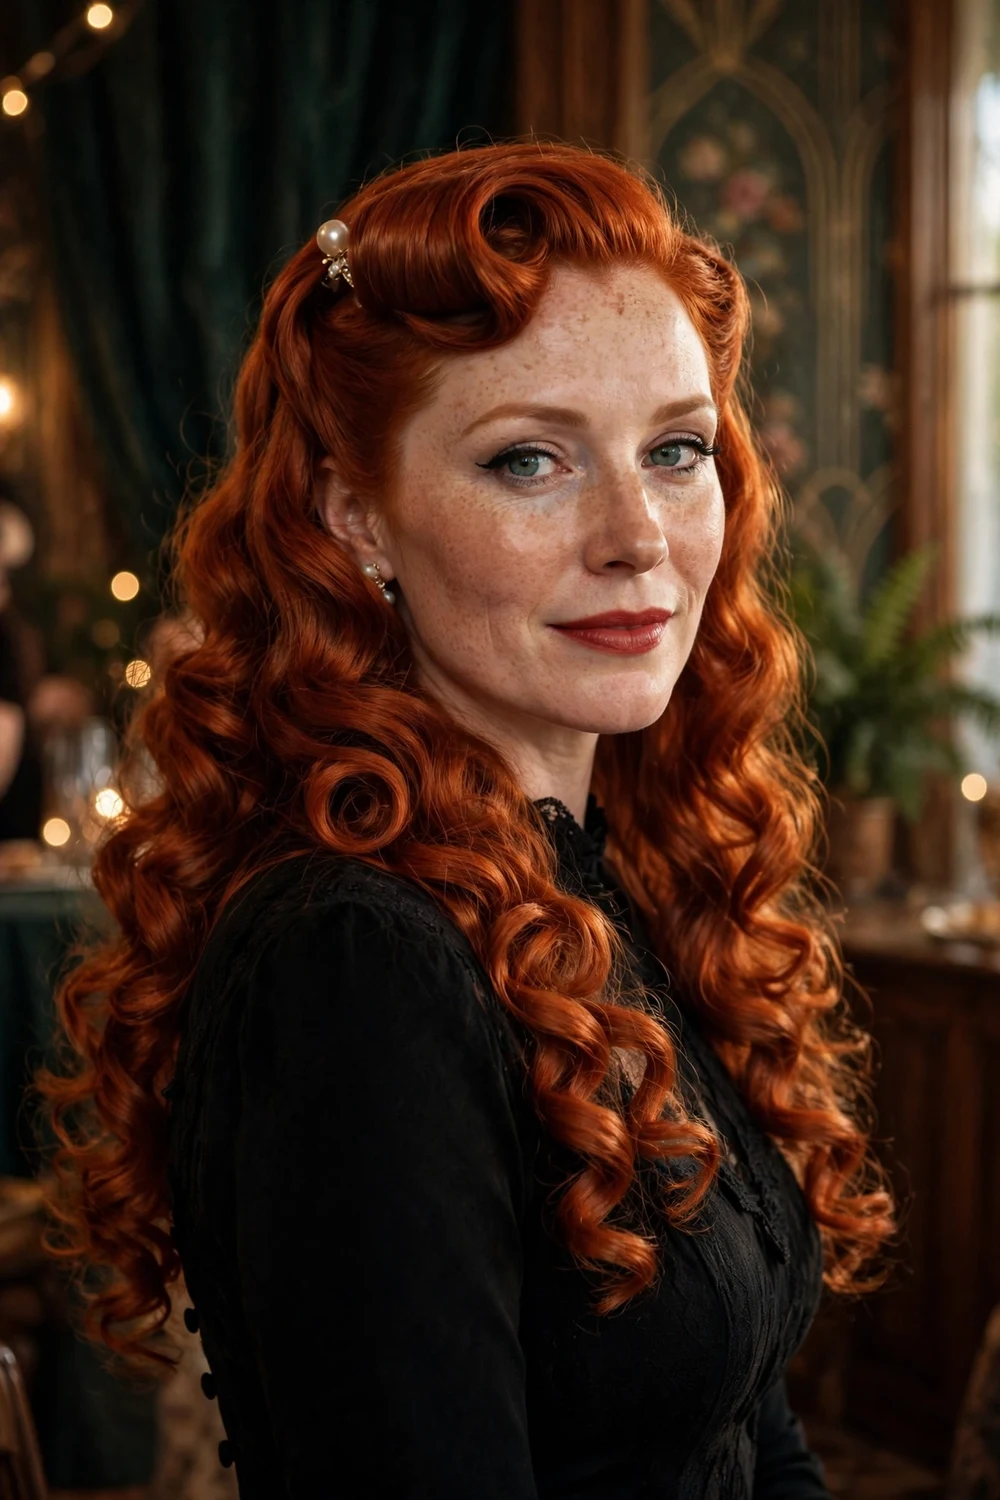
This retro look pairs a rolled front section with defined ringlets through the lengths for full vintage glamour. Backcomb the front section lightly, roll it under and pin it in place, then curl the remaining hair into tight ringlets with a small iron (heat protectant first). The front roll adds height and drama at the hairline while the ringlets keep the back lush. It suits themed parties, retro weddings, and anyone who wants a bold, unmistakable silhouette.
Try this: shape the front roll over a small piece of hair padding so it keeps its height all night without extra backcombing.
Difficulty: Hard · Cost: $0–$12 (salon: $65–$120)
6. Bombshell Blowout
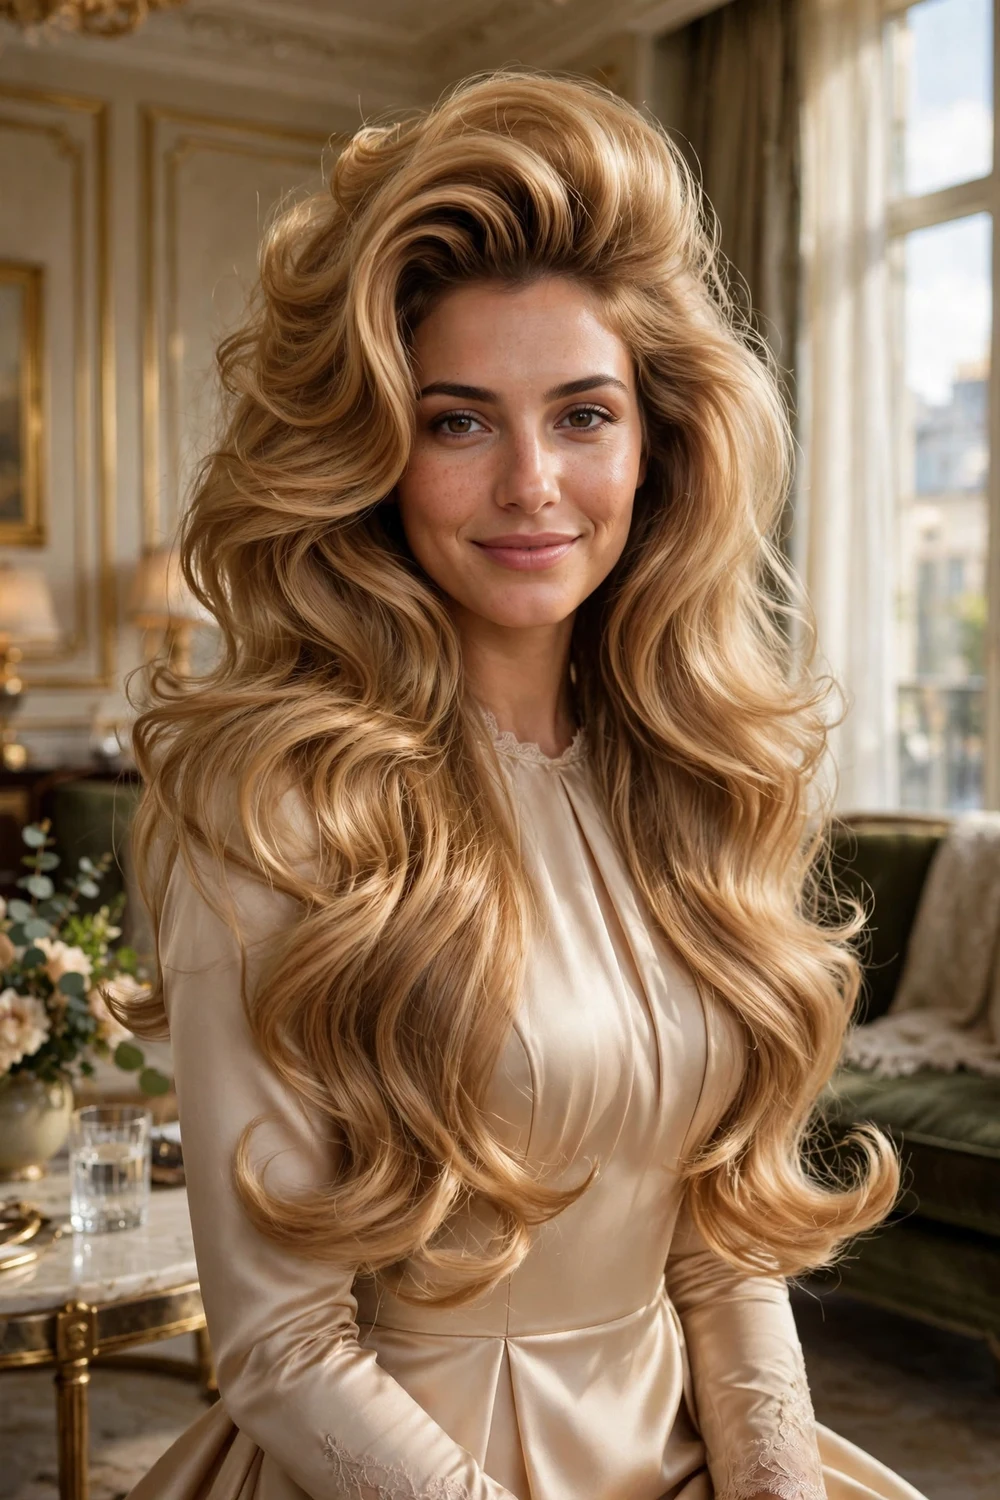
The bombshell blowout is all volume: big, bouncy, freshly-blown hair with flipped ends and lift at the crown. Blow-dry with a large round brush, directing the roots upward, then set the top sections in velcro rollers while they cool. Long hair gives this style its signature weight and swing. It works for any dressy event where you want maximum hair with minimum pinning, and it looks expensive without a single accessory.
Try this: flip your head upside down for the final cool blast of the dryer to lock in root volume before the event.
Difficulty: Medium · Cost: $0–$15 (salon: $50–$100)
7. Glass-Hair Sleek Straight
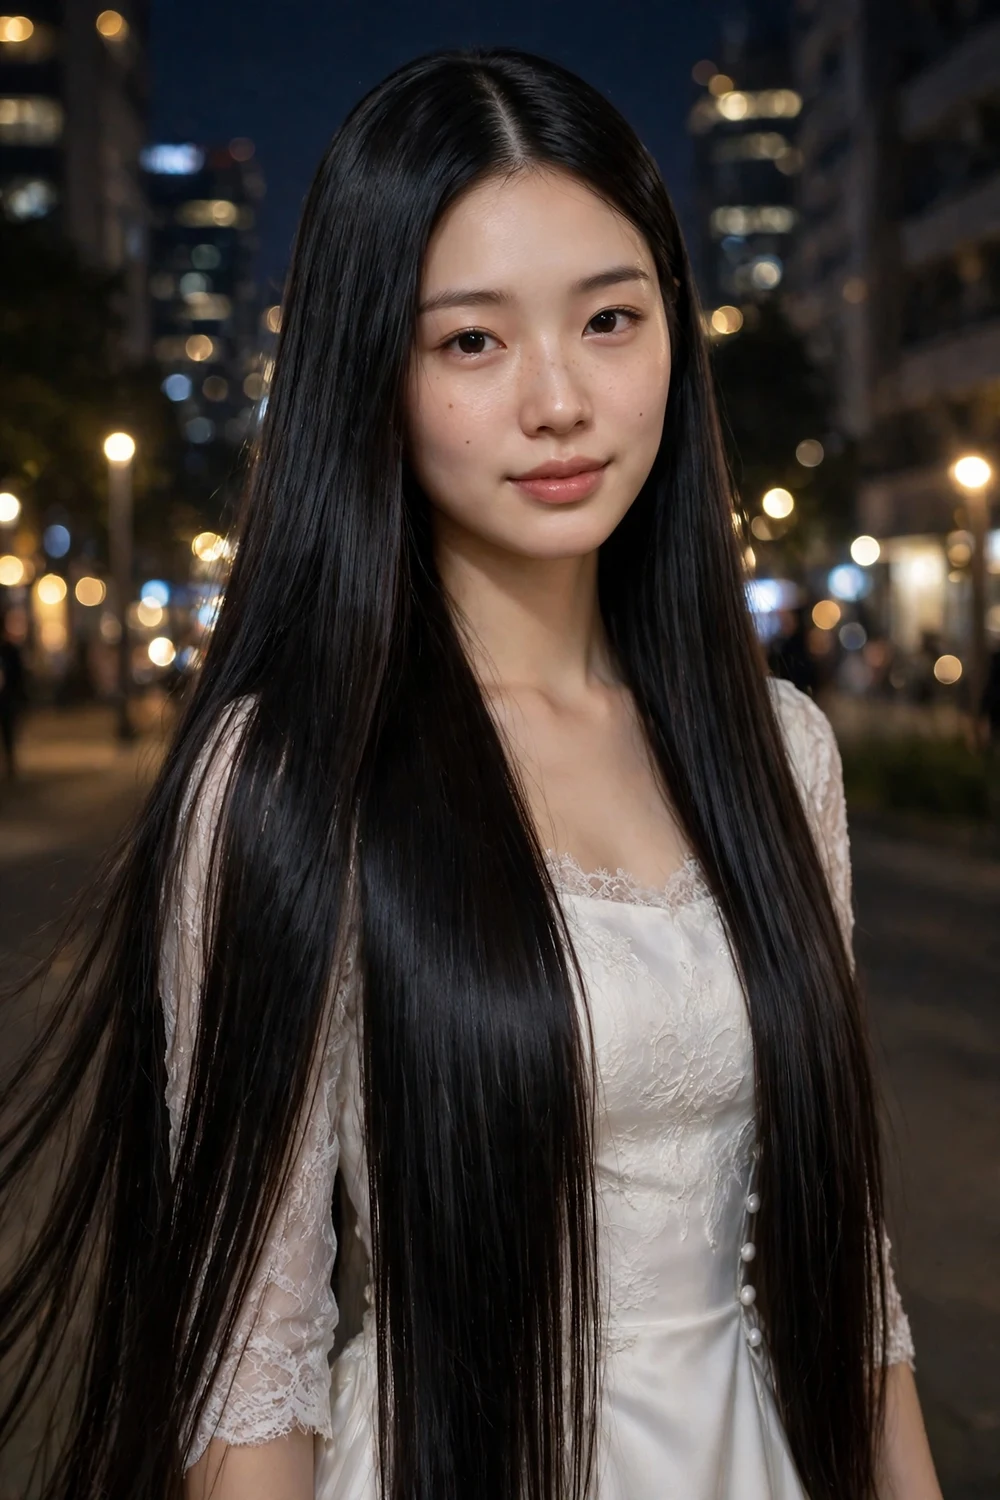
Glass hair takes straight long hair to its glossiest extreme: pin-straight, frizz-free, and reflective like a mirror. Flat-iron in thin sections with heat protectant, keeping the iron moving at a steady pace, then smooth a pea-sized amount of serum through the mid-lengths and ends. The precision of the finish is what makes it fancy, so keep the part line crisp and the ends blunt. It pairs well with bold makeup and minimal jewelry.
Try this: finish with a cool shot from the dryer pointing downward to seal the cuticle and boost the shine.
Difficulty: Easy · Cost: $0–$12 (salon: $45–$95)
8. Vintage Finger Waves
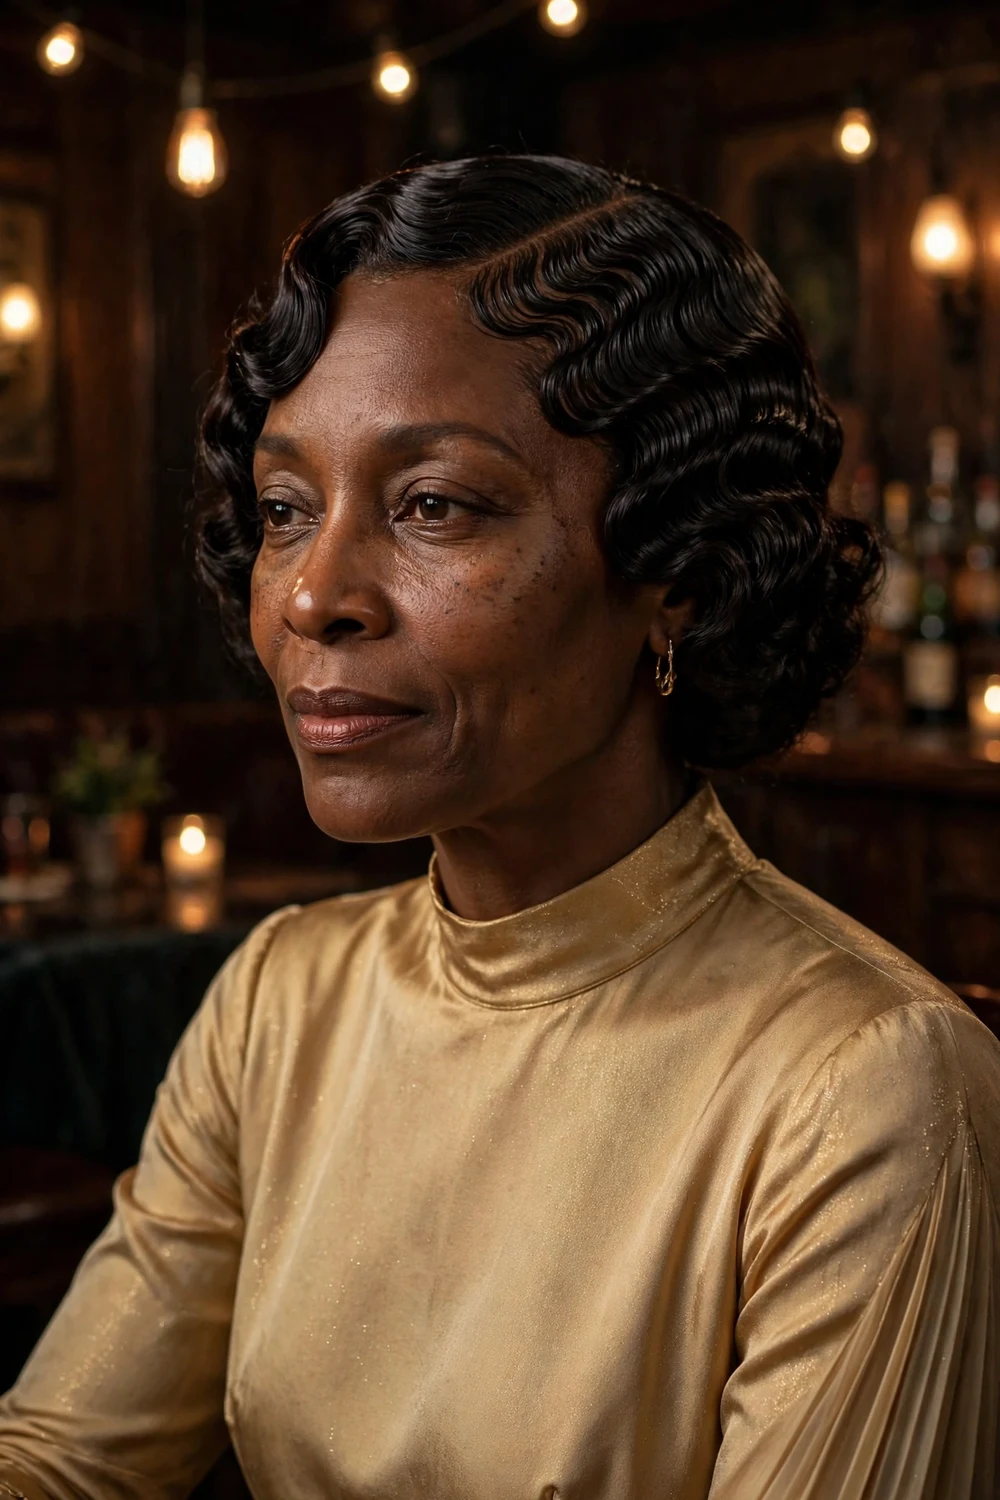
Vintage finger waves sculpt damp hair into flat, rippling S-curves that lie close to the head for old-Hollywood drama. Work a strong-hold gel through damp hair, then mold the waves with a fine-tooth comb, pinching each ridge into place with clips. Let the hair dry completely before removing the clips. On long hair, let the waves transition into soft curls past the shoulders so the length does not look weighed down.
Try this: use a hooded dryer or sit under a dryer to set the waves faster and keep the ridges crisp.
Difficulty: Hard · Cost: $0–$10 (salon: $70–$140)
9. Side-Swept Glam
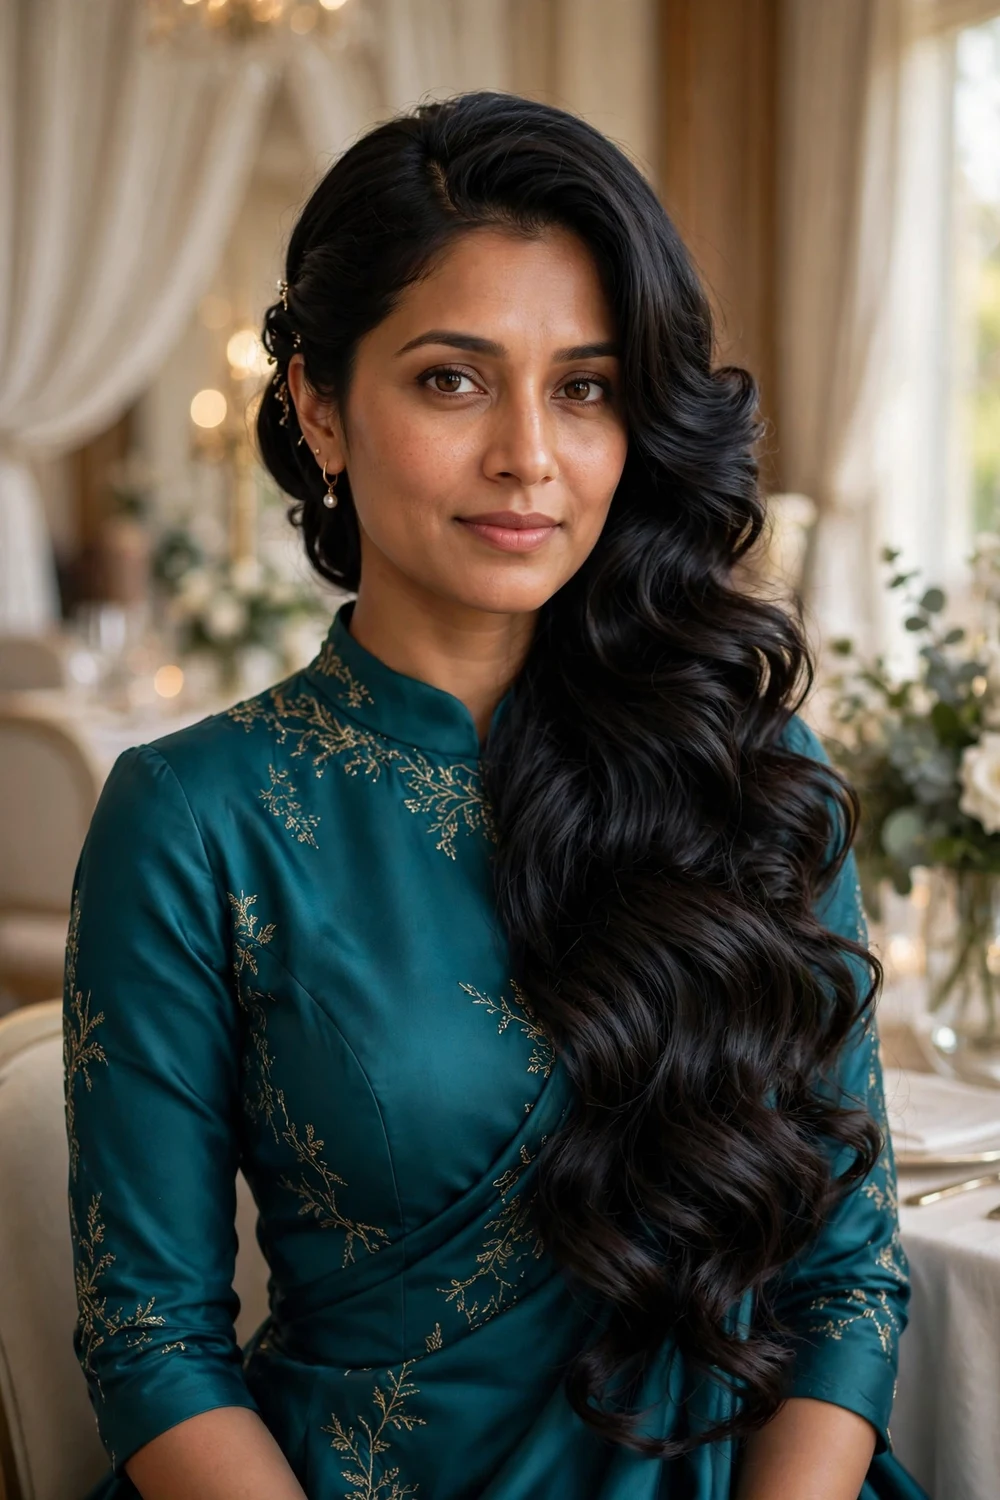
Side-swept glam throws all the length over one shoulder for a dramatic, asymmetrical line. Part deeply on one side, smooth the roots, then curl or straighten the lengths and sweep everything across. Pin the hair behind the opposite ear with a jeweled pin so the sweep holds. The bare shoulder on the other side shows off earrings and necklines, which is why this style is a red-carpet staple for one-shoulder and strapless dresses.
Try this: secure the sweep with two crossed bobby pins hidden under the top layer so it cannot slide back during the night.
Difficulty: Easy · Cost: $0–$8 (salon: $45–$90)
10. Sleek High Ponytail
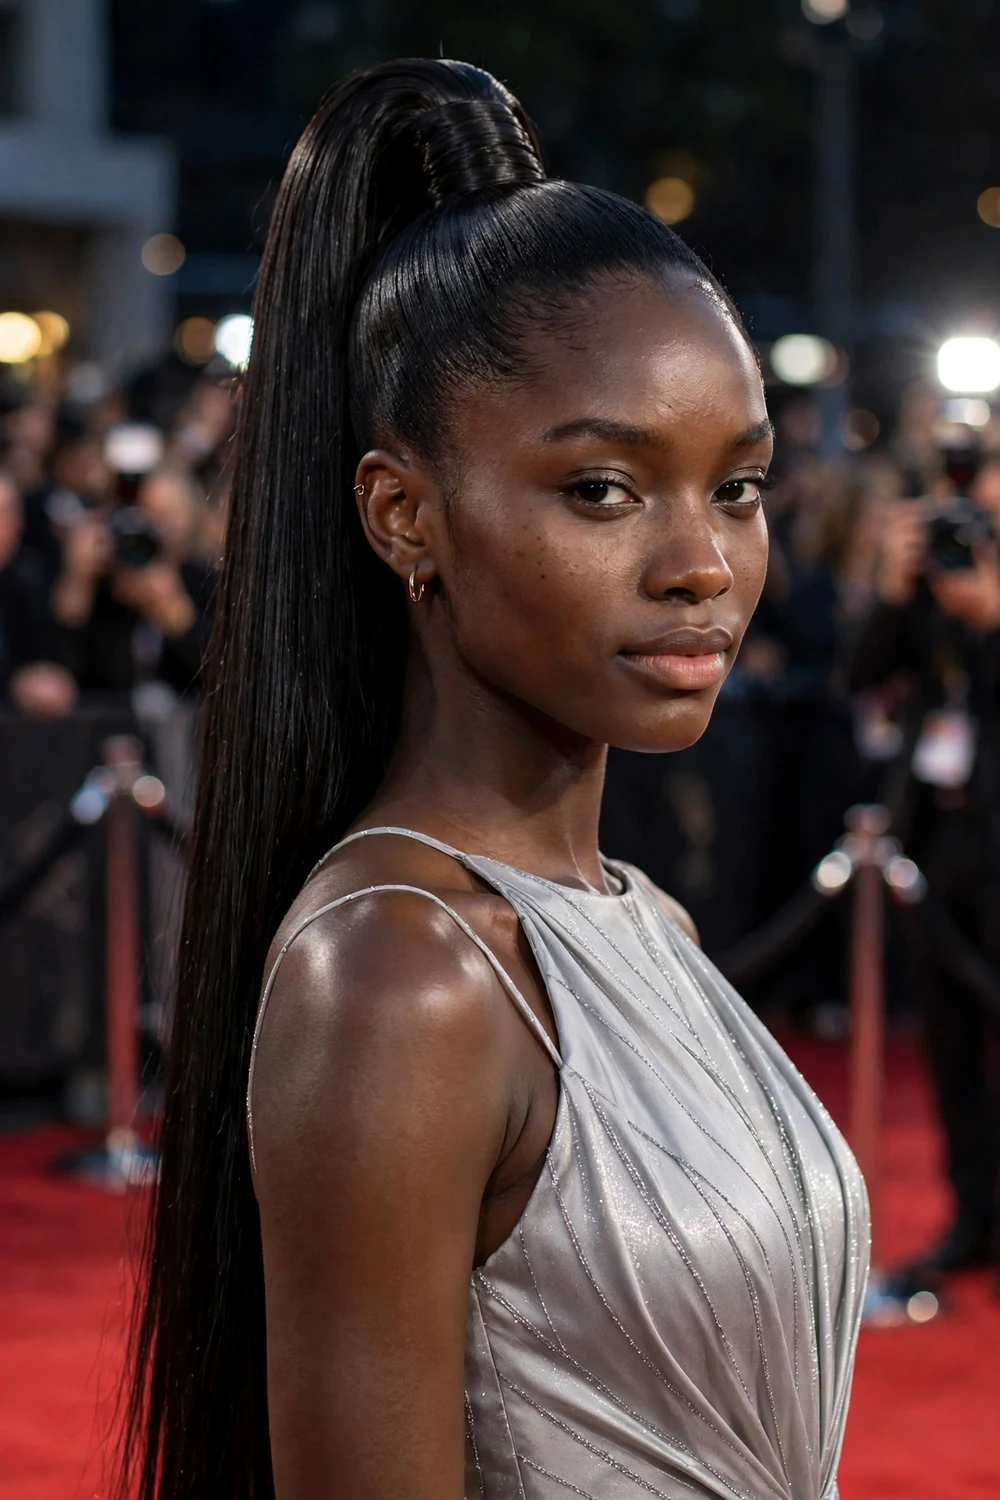
The sleek high ponytail goes fancy through finish: glass-smooth roots, a wrapped base, and a straight, glossy tail. Gather the hair at the crown, smooth with a flat iron and heat protectant, then wrap a strand around the elastic. Long hair gives this style its drama, since the tail falls well past the shoulders. It pairs well with bold makeup and statement earrings for proms and galas.
Try this: tilt your head back slightly while securing the elastic so the ponytail sits high and the front stays smooth without bumps.
Difficulty: Easy · Cost: $0–$10 (salon: $40–$80)
11. Voluminous Ponytail
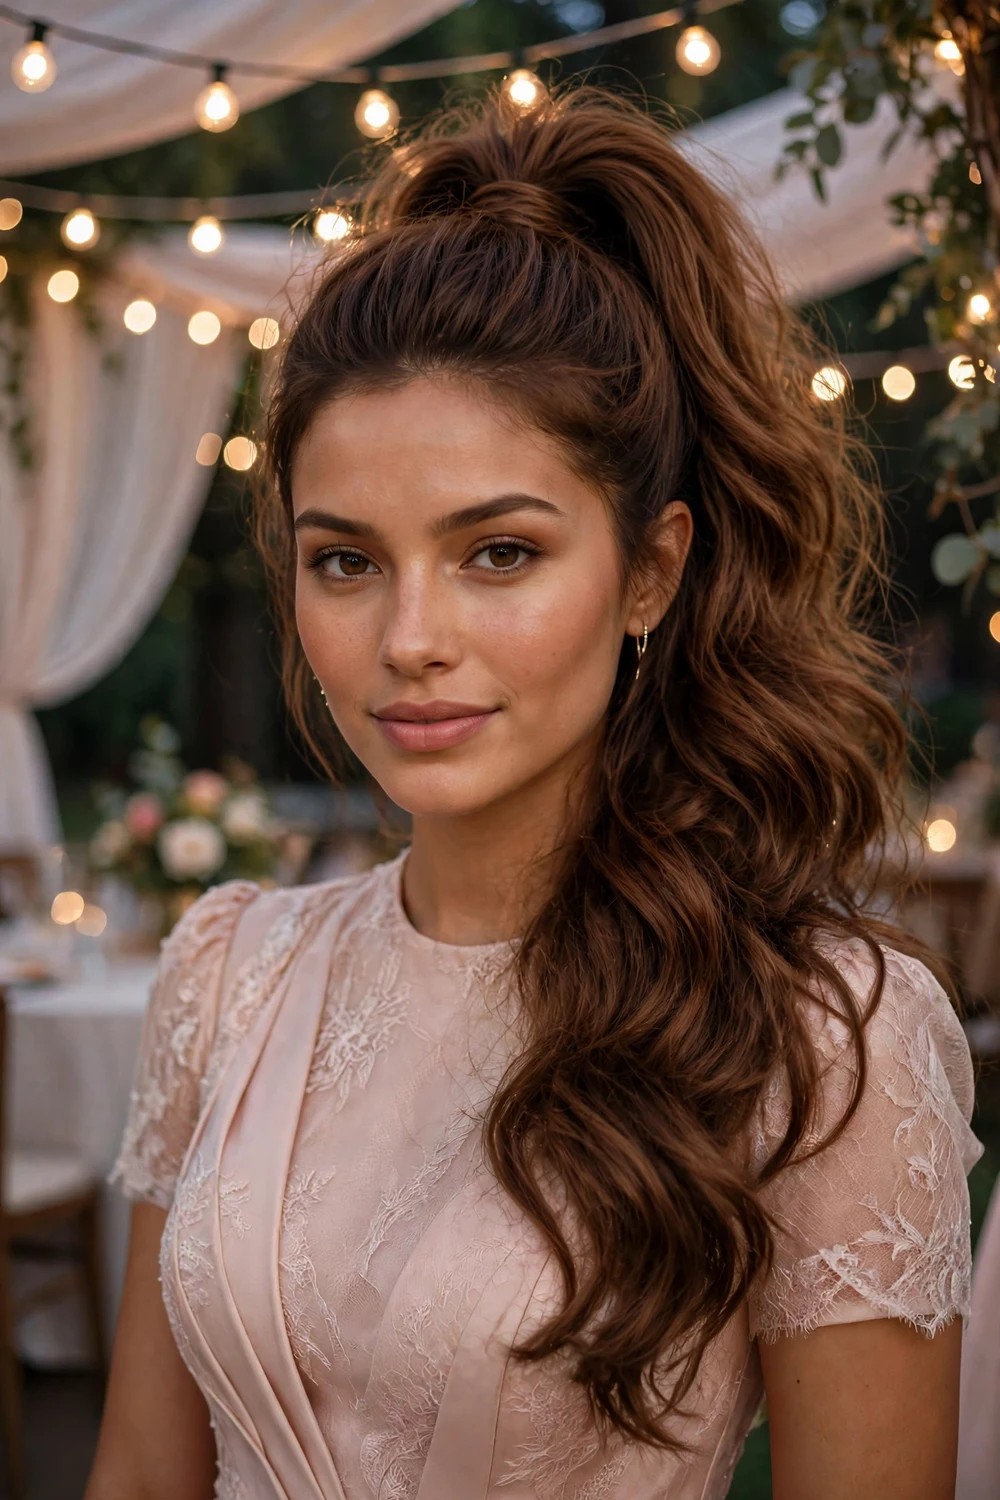
The voluminous ponytail trades sleekness for fullness: a lifted crown, teased roots, and big waves through the tail. Curl the length with a large iron (heat protectant first), backcomb the crown lightly, and secure high on the head. The contrast between the smooth front and the full tail keeps it polished rather than messy. It suits proms and parties with lots of movement, since the volume reads well in photos from every angle.
Try this: stack two elastics a half-inch apart under the ponytail base to prop it up so the volume does not collapse during the night.
Difficulty: Medium · Cost: $0–$12 (salon: $50–$95)
12. Curly Ponytail with Crown Volume
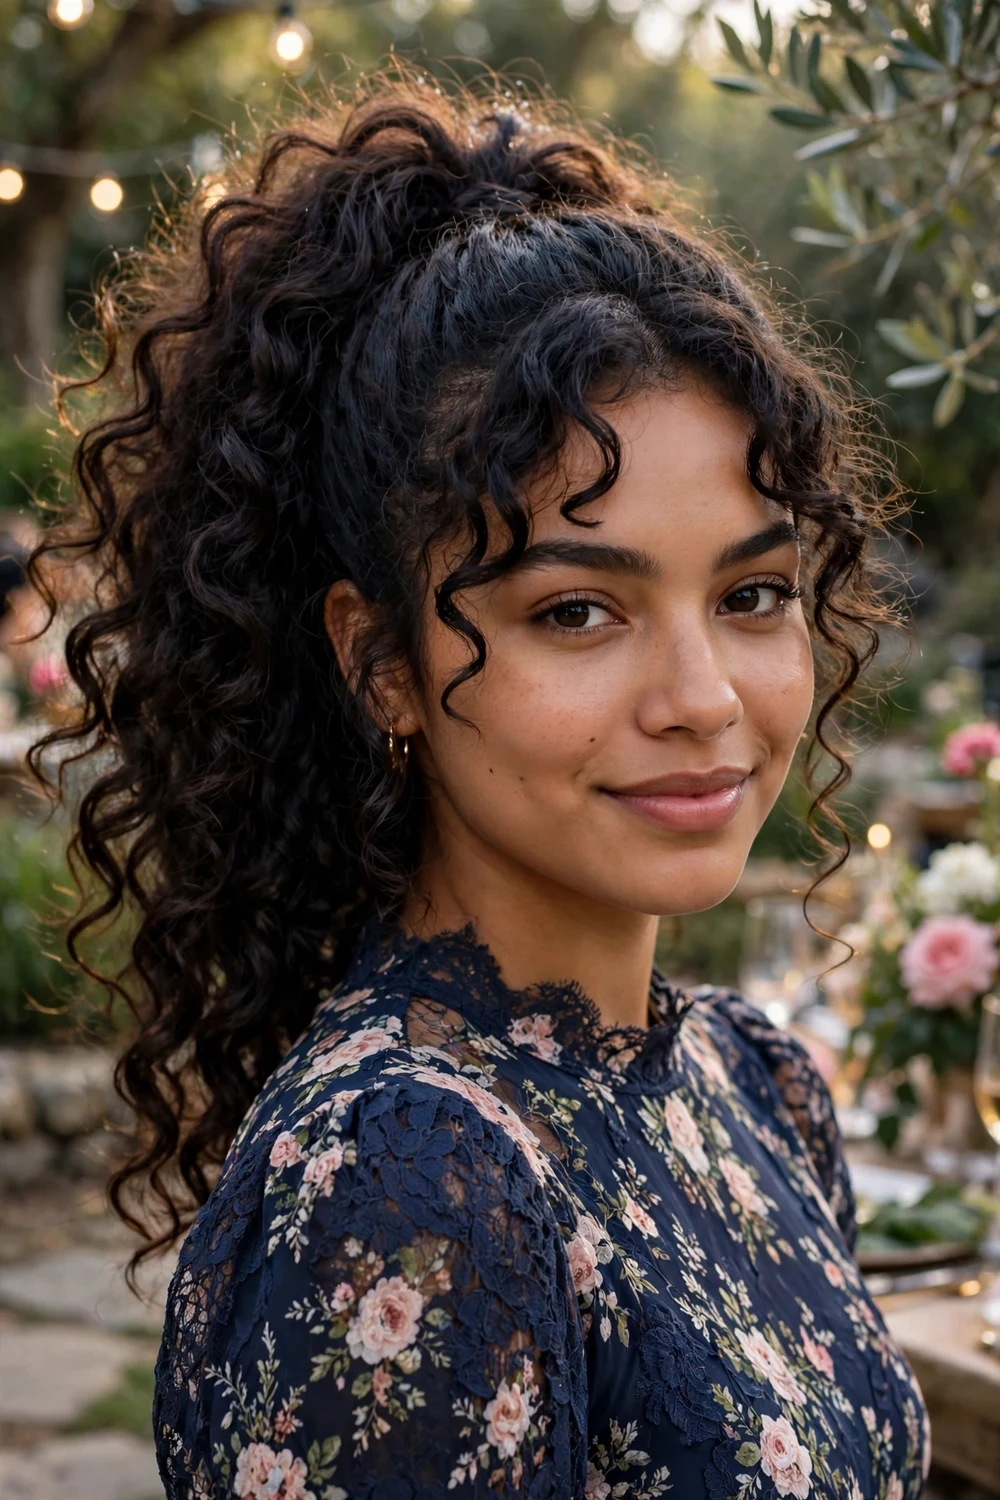
This ponytail builds height at the crown, then lets long curls cascade from a high base. Tease or pick the roots at the crown for lift, smooth the very top layer over it, and gather the curls high. On naturally curly hair, stretch the front smooth with a brush and let the texture provide the volume through the tail. Define the curls with a light cream so they stay separated and glossy all evening.
Try this: insert a small hair cushion under the crown before smoothing the top layer for lift that does not rely on teasing alone.
Difficulty: Medium · Cost: $0–$10 (salon: $50–$95)
13. Wavy Side Ponytail
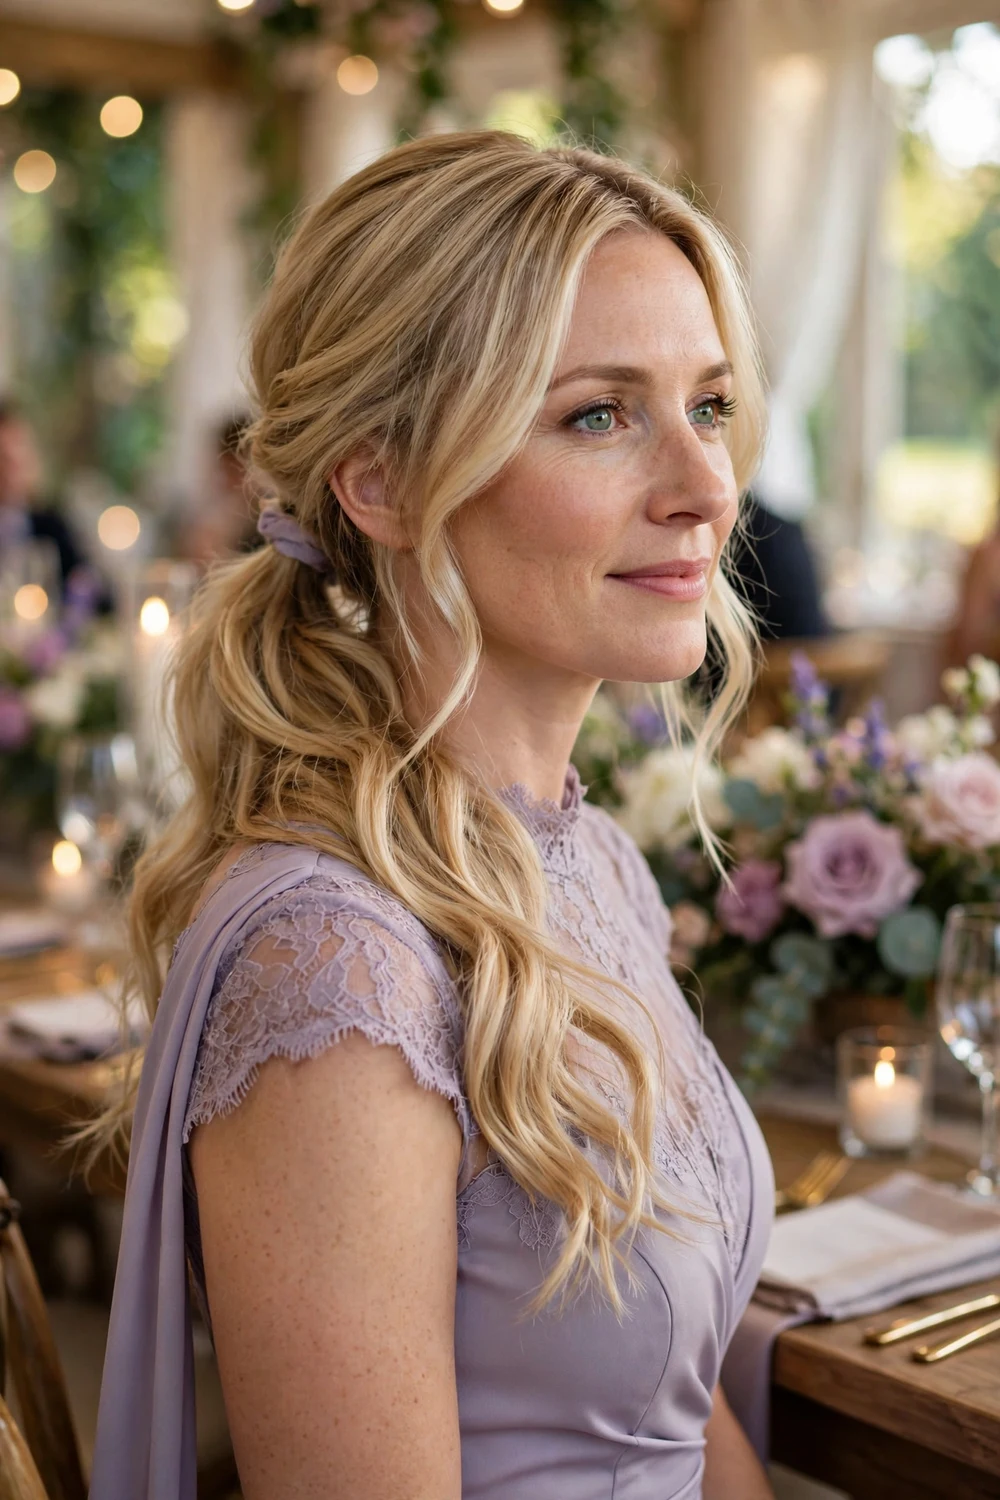
The wavy side ponytail gathers long hair low over one shoulder, keeping the waves front and center. Style the hair in loose waves with a curling iron (heat protectant first), part on the opposite side, and sweep everything across to tie just behind the ear. A few face-framing pieces left out soften the look. Draping the tail forward shows off the waves in photos and keeps the back of the dress fully visible.
Try this: wrap a strand of hair around the elastic and pin it underneath so no hardware shows in close-up photos.
Difficulty: Easy · Cost: $0–$8 (salon: $40–$85)
14. Twisted Ponytail
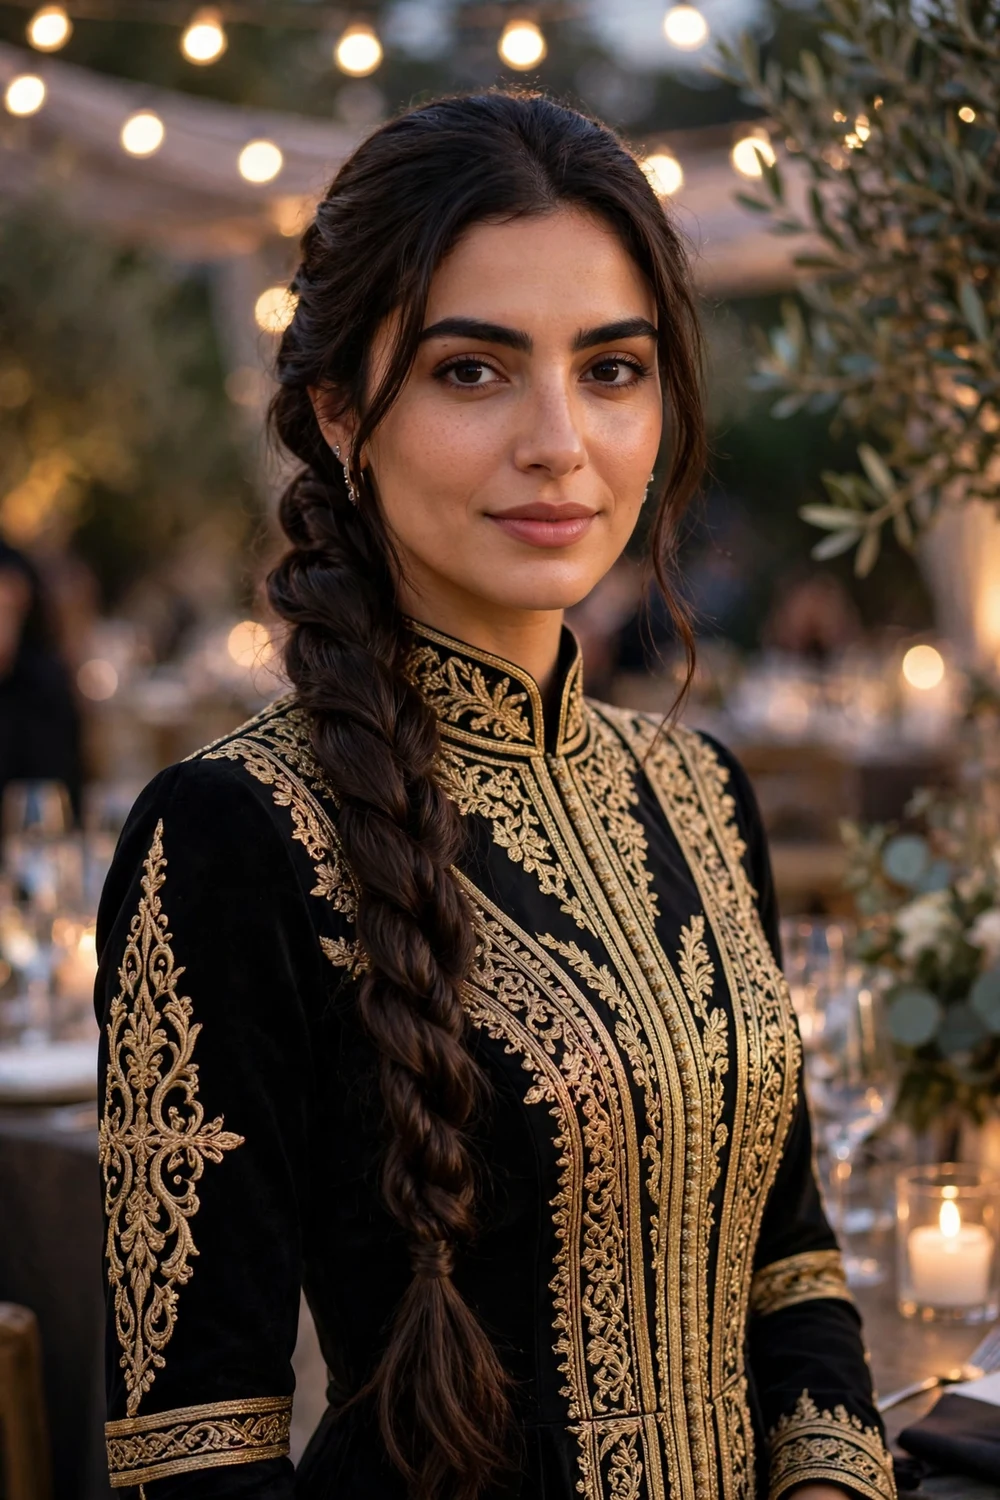
The twisted ponytail replaces a plain tail with a rope twist for instant polish. Secure a low or mid-height ponytail, split it into two sections, twist each section in the same direction, then wind them around each other in the opposite direction. The rope holds its shape without pins and looks intricate from a distance. It suits cocktail parties and dinners where you want something more interesting than a basic pony.
Try this: apply a dab of smoothing cream before twisting so the rope looks sleek instead of fuzzy.
Difficulty: Easy · Cost: $0–$8 (salon: $45–$85)
15. Low Polished Ponytail
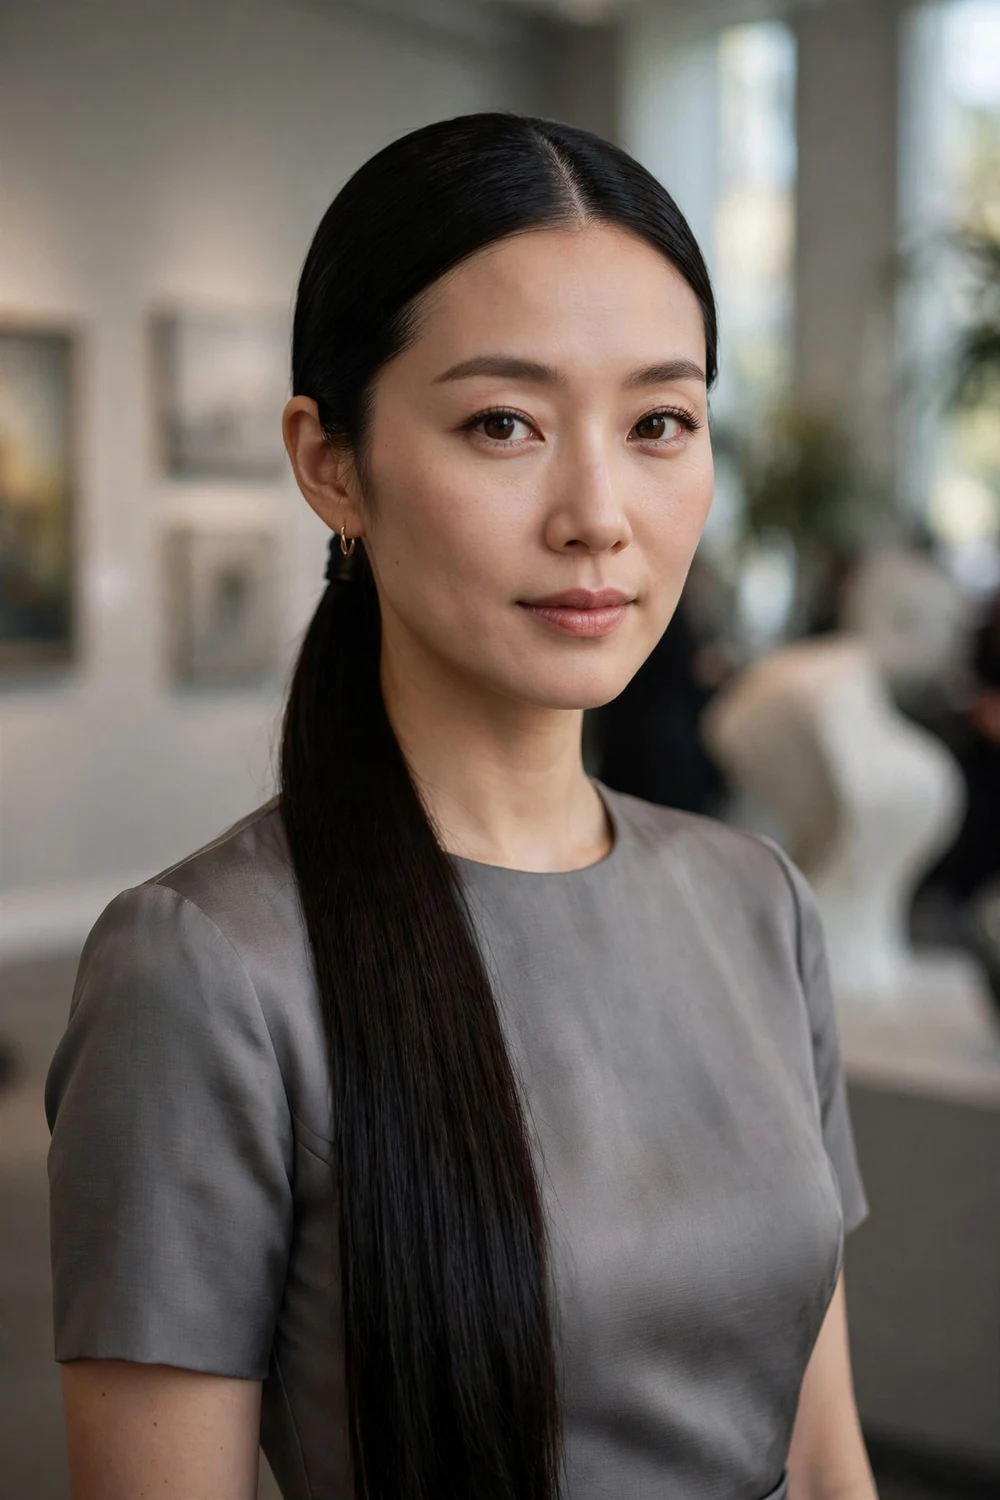
The low polished ponytail is minimalism at its fanciest: a crisp center part, flat-ironed lengths, and a low tail at the nape. Smooth the hair with a flat iron and heat protectant, part precisely down the middle, and secure low. Because there is nowhere to hide, the finish must be immaculate, so take time on the roots and the part line. It works when the outfit is dramatic, since the hair stays quiet and clean.
Try this: run a clean mascara wand or toothbrush with a touch of gel along the part to tame flyaways without disturbing the line.
Difficulty: Easy · Cost: $0–$8 (salon: $40–$80)
16. Cornrow-to-Ponytail
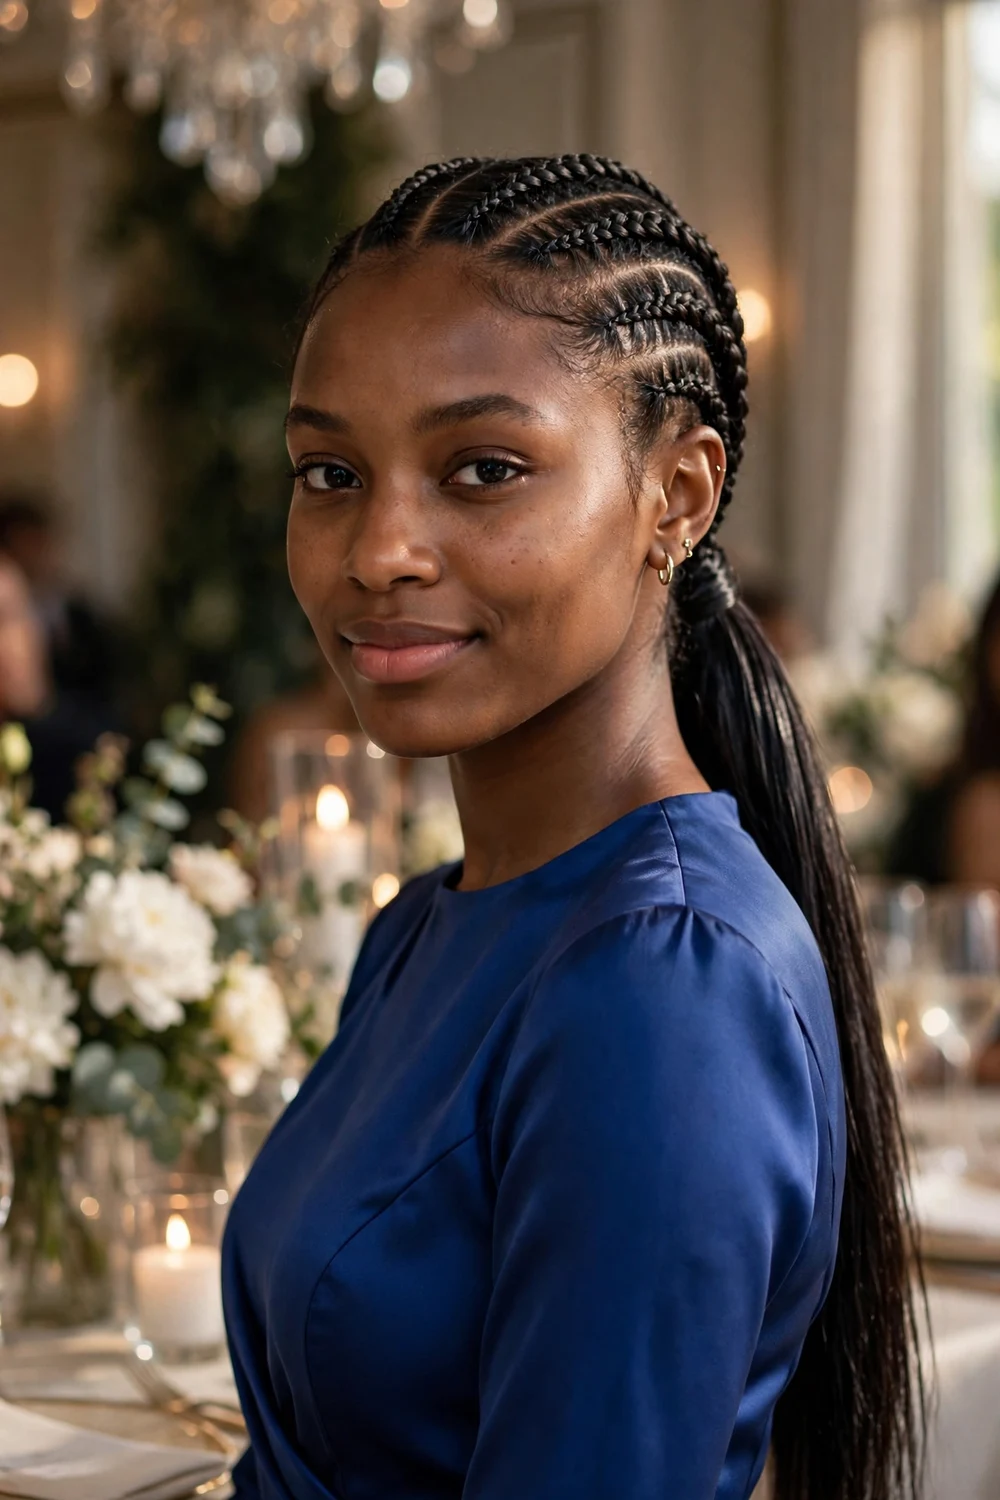
Cornrows braided back into a sleek low ponytail combine intricate detail at the front with flowing length at the back. Braid neat cornrows from the hairline toward the nape, then gather everything, including the braid ends, into a low ponytail. Smooth the tail with serum or a flat iron and heat protectant. The braided crown keeps the style secure for hours of dancing, while the long tail keeps it glamorous.
Try this: apply edge control along the hairline and tie a silk scarf over the braids for ten minutes to set them smooth before the event.
Difficulty: Hard · Cost: $0–$15 (salon: $60–$120)
17. Half-Up Twisted Knot
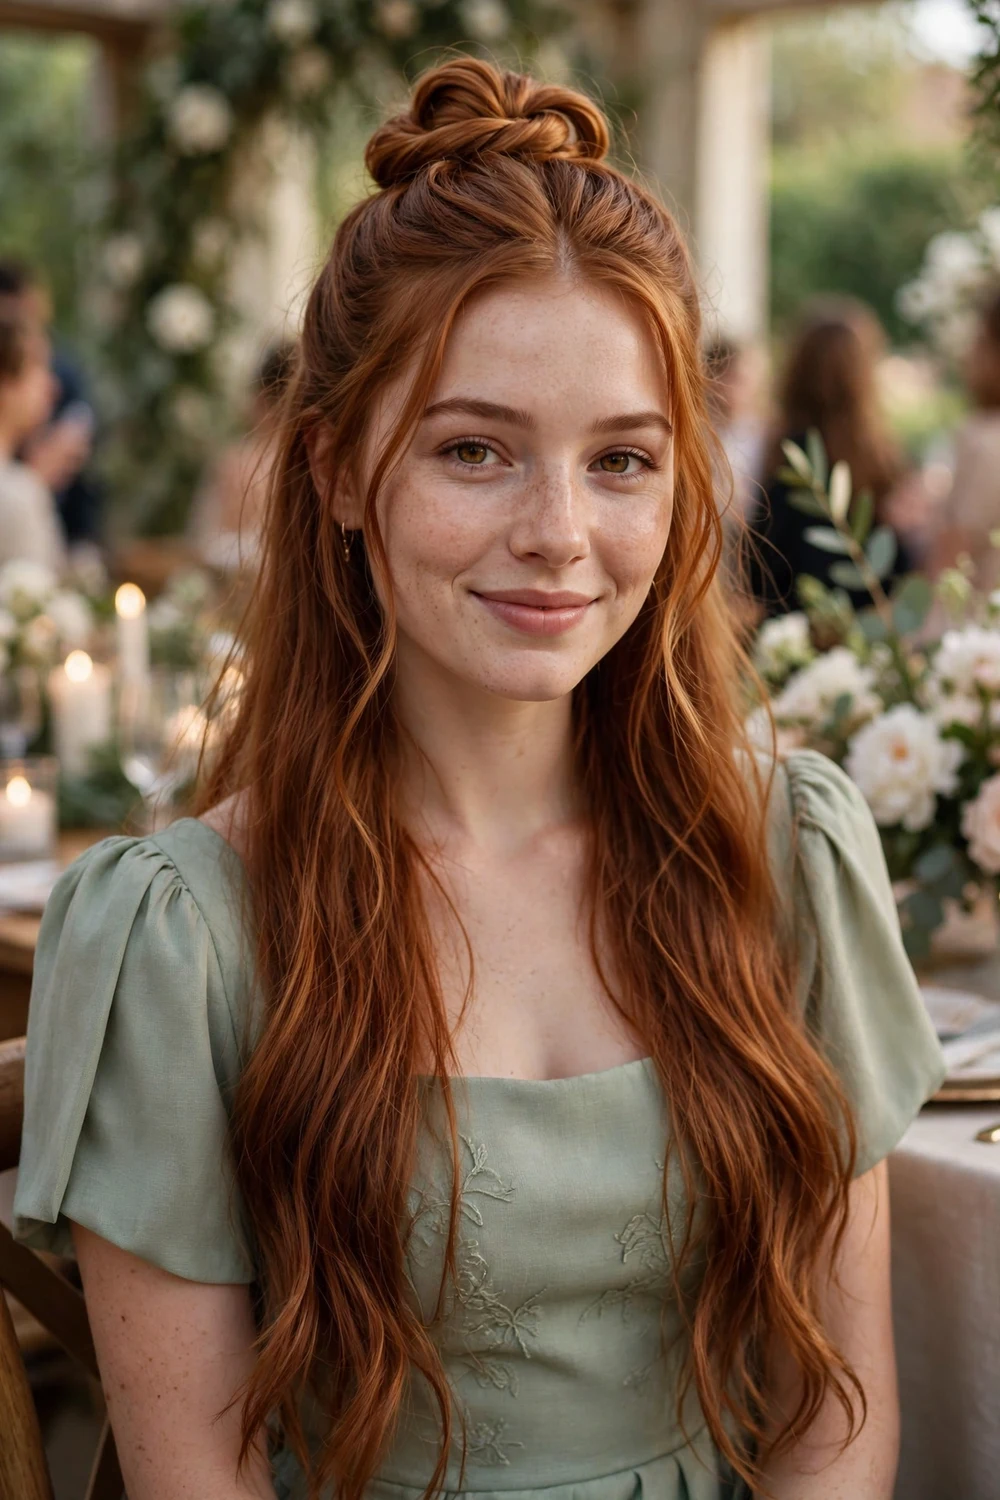
The half-up twisted knot pulls the top section into a small twisted knot at the crown while the rest flows free. Gather the top third of the hair, twist it into a compact knot, and pin it securely. The knot adds a focal point and keeps hair off the face, while the loose lengths keep the look soft. It suits engagement parties and showers where you want polish without a full updo.
Try this: gently pull the knot wider after pinning (pancaking) so it looks full rather than tight and small.
Difficulty: Easy · Cost: $0–$8 (salon: $45–$85)
18. Twisted Half-Up Ponytail
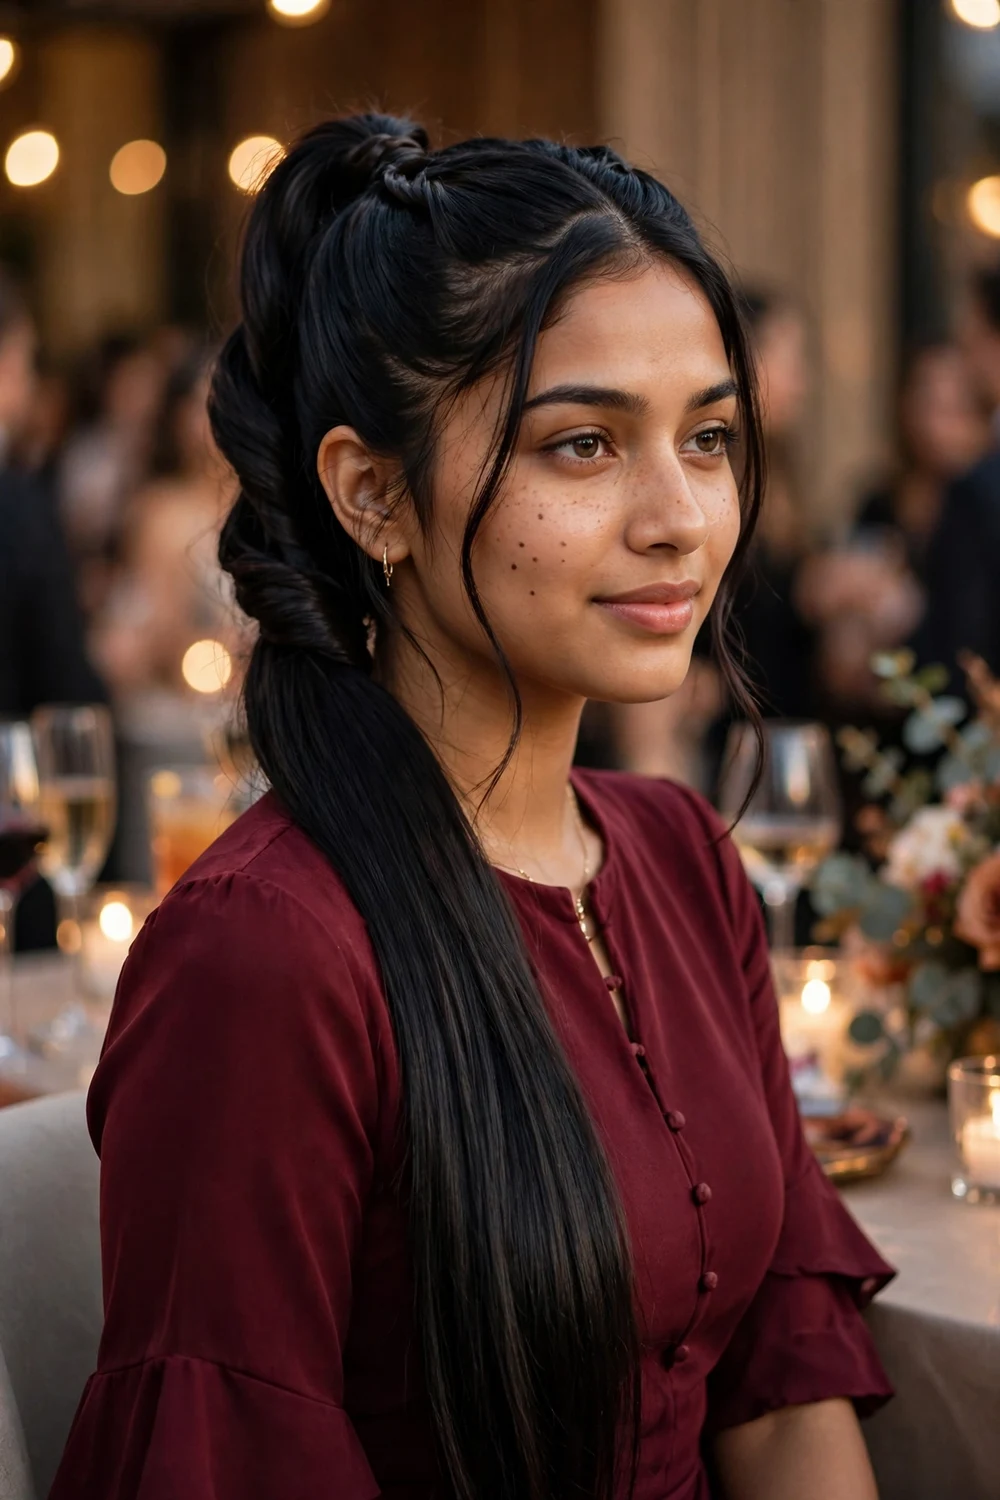
This half-up style twists the side sections back into a small ponytail at the crown, leaving the lengths loose. Take a section from each temple, twist them toward the back, and join them into a mini ponytail. The twists frame the face and add detail, while the ponytail keeps the top secure. Smooth the hanging hair with a flat iron and heat protectant for a sleek finish that suits cocktail parties.
Try this: cross the two twists over each other before joining them so the join looks like one continuous twist.
Difficulty: Easy · Cost: $0–$8 (salon: $45–$90)
19. Half-Up Top Knot with Curls
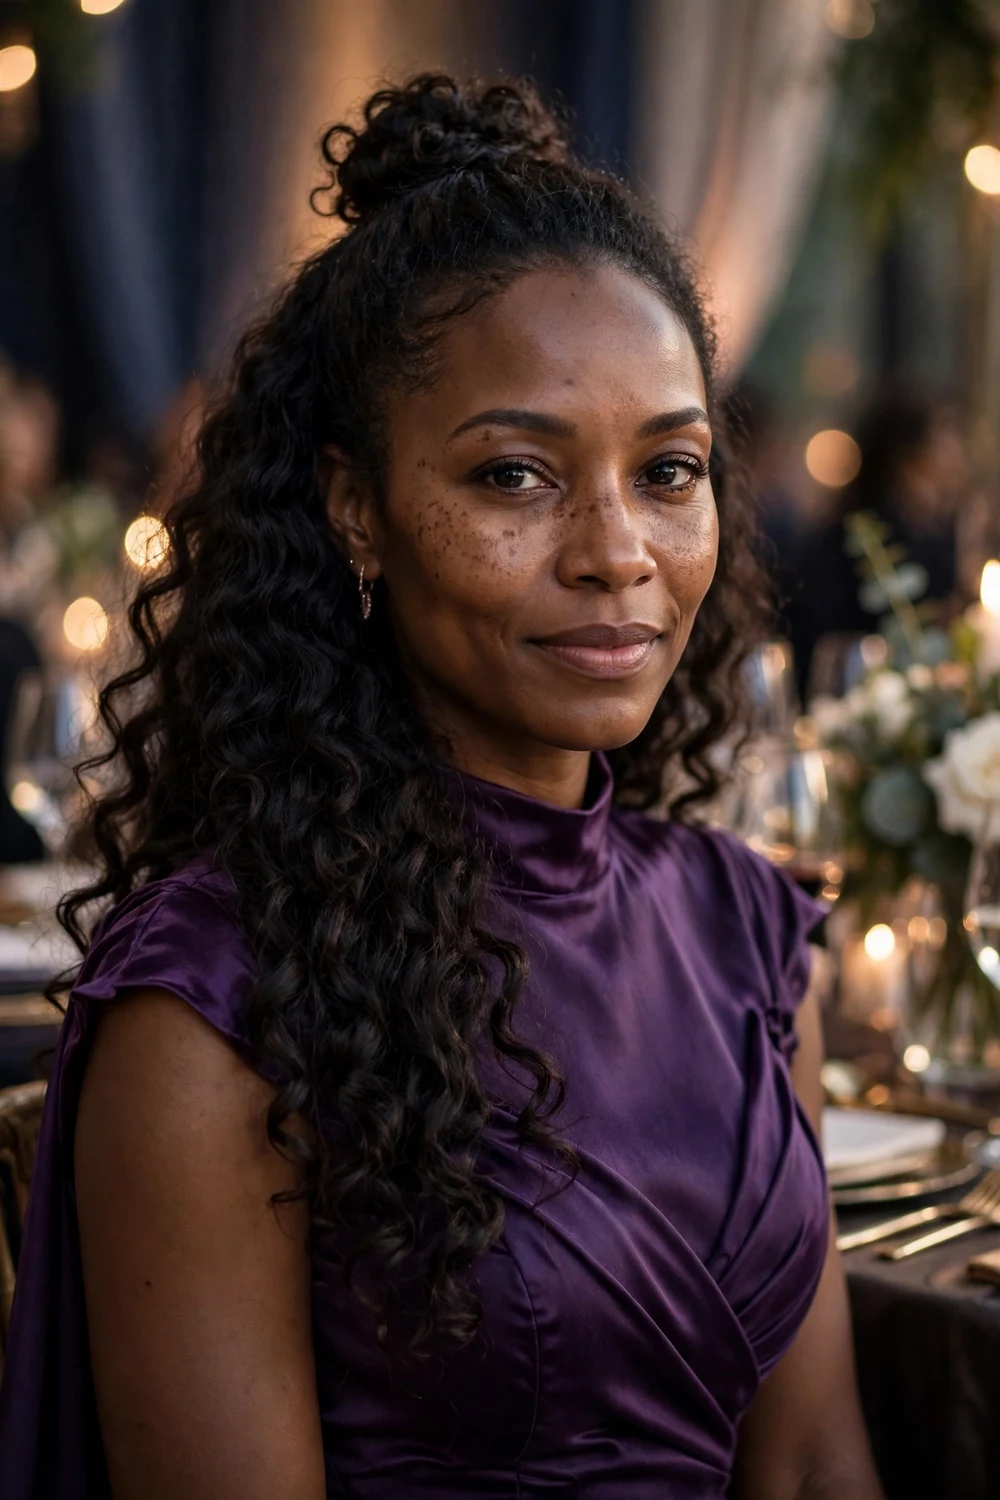
The half-up top knot piles the crown section into a full knot while long curls fall past the shoulders. Curl the lengths first with a large iron (heat protectant first), then gather the top half into a high knot and pin it firmly. The height of the knot lengthens the face, and the curls keep the back dramatic. It is a strong pick for galas and formal dinners where you want presence without pinning everything up.
Try this: leave the knot slightly loose and pull a few curls free around it so it looks soft rather than severe.
Difficulty: Medium · Cost: $0–$10 (salon: $55–$100)
20. Half-Up Flower Braids
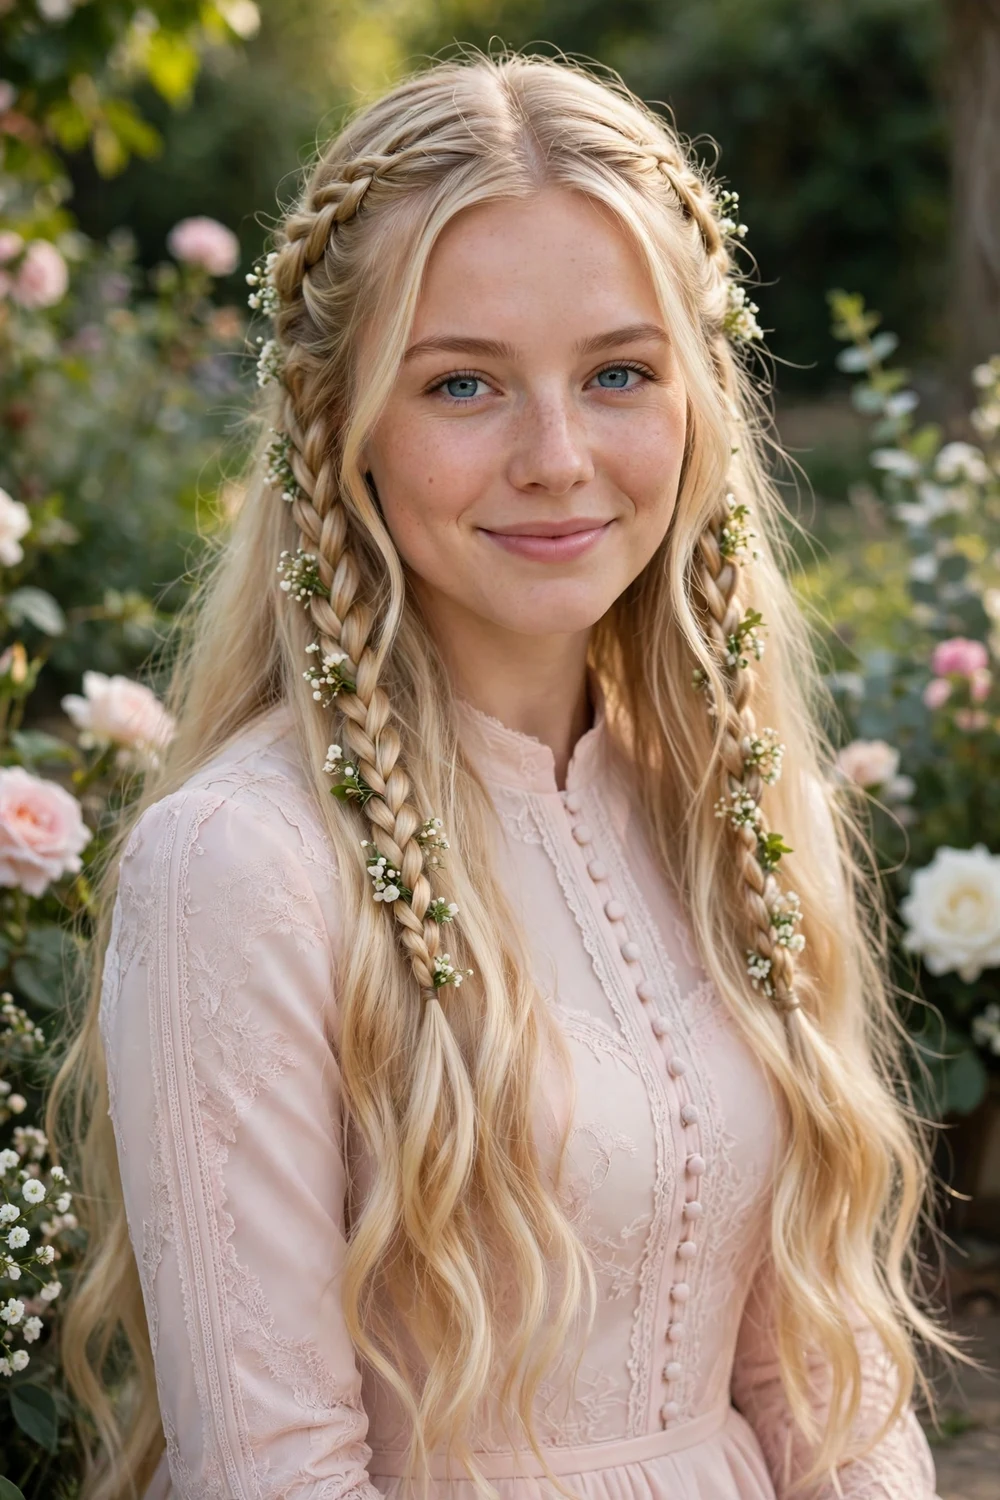
Half-up flower braids weave two small braids from the temples into the back, then dot them with tiny fresh blooms. Braid the side sections loosely, pin them together at the back, and tuck small flowers (baby’s breath or spray roses) along the braids. The flowers turn a simple half-up into a wedding-ready style. Bridesmaids wear this one often; for more wedding-party looks, see our bridesmaid hairstyles guide.
Try this: ask a florist for wired blooms or clip tiny alligator clips to the stems so each flower stays anchored while you dance.
Difficulty: Medium · Cost: $6–$20 (salon: $60–$120)
21. Boho Half-Up with Braids
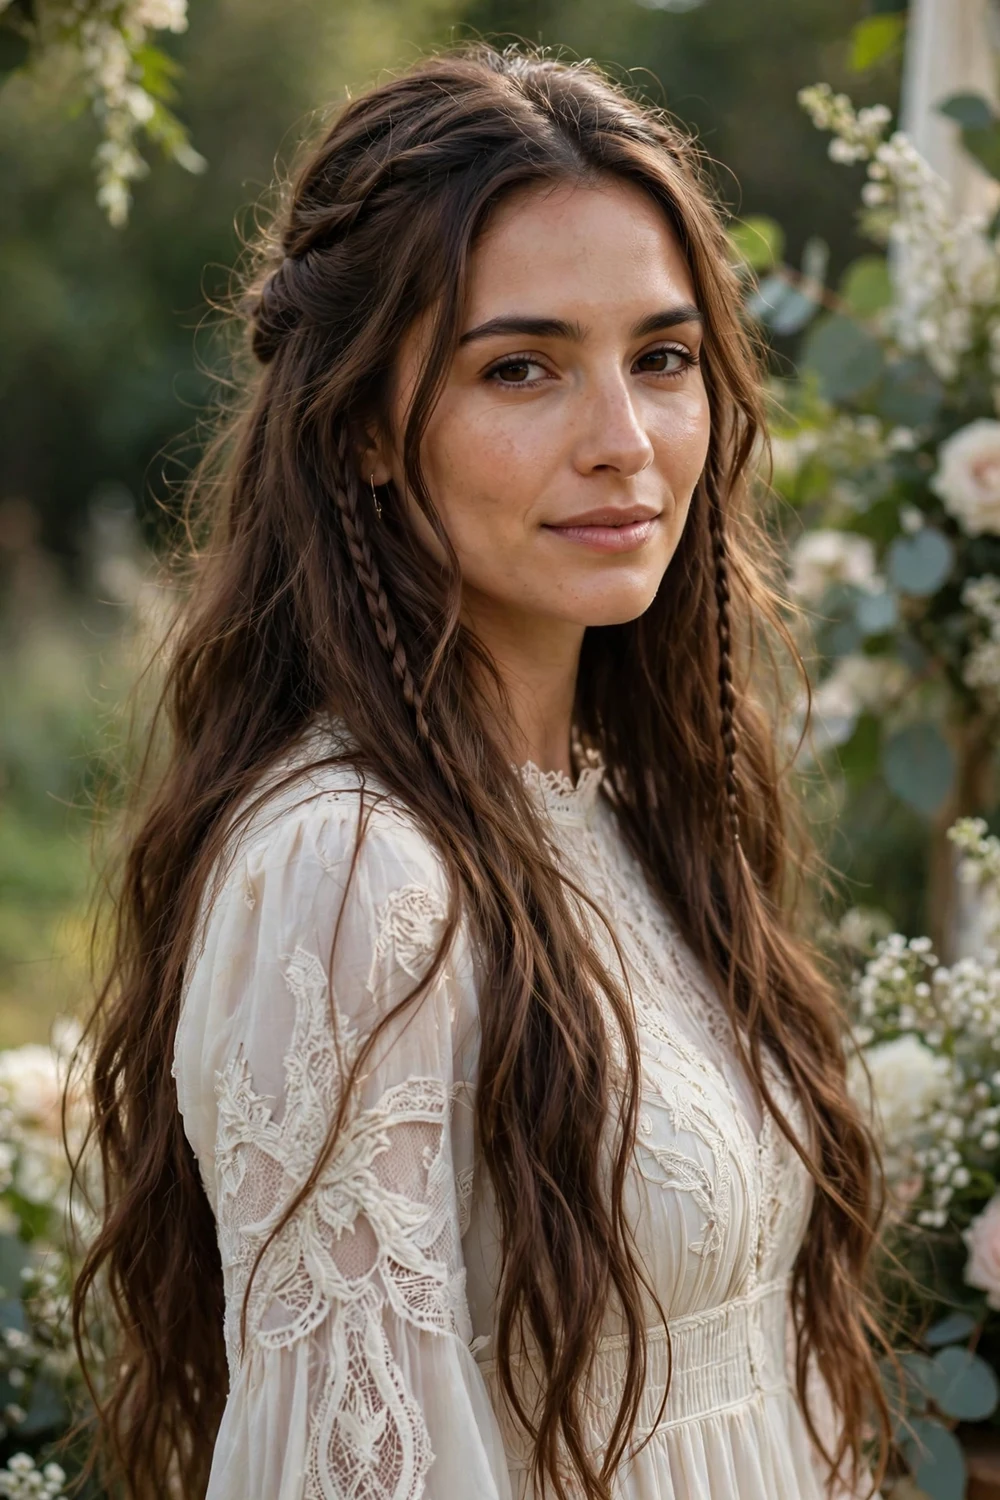
Boho half-up with braids keeps things relaxed but event-ready: loose waves, two or three thin braids pulled back, and a soft, undone finish. Add texture with a salt or texturizing spray, braid a few face-framing sections, and pin them back loosely. The mix of textures reads effortless in photos, which suits outdoor and bohemian weddings. Keep the braids uneven on purpose; symmetry would kill the effect.
Try this: braid on second-day hair so the plaits grip better and the waves hold their shape longer.
Difficulty: Easy · Cost: $0–$8 (salon: $50–$95)
22. Mid-Part Half-Up

The mid-part half-up is the cleanest half-up option: a precise center part, smooth top section pulled straight back, and sleek lengths. Part down the middle, gather the top half flat against the head, and secure at the crown. The symmetry suits formal photos and pairs well with statement earrings, since nothing competes around the face. For more ways to wear this shape, browse our half-up half-down hairstyles collection.
Try this: smooth the top with serum and a fine-tooth comb after securing so the crown looks glassy from every angle.
Difficulty: Easy · Cost: $0–$8 (salon: $45–$85)
23. Braided Crown

The braided crown wraps the full length into a halo around the head, keeping long hair completely controlled while looking intricate. Dutch-braid from one ear around to the other, pin the tail under the start, and gently pull the braid edges for width. It survives wind, hugs, and long photo sessions, which is why brides and wedding guests rely on it. Long hair gives the halo real thickness and presence.
Try this: braid on second-day hair with a little texturizing spray so the strands grip each other and the crown does not slip.
Difficulty: Medium · Cost: $0–$10 (salon: $65–$120)
24. Waterfall Braid
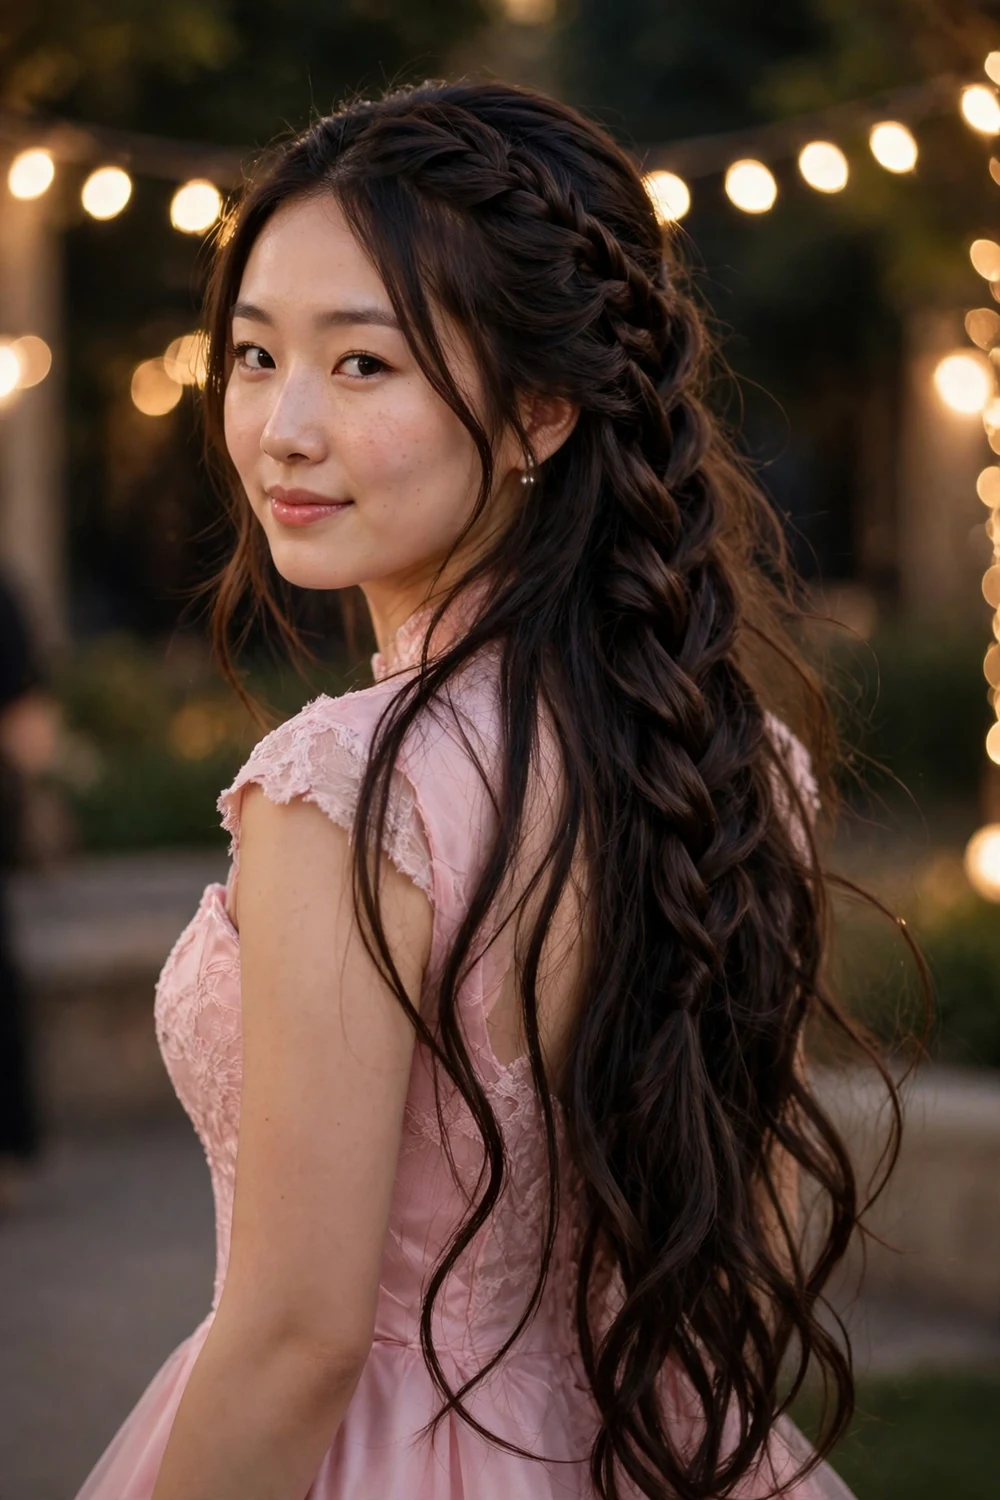
The waterfall braid lets strands cascade through the plait like water over a ledge, showing off long hair at its prettiest. Braid across the back of the head, dropping the bottom strand of each stitch and picking up a new one, so loose sections fall through the braid. Curl the falling sections lightly (heat protectant first) for extra movement. It suits proms and garden parties where the hair itself is the decoration.
Try this: keep the dropped sections even in size so the cascade looks intentional rather than random.
Difficulty: Medium · Cost: $0–$8 (salon: $55–$100)
25. Chic Layered Braid
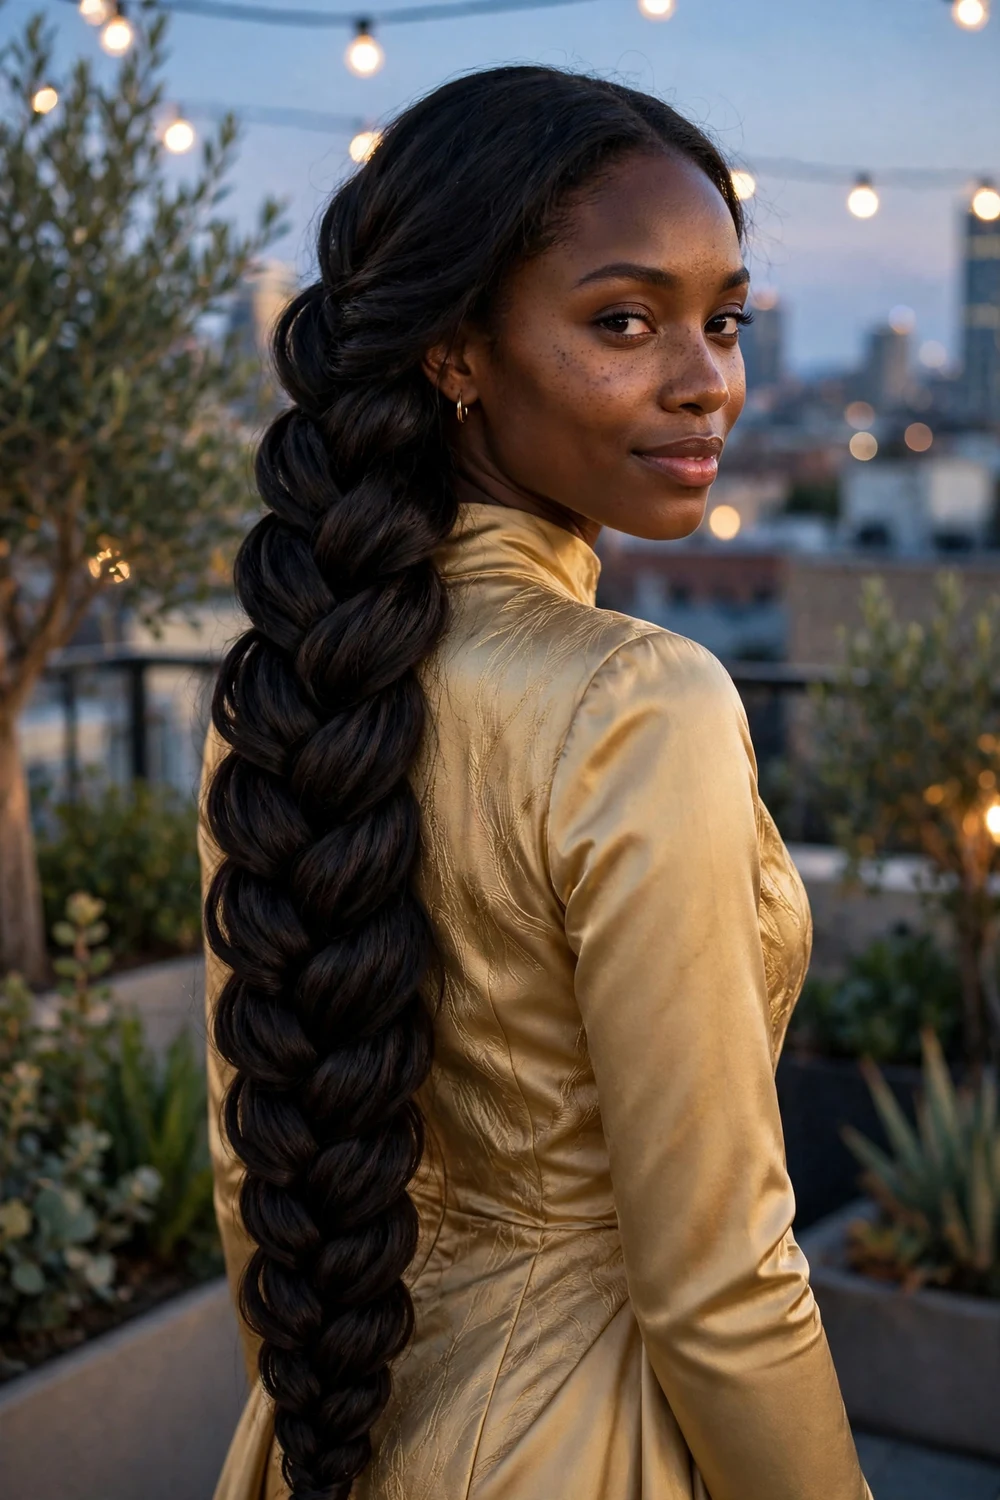
The chic layered braid takes a fishtail and pulls it wide for a lush, dimensional plait. Weave a fishtail braid down the back, then gently pull each section outward (pancaking) to widen it. Prep with volumizing mousse so the braid looks thick, and finish with hairspray. The widened braid photographs like a rope of hair down the back, which makes it a strong choice for events where guests will see you from behind.
Try this: pancake only the outer edges and leave the center snug so the braid keeps its structure all night.
Difficulty: Easy · Cost: $0–$8 (salon: $50–$95)
26. Side Fishtail Braid
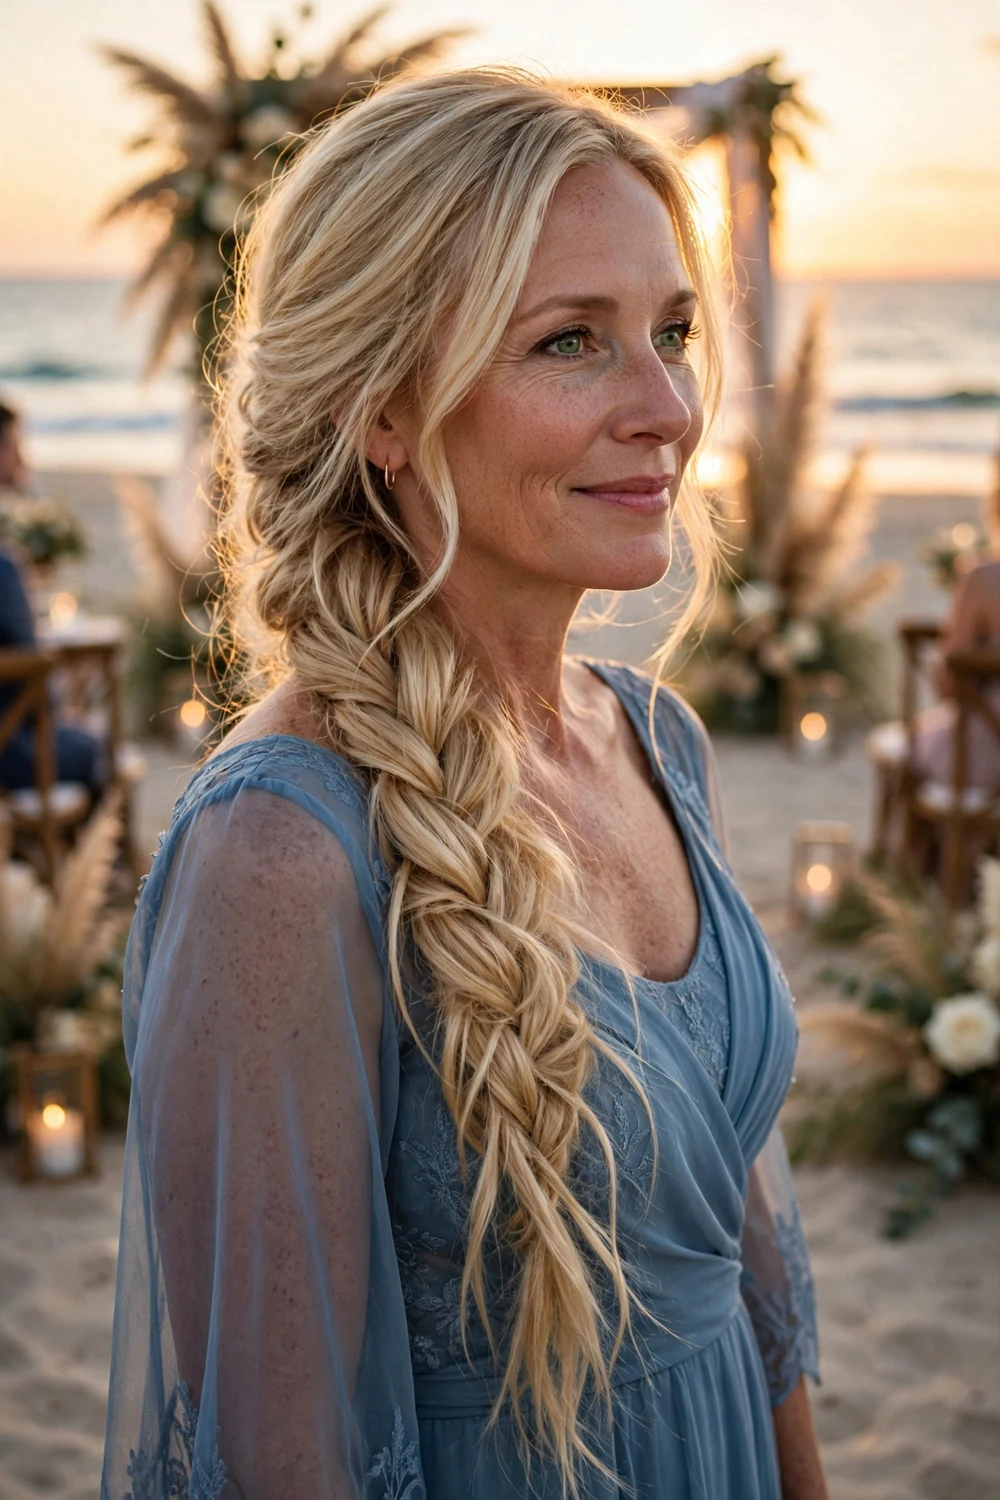
The side fishtail drapes a loose, textured plait over one shoulder for soft event glamour. Fishtail the hair to the side with relaxed tension, then pull the sections wider for fullness. A few face-framing pieces keep it from looking severe. Tie the end with a small clear elastic wrapped in hair. It suits beach and garden weddings where a stiff updo would feel overdressed.
Try this: curl the length lightly before braiding (with heat protectant) so the fishtail has wave and movement instead of hanging straight.
Difficulty: Easy · Cost: $0–$8 (salon: $45–$85)
27. Flower-Adorned Fishtail
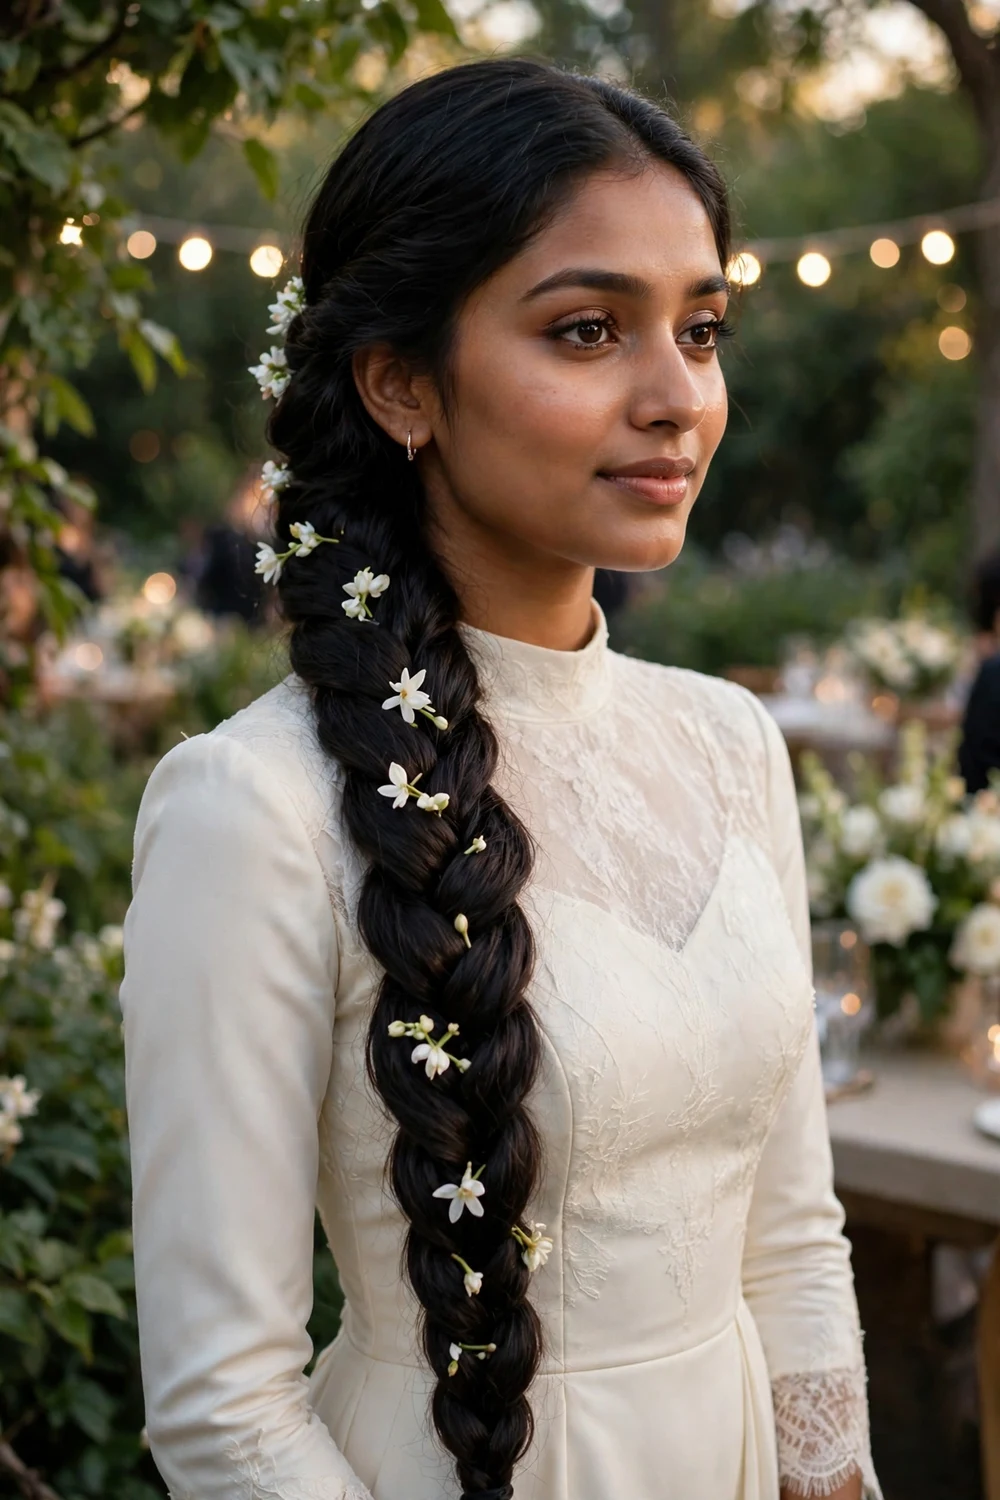
A fishtail braid scattered with small white flowers reads instantly bridal. Braid a smooth fishtail down the back or over one shoulder, then tuck tiny blooms along the plait at even intervals. The contrast of the intricate braid and delicate flowers suits weddings and garden galas. Use fresh flowers for daytime events and good silk ones for evening, since fresh blooms wilt faster in heat.
Try this: slide each flower stem through the braid rather than pinning to the scalp so the blooms sit on the surface and catch the light.
Difficulty: Easy · Cost: $5–$18 (salon: $55–$105)
28. Wavy Braid
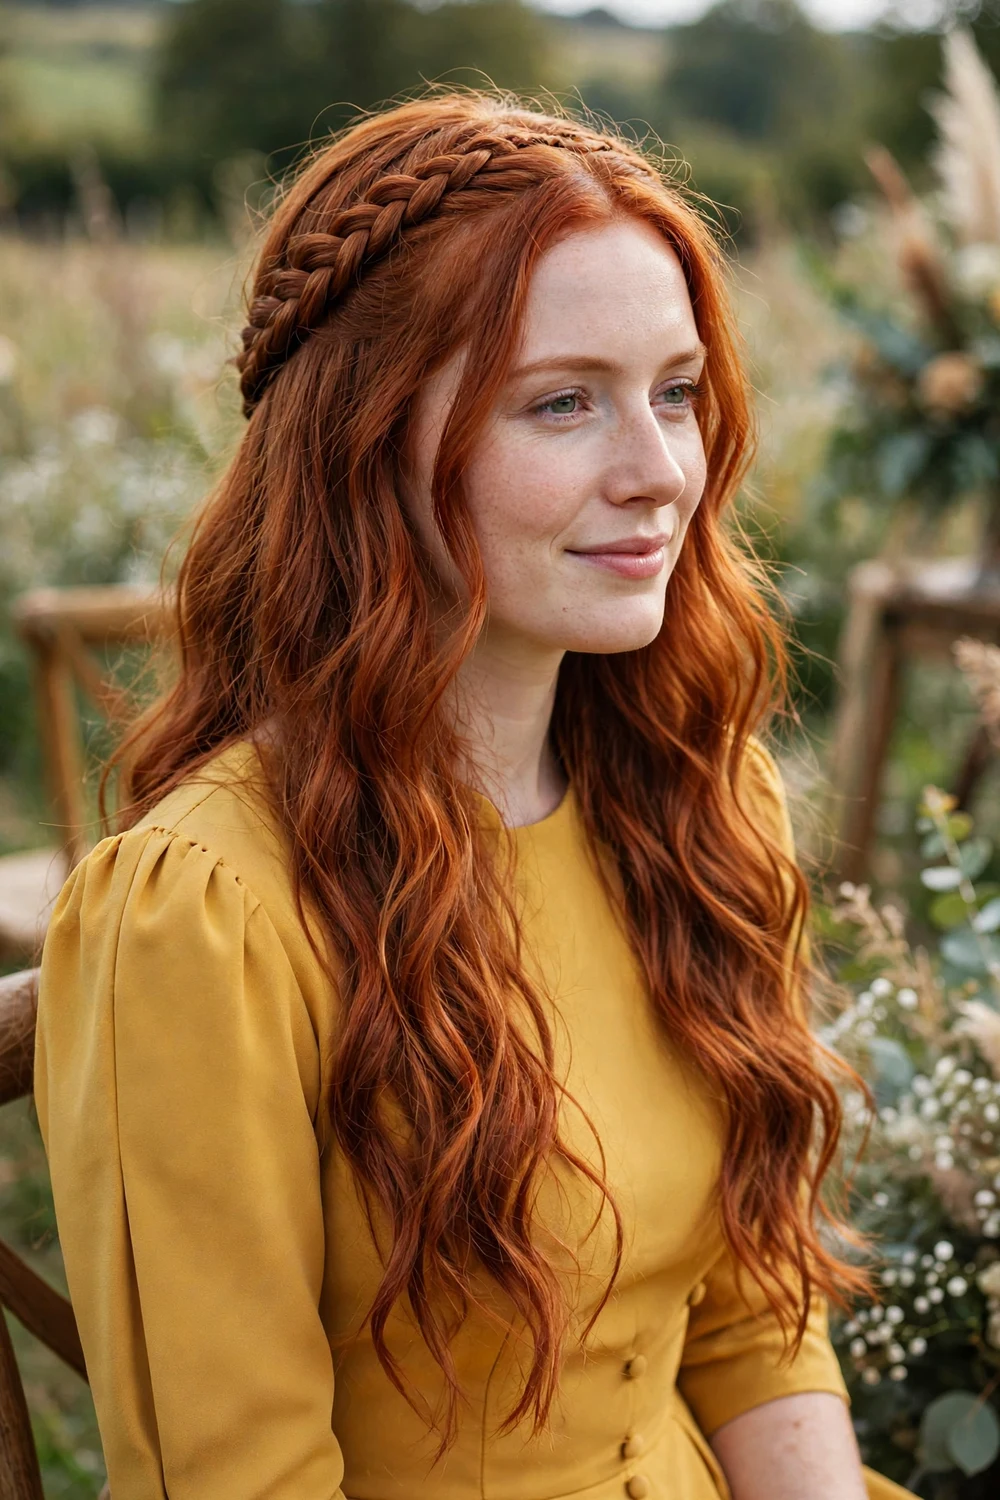
The wavy braid runs a neat plait across the back of the head like a headband while the waves flow free below. With a side part, take strands from above each ear, braid them tightly, and pin the braids together at the back. The braid acts as built-in decoration for the waves, which suits rustic and countryside weddings. Keep the waves soft so the contrast with the tight braid stays flattering.
Try this: curl the loose hair away from the face on both sides so the waves frame the braid symmetrically.
Difficulty: Easy · Cost: $0–$8 (salon: $45–$85)
29. Double Dutch Braid
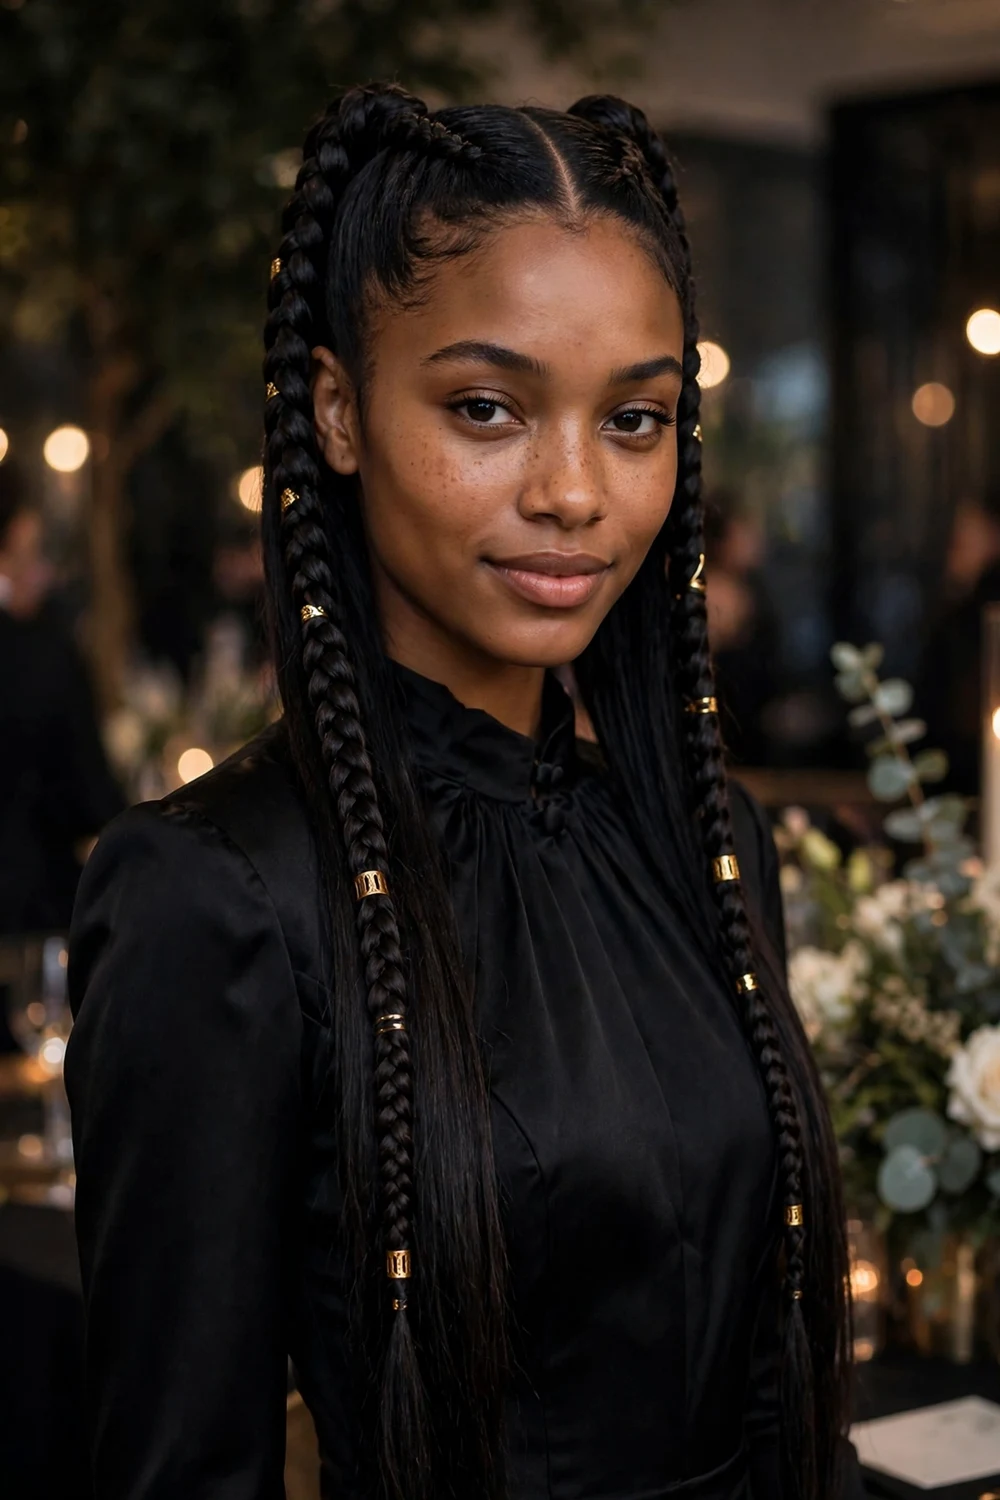
Double Dutch braids run two raised plaits from the hairline to the nape for a bold, graphic look. Part down the middle, Dutch-braid each side tightly, and finish the ends as braids or gather them into a low ponytail. The raised texture catches event lighting well. Add gold cuffs or rings along the braids for an after-party look with real edge.
Try this: apply edge control and braid on stretched or blow-dried hair so the parts stay crisp all night.
Difficulty: Medium · Cost: $0–$10 (salon: $55–$100)
30. Side Braid with Crown Volume
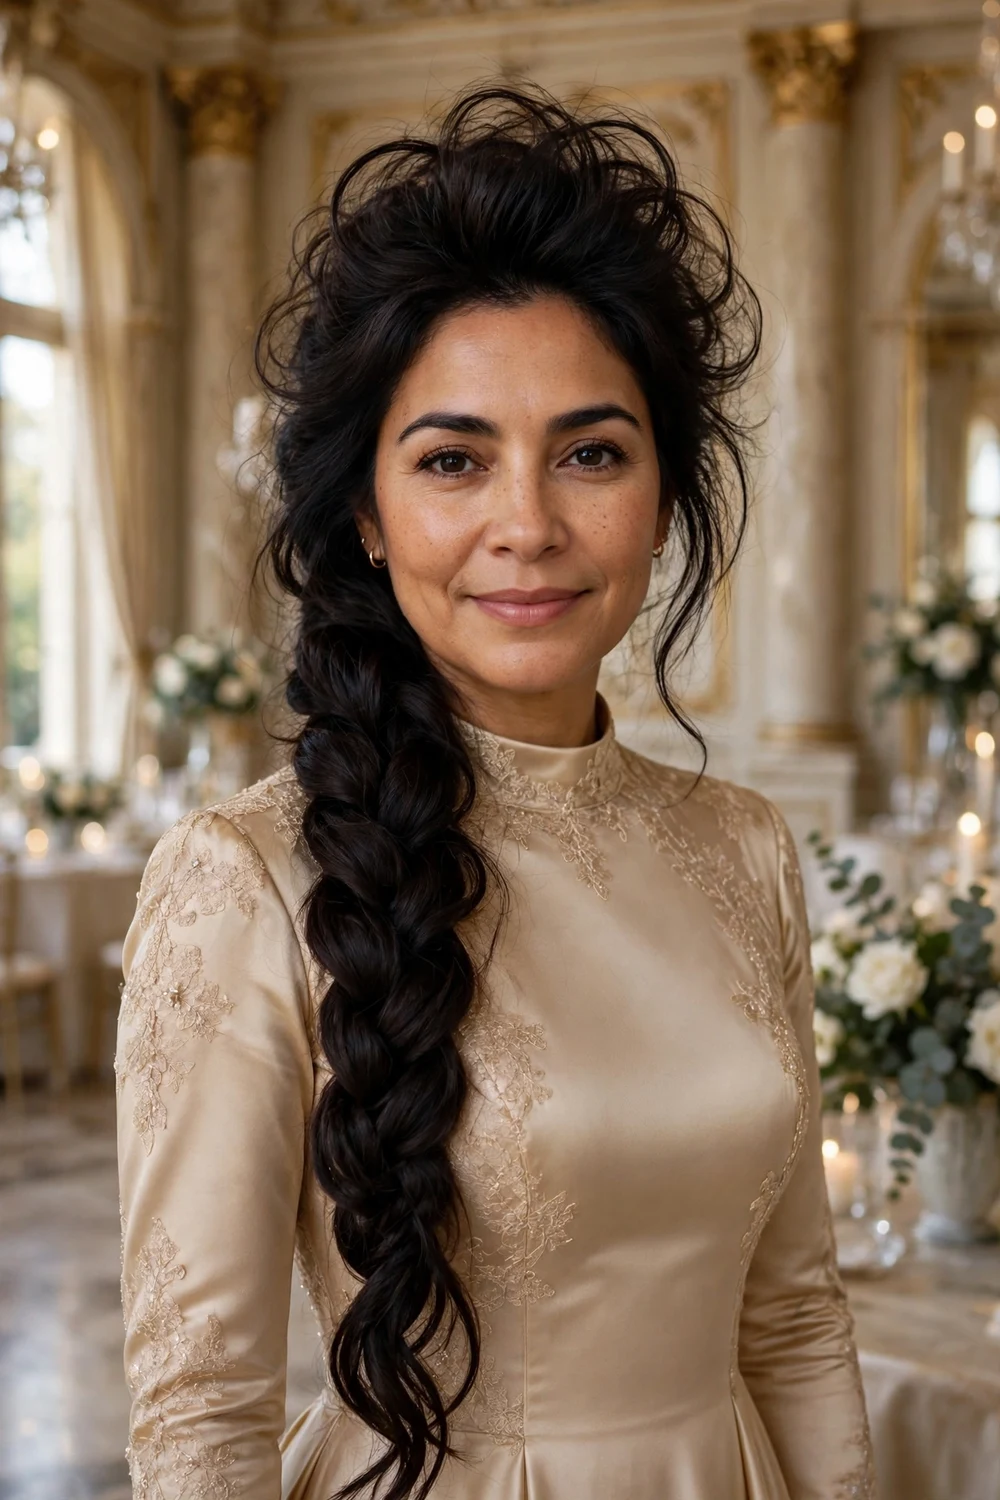
This style pairs a teased, lifted crown with a chunky side braid for vintage-inspired drama. Backcomb the crown for height, smooth the top layer over it, then sweep everything into a thick three-strand braid over one shoulder. The height at the front balances the weight of the braid. It suits ballroom events and formal dinners where a little retro drama fits the mood.
Try this: pancake the braid edges after finishing to make it look twice as thick without extra hair.
Difficulty: Medium · Cost: $0–$10 (salon: $55–$100)
31. Hairline Braid
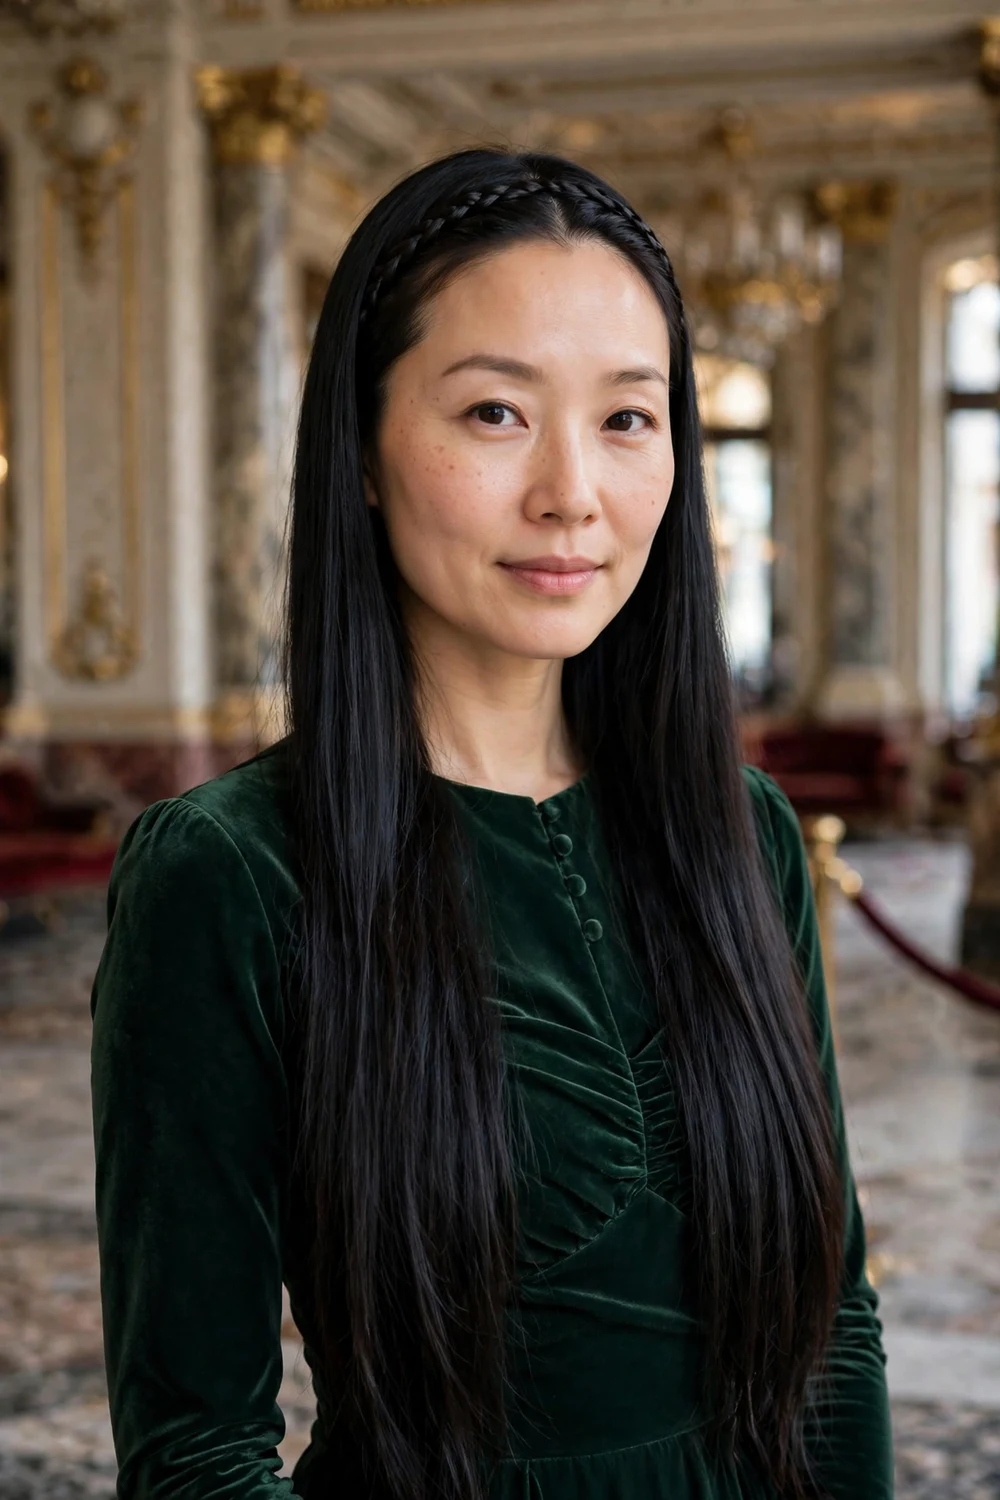
The hairline braid is a thin, delicate plait that traces the hairline like a headband, keeping the front immaculate while the lengths flow. Braid a narrow section along the forehead from one temple to the other and pin it behind the ear. It keeps front pieces off the face all night, which suits opera nights and formal dinners. Wear the lengths straight or waved; the braid does the detailed work up front.
Try this: keep the braid close to the hairline and match the pin color to your hair so the plait looks like part of the style.
Difficulty: Medium · Cost: $0–$8 (salon: $50–$90)
32. Boho Braids
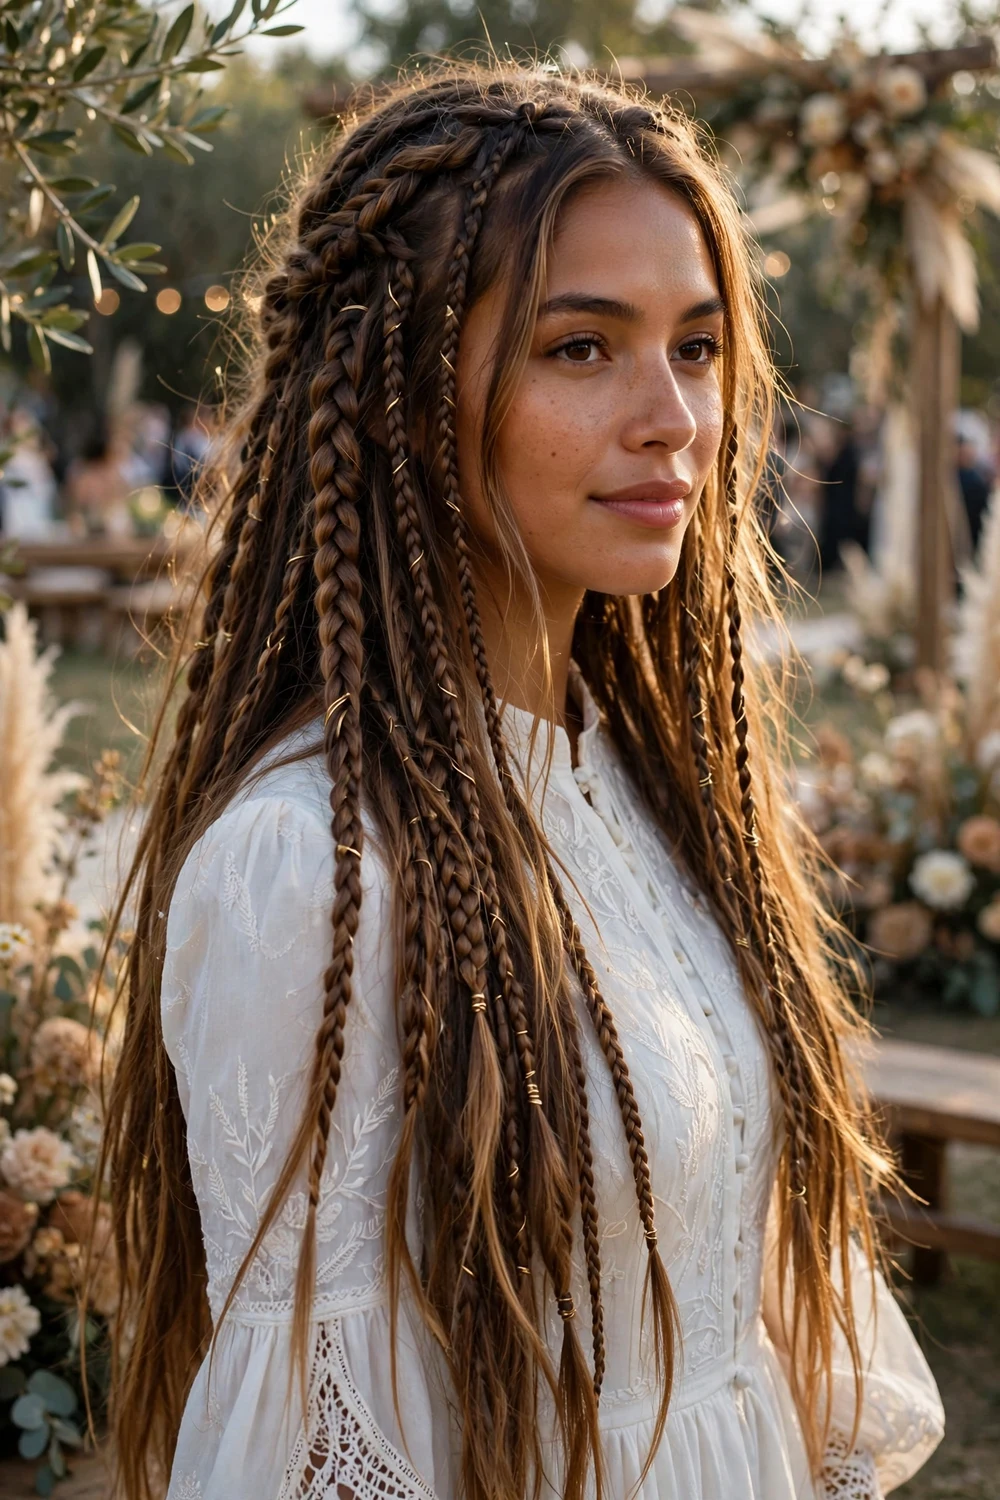
Boho braids mix several loose plaits through long, textured hair for an undone event look. Work in two or three braids of different sizes: a fishtail here, a three-strand there, some starting at the crown and others mid-length. Pull the edges loose for softness. The varied textures look striking in photos at outdoor and festival-style weddings. Small gold rings or charms woven into one braid add a fancy touch.
Try this: mist with texturizing spray before braiding so the plaits hold their loose shape instead of slipping out.
Difficulty: Easy · Cost: $0–$8 (salon: $50–$95)
33. Braided Faux Hawk
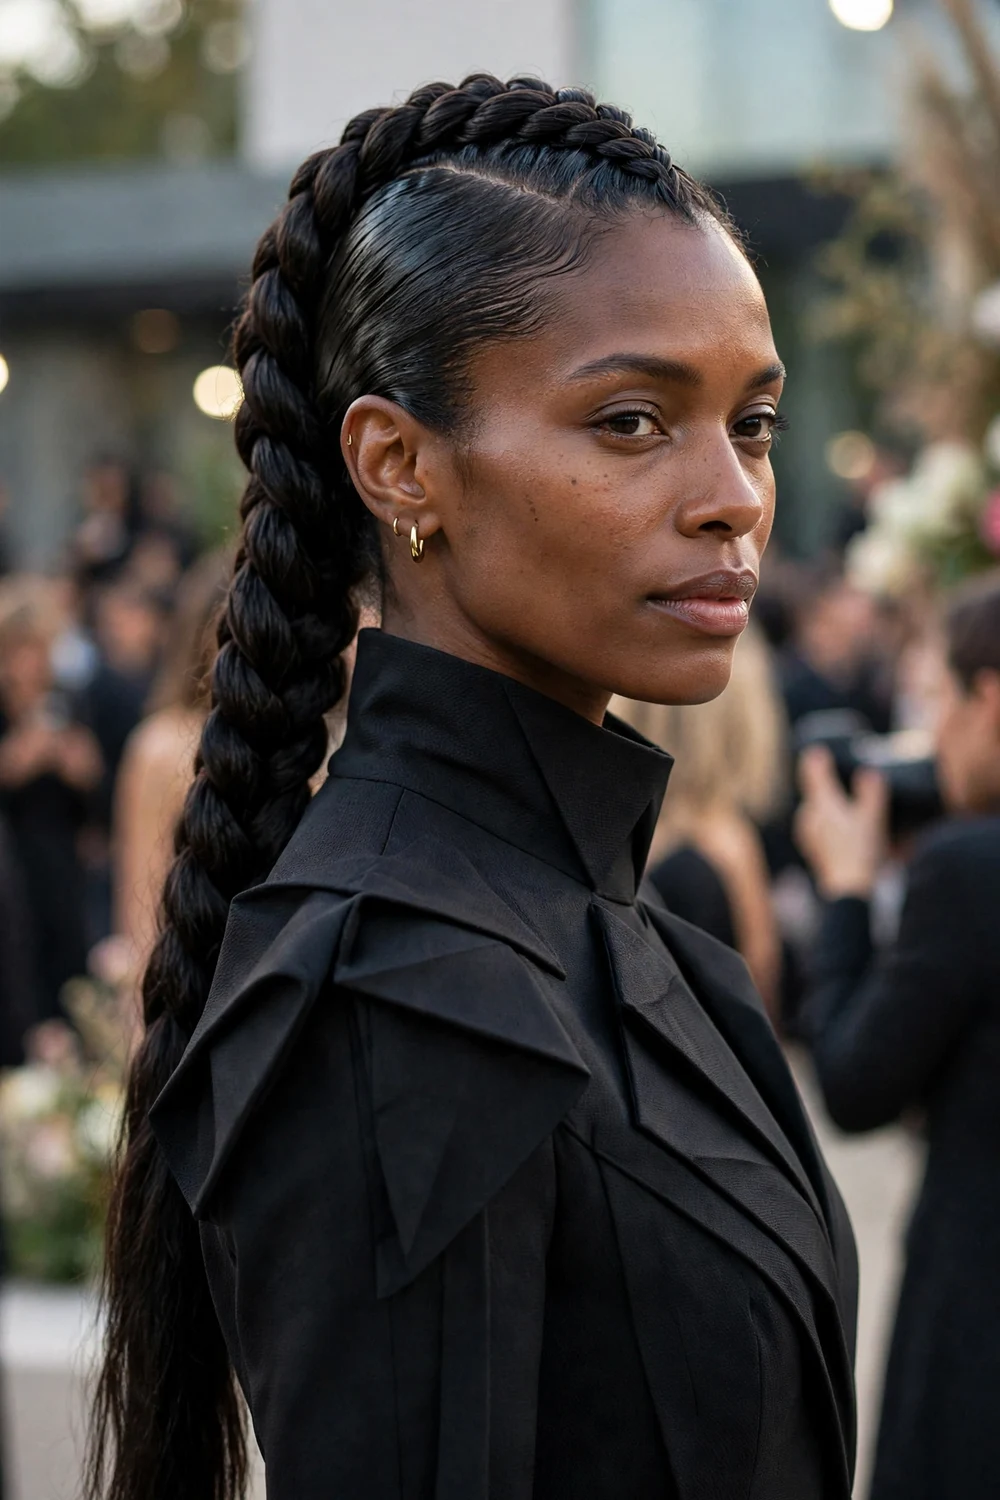
The braided faux hawk builds a raised center braid from forehead to nape while the sides stay sleek and close to the head. Smooth the sides with strong-hold gel, then Dutch-braid the center section with added height, pancaking the edges for width. It delivers runway drama without cutting anything, which makes it a favorite for fashion events and bold party looks. Long hair gives the hawk real length and presence down the back.
Try this: anchor the center braid with pins at every crossover so the height does not flatten during the night.
Difficulty: Hard · Cost: $0–$12 (salon: $70–$130)
34. Tight Curls with Cornrow Accents
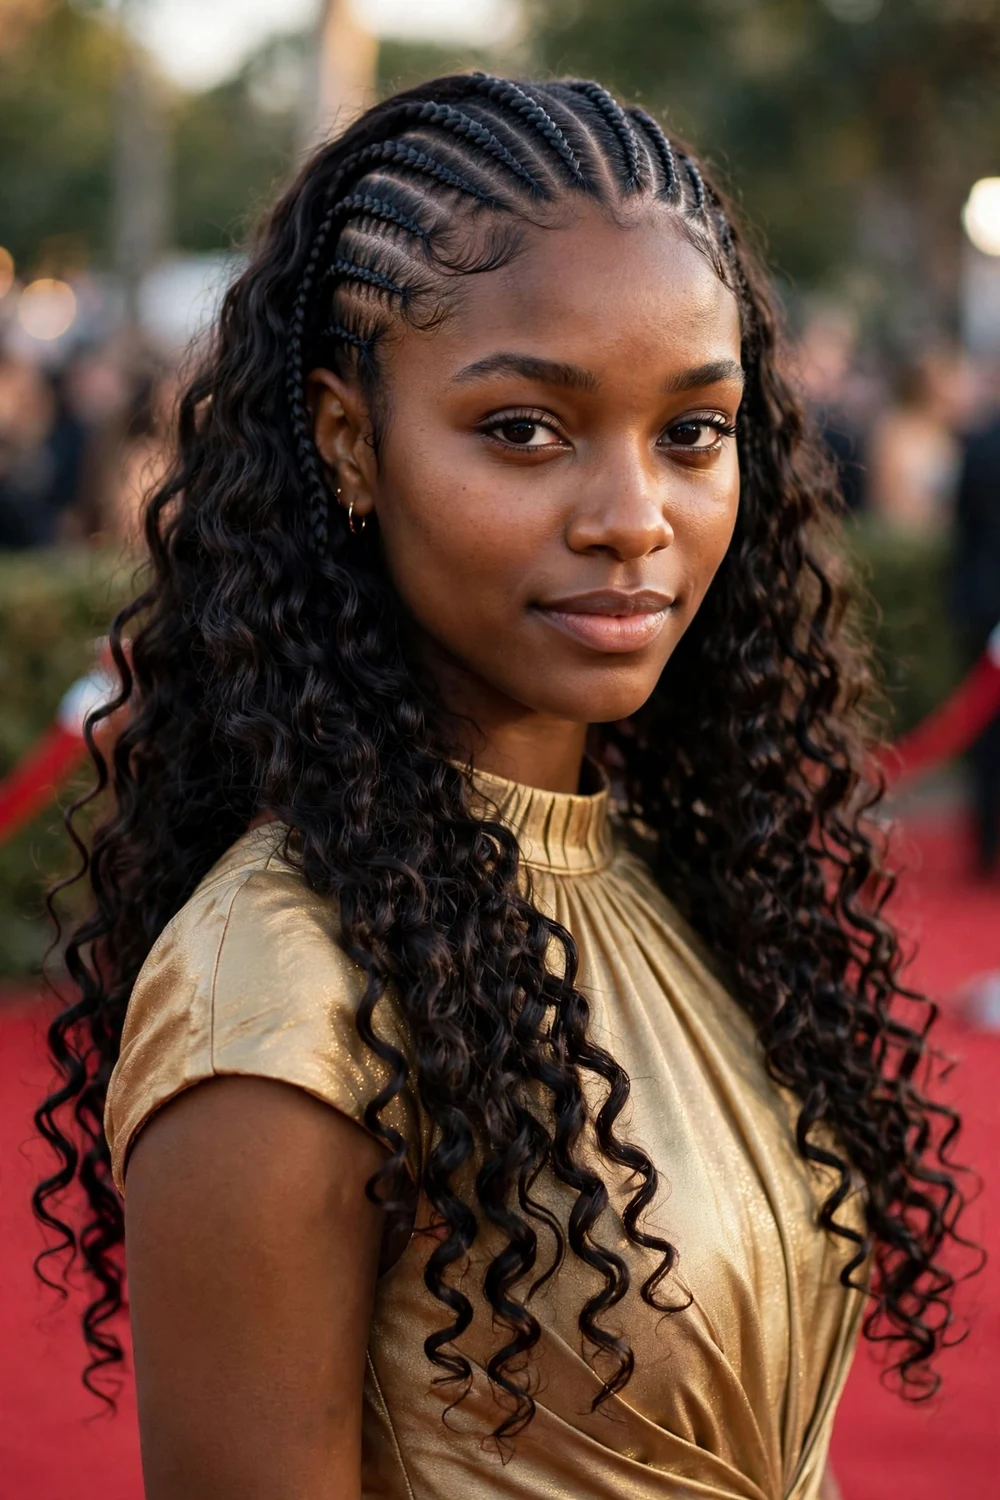
Neat cornrows at the front melt into tight, defined curls through the lengths for a look with both structure and volume. Braid two or three slim cornrows along each side of the part, then leave the back in springy curls defined with curl cream. The contrast between the sleek braided front and the full curls reads glamorous under event lighting. It holds well through long nights since the front is fully secured.
Try this: define the curls with a cream on damp hair and diffuse dry so they stay separated and frizz-free.
Difficulty: Hard · Cost: $0–$15 (salon: $65–$125)
35. Classic Glam Bun
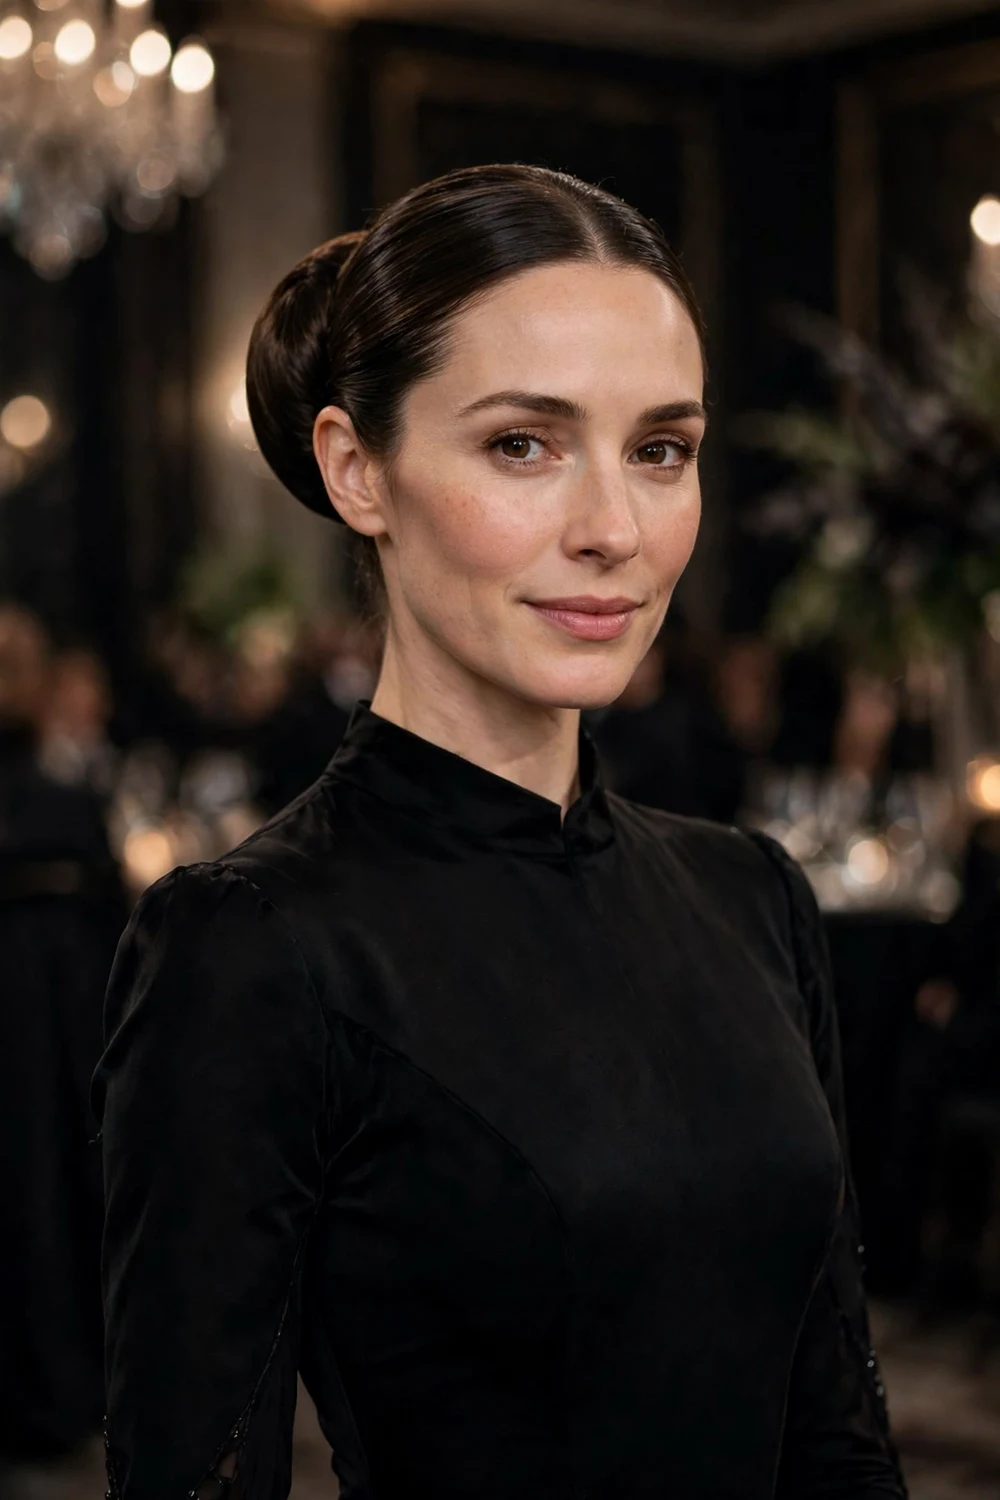
The classic glam bun is the round, smooth ballerina-style bun, polished to event standard. Pull the hair into a high or mid ponytail, smooth with a brush and a touch of gel, then wrap the length into a firm round shape. A hair donut underneath adds fullness on finer hair. The clean silhouette shows off the neck, shoulders, and earrings, which is why it never looks out of place at black-tie events.
Try this: wrap a thin strand of hair around the base to hide the elastic, pinning it underneath for an invisible finish.
Difficulty: Easy · Cost: $0–$10 (salon: $55–$95)
36. Classic Chignon
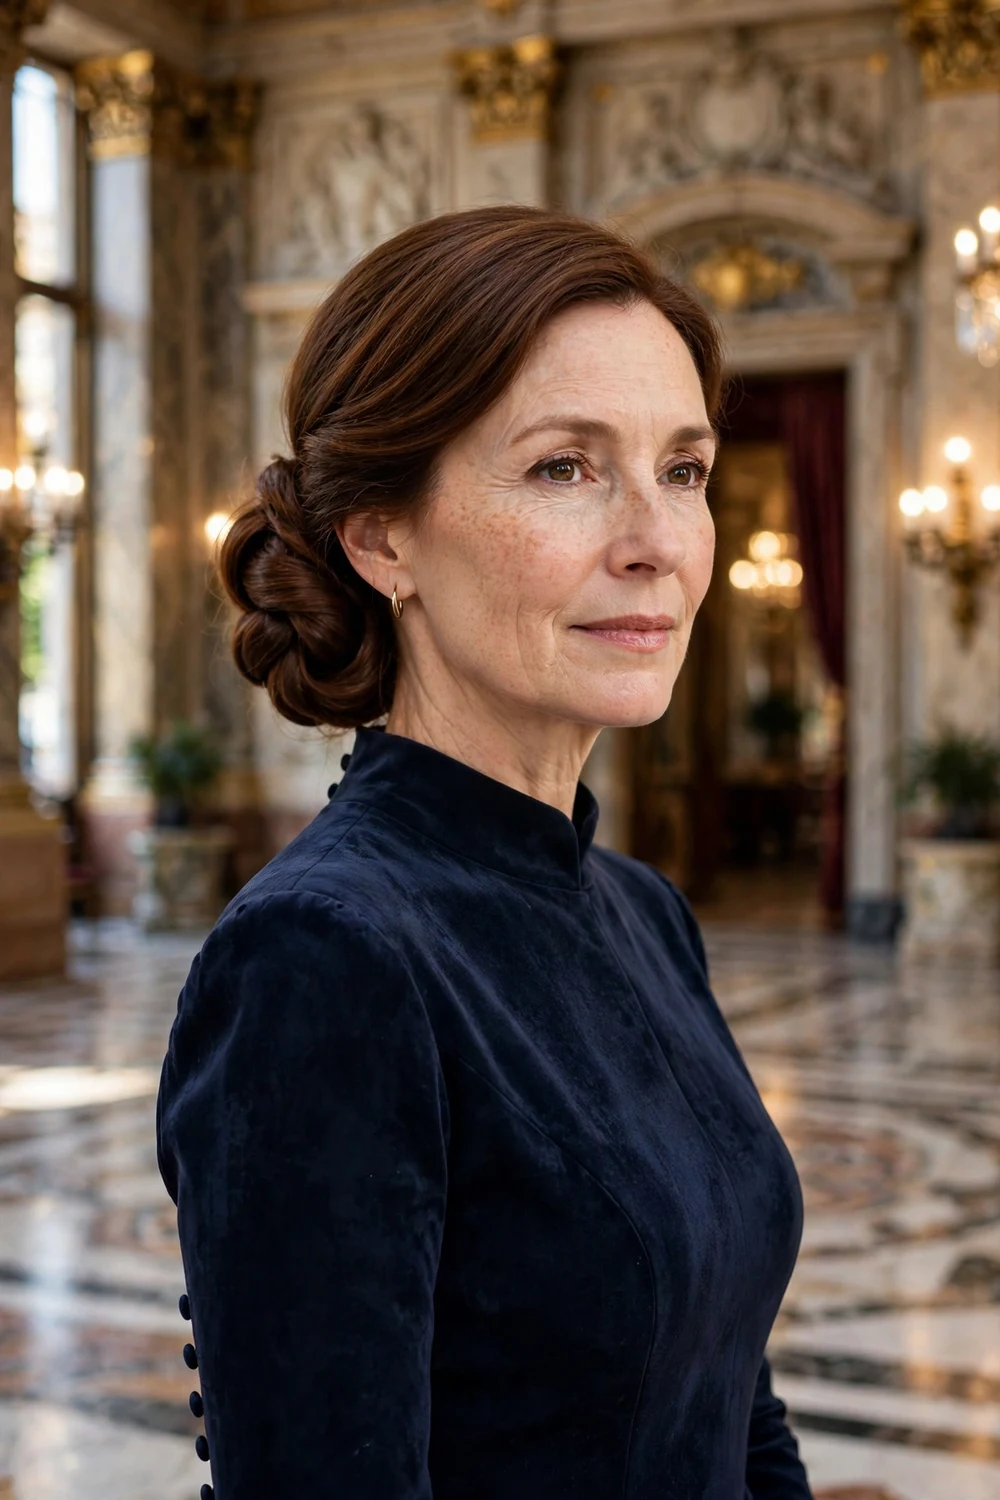
The classic chignon gathers long hair into a twisted coil at the nape for timeless event polish. Smooth the hair back, twist the length into a roll, and pin it flat against the nape in a neat coil. Long hair gives the chignon satisfying fullness. It pairs with high necklines and backless dresses alike, since the nape placement keeps the shoulders completely clear. A side part softens the look; a center part sharpens it.
Try this: tuck the ends fully under the coil and pin from underneath so no stray ends peek out in photos.
Difficulty: Medium · Cost: $0–$10 (salon: $60–$110)
37. Sleek Low Bun

The sleek low bun smooths everything into a neat coil at the nape with a glassy finish. Part the hair precisely, brush it flat against the head with smoothing cream, and twist into a compact bun. The precision is the point: every strand sits in place, which reads formal under bright event lighting. It suits award ceremonies and ceremonies where the look must stay immaculate for hours.
Try this: finish with a strong-hold spray, then smooth the surface once more with the palms of your hands to catch any late flyaways.
Difficulty: Easy · Cost: $0–$10 (salon: $55–$95)
38. Textured Low Bun
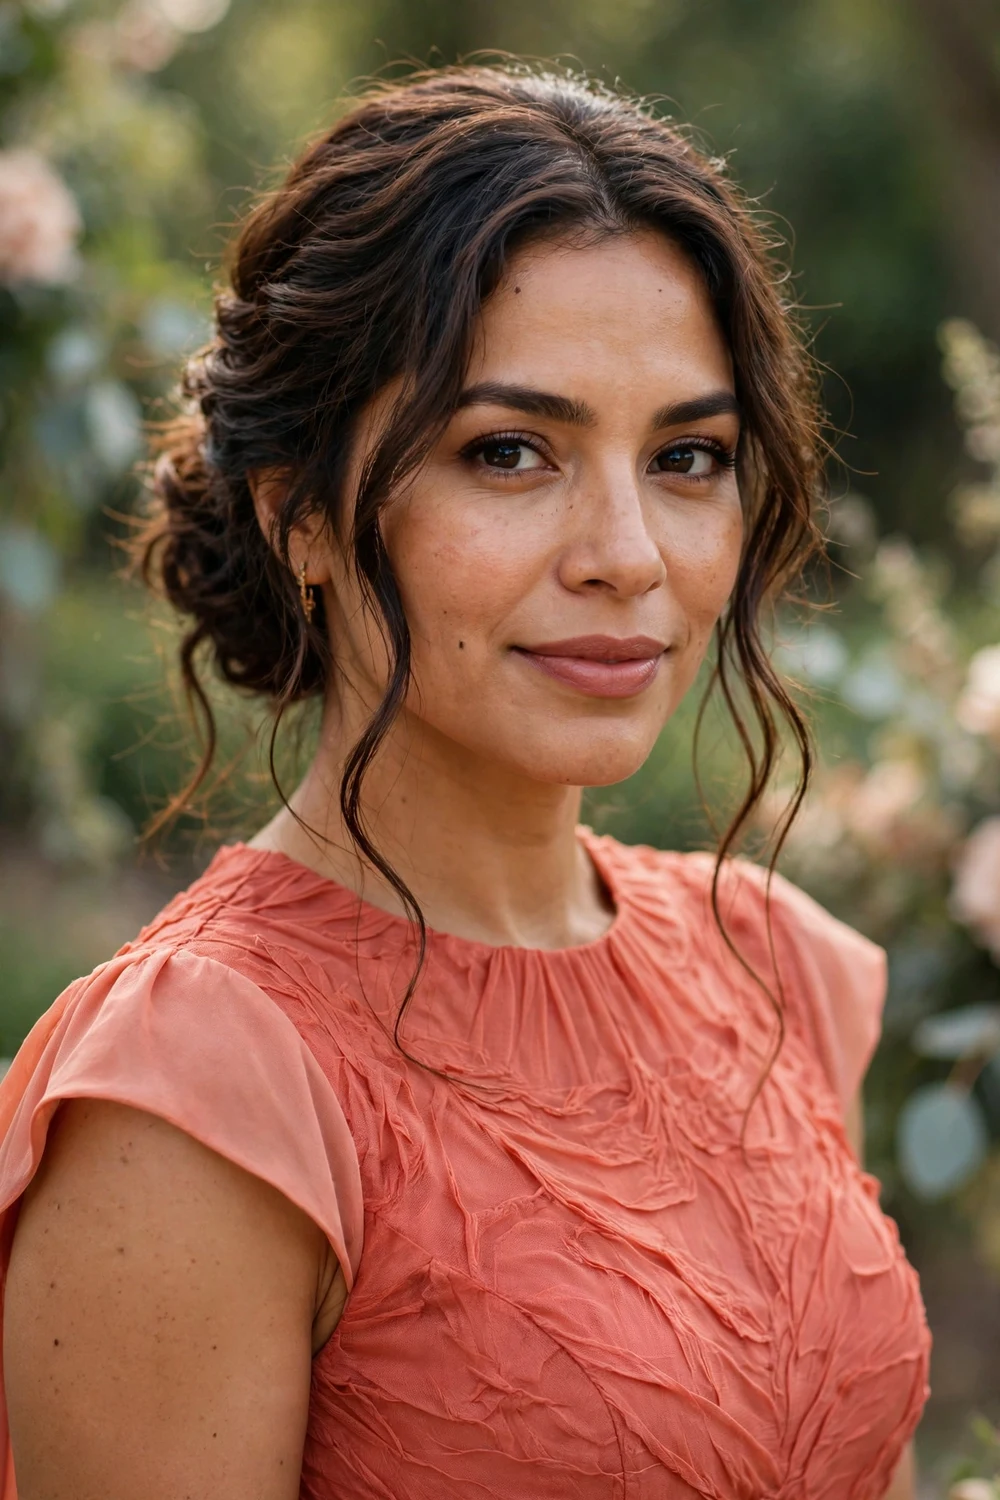
The textured low bun keeps the low placement but relaxes the finish with piecey, lived-in texture. Tease the ponytail lightly, twist loosely, and pin in a soft coil, pulling a few pieces free around the face. The texture gives the bun dimension that a sleek bun lacks. It suits wedding guests and evening parties where you want polish without stiffness.
Try this: work a texturizing spray through the lengths before pinning so the pieces hold their separation all night.
Difficulty: Easy · Cost: $0–$10 (salon: $55–$100)
39. Twisted Low Bun
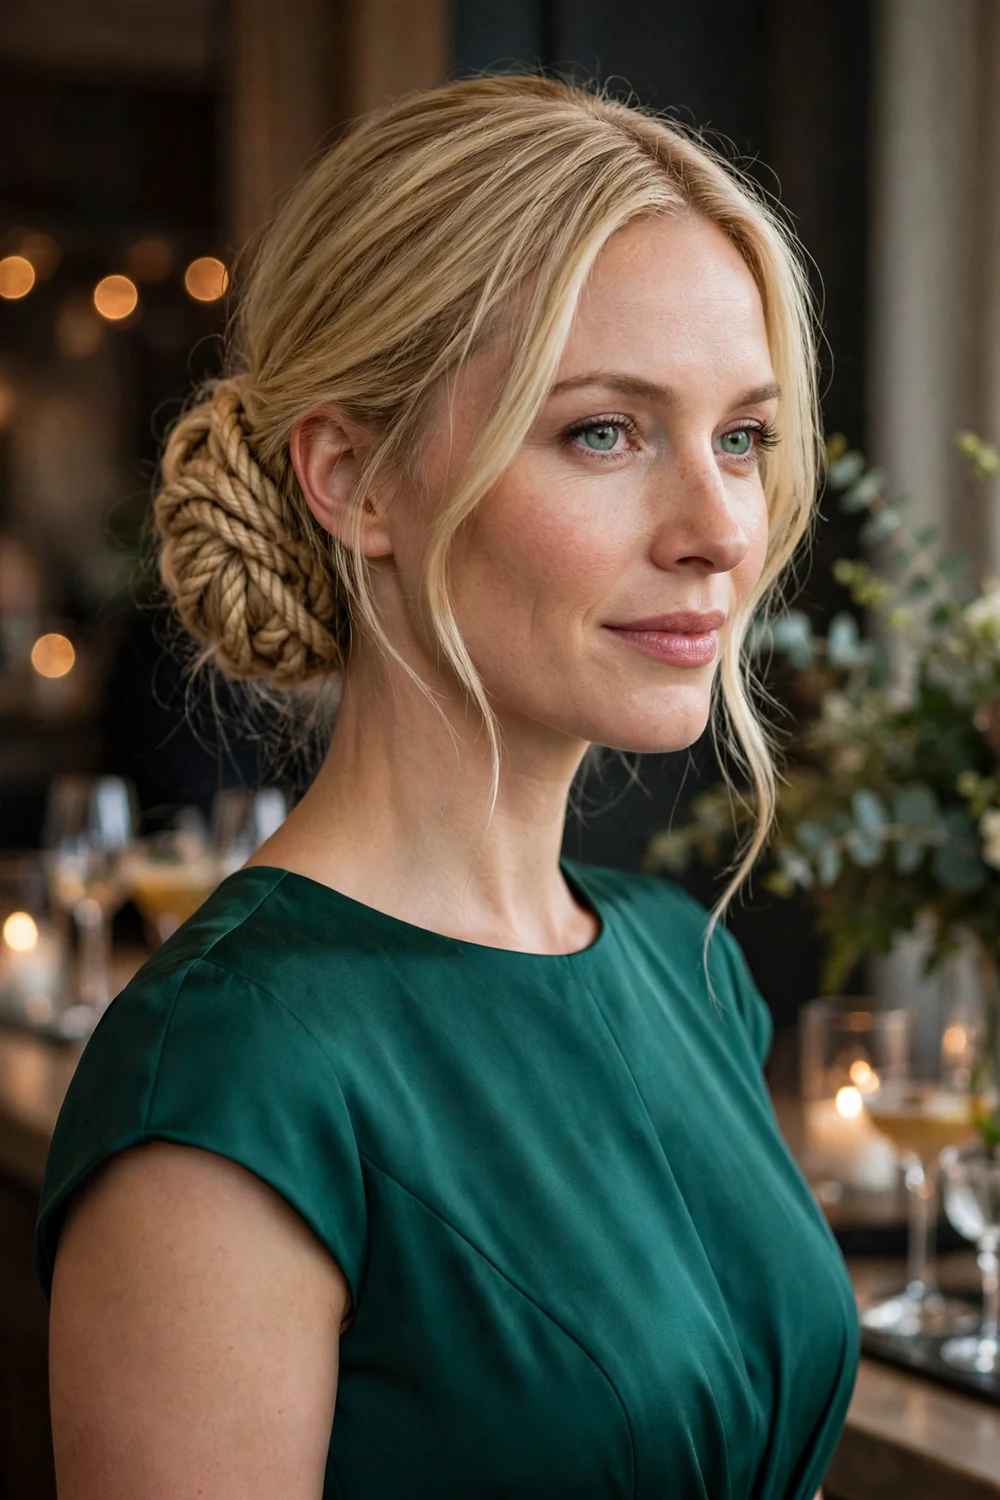
The twisted low bun builds the coil from rope twists instead of a plain wrap, adding visible texture to the bun. Split a low ponytail into two sections, twist each one, wind them together, then coil the rope around the base. The twisted surface catches the light in a way a smooth bun cannot. It works for cocktail receptions and dinners where the hair should look detailed up close.
Try this: twist the sections tightly and coil loosely so the rope pattern stays visible instead of compressing flat.
Difficulty: Medium · Cost: $0–$10 (salon: $60–$105)
40. Jeweled Low Bun
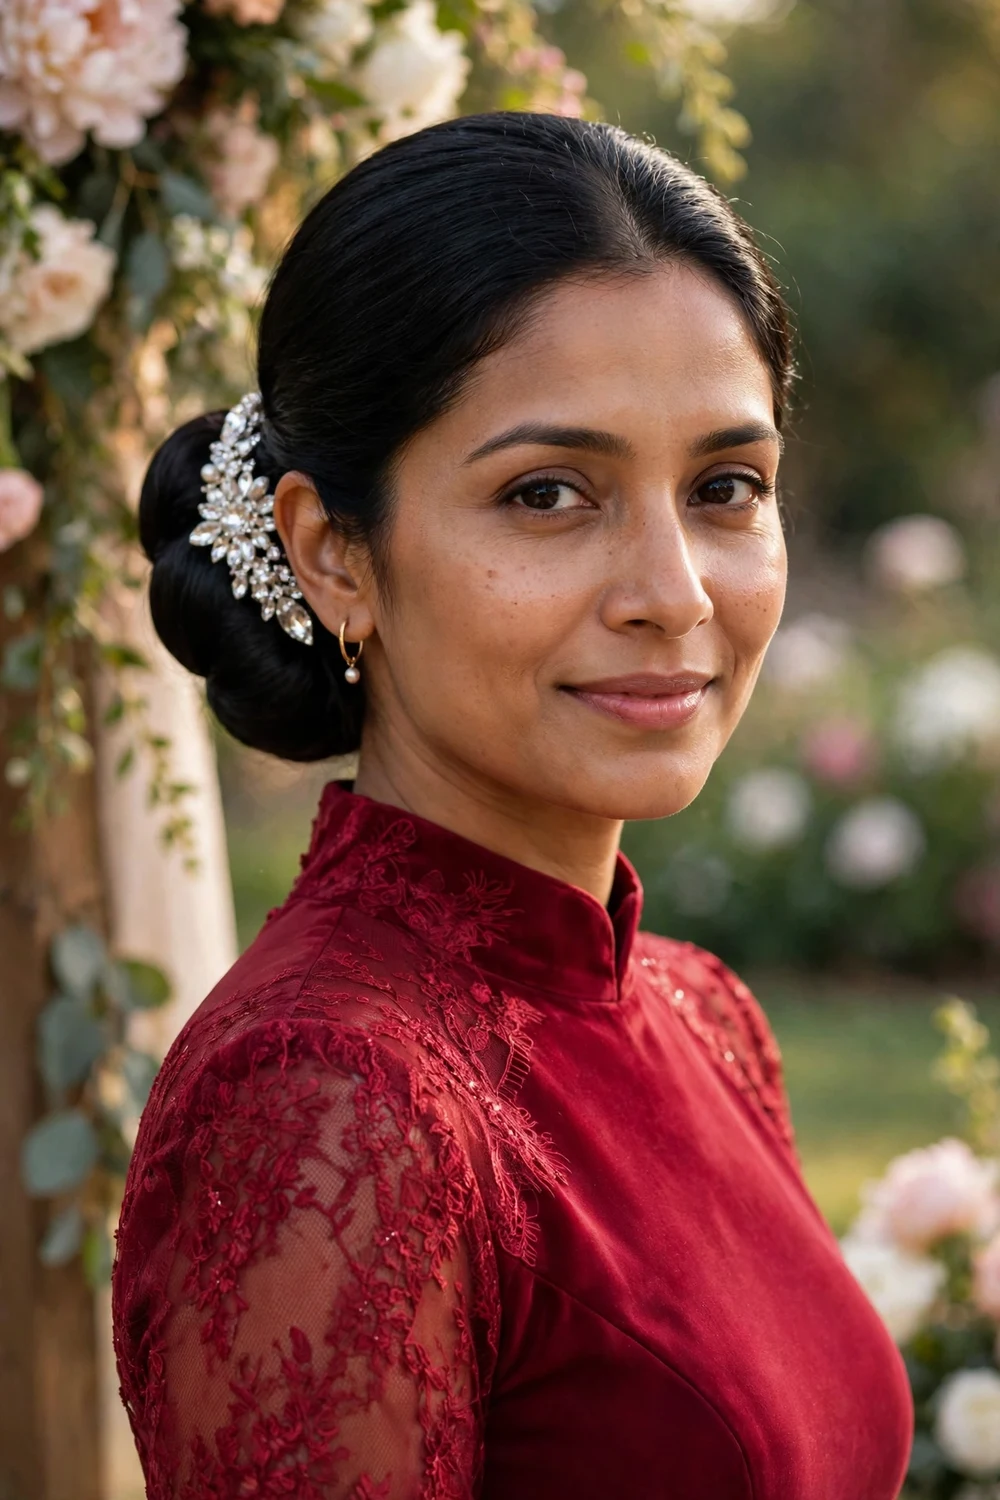
The jeweled low bun starts as a polished low bun, then gets its event character from a jeweled clip, crystal pins, or a rhinestone comb. Build the bun first and get it fully secure, then place the hardware where the light will catch it: along the part or fanning above the bun. The jewels do the talking, so the base can stay simple. This is a strong pick for evening weddings and black-tie guests.
Try this: insert jeweled pins at a slight angle and cross two bobby pins underneath each one so heavy pieces cannot slide out.
Difficulty: Easy · Cost: $8–$25 (salon: $70–$125)
41. Pearl-Adorned Chignon
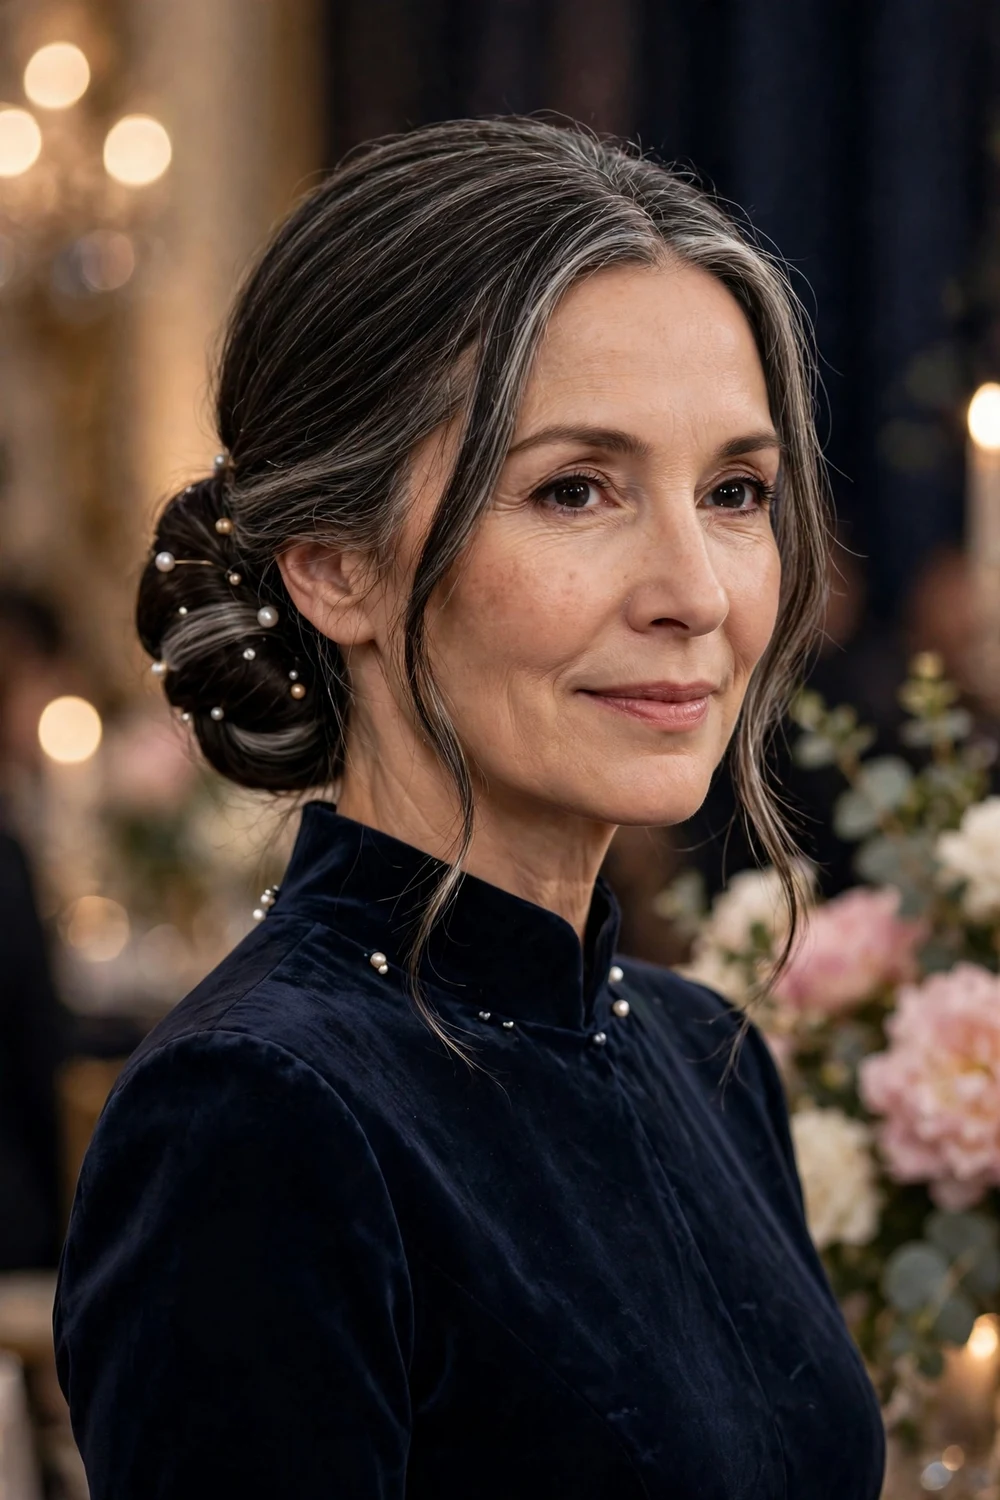
Pearl pins scattered through a smooth chignon give long hair a soft, luminous finish. Build a neat low chignon first, then slide pearl pins along the coil and the part at uneven intervals. The matte glow of pearls flatters every hair color and suits weddings especially well. Keep the arrangement asymmetrical for a modern feel rather than a dated, overly matched look.
Try this: place the pearls after finishing with hairspray, pushing each pin through the coil rather than into the scalp.
Difficulty: Medium · Cost: $8–$22 (salon: $70–$125)
42. Voluminous Updo
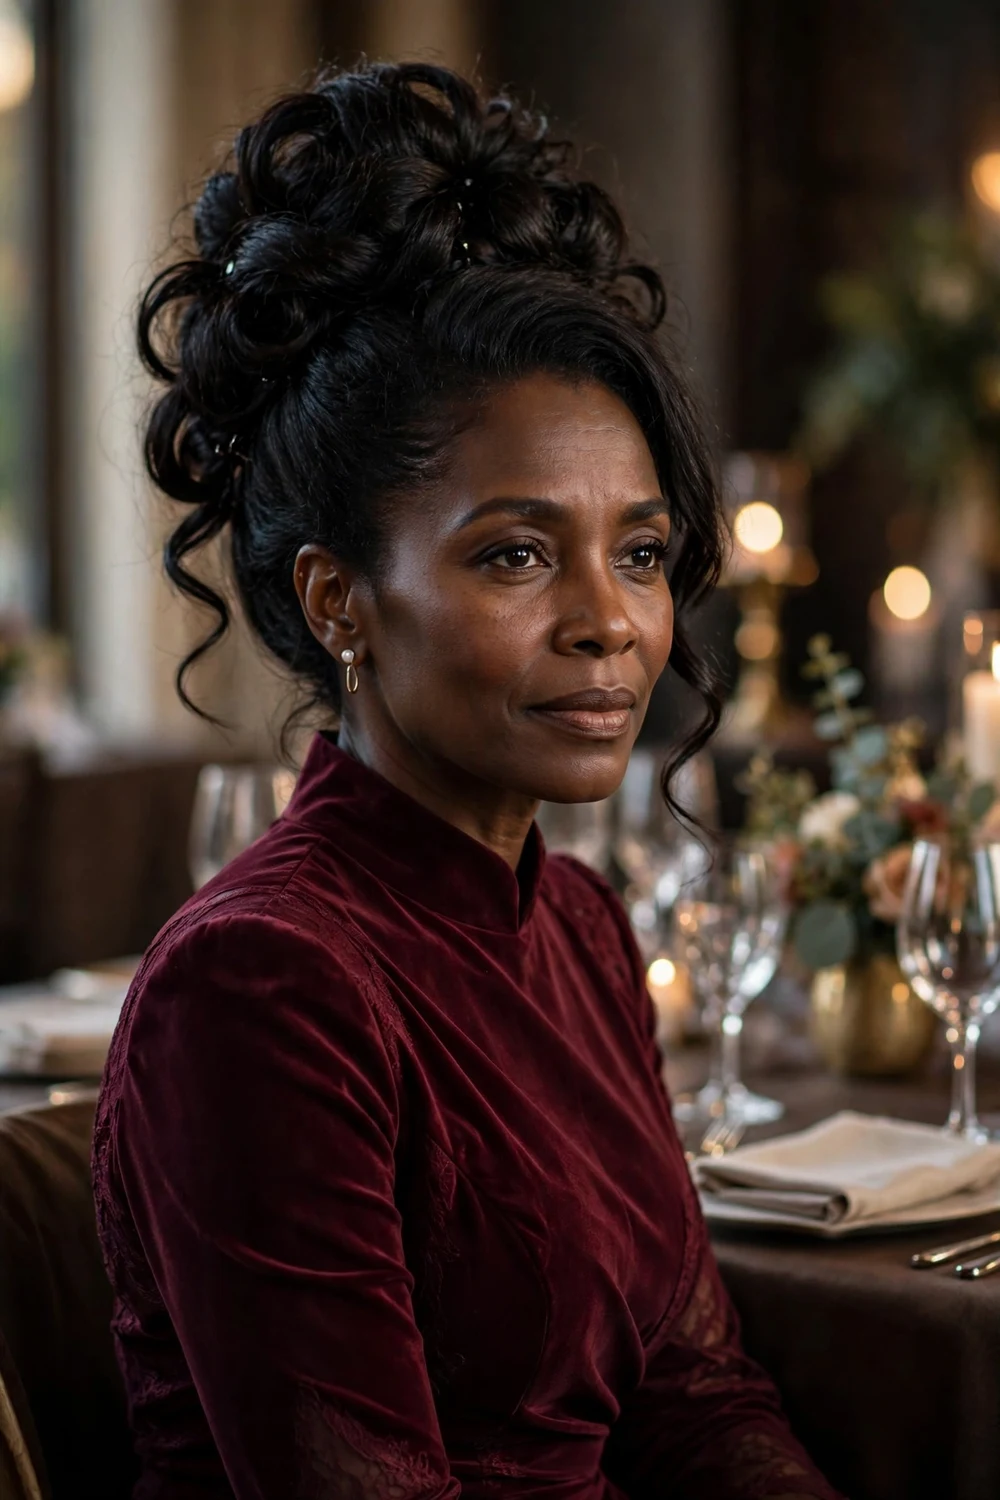
The voluminous updo piles long hair into a big, airy shape with height at the crown and fullness through the back. Tease the roots for structure, then pin the lengths in loose loops and rolls, building section by section. Long hair provides the raw material for real drama here. It suits formal dinners and galas where the hair is part of the outfit, and it photographs with presence from every angle.
Try this: build the shape over a mesh hair donut or padding at the crown so you get height without over-teasing.
Difficulty: Hard · Cost: $0–$12 (salon: $80–$150)
43. Timeless Elegant Updo
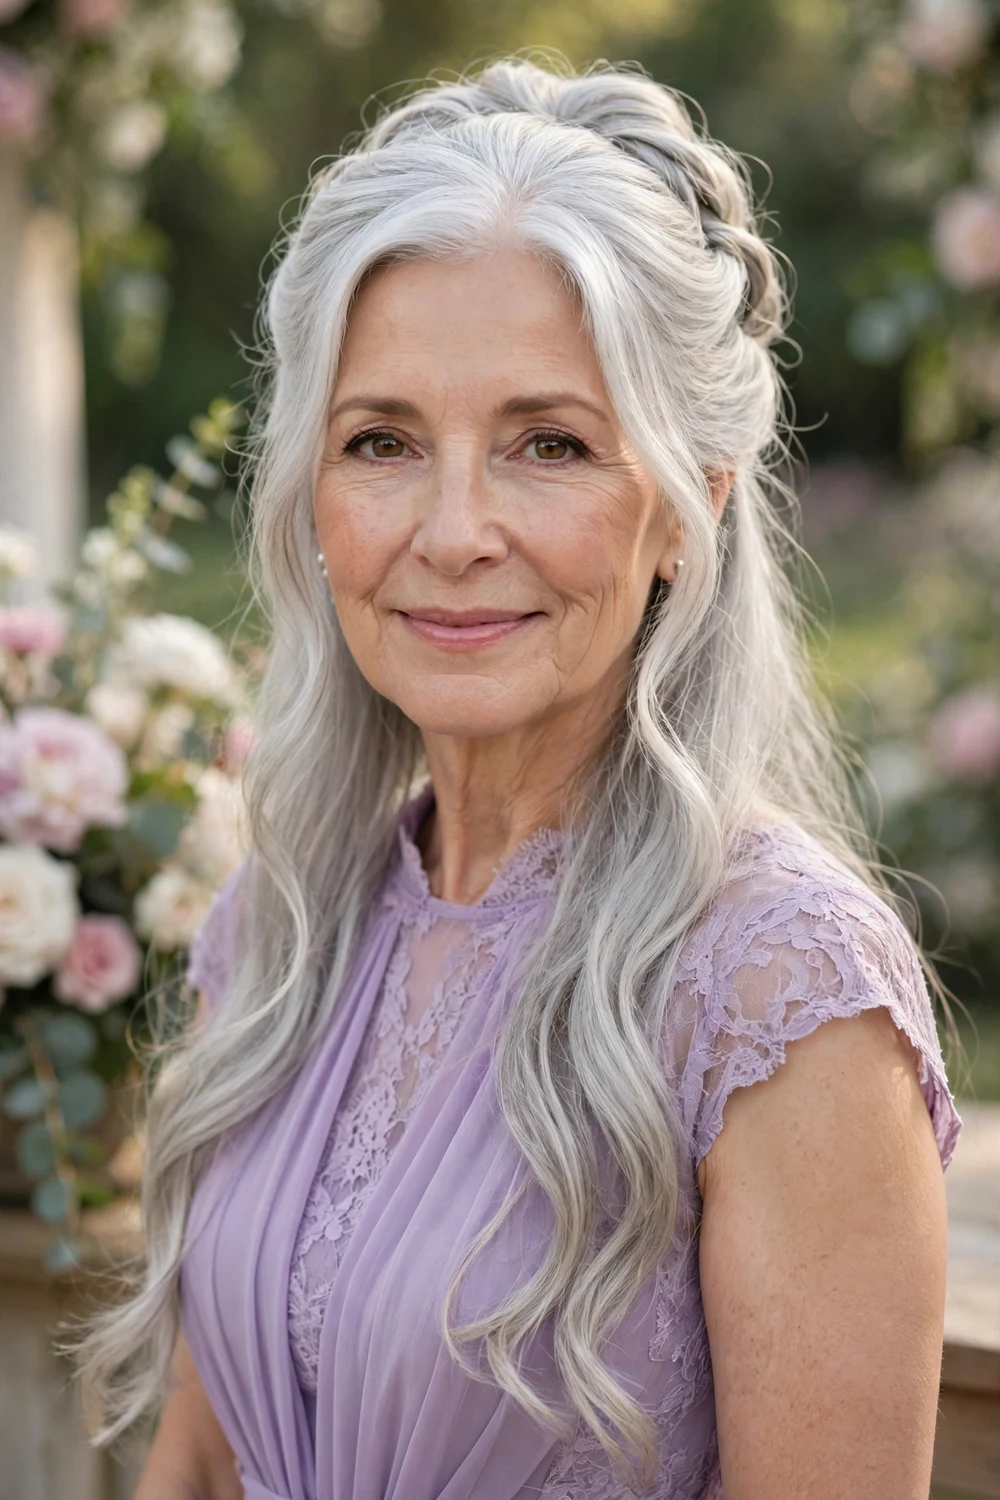
The timeless elegant updo is a soft, classic pinned style with gentle volume and face-framing pieces, flattering at any age. Sweep the hair up loosely, pin in soft rolls, and leave two curved pieces out around the face. The softness keeps it from looking severe, while the pinned shape keeps it secure. For more long-hair looks at every age, see our long hairstyles for women over 50 guide.
Try this: curl the face-framing pieces with a 1-inch iron (heat protectant first) and let them cool before touching so they keep their curve.
Difficulty: Medium · Cost: $0–$10 (salon: $65–$120)
44. Elegant Twisted Updo Bun
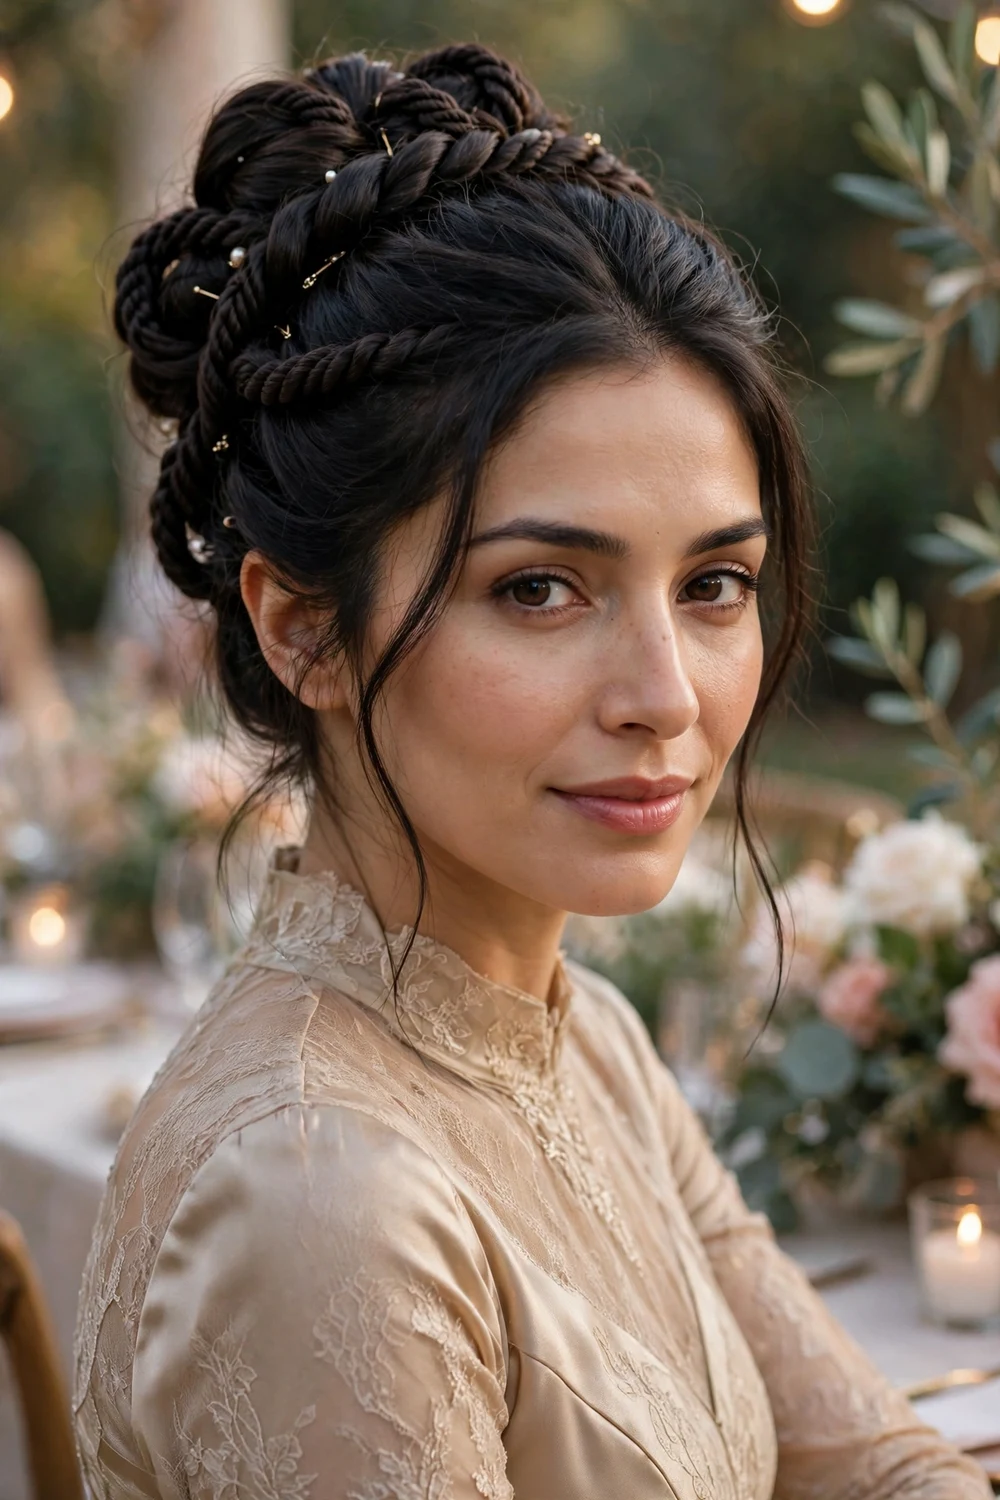
This updo twists multiple sections and pins them into a sculpted bun with visible rope detail throughout. Divide the hair into four or five sections, twist each one, and pin them in a circle around a central point. The overlapping twists create depth that a plain bun lacks. It suits engagement parties and formal celebrations where the hair will be seen up close in photos.
Try this: pin each twist as you go rather than twisting everything first, so the shape builds evenly and nothing unravels.
Difficulty: Hard · Cost: $0–$12 (salon: $75–$140)
45. Braided Updo Bun
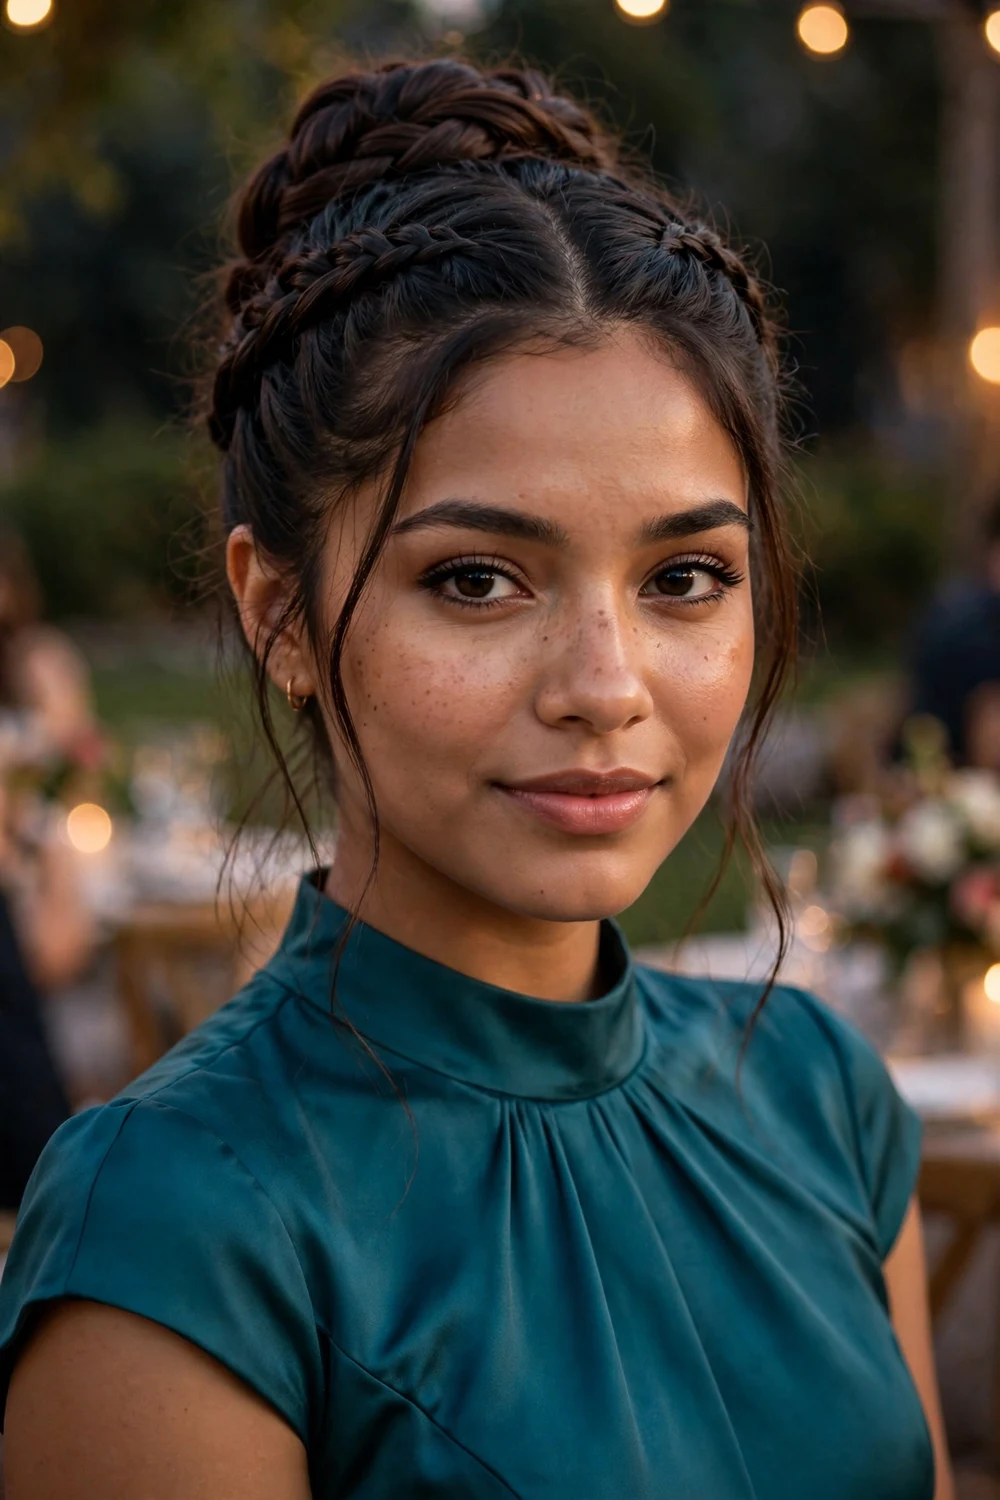
The braided updo bun weaves braids into a high or mid bun for a style with visible craftsmanship. Try a Dutch braid on each side feeding into a twisted bun, or one wide braid wrapped around a smooth bun base. Because the braiding is the decoration, this needs no accessories. Long hair gives the braids real thickness, which is what makes the finished bun look substantial.
Try this: keep a dampening spray nearby while braiding so flyaways stay down and the finished updo looks neat.
Difficulty: Hard · Cost: $0–$12 (salon: $75–$140)
46. Braided Low Bun
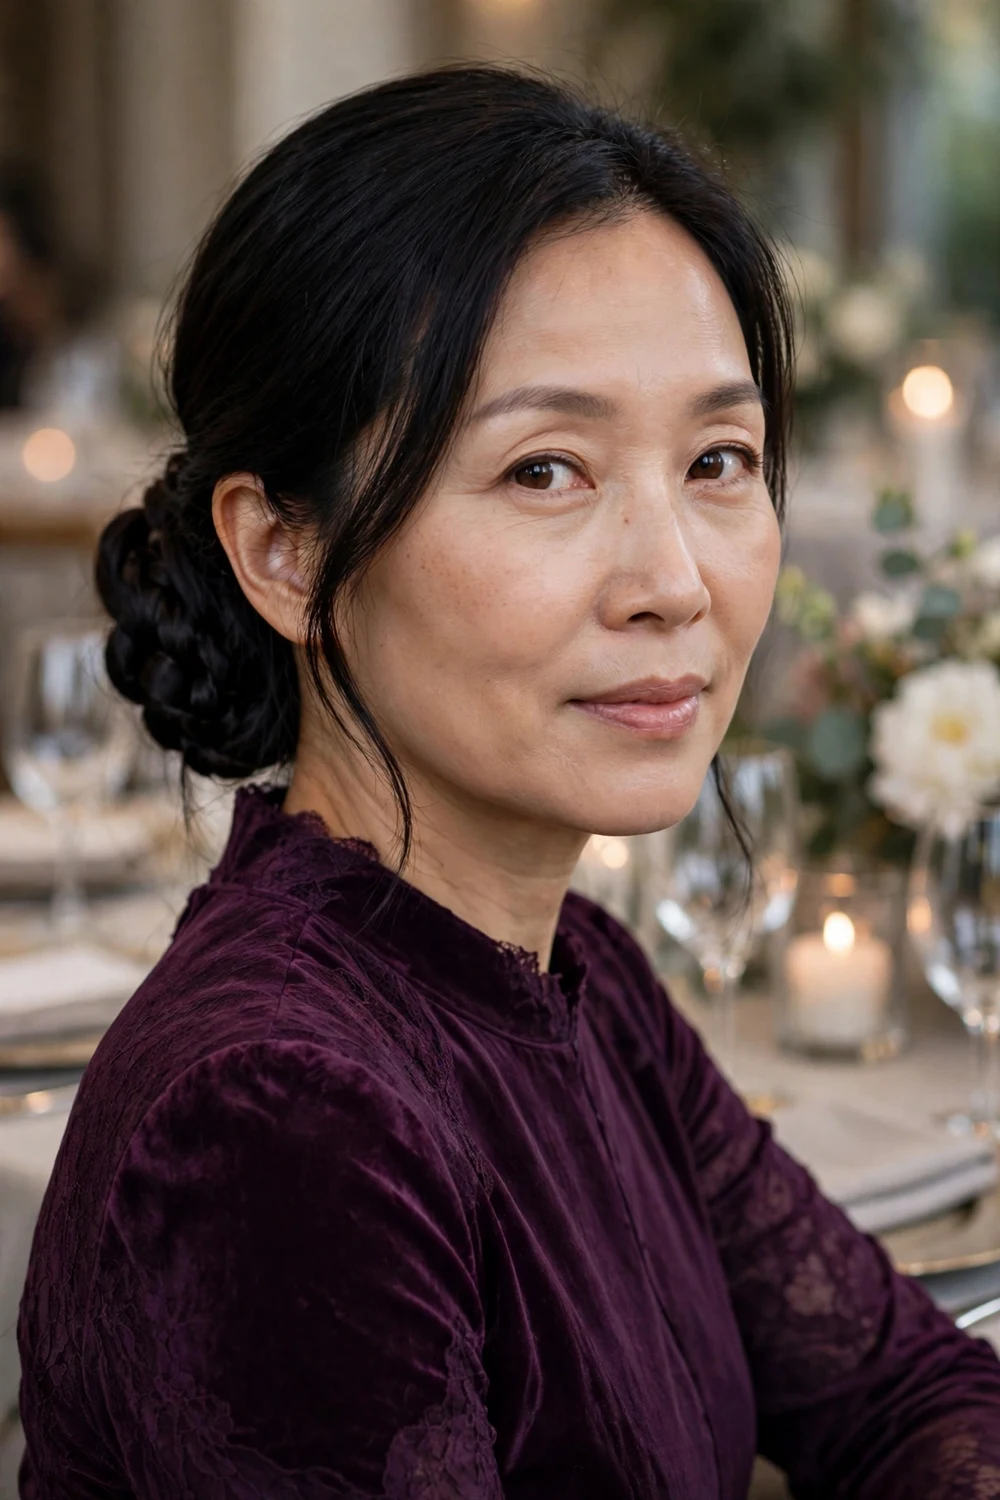
The braided low bun adds plaited texture to the classic low bun for extra visual interest. Braid the ponytail loosely before coiling it, or wrap a thin accent braid around the finished bun. The braid pattern catches light and shadow, which makes the bun look detailed without accessories. It suits banquets and evening weddings where the style needs to hold for hours.
Try this: pancake the braid before coiling so the plait looks full and deliberate rather than thin.
Difficulty: Medium · Cost: $0–$10 (salon: $60–$110)
47. Braid Bun
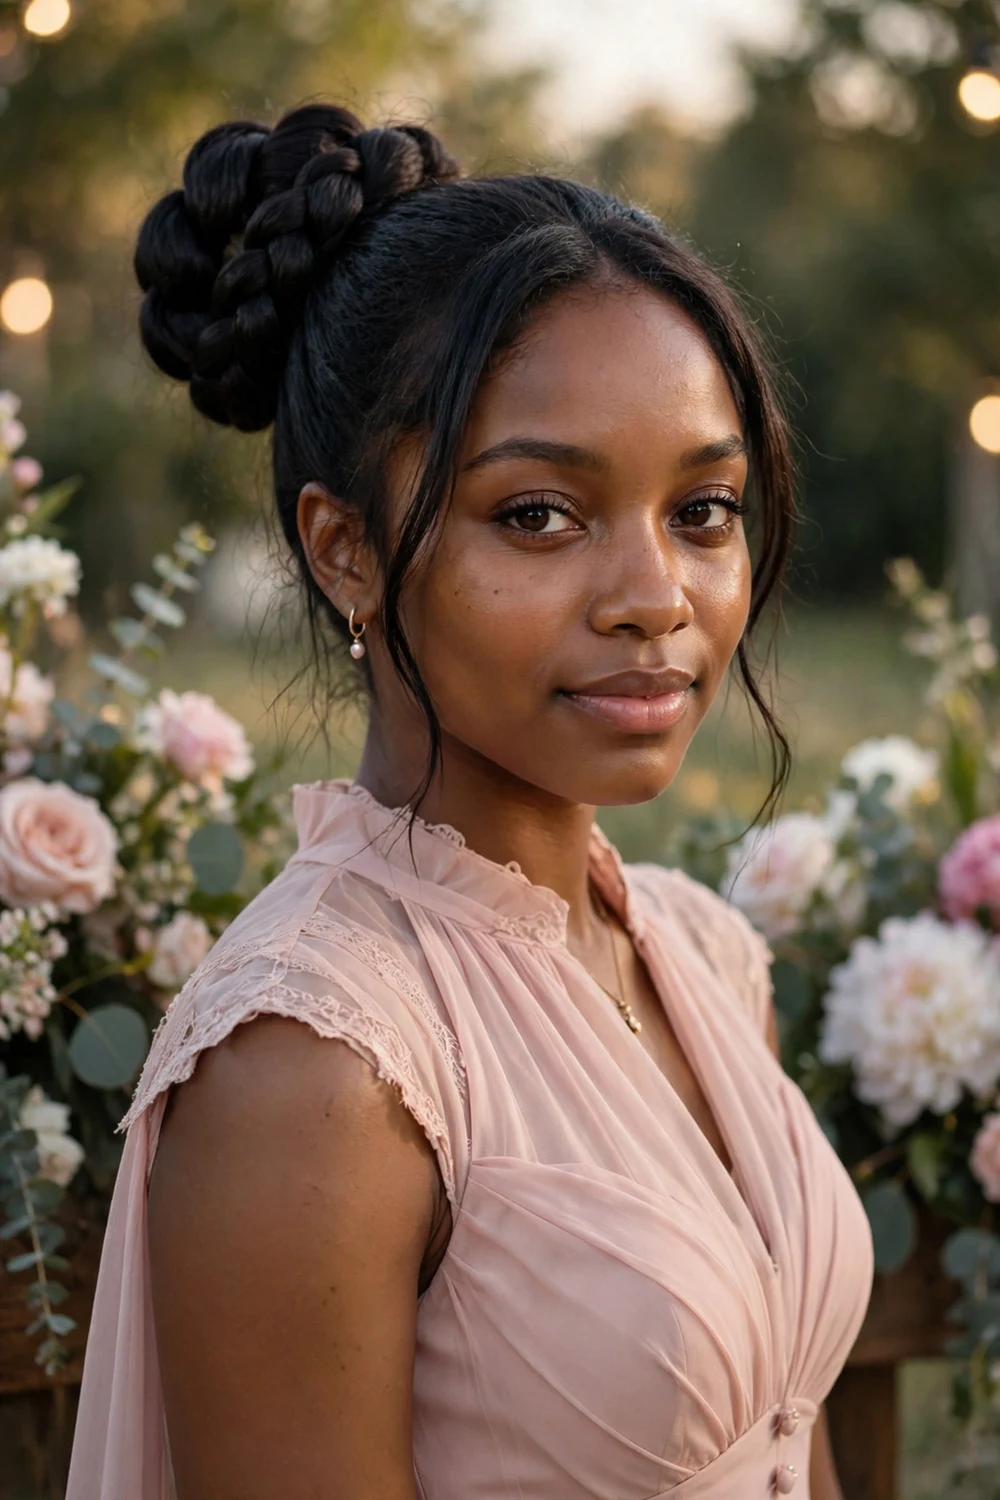
The braid bun coils one thick braid into a round bun for a clean, graphic shape. Braid the full length into a single three-strand plait, then wrap it around its base and pin. Long hair makes this bun impressively full. It suits proms and formal dances because the coiled braid stays locked in place through hours of movement. Keep the braid snug for polish or pull it loose for softness.
Try this: secure the braid end with a small elastic before coiling so the tail does not unravel inside the bun.
Difficulty: Easy · Cost: $0–$8 (salon: $50–$95)
48. Spiral Braided Bun
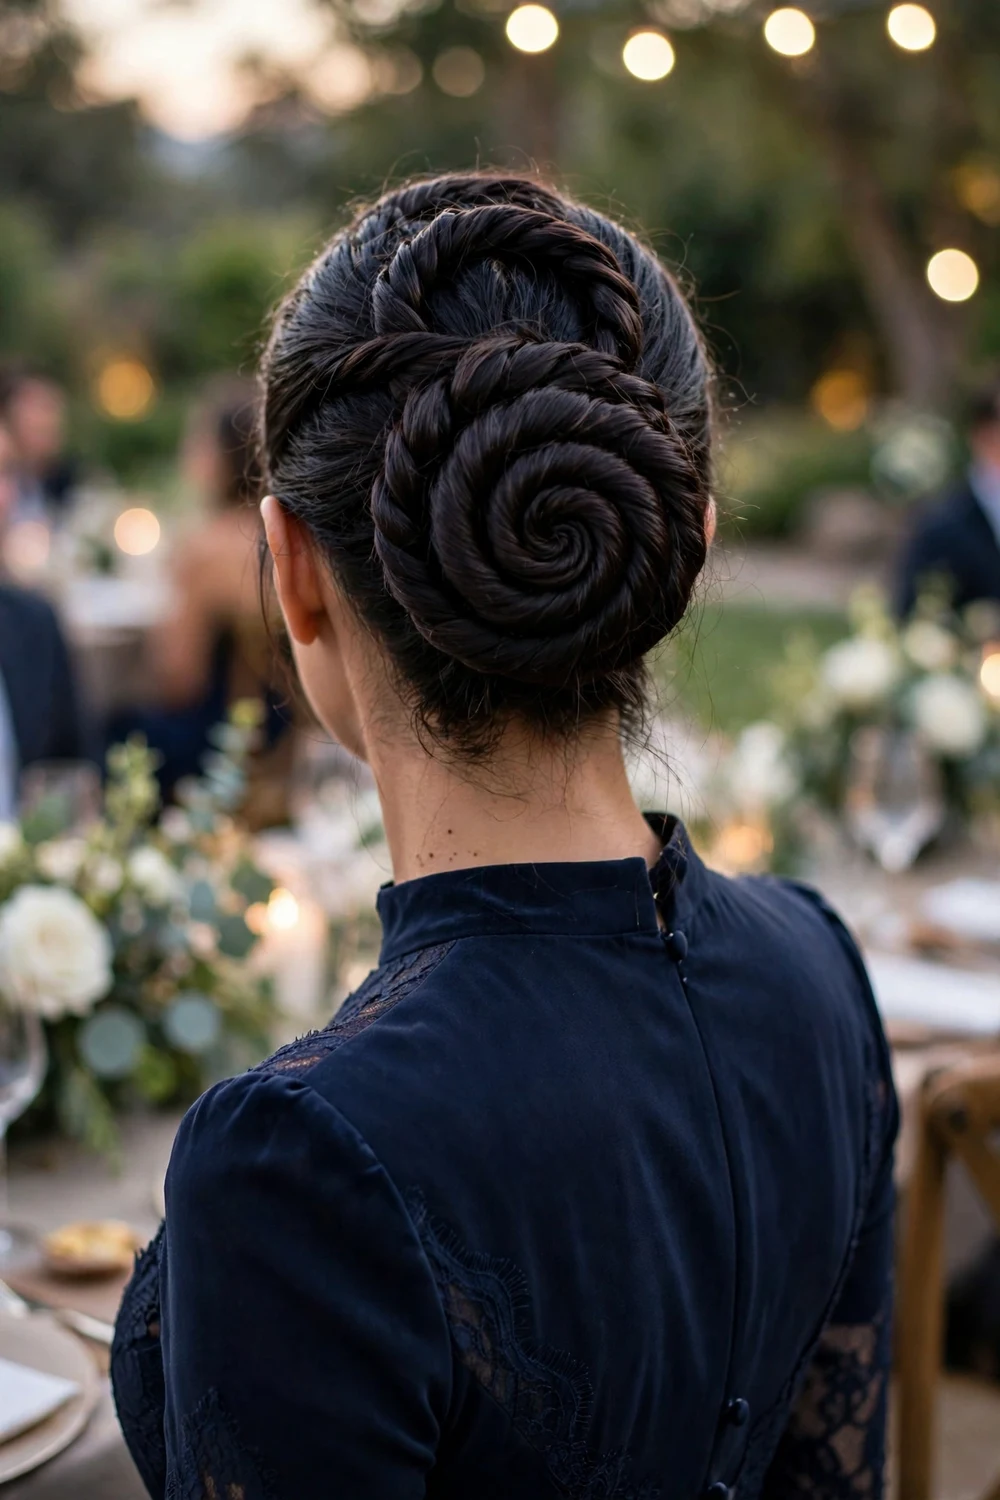
The spiral braided bun starts as a French or Dutch braid at the nape and spirals inward into a coiled bun. Begin braiding at the nape, then curve the braid around itself, pinning as you go, until the full length forms a flat spiral. The spiral pattern is striking from behind, which matters at ceremonies where guests see the back of your head. It holds securely since the braid anchors the whole shape.
Try this: braid with consistent tension so the spiral lies flat instead of puffing up unevenly.
Difficulty: Hard · Cost: $0–$10 (salon: $70–$130)
49. Classy Knotted Bun

The knotted bun ties long hair into an actual knot for a modern, sculptural shape. Pull the hair into a ponytail, loop it into a loose knot, and tuck the ends underneath with pins. Long hair makes a satisfyingly large knot with visible dimension. It suits charity galas and art events where a slightly fashion-forward shape fits the crowd. Keep the knot neat; a sloppy knot reads casual instead of classy.
Try this: loop the knot twice for extra size, then pin the center firmly so the shape does not collapse.
Difficulty: Easy · Cost: $0–$8 (salon: $50–$95)
50. Cinnamon Bun
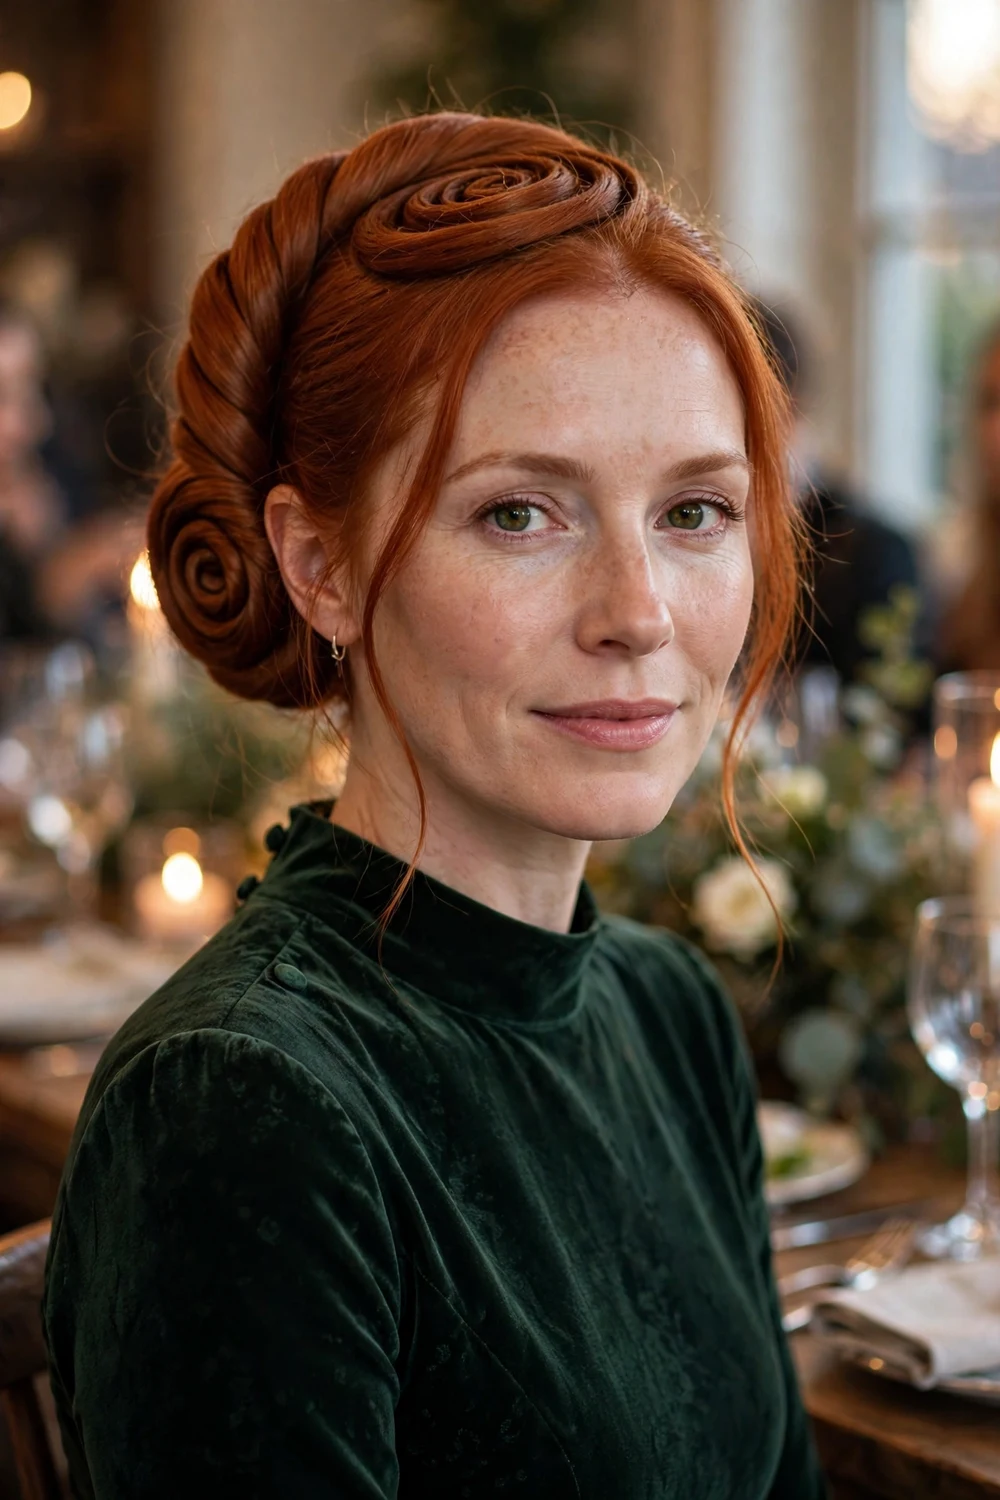
The cinnamon bun twists the full length into a flat spiral coil, like its namesake pastry, for a neat and striking shape. Comb the hair smooth, twist the entire length tightly, and roll it flat against the head, pinning around the edges. Long hair creates a wide, impressive coil. It pairs well with gowns and backless dresses, since the flat profile keeps the focus on the outfit.
Try this: twist the hair in one direction only and keep the tension even so the coil lies flat and symmetrical.
Difficulty: Easy · Cost: $0–$8 (salon: $50–$95)
51. Messy Updo Bun
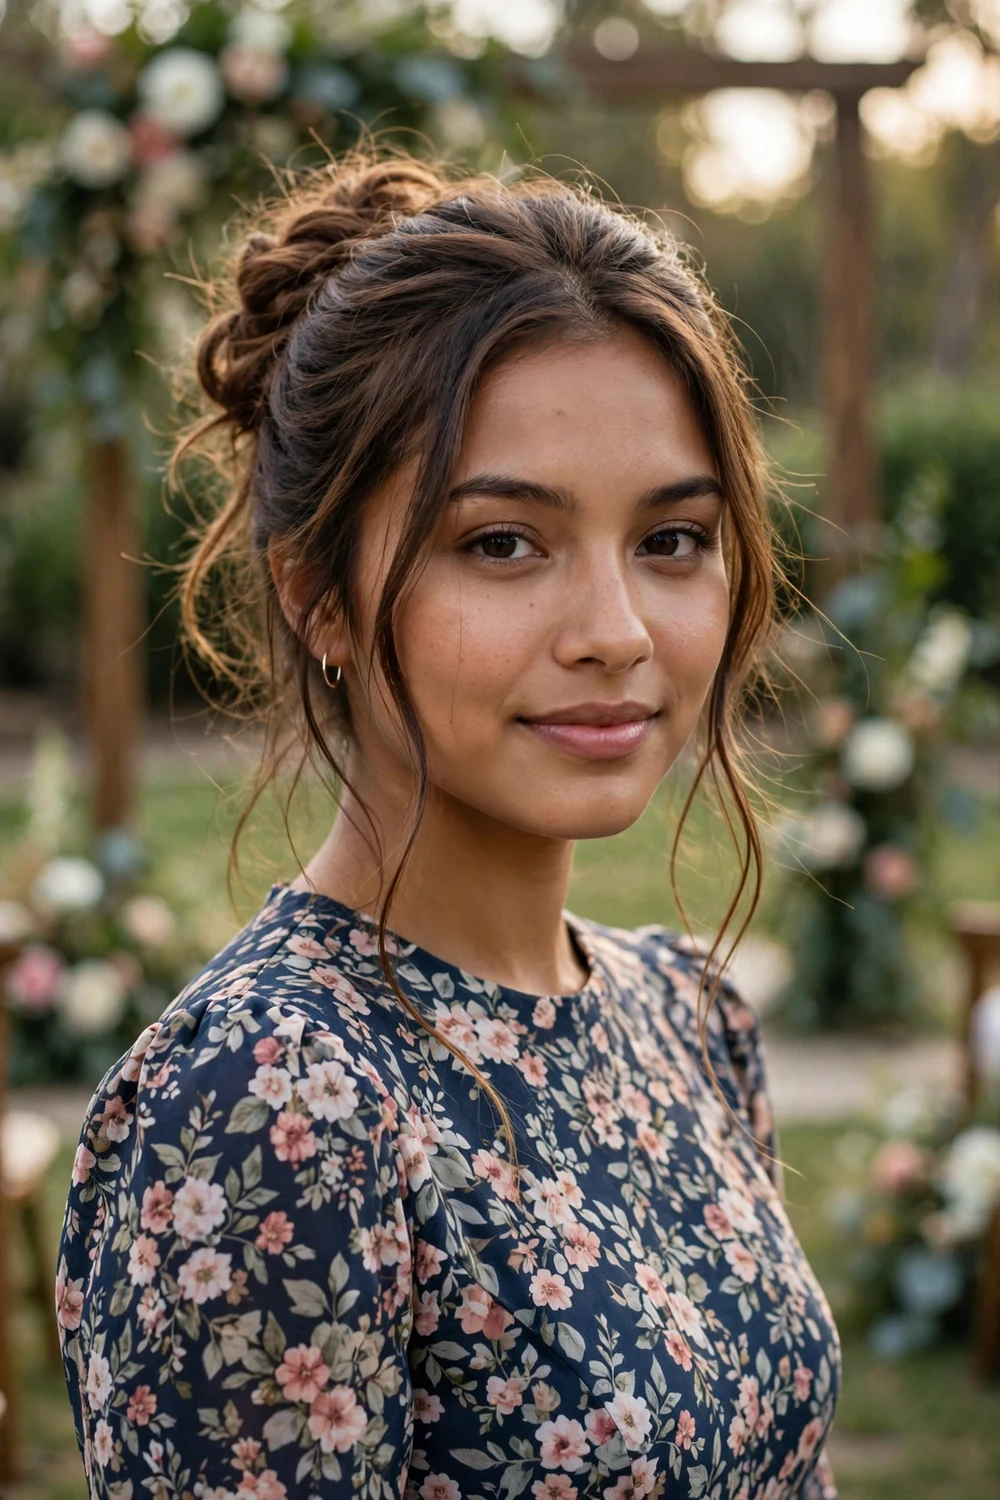
The messy updo bun keeps a pinned-up shape but relaxes the finish with soft, undone texture. Gather the hair loosely, twist and pin in sections, then pull pieces free for softness. The key is controlled looseness: the base must be secure even though the surface looks casual. It suits outdoor weddings and relaxed-formal parties where a stiff updo would feel overdressed.
Try this: pin the base firmly first, then pull pieces free only afterward, so the looseness is deliberate and the style still holds.
Difficulty: Easy · Cost: $0–$10 (salon: $55–$100)
52. Curly Updo
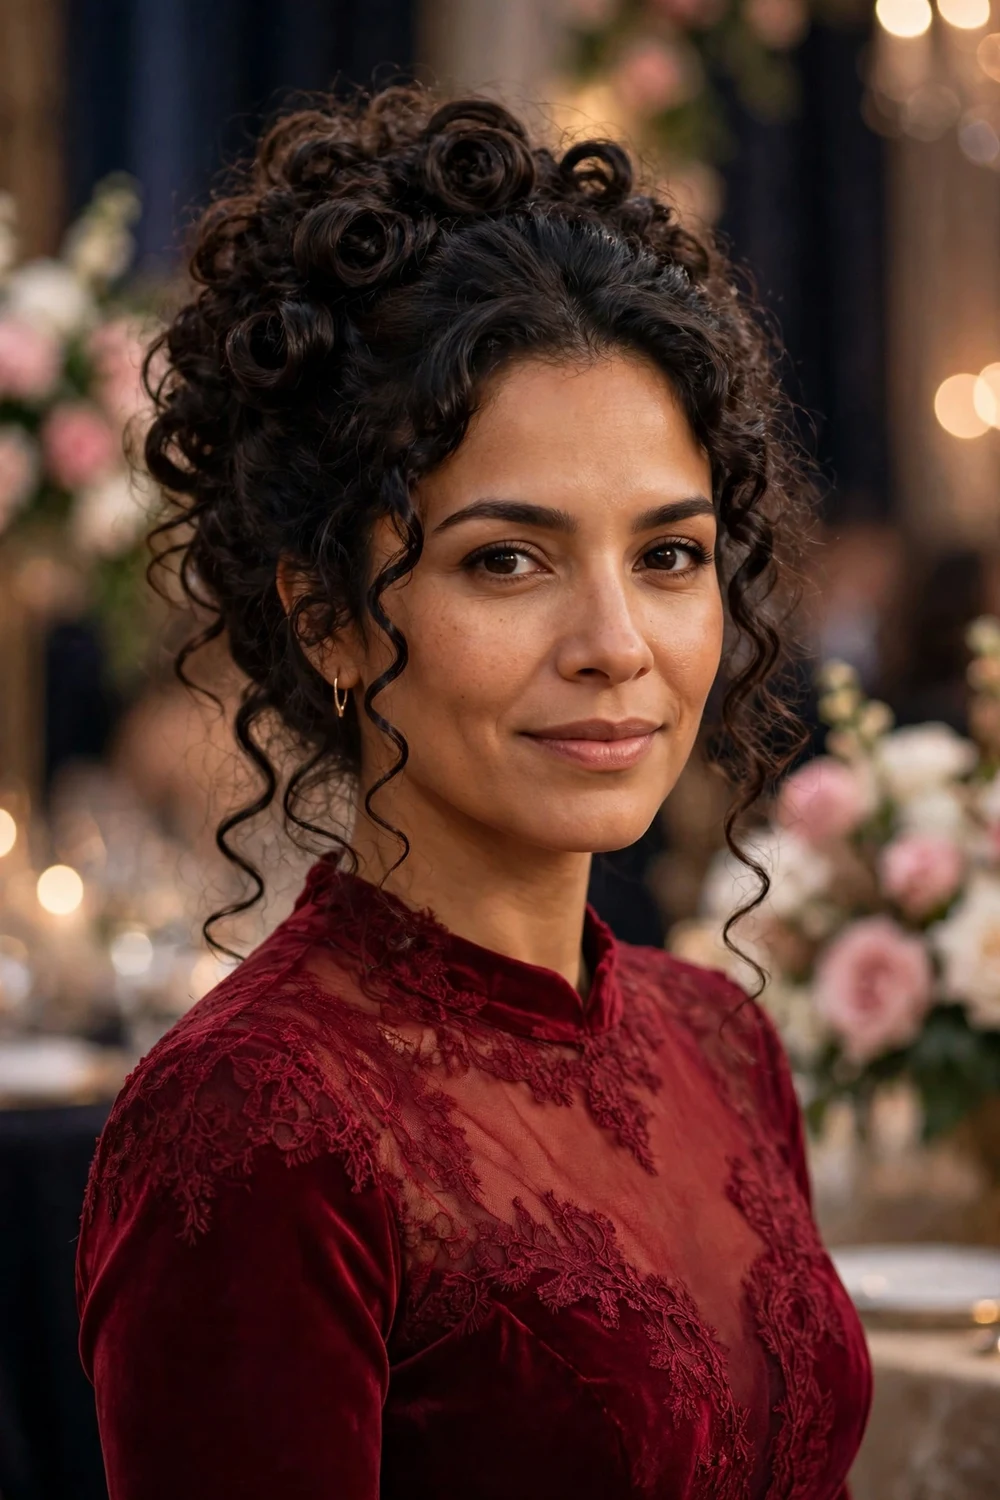
The curly updo pins long curls up in soft clusters for a romantic, voluminous shape. Curl the hair first if it is not naturally curly (heat protectant first), then gather curl clumps and pin them loosely at the back of the head. The curls provide the texture, so the pinning can stay simple. It suits galas and weddings where softness is the goal, and it flatters naturally curly and coily hair.
Try this: pin curl clumps rather than individual curls so the shape looks full instead of stringy.
Difficulty: Medium · Cost: $0–$10 (salon: $60–$110)
53. Pinned-Curl Updo with Lifted Front
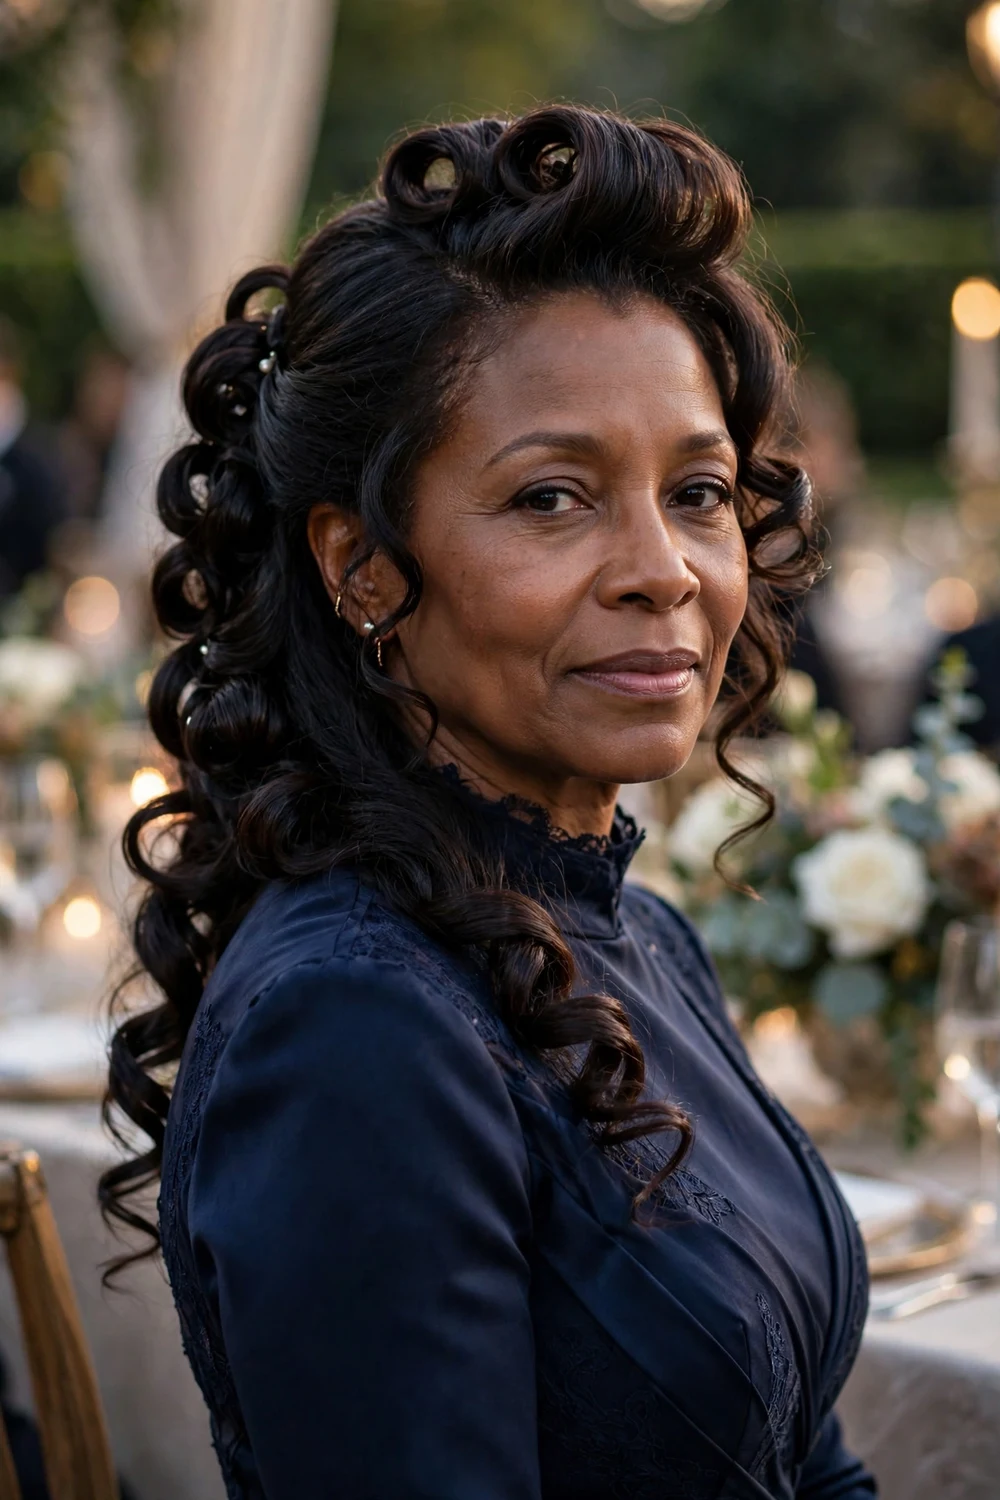
This updo lifts the front section for height while the back becomes a cluster of pinned curls. Backcomb the front lightly and pin it with lift at the crown, then curl the lengths (heat protectant first) and pin the curls up in the back. The lifted front opens the face and adds formality. It suits mature formal events and anyone who wants height without a full bouffant.
Try this: set the lifted front with strong-hold spray before pinning the back so the height does not sink as the night goes on.
Difficulty: Hard · Cost: $0–$12 (salon: $70–$130)
54. Sculpted Pompadour
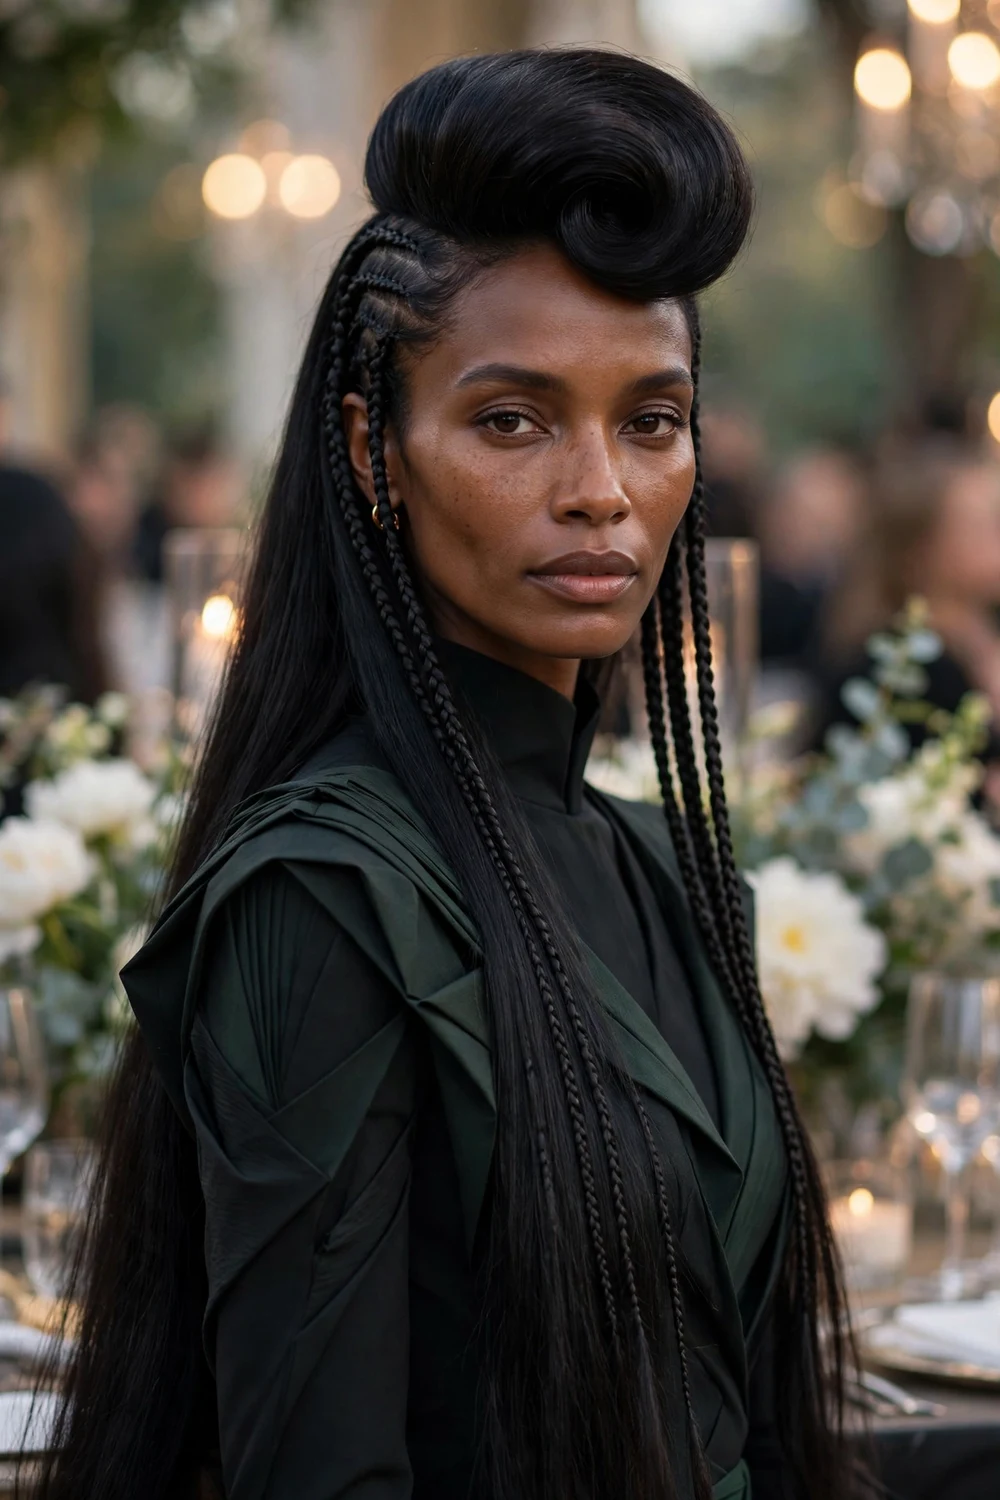
The sculpted pompadour sweeps the front up into a high, rounded shape, with slim braids along the sides for detail. Backcomb the front section, smooth it over padding or a light tease, and pin, then add thin accent braids from each temple. The height is dramatic and unmistakably fancy. It suits fashion galas and bold party looks where the hair should make a statement.
Try this: use a strong-hold pomade on the sides before braiding so the accent braids stay sleek against the head.
Difficulty: Hard · Cost: $0–$12 (salon: $70–$140)
55. Bouffant with Bow
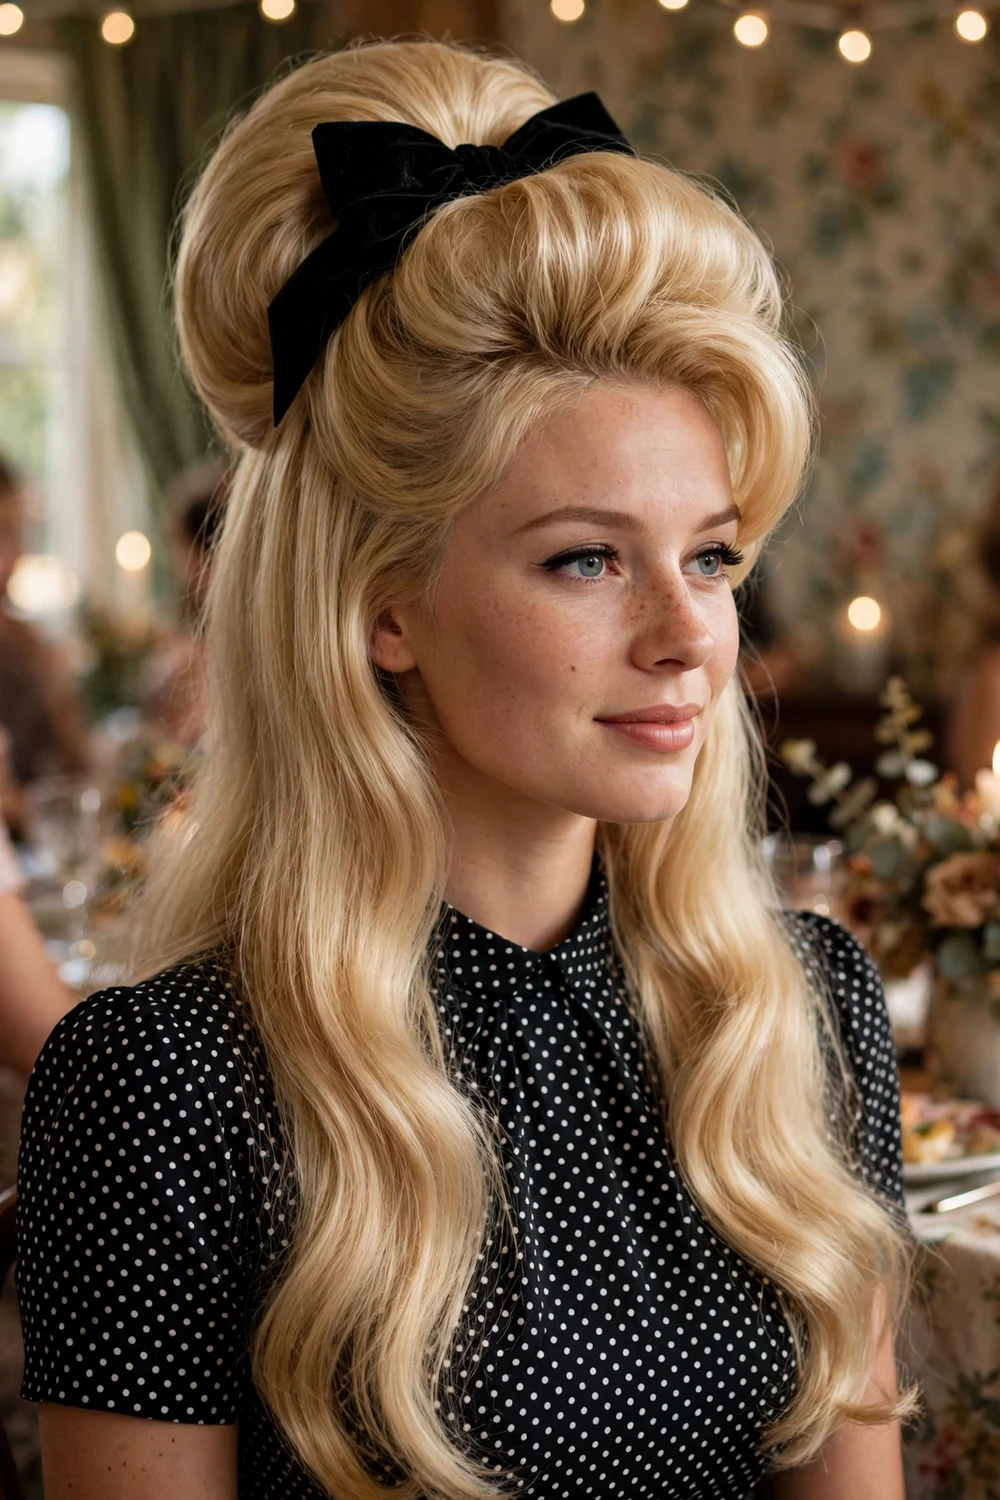
The bouffant builds big crown volume and finishes it with a bow for retro party glamour. Tease the crown section thoroughly, smooth the top layer over it, and secure the back, then tie a velvet or satin bow at the base of the volume. The bow turns the height into a deliberate style statement. It suits retro-themed parties and anyone channeling vintage glamour with long hair.
Try this: choose a bow in a fabric that matches your outfit (velvet for winter, satin for summer) so it reads intentional.
Difficulty: Medium · Cost: $5–$15 (salon: $55–$105)
56. French Twist
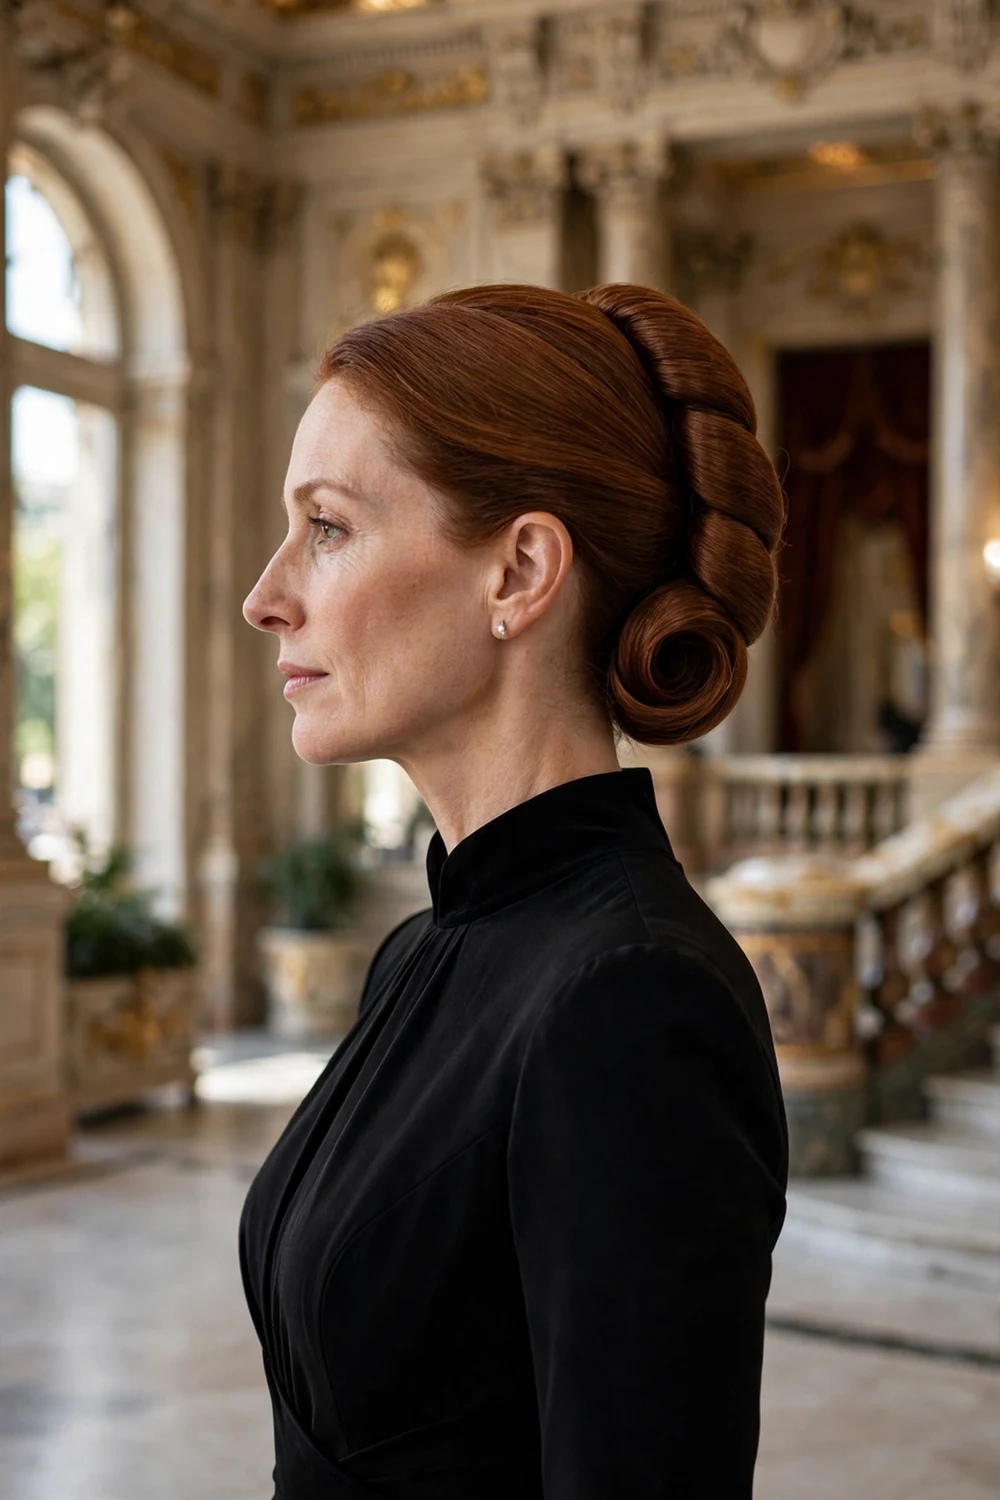
The French twist folds long hair into one vertical roll along the back of the head, one of the slimmest fancy updos. Sweep the hair to one side, roll it upward, and pin along the seam so the roll looks seamless. It flatters high necklines and collared formal wear because nothing competes around the shoulders. Long hair gives the roll a fuller, more substantial finish than shorter lengths can manage.
Try this: smooth the surface with a boar-bristle brush and a light mist of flexible-hold spray before pinning for a polished finish.
Difficulty: Medium · Cost: $0–$10 (salon: $60–$110)
57. French Pin Updo
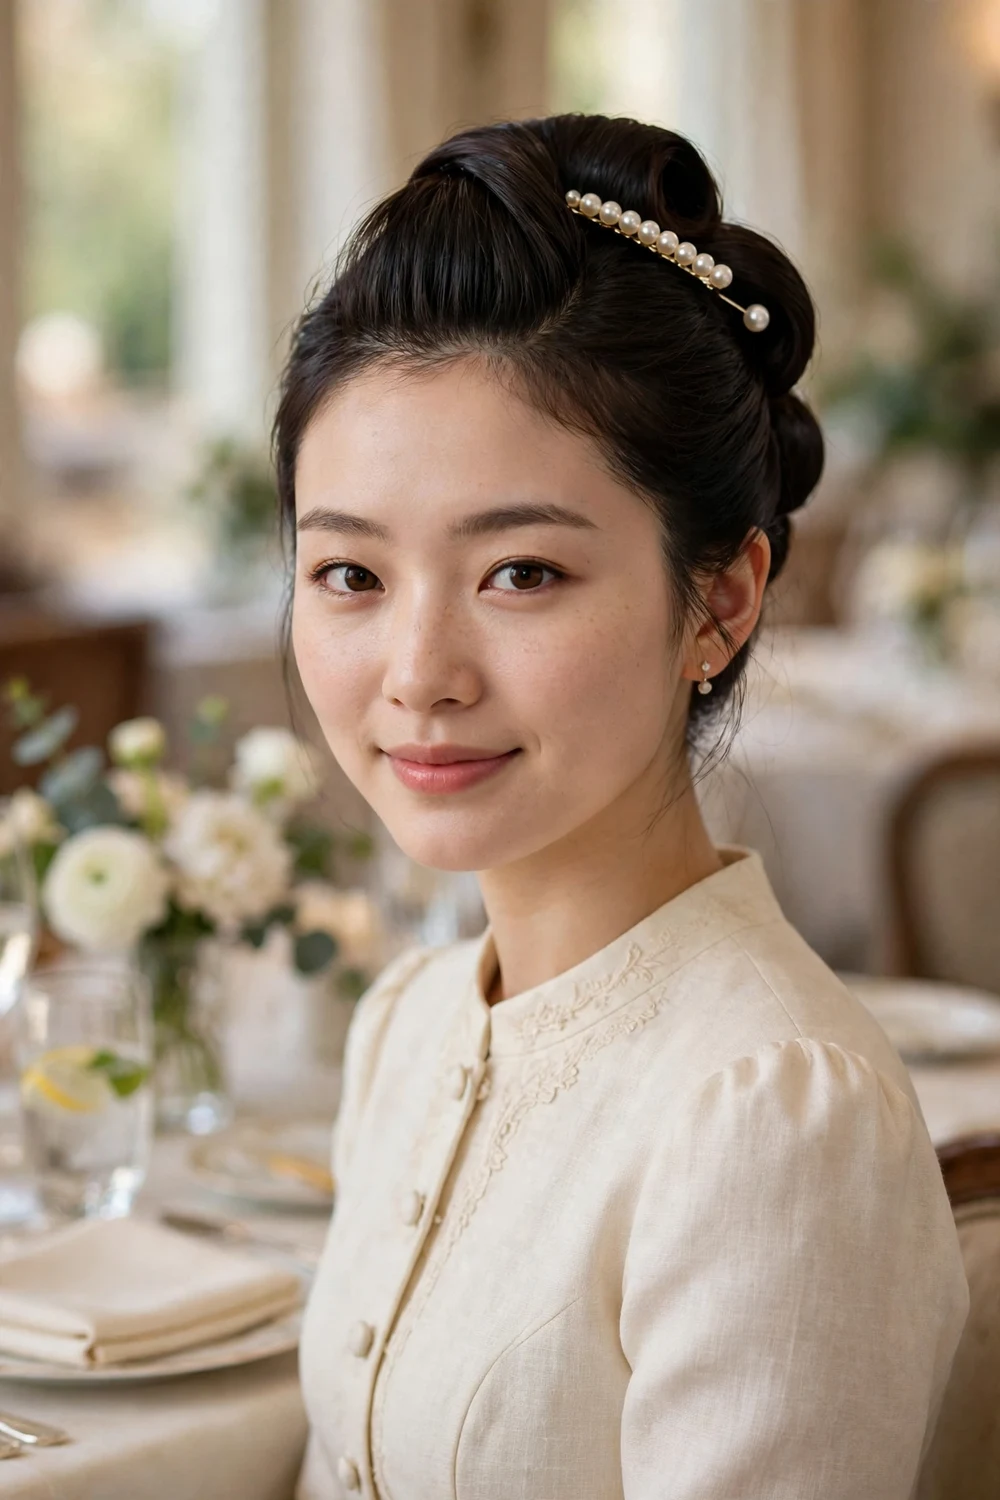
The French pin updo twists long hair into a sleek roll secured with a single decorative French pin or hair fork. Twist the length upward, fold it against the head, and spear the pin through the twist to lock it. The pin itself becomes the jewelry: choose one with pearls, crystals, or an sculptural metal design. It suits formal luncheons and dinners where understated polish matters.
Try this: twist the hair firmly before inserting the pin, since the pin grips twisted hair far better than loose hair.
Difficulty: Easy · Cost: $10–$25 (salon: $60–$110)
58. Rolled Updo with Thin Headband

This updo rolls long hair into a smooth tucked shape and finishes it with a thin metallic headband. Roll the lengths upward and pin along the roll, then slide a slim gold or silver headband into place a couple of inches behind the hairline. The headband adds the fancy element while the rolled base keeps everything secure. It suits wedding guests who want an easy style with a dressed-up finish.
Try this: place the headband after the updo is fully pinned, and anchor it with two bobby pins crossed behind each ear.
Difficulty: Easy · Cost: $5–$18 (salon: $55–$100)
59. Tiara-Topped High Bun
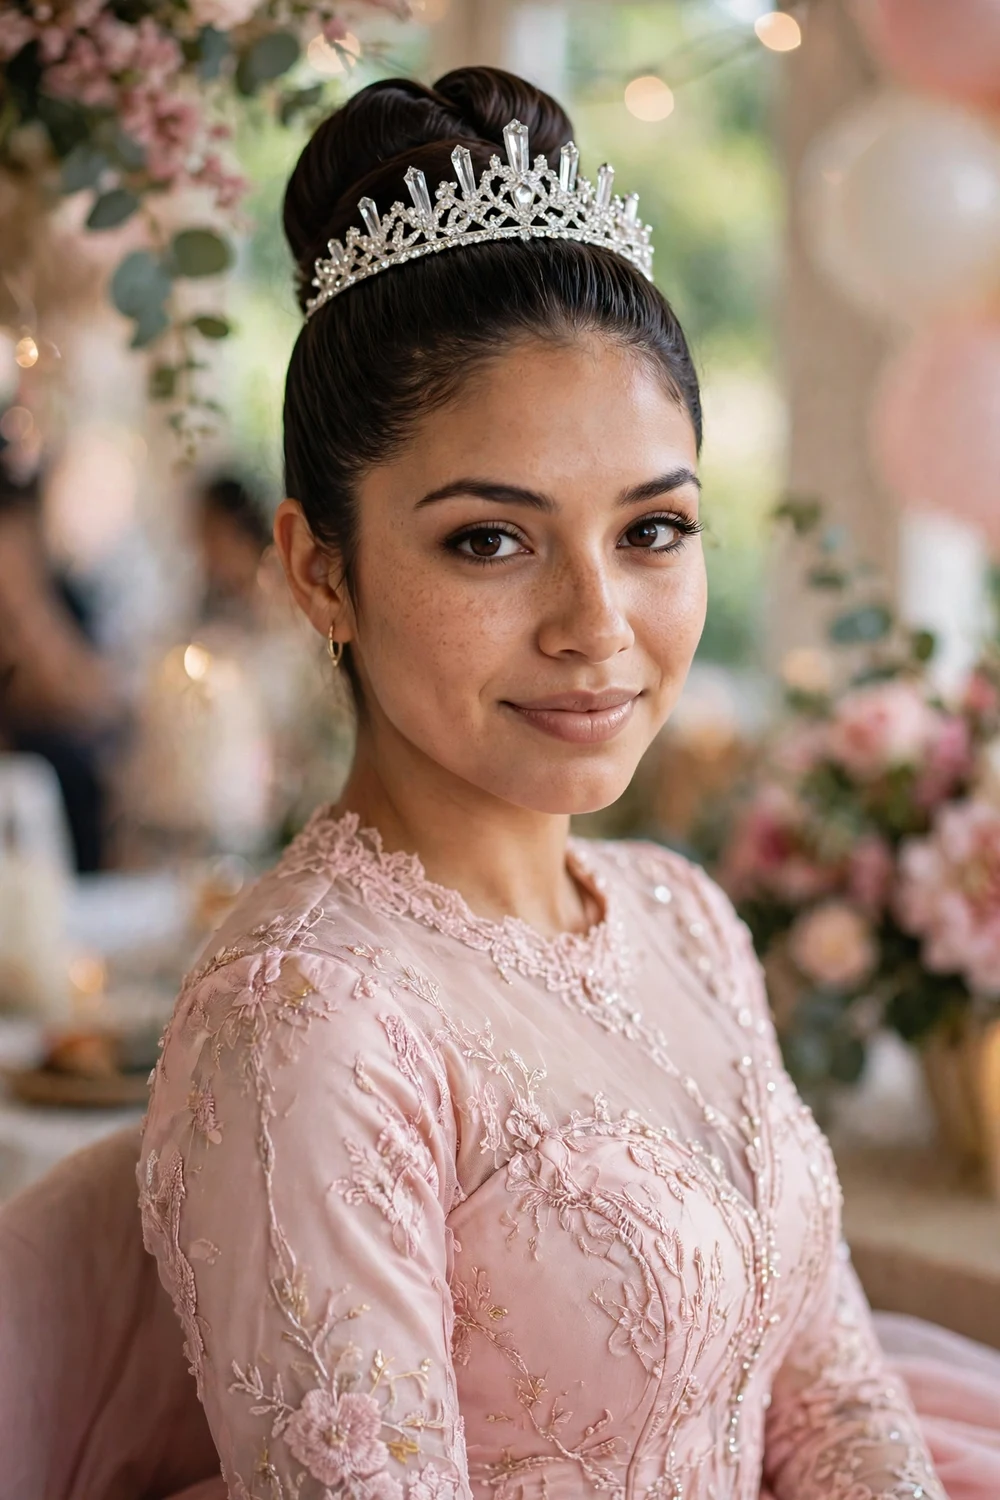
A smooth high bun crowned with a tiara is the ultimate princess-event look. Build a sleek high bun first, getting it fully secure, then position the tiara just in front of the bun and pin it at both ends. The bun gives the tiara a stable base to sit on. It suits quinceañeras, proms, and bridal looks where a tiara is part of the tradition.
Try this: choose a tiara with loops at the ends and thread bobby pins through them into the hair so it cannot shift.
Difficulty: Easy · Cost: $10–$30 (salon: $70–$130)
60. Sleek High Bun
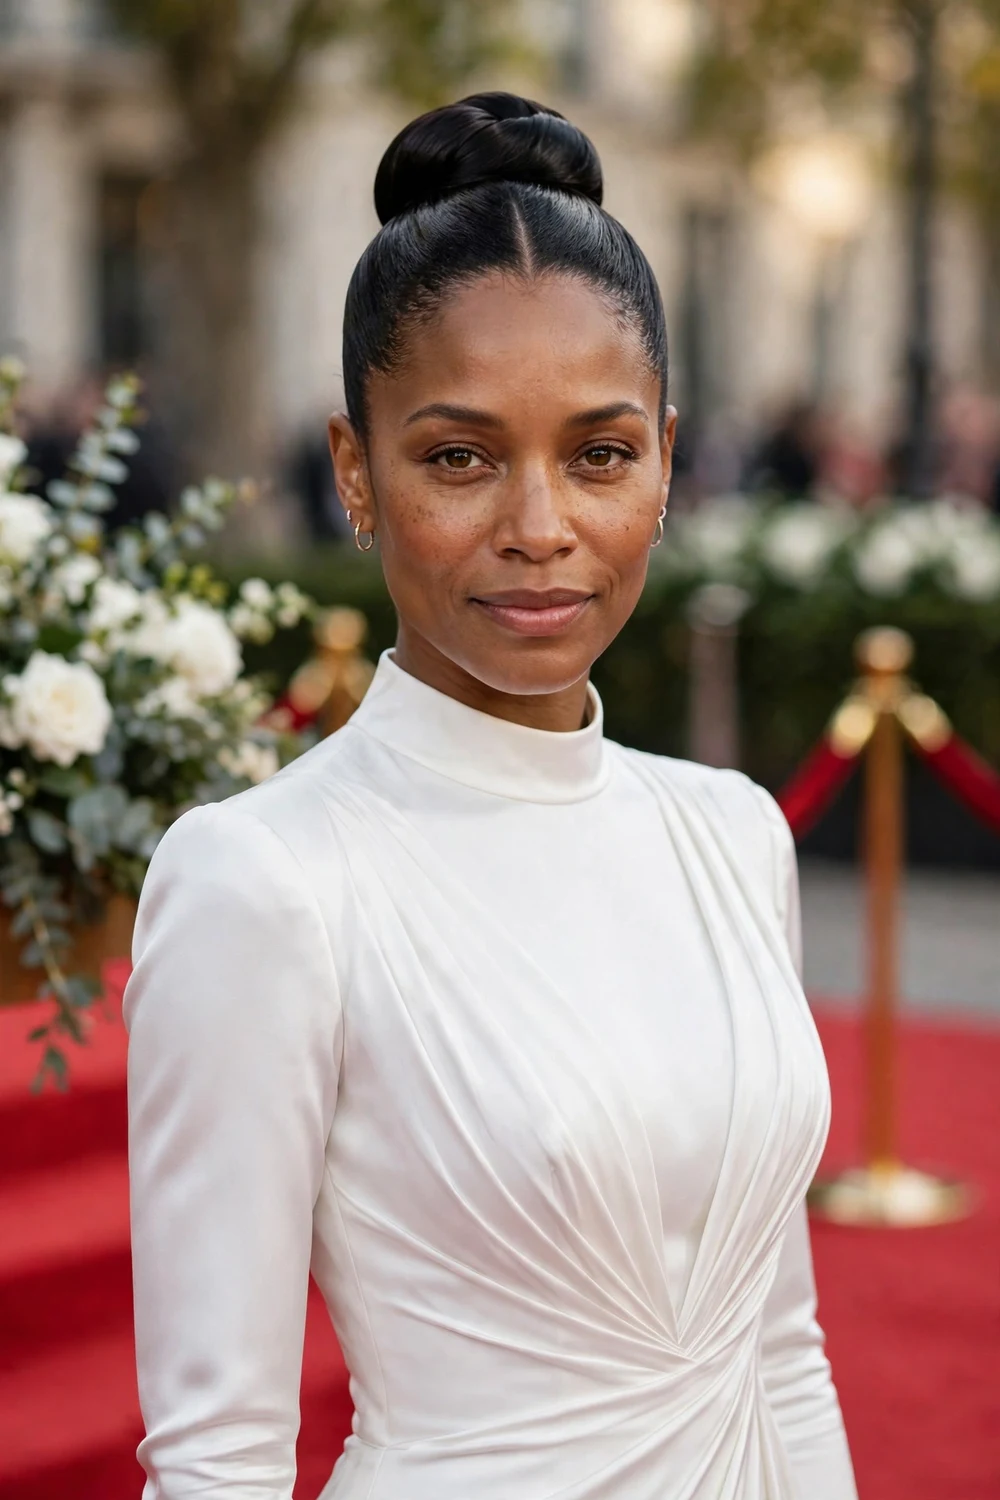
The sleek high bun sits on the crown with a glass-smooth finish, pulling the face open and showing off the neck and shoulders. Brush the hair upward into a tight ponytail, smooth flyaways with gel on a fine-tooth comb, then wrap the length into a firm round bun. Because the silhouette is so clean, makeup and earrings carry the look, which is why it photographs so well at galas and red-carpet events.
Try this: brush the hair up in sections, smoothing each one before adding it to the ponytail, to avoid bumps under the surface.
Difficulty: Easy · Cost: $0–$10 (salon: $55–$95)
61. Box-Braided High Bun
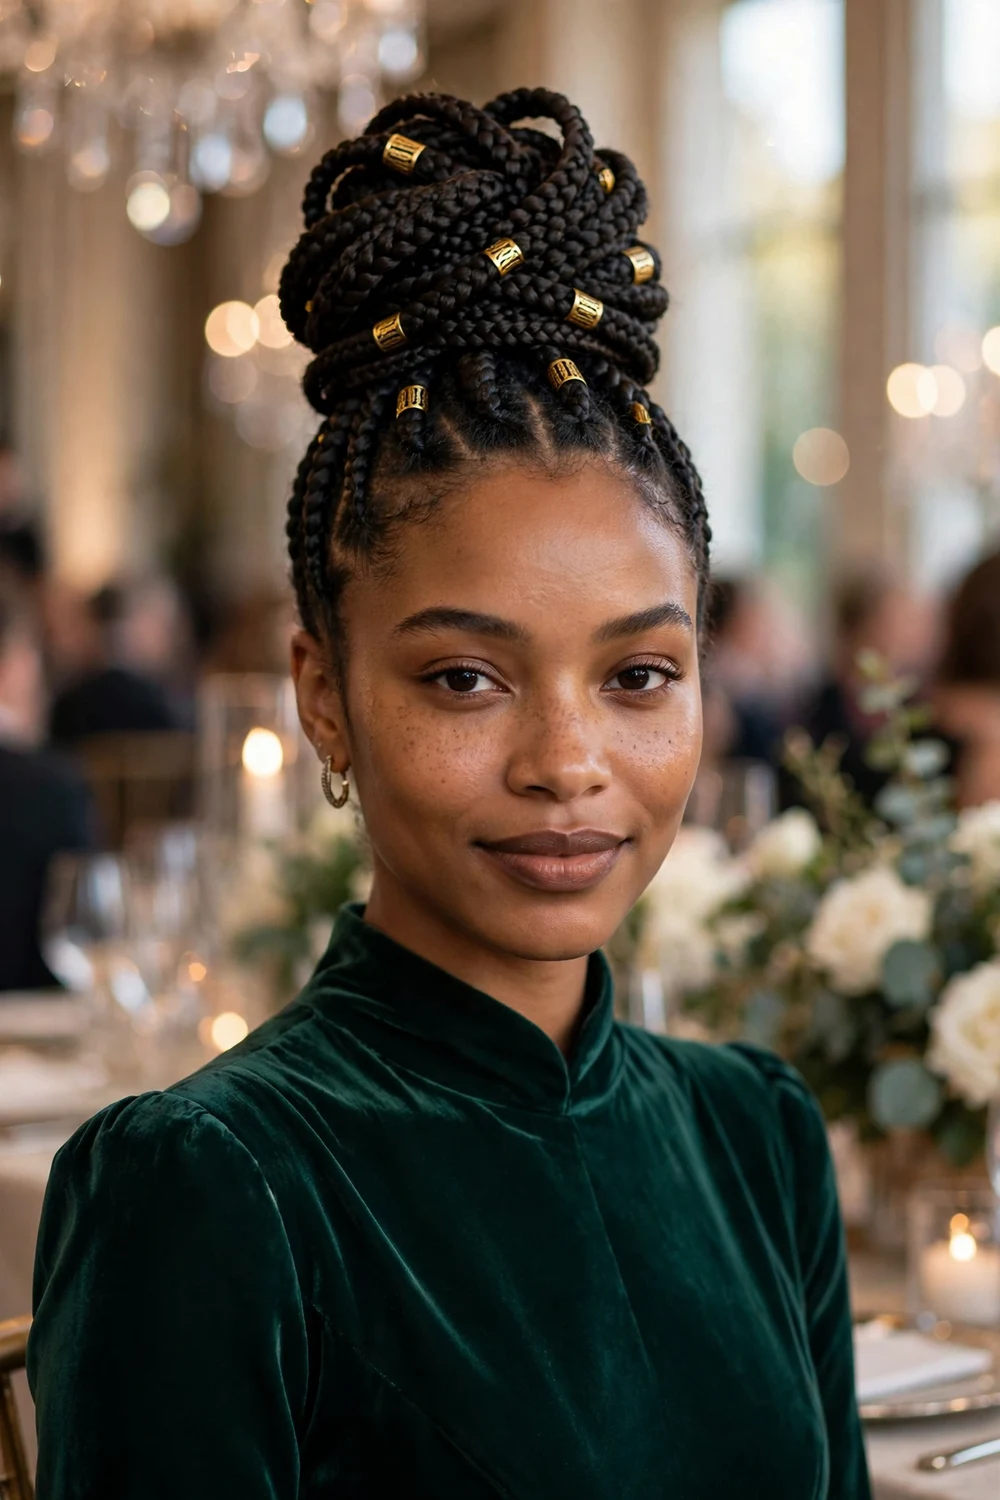
Long box braids wrapped into a high bun create a regal, sculptural style with rich texture. Gather the braids high, wrap them around the base in layers, and pin or tuck the ends. The braided texture gives the bun dimension that loose hair cannot match. Add gold cuffs to a few braids for extra event shine. For more updos created with textured hair in mind, see our updo hairstyles for Black women guide.
Try this: wrap the braids in the same direction and tuck each end under the previous layer so the bun looks seamless.
Difficulty: Medium · Cost: $0–$15 (salon: $60–$120)
62. Pink Curly Bun
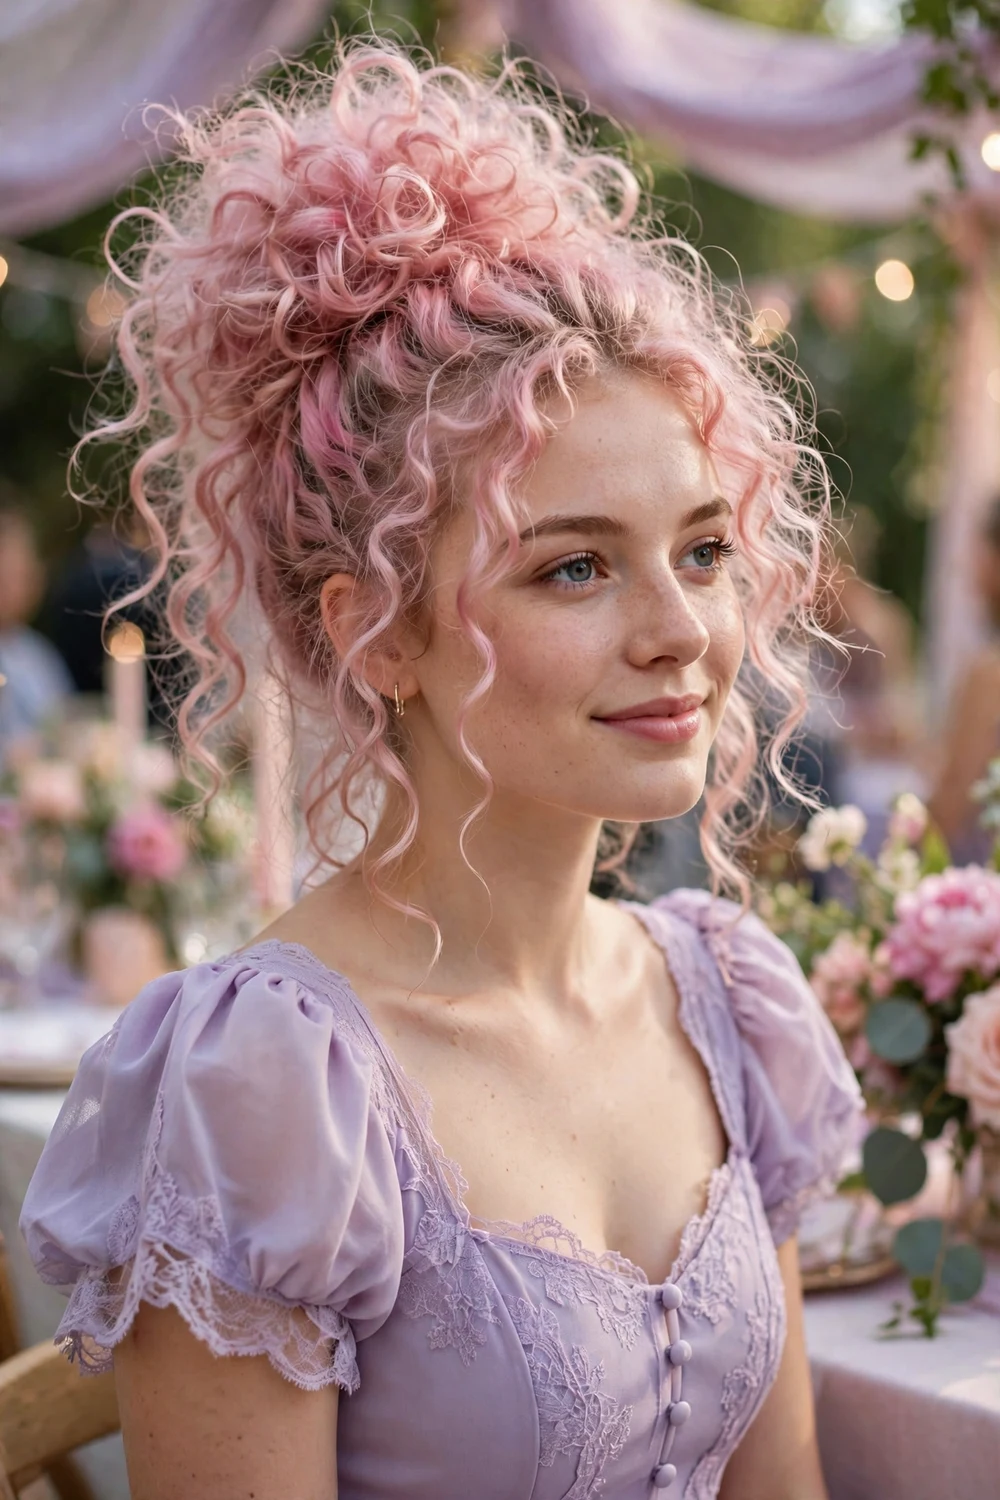
A curly bun in a pink tint is fancy with a playful edge: soft curls piled high in a full, romantic shape. Curl the hair (heat protectant first), gather loosely at the crown, and pin the curls in a round, airy bun. Use a temporary pink tint, wash-out color, or clip-in streaks rather than permanent dye for a one-night look. It suits themed parties and fashion-forward events where the hair color is part of the fun.
Try this: apply the temporary color to the curled lengths before pinning so the pink shows evenly through the bun.
Difficulty: Medium · Cost: $8–$20 (salon: $70–$130)
63. Bubble Braids
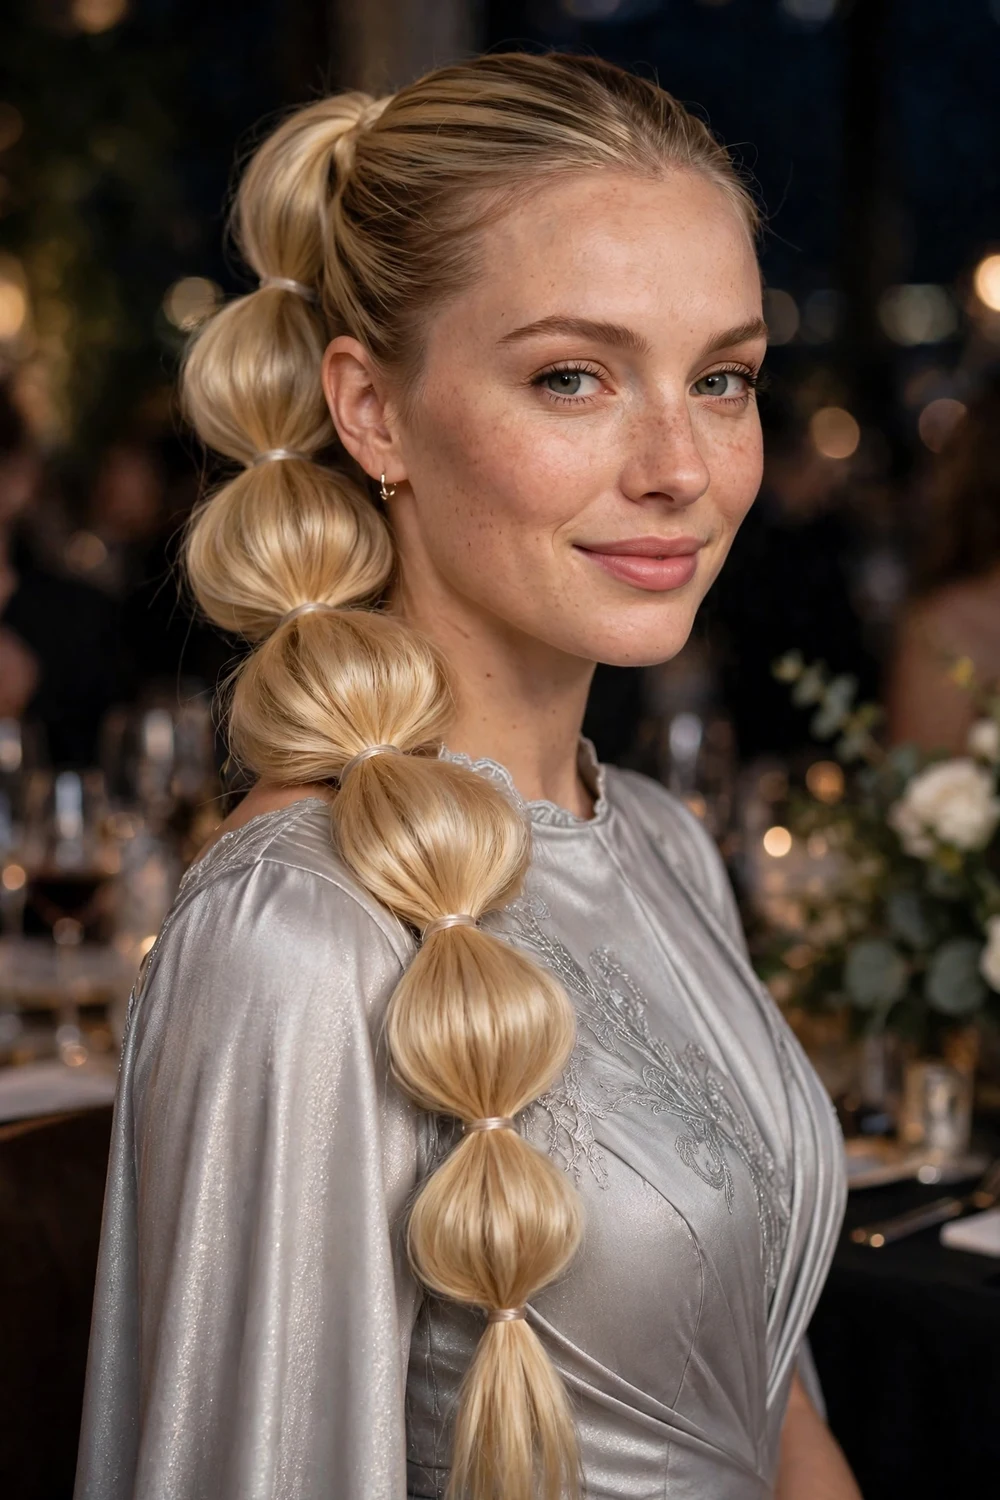
Bubble braids section a ponytail with elastics at even intervals, then puff each section for a beaded, graphic effect. Secure a sleek high or low ponytail, add elastics every two inches, and gently pull each segment wider. Wrap small strands of hair around each elastic to hide them. The sculptural result suits awards after-parties and fashion events where a bold, modern shape fits the mood.
Try this: use clear mini elastics and keep the spacing perfectly even; uneven bubbles are the most common mistake.
Difficulty: Easy · Cost: $0–$8 (salon: $45–$85)
How to Choose the Right Fancy Style
Start with the event’s formality. Black-tie galas and weddings call for the most structured options (chignon, French twist, braided crown), while proms, date nights, and cocktail parties leave room for glam ponytails, waves, and half-up looks. As a rule, high necklines look best with hair worn up, and open necklines suit down styles or half-up looks that frame the collarbone.
Next, weigh your hair’s texture and the venue. Very thick or heavy hair holds best in low buns and braided updos that anchor the weight at the nape. Outdoor events favor pinned styles that will not wilt in humidity or wind, while indoor evening events are kind to down styles and waves. If rain or humidity is likely, pick a braided or twisted style over a sleek one.
Finally, be honest about time and skill. If the event is in an hour, pick a style you have done before rather than attempting a first-time updo. If you are booking a stylist, bring reference photos and do a trial run with the exact accessories you plan to wear. Pack an emergency kit: bobby pins, a travel-size hairspray, and a small comb handle most mid-event fixes.
Fancy Long Hairstyles at a Glance
| Style | Best event | Time needed | DIY or salon |
|---|---|---|---|
| Hollywood Waves | Weddings, galas | 45–60 min | Either |
| Sleek High Ponytail | Proms, parties | 15–20 min | DIY-friendly |
| Braided Crown | Outdoor weddings | 25–35 min | DIY-friendly |
| Classic Chignon | Black-tie events | 20–30 min | Either |
| Jeweled Low Bun | Evening weddings | 20–30 min | DIY-friendly |
| Glass-Hair Sleek Straight | Red-carpet parties | 30–45 min | DIY-friendly |
| Messy Updo Bun | Casual-formal parties | 15–25 min | DIY-friendly |
| Tiara-Topped High Bun | Quinceañeras, proms | 20–30 min | DIY-friendly |
Frequently Asked Questions
What is the fanciest hairstyle for long hair?
Hollywood waves and the classic chignon are the two most reliably fancy choices for long hair. Hollywood waves deliver red-carpet drama with glossy, uniform S-waves, while a chignon or French twist gives black-tie polish that lasts all night. For maximum impact with accessories, a jeweled low bun or tiara-topped high bun reads fancy instantly.
How do I make a fancy hairstyle last all night on long hair?
Build the style on second-day hair or add texturizing spray, since freshly washed hair slips out of pins. Pin in an X pattern with bobby pins that match your hair color, finish with strong-hold hairspray, and carry extra pins plus a travel-size spray for touch-ups. Pinned updos and braided styles naturally outlast down styles on long hair.
Can I do fancy hairstyles for long hair at home?
Yes, most of them. Sleek ponytails, half-up styles, twist-backs, bubble braids, and simple low buns take 15 to 30 minutes with practice. Book a stylist for intricate braided updos, sculpted pompadours, and wedding-day hair, and always do a trial run before the event. A professional fancy updo for long hair usually costs $60 to $150.
What accessories make long hair look fancy?
Jeweled hairpins, pearl combs, fresh flowers, tiaras, velvet bows, and thin metallic headbands all turn simple styles into event looks. Place accessories after the base style is fully secure and finished with hairspray. Anchor heavier pieces with crossed bobby pins underneath so they cannot slide out during the event.
How long does a fancy updo take on long hair?
Simple buns and twists take 15 to 25 minutes, most braided and half-up styles take 25 to 40 minutes, and intricate updos like Hollywood waves or sculpted styles take 45 to 60 minutes. Long hair adds time because of the sheer amount of hair to smooth, curl, or pin. Do a timed trial run before the event day so you know your real number.
Final Thoughts
Fancy hairstyles for long hair come down to finish and structure: smooth roots, set shapes, and accessories placed with intent. Pick the lane that fits your event, do a trial run, and pack extra pins. The hair is long enough to do the dramatic work for you.

