


A hoodie changes how almost every hairstyle behaves. The hood adds bulk behind the neck, the collar pushes ponytails and clips forward, and loose hair left down the back rubs against fleece until it tangles at the nape. The styles that work share a few traits: they sit low and flat, they keep hair forward or fully contained, or they use the hood itself as a frame around the face.
This list has 25 hoodie hairstyle ideas, grouped by how you wear the hood. Some are built for the hood up, with hair down, tucked, or spilling out at the front. Others are built for the hood down, with low buns, flat braids, and nape-level ponytails that leave room for the hood to go up later. If cold weather headwear is on your mind too, the cozy beanie hairstyles for women roundup covers the hat version of the same problem.
Quick Takeaways
- Hood up works best with hair down, tucked in, or in a very low, flat style. High buns and high ponytails get pushed forward by the hood and collar.
- Hood down works best with hair up and low: nape buns, low ponytails, and flat braids keep the back of the neck clear and stop tangles forming under the resting hood.
- Bulk at the nape is the main thing to avoid. Anything that sits at the base of the neck should be slim, flat, or moved to the side.
- Braids are the most hood-proof option. Dutch, French, side, and fishtail braids stay flat, survive the hood going up and down, and need no fixing during the day.
- Pulling hair forward over the shoulders and chest stops most nape tangles, because the lengths rest on the front of the hoodie instead of rubbing behind the neck.
Hood Up or Hood Down: Pick Your Group First
Start by deciding how the hood will spend most of the day. If the hood stays up against wind or cold, choose from the down and tucked styles: tucked-in hair, loose waves pulled forward, natural curls spilling from the hood, and the short bob smoothed under the collar. These keep the inside of the hood smooth, so the hood sits close to the head and frames the face.
If the hood stays down and only goes up for short spells, choose from the low and flat up styles: nape buns, low ponytails, flat claw clip twists, and braids. The hood can still pull up over them without a lump, and it drops back down without dragging the style out of place. For longer winter styles that pair with coats and scarves as well, the winter hairstyles for long hair list covers the cold season options in full.
1. Tucked-In Hoodie Hair with Front Pieces Out

Put the hoodie on first, then gather the lengths and tuck them inside the collar at the sides and back, so the hair sits against the upper back under the fabric. Pull two front pieces forward over the chest. The tucked lengths stay still, which cuts down on friction, static, and the knots that form when loose hair rubs on fleece all day.
This works with straight, wavy, and curly hair at medium length or longer. It suits oversized hoodies best, because the roomier collar holds the tucked hair without a visible bulge at the back.
Try this: Tuck the hair in after the hoodie is fully on, and leave the front pieces out from the start. Pulling them out later drags the tucked section loose.
Difficulty: Low | Cost: $ | Time: 2 minutes
2. Low Flat Claw Clip Twist for Hoodie Collars

Gather the hair as a low ponytail at the nape, twist it upward once, fold the twist flat against the back of the head, and secure it with a large claw clip placed low. Keeping the clip low and flat is the whole point: a clip placed at mid-head height presses against the hoodie collar and gets shoved forward every time the hood moves.
The twist holds second and third day hair well, and the ends can poke out at the top of the clip for a softer finish. On rushed days it pairs well with the quick routines in the easy short hairstyles for busy mornings list, since both are built around two minute styling.
Try this: Choose a flatter clip profile rather than a deep rounded one. Flat clips sit closer to the head, lean back against headrests with less pressure, and clear the hood seam.
Difficulty: Low | Cost: $ | Time: 3 minutes
3. Sleek Low Nape Bun Under a Hoodie

Part the hair in the center or to the side, brush it down to the nape, tie a low ponytail, then twist the length into a small, tight bun and pin it flat. The bun sits below the collar line, so the hood rests above it and can still pull up cleanly. The smooth top gives a plain hoodie a tidy, deliberate finish.
A small amount of gel or smoothing cream along the part and hairline keeps flyaways down. Because the bun is compact, it adds almost no bulk at the nape, which is where hoodies feel tight first.
Try this: Secure the bun with a second small elastic over the twist before pinning. The elastic holds the shape if a pin slips while the hood moves.
Difficulty: Low | Cost: $ | Time: 5 minutes
4. Flip-Through Low Bun for Hoodie Wear
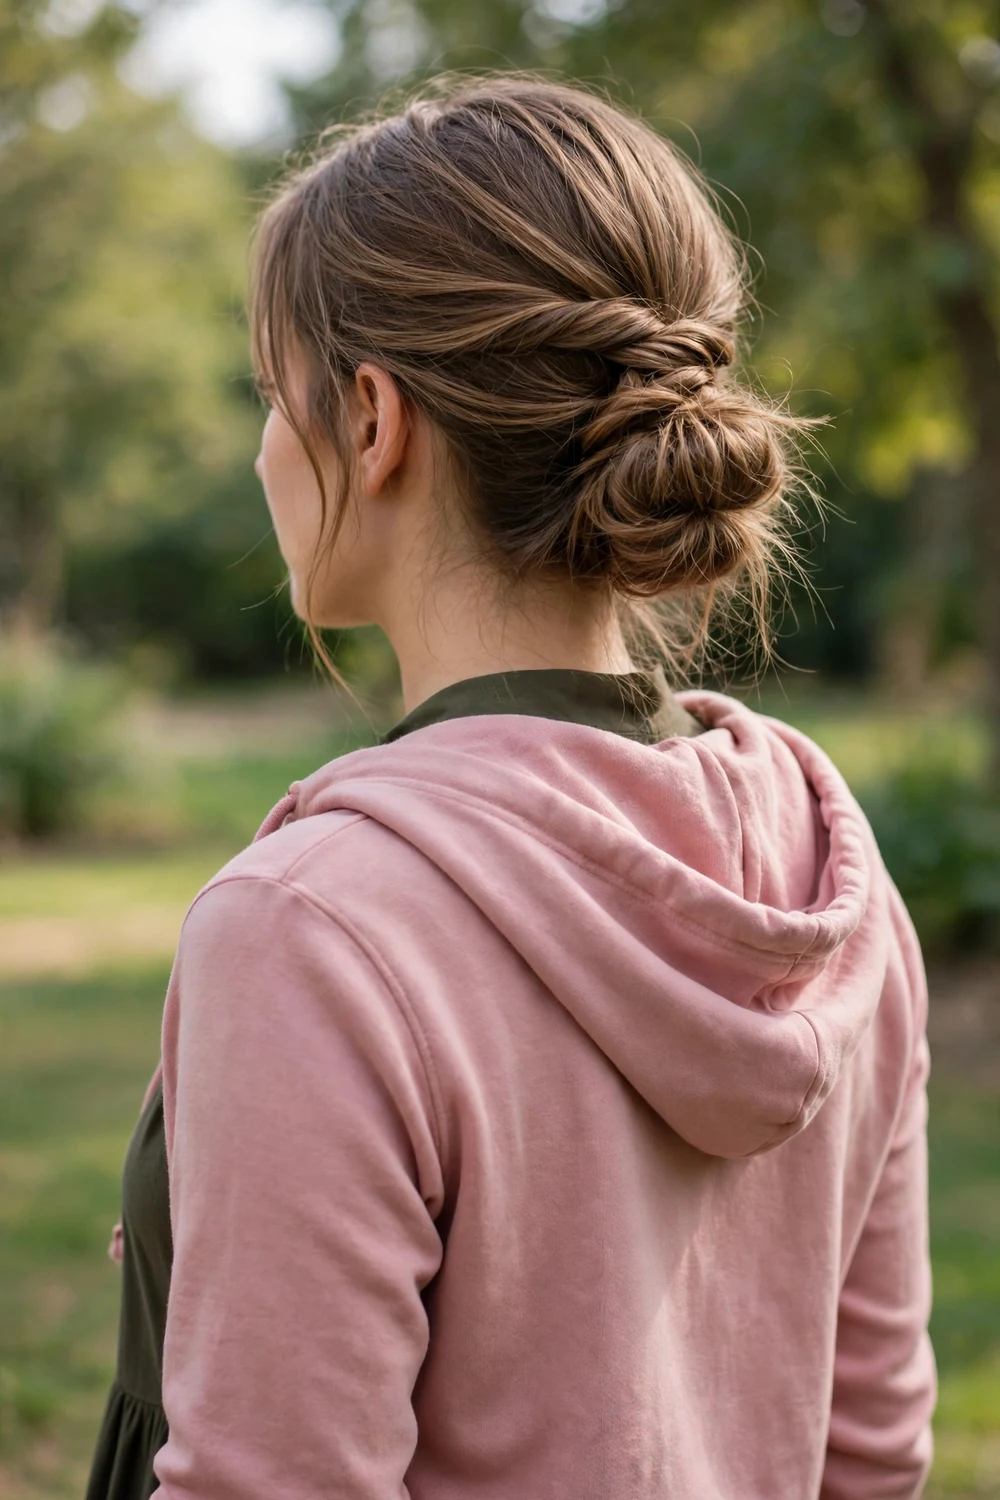
Make a low ponytail, open a small gap in the hair just above the elastic, and flip the ponytail up and through the gap. Then twist the remaining length, wrap it into a bun at the nape, and pin it in place. The flip leaves a twisted section above the bun, so the back view looks detailed while the whole style stays low and flat.
This holds well on medium to long hair with some natural grip. Very silky, freshly washed hair may need a light texturizing spray before the flip so the twist keeps its shape.
Try this: Loosen the flipped section slightly with your fingertips after pinning. A gentle pull at the edges widens the twist and makes the detail read from a distance.
Difficulty: Medium | Cost: $ | Time: 7 minutes
5. Loose Waves Pulled Forward over a Hoodie

Divide the hair into two sections and bring both forward over the shoulders so the lengths rest on the chest, on top of the hoodie fabric. With the hair forward, nothing hangs behind the neck to tangle against the resting hood, and the waves frame the front of the hoodie the way a scarf would.
Loose waves hold this position better than pin straight hair, because the bends grip the fabric. Overnight braids and other methods from the heatless hairstyles for long hair guide give the same wave pattern without a curling iron in the morning.
Try this: Pull the hair forward before you put the hood up or down, every time. Moving the lengths first stops them getting trapped and flattened under the hood.
Difficulty: Low | Cost: $ | Time: 5 minutes
6. Sleek Straight Lengths Over a Down Hood

Wear the hair straight and down, draped over the top of the resting hood so the lengths lie flat down the back of the hoodie in one smooth sheet. Thicker, straighter hair suits this best, because the weight keeps the sheet in place and the ends cling less to fleece than fine hair does.
A light smoothing oil through the ends reduces static where hair meets synthetic fabric. If the lengths start to cling and separate, brush them back into one sheet rather than adding more product.
Try this: Smooth the hair after the hoodie is on, and arrange it over the hood in one go. Arranging it before dressing means the hood drags it out of place as it settles.
Difficulty: Low | Cost: $ | Time: 5 minutes
7. Low Nape Ponytail with a Hoodie

Brush the hair back and secure it at the very base of the neck, then bring the ponytail forward over one shoulder. At nape height the elastic sits below the collar pressure point, so the hood stops pushing the ponytail forward, and the forward drape keeps the length off the fleece at the back.
This is the most forgiving ponytail height for hoodies across hair types. Mid and high ponytails fight the collar, while the low version works with the hood up or down with no adjustment.
Try this: Leave two slim pieces out at the front before tying. They soften the hairline and keep the style from reading too severe against a casual hoodie.
Difficulty: Low | Cost: $ | Time: 3 minutes
8. High Ponytail Worn Over a Down Hood

A high ponytail can still work with a hoodie if the hood stays down for the whole wear. Gather the hair high at the crown, secure it firmly, and let the ponytail fall back over the resting hood, so the hood acts as a base under the tail rather than a lump behind it. The result reads sporty and keeps all the hair off the neck and face.
Plan this for gym, training, and errand days when the hood is decoration rather than weather protection. If the hood needs to go up, drop the ponytail to the nape first, because a high tail under a raised hood pushes the whole hood forward.
Try this: Tilt your head back slightly while tying, and secure the elastic at that angle. The tail then falls in line with the hood instead of kinking over it.
Difficulty: Low | Cost: $ | Time: 4 minutes
9. Slicked-Back Ponytail for Zip-Up Hoodies
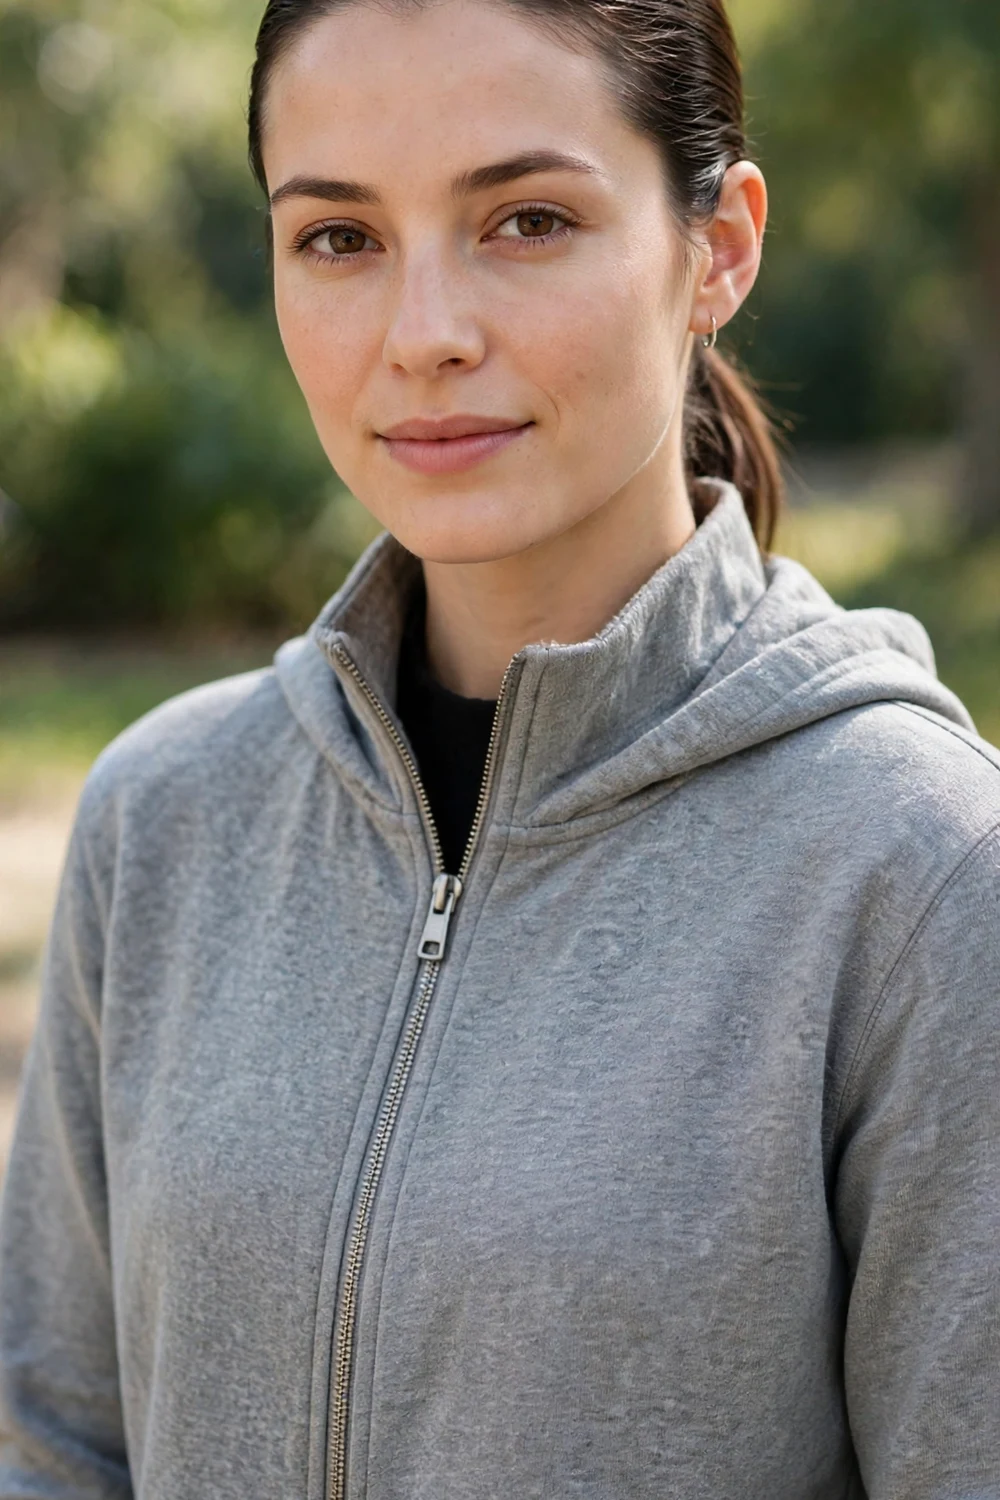
Apply gel or mousse through the front and sides, comb everything straight back, and secure a smooth ponytail at the nape. With no part and no loose strands at the hairline, nothing catches on a zip or collar, and the smooth crown contrasts cleanly with the soft fabric of a zip-up hoodie.
This suits straight, wavy, and relaxed hair that can be smoothed flat. The slicked front also holds up well under a hood pulled up for short periods, since there is no volume at the crown for the hood to crush unevenly.
Try this: Run the gel through damp rather than dry hair. Damp hair smooths flatter, and the finish sets without the crunchy edge dry application can leave.
Difficulty: Low to Medium | Cost: $ | Time: 6 minutes
10. Flat Messy Bun at the Nape for Hoodies

Gather the hair loosely at the nape, twist it into a bun, and press the bun flat as you secure it with an elastic and a pin or two. The messy texture stays, but the shape stays slim, so the bun tucks under the collar line and the hood can move over it. A few strands pulled free at the front keep the finish relaxed.
Second day hair with some natural texture grips best here. Freshly washed, slippery hair benefits from a pinch of dry shampoo at the roots before gathering, for hold rather than volume.
Try this: Position the bun slightly off center, low on one side of the nape. The offset keeps the bun clear of the hood center seam, where pressure is highest.
Difficulty: Low | Cost: $ | Time: 4 minutes
11. Half-Up Mini Bun with the Hood Down

Section the hair from the temples back, twist that top section into a small bun set low at the back of the crown, and leave the rest loose. Setting the mini bun low matters: a bun perched on top of the head collides with a raised hood, while a low one sits in the same flat zone as the other nape styles on this list.
The loose lengths can rest forward over the shoulders or down the back over the resting hood. This is a good middle option for days when fully up feels too bare and fully down keeps falling into the collar.
Try this: Keep the bun small and take less hair than you think. A slim top section keeps the bun flat and leaves enough length below to balance the look.
Difficulty: Low | Cost: $ | Time: 5 minutes
12. Natural Curls Spilling from a Raised Hood

Style the curls as usual with your regular defining products, let them dry fully, then pull the hood up and arrange the curls so they spill out around the face and over the front edges of the hood. The hood becomes a frame, and the curl volume sits where it shows, at the front, rather than compressed at the back.
Dry curls are the key. Putting a hood over damp curls flattens the back section and leaves a clear line between the crushed part and the full front part once the hood comes down.
Try this: Lift the hood up from the front edge and settle it over the curls, rather than dragging it back from the forehead. Lifting preserves the curl shape at the hairline.
Difficulty: Low | Cost: $ | Time: 5 minutes
13. Layered Curls Framing a Hood

Layers give curls a shaped outline, and that outline is what makes this style work with a hood up or down. With the hood down, pull some curls forward over the shoulders. With the hood up, arrange the front layers around the hood opening so the shortest layers sit at the cheeks and the longer ones fall below the collar.
Because the layers graduate, the hair avoids the wide triangle shape that one length curls can form against a bulky hood. Refresh the front layers with a water and conditioner mist if the hood flattens them during the day.
Try this: Shake the curls out at the roots after the hood comes down, using fingertips only. Brushing breaks the curl pattern and turns the frame into frizz.
Difficulty: Low | Cost: $ | Time: 5 minutes
14. Low Side Braid Draped over a Hoodie Front

Sweep all the hair to one side at the nape and braid a standard three strand braid down to the ends, then lay the braid over the shoulder so it rests on the front of the hoodie. Nothing sits at the back of the neck, so the hood moves freely, and the braid stays visible all day instead of hiding under fabric.
Loosen the braid slightly by pulling at the edges of each section once it is secured. The flatter, wider braid sits more comfortably against the chest and reads clearly against plain fleece.
Try this: Start the braid low and loose at the nape. A braid that starts tight and high pulls against the collar every time you turn your head.
Difficulty: Low | Cost: $ | Time: 5 minutes
15. Twin Dutch Braids Flat Under a Hood

Part the hair in the center and Dutch braid each side, crossing the strands under so the braid sits on top of the hair in a raised ridge. Braided close to the scalp, the ridges are slim enough to fit under a raised hood without pressure points, and the style stays secure through activity, wind, and repeated hood movement.
Dutch braids suit medium to long hair and hold on most textures, with fine hair gaining grip from a little dry shampoo worked in before braiding. The braids can hang over the shoulders or down the back over the resting hood.
Try this: Braid with steady, even tension rather than pulling each section tight. Even tension keeps the ridge flat and stops one side sitting higher than the other under the hood.
Difficulty: Medium | Cost: $ | Time: 12 minutes
16. Double French Braids with Hoodie Down

French braid each side from the front hairline to the nape, crossing strands over the top, then continue as regular braids to the ends. French braids lie flatter than Dutch braids because the braid tucks into the hair, so this is the lower profile of the two twin braid options, and it works well when the hood is down and the braids rest against the back of the hoodie.
Leave a few wispy strands out at the hairline for a softer edge, or braid everything in for a cleaner finish that lasts two days. Sleeping with the braids in gives loose waves the next day once they are taken out.
Try this: Secure the ends with small clear elastics. Bulky ties at the ends catch on fleece and pull the last sections of the braid loose.
Difficulty: Medium | Cost: $ | Time: 12 minutes
17. Low Loose Fishtail Braid with a Hoodie

Gather the hair low to one side, split it into two sections, and cross small pieces from the outside of each section into the other until you reach the ends. Keep the crossing pieces loose from the start. A fishtail built loosely lies flatter, drapes over the shoulder without stiffness, and clears the collar area completely.
Fishtails show best on longer hair, because the pattern shortens the visible length as it builds. On medium hair, braid to the last few inches and leave the ends loose for a softer tail.
Try this: Take uneven sized pieces as you cross. Slightly varied pieces give the relaxed, woven finish that suits the casual weight of a hoodie.
Difficulty: Medium | Cost: $ | Time: 10 minutes
18. Braided Low Coil Bun for Hoodie Days

Tie a low ponytail, braid the length, then coil the braid around its own base and pin the coil flat at the nape. Braiding before coiling keeps the bun compact and stops loose ends escaping during the day, and the finished coil is slimmer than a standard bun of the same hair, which matters in the tight space between neck and collar.
The braid texture shows through the coil, so the back view has detail from every angle. It holds on medium to long hair and works as the dressed up end of the hoodie range, for days when the top half is casual and the plans are not.
Try this: Pin the end of the braid under the coil first, then pin the coil itself. Anchoring the end stops the whole bun unwinding if one outer pin works loose.
Difficulty: Medium | Cost: $ | Time: 8 minutes
19. Twisted Front Halo with the Hood Down

Starting at one temple, twist a section along the front hairline, adding hair as you move toward the back, and repeat on the other side. Pin the two twists where they meet at the back, low and flat, and tuck the ends under. The halo line keeps hair off the face, while the flat back leaves the resting hood a smooth surface to sit against.
This is a hood down style. A raised hood would cover the twist work at the back, so save it for mild days. The loose lengths below the halo can fall forward over the shoulders or rest down the back.
Try this: Twist away from the face on both sides. Matching twist direction keeps the halo even and stops one side looking tighter than the other.
Difficulty: Medium | Cost: $ | Time: 8 minutes
20. Curly Ponytail Peeking from a Hoodie

Gather the curls at mid height, a little lower than a standard high ponytail, and secure with a satin scrunchie or a spiral tie that grips without creasing. The slightly lower base clears the hood seam, and the curls spill over the shoulder rather than stacking up behind the head where the hood rests.
Use a scrunchie with real width. Thin elastics sink into curls, tangle on removal, and leave a dent that stays visible if you take the ponytail down later in the day.
Try this: Gather the curls with your hands rather than a brush, and smooth only the edges with a little water. Brushing first breaks up the curl pattern the style is showing off.
Difficulty: Low | Cost: $ | Time: 4 minutes
21. Low Bubble Ponytail Down a Hoodie Back

Tie a low ponytail at the nape, then add small elastics every few inches down the length, pulling each section gently outward to round it into a bubble. Starting the ponytail low is the hoodie adjustment: the bubbles then run down the back over the resting hood in a straight line, instead of the top bubble colliding with the collar.
Clear elastics give a clean finish, while elastics that match the hoodie color tie the look together. The segmented shape also keeps long hair from swinging and tangling as one loose mass.
Try this: Round each bubble as you go, before adding the next elastic. Shaping at the end is harder, because the later elastics lock the earlier sections in place.
Difficulty: Low | Cost: $ | Time: 6 minutes
22. Messy Low Side Ponytail over a Hoodie

Gather the hair loosely to one side at the nape, secure it with an elastic, then rough up the crown slightly with your fingertips and pull a few strands free around the face. The side position moves all the bulk away from the center back, which is exactly where the hood rests and where the center seam sits.
Wavy and textured hair carries this best, since the loose gather matches the natural finish. On straight hair, a quick bend through the ponytail length with a large iron, or a night in a loose braid, adds the texture first.
Try this: Wrap a thin strand of hair around the elastic and pin it underneath. The wrap hides the tie and makes a two minute style read as planned.
Difficulty: Low | Cost: $ | Time: 3 minutes
23. Low Nape Space Buns with a Hoodie

Part the hair in the center, gather each side low at the nape, and twist each side into a small bun, one on either side of the neck. Placing space buns low is what makes them hoodie compatible: crown height buns block the hood, while nape height buns sit either side of the collar and leave the center back completely flat.
The double bun shape shows up often in the trending hairstyles for college girls roundup, and the low placement here is the cold weather adaptation of that look. Keep the buns compact rather than wide, so they clear the collar on both sides.
Try this: Check both buns in a mirror from the back before leaving. Even height on both sides matters more here than with any other style on this list.
Difficulty: Low to Medium | Cost: $ | Time: 7 minutes
24. Two Mini Front Braids with Tucked Lengths

Braid two slim braids along the front hairline, one on each side of the part, and secure them with tiny clear elastics around ear level. Then tuck the remaining lengths into the hoodie collar, as in the first style on this list. The braids hold the front sections in place, keep hair out of the eyes, and give the tucked style a finished front view.
This suits medium to long hair and works with the hood up or down, because the braids sit at the front where the hood opening frames them rather than covering them.
Try this: Braid the front sections while they are slightly damp. The braids set smoother, hold longer, and leave a clean wave in those sections when taken out.
Difficulty: Low to Medium | Cost: $ | Time: 8 minutes
25. Short Bob Smoothed Under a Hood Collar

Short hair has its own hoodie problem: the ends sit right at collar height, where they flip outward over the fleece and kink. Smooth the bob flat with a brush and a light styling cream, tuck the sides behind the ears, and let the collar hold the back ends down against the neck. The hoodie then works as a weight that keeps the bob sleek rather than a surface that pushes it out of shape.
A bob cut just above collar length needs the least work, since the ends clear the fleece entirely. Jaw length and longer bobs benefit from the smoothing step most, especially in wind when the hood goes up and down often.
Try this: Smooth and tuck the hair after putting the hoodie on, as the final step. Styling before dressing means the collar drags the back section out of place straight away.
Difficulty: Low | Cost: $ | Time: 4 minutes
| Style group | Hood position | Best hair length | Typical time |
|---|---|---|---|
| Tucked and down styles (ideas 1, 5, 6, 24) | Up or down | Medium to long, short bob for idea 25 | 2 to 8 minutes |
| Low buns and claw clip (ideas 2, 3, 4, 10) | Down, up for short spells | Medium to long | 3 to 7 minutes |
| Low ponytails (ideas 7, 9, 21, 22) | Up or down | Medium to long | 3 to 6 minutes |
| High ponytail and half-up (ideas 8, 11) | Down only | Medium to long | 4 to 5 minutes |
| Curls worn loose (ideas 12, 13, 20) | Up or down | Medium to long | 4 to 5 minutes |
| Braids (ideas 14 to 19) | Up or down | Medium to long | 5 to 12 minutes |
| Double buns (idea 23) | Down, up for short spells | Medium to long | 7 minutes |
Frequently Asked Questions
How do I stop my hair tangling at the nape in a hoodie?
Keep loose hair off the back of the neck. Pull the lengths forward over your shoulders, tuck them into the collar, or wear the hair in a low braid, low ponytail, or low bun. Most nape tangles form where loose hair rubs between the neck and the resting hood, so any style that moves the hair away from that spot or holds it together will reduce them.
Can I wear a bun with a hoodie?
Yes, if the bun sits low at the nape and is kept flat. Low buns clear the collar and let the hood rest above them. High buns and top knots sit where the hood needs to be, so the hood pushes them forward and the style loosens. Keep high buns for hood down days only, or use low nape space buns when you want a double bun shape.
What is the best hairstyle for wearing a hood up?
Hair worn down, tucked in, or very low and flat works best with the hood up. Tucked-in hair, loose waves pulled forward, natural curls arranged around the hood opening, and flat twin braids all leave the inside of the hood smooth, so the hood sits close and frames the face. Avoid clips and buns at mid head height, because the hood presses on them.
How do I stop a ponytail being pushed forward by a hoodie?
Move the ponytail lower. Mid and high ponytails sit at the collar pressure point, and the resting hood shoves the base forward. A ponytail tied at the nape sits below that point and stays in place with the hood up or down. A slicked-back finish also helps, because smooth hair slides against fleece instead of gripping it.
Do claw clips work with hoodies?
Yes, with a low and flat placement. Gather the hair at the nape, twist it up, and clip it low with a flat profile clip. A clip placed higher on the back of the head presses against the collar and can dig in when you lean back. For long periods sitting against a headrest, a low bun is the more comfortable swap.
Final Thoughts
Pick two or three styles from this list that match how you wear your hood most days, one for hood up and one for hood down, and let those become your default rotation. The low and flat rule covers almost every case: keep bulk away from the nape, keep loose hair forward or contained, and save high styles for days when the hood stays down. With those two defaults settled, a hoodie stops being a hairstyle problem and becomes part of the look.

