


A round face has full cheeks, a soft jawline, and a width that is close to its length. After 50, the cuts that suit it most share the same habits: height at the crown, length that passes the jaw, and sides that stay close instead of bulking out at the cheeks.
This guide gathers 20 hairstyles for women over 50 with round faces, from pixies and crops to bobs, lobs, shoulder cuts, and long layers. Each idea explains the cut to ask for, how it sits on a round face, and one tip to try at home. If your main goal is a narrower look, the guide to hairstyles to slim a round face covers that angle across all ages.
Key Takeaways
- Height at the crown and length past the jaw make a round face read longer.
- Keep volume on top and keep the sections beside the cheeks smooth and close.
- Side-swept bangs and curtain bangs add a diagonal line that suits round faces.
- A blunt cut ending right at the jaw is the hardest length to wear, since it stops at the widest point.
- Short cuts need a trim every 4 to 6 weeks, while lobs and long layers can go 8 to 10 weeks.
How to Choose a Cut for a Round Face After 50
Start with where the cut puts its volume. Lift at the crown, a deep side part, and longer front pieces all pull the eye up or down. Fullness at the sides does the opposite, so ask your stylist to keep the cheek area smooth, even on curly and wavy cuts.
Then match the cut to your hair as it is now. Hair after 50 is often finer or drier than it was, so light layers, a mostly blunt base on fine hair, and regular trims matter more than a complicated shape. Bring a photo of the idea you like and point to where its length ends on the face.
| Style group | Best for | Upkeep | Daily styling time |
|---|---|---|---|
| Pixies and crops (ideas 1, 2, 3, 19) | Crown height with close, neat sides | Trim every 4 to 6 weeks | 5 to 10 minutes |
| Bobs (ideas 4, 5, 6, 16) | Length past the jaw with a clear front line | Trim every 5 to 8 weeks | 10 minutes |
| Lobs and shoulder cuts (ideas 7, 8, 9, 10, 15, 17) | Length you can still tie back, with layers below the chin | Trim every 6 to 8 weeks | 10 to 15 minutes |
| Long and midi cuts (ideas 11, 12, 13, 14, 20) | Keeping length, with fullness placed low or on top | Trim every 8 to 10 weeks | 15 to 20 minutes |
| Lifted ponytail (idea 18) | Warm days and a quick up style with crown height | Restyle each wear | 5 minutes |
1. Textured Pixie with Height at the Crown
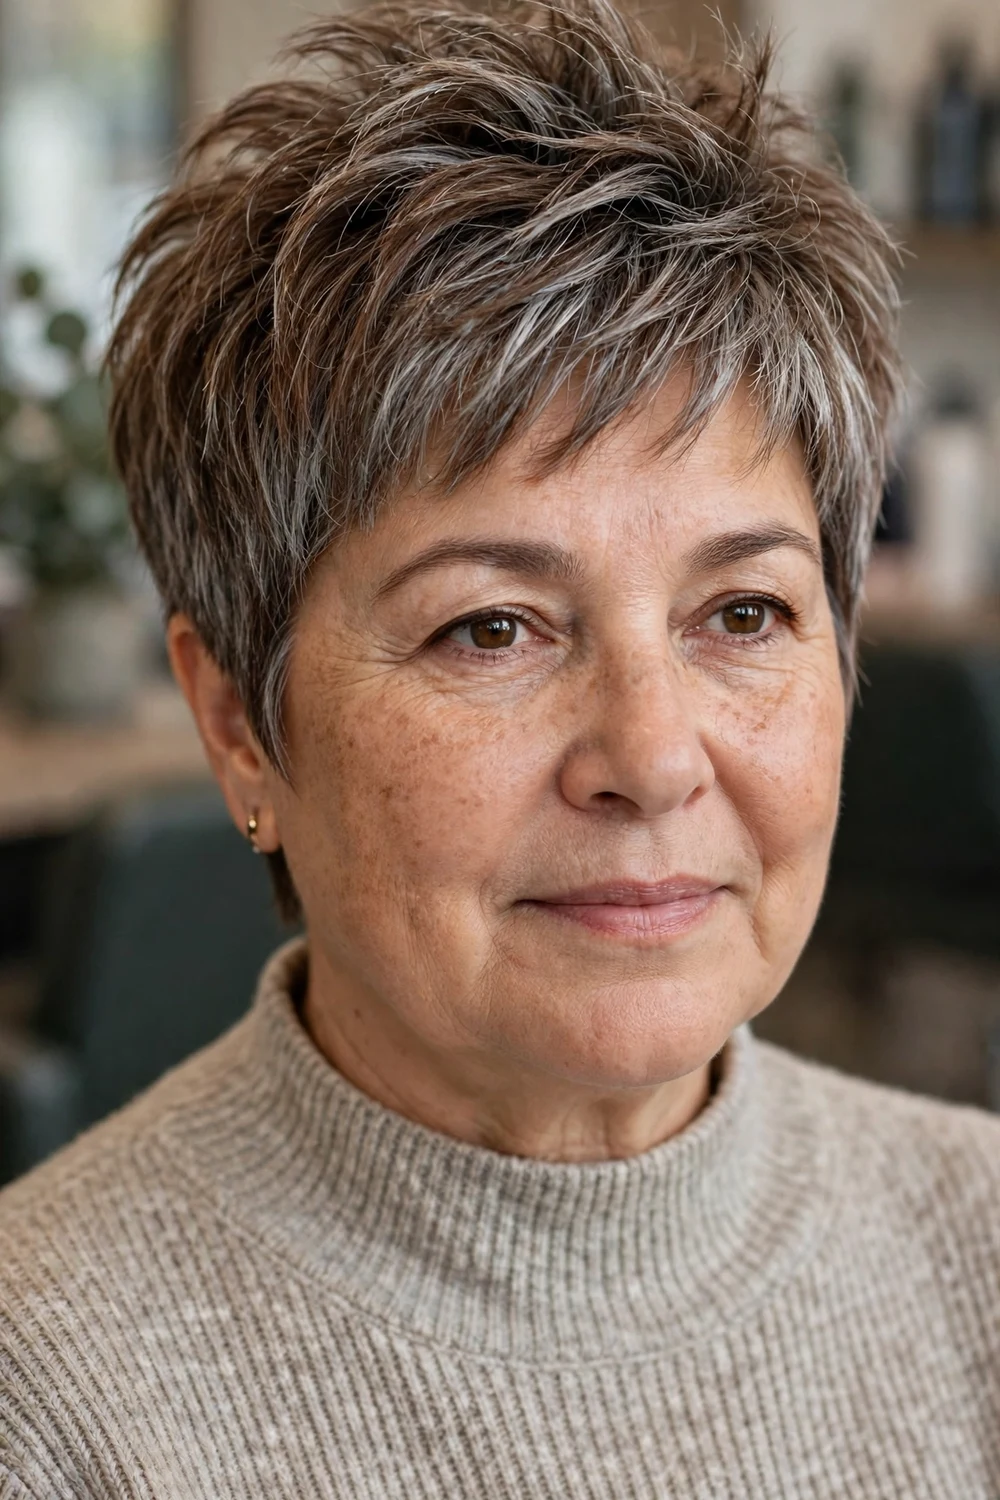
This pixie keeps the sides and back close and neat, then leaves the top longer and textured. The height at the crown draws the eye upward, so a round face reads longer, and the close sides add no width at the cheeks.
Ask for piecey layers on top that you can lift with your fingers, plus a tapered nape. It suits straight and slightly wavy hair, and the top grows out softly for four to five weeks before the shape needs a tidy.
Try this: Lift the top with a pea-size amount of matte paste on dry hair, pushing the front pieces up and slightly forward.
Difficulty: Easy | Cost: $ | Time: 5 minutes
2. Tapered Crop with Long Side-Swept Bangs

A tapered crop narrows at the nape and sides while the front stays long enough to sweep across the forehead. That diagonal sweep breaks up the width of a round face and draws attention to the eyes.
Keep the sides neat rather than clipped very short, so the outline stays soft after 50. The long front section can tuck behind one ear on days when you want a cleaner line.
Try this: Sweep the bangs across while the hair is damp, then leave them alone as they dry so the diagonal line holds.
Difficulty: Easy | Cost: $ | Time: 5 minutes
3. Asymmetric Pixie with a Deep Side Part

One side of this pixie stays longer and falls across the forehead, while the other side sits closer to the head. The uneven line and deep side part add angles that balance full cheeks.
Ask your stylist to keep the longer side at cheekbone length or just past it, with weight removed from the ends. It works well on straight and wavy hair and needs a trim every four to six weeks.
Try this: Part the hair deeper than your natural part once a week. The small shift keeps the longer side from lying flat.
Difficulty: Moderate | Cost: $$ | Time: 10 minutes
4. Angled Layered Bob Below the Chin

This bob sits below the chin and angles down toward the front, so the longest pieces pass the jaw instead of ending at the widest part of the face. Light layers through the ends keep the line from looking heavy.
Ask for a gentle angle rather than a sharp one, with layers that start below the chin. On fine hair, keep the base mostly blunt so the ends still look full.
Try this: Dry the front sections forward and down with a paddle brush. The forward fall keeps the slim front line in place.
Difficulty: Easy | Cost: $$ | Time: 10 minutes
5. Stacked Bob with a Slim Nape

Short stacked layers at the back build a lifted shape above a slim, tidy nape. The front falls to chin length or just past it, so the profile looks longer from the side.
This cut suits straight and lightly wavy hair, and it helps fine hair look fuller at the back. Plan on a trim every five to six weeks, since the stacked back shows growth sooner than the front.
Try this: Blow-dry the back sections under with a small round brush for two minutes. The rest of the cut can air-dry.
Difficulty: Moderate | Cost: $$ | Time: 10 minutes
6. A-Line Bob with Elongated Front Pieces

The back of this bob sits higher, and the front pieces run longer, ending past the jaw. Those long front pieces pull the eye down and give a round face a narrower frame.
Keep the difference between back and front gradual, so the cut still looks soft at the salon and at home. It holds its shape well on straight hair and needs a tidy every six weeks or so.
Try this: Comb the front pieces straight down while damp and clip them flat for ten minutes. They will dry in the longer line.
Difficulty: Easy | Cost: $$ | Time: 10 minutes
7. Collarbone Lob with Long Face-Framing Layers

A lob at the collarbone gives length without the weight of long hair, and the front layers start below the chin. Those layers skim past the cheeks instead of stopping at them, which is the detail that matters for a round face. The long bob cuts for round faces show this length on its own, while this version adds the over-50 layer placement.
Ask for long layers through the last third of the hair only, so the ends keep their fullness. The cut suits most textures and grows out evenly for eight weeks or more.
Try this: Twist each front layer away from the face while it dries. The soft bend opens the face up instead of curling into the cheeks.
Difficulty: Easy | Cost: $$ | Time: 10 minutes
8. Shoulder-Length Layers with a Side Part

Shoulder-length hair with long layers and a side part is a steady choice after 50. The side part moves the widest visual line off center, and the layers add movement through the lower half of the hair.
Keep layering light if your hair is fine, and stronger if your hair is thick and sits heavy at the sides. This length still ties back, which many women want for warm days and exercise.
Try this: Change your part side every few weeks. Roots lift more easily when they are not trained flat in one place.
Difficulty: Easy | Cost: $$ | Time: 10 minutes
9. Soft Shag with Curtain Bangs and Crown Lift

A soft shag uses layers around the crown and feathered ends, with curtain bangs that part in the middle and taper toward the cheekbones. The lift on top adds height, and the tapered bangs leave the center of the forehead open.
Ask for curtain bangs that end at the cheekbones and blend into the side layers, rather than a heavy fringe cut straight across. The shag suits wavy hair well, since the layers follow the natural bend.
Try this: Scrunch a light mousse into damp hair and let the layers dry tousled. A tidy shag loses the texture that makes it work.
Difficulty: Easy | Cost: $$ | Time: 10 minutes
10. Wavy Shoulder Cut with Volume on Top Only

This shoulder cut keeps the sides smooth and close, then adds volume through the top and crown only. That placement is the whole point for a round face, since fullness at cheek level widens the look.
Ask your stylist to flatten the side sections with the cut itself, using longer layers that lie down, and to layer the top for lift. It suits natural waves and loose curls.
Try this: Pin the top section up while the hair dries, then let it down. The roots set with lift and the sides stay calm.
Difficulty: Moderate | Cost: $$ | Time: 15 minutes
11. Long Layers with a Deep Side Part

Long hair can suit a round face after 50 when the part sits deep to one side and the layers run long. The deep part creates a diagonal across the top, and the length draws the eye down. More length-led options sit in the guide to long hairstyles for round faces.
Start the first layer below the chin, and keep the side sections sleek rather than curled outward. Long layers need a trim every eight to ten weeks to keep the ends healthy.
Try this: Blow-dry the fringe area away from the face first, while it is fully wet. That section sets the direction for the whole part.
Difficulty: Moderate | Cost: $$ | Time: 15 minutes
12. Past-Shoulder Waves with Layers Below the Cheekbones

These waves start below the cheekbones, so the fullest part of the style sits low, past the widest part of the face. The top and sides stay smoother, which keeps the overall outline long.
Use large, loose waves rather than tight curls, since small curls at the sides add width. This style suits hair with a natural wave and lengths from just past the shoulders to mid-back.
Try this: Wave the hair with a large-barrel iron on the lower half only, then brush through once for a soft finish.
Difficulty: Moderate | Cost: $$ | Time: 20 minutes
13. Sleek Long Cut with Angled Front Sections

A sleek long cut keeps the back length simple, while the front sections are angled from below the chin down to the ends. The angled front works like a frame that narrows the cheeks.
This cut needs healthy ends, so book trims every eight weeks even though the shape is simple. It suits straight hair and hair that straightens easily, and it shows gray blending well because the surface lies smooth.
Try this: Run a drop of lightweight oil over the front sections only. The shine makes the angled line easier to see.
Difficulty: Easy | Cost: $$ | Time: 15 minutes
14. Curly Cut with Crown Height and Slimmer Sides

For natural curls, this cut shapes the top for height and keeps the sides closer to the head, cut curl by curl. Height on top lengthens the outline, and slimmer sides stop the curls from widening at the cheeks. The shaping approach pairs well with the routines in the guide to hairstyles for naturally curly hair.
Ask for a dry cut or a curl-aware cut, so the stylist shapes the hair in the state you wear it. Keep the top layers shorter than the side layers are wide, and refresh the shape every eight to ten weeks.
Try this: Apply curl cream to wet hair, then lift the crown with your fingers and leave the curls untouched while they dry.
Difficulty: Moderate | Cost: $$ | Time: 15 minutes
15. Feathered Shoulder Cut with a Side Sweep

Feathered layers flip lightly away from the face, and a side sweep carries the front across the forehead and down one side. The movement sits above and below the cheeks, rather than bulking out beside them.
Feathering works best on straight to wavy hair with some natural body. Ask for the feathered pieces to start at the cheekbones and flick outward, with the back kept simple.
Try this: Blow-dry the front sections back and away with a round brush. Feathered layers hold their flick better when they dry in that direction.
Difficulty: Moderate | Cost: $$ | Time: 15 minutes
16. Bob with Curtain Bangs Past the Jaw

This bob ends past the jaw, below the widest part of a round face, and the curtain bangs part in the center and taper down both sides. The open center of the forehead and the longer bob length keep the outline vertical.
Ask for bangs that reach the cheekbones at their shortest point. Cut shorter, they can widen the forehead, so bring a photo that shows the length clearly.
Try this: Dry the curtain bangs forward first, then sweep each side back. Drying them forward stops them splitting in the wrong place.
Difficulty: Easy | Cost: $$ | Time: 10 minutes
17. Layered Cut with Side-Swept Bangs for Fine Hair

Fine hair on a round face needs lift without bulk at the sides, and this chin-to-shoulder layered cut is built for that. The side-swept bangs add a diagonal line, and the layers stay light so the ends do not look thin. Keep layers light through the ends, so fine hair still looks full at the perimeter.
Ask for a mostly blunt base with soft layers only through the top and front. Too much layering through the ends makes fine hair look sparse, so keep the perimeter solid.
Try this: Use a root-lift spray at the crown only, and skip heavy oils on the lengths. Fine layers collapse fast under rich products.
Difficulty: Easy | Cost: $ | Time: 10 minutes
18. Lifted Ponytail with Soft Front Pieces
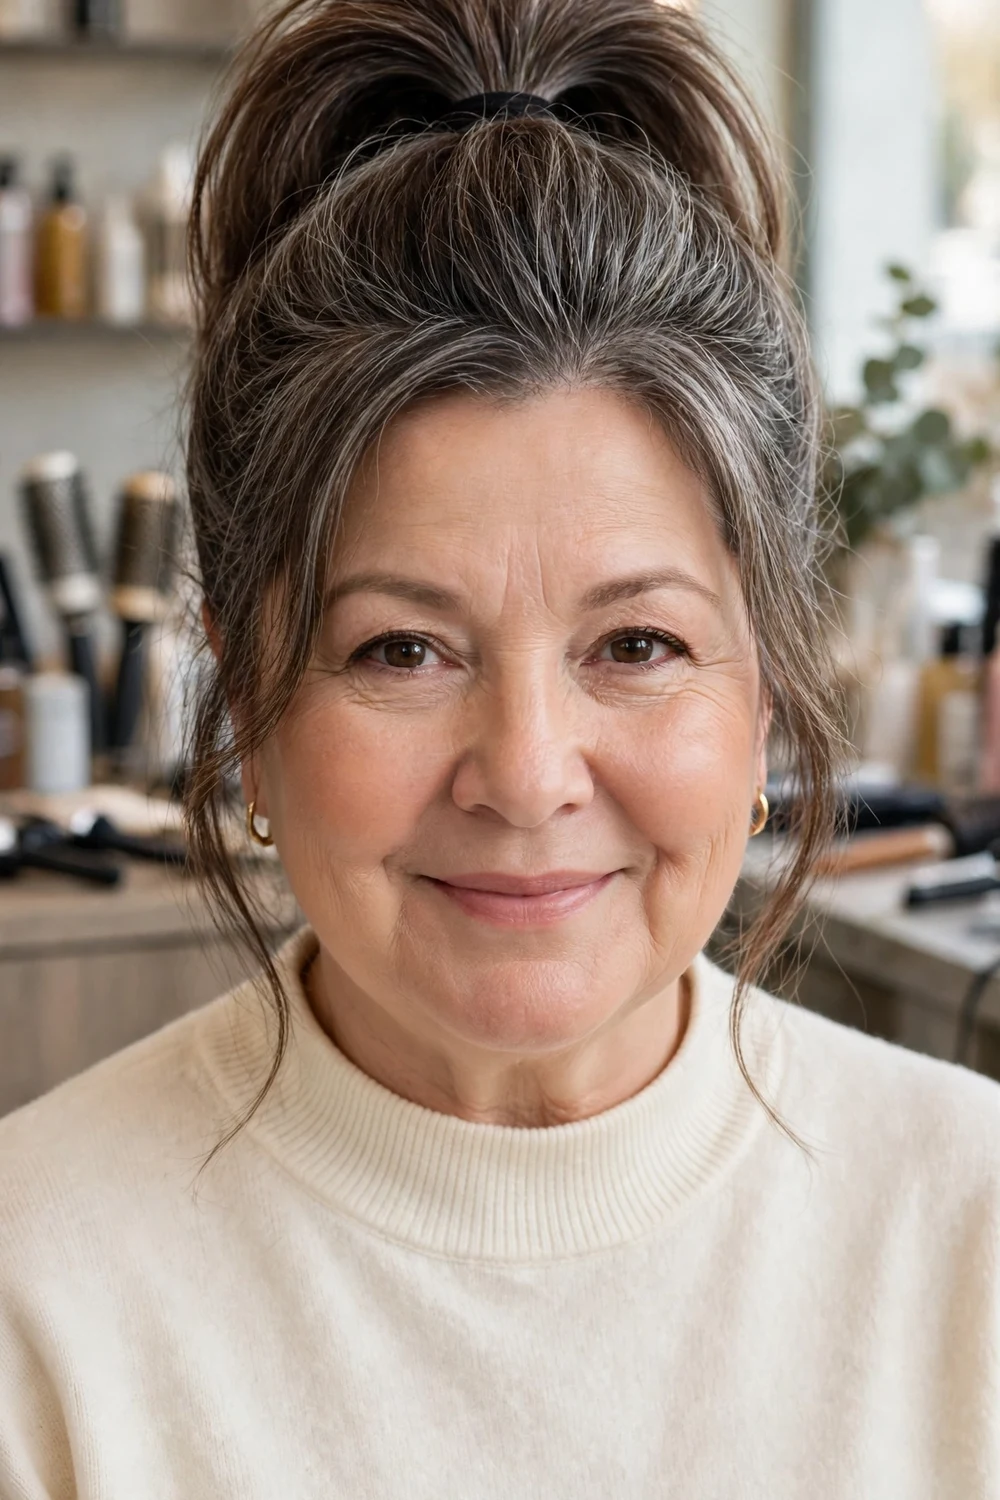
A ponytail placed high at the crown adds height above the face, and two soft front pieces left loose keep the style gentle. The lifted placement suits round faces because the eye follows the height first.
Set the ponytail at the crown rather than at the back of the head, and wrap a small section of hair around the band for a tidy finish. This style needs shoulder-length hair or longer to sit securely.
Try this: Tease the crown lightly before you gather the hair, or clip a small section up first. The base lift keeps the ponytail from dragging the face down.
Difficulty: Easy | Cost: $ | Time: 5 minutes
19. Short Back and Sides with a Longer Textured Top

The back and sides sit short and close, while the top keeps enough length for texture and a soft forward fall. With no width at the sides and clear texture on top, the face reads longer and the cut stays simple to run.
This is a good step for women moving shorter in stages, since the top still gives you something to style. Book a tidy every four to five weeks to keep the back and sides neat.
Try this: Work a small amount of styling cream through the top while damp and pinch the ends into place. The texture sets as it dries.
Difficulty: Easy | Cost: $ | Time: 5 minutes
20. Midi Cut with Vertical Layers and a Center Part

A midi cut falls between the shoulders and the collarbone area in back, with layers cut to fall vertically rather than kick out at the ends. A center part works here because the long front sections hang straight down both sides, framing the cheeks in two long lines. Broader age-based ideas sit in the guide to hairstyles for women over 40.
Ask your stylist to cut the layers so the ends turn under slightly instead of flipping out. Flipped ends at jaw level add width, while turned-under ends keep the line long.
Try this: Dry the front sections straight down with a paddle brush and finish with a cool blast. The straight fall is what frames the face.
Difficulty: Moderate | Cost: $$ | Time: 15 minutes
Frequently Asked Questions
What length suits a round face best after 50?
Lengths that pass the jaw tend to suit a round face best, such as a bob below the chin, a collarbone lob, or long layers. Very short cuts also work when they add height at the crown and keep the sides close. The length to treat with care is a blunt cut that ends right at the jaw, since it stops at the widest part of the face.
Should women over 50 with round faces wear bangs?
Side-swept bangs and curtain bangs that taper toward the cheekbones suit a round face well, because they add a diagonal or vertical line. A heavy fringe cut straight across the forehead tends to shorten the face, so ask for a softer, longer fringe that blends into the side layers.
How do I add volume without making my face look wider?
Put volume at the crown and on top only, and keep the sections beside the cheeks smooth and close. Lift roots with a light mousse or root spray, dry the top upward, and avoid curls or flicks that sit right at cheek level.
Which of these cuts works best for fine or thinning hair?
The stacked bob in idea 5, the layered cut with side-swept bangs in idea 17, and the short back and sides cut in idea 19 work well on fine hair. They keep the base mostly blunt, place layers where lift is needed, and avoid heavy layering through the ends.
How often do these cuts need a trim?
Pixies, crops, and short stacked shapes need a trim every four to six weeks. Bobs and lobs hold their shape for six to eight weeks, and long or midi layers can go eight to ten weeks. Bangs usually need a quick tidy every three weeks.
Final Thoughts
For a round face after 50, small placement choices do most of the work: height on top, smooth sides, and front pieces that fall past the jaw. Pick the length you will enjoy wearing each day, show your stylist where you want that length to land, and keep the trim rhythm that holds the shape. A cut that follows those three points will suit your face on busy mornings as well as on dressed-up days.

