


Thanksgiving is the one day when your hair has to survive a full marathon: cooking, photos, hugs, the drive to someone’s house, and a long nap on the couch afterward. Bows are the easiest shortcut I know for making hair look holiday-ready without booking a salon appointment. A velvet bow turns a plain ponytail into something you’d actually pin on a board, and it takes about ten seconds.
These 24 thanksgiving hairstyles with bows cover every base, from low-effort ponytails to braids with ribbon woven right through them. Pick velvet for a classic look, satin for shine, or gingham for a cozy fall feel. Each style below includes concrete steps, a styling tip, and a difficulty rating so you can pick one that fits your morning.
Quick Takeaways
- Velvet bows in burgundy, rust, and forest green read Thanksgiving instantly without looking like Christmas came early.
- Dirty hair from the day before holds bows, braids, and pins far better than freshly washed, slippery hair.
- Anchor every bow with a small clear elastic or a hidden bobby pin so it survives hugs and the car ride.
- Match the bow’s size to your hair: oversized bows suit long thick hair, while small bows flatter bobs and fine hair.
- Keep a mini kit in your bag: two bobby pins, one elastic, and a travel hairspray for midday touch-ups.
1. Velvet Bow Ponytail

This is the style that started the whole bow revival, and it stays popular because it works on almost everyone. Gather your hair into a ponytail at whatever height you like, secure it with a strong elastic, then tie a wide velvet ribbon around the base and knot it into a full bow. Let the ribbon ends hang down over the ponytail for a soft, dressy finish, or trim them short for something tidier.
Velvet grips hair better than satin, so the bow stays put through a long day of cooking and visiting. Burgundy, rust, and chocolate brown are the most Thanksgiving-appropriate colors, and they flatter warm fall outfits. If your bow keeps sliding to one side, push a bobby pin through the knot and into the elastic underneath. For more seasonal styling, these fall hairstyle trends show which textures pair best with statement accessories this year.
Try this: tease the crown lightly before pulling your hair back so the ponytail has lift behind the bow.
Difficulty: Low · Cost: $ (salon)
2. Side Ponytail with a Gingham Bow

A side ponytail has a relaxed, romantic feel that suits Thanksgiving’s cozy mood, and a gingham bow keeps it firmly in the fall season. Sweep all your hair over one shoulder, secure it loosely at the nape with an elastic, and tie the gingham ribbon into a generous bow at the base. Leave a few soft pieces out around your face so the look stays effortless rather than stiff. A loose curl through the ends before you tie the bow gives the ponytail extra movement.
This style photographs well from the front because the bow sits right where the camera sees it. Gingham in brown, black, or rust reads autumn without trying too hard. Curl the ponytail loosely with a large-barrel iron first if you want extra body, but the style works just as well on second-day waves. Wear it with a turtleneck and the bow peeks out right above the collar in every photo.
Try this: part your hair on the opposite side from the ponytail for extra sweep and volume at the crown.
Difficulty: Low · Cost: $ (salon)
3. Braided Ponytail with a Bow
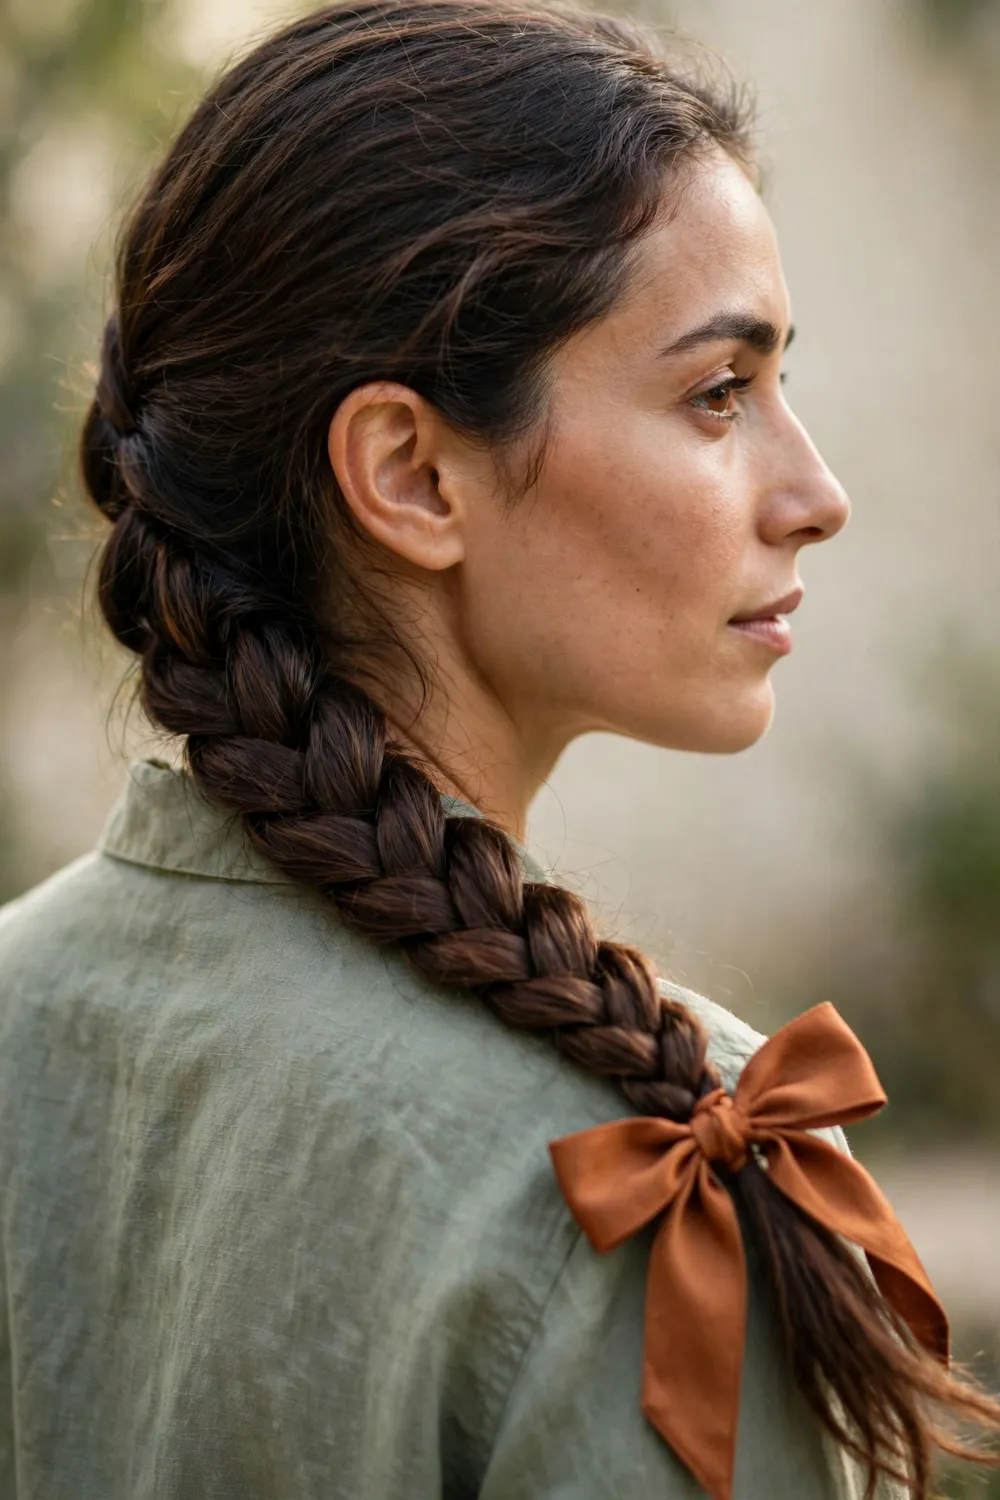
When a plain ponytail feels too simple but you still want your hair up and out of the way, braid the length and finish with a bow. Pull your hair into a ponytail, do a simple three-strand braid down the length, secure the end with a small elastic, then tie a ribbon bow around the elastic. The braid adds texture and interest while keeping every strand controlled through dinner. Use a snag-free elastic at the base so the bow sits on a smooth, bump-free foundation.
This is one of the most practical holiday styles because nothing falls in the gravy. Gently tug the braid’s edges outward (pancaking) to make it look fuller before tying the bow. A rust or caramel satin bow warms up the look, while a deep red velvet one makes it dressier. The whole style takes about ten minutes and survives the entire day without a single touch-up. It also travels well, so you can style it at home and arrive looking finished.
Try this: pancake the braid by tugging each edge gently outward before tying the bow for a fuller look.
Difficulty: Low · Cost: $ (salon)
4. Puffy Dutch Braid Ponytail with a Bow
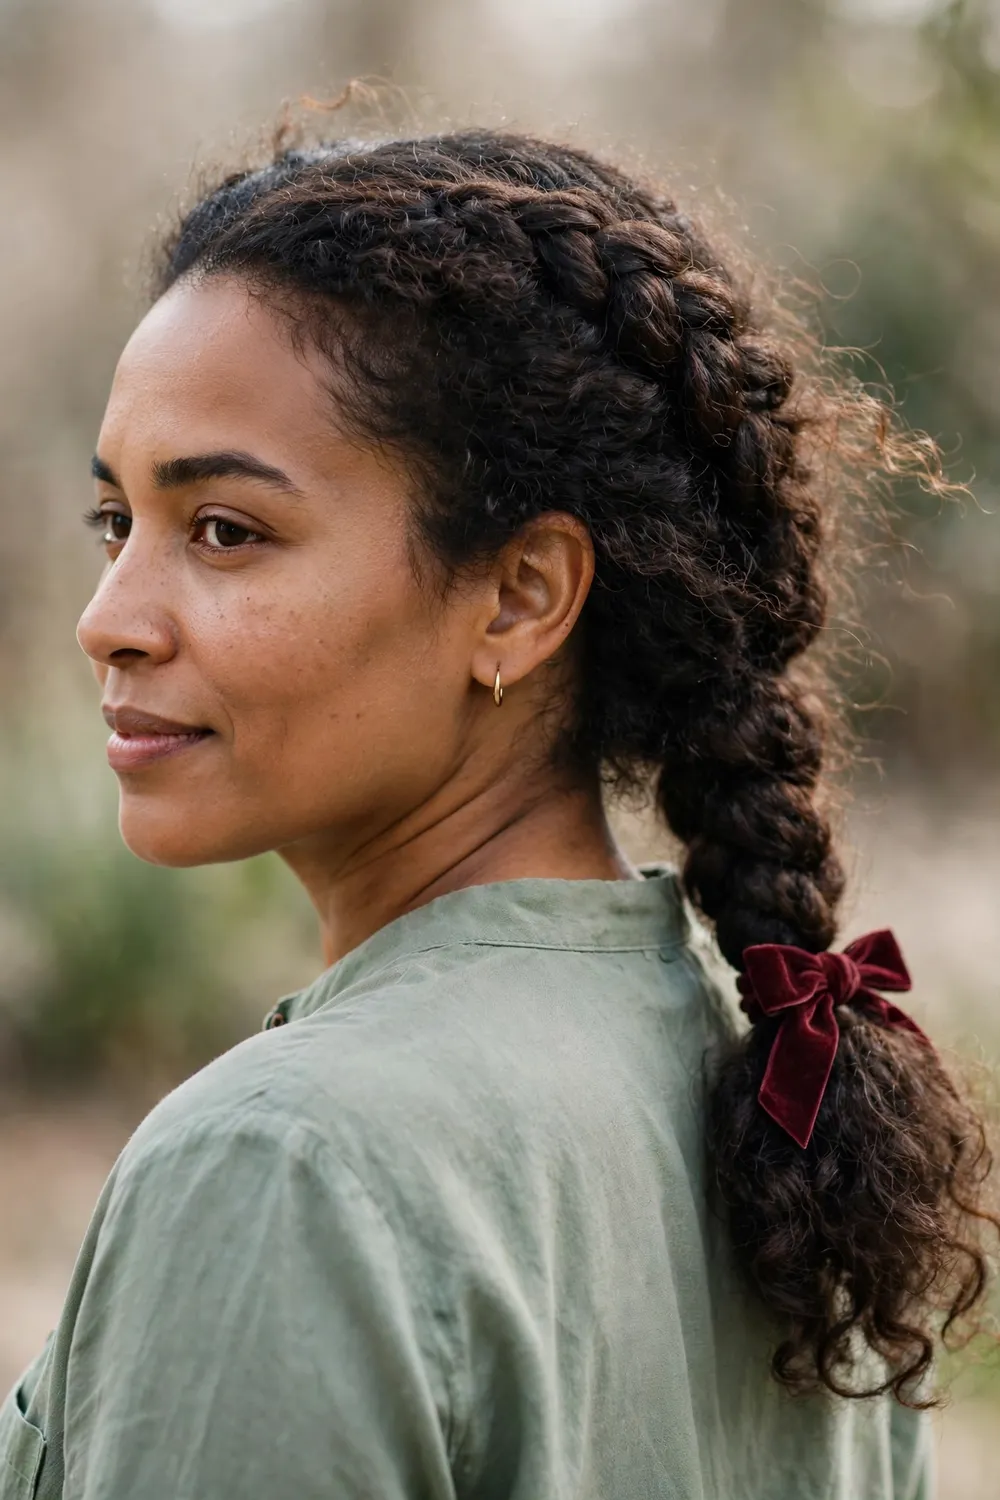
A Dutch braid down the center of the head, pulled into a ponytail and finished with a bow, looks far more elaborate than it is. Start the Dutch braid at your hairline and braid back to the crown, then gather everything into a ponytail. Pull the braid’s sections outward for that puffy, voluminous effect, and tie a bow at the base of the ponytail. Keep your sections even as you braid so the puffy texture looks balanced on both sides.
The puffy texture gives fine hair a serious fullness boost, and the bow distracts from any uneven sections. This style reads festive and fall-ready thanks to the bow, so pick one in a seasonal fabric like velvet or thick grosgrain. It holds up remarkably well through hugs and wind, since the braid anchors everything at the top. Finish with a light mist of hairspray to keep flyaways smooth. Braiding on slightly damp hair also gives extra grip and longer-lasting volume.
Try this: braid on slightly damp hair, then let it dry for extra grip and longer-lasting volume.
Difficulty: Medium · Cost: $ (salon)
5. High Bubble Ponytail with a Bow
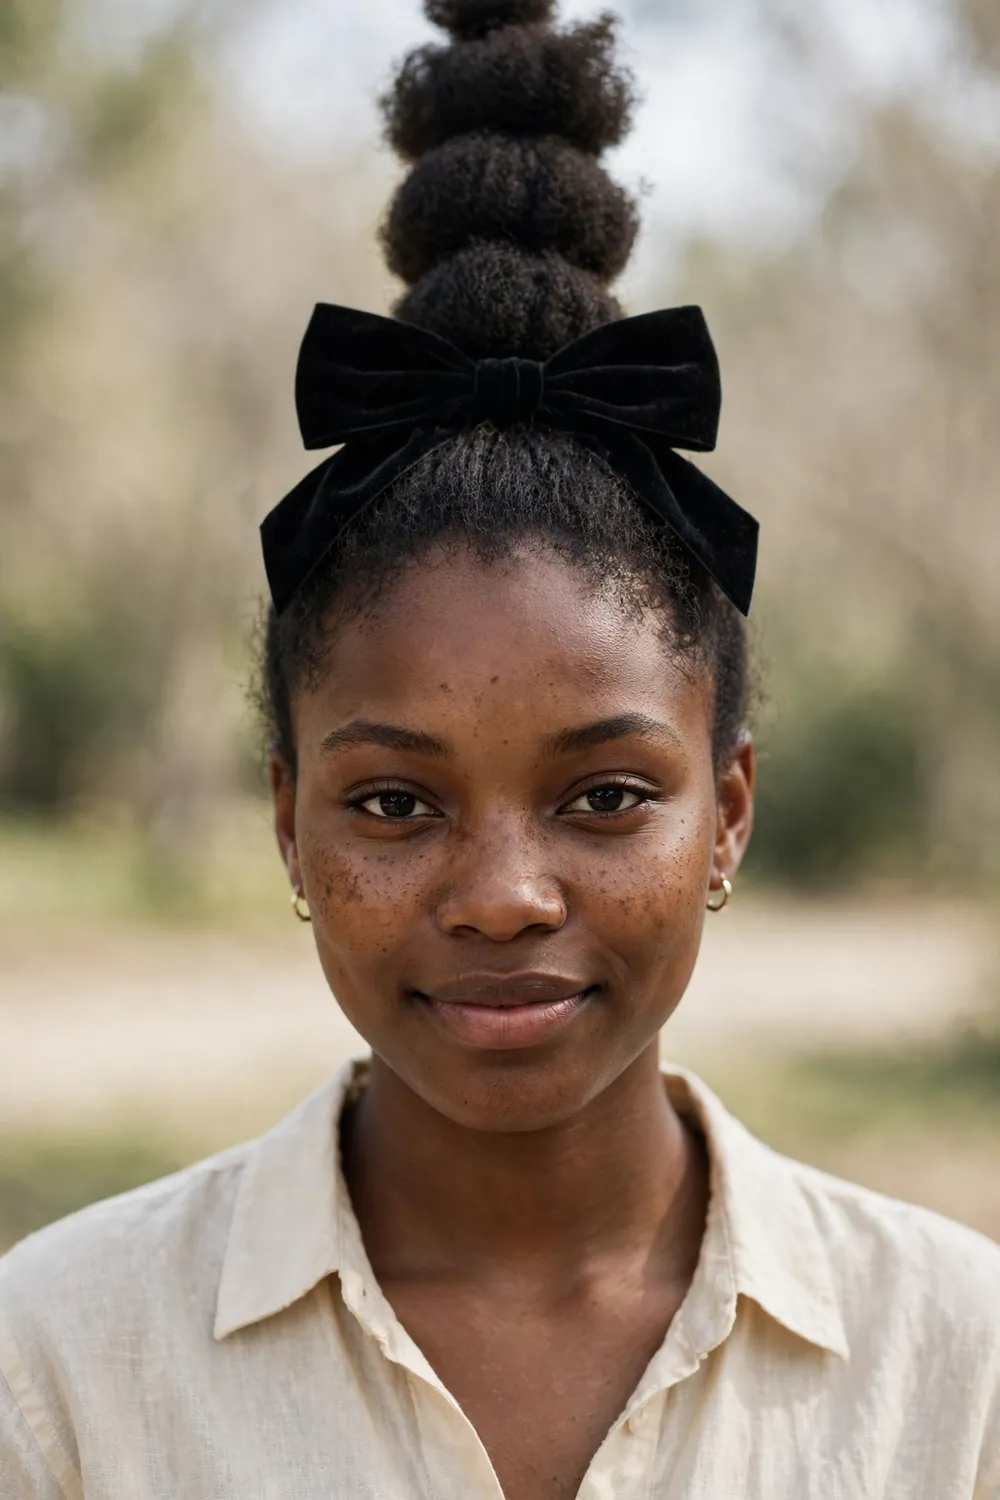
The bubble ponytail is playful, sturdy, and practically made for long holiday days. Secure a high ponytail, then add small elastics every two to three inches down the length. Gently pull each section outward to form the bubbles, fluffing them until they look full and even. Tie a big bow at the base to dress the whole thing up for Thanksgiving. Space the elastics evenly from the start so every bubble comes out the same size.
Each elastic acts as an anchor point, so this style barely moves once it’s set, which makes it ideal if you’re chasing kids or running around the kitchen. The bow at the base turns a fun style into a festive one. Black velvet looks chic against a fall outfit, while a rust or gold bow leans into the harvest theme. Smooth the top with a little gel before you start for a clean finish.
Try this: use clear mini elastics for the bubbles so the bow stays the star of the show.
Difficulty: Low · Cost: $ (salon)
6. Bubble Braid Pigtails with Bows
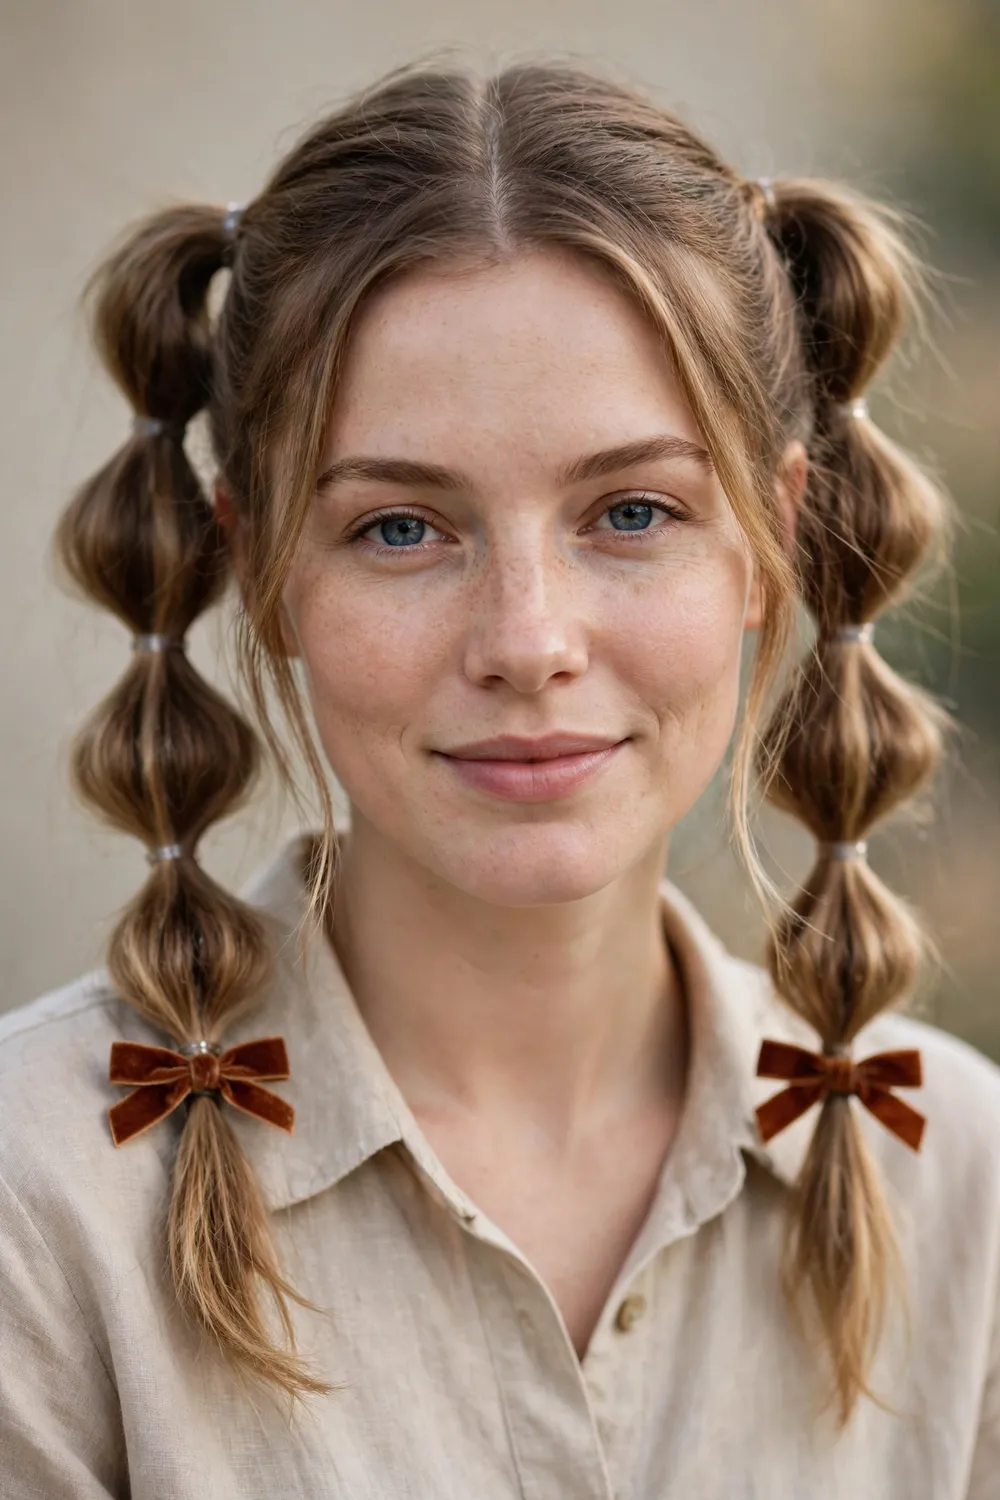
Two bubble-braid pigtails with a bow on each side are cute, youthful, and surprisingly wearable for adults when the styling is neat. Part your hair down the middle, make a bubble ponytail on each side, and tie a small bow at the base of each one. Keep the bubbles smooth and even rather than messy for a polished, grown-up result. Check both sides in the mirror as you go so the part stays centered and the bubbles match.
Choose fall-colored bows in rust, mustard, or burgundy to keep the look seasonal instead of schoolgirl. This style keeps hair completely off your face and neck, which is a blessing during a hot, crowded dinner. It also photographs well from every angle since the bows frame your face symmetrically. If your hair is on the shorter side, even shoulder-length hair can pull this off with small bubbles. The symmetrical bows draw the eye upward, which flatters round and square face shapes.
Try this: curl the ends of each pigtail under for a bouncy finish that makes the bubbles look intentional.
Difficulty: Low · Cost: $ (salon)
7. High Bun with a Velvet Bow

A high bun gets you through the entire holiday without a single strand falling into your plate, and a velvet bow makes it look like you planned it. Gather your hair into a high ponytail, twist it into a bun, and pin it securely. Clip or tie a velvet bow at the base of the bun, slightly off to one side for a graceful, asymmetrical touch. The look works sleek or messy, so pick whichever matches your outfit.
Curly and textured hair gives this style natural volume that makes the bun look full with zero teasing. For straight hair, a donut form or a little backcombing builds the same fullness. A deep red or burgundy velvet bow photographs like a jewel against dark or light hair. If you want more polished updo options for formal dinners, these medium hair updo ideas gather elegant styles that work with similar accessories.
Try this: place the bow slightly off-center at the bun’s base for a softer, more flattering finish.
Difficulty: Low · Cost: $ (salon)
8. Low Twisted Bun with a Velvet Ribbon

For a quieter, more refined holiday look, twist your hair into a low bun at the nape and wrap a ribbon around it. Split your hair into two sections, twist them together, coil the twist into a bun, and pin it firmly. Wrap a velvet or satin ribbon around the base and tie it into a neat bow at the back. Smooth the top with a brush for a clean, polished surface.
This is the style to choose when the dinner is formal or you’re wearing a dress with a detailed neckline. Cream, champagne, or burgundy ribbons look timeless here, and the low placement keeps the silhouette classic. It also stays comfortable for hours because nothing pulls at the crown. A few face-framing pieces pulled loose soften the whole look and keep it from feeling severe. Pin the ribbon’s tails flat against the bun so they don’t flip up in photos.
Try this: wrap the ribbon twice around the bun’s base before tying the bow so it sits snugly.
Difficulty: Medium · Cost: $ (salon)
9. Braided Top Knot with a Bow
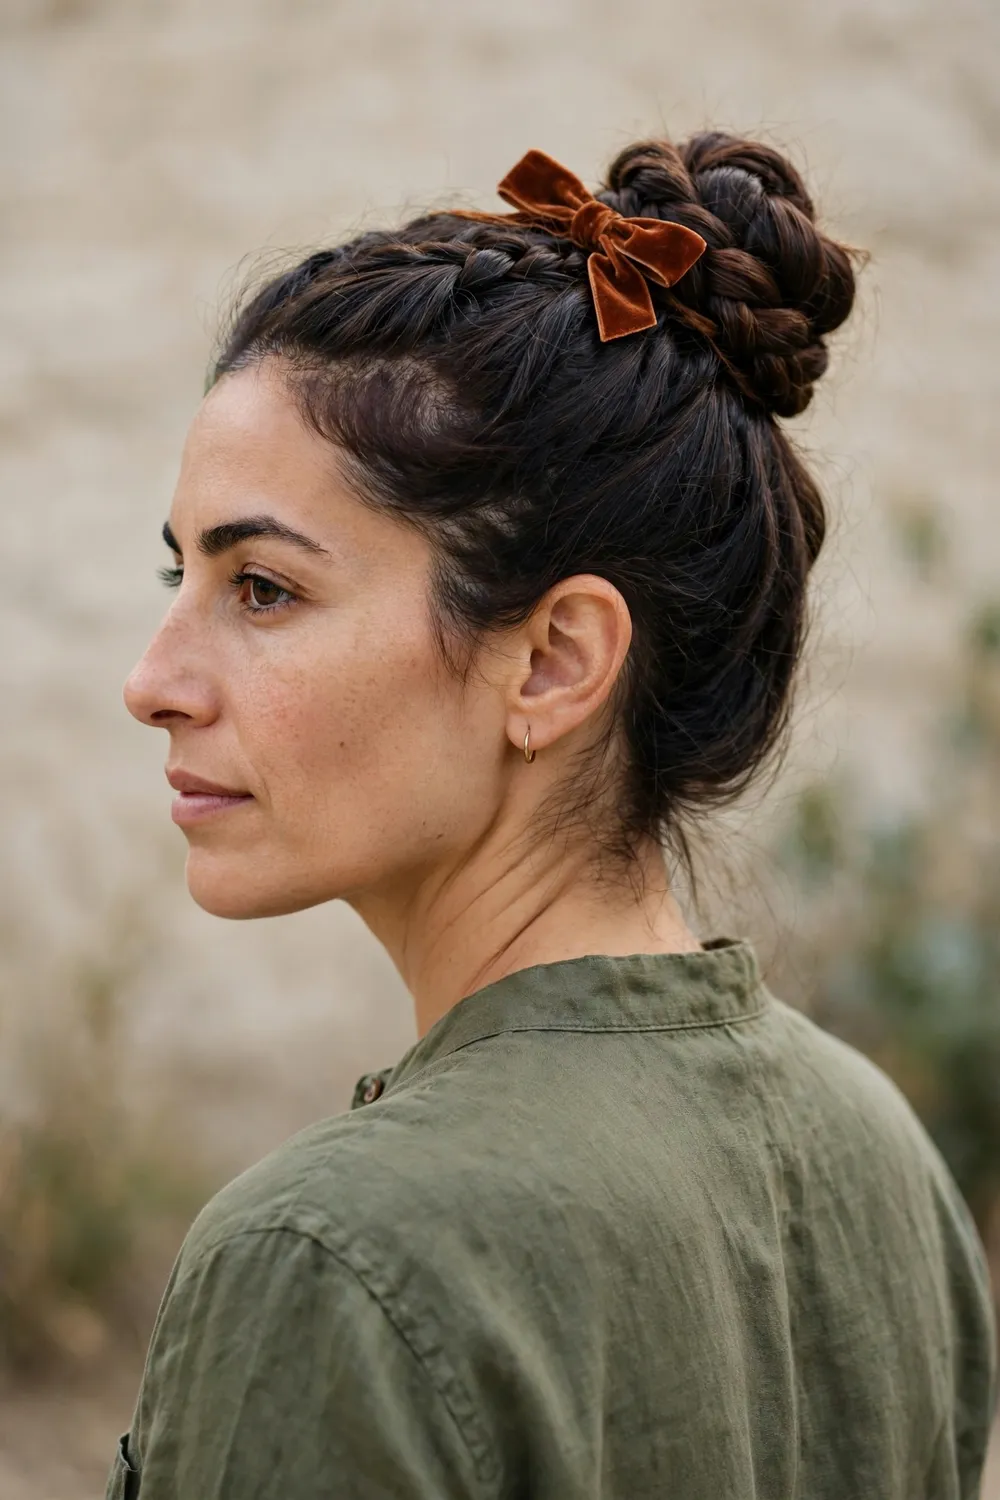
A French braid running from the nape up to the crown, finished in a top knot with a bow on top, is equal parts sporty and festive. Flip your head forward, French braid from the neckline upward, then twist the remaining hair into a knot at the crown and pin it. Perch a small bow right on top of the knot or tuck it at the front edge. Ask someone to check the braid’s path in a mirror so it runs straight up the back.
This style locks everything in place, so it survives cooking, playing with kids, and an afternoon walk. The braid adds texture and interest from the back, which is the angle most people see at a crowded table. A rust or caramel bow keeps it autumnal. If you’re heading to a fancier event after dinner, this same knot-and-bow formula appears in many bridesmaid hairstyles, where elegant updos get the same kind of finishing touch.
Try this: braid with a little texturizing spray in your hair so the upward braid grips better.
Difficulty: Medium · Cost: $ (salon)
10. Curly Half-Up with a Satin Ribbon Bow
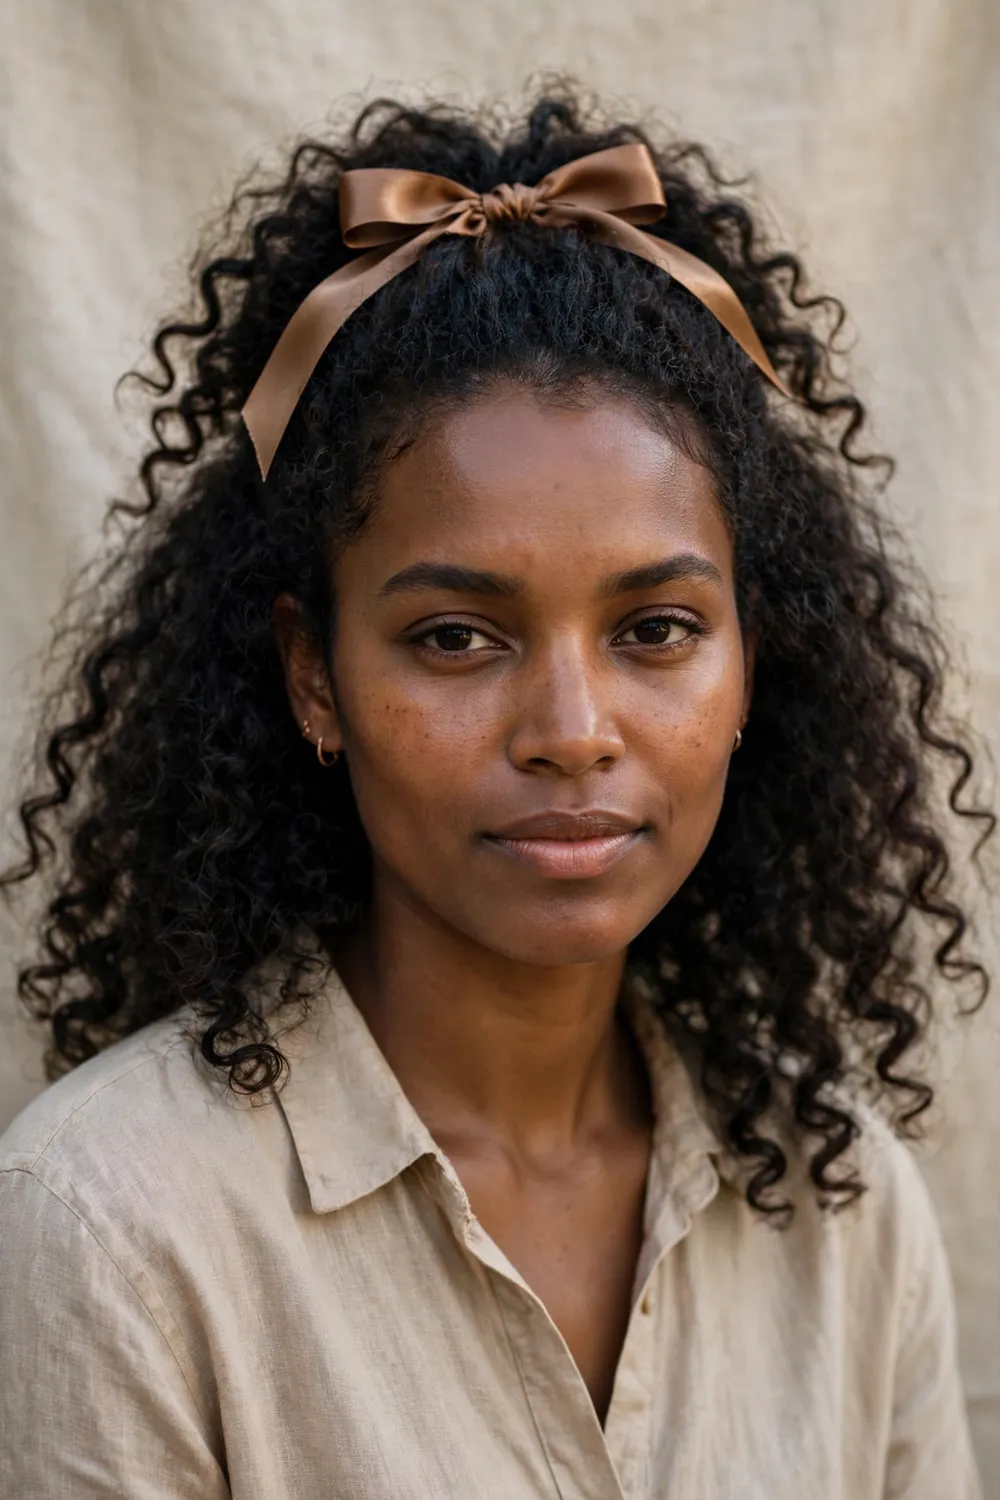
Curls and a satin ribbon are a natural pair: the ribbon’s shine plays off the curls’ texture, and the half-up shape shows off both. Gather the top half of your hair, from temple to temple, and secure it with an elastic. Tie a satin ribbon around the elastic in a neat bow, letting the ends trail over your curls. The bottom half stays loose and full. Use a ribbon at least an inch wide so the bow holds its shape against the curls.
This style keeps curls out of your face while you’re eating but lets them cascade for photos. Bronze, copper, or gold satin ribbons catch warm fall light nicely. Define your curls with cream before styling so they stay springy all day. The bow sits at the back of your head, so it peeks through the curls in a way that looks effortless rather than fussy. Refresh the bottom curls with a little water and cream if they flatten by evening.
Try this: secure the half-up section slightly higher than you think, since curls pull the style down as they settle.
Difficulty: Low · Cost: $ (salon)
11. Half-Up Waves with a Velvet Ribbon
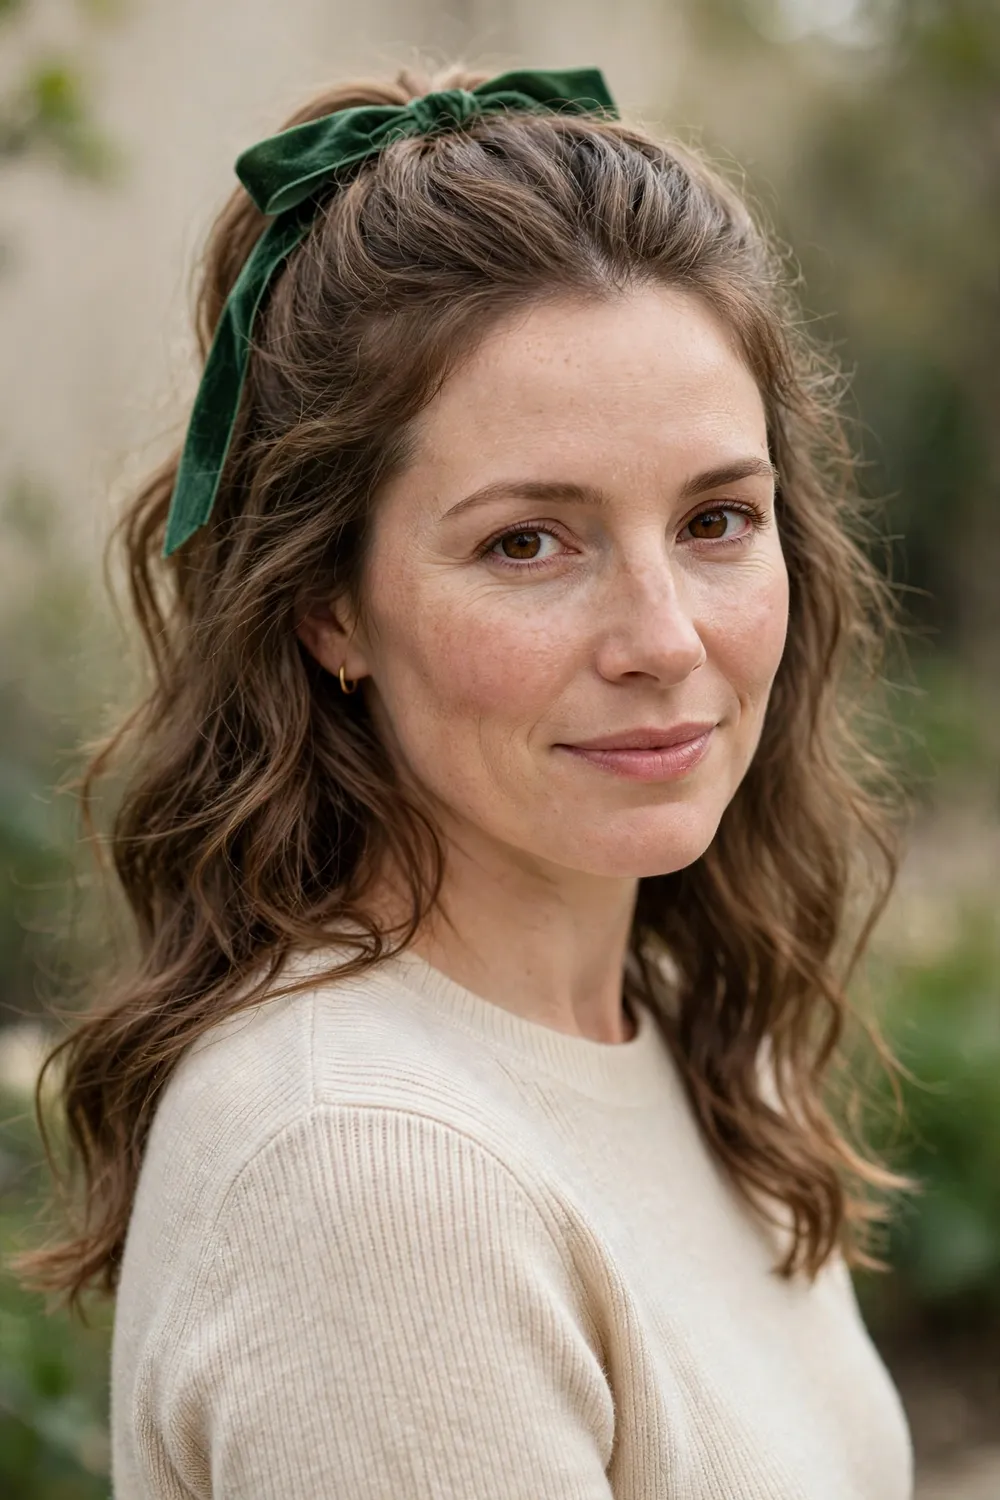
Loose waves pulled halfway back with a velvet ribbon bow strike the right balance between done and relaxed. Curl your hair in loose waves, gather the top section from each side, and tie them together at the back with a velvet ribbon knotted into a bow. The waves give the style movement, and the velvet adds the holiday weight. Velvet’s texture grips the hair, so the tied bow rarely needs a pin to stay centered.
Forest green, burgundy, or chocolate velvet all look rich against wavy hair, especially in candlelight or warm indoor lighting. This style suits medium to long hair best, since the bow needs enough gathered hair to anchor to. Tease the crown a touch before tying so the top doesn’t fall flat by dessert. It takes about fifteen minutes and looks like you spent far longer. A side part adds softness, while a center part makes the style look more polished.
Try this: curl away from your face on the front sections so the waves frame you softly in photos.
Difficulty: Low · Cost: $ (salon)
12. Half-Up Bubble Braid with a Bow
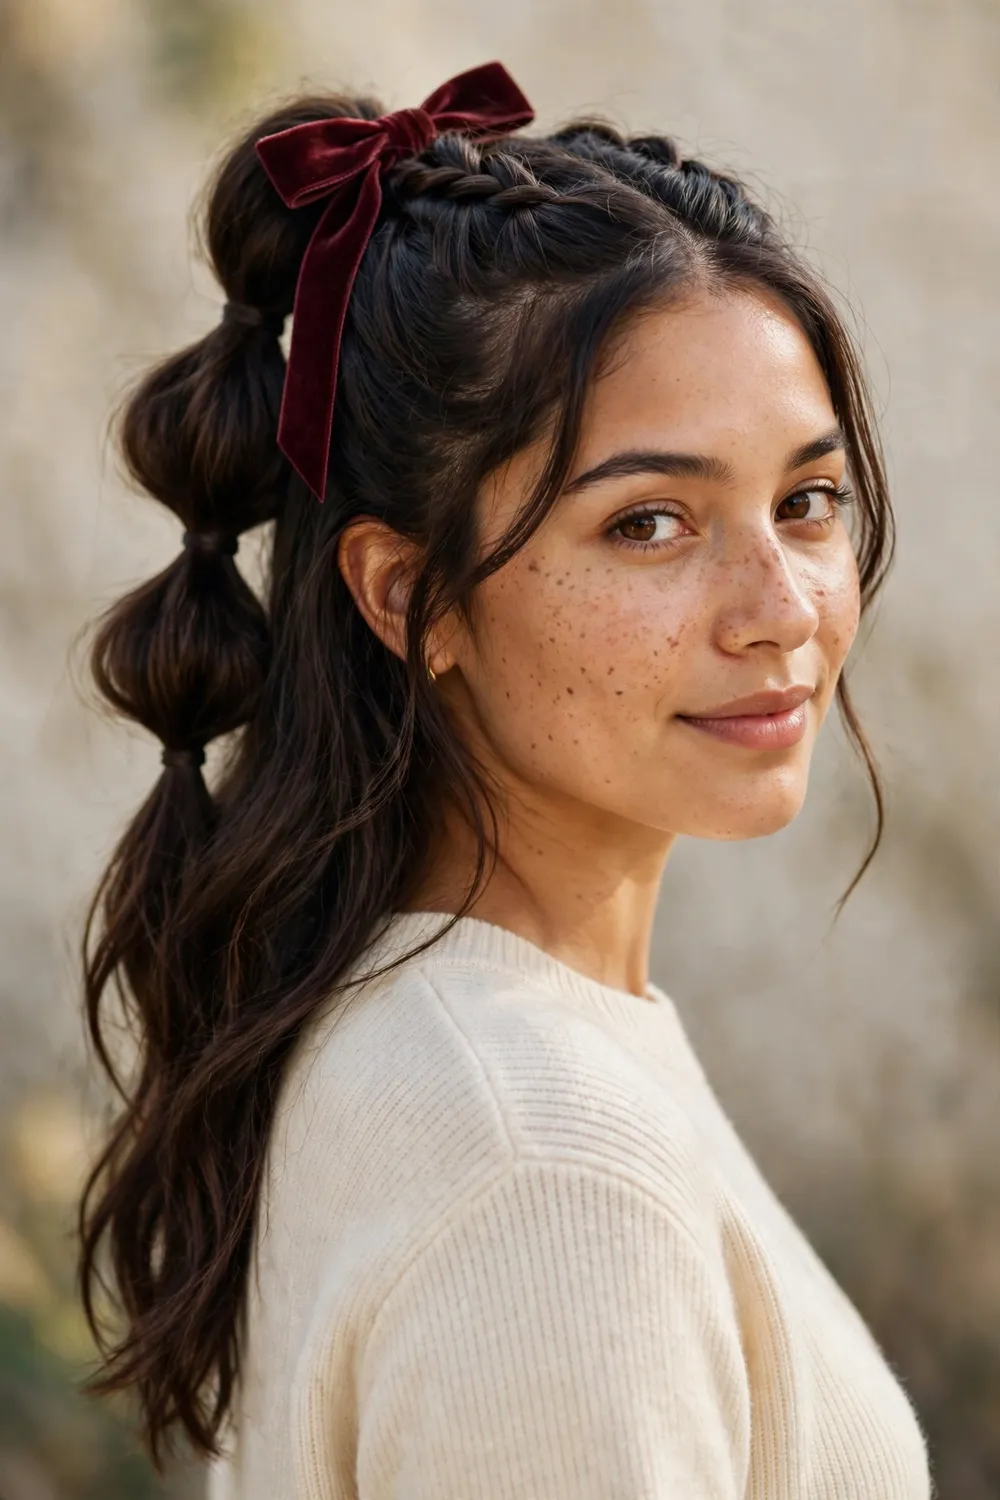
A half-up style gets a fun upgrade when the top section becomes a bubble braid finished with a bow. Pull the top half of your hair back, then add elastics down the section and puff each segment into bubbles. Tie a bow at the very top where the section starts, or at the bottom where it ends. The rest of your hair stays down and loose. Three to four bubbles look best on a half-up section, so space your elastics accordingly.
The bubbles add a playful texture that keeps the style from looking plain, while the bow signals the holiday. This works on straight, wavy, or curled hair, though curls make the bubbles look extra full. A burgundy or rust bow keeps it in the Thanksgiving palette. The style holds well because the elastics lock each bubble in place, so it lasts from morning prep through the last slice of pie.
Try this: tie the bow at the top of the braid for a headband-like effect that frames your face.
Difficulty: Low · Cost: $ (salon)
13. Half-Up Twists with Ribbon Bows
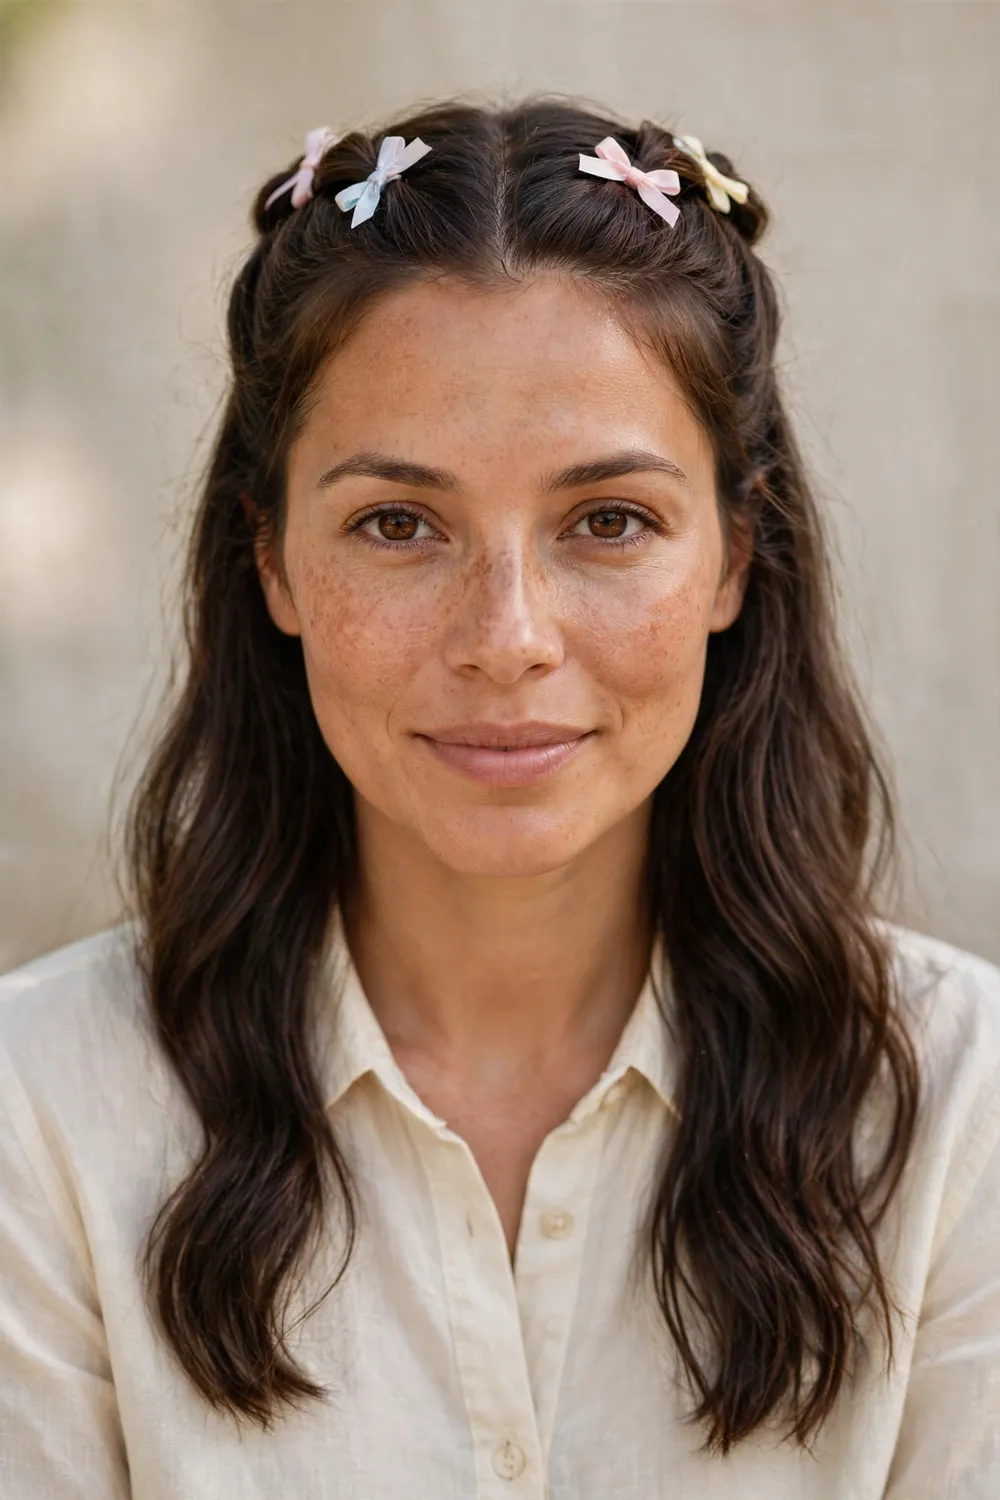
Small ribbon bows scattered along half-up twists give you a hairstyle that looks detailed without any real braiding skill. Take a section from each side of your face, twist each one back, and pin them where they meet. Tie tiny bows from thin ribbon at intervals along the twists, or cluster two or three near the back. The twists keep hair tidy while the little bows do the decorating. Pre-tie the tiny bows before you start so you’re not fumbling with ribbon mid-style.
Thin satin or grosgrain ribbon in fall colors like rust, mustard, and olive works best for the small bows, since wide ribbon overwhelms the twists. This style is forgiving: slightly uneven twists just look more romantic. It suits medium-length hair especially well, and the bows catch the light in photos. Pin each twist with a bobby pin crossed in an X so nothing loosens during the day. Tuck the ribbon ends under the twists so only the bow loops show.
Try this: use a dab of styling cream on the twists first so flyaways don’t fuzz up the sections.
Difficulty: Low · Cost: $ (salon)
14. Red Bow Half-Up
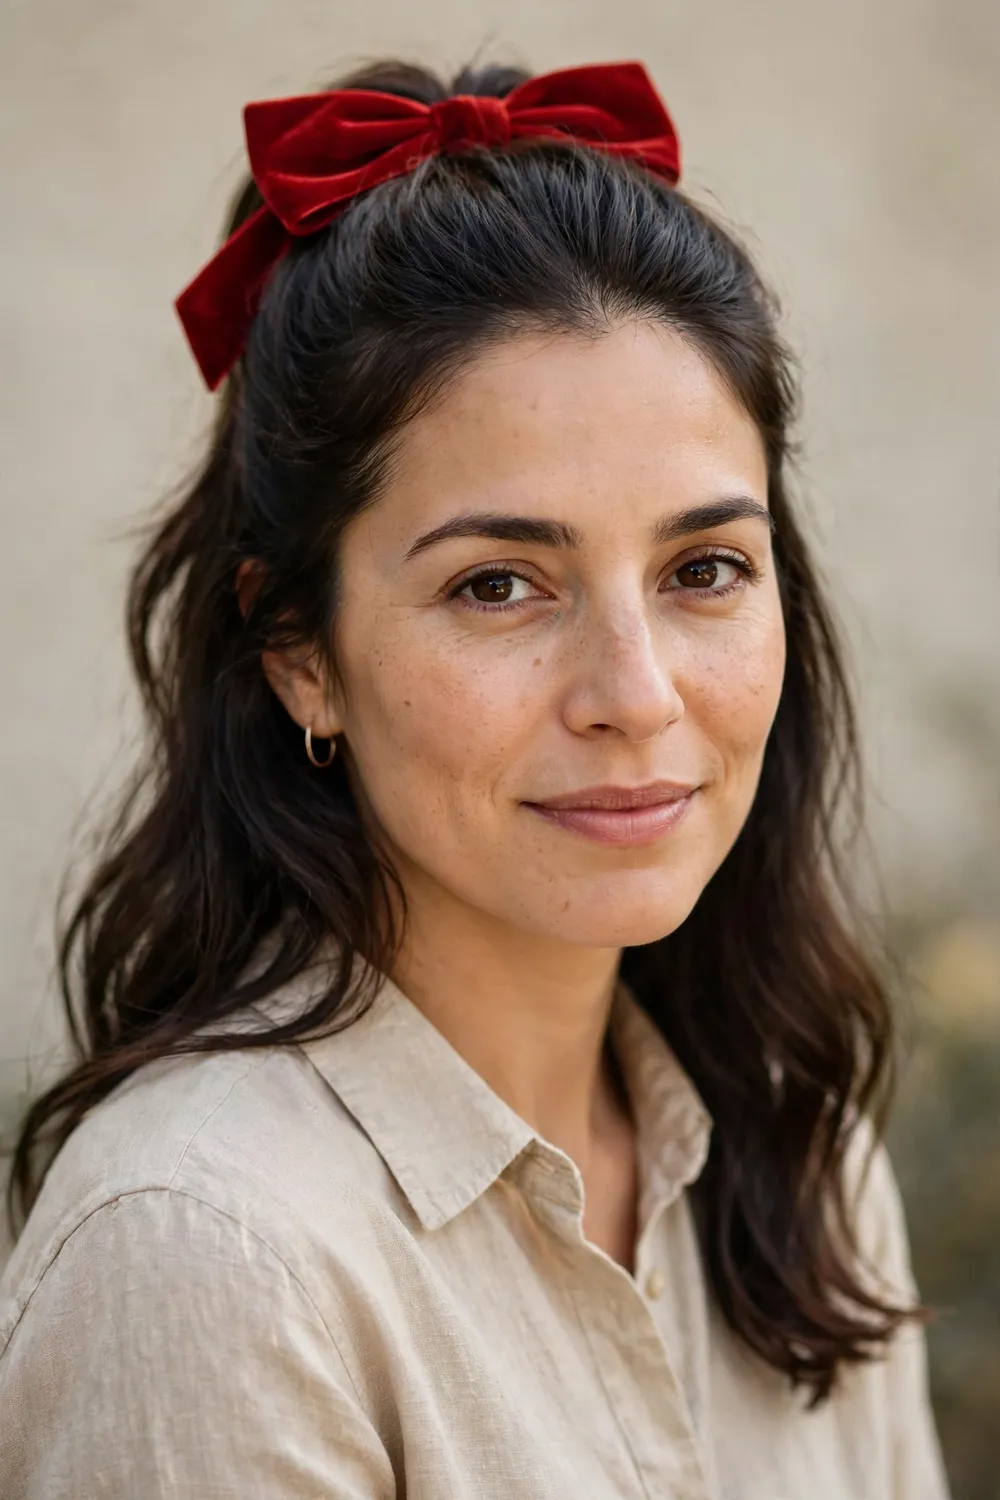
Sometimes the simplest version is the best one: pull the top half of your hair back and clip a red bow over it. Gather a section from each side, secure it with a small elastic, then clip a bow barrette right over the elastic to hide it. Leave the rest of your hair down, straight or wavy. The whole thing takes about three minutes. Smooth the top with a brush before clipping so the bow sits on a sleek surface.
A red bow is the classic Thanksgiving choice, festive without drifting into Christmas territory. Bow clips with an alligator clip back grip best, especially on fine hair. This style works on nearly every hair length past the chin, and it keeps the front of your hair out of your face while you eat. If the clip starts slipping, anchor it with a bobby pin slid underneath. Keep the bow medium-sized so it reads festive rather than costume-like.
Try this: backcomb the crown section lightly before clipping so the bow sits on a little cushion of volume.
Difficulty: Low · Cost: $ (salon)
15. Half-Up Hair Bow
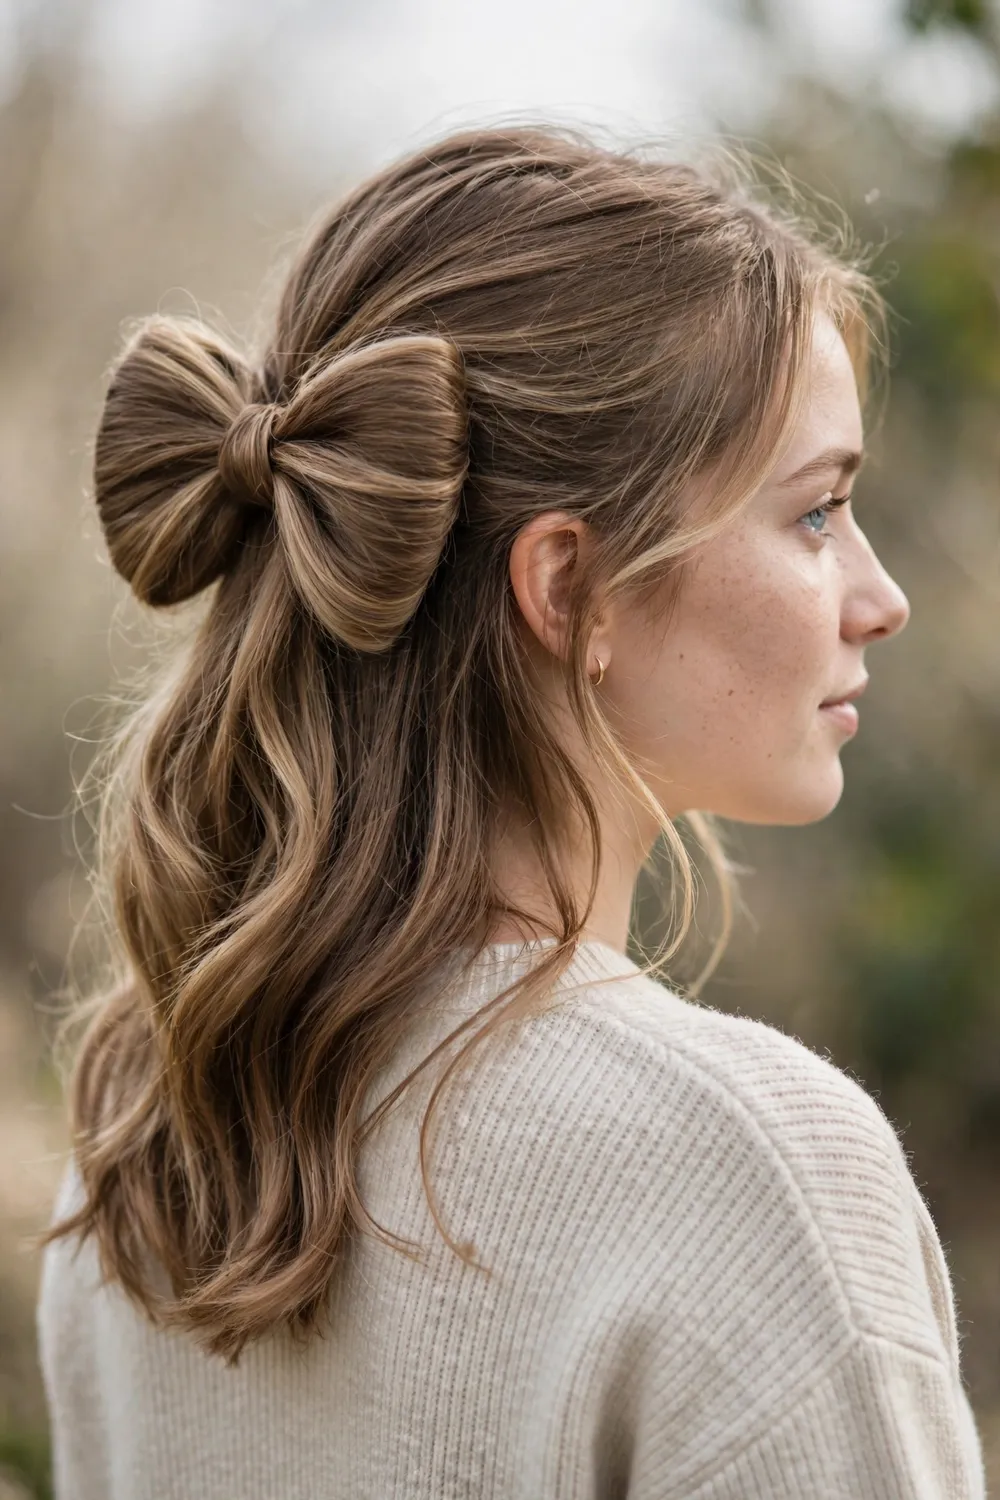
Instead of wearing a bow accessory, shape the bow from your own hair for a look that always gets compliments. Pull the top half of your hair into a half ponytail, but on the last loop of the elastic, pull the hair only halfway through to form a loop. Split the loop into two, pin each side down to form the bow’s loops, then wrap the remaining tail around the center and pin it.
This technique takes practice, so try it once before Thanksgiving morning. It works best on medium to long hair with some texture, since slippery straight hair slides out of the loops. A spritz of texturizing spray before you start gives the hair grip. The result is a bow that matches your hair exactly and never looks like an afterthought, and it photographs well from behind. Pin each loop in two places, at the inner and outer edge, for the most secure hold.
Try this: make the loops smaller than you want them at first, since they loosen slightly as you pin.
Difficulty: High · Cost: $ (salon)
16. Soft Waves with Tiny Pink Bows
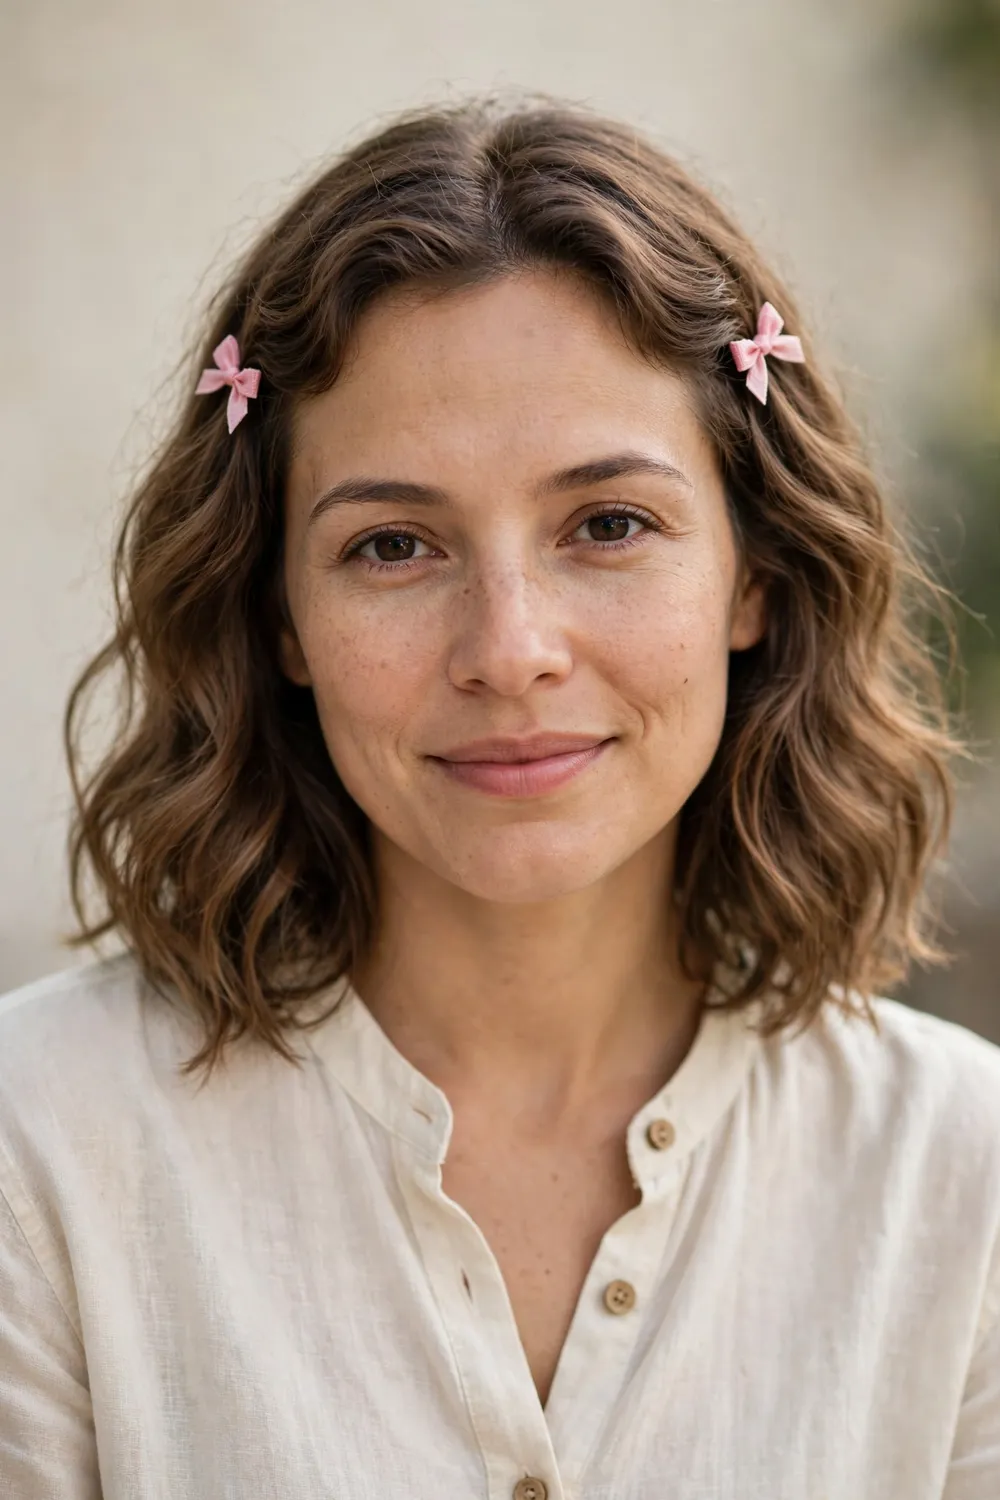
Two tiny bows clipping back the face-framing sections turn soft waves into something sweet and intentional. Curl your hair in loose waves, take a small section from each side of your face, and pull them back. Secure each with a miniature bow clip or tie a small ribbon bow around each section. The symmetry keeps it chic rather than childish. Position the bows just above the ears so they frame your face like jewelry.
Keep the bows genuinely small, about the size of a quarter, so they read as jewelry rather than costume. Dusty pink, blush, or champagne bows flatter most skin tones and hair colors. This style works on shoulder-length hair and longer, and it keeps the front pieces out of your food while framing your face for photos. It’s also one of the fastest styles here at under five minutes. Match the bow color to your lipstick or blush for a pulled-together finish.
Try this: curl the pulled-back sections first so the bows sit on defined waves instead of flat hair.
Difficulty: Low · Cost: $ (salon)
17. Gingham Bow Headband with Loose Waves
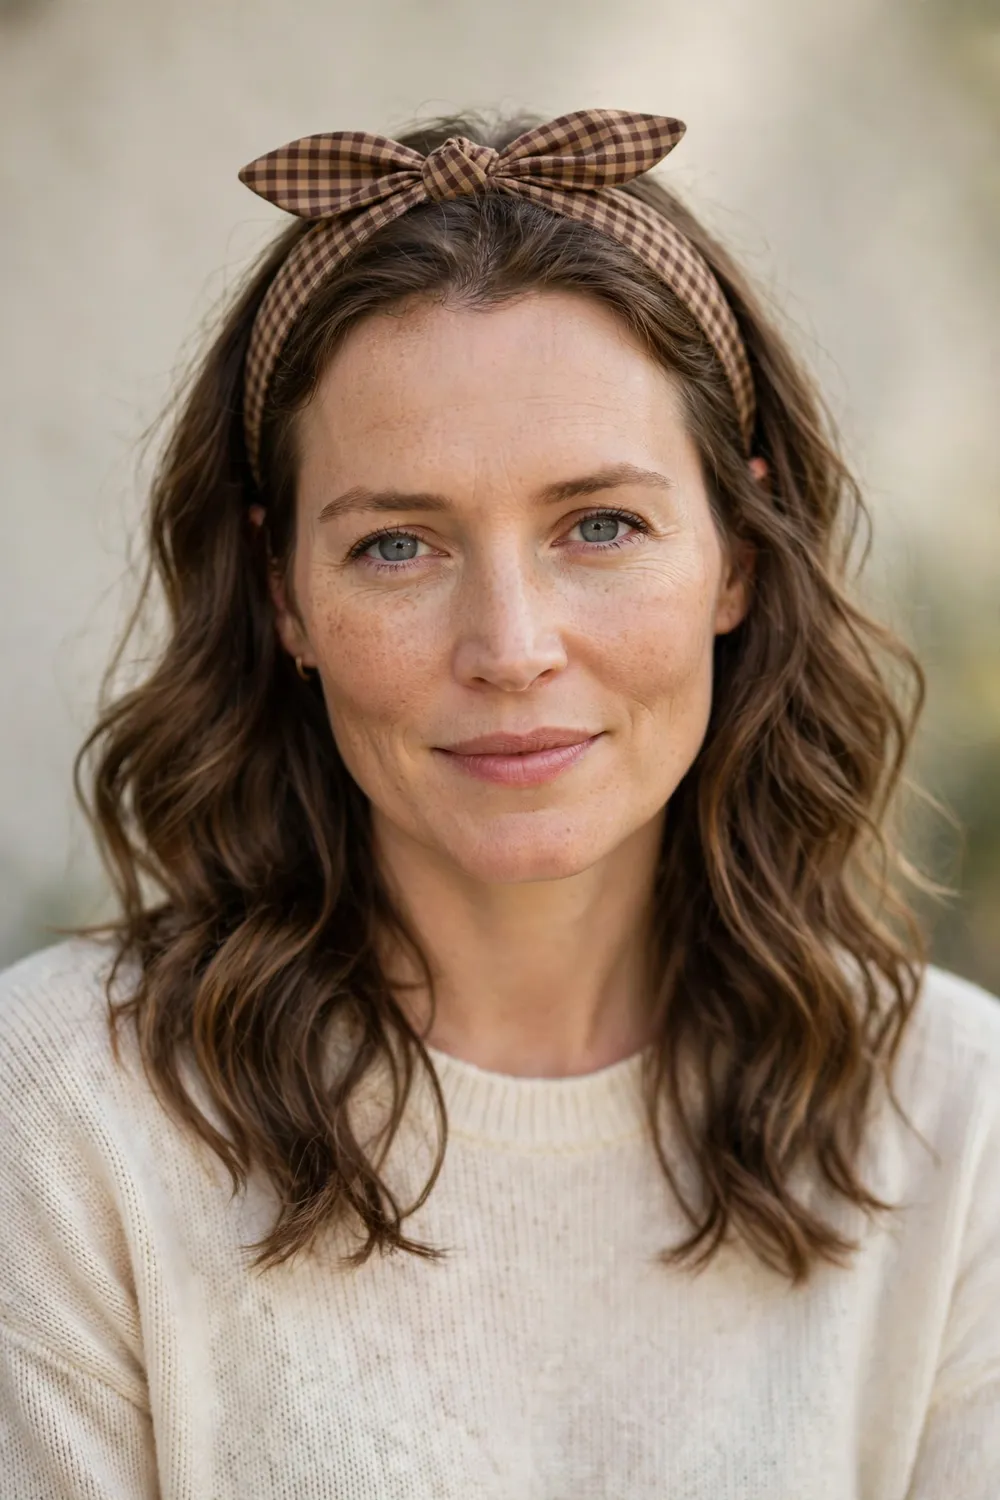
A bow headband does all the work for you: put it on, and loose waves instantly look Thanksgiving-ready. Style your hair in soft, loose waves, then slide the headband on so it sits about an inch behind your hairline. The bow can sit centered on top or pushed slightly to one side. Tuck a little hair behind your ears or leave it all loose. Push the headband back slightly after placing it so it doesn’t press into your forehead.
Gingham, plaid, or velvet headbands in fall colors are the most seasonal picks. This is the ultimate low-effort option for anyone who doesn’t want to fuss with pins or elastics, and it’s comfortable enough to wear all day. It also works on second- or third-day hair, since the headband hides a flat crown. Keep the waves soft rather than tight so the headband stays the focal point. Tease the crown lightly before sliding the headband on for a little extra lift.
Try this: choose a headband with a little grip or teeth underneath so it doesn’t slide back by afternoon.
Difficulty: Low · Cost: $ (salon)
18. Short Bob with a Floral Bow Clip
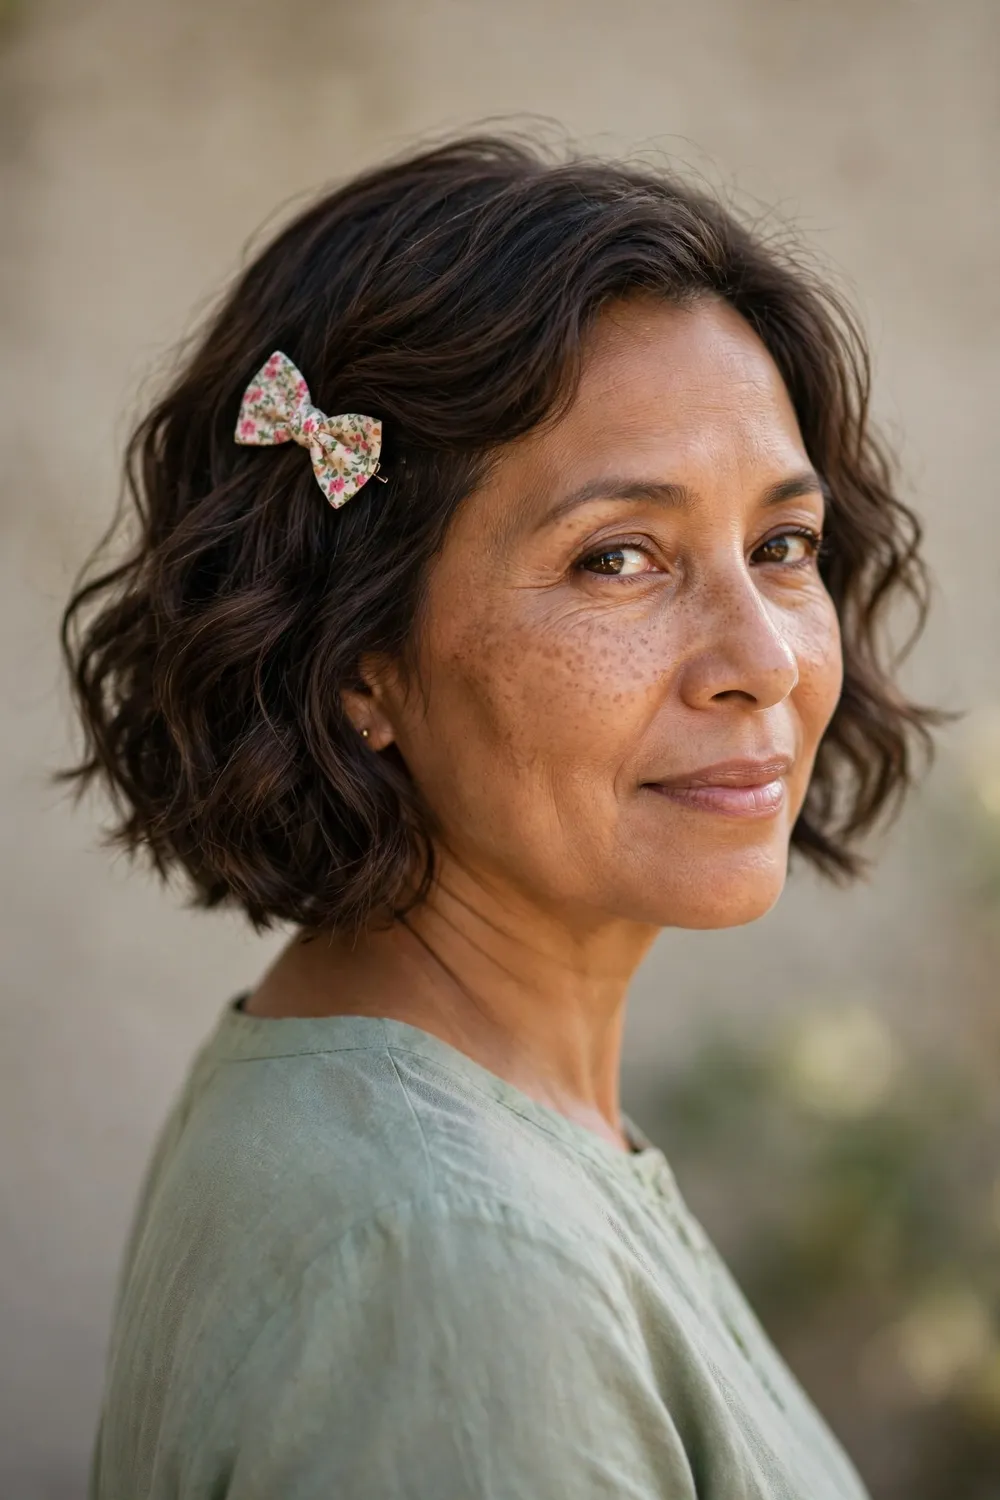
Short hair gets bows too. Style your bob in soft waves, sweep one side back, and clip a small bow barrette above the ear. A floral or patterned bow adds personality, while a solid velvet one keeps it classic. The single-sided placement draws the eye up and shows off your earrings. Choose a bow no wider than two fingers and place it just above the ear, where the hair is thickest, for the best grip.
The key for short hair is proportion: the bow should be small enough to look like an accent, not a hat. This style takes two minutes and works on chin-length bobs and lobs alike. A little texturizing spray gives the waves grip so the clip holds. Once December arrives, this same trick carries straight into party season, and these christmas hairstyles for women show how bows and accessories shift into winter looks.
Try this: wave the hair on the clipped side first so the bow sits on texture that grips the clip.
Difficulty: Low · Cost: $ (salon)
19. French Braid with a Ribbon Woven In

Weaving a ribbon directly into a French braid gives you a hairstyle that looks intricate from every angle. Tie a thin ribbon to a small section at the crown, then French braid as usual, treating the ribbon as one of your strands or laying it alongside the braid as you go. Finish with a small bow tied at the end of the braid. The ribbon peeks through the whole length.
A thin ribbon, about half an inch wide, weaves most neatly and stays flexible in the braid. Burgundy, gold, or cream ribbons all look seasonal. This style holds all day because the braid itself is the structure, and the bow at the end is the payoff. It suits medium to long hair, and it keeps every strand off your neck if the kitchen runs hot. Braid a little tighter than usual at the start so the ribbon doesn’t slip down.
Try this: secure the ribbon at the crown with a tiny elastic before you start braiding so it can’t slide out.
Difficulty: Medium · Cost: $ (salon)
20. Chunky Dutch Braids with Ribbon Weave
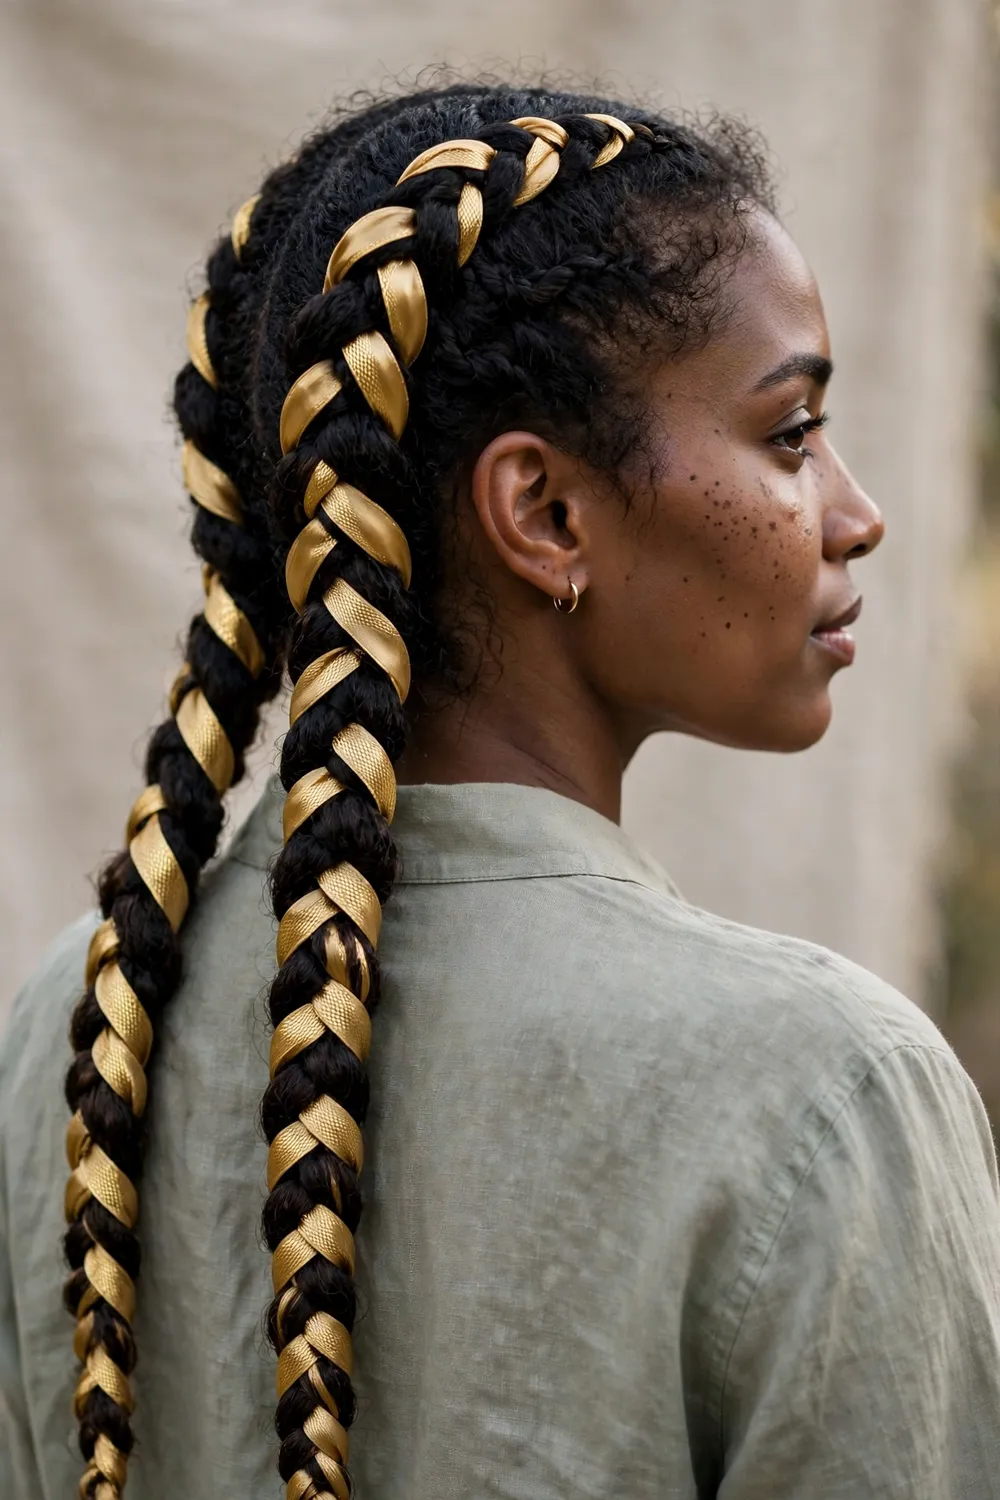
Two chunky Dutch braids with ribbon woven through each one make a bold, festive statement that still feels Thanksgiving-appropriate. Part your hair down the middle, Dutch braid each side, weaving a ribbon through the braid pattern as you work. Tie each braid off with a small bow at the end. Pull the braid edges out gently for extra fullness. Keep the center part crisp with a rattail comb so the two braids look symmetrical.
Dutch braids sit on top of the hair rather than inside it, so the ribbon stands out nicely against the braid’s ridges. Gold or bronze ribbon catches the light in photos, while rust ribbon blends into the fall palette. This style is a workhorse: it survives wind, hugs, and an entire day of activity. A dab of edge control smooths the hairline for a clean finish. Finish each braid end with a clear elastic before tying the bow for a tidy base.
Try this: pancake each braid before tying the end bows so the ribbon has room to show.
Difficulty: Medium · Cost: $ (salon)
21. Braided Pigtails with Ribbon Bows

Two simple braids tied off with ribbon bows are a classic for a reason: they keep hair completely contained and look adorable doing it. Part your hair in the middle, braid each side in a simple three-strand braid, and tie a ribbon bow around each elastic at the end. Rust, caramel, or deep red ribbons give the style its Thanksgiving feel. Braid all the way to the very ends so the bows sit on neat, tapered tips.
Keep the braids neat and the part clean for a grown-up finish, or go slightly loose for a softer look. This is one of the most comfortable styles on the list, since the weight is evenly distributed and nothing pulls. It works on most hair lengths past the shoulders and holds through anything the day throws at you. Small bows look more refined here than oversized ones. A center part keeps the look balanced, while a side part makes it more relaxed.
Try this: tie the bows in double knots so they don’t loosen while you’re moving around.
Difficulty: Low · Cost: $ (salon)
22. Candy Cane Twist with a Red Ribbon

A two-strand twist with a red ribbon woven through it looks like a candy cane and takes about five minutes. Take a section of hair along one side of your head, divide it into two parts, and twist them together while wrapping the ribbon around the twist as you go. Secure the end with an elastic and a small bow. Wear it as an accent with the rest of your hair down, or add it to a low ponytail.
A thin red ribbon is easiest to weave and reads festive without screaming Christmas. This is a great pick if you can’t braid, since a two-strand twist is much simpler to learn. The twist adds a handmade, crafty touch that fits Thanksgiving’s cozy vibe. Pin the twist’s start with a bobby pin so the ribbon doesn’t unravel from the top. Twist the two sections in the same direction every time so the twist stays tight and even.
Try this: do the twist on slightly damp hair so it holds its shape without much product.
Difficulty: Low · Cost: $ (salon)
23. Puffed Curls with Pink Bows
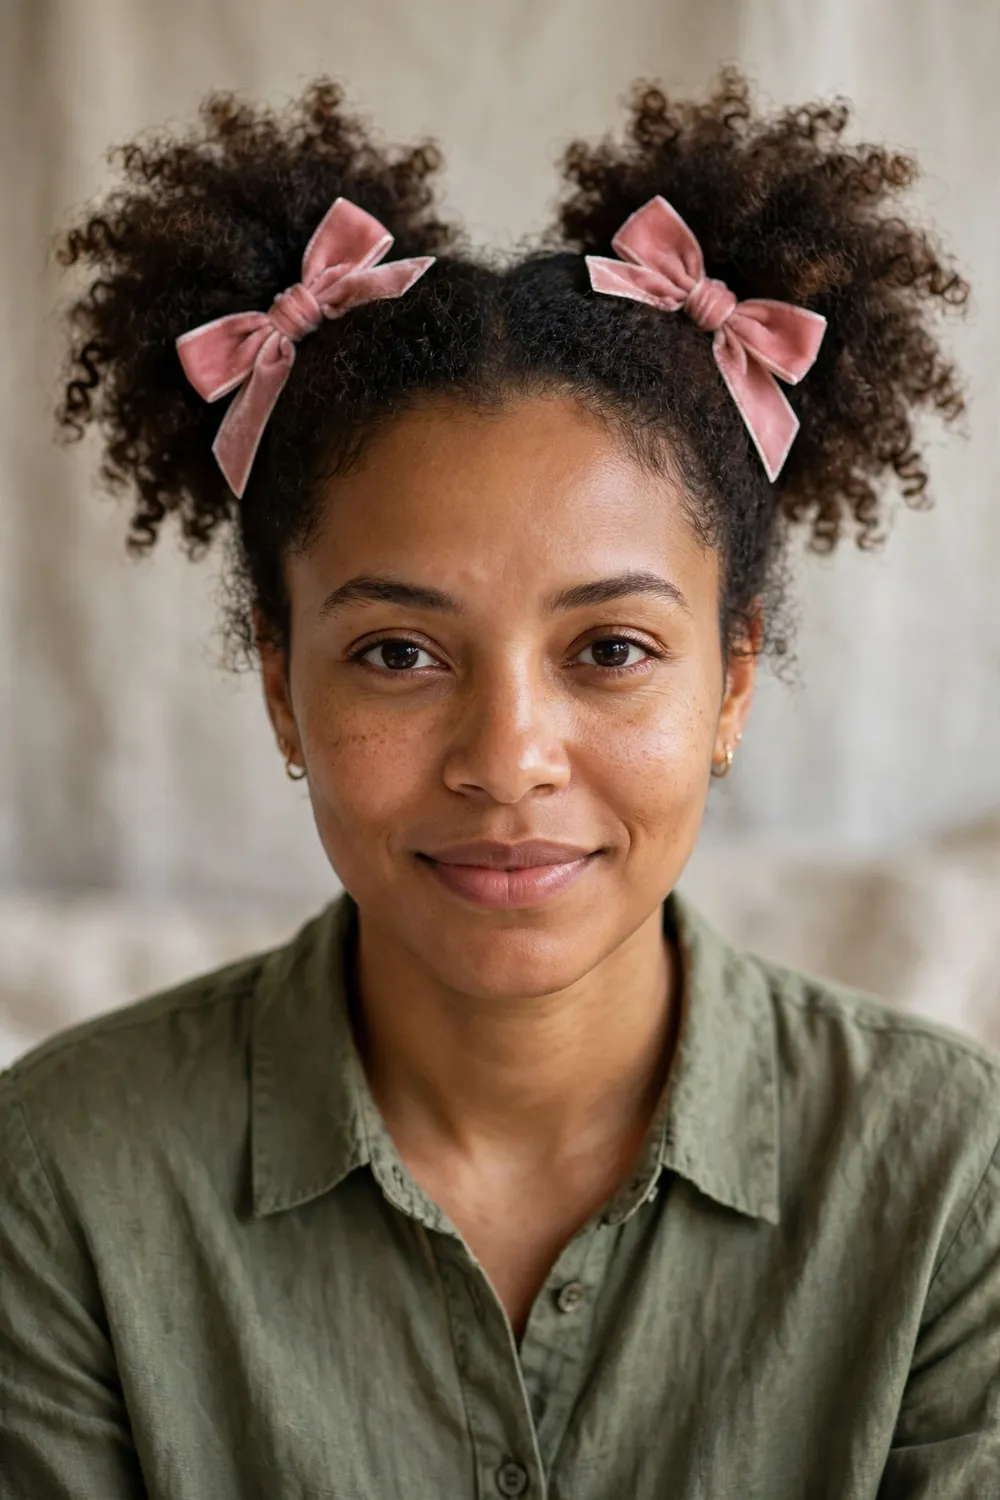
Two high puffs with a bow on each one show off natural curls while keeping everything neat for the holiday. Part your hair down the middle, gather each side into a high puff with a soft elastic, and tie a bow at the base of each puff. Fluff the puffs gently for shape and use a little curl cream for definition. Position the puffs high on the head, near the crown, for the most flattering lift.
This style celebrates texture and looks joyful in every photo. Pink, burgundy, or gold bows all work, so pick the color that matches your outfit. Soft, stretchy elastics protect curls from breakage better than tight bands. The puffs keep hair off your neck and face through the whole meal, and the bows make the style feel deliberately festive rather than everyday. Smooth the hairline with a soft brush and a little gel for a polished finish.
Try this: tie the bows around the elastic itself so they sit snugly at each puff’s base.
Difficulty: Low · Cost: $ (salon)
24. Turkey Tail Ponytail with a Bow
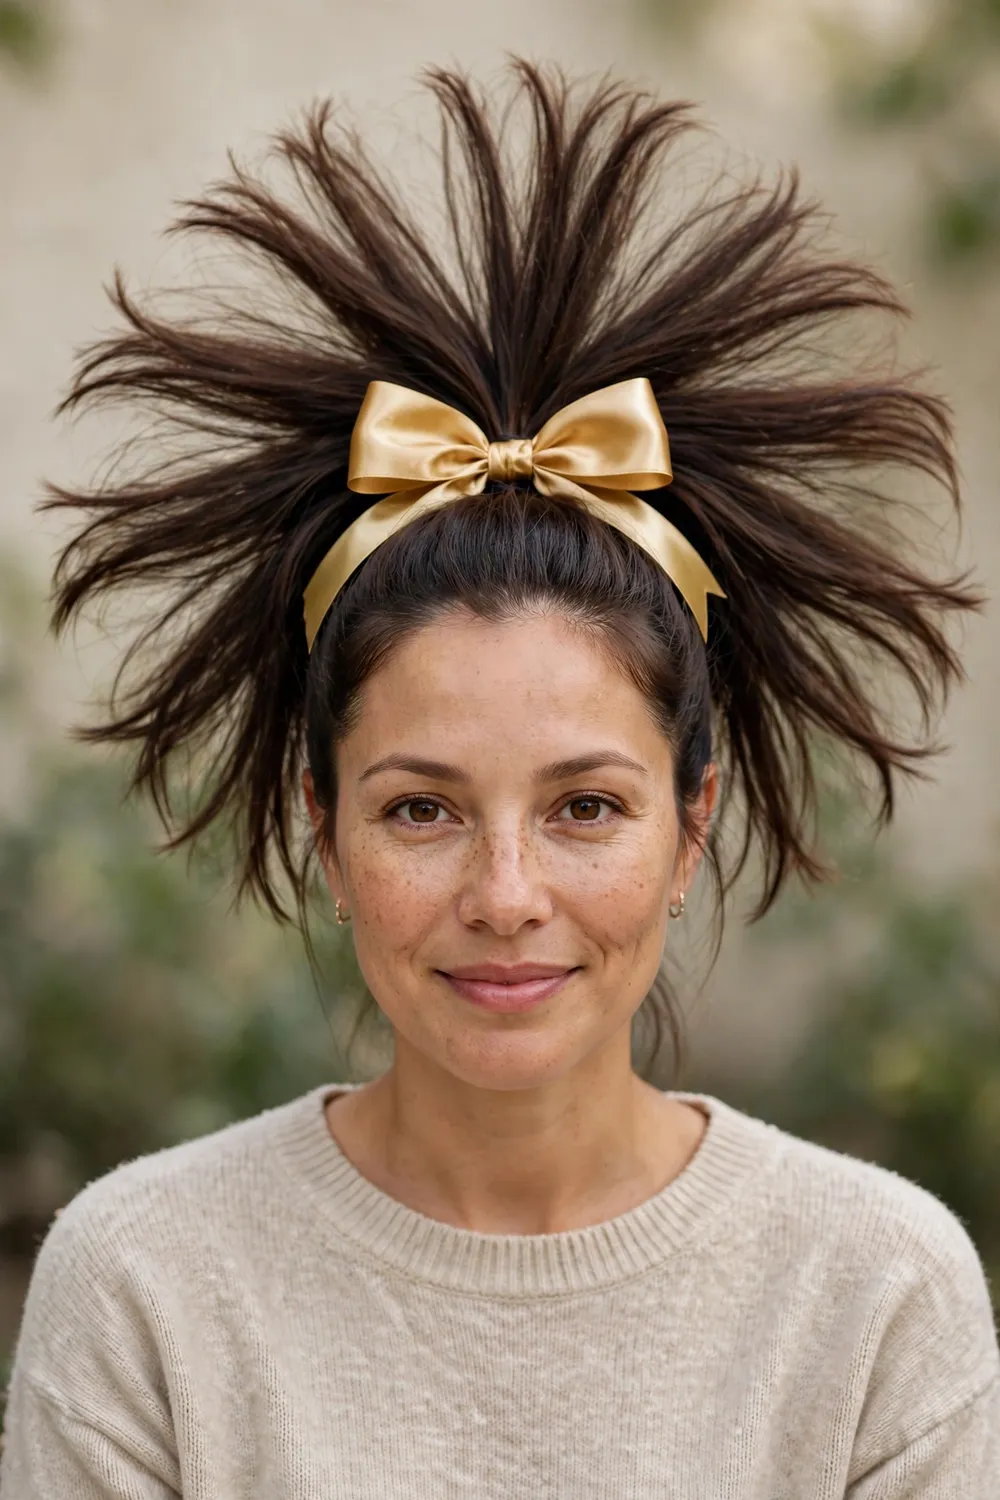
The turkey tail pony fans the ends of a high ponytail out like a tail, then finishes with a bow for festive flair. Secure a high ponytail, add small elastics every couple of inches down the length, and fan each section outward so the ends spread wide. Tie a bow at the base or tuck a small one near the top of the fanned section. Use a strong elastic at the base since the fanned sections add extra weight.
It’s a playful nod to the holiday bird that still looks like a real hairstyle, not a costume. The fanned sections give fine hair the illusion of fullness, and the elastics keep everything locked in through dessert and beyond. A gold or bronze bow ties the whole thing to the harvest table. Keep the top of the ponytail smooth with gel so the contrast with the fanned ends looks intentional.
Try this: backcomb each section lightly before fanning so the tail holds its spread all day.
Difficulty: Medium · Cost: $ (salon)
At a Glance: 24 Thanksgiving Bow Looks Compared
| Look | Best for | Holiday perk | Upkeep |
|---|---|---|---|
| Velvet Bow Ponytail | All hair types | Classic festive look in seconds | Pin the knot so it stays centered |
| Side Ponytail with a Gingham Bow | Medium to long hair | Cozy fall-casual feel | Loose elastic, soft face pieces |
| Braided Ponytail with a Bow | Long hair | Nothing falls in the food | Pancake the braid for fullness |
| Puffy Dutch Braid Ponytail with a Bow | Fine hair needing volume | Looks elaborate, takes minutes | Light hairspray on flyaways |
| High Bubble Ponytail with a Bow | Long hair, active days | Barely moves once set | Clear mini elastics for bubbles |
| Bubble Braid Pigtails with Bows | Shoulder-length and longer | Keeps hair off face and neck | Keep bubbles smooth and even |
| High Bun with a Velvet Bow | Thick or curly hair | Zero strands in the plate | Enough pins for the bun’s weight |
| Low Twisted Bun with a Velvet Ribbon | Formal dinners | Timeless, refined silhouette | Smooth the top with a brush |
| Braided Top Knot with a Bow | Active holidays | Locks in through any activity | Texturizing spray for grip |
| Curly Half-Up with a Satin Ribbon Bow | Curly and coily hair | Shows off curl texture | Curl cream for definition |
| Half-Up Waves with a Velvet Ribbon | Wavy to straight hair | Rich look in warm lighting | Tease the crown lightly |
| Half-Up Bubble Braid with a Bow | Straight to curly hair | Playful texture, easy hold | Elastics lock each bubble |
| Half-Up Twists with Ribbon Bows | Medium-length hair | Detailed look, no braiding skill | Crossed bobby pins hold twists |
| Red Bow Half-Up | Chin-length and longer | Three-minute classic | Anchor the clip with a pin |
| Half-Up Hair Bow | Medium to long hair | Bow matches your hair exactly | Texturizing spray for grip |
| Soft Waves with Tiny Pink Bows | Shoulder-length and longer | Sweet detail in five minutes | Keep bows quarter-sized |
| Gingham Bow Headband with Loose Waves | All hair types | Zero pins or elastics needed | Grippy headband stays put |
| Short Bob with a Floral Bow Clip | Bobs and lobs | Two-minute short-hair option | Texturizing spray for grip |
| French Braid with a Ribbon Woven In | Medium to long hair | Intricate look from every angle | Thin ribbon weaves neatest |
| Chunky Dutch Braids with Ribbon Weave | Thick hair | Survives wind and activity | Edge control on the hairline |
| Braided Pigtails with Ribbon Bows | Past-shoulder hair | Comfortable, balanced weight | Double-knot the bows |
| Candy Cane Twist with a Red Ribbon | Beginners who can’t braid | Five-minute handmade touch | Pin the twist’s start |
| Puffed Curls with Pink Bows | Natural curls and coils | Celebrates texture, photo-friendly | Soft elastics protect curls |
| Turkey Tail Ponytail with a Bow | Fine hair wanting fullness | Playful nod to the holiday | Backcomb before fanning |
How to Choose Your Thanksgiving Bow Style
Start with your hair length and texture. Long hair can carry oversized velvet bows and woven-ribbon braids, while bobs and lobs look best with small bow clips or a bow headband. Curly and coily hair gives buns and puffs natural volume, so lean into styles that show it off. Fine, slippery hair holds braids and twists better than plain ponytails, which tend to slide.
Next, match the style to your day. If you’re cooking, pick something fully secured like a braided top knot or bubble pigtails. If you’re mostly visiting and posing for photos, a half-up style with waves shows off your hair’s length and movement. These thanksgiving hairstyles with bows all photograph well, but the ones with the bow at the back need a second person to check placement before the camera comes out.
Finally, keep the bow itself in the Thanksgiving palette: burgundy, rust, forest green, bronze, and champagne all read fall. Save bright red and green combos for December. One bow per style is the sweet spot; two small matching bows work for pigtails and puffs, but more than that starts looking like a costume.
Bow Placement and All-Day Hold
Placement. Where the bow sits changes the whole look. A bow at the base of a ponytail or bun is the classic choice and shows in most photos. A bow clipped to one side feels softer and more romantic. For half-up styles, place the bow where the sections meet, and check it in a hand mirror from behind before you leave.
Securing. Bows slip when they’re only held by a clip’s grip. Tie or clip the bow over a small elastic, then slide a bobby pin through the bow’s knot and into the hair underneath. For ribbon tied into a bow, a double knot plus one crossed pin keeps it centered through hugs, car rides, and couch naps.
Weather-proofing. November air is dry, and indoor heating makes it worse. Smooth a pea-sized amount of cream or serum over the surface before adding the bow to tame flyaways. A light mist of flexible-hold hairspray over the finished style keeps everything in place without stiffness.
Comfort. You’ll wear this style for eight hours or more, so skip anything that pulls. Secure buns and ponytails firmly but not tightly, and avoid placing a bulky bow where you’ll lean back against a chair or car seat. If your scalp aches by midday, loosen the base slightly and re-pin; the bow will hide the adjustment.
Frequently Asked Questions
What size bow works best for Thanksgiving hairstyles?
Match the bow to your hair’s volume. Long, thick hair can carry an oversized bow of four to five inches without it looking out of place. Medium hair suits a classic three-inch bow. For bobs, fine hair, or face-framing accents, keep bows around one to two inches so they read as a detail rather than the whole style. When in doubt, go slightly smaller; a modest bow always looks intentional.
How do I keep a hair bow from slipping out all day?
Anchor the bow to structure, not just hair. Tie or clip it over a small elastic at the style’s base, then push a bobby pin through the bow’s knot into the hair underneath. Start with day-old hair or add texturizing spray, since clean, slippery hair lets clips slide. A light mist of hairspray over the finished style adds grip, and carrying two spare pins lets you fix any loosening in seconds.
What color bow should I wear for Thanksgiving?
Stick to the fall palette: burgundy, rust, forest green, chocolate brown, bronze, gold, and champagne. These colors read Thanksgiving instantly and flatter the warm outfits people wear to dinner. Black velvet also works and looks chic against any hair color. Save bright red-and-green combinations for December so your look doesn’t feel like Christmas arrived early.
Can I wear bows with short hair for Thanksgiving?
Yes, just scale the bow down. A small bow clip swept to one side of a bob, a bow headband over loose waves, or two tiny bows pinning back face-framing pieces all work on chin-length hair and longer. The rule is proportion: the bow should look like an accent, not overwhelm the cut. A little texturizing spray gives short hair the grip a clip needs to stay put.
How do I make a hair bow look grown-up instead of childish?
Three things keep bows sophisticated: fabric, size, and styling. Choose velvet, satin, or grosgrain over shiny costume ribbon. Keep the bow medium-sized and neat rather than oversized and floppy. Pair it with polished styling, like smooth waves or a sleek bun, instead of messy pigtails. One well-placed bow with an elegant base style reads festive and adult every time.
Final Thoughts
A bow is the smallest change that makes the biggest difference on Thanksgiving. Pick one of these thanksgiving hairstyles with bows the night before, lay out the ribbon or clip with your outfit, and give yourself ten extra minutes in the morning. You’ll look like you tried, your hair will survive the whole day, and the photos will prove it.

