



Short hair is supposed to save time, but some mornings it does the opposite. These cute easy hairstyles for short hair are built for real life: every style below takes 10 minutes or less, needs only basic tools, and works on second-day hair. No advanced braiding skills required.
A claw clip and a pack of bobby pins cover most of these styles, which work best when you have five minutes and a mirror.
Quick Takeaways
- Every style here takes 10 minutes or less, and most take under 5.
- Second-day hair holds pins and braids better than freshly washed hair.
- Use a heat protectant every time a hot tool touches your hair.
- A $6 claw clip and a pack of bobby pins cover half this list.
- Start with your hair length: pixie styles differ from bob-length styles.
1. Messy Top Knot

Gather the top half of your hair, from temple to temple, and secure it with a small elastic at the crown. Twist the ponytail loosely and wrap it around its base, then pin it with two bobby pins. Pull out a few face-framing pieces with your fingers.
Don’t pull the section too tight. It works on chin-length hair and longer, and hides greasy roots well.
Try this: dust a little dry shampoo at the roots before you gather the hair. It adds grip and soaks up oil at the same time.
Difficulty: Easy · Cost: $0–$5 (elastic pack, bobby pins)
2. Side Braid

Make a deep side part and start a three-strand braid right at the hairline, feeding in small sections as you move toward your ear. Secure the end behind your ear with two crossed bobby pins.
Don’t braid freshly washed hair for this one. Clean hair is slippery and the braid loosens within an hour. Day-old hair, or hair with a little texture spray, holds the shape until evening.
Try this: pancake the braid by gently tugging each loop wider after pinning. It makes thin hair look twice as thick.
Difficulty: Easy · Cost: $0–$4 (bobby pins, clear elastics)
3. Pixie Pompadour

Rub a dime-sized amount of styling gel or pomade between your palms and work it through the top of your pixie. Use a comb or your fingers to push the front section up and back, building height at the crown. Four minutes, no heat, no pins.
Less product is more here. A second dime-sized amount turns the style greasy instead of piecey.
Try this: blow-dry the top section upward for 30 seconds before adding product. The pre-set volume lasts all day.
Difficulty: Easy · Cost: $6–$10 (gel or pomade)
4. Headband Tuck

Place a wide fabric headband over your hair, about two inches back from your hairline. Starting at one side, take two-inch sections and tuck them up and over the band, working your way around to the other side. Tuck the ends in so nothing hangs loose. It reads dressy enough for dinner.
Pick a headband with some grip, not slick satin, or the tucks slide out. This needs at least chin-length hair to work.
Try this: mist the tucked sections with light-hold hairspray before your final mirror check. It locks the roll without stiffness.
Difficulty: Easy · Cost: $5–$10 (fabric headband)
5. Textured Low Chignon

Spray dry shampoo or texture spray through dry hair and part it to one side. Gather everything loosely at the nape of your neck, twist it into a low bun, and secure with four to six bobby pins. Seven minutes gives you a style that passes at weddings and job interviews.
The texture step is not optional. On clean, silky hair the twist unravels within the hour.
Try this: cross two bobby pins in an X over the bun’s base. The X formation grips far better than parallel pins.
Difficulty: Easy · Cost: $0–$8 (texture spray, pins)
If you need this style to survive a full ceremony, our bridal hairstyles for short hair guide covers longer-hold versions of the low chignon.
6. Claw Clip Twist
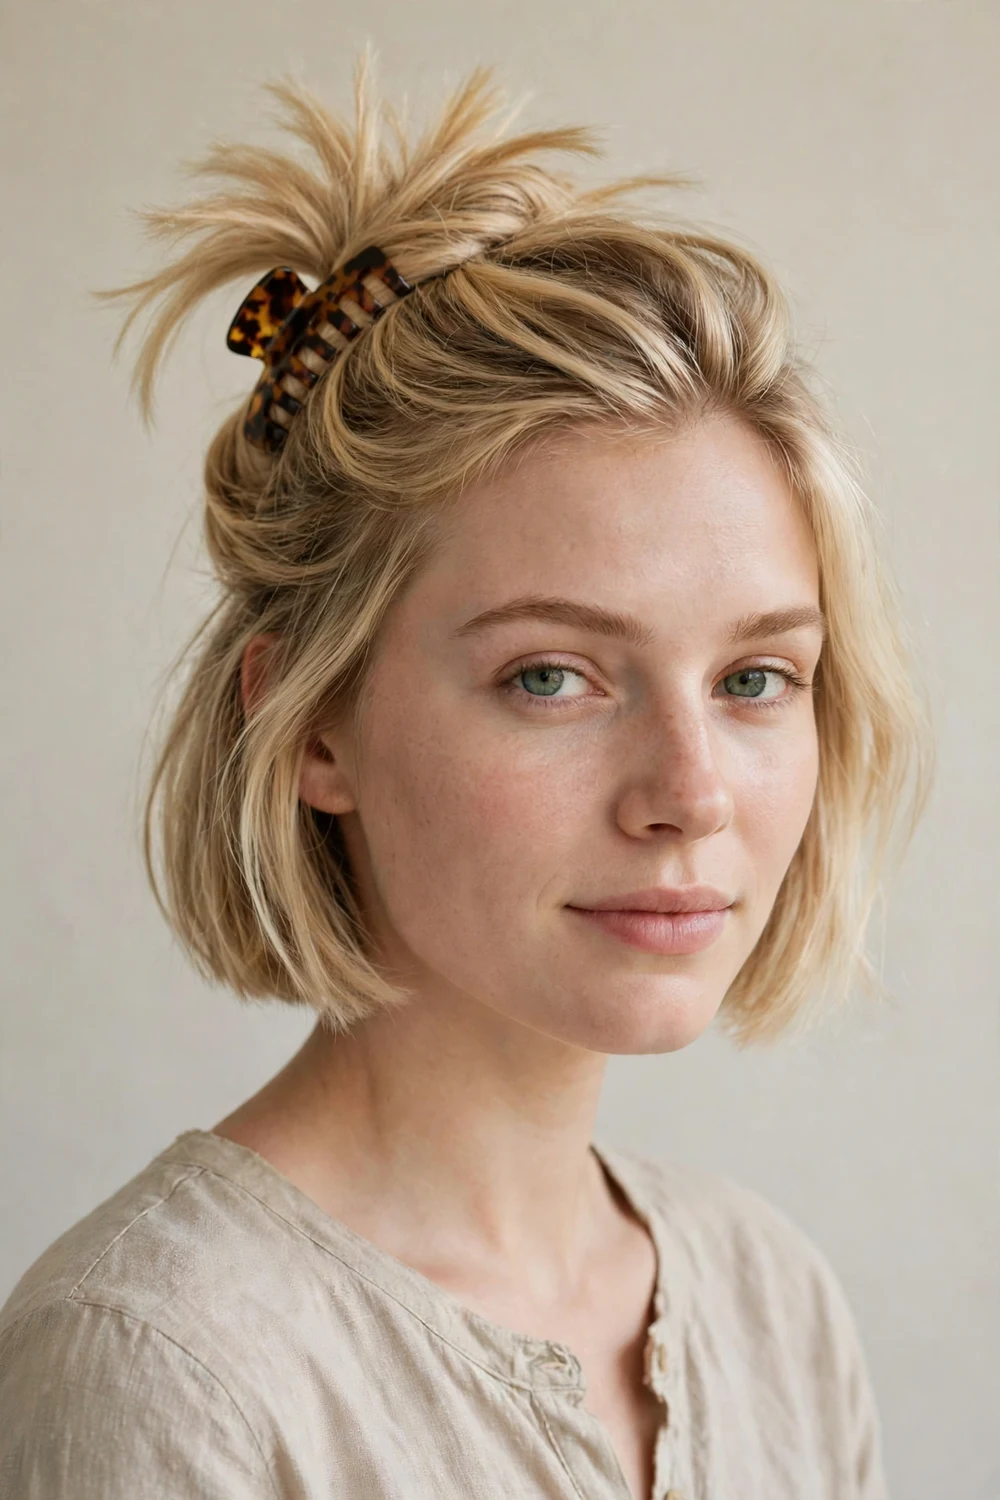
Gather your hair at the back as if making a low ponytail, twist it upward in one motion, and clamp a medium claw clip over the twist. Two minutes, one tool, done. It works on bobs, lobs, and growing-out pixies.
Size the clip to your hair. A small clip on thick hair pops open by lunch. A medium 3-inch clip handles most short hair.
Try this: twist in the opposite direction of your natural growth pattern. The tension holds longer with zero extra pins.
Difficulty: Very easy · Cost: $4–$8 (claw clip)
Girls with very thick hair should size up to a large clip. Our short hairstyles for thick hair article lists cuts that make thick hair quicker to style every morning.
7. Dutch Braid Crown

Part your hair down the middle and Dutch braid each side, starting at the temple and working toward the back of your head. You only need to braid the top layer; leave the shorter underlayers loose. Pin the two braid ends together at the back and tuck any tails underneath. Budget 10 minutes if you are new to Dutch braiding, 6 once you have the motion down.
Dutch braids sit on top of the hair instead of inside it, which is why they show up so well on short lengths.
Try this: braid on hair with dry shampoo in it. The grit gives short layers something to grip so the braid doesn’t shed pieces.
Difficulty: Medium · Cost: $0–$5 (elastics, pins, texture spray)
8. Pinned Fauxhawk

Lightly tease the center strip of your hair, from forehead to crown, with a fine-tooth comb. Smooth the sides down and pin small sections toward the middle with bobby pins, stacking them so the center strip stands tall. Six minutes, zero cutting involved.
Tease near the roots, not down the shaft, or detangling takes forever. Two to three strokes per section is plenty. Pin the sides first, then fluff the center last.
Try this: spray each teased section with hairspray before smoothing the top layer over it. The hold doubles without looking stiff.
Difficulty: Medium · Cost: $0–$6 (pins, teasing comb)
9. Deep Side Part and Tuck

Comb a deep part about two inches off center, on whichever side your hair naturally falls. Sweep the smaller side back and tuck it behind your ear, securing it with one flat bobby pin placed vertically. Leave the larger side to fall forward. Three minutes, one pin, and your whole face shape changes.
A deep part adds instant volume at the crown because the hair has farther to fall.
Try this: use a pin that matches your hair color exactly. A visible pin ruins the clean line this style depends on.
Difficulty: Very easy · Cost: $0–$3 (bobby pins)
Fine hair slips out of pins fast, so the cut underneath matters. Our short hairstyles for thin hair guide covers cuts that give fine hair more grip for styles like this one.
10. Braid as Headband

Take a one-inch section of hair from behind one ear and braid it tightly to the ends. Pull it across your head like a headband and pin it behind the opposite ear. Eight minutes, no store-bought headband needed.
Braid it tighter than you think you need to. A loose braid stretches and sags by afternoon. Anchor the starting point with a pin first so the braid doesn’t pull your hairline.
Try this: do two thin braids instead of one and pin them a half inch apart. The double line looks like a deliberate accessory.
Difficulty: Easy · Cost: $0–$3 (pins, small elastic)
11. Scarf-Wrapped Low Bun

Make a simple low bun at your nape with an elastic and a few pins. Fold a square silk scarf into a band, wrap it around the bun’s base, and tie it in a knot or bow at the top. Six minutes total. The scarf covers a multitude of sins: lumps, stray ends, and yesterday’s roots.
Cotton scarves slip; silk or satin stays put.
Try this: pick a scarf with a color from your outfit. The match makes the whole look seem planned.
Difficulty: Easy · Cost: $6–$12 (silk scarf)
12. Mini Space Buns

Part your hair down the middle and gather each half into a small high ponytail. Twist each ponytail into a mini bun and pin it. Leave the back layers down if they are too short to reach. Eight minutes for festivals, gym days, and casual weekends.
Keep the buns small and high. Let escaping layers frame your face instead of fighting them.
Try this: wrap a thin strand from each ponytail around its elastic before pinning the bun. It hides the elastic completely.
Difficulty: Easy · Cost: $0–$4 (mini elastics, pins)
13. Twisted Front Pieces

Take a two-inch section from each side of your front hairline and twist each one back toward your ears. Cross the twists at the back of your crown and pin them with two crossed bobby pins. Four minutes. It pulls hair off your face without a full updo, so the length still shows.
Twist away from your face so the twists lie flat instead of buckling. It works on straight, wavy, and curly hair alike.
Try this: add a light mist of flexible-hold spray to each section before twisting. It keeps flyaways down without crunch.
Difficulty: Very easy · Cost: $0–$3 (bobby pins)
14. Flat-Iron Waves

Spray a heat protectant through dry hair first, every time. Clamp one-inch sections in a flat iron, twist the iron a half turn, and glide down to the ends. Alternate the twist direction for a natural finish, then finger-comb the waves apart. Ten minutes for polished waves.
The protectant step is mandatory, not optional. Keep the iron at or below 350°F for fine hair and 400°F for thick hair.
Try this: wave only the top layer and leave the underlayers straight. You get the full effect in half the time.
Difficulty: Medium · Cost: $8–$15 (heat protectant; flat iron if you don’t own one)
15. Slicked-Back Wet Look

Start with damp hair and rake a quarter-sized amount of strong-hold gel through it from roots to ends. Comb everything straight back with a fine-tooth comb, pressing it close to your head. Let it air-dry without touching it. Five minutes for a sleek evening look.
Don’t touch it while it dries. Every finger-comb breaks the smooth shell and creates frizz you can’t fix without starting over.
Try this: add a deep side part before slicking for a red-carpet variation that takes ten extra seconds.
Difficulty: Easy · Cost: $5–$9 (strong-hold gel)
16. Finger-Coiled Curls

On damp hair, work a leave-in conditioner through one small section at a time. Wrap each section around your finger from root to tip, then release the coil. Work around your whole head in rows. Eight minutes of coiling gives natural curls definition that lasts for days with nightly pineappling.
Small sections are the whole secret. Sections wider than your finger produce loose, frizzy curls instead of defined coils.
Try this: sit under a hooded dryer or use a diffuser for 10 minutes after coiling. Fully dry roots prevent the coils from stretching out by noon.
Difficulty: Medium · Cost: $6–$12 (leave-in conditioner)
17. Decorative Clip Accents

Sweep one side of your hair back and secure it with two or three decorative clips: pearls, gold bars, or jeweled pins. Stack them in a row for a deliberate look, or scatter one statement clip above your ear. Two minutes, and yesterday’s unwashed hair suddenly looks styled.
Placement matters more than the clip itself. Clips lined up along the temple draw the eye and look intentional. Press each clip firmly so it grips the underlayers too.
Try this: match the clip metal to your earrings. The coordination reads polished with zero extra effort.
Difficulty: Very easy · Cost: $5–$10 (decorative clip set)
These clips dress up any short cut. If you want fresh cut ideas to pair them with, our cute hairstyles for short hair collection covers 22 bobs and pixies that style fast.
18. Twisted Low Ponytail

Twist a two-inch section back from each temple and gather both twists plus the rest of your hair into a low ponytail at your nape. Secure with an elastic, then wrap a thin strand around the elastic and pin it underneath. Five minutes. The twists add interest that a plain short ponytail lacks.
Pin escaping layers flat against your head instead of re-gathering everything. A few crossed pins at the nape hold better than one elastic doing all the work.
Try this: tease the crown lightly before gathering. The lift keeps the style from looking flat against your head.
Difficulty: Easy · Cost: $0–$4 (elastic, pins)
19. Silk Scarf Tie

Fold a square silk scarf into a two-inch band and place it over your hair like a headband, tying it at the top of your head or just behind one ear. Leave the knot and ends showing as part of the look. Four minutes. It tames frizz, covers roots, and adds color in one step.
Double-knot it so it stays put all day.
Try this: use the scarf to hold back just the front section, leaving the back loose. You get the accessory without full coverage.
Difficulty: Very easy · Cost: $6–$12 (silk scarf)
20. Overnight Braid Waves

Before bed, mist damp hair lightly with water and make two loose three-strand braids, one behind each ear. Sleep on them. In the morning, undo the braids and shake the waves out with your fingers. Three minutes of morning work for texture that looks heat-styled.
Keep the braids loose, since tight ones create crimps instead of waves. If your hair is very short, do four smaller braids instead of two so every section gets waved.
Try this: add a pea-sized drop of styling cream to each braid before bed. The waves hold their shape hours longer.
Difficulty: Very easy · Cost: $0–$3 (two elastics)
Quick Comparison
| Style | Works best on | Time needed | What you need |
|---|---|---|---|
| Claw Clip Twist | All lengths | 2 minutes | Medium claw clip |
| Decorative Clip Accents | All lengths | 2 minutes | Pearl or jeweled clips |
| Messy Top Knot | Chin-length and longer | 3 minutes | Elastic, 2 bobby pins |
| Deep Side Part and Tuck | All lengths | 3 minutes | 1 bobby pin |
| Overnight Braid Waves | All lengths | 3 minutes (morning) | 2 elastics |
| Pixie Pompadour | Pixie cuts | 4 minutes | Gel or pomade |
| Headband Tuck | Chin-length and longer | 5 minutes | Wide fabric headband |
| Flat-Iron Waves | Straight to wavy hair | 10 minutes | Flat iron, heat protectant |
How to Choose the Right One
Start with your length, not the style. Pixie cuts suit the pompadour, the slicked-back look, and clip accents. Chin-length and longer hair works for the chignon, the headband tuck, and the top knot. Picking a style your length can’t support is the top reason easy styles fail.
Then be honest about your mornings. If you truly have three minutes, stay in the two-to-four-minute group: claw clip, deep part, overnight waves. Save the Dutch braid crown and flat-iron waves for days with ten spare minutes. A style you skip because it takes too long helps no one.
A few things to avoid: heavy oils on fine hair before pinning, since pins slide right out. Tight pulled-back styles every single day, since constant tension stresses the hairline. And never skip heat protectant when hot tools are involved, even for a quick pass.
Frequently Asked Questions
How can I style short hair fast in the morning?
Keep it to two-minute styles on rushed days: a claw clip twist, a deep side part with one pin, or decorative clips on unwashed hair. Prep the night before with loose braids for waves, and keep your tools in one spot so you are not hunting for pins.
What is the easiest hairstyle for a very short pixie?
The pixie pompadour or the slicked-back wet look. Both need only product and your fingers, take under five minutes, and work as the cut grows out. Clip accents are the fastest option of all at two minutes.
How do I make short hairstyles last all day?
Style second-day hair instead of freshly washed hair, since natural oils give pins grip. Cross bobby pins in X shapes, use texture spray before braiding, and finish with a light mist of flexible-hold hairspray. Avoid touching the style once it is set.
Can I get cute styles without using heat?
Yes. Nineteen of the twenty styles on this list need no heat at all. Overnight braids give you waves, finger coiling defines natural curls, and accessories like scarves, headbands, and pearl clips do the rest. Only the flat-iron waves require a hot tool.
What basic products do I need for easy short hairstyles?
A starter kit covers nearly everything here: bobby pins, small clear elastics, one medium claw clip, dry shampoo or texture spray, a light-hold hairspray, and a styling gel or cream. Add a heat protectant if you ever use hot tools. Total cost runs about $25 to $40.
Final Thoughts
Easy doesn’t mean boring. The difference between a rushed ponytail and a cute style is usually one pin, one twist, or one accessory. Pick three styles from this list that fit your length, practice each once on a slow evening, and your busy mornings get a lot simpler.
