


If your hair sits between your shoulders and your collarbones and falls flat by lunchtime, I get why a shag sounds appealing. Medium length is long enough to feel like real length, and a shag adds the layers and movement that fine hair rarely shows on its own. The trick is balance. Too little layering and the cut looks like a plain one length style. Too much, and the ends can look thin.
I put this list together for that exact balance. Every idea here is a medium length shag made for thin fine hair, with notes on where the layers sit, what the fringe does, and how much styling the cut asks for each morning. Save the photos that match your natural texture first, then look at color and bangs.
Key Takeaways
- Medium length helps fine hair, because the ends keep enough weight to look full while layers add lift higher up.
- Keep the shortest layers long and the bottom fairly full. Heavy thinning at the ends is the fastest way to make thin hair look sparse.
- Bangs change the front more than any other choice. Wispy, bottleneck, curtain, and side swept styles stay light at the hairline.
- Light products work best: mousse, dry texture spray, and salt spray add grip without joining fine strands together.
- Color can add the look of density. Root shadow, fine highlights, and blended tones break up the surface so layers read clearly.
1. Barely Layered Collarbone Shag
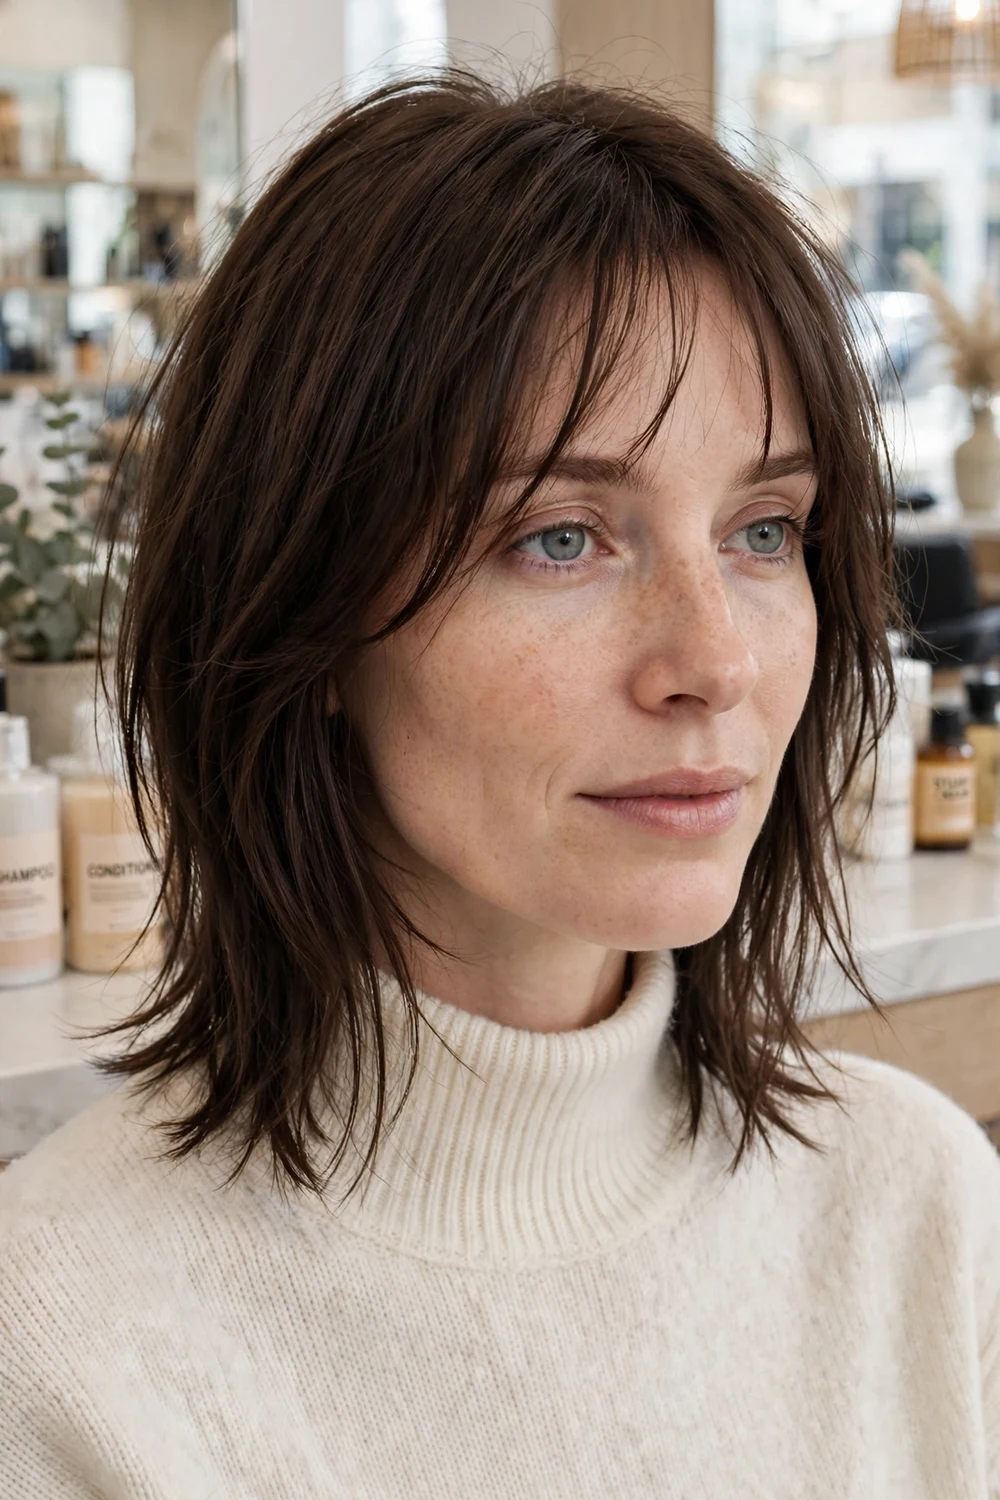
This cut keeps layering very light and starts it low, below the chin, so the ends still look full. The length sits at the collarbone and the outline stays soft, with just enough separation to stop fine hair from lying in one flat sheet.
Ask your stylist to point cut the ends and keep the shortest layer long. That detail matters on thin hair, because short layers taken too high can leave the bottom looking sparse after a few weeks of growth.
Try this: Blow dry with mousse at the roots only and leave the ends to dry mostly on their own for the softest finish.
Difficulty: Low · Cost: $ (salon)
2. Rounded Shoulder-Length Shag

The sides curve in a rounded shape that adds width where fine hair often looks narrow. Layers are blended around the back and sides, and the bottom edge stays fairly full so the cut reads thick from behind.
This shape suits straight to slightly wavy hair and works well if your hair falls flat at the sides. A round brush through the mid lengths helps the curve hold without adding heavy product.
Try this: Dry the sides away from the face with a round brush, then pinch the ends lightly to keep the rounded outline clear.
Difficulty: Low · Cost: $ (salon)
3. Piecey Shoulder-Length Shag with Separated Ends

Separated, piecey ends are the point of this cut. The layers are cut to fall in small sections, so light catches each piece and the hair looks like it has more strands than it does.
Keep the pieces defined with dry texture spray rather than wet gels or creams. Heavy product joins the pieces back together and removes the effect the cut was built to create.
Try this: Spray dry texture spray from a distance, then separate the ends with your fingers instead of a brush.
Difficulty: Low · Cost: $ (salon)
4. Bottleneck Bang Medium Shag
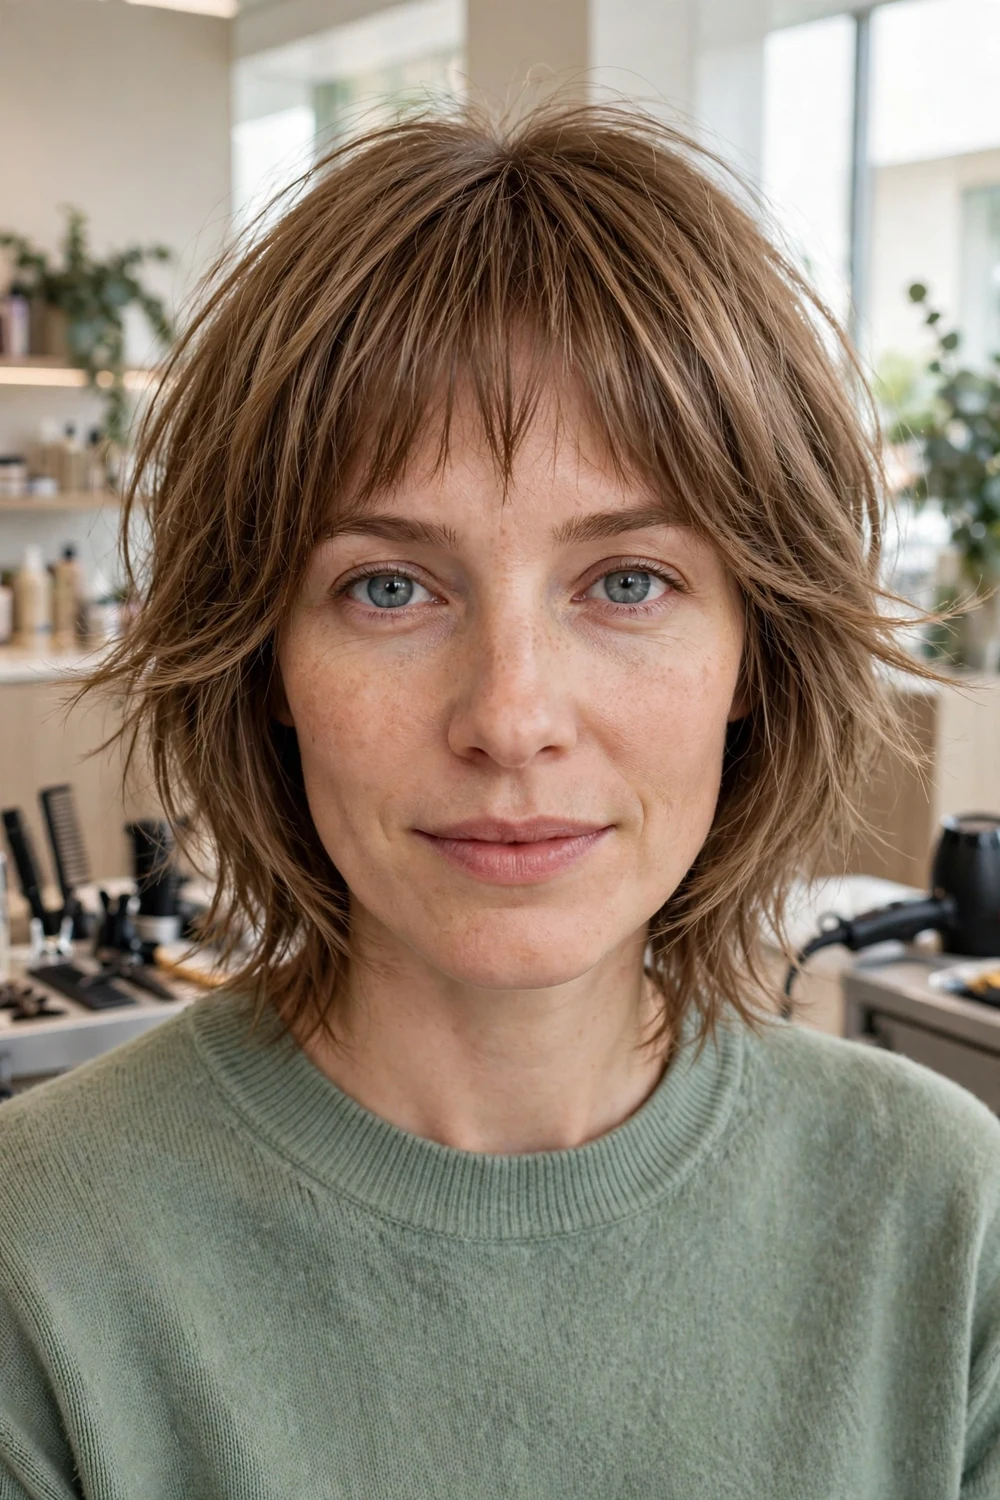
Bottleneck bangs start narrow at the forehead and open wider at the cheekbones, following the shape of a bottle neck. They add a clear front detail while keeping the fringe light, which suits a fine hairline.
The rest of the cut uses soft medium layers that blend into the wider part of the bangs. Trim the bangs little and often, since the shape depends on the narrow top section staying short.
Try this: Blow dry the bangs forward first, then sweep each side out toward the cheekbone to set the bottleneck curve.
Difficulty: Low · Cost: $$ (salon)
5. Long Side-Swept Bang Medium Shag

A long side swept bang creates a diagonal line across the forehead and adds movement at the front without a full fringe. The bang blends into the first layer at cheek level, so there is no hard step in length.
This is a practical pick if you wear your hair parted to one side already. The diagonal adds lift at the front root, and the rest of the shag can stay soft and low contrast.
Try this: Dry the bang across your forehead in the opposite direction first, then flip it to its final side for extra lift.
Difficulty: Low · Cost: $ (salon)
6. Soft Razored Layer Medium Shag

A razor softens the edge of each layer, so the ends look wispy and light rather than blunt. On medium length fine hair, that soft edge helps layers move and stops the cut from looking blocky.
Razor work needs a light hand on very fine hair. Ask for razor texture through the top layers only and scissor cut ends at the bottom, so the baseline keeps some fullness.
Try this: Use a small amount of texture paste on dry ends only, warmed between your palms before you pinch the layers apart.
Difficulty: Medium · Cost: $$ (salon)
7. Straight Textured Medium Shag

This version proves a shag can work worn straight. Texture comes from the cut itself, with point cut layers and a broken up bottom edge, rather than from waves added later.
It suits fine hair that is naturally straight and tends to look limp in a one length cut. A flat iron pass through the mid lengths is enough on most days, and the layers keep the surface from looking flat.
Try this: Run a flat iron through the mid lengths only and leave the ends natural, so the texture from the cut stays visible.
Difficulty: Low · Cost: $ (salon)
8. Soft Collarbone Shag with Blended Ends

Layers melt into each other with no obvious steps, and the ends are blended so the collarbone length looks smooth. The result is a shag shape with a polished finish, suited to work and formal settings.
Because the layers are blended, grow out is gentle and the cut holds its shape longer between visits. It is a good first shag if choppy or heavily textured cuts feel too strong.
Try this: Blow dry with a paddle brush and finish with a light shine spray through the ends only.
Difficulty: Low · Cost: $ (salon)
9. Side-Part Medium Shag with Crown Lift
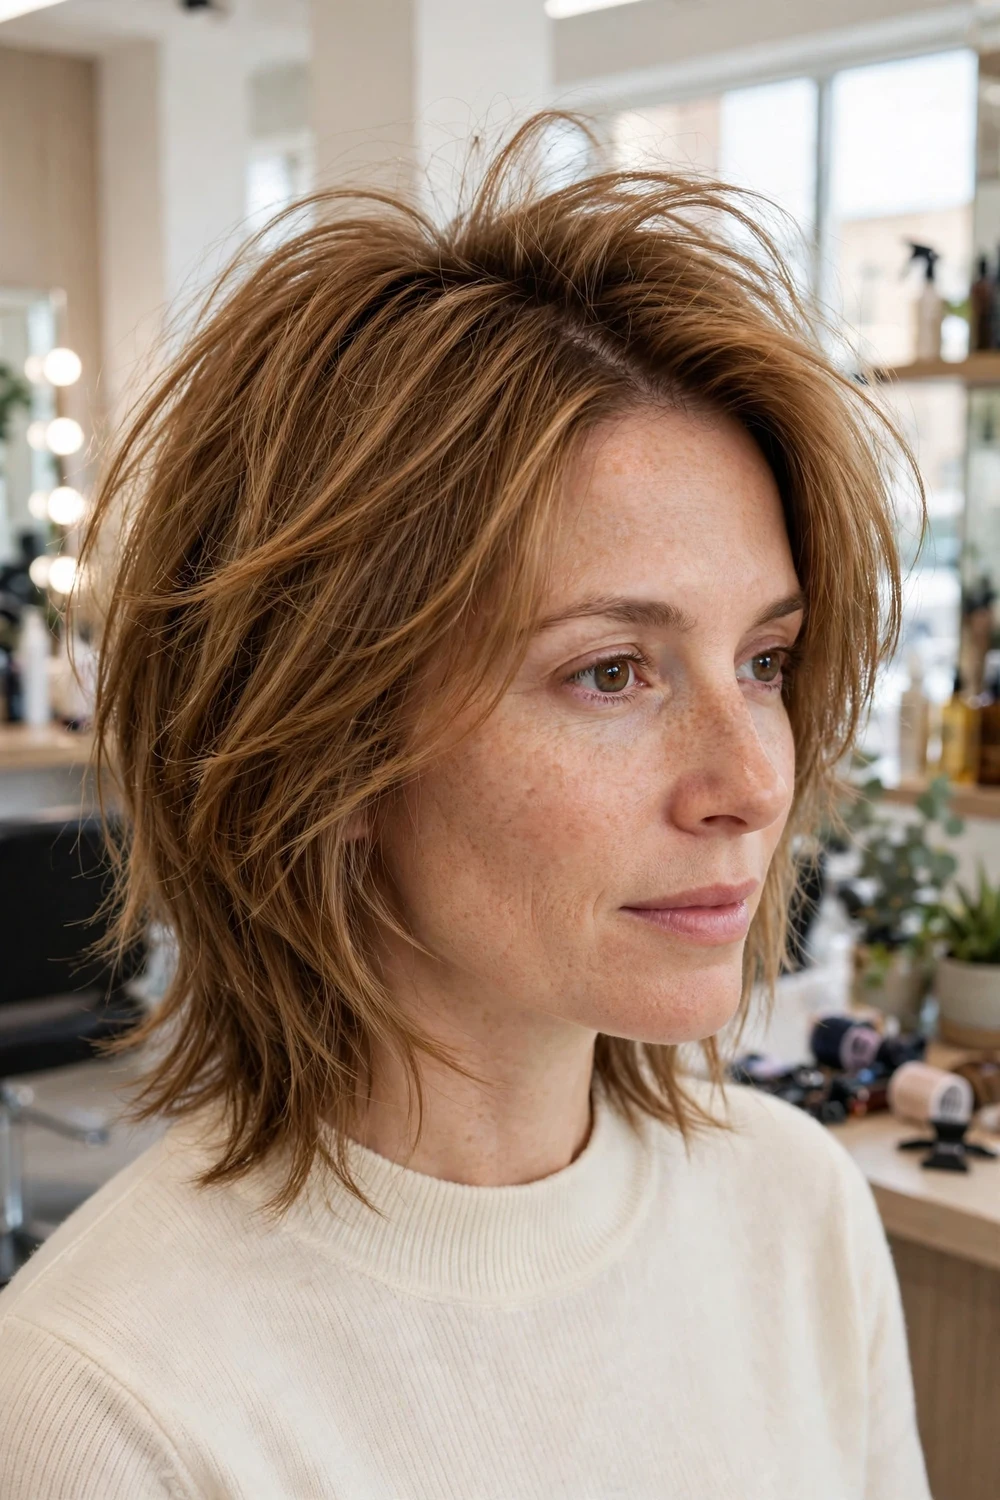
Moving the part to the side lifts the root on the heavier side and creates height at the crown without backcombing. Shorter crown layers support that lift, while the sides stay longer and softer.
Fine hair that falls flat on top by midday often responds well to this simple change. Keep crown layers controlled, since too much length removal on top can make the sides look thin by contrast.
Try this: Blow dry the crown in the opposite direction to your part, then flip it over once dry for lift that lasts longer.
Difficulty: Low · Cost: $ (salon)
10. Shadowed Brunette Shag with Flipped Layers

A darker root shadow gives depth at the scalp, and flipped face framing layers turn outward at cheek and jaw level. The contrast between the dark root and lighter movement through the front makes fine hair look denser.
Ask for internal layers that remove weight without thinning the ends. The flip needs a round brush or a quick bend with a flat iron, so allow a few extra minutes on styling days.
Try this: Curl the face framing pieces away from your face with a round brush and hold each section for a few seconds as it cools.
Difficulty: Medium · Cost: $$ (cut and color)
11. Auburn Feathered Shag with Center-Parted Fringe

Warm auburn color and feathered, point cut ends give this shoulder to collarbone shag a soft, light finish. The fringe parts in the center and blends into feathered layers at the sides.
Auburn fades faster than brown, so a gloss between color visits helps keep the tone even. Feathering should stay light at the ends to protect fullness on fine hair.
Try this: Ask for a demi permanent gloss at your trim visit to refresh the auburn tone without a full color service.
Difficulty: Medium · Cost: $$ (salon)
12. Platinum Feathered Shag with Glasses-Friendly Fringe

The wispy fringe is cut to sit just above a glasses frame, so it does not catch or bunch over the top bar. Feathered layers through the rest of the cut add movement to the pale platinum color.
Platinum needs regular toning and gentle care, since lightened fine hair breaks more easily. Keep heat low, use a heat protectant, and plan for root upkeep when you book the cut.
Try this: Show your stylist the glasses you wear most often at the appointment, so the fringe length is measured with them on.
Difficulty: Medium · Cost: $$$ (cut and color)
13. Curly Medium Shag with Crescent Bangs

Curls are cut in a shag shape with shorter layers at the crown and a soft crescent bang that follows the curve of the forehead. The layers give curls room to form separate clumps instead of one heavy mass.
Cutting curls dry, in their natural pattern, helps keep the length even once the hair springs up. Use a lightweight gel or mousse and diffuse on low heat, or air dry with minimal touching.
Try this: Scrunch curl cream into wet hair and diffuse on low until the cast feels dry, then break the cast with dry hands.
Difficulty: Medium · Cost: $ (salon)
14. Boho Wavy Medium Shag

Loose, uneven waves and soft face framing layers give this shag a relaxed finish. The wave pattern is irregular, with some sections bending more than others, which helps fine hair look fuller.
This cut works best if your hair already has a natural wave. Enhance the pattern you have with salt spray or mousse and air drying, rather than curling every section the same way.
Try this: Mist salt spray into damp hair, twist two large sections away from your face, and let the hair dry before you shake it out.
Difficulty: Low · Cost: $ (salon)
15. Dark Espresso Shag with Piecey Fringe
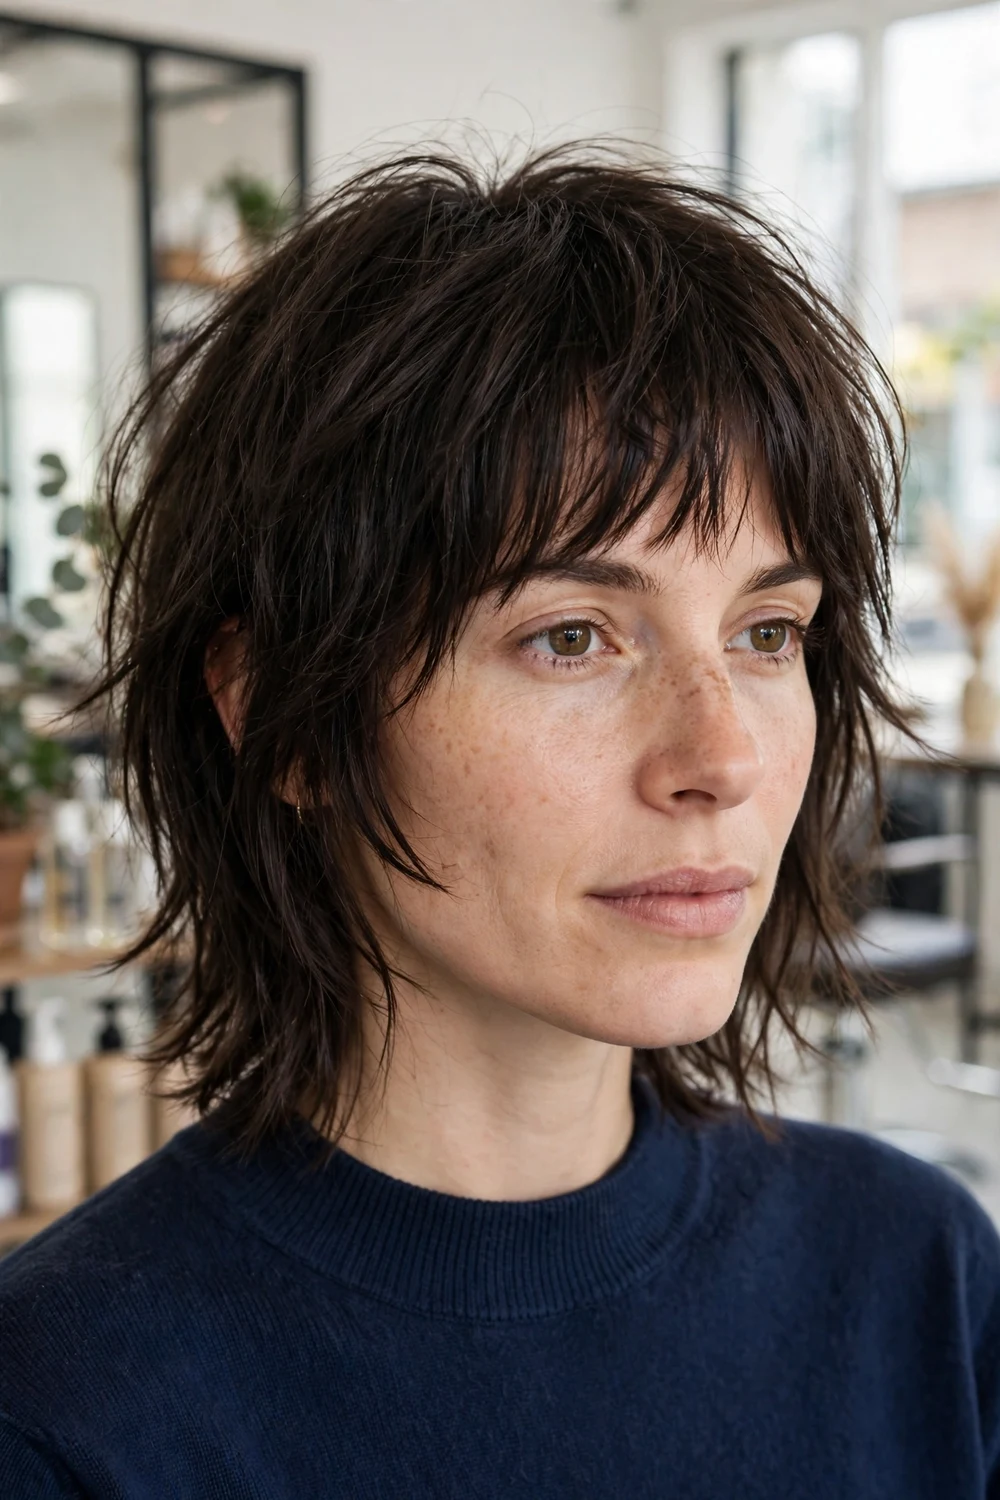
Deep espresso brown adds visual depth, and a piecey fringe brings texture right to the front of the face. The dark tone makes the layered surface look richer, even when the hair itself is fine.
Single process dark color is lower upkeep than lightening and can make fine hair look glossier. Keep the fringe piecey with dry styling, since wet product can make it separate too much and look sparse.
Try this: Define the fringe with a tiny amount of matte paste on dry hair, applied only to the very ends.
Difficulty: Low · Cost: $$ (salon)
16. Honey Blonde Shag with Layered Face Frame
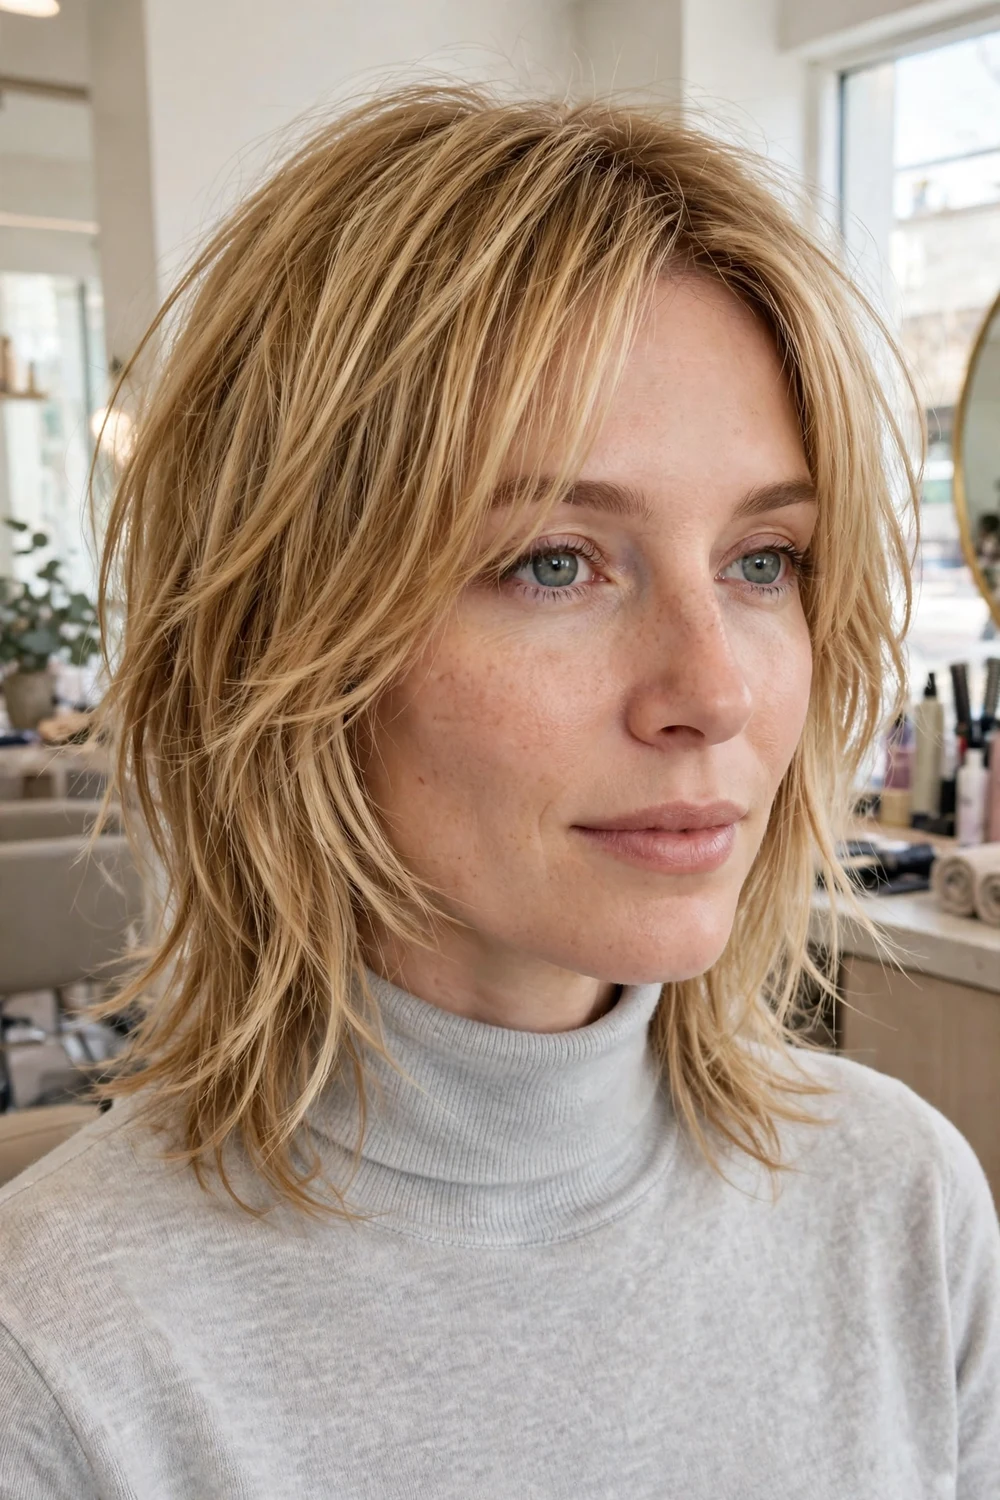
Honey blonde warmth runs through the cut, and face framing layers are cut at several lengths around the cheeks and jaw. Those changing lengths create movement around the face and draw attention away from flatter areas at the back.
Ask your colorist to place the lightest pieces around the face and keep some natural depth at the root. That placement gives brightness without a solid light color that can make fine hair look thinner.
Try this: Blow dry the face framing layers forward first, then roll them back with a round brush for a soft flare.
Difficulty: Medium · Cost: $$ (cut and color)
17. Chocolate Brown Shag with Soft Curtain Layers

Rich chocolate brown pairs with curtain style layers that part in the middle and sweep back into the length. The front stays soft and open, and the layers through the back add shape without a choppy finish.
This is a low contrast option that suits many skin tones and grows out gently. A gloss service every few visits keeps the brown from looking flat as the color fades.
Try this: Dry the curtain sections away from your face with a round brush, pulling up at the root before you roll them back.
Difficulty: Low · Cost: $$ (cut and color)
18. Caramel Blonde Shag with Feathered Fringe
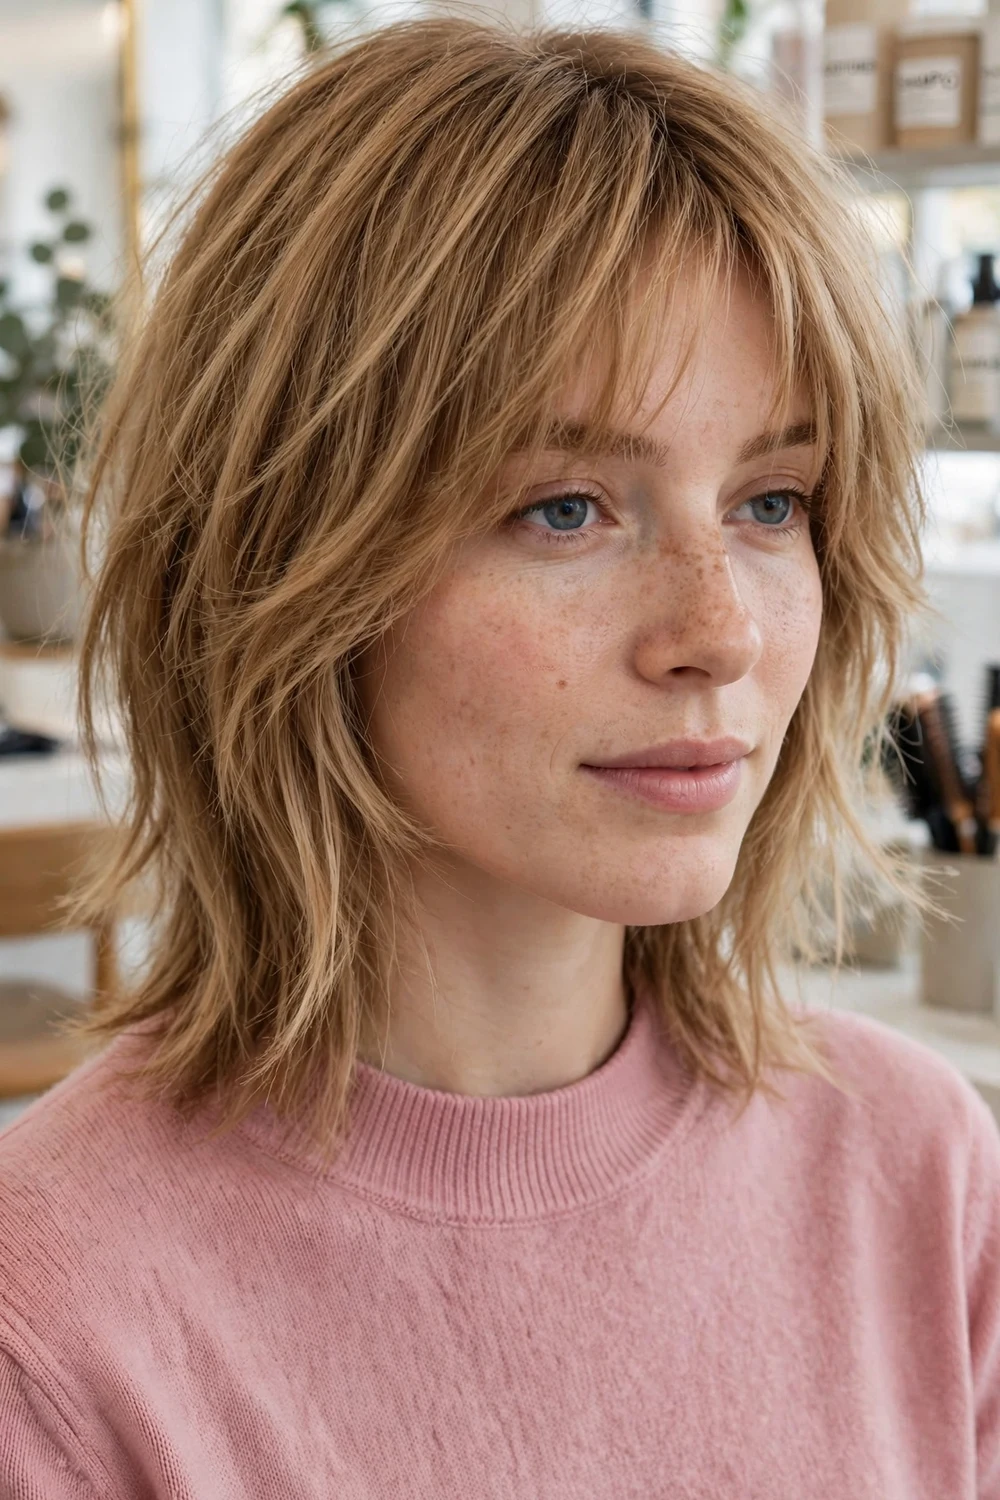
Caramel blonde tones add warmth and light around the face, while a feathered fringe blends into the first layers at the temples. The fringe is light and textured, so it does not use up too much of your front hairline.
Keep feathering soft on fine hair. If the fringe is thinned too much it can look see through, so ask for point cutting rather than heavy razor work at the front.
Try this: Use a purple free, color safe shampoo if your caramel tends to fade, and refresh the front with a quick round brush pass on day two.
Difficulty: Medium · Cost: $$ (cut and color)
19. Golden Blonde Shag with Airy Wispy Fringe
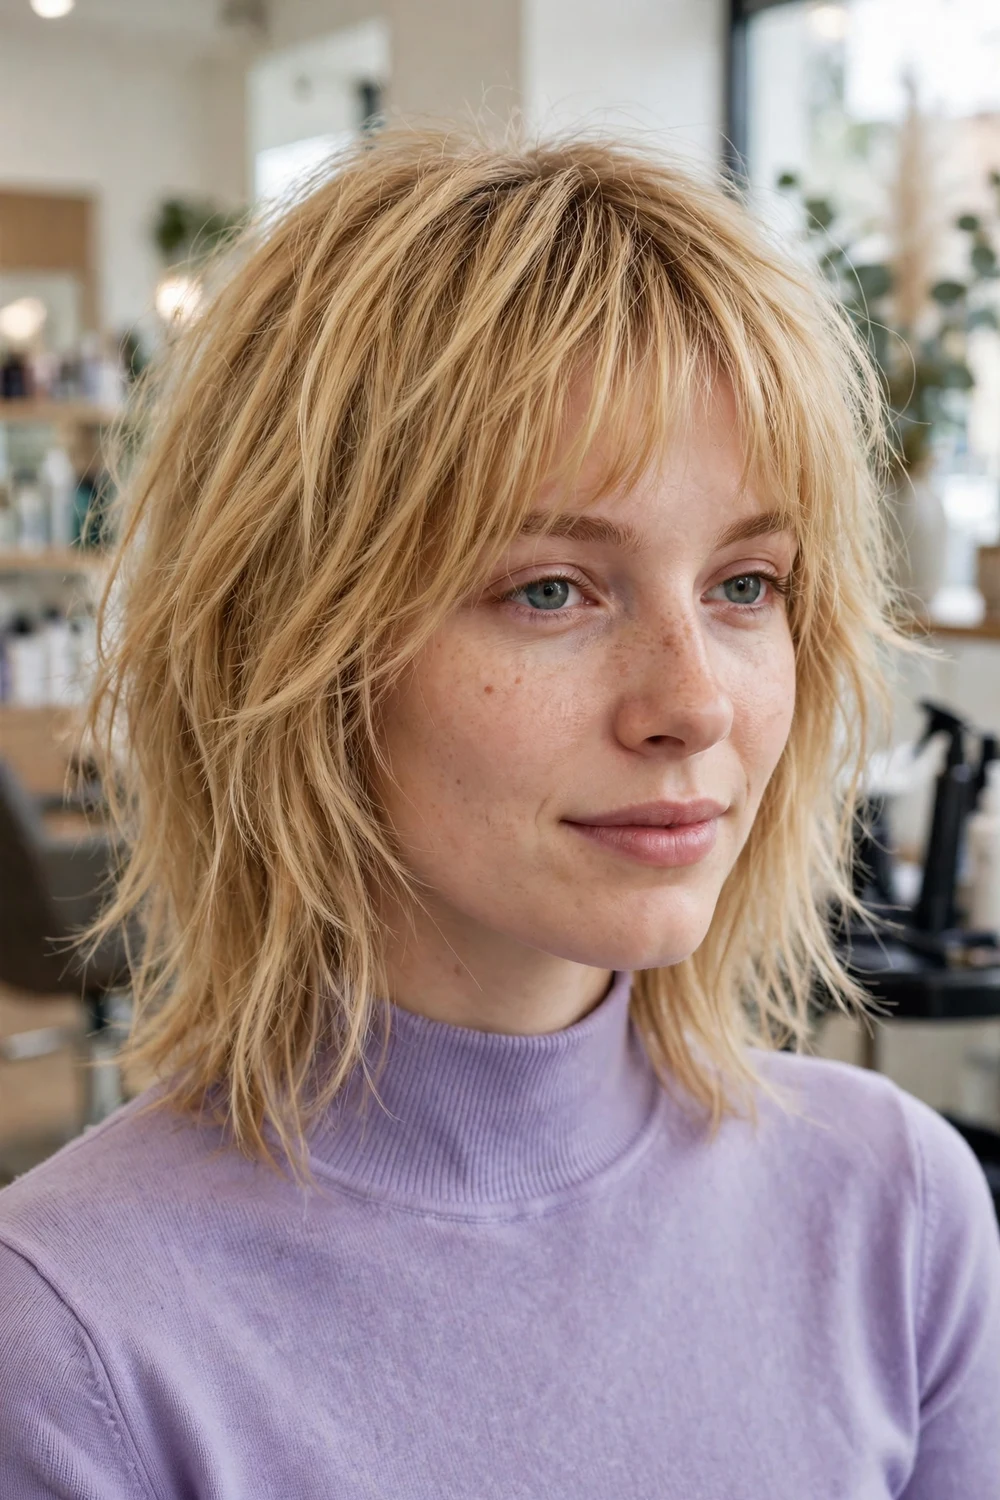
Golden blonde color keeps this cut looking warm and bright, and the wispy fringe skims the brow in light separated pieces. The layers through the sides are kept long, so the bright color does not come at the cost of fullness.
Wispy fringes need small trims to stay wispy rather than heavy. Book fringe trims between full cuts, and keep daily styling light so the fringe stays airy.
Try this: Apply volumizing powder at the roots of the fringe on second day hair instead of washing the whole head.
Difficulty: Low · Cost: $$ (salon)
20. Tousled Platinum Shag with Cheek-Level Layers

Platinum color and a tousled, undone finish give this shag a strong look, balanced by layers that start at cheek level. Those cheek level layers add width at the face and keep the pale color from looking flat.
Pale colors show every layer, which helps fine hair, but lightening needs care. Ask about bond care at the salon and keep home heat styling to a minimum between visits.
Try this: Tousle with dry texture spray and your fingers only, since brushing platinum fine hair when dry can add breakage.
Difficulty: Medium · Cost: $$$ (cut and color)
21. Soft Feathered Shag with Long Curtain Part

Long curtain sections part in the center and fall past the chin before joining the feathered layers. The long front keeps coverage at the hairline, which many people with fine hair prefer to a short fringe.
Feathered layers begin around chin level, so the top stays smooth and the movement sits lower. This placement suits straight to slightly wavy hair and oval face shapes well.
Try this: Part the hair in the center while it is damp, then blow dry each curtain section away from the face to set the sweep.
Difficulty: Low · Cost: $ (salon)
22. Textured Medium Shag with Fine Blonde Highlights

Fine blonde highlights are woven through the layers in thin sections, so the surface shows several tones as it moves. That broken up color helps layered fine hair look thicker than a single flat tone.
Ask for highlights placed a short distance from the root for a softer grow out. Fine highlights take longer to apply than chunky ones, so allow extra time at the color appointment.
Try this: Ask your colorist to highlight the top layers most, since those are the layers that catch light and show the texture.
Difficulty: Medium · Cost: $$ (cut and color)
23. Mid-Length Wolf Shag with Long Bangs
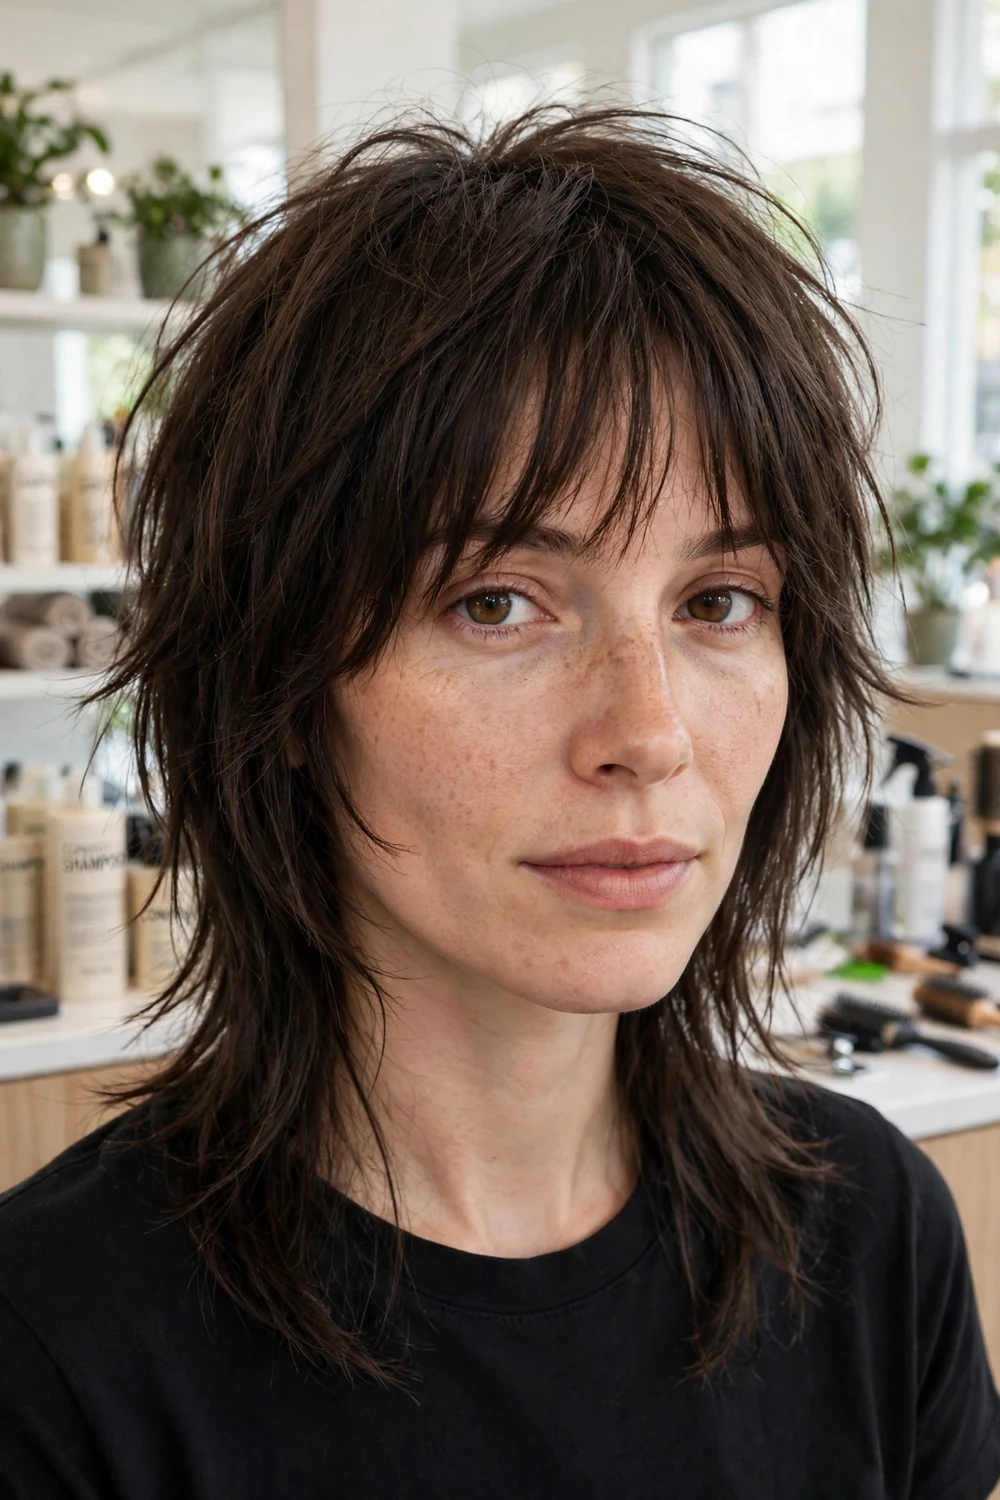
This wolf inspired shape keeps more length at the back and sides, with shorter choppy layers at the crown and long bangs that sweep into the front layers. The contrast between crown and length gives fine hair a fuller top.
Keep the contrast moderate on thin hair. If the crown is cut too short and the back too long, the bottom can look sparse, so ask for the back layers to stay fairly full.
Try this: Style the crown with mousse and a diffuser for lift, and leave the longer back pieces to fall naturally.
Difficulty: Medium · Cost: $$ (salon)
24. Mulleted Medium Shag with Cropped Micro Bangs
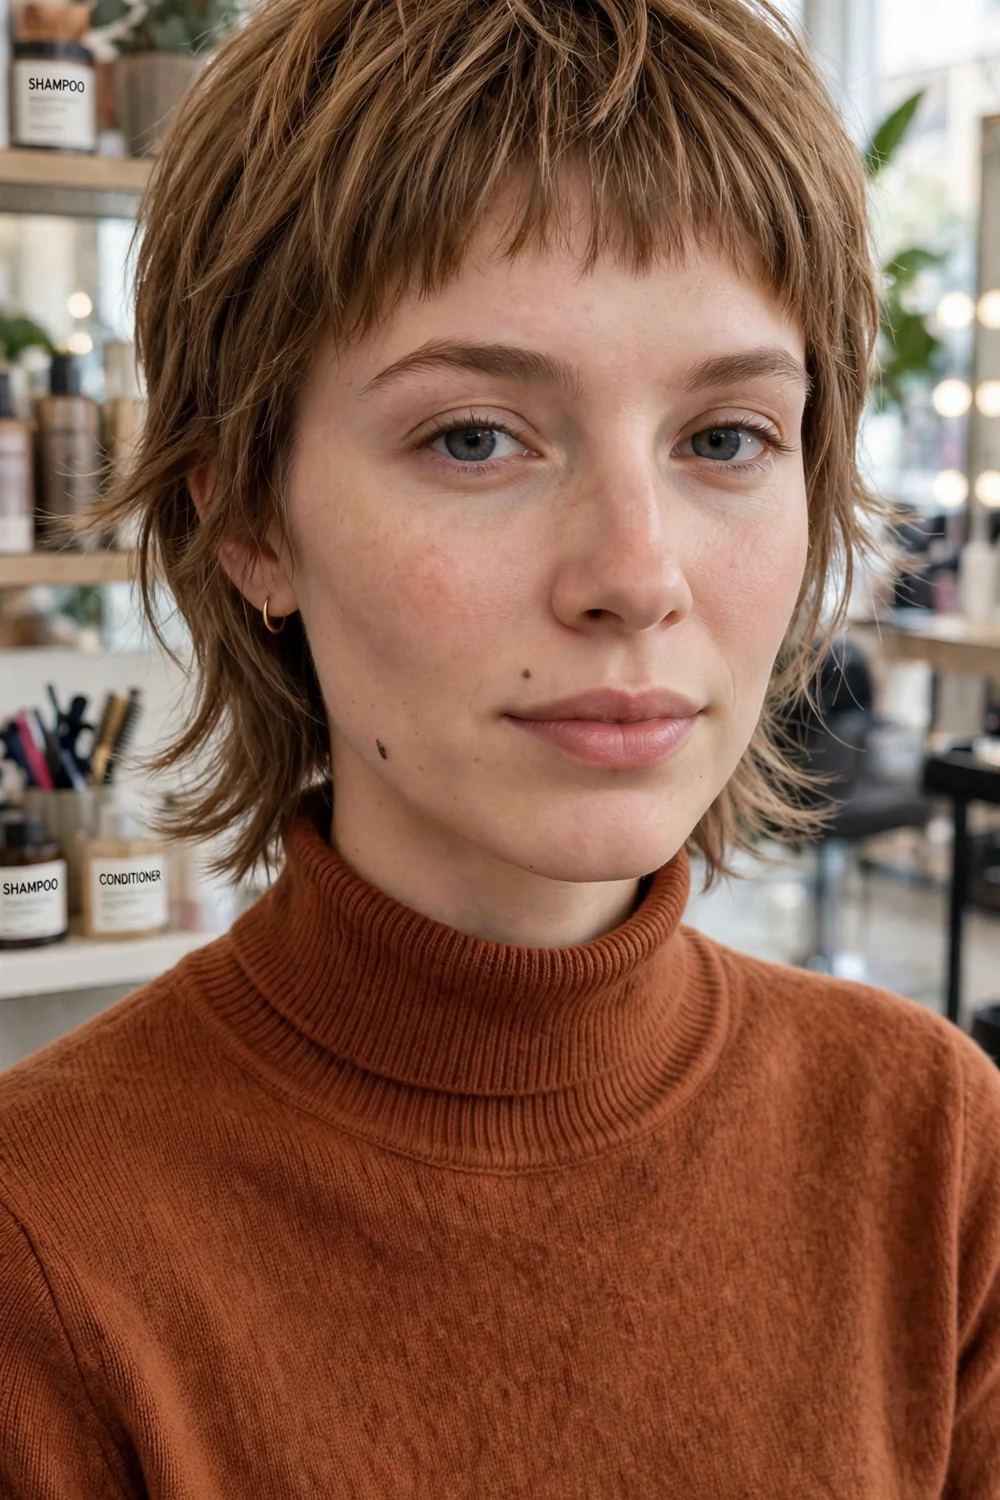
A soft mullet outline keeps the sides shorter and the back at medium length, paired with cropped micro bangs above the brow. The short fringe and crown layers add height, while the back keeps the medium length you want.
Micro bangs need precise cutting and regular trims, and they show a cowlick clearly. Talk through your natural growth pattern with your stylist before committing to the shortest fringe length.
Try this: Set micro bangs while they are wet, drying them flat with a paddle brush in both directions to counter a cowlick.
Difficulty: Medium · Cost: $$ (salon)
25. Copper-Red Razor Shag with Choppy Micro Fringe

Copper red color, razor texture, and a choppy micro fringe give this collarbone shag a clear point of view. Razor work through the ends adds separation, and the warm color makes each layer easy to see.
Copper red fades quickly, so plan for gloss refreshes and use color safe washing at home. Keep razor work light on the thinnest sections, since over texturizing can make fine ends look frayed.
Try this: Wash with lukewarm water and a color safe shampoo to slow copper fade between salon visits.
Difficulty: Medium · Cost: $$$ (cut and color)
26. Rose-Gold Textured Shag with Tapered Layers

Rose gold color sits over a lightened base, and tapered face framing layers soften the front of the cut. Stacked crown layers add lift at the back of the head, balancing the softness at the front.
Pastel and rose tones fade faster than natural shades, so this cut pairs best with a toning plan. Ask your stylist how often the tone will need refreshing before you book the color.
Try this: Use a color depositing conditioner in a rose tone between visits if your stylist approves it for your hair.
Difficulty: Medium · Cost: $$$ (cut and color)
27. Air-Dry Medium Shag with No-Heat Texture

This shag is cut specifically to dry well without heat. Layers follow your natural bend, the ends are point cut to encourage separation, and the shape does not rely on a round brush blowout to look finished.
It is a genuine gap in many shag lists, which focus on heat styling. Tell your stylist you plan to air dry most days, since that changes where layers should start and how much texture to add.
Try this: Apply mousse to damp hair, twist small sections with your fingers, and do not touch the hair again until it is fully dry.
Difficulty: Low · Cost: $ (salon)
28. Silver Blend Medium Shag with Wispy Fringe

Silver and natural gray tones are blended through a medium shag, with a wispy fringe that keeps the front soft. The layered shape gives gray hair movement, since gray strands can be wiry in some areas and fine in others.
Blending works with your natural silver rather than covering it in one solid color, so upkeep is lower. Purple shampoo used once in a while helps keep silver tones clear if yellowing appears.
Try this: Ask for a blend that follows your natural silver pattern at the front, so new growth matches the placement.
Difficulty: Low · Cost: $$ (cut and color)
How to Choose Your Medium Shag
Start with texture. If your hair is straight, a straight textured or barely layered cut will look closest to the photo on day two. If your hair has a natural wave, a wavy or air dry version needs less daily work. For a broader view of the family, compare these medium cuts with our guide to trendy shag haircuts for fine hair and the longer shaggy lob hairstyles for fine hair.
Length at the front matters too. If you like a shorter front, look at shaggy bob hairstyles for fine hair for where that spectrum starts. If you plan to wear your shag wavy most days, the styling notes in medium hairstyles with waves cover wave size, drying, and hold in detail.
| Shag Group | Idea Numbers | Best For | Daily Styling |
|---|---|---|---|
| Soft and blended shags | 1, 2, 8, 17, 21 | Fine hair that needs fullness at the ends, polished settings | 5 to 10 minutes |
| Textured and piecey shags | 3, 6, 7, 15, 22 | Flat sides and crowns, straight to wavy hair | 5 to 15 minutes |
| Fringe-led shags | 4, 5, 9, 19, 24, 25 | Adding a front detail and lift at the hairline | 10 to 15 minutes, plus fringe trims |
| Wavy and curly shags | 13, 14, 27 | Natural wave and curl patterns, low heat routines | 10 minutes, plus drying time |
| Color-led shags | 10, 11, 12, 16, 18, 20, 26, 28 | Adding the look of density with tone and placement | Cut styling plus color upkeep |
Frequently Asked Questions
Are shag hairstyles good for medium length thin fine hair?
Yes, when the layers are placed with care. Medium length keeps enough weight at the ends for the hair to look full, while shag layers at the crown and around the face add movement and lift. Ask your stylist to keep the bottom layers fairly full and to avoid heavy thinning at the ends.
How do I stop a medium shag from making my ends look thin?
Keep the shortest layers long, limit razor work to the top layers, and keep the baseline point cut rather than heavily textured. Light products also help, since heavy creams and oils join fine strands together and make the ends look sparse. Regular small trims keep the bottom edge looking full.
Which bangs work best with a medium shag on fine hair?
Wispy, bottleneck, curtain, and long side swept bangs all work well, because each style stays light at the hairline. A full heavy fringe can work too, but it uses more of your front hair and needs more upkeep. Micro bangs are the boldest option and need the most frequent trims.
How often does a medium shag need a trim?
Most medium shags hold their shape for six to eight weeks. Bangs need shorter cycles, with wispy and curtain styles trimmed at three to four weeks and micro bangs at two to three weeks. If your ends start to look stringy before six weeks, book a small trim rather than waiting for a full cut.
Can I air dry a medium shag on fine hair?
Yes, if the cut is planned for air drying. Choose a version with layers that follow your natural wave or bend, apply mousse or texture spray to damp hair, and let the hair dry fully without brushing. A diffuser on low heat speeds drying while keeping the natural pattern in place.
Final Thoughts
Bring two or three saved photos to your appointment and talk about layer placement before color or bangs. For thin fine hair at medium length, where the shortest layer starts and how full the ends stay will decide how the cut looks for the next two months. Start softer than you think you need. You can always add more texture at the next visit, and a softer first cut keeps your options open while you learn how your hair wears in a shag shape.

