


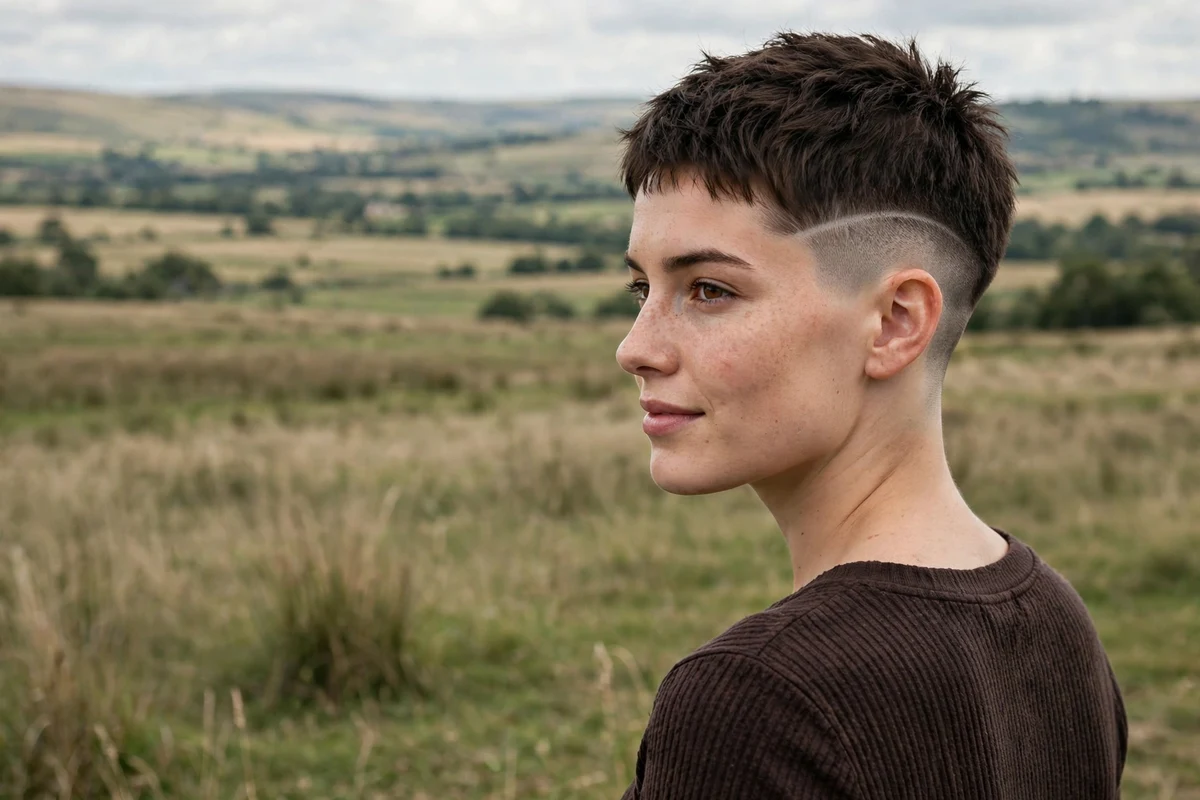
A very short pixie haircut with shaved sides pairs a close-cropped top, often cut with #1 to #4 clipper guards, with sides and back shaved down tight or faded to the skin. It is the shortest wearable version of the pixie: bold, low-fuss, and full of shape.
This cut suits women who want wash-and-go hair with an edge. It flatters strong cheekbones and jawlines, and the shaved sides keep thick hair feeling light. Plan on clipper touch-ups every two to three weeks to keep the lines crisp.
Below are 43 ideas covering buzz cuts, fades, shaved designs, curls, and color, all kept at the ultra-short end of the pixie spectrum.
Quick Takeaways
- Shaved sides grow out fast, so book a clipper clean-up every two to three weeks.
- A #2 or #3 guard on top keeps the pixie soft; a #1 or skin fade goes bolder.
- Round faces gain balance from height on top, while oval faces suit nearly every version here.
- Curly and coily hair works well: shaved sides remove bulk while curls keep volume up top.
- Bleach and fashion colors show up fast on short hair but need regular toning upkeep.
1. Buzz Cut Pixie
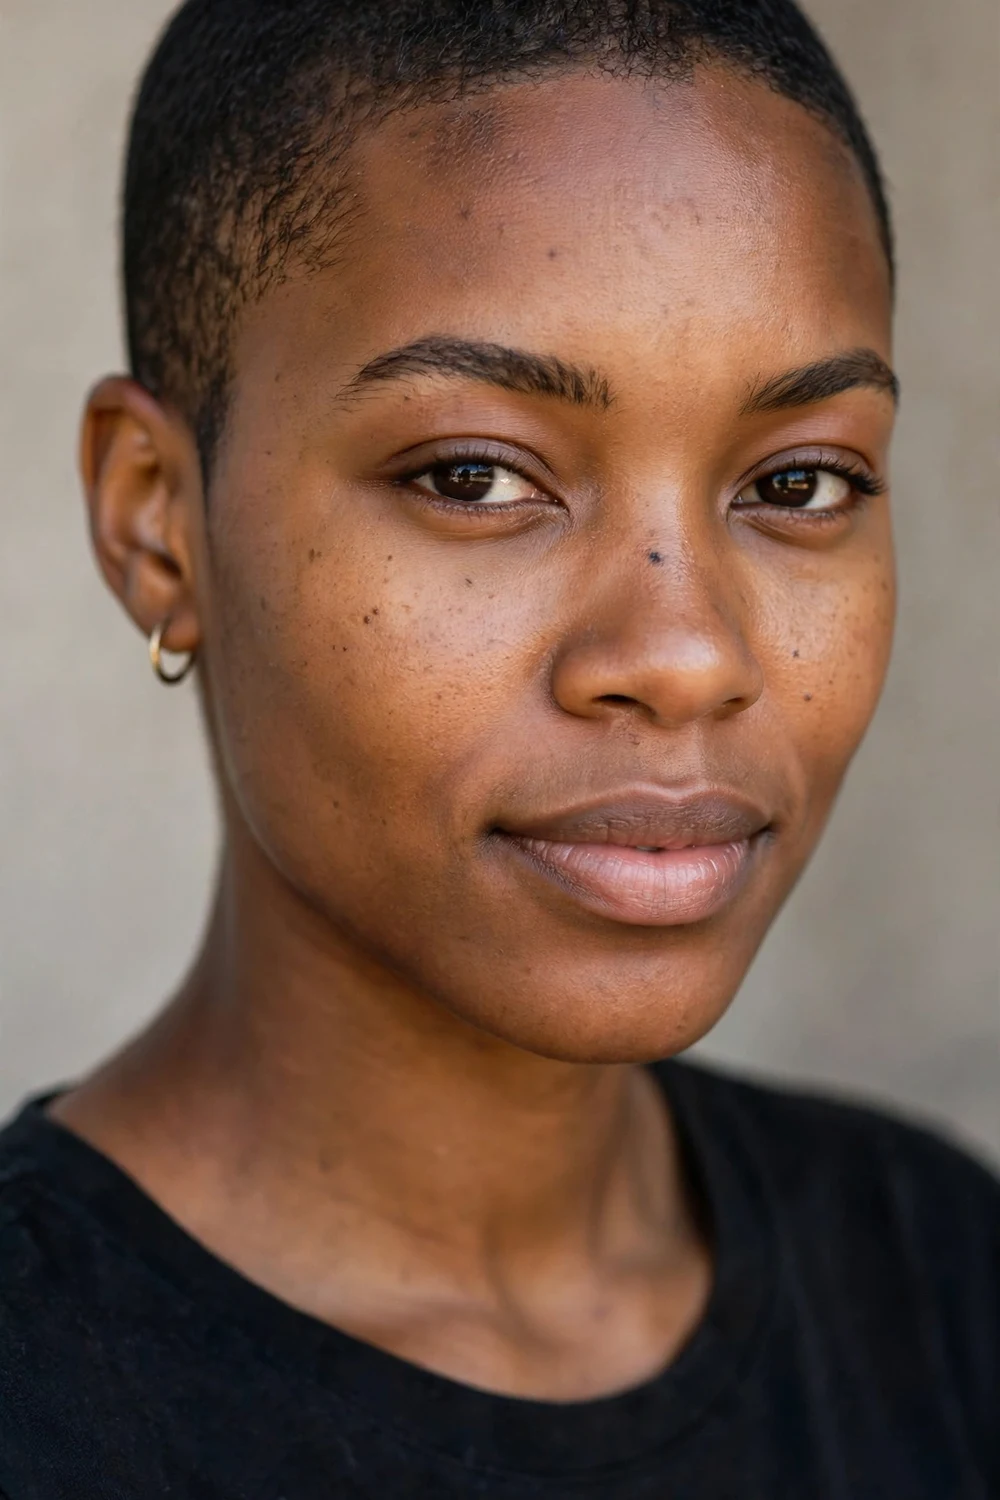
The buzz cut pixie is the shortest take on this trend. A single clipper guard, usually a #2 or #3, cuts the whole head to one even length, and the sides get blended a fraction tighter for shape. Daily styling is basically zero: wash, towel dry, and go. The cut throws all the focus onto your eyes, cheekbones, and jawline, which makes it a strong pick if you like a clean, no-fuss look. Regrowth stays even because the length is uniform. Ask your barber to soften the hairline instead of edging it hard.
Try this: rub a pea-sized amount of matte paste between your palms and press it over the top for a soft, lived-in finish.
Difficulty: Easy | Cost: $25–$45
2. Classic Very Short Pixie

This is the tidy, timeless version of the ultra-short pixie. The top holds about an inch to an inch and a half of length, neatly tapered down through the sides and nape with clippers. It reads polished enough for the office yet still shows off the shaved-side edge. A side part or a slight forward push gives it shape in under a minute. It flatters oval and heart-shaped faces especially well. Schedule trims every three to four weeks so the taper stays crisp.
Try this: use a heat protectant first, then blow-dry the top forward with a small vent brush for a smooth, rounded finish.
Difficulty: Easy | Cost: $35–$60
3. Undercut Pixie
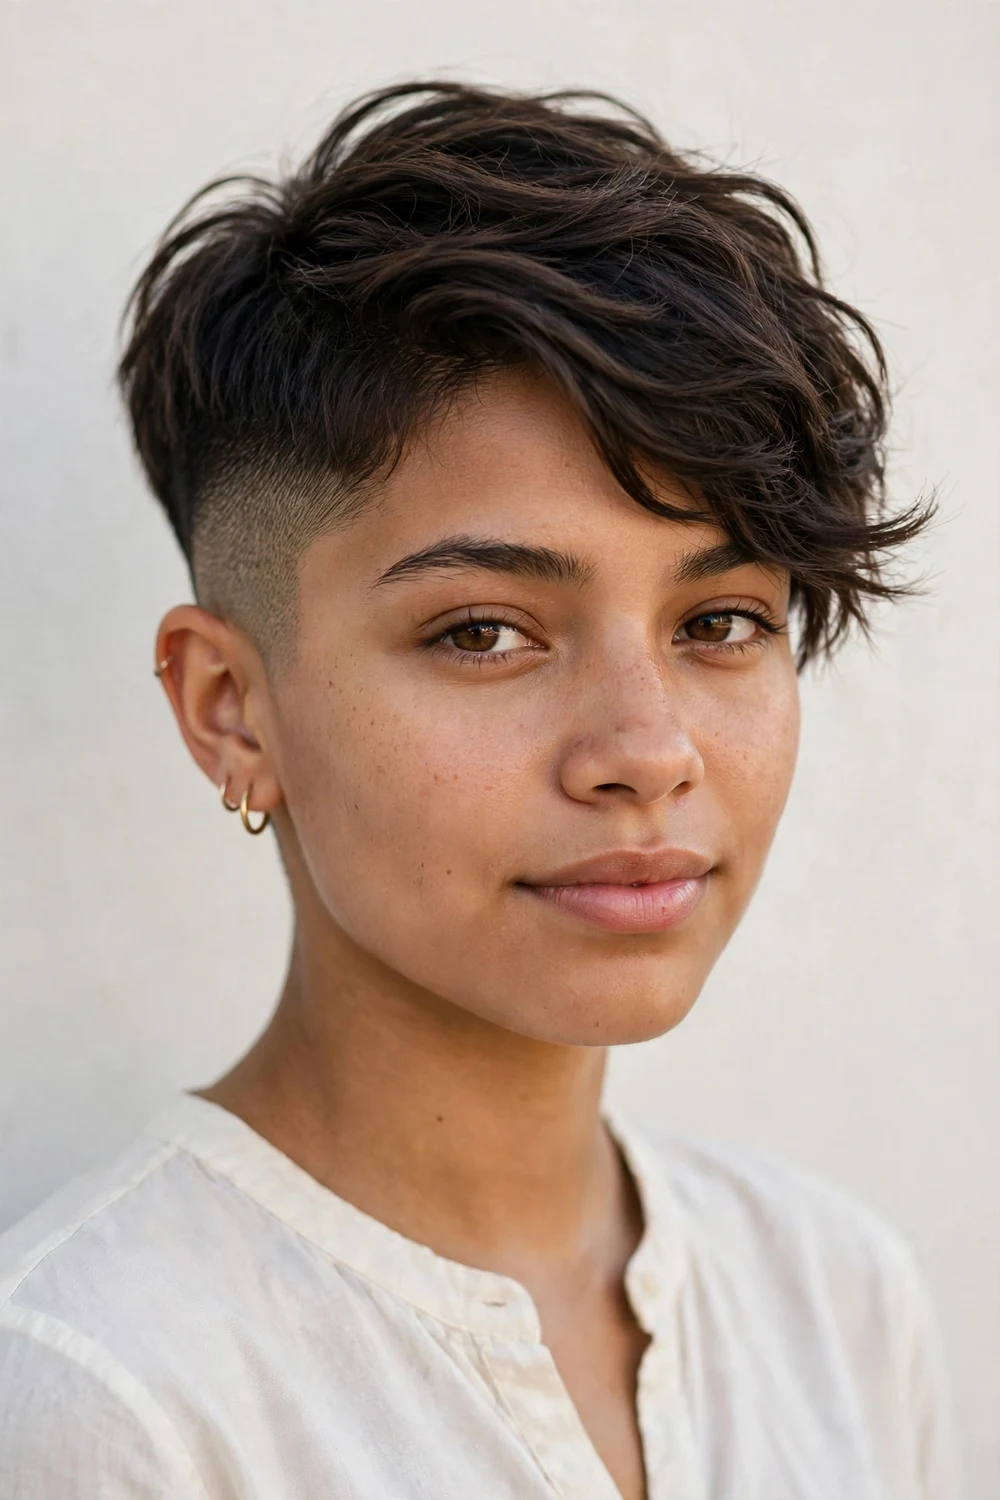
The undercut pixie keeps the contrast high: sides and back shaved close with clippers while the top stays long enough to style, usually one to three inches. Sweep it forward, push it back, or spike it up; the shaved sections stay the same either way. Thick hair benefits most since the shaved sides remove serious bulk. The catch is upkeep: those crisp lines blur fast, so plan a touch-up every two to three weeks. It is one of the boldest ultra-short options here.
Try this: work a matte clay through the top only, keeping product off the shaved sides so they stay clean.
Difficulty: Moderate | Cost: $40–$70
4. High-Fade Pixie with Volume on Top
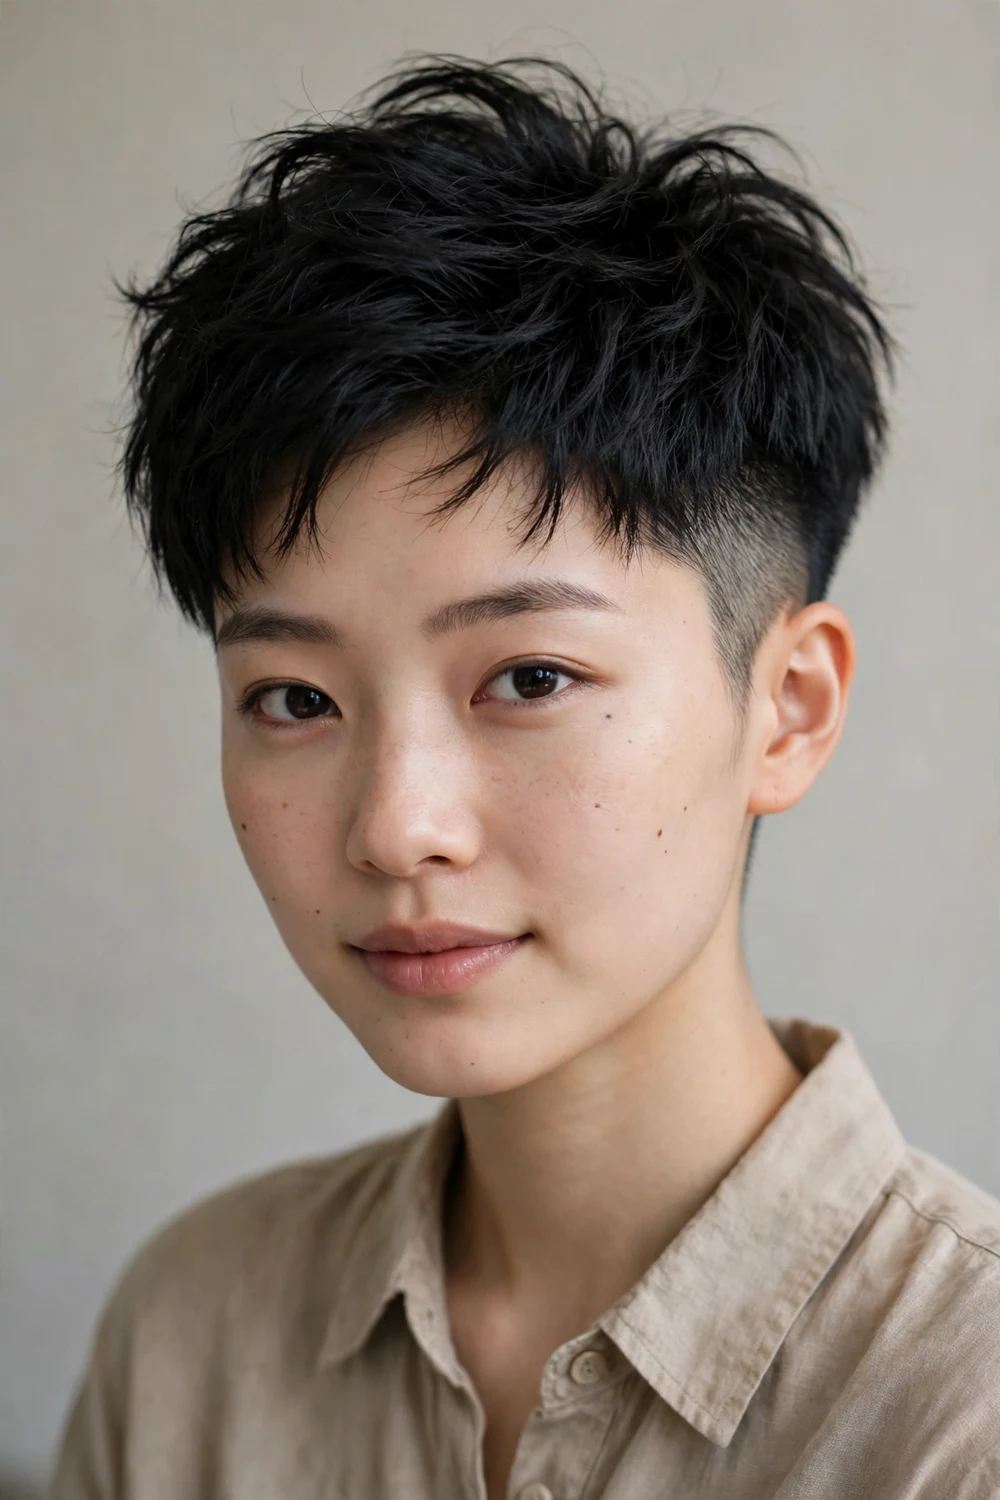
A high fade takes the shaved sides up near the crown, leaving a tight gradient that melts from skin to length. The top keeps two to three inches of volume, which gives the whole cut its height and drama. It is a favorite for round faces because the vertical shape draws the eye upward. Barbers build the fade with a sequence of guards, so the blend looks seamless rather than stepped. Book a fade refresh every two weeks; regrowth shows quickly on faded sides.
Try this: lift the top with a small round brush while blow-drying for maximum height. Use a heat protectant first.
Difficulty: Moderate | Cost: $45–$75
5. Hard Part Skin Fade Pixie
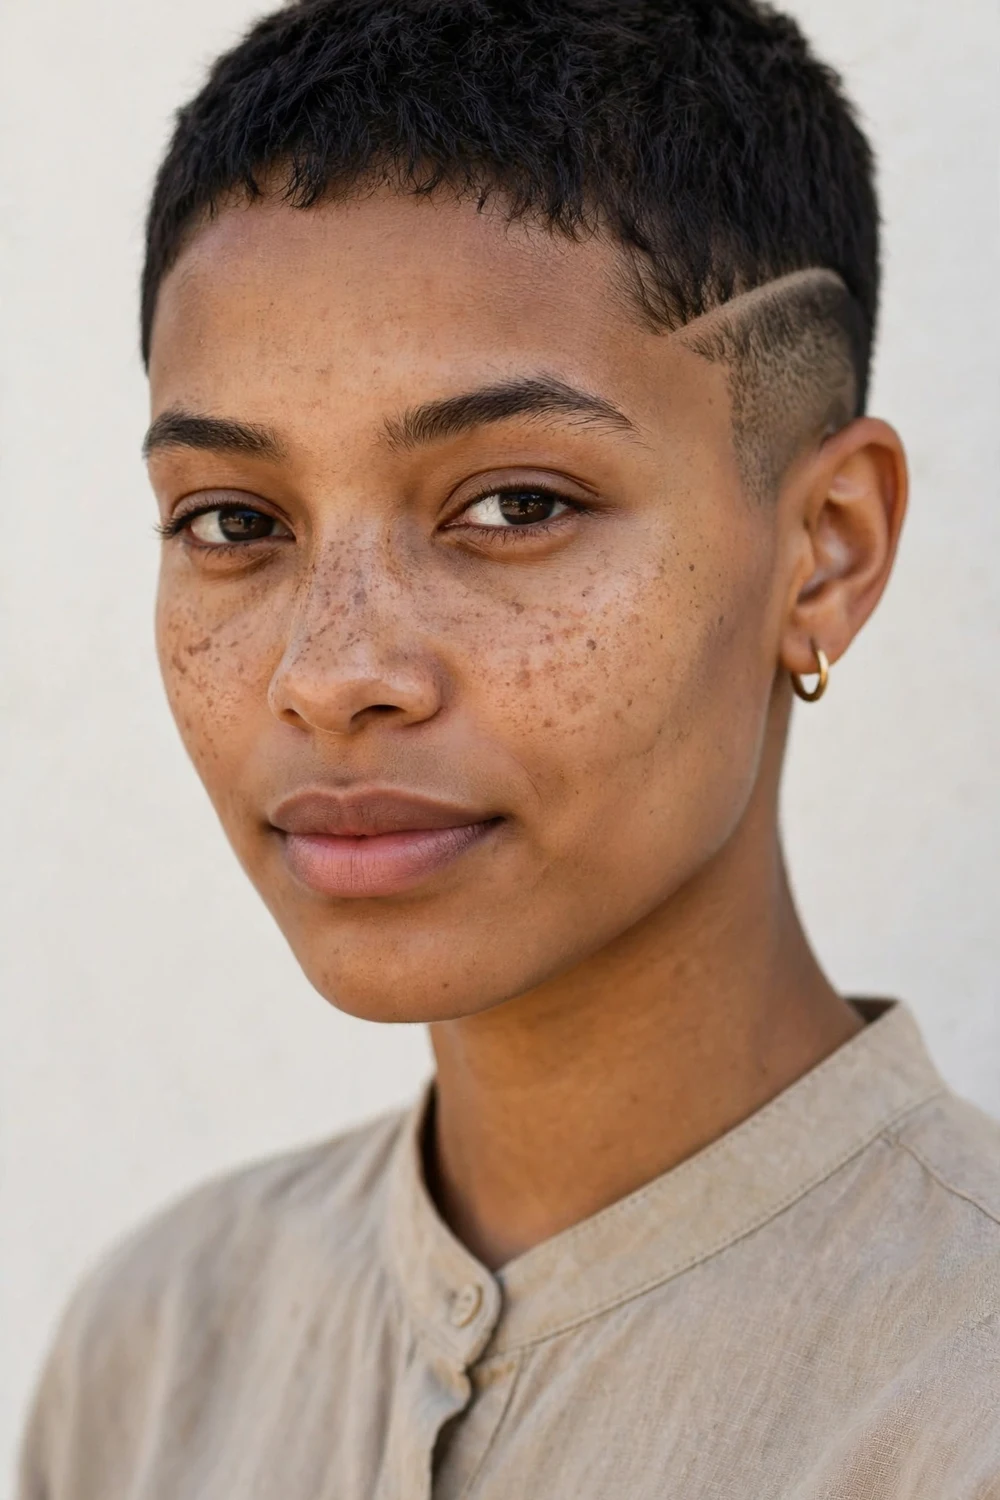
Borrowed from the barbershop, the hard part is a crisp shaved line that divides the top from a skin fade. It adds instant structure to a very short pixie and makes the fade look intentional even as it grows. Your barber cuts the part with trimmers, no guard, so the line stays razor sharp. It suits straight to wavy hair best, since the line shows cleanest on smooth textures. The part needs re-carving every two weeks, or it softens into the fade.
Try this: comb the top away from the part while damp, then let it air-dry to keep the line visible.
Difficulty: High | Cost: $50–$80
6. Shadow Low-Taper Pixie
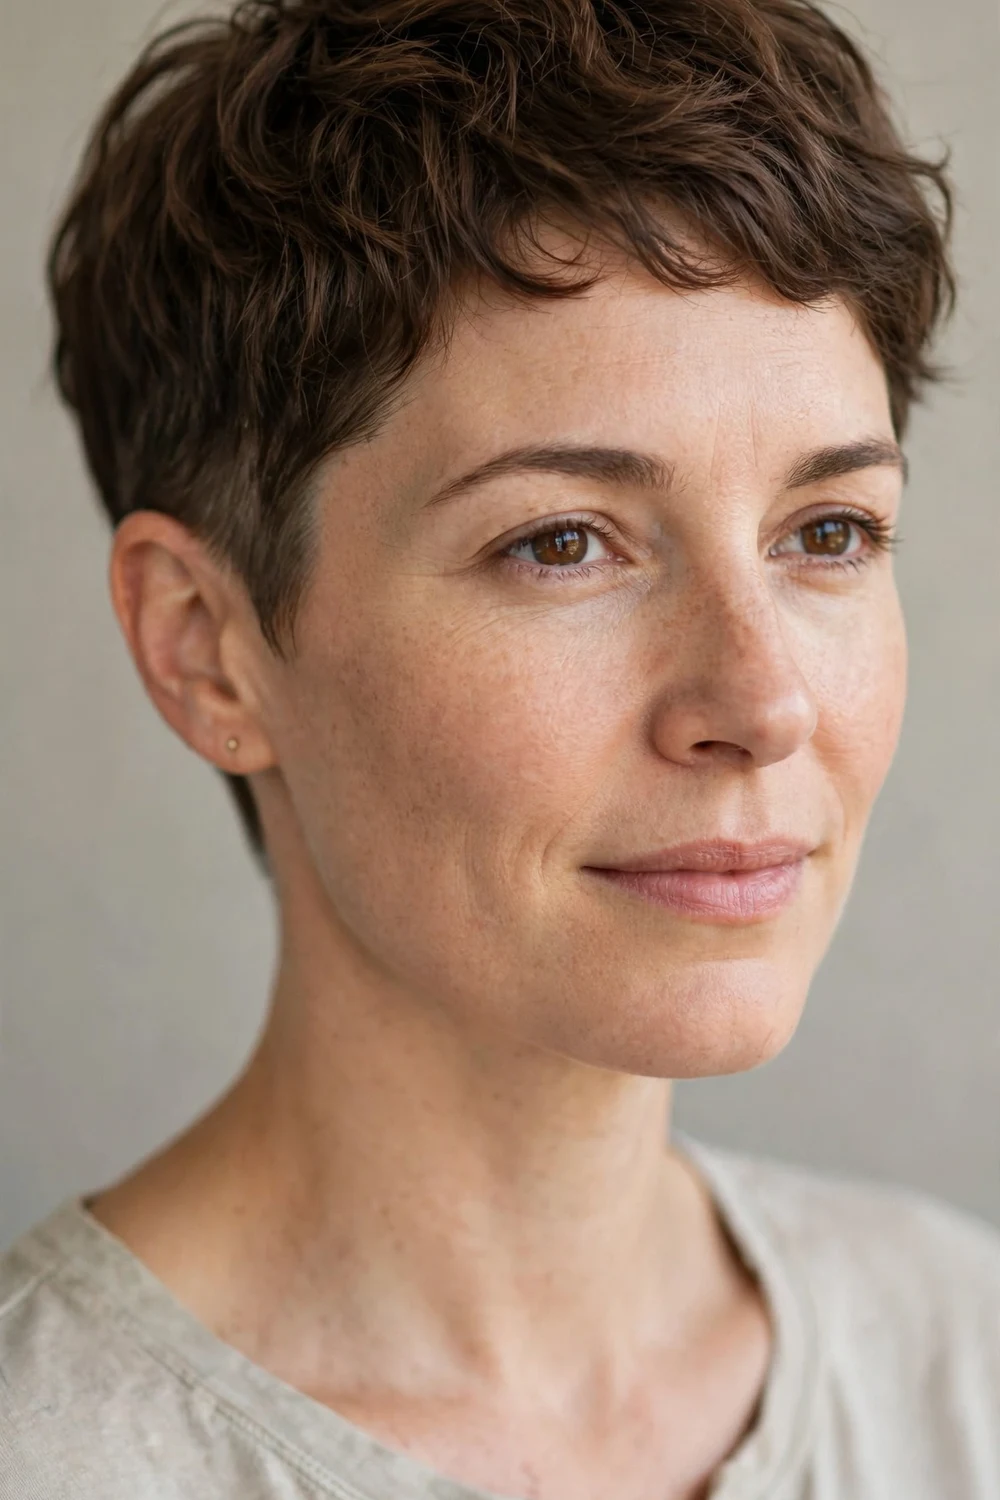
Not every shaved side has to go dramatic. The shadow taper keeps the fade low and soft, hugging the ears and sideburns with a gentle gradient instead of a high skin fade. The result looks neat and office-friendly while still reading as a proper short pixie. It grows out more gracefully than a skin fade, stretching touch-ups to three or even four weeks. This is the version to pick if you want the shaved-side look without the full barbershop edge.
Try this: smooth a light styling cream over the sides after washing to keep the taper looking tidy between cuts.
Difficulty: Easy | Cost: $35–$60
7. Tapered Neckline Pixie
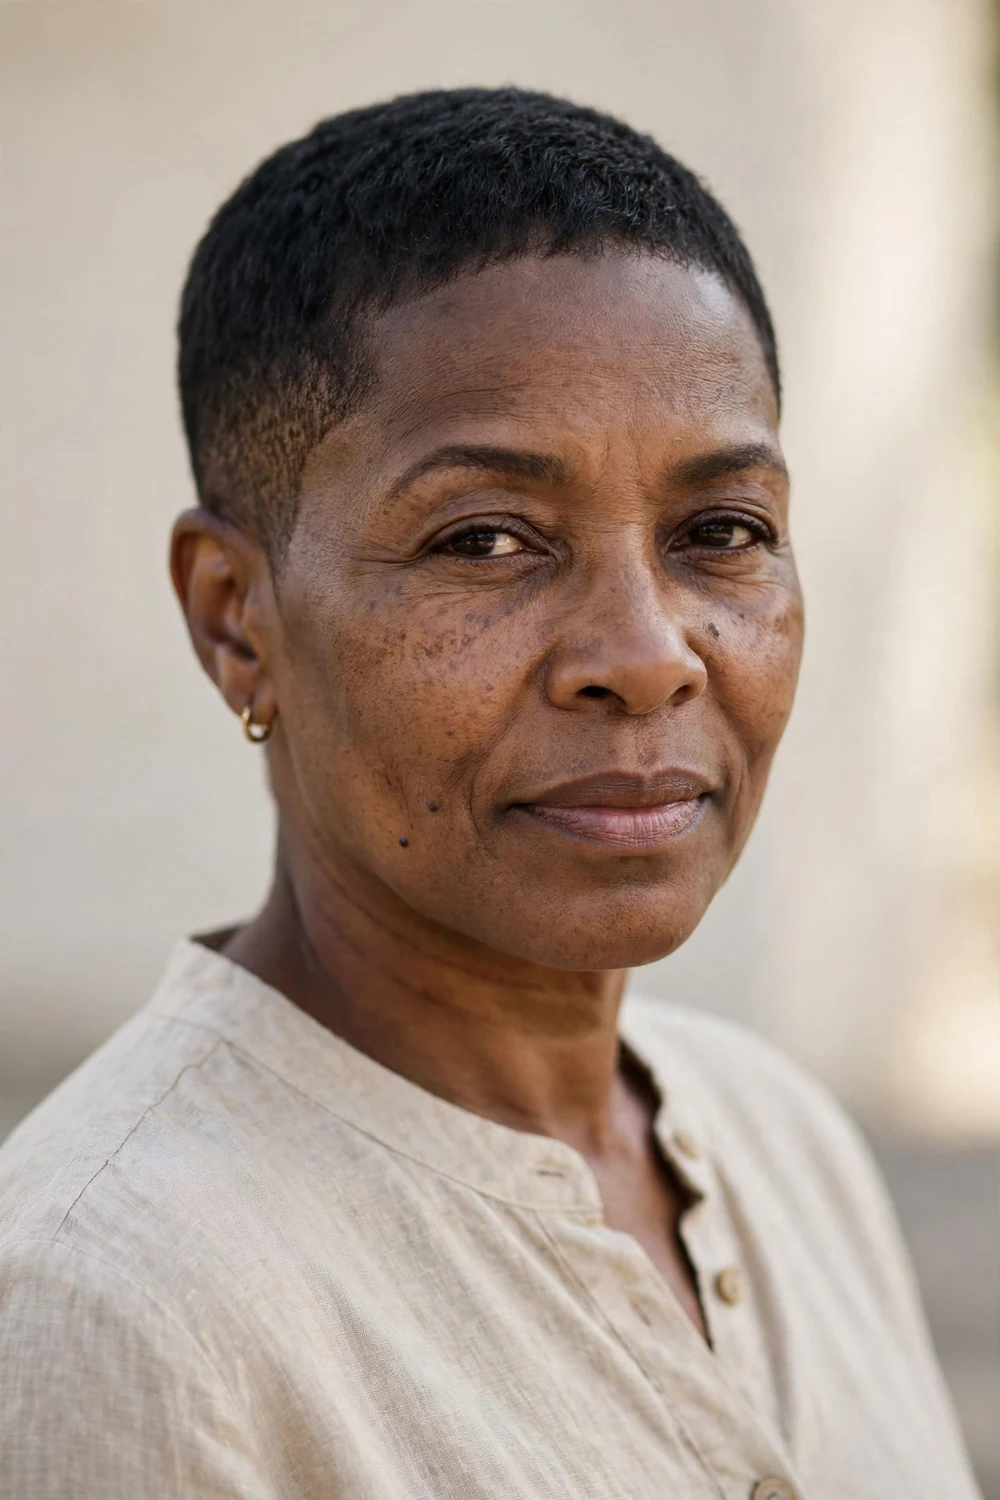
Here the detail work sits at the nape. The neckline tapers in a clean gradient from short hair down to bare skin, following your natural hairline for a polished finish. From the front it looks like any neat short pixie; from behind it looks sharp and deliberate. It keeps the neck cool and shows off earrings and necklaces nicely. The taper blurs as it grows, so a quick nape clean-up every two to three weeks keeps it looking fresh.
Try this: ask your stylist to taper, not square off, the nape so it grows out softer.
Difficulty: Easy | Cost: $35–$60
8. Nape-Shaved Pixie
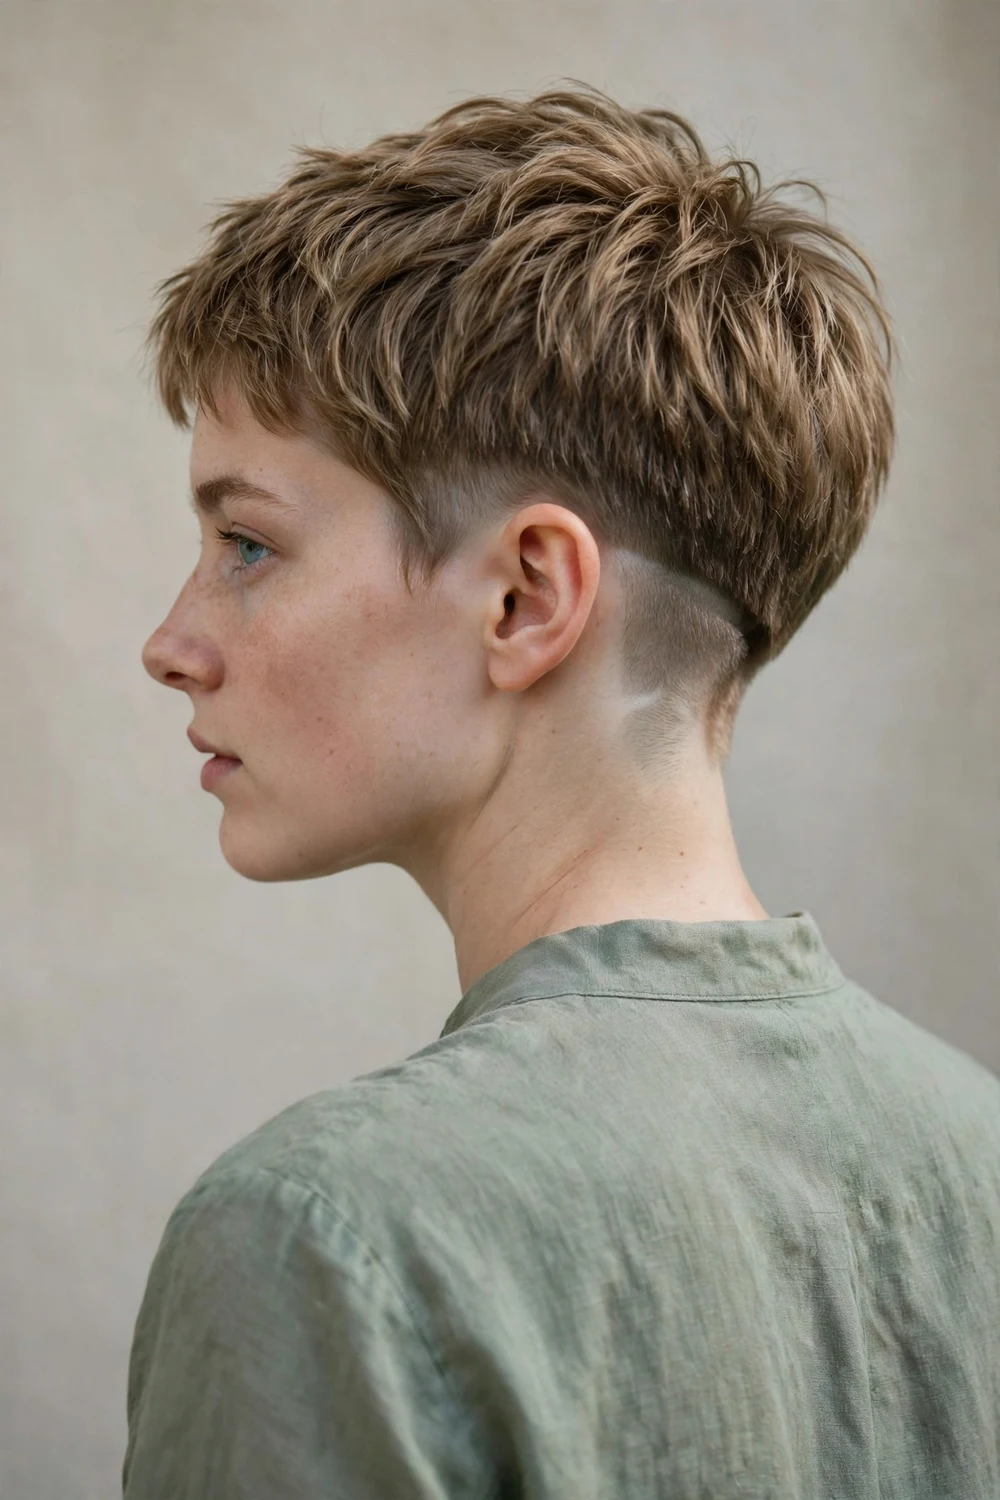
The nape-shaved pixie hides its boldest feature underneath. The top and crown keep one to three inches of soft length while the entire nape is buzzed clean below. Wear your hair down and nobody sees it; tuck it behind your ears and the shaved panel shows. It is a smart compromise if your workplace frowns on visible shaved sides. The hidden section still needs trimming every two to three weeks or the regrowth gets fuzzy fast.
Try this: tuck one side behind your ear to flash the shaved nape only when you want to.
Difficulty: Easy | Cost: $35–$60
9. Temple Shave Pixie
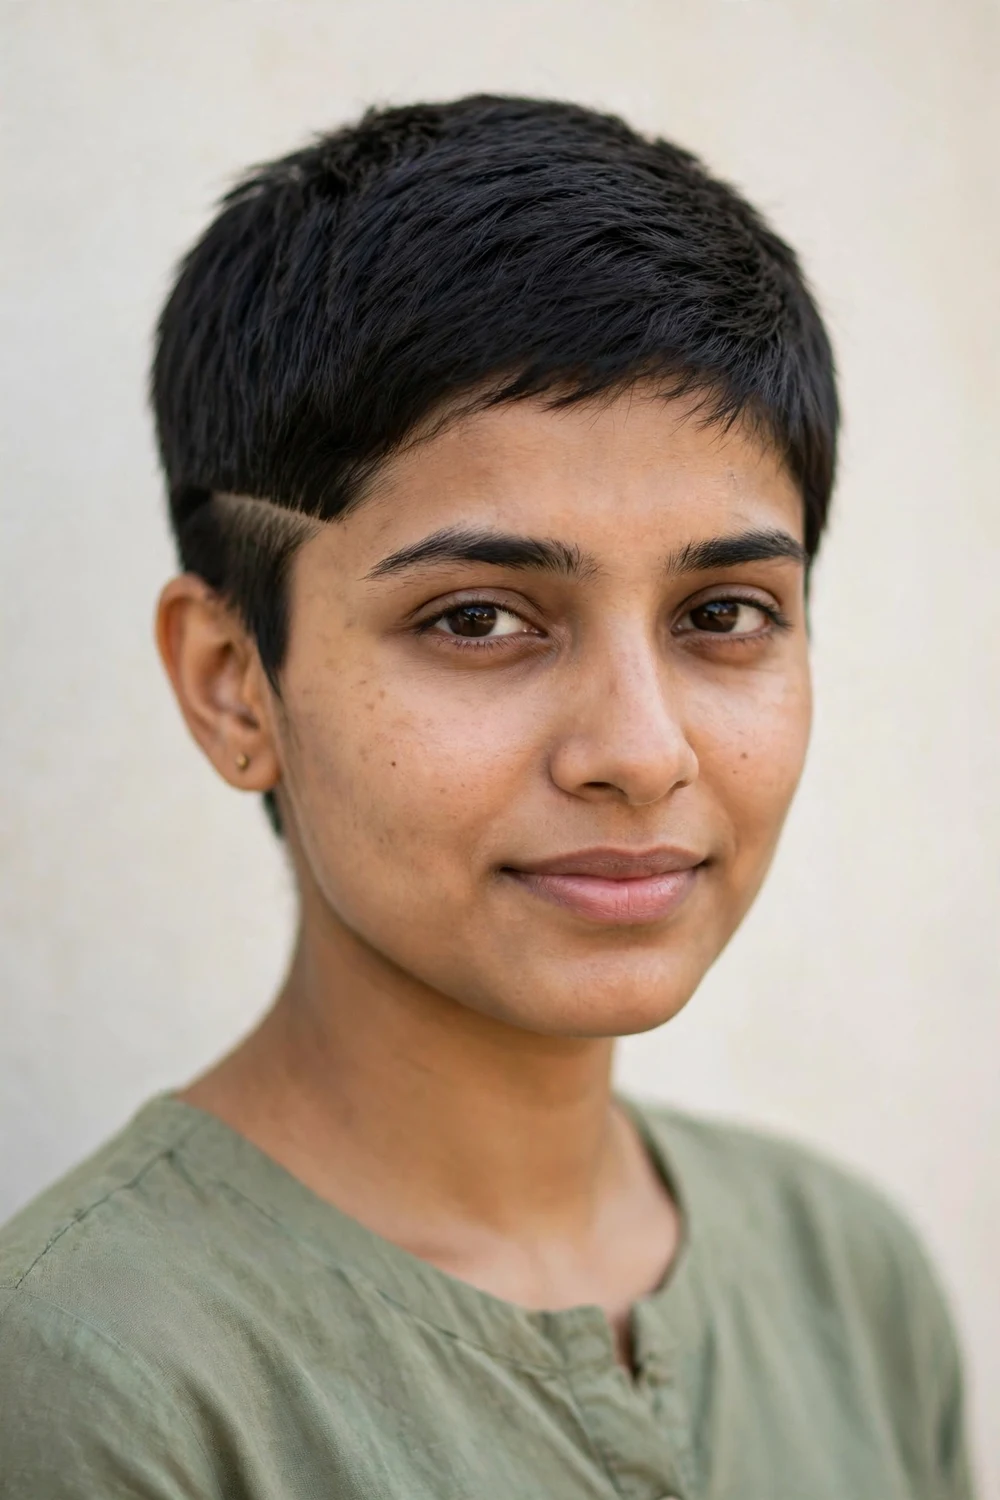
Instead of shaving both sides, this version shaves a clean strip above one temple only. The rest of the pixie stays very short and neat, so the single shaved panel becomes the focal point. It is less commitment than a full undercut and grows out with less awkwardness. Some wearers add a second thin shaved line inside the panel for extra detail. Keep the strip edged every two weeks; a blurry temple shave loses its impact quickly.
Try this: part your hair to the opposite side so the shaved temple stays fully exposed.
Difficulty: Easy | Cost: $30–$55
10. Asymmetrical Shaved Pixie

One side gets buzzed close while the other keeps extra length that sweeps across the crown. The imbalance creates movement and draws the eye diagonally, which flatters round and square faces. Style the longer side smooth for polish or tousled for edge; both work with the shaved side underneath. Ask for the longer side to fall just past the ear for the strongest effect. Grow-out needs managing because the two sides grow at visibly different rates, so see your stylist every three weeks.
If you like this idea with more length on top, browse our pixie cut shaved sides collection for longer variations.
Try this: flat-iron the longer side smooth for contrast against the buzzed side. Use a heat protectant first.
Difficulty: Moderate | Cost: $40–$70
11. Disconnected Pixie
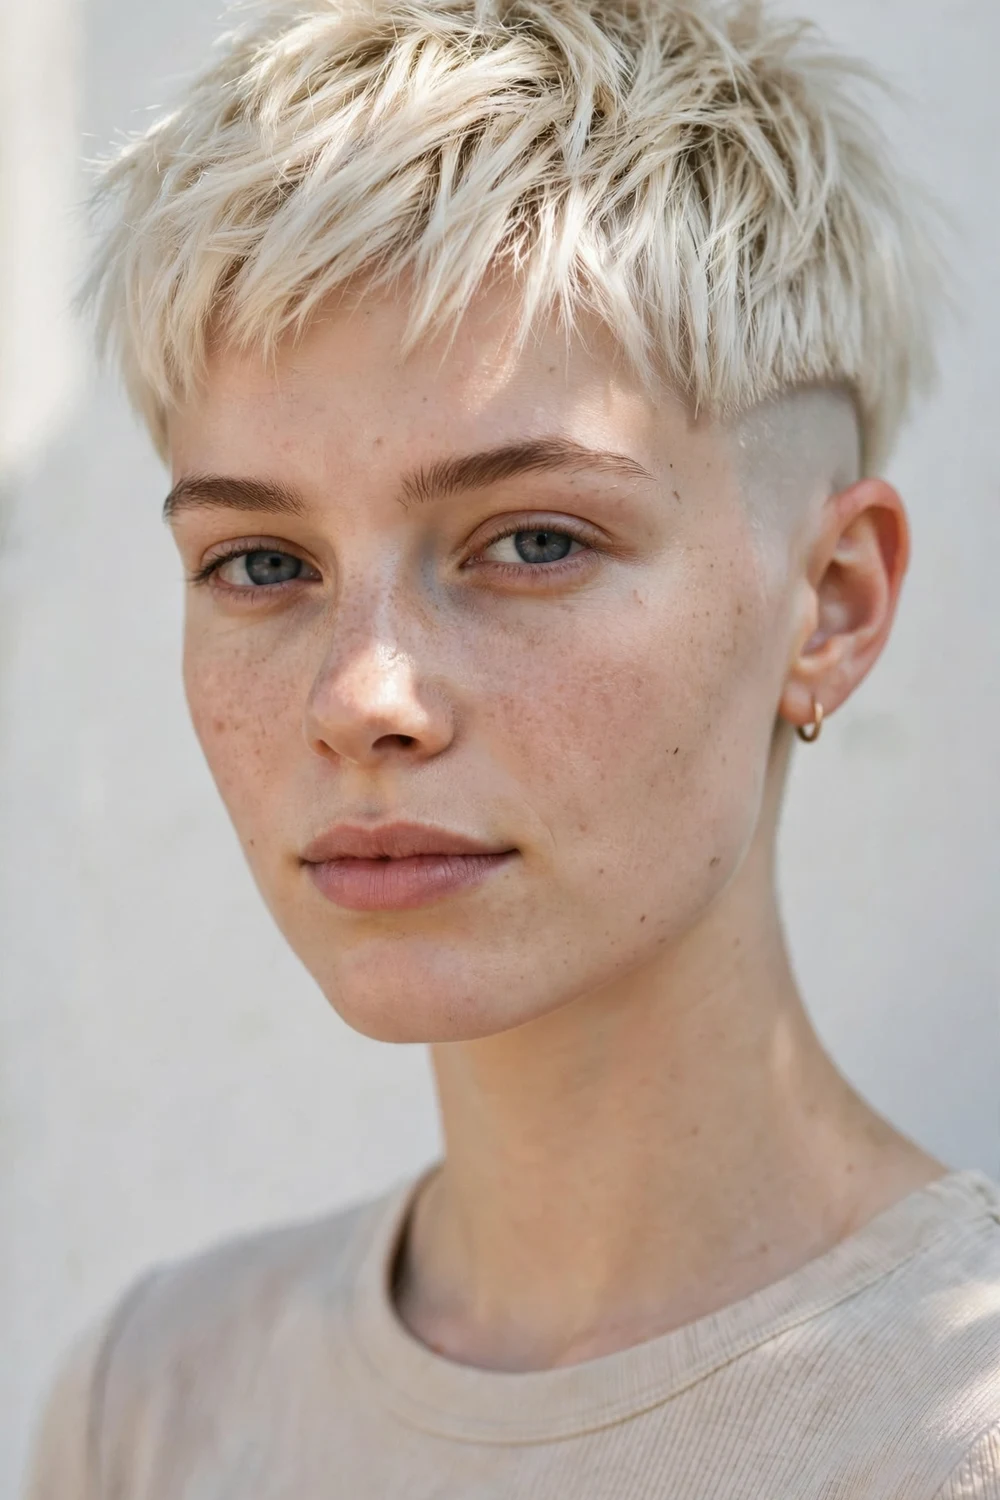
The disconnected pixie skips the blending entirely. The top keeps two to three inches of length and then drops straight to a #1 or #2 on the sides with no fade in between. That hard line is the whole point: it looks sharp, modern, and a little rebellious. It works best on straight hair, where the line between lengths stays crisp. Regrowth softens the disconnect within three weeks, so this one demands regular barber visits to keep its edge.
Try this: define the disconnect line with a dab of fiber cream pressed along the boundary.
Difficulty: Moderate | Cost: $45–$70
12. Faux Hawk Pixie
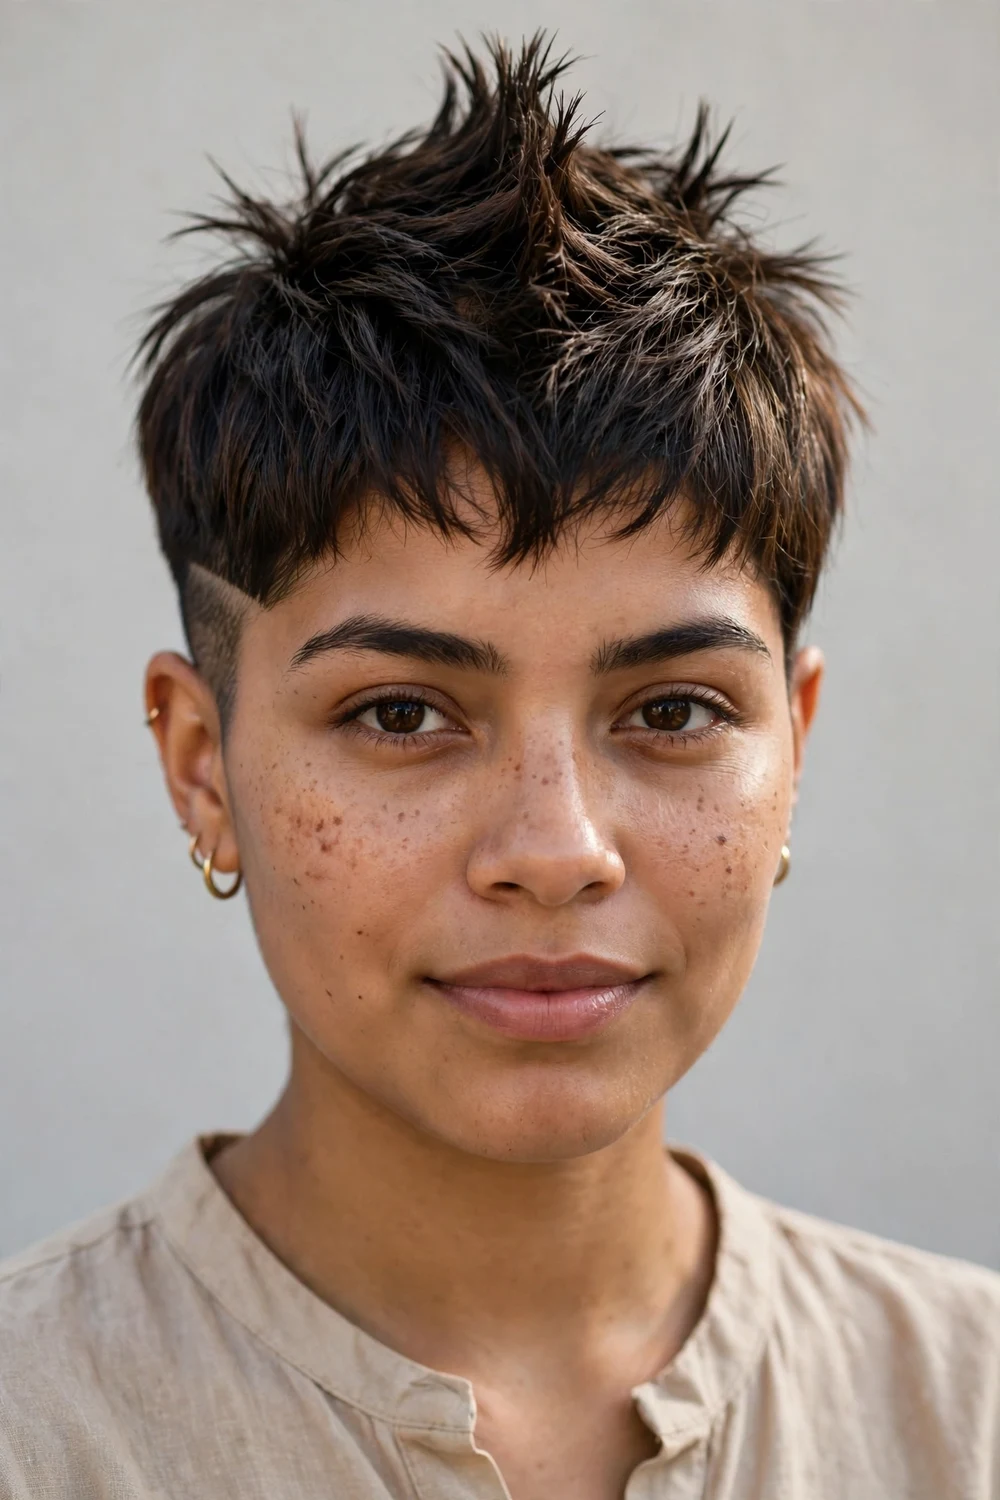
Shaved sides plus a center strip of longer hair gives you the faux hawk. The strip usually runs one to three inches long from forehead to nape, and you style it up, back, or to the side depending on your mood. A strong matte product holds the shape through the day. It is louder than a standard undercut but still easy to tone down by flattening the strip. The sides need shaving every two weeks to keep the strip standing out.
Try this: push the strip slightly to one side for a wearable daytime version of the hawk.
Difficulty: Moderate | Cost: $40–$70
13. Spiky Pixie
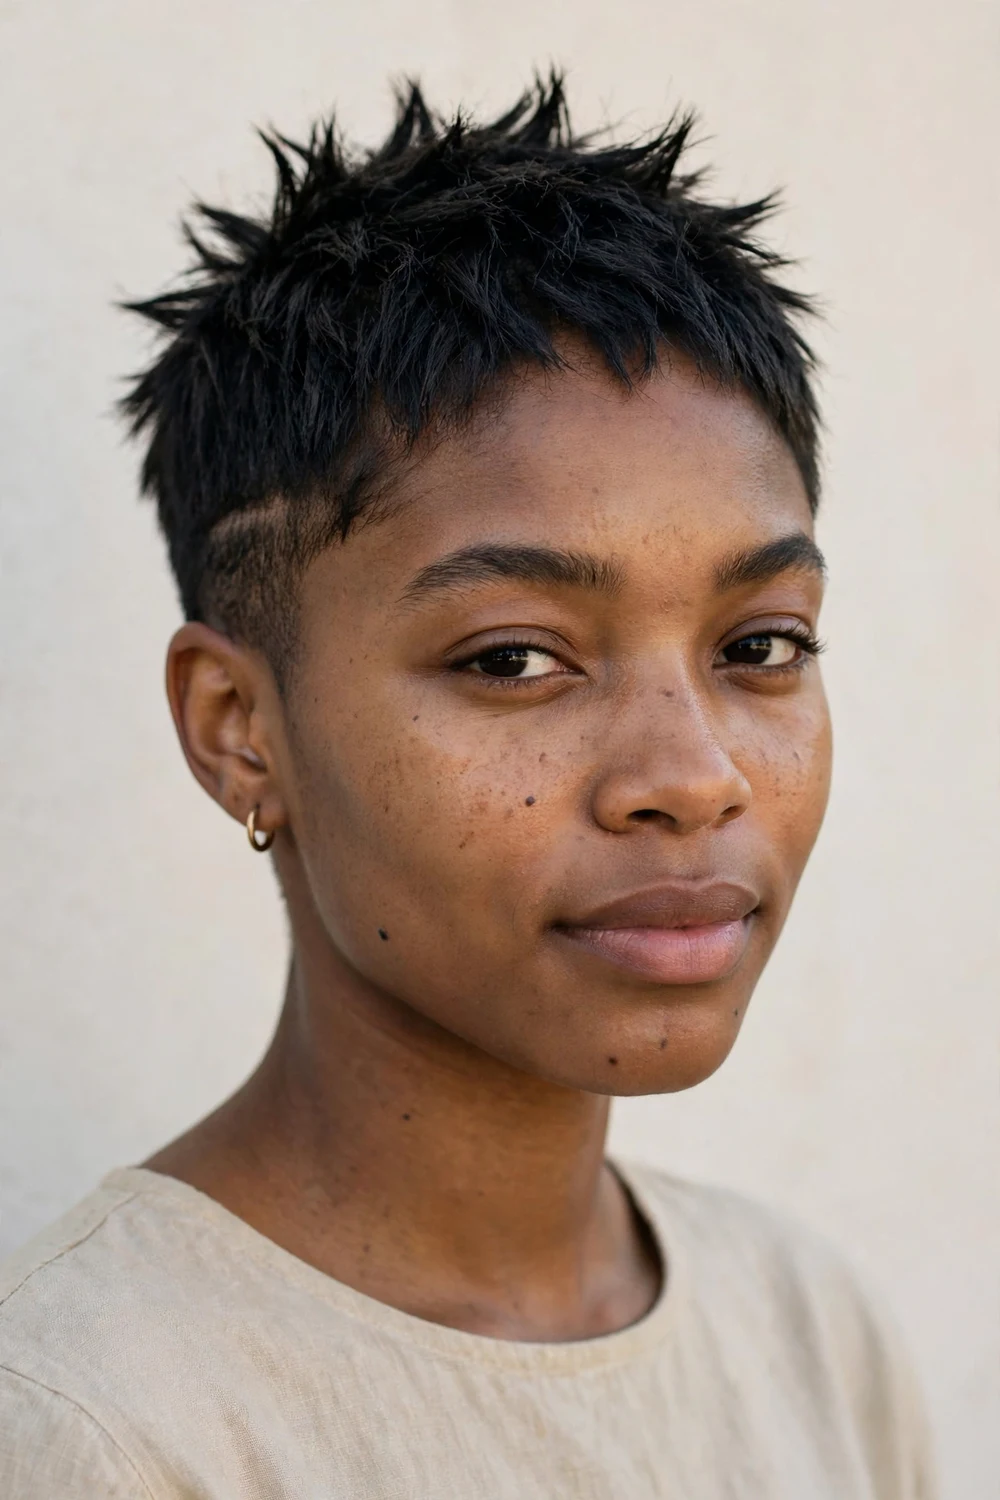
Short spikes turn a basic crop into something with attitude. The top needs about one to two inches so the pieces can stand up; anything shorter lies flat. Warm a strong-hold wax between your fingers and pinch the ends upward in small sections. Fine hair spikes easily and the vertical pieces make it look thicker. Wash it out nightly, since heavy wax builds up fast on short hair. Trim every three to four weeks to keep the spikes from flopping.
Try this: spike only the crown and leave the front smooth for a less costume-like finish.
Difficulty: Easy | Cost: $35–$60
14. Pompadour Quiff Pixie

A little height at the front transforms the whole silhouette. The pompadour quiff lifts the front section up and back while the sides stay faded tight, which adds length to round faces and drama to the profile. You need two to three inches up front to build the lift. With a heat protectant applied, a round brush and blow-dryer do the heavy lifting; set it with a firm-hold spray. It takes more morning effort than most ideas here, but the payoff is a polished, retro-leaning finish.
Try this: backcomb the roots lightly before smoothing the surface for extra staying power.
Difficulty: High | Cost: $45–$75
15. Slicked-Back Pixie
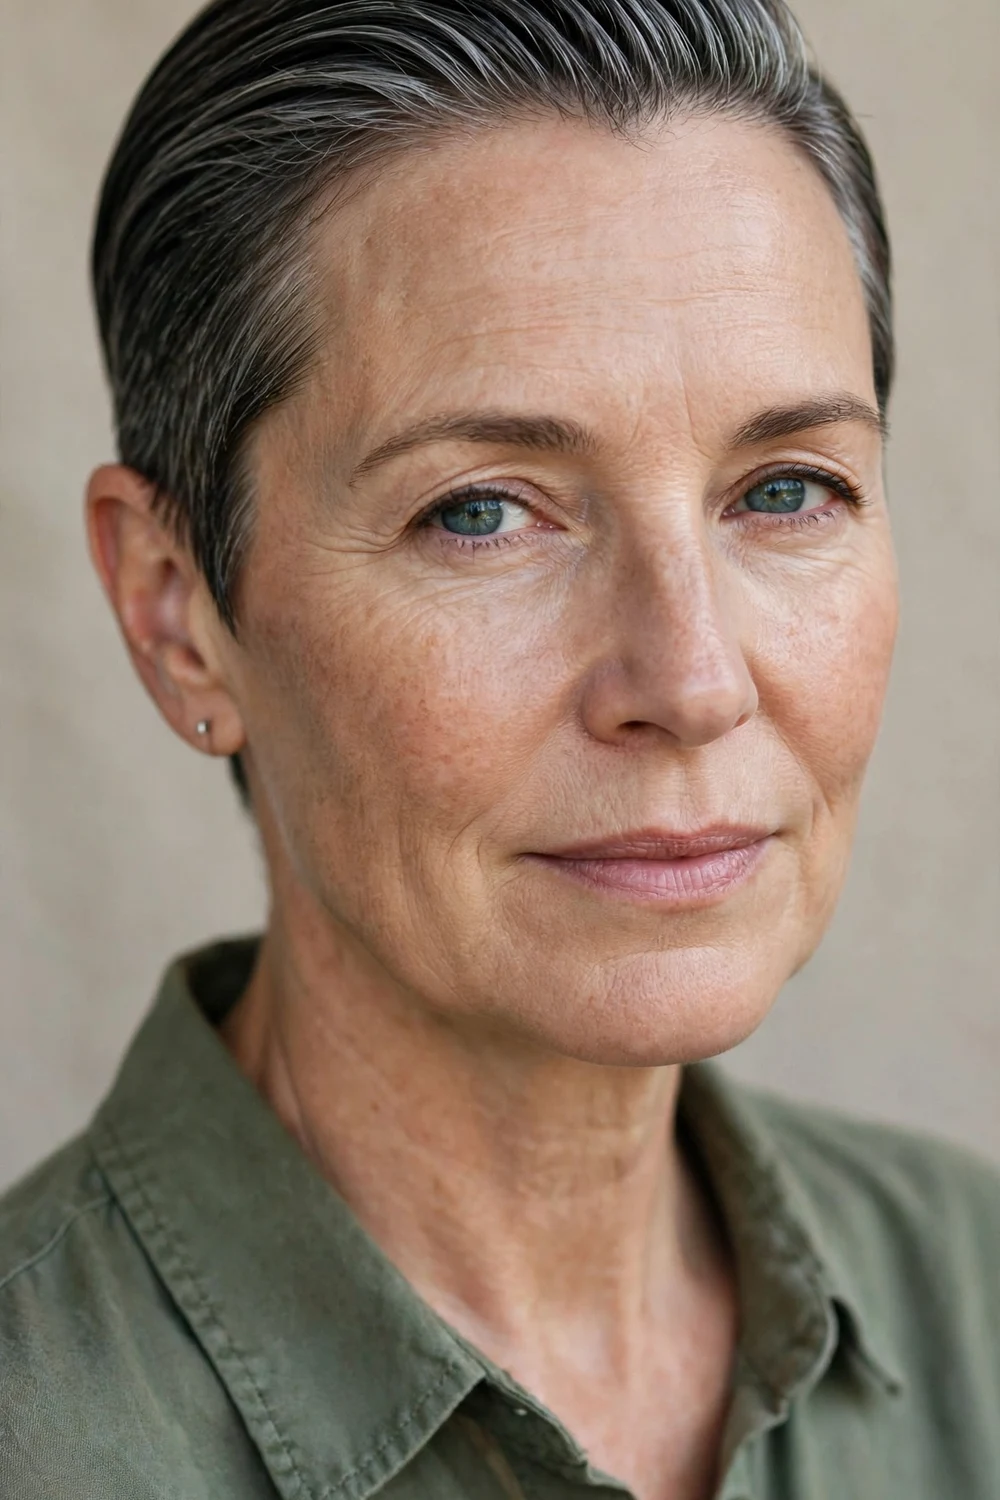
Combing everything straight back gives the shortest pixie a sleek, grown-up finish. It works when the top holds at least two inches; shorter than that and there is nothing to slick. A strong gel or wet-look pomade keeps it in place from morning to night. The style exposes the whole face, so it favors strong bone structure and neat brows. It also shows the fade lines crisply, which makes the barber work part of the look.
Try this: apply gel to damp hair and comb back with a fine-tooth comb for the smoothest result.
Difficulty: Easy | Cost: $35–$60
16. Side-Swept Pixie
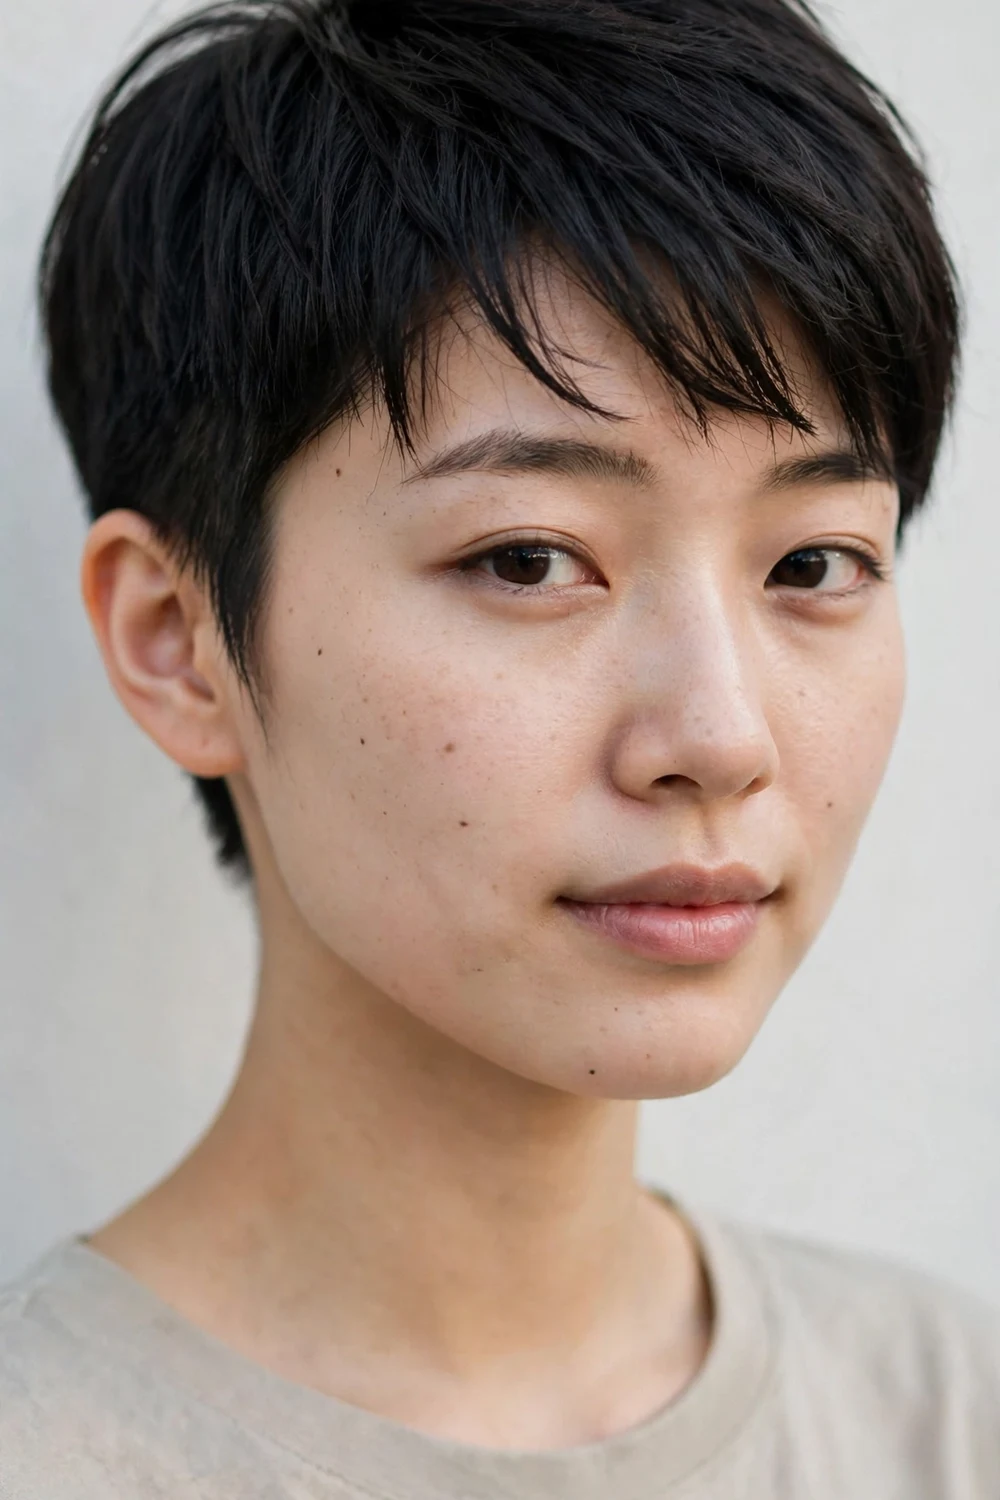
A deep sweep across the forehead softens the whole cut. The front keeps two to four inches while the sides and back stay close-cropped, so the contrast does the talking. It suits most face shapes and hides a high forehead nicely. With a heat protectant applied, blow-dry the front to the side with a vent brush, then lock it with a light spray. If the sweep keeps falling into your eyes, ask for the fringe to be thinned at the next trim.
If you enjoy bold short shapes, explore our edgy pixie haircuts for more daring styles.
Try this: switch the sweep direction every few weeks to train the hair to fall either way.
Difficulty: Easy | Cost: $35–$60
17. Cropped Fringe Pixie
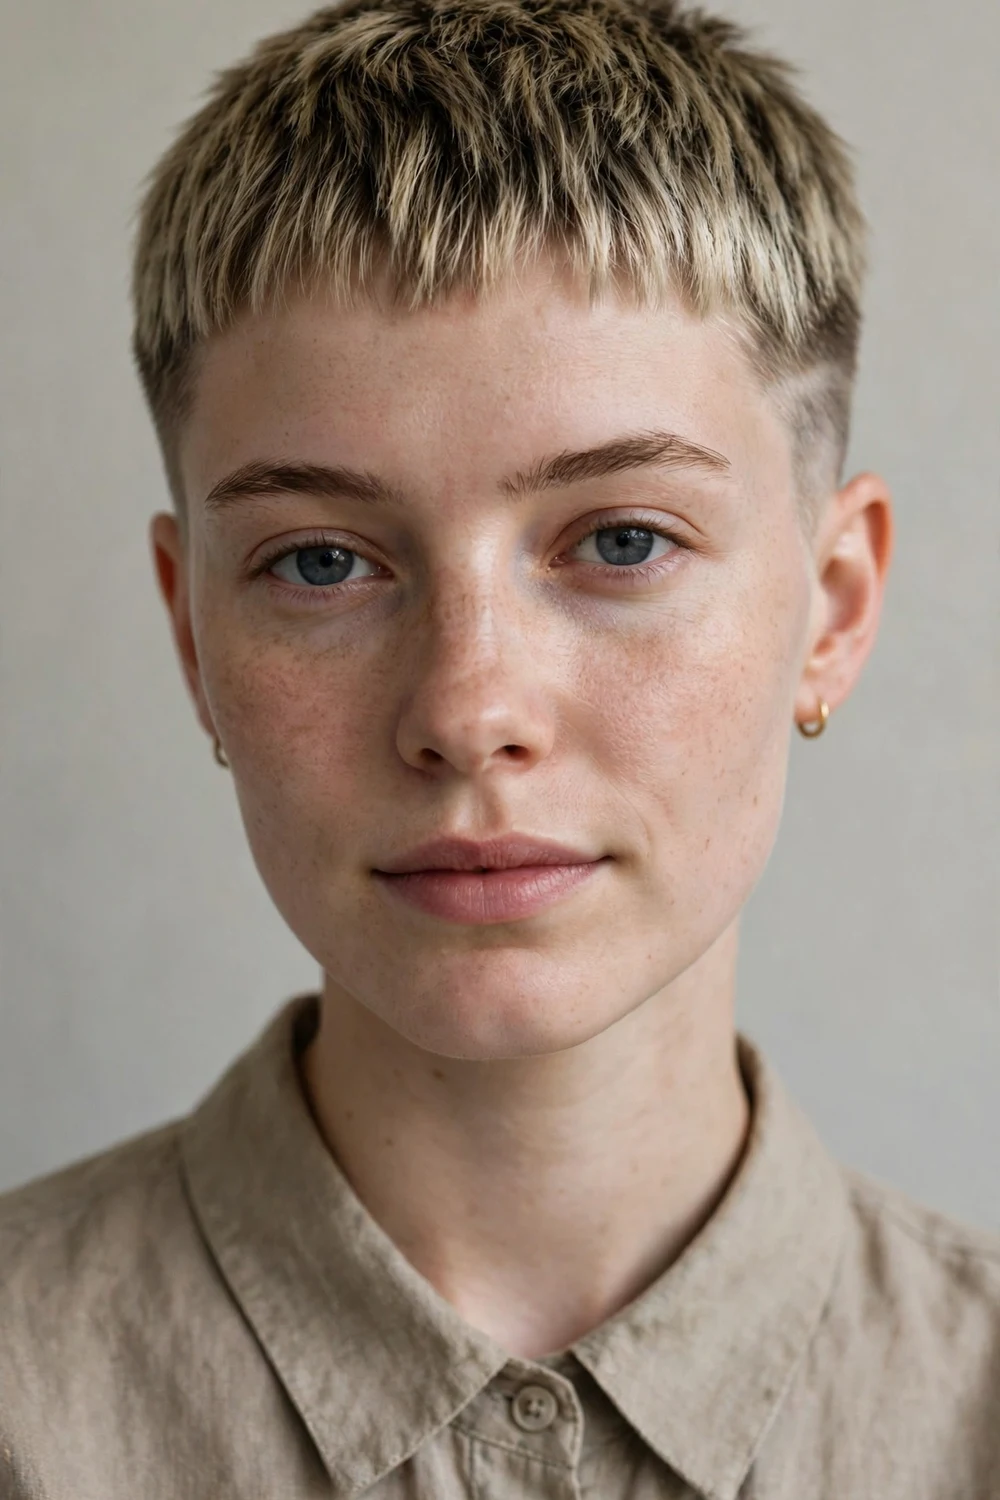
A micro fringe cut well above the brows gives the pixie a fashion-forward jolt. Keep it blunt for graphic impact or piecey for softness; both pair naturally with shaved sides. The fringe draws attention straight to the eyes, so it rewards good brows and simple makeup. It needs trimming every two to three weeks, since even a quarter inch of growth changes the look. This one photographs strikingly from the front.
Try this: trim the fringe yourself between appointments with small brow scissors, cutting less than you think.
Difficulty: Moderate | Cost: $35–$60
18. Longer Fringe Contrast Pixie
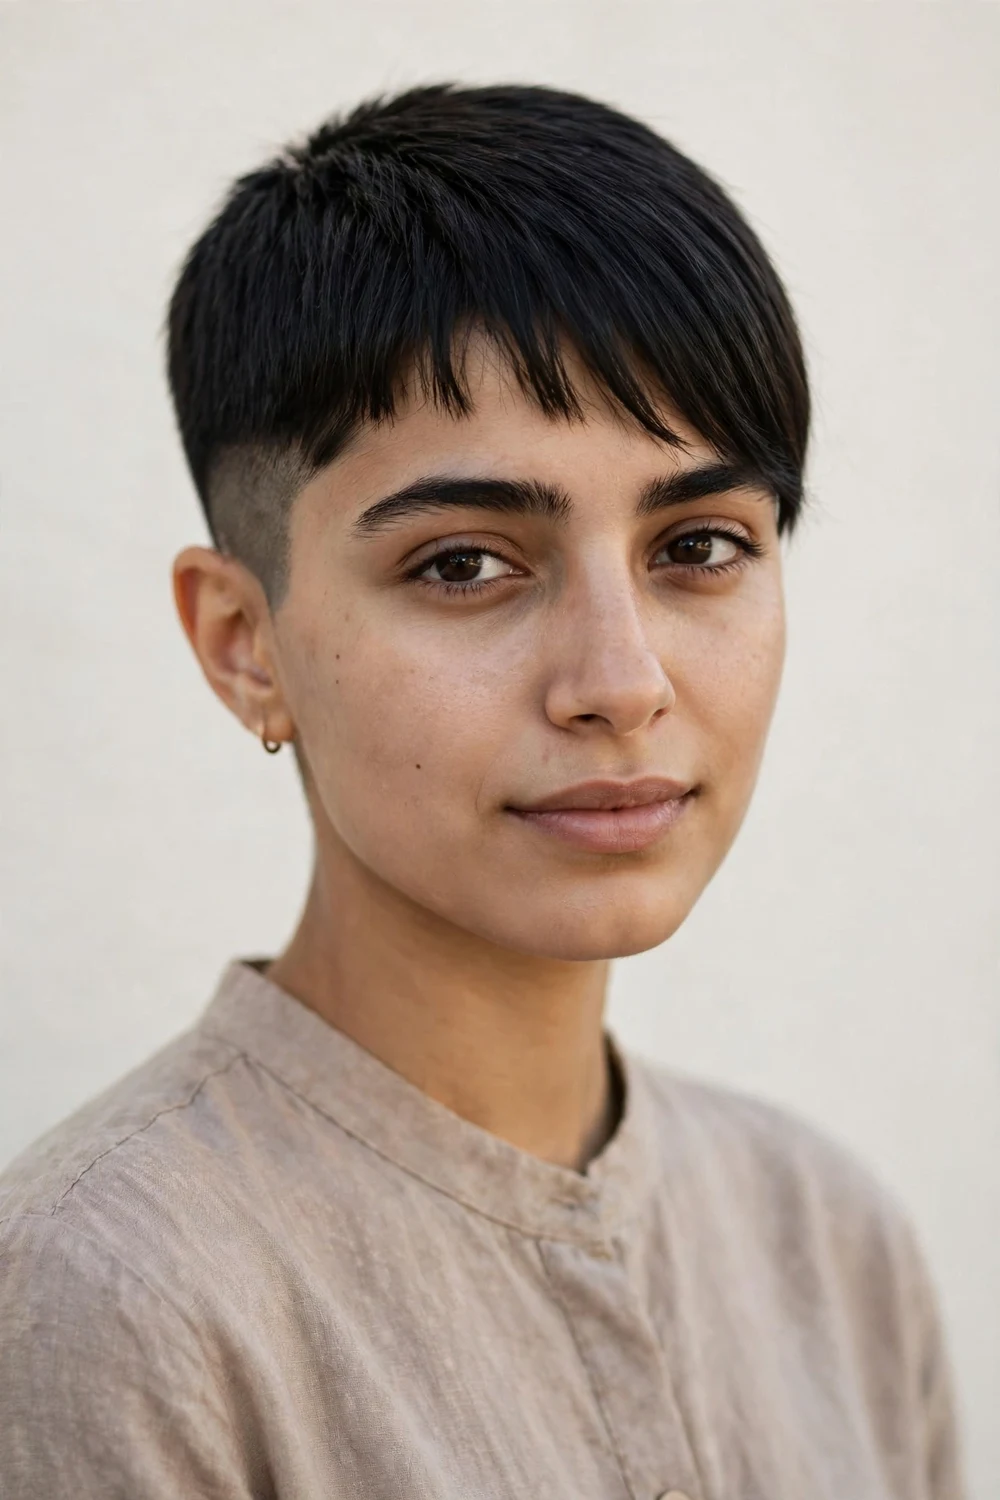
This one plays with extremes. The sides and back go fully shaved while the fringe keeps three to four inches of length falling over the forehead. The long-short clash is what makes it interesting, and it gives you the most styling room of any idea here. Wear the fringe straight and heavy, or sweep it aside for a softer read. The fringe needs its own trim schedule, about every three weeks, separate from the two-week side clean-ups.
Try this: tuck the fringe behind one ear to show off the shaved side underneath.
Difficulty: Moderate | Cost: $40–$65
19. Choppy Textured Crop

Point cutting and razor work break the top into uneven, piecey bits that catch the light. Nothing sits flat, which makes fine hair look denser and thick hair feel lighter. The sides stay faded short so the texture on top does all the talking. Styling takes seconds: squeeze a little texturizing paste through dry hair and pull pieces in different directions. It grows out well because the choppiness hides uneven regrowth.
Try this: rake the paste through with your fingers instead of a comb to keep the pieces separated.
Difficulty: Easy | Cost: $35–$60
20. Tousled Messy Pixie
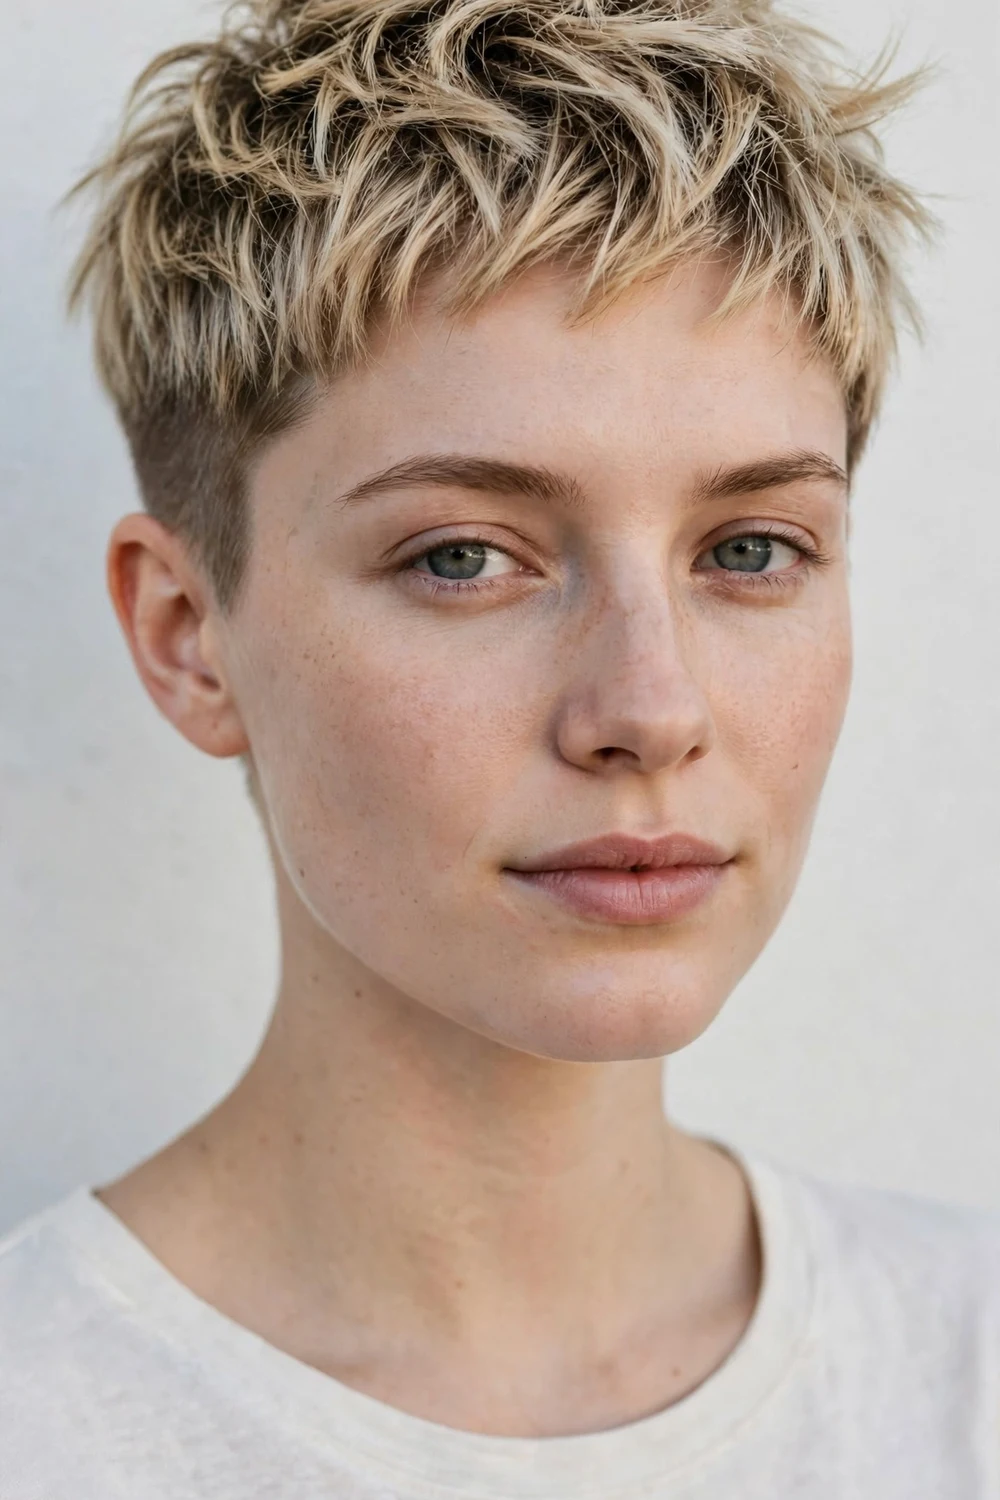
Deliberately undone is the brief here. The cut keeps soft layers through the top with faded sides, and you style it by scrunching product in and leaving it alone. It suits wavy and straight hair equally, and it forgives bedhead completely. This is also the easiest grow-out of the ultra-short styles since messiness is the point. A sea salt spray on damp hair gives the best texture without stiffness, and it washes out clean.
Try this: sleep on it and just reshape with damp hands in the morning; it is built for that.
Difficulty: Easy | Cost: $30–$55
21. Shaggy Pixie
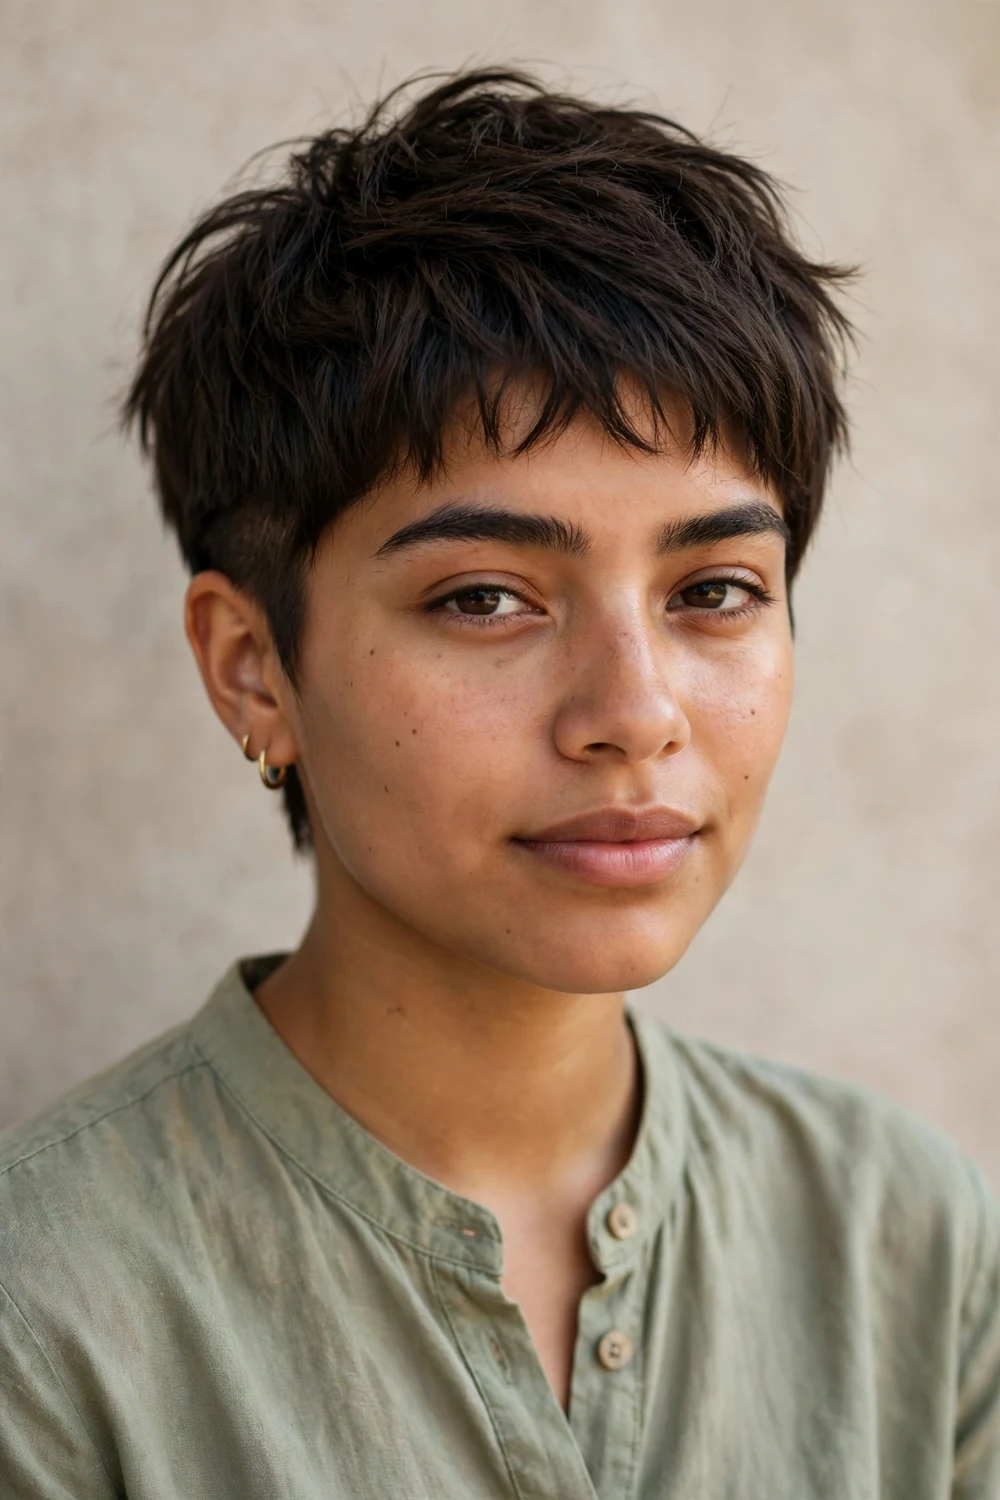
Shaggy layers bring a relaxed, rock-leaning feel to the short pixie. The top and crown get razored into soft, flicky layers while the sides stay shaved or faded underneath. It moves when you move, which keeps the look from feeling severe. Medium to thick hair holds the shag best; very fine hair can look stringy without enough density. Ask your stylist to keep weight at the crown so the layers have something to fall from.
Try this: flip the crown layers in alternating directions for extra piece-y movement.
Difficulty: Moderate | Cost: $40–$65
22. Feathered Pixie

Feathering softens every edge of the cut. Fine, wispy layers flip outward around the crown and face, giving the pixie movement without bulk. It is a gentle entry point if you are nervous about going ultra-short, since the softness keeps it from reading harsh. With a heat protectant applied, a round brush and light blow-dry coax the feathers into place. Women with fine to medium hair get the best version of this; very thick hair needs serious thinning first.
Try this: direct the feathers outward at the crown and inward at the temples for balanced shape.
Difficulty: Moderate | Cost: $40–$65
23. Rounded Pixie
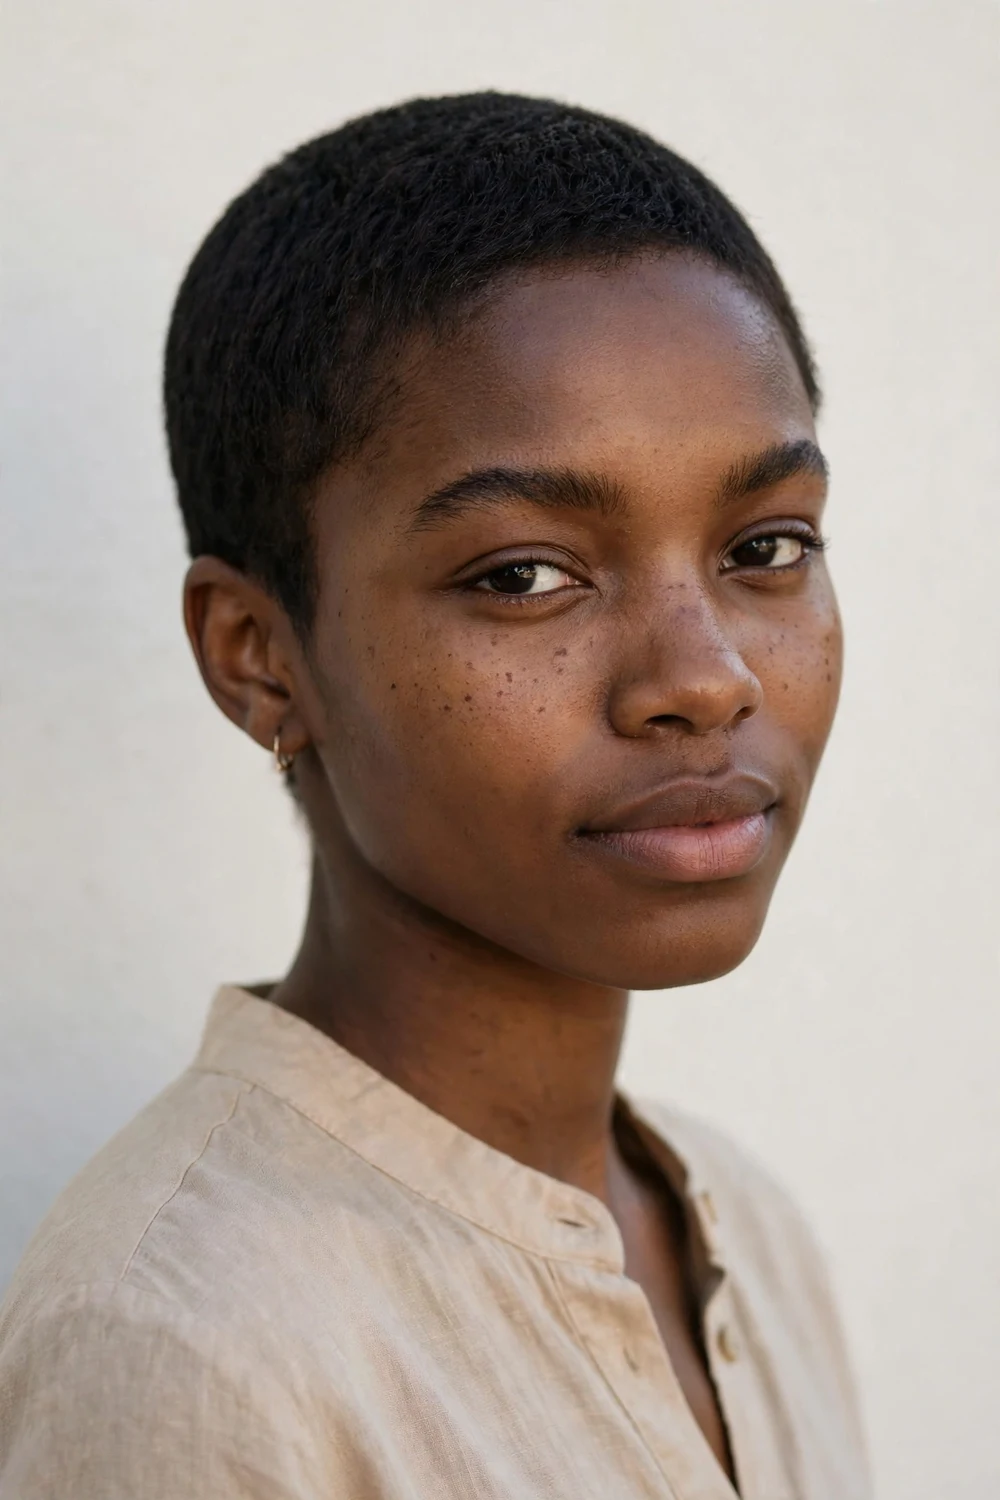
The rounded pixie follows the curve of the head for a soft, globe-like shape. Layers arc smoothly from crown to nape with no harsh corners, and the sides taper neatly underneath. It reads feminine and approachable, a good pick if angular cuts feel too severe on you. The shape demands precision cutting, so choose a stylist with strong short-hair skills. Trims every four weeks keep the curve from going boxy as it grows.
Try this: smooth the surface with a boar-bristle brush to emphasize the rounded silhouette.
Difficulty: Moderate | Cost: $40–$65
24. Sleek Smooth Pixie
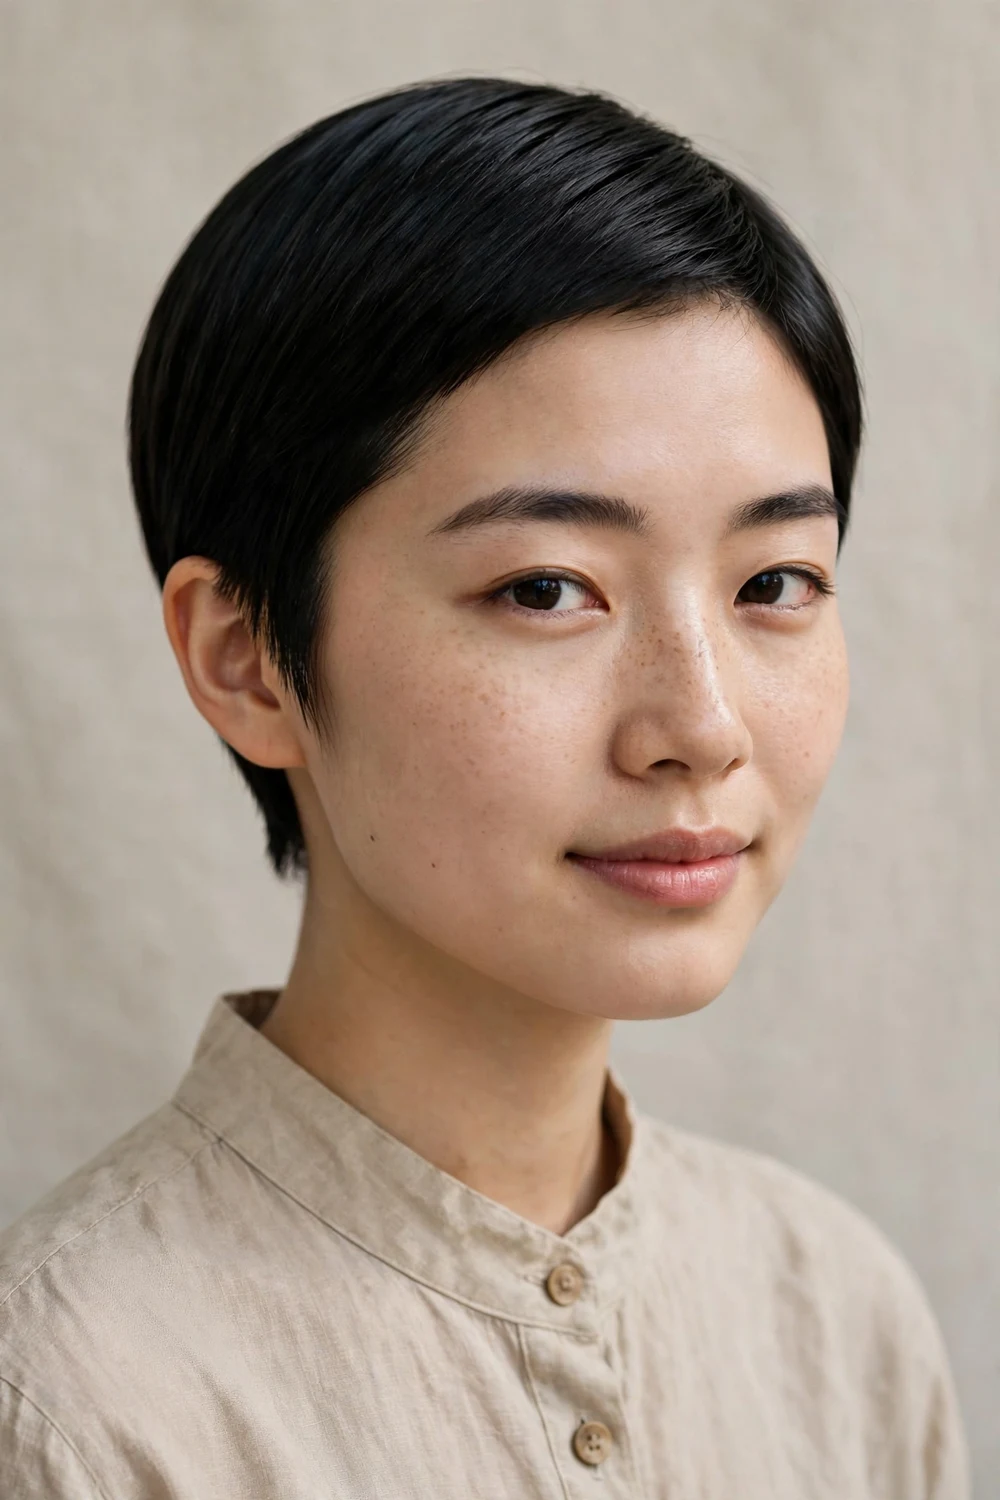
Polished to a shine, this pixie hugs the head with not a hair out of place. The sides taper close and the top gets smoothed flat with a fine-tooth comb and light pomade. It is the most office-ready of the ultra-short options and pairs well with strong makeup. Straight hair achieves it fastest; wavy hair needs smoothing first. The sleek finish shows regrowth quickly, so keep the sides tight with touch-ups every two to three weeks.
Try this: finish with a shine spray, holding the can at arm’s length to avoid wet spots.
Difficulty: Easy | Cost: $35–$60
25. Soft Subtle Undercut Pixie
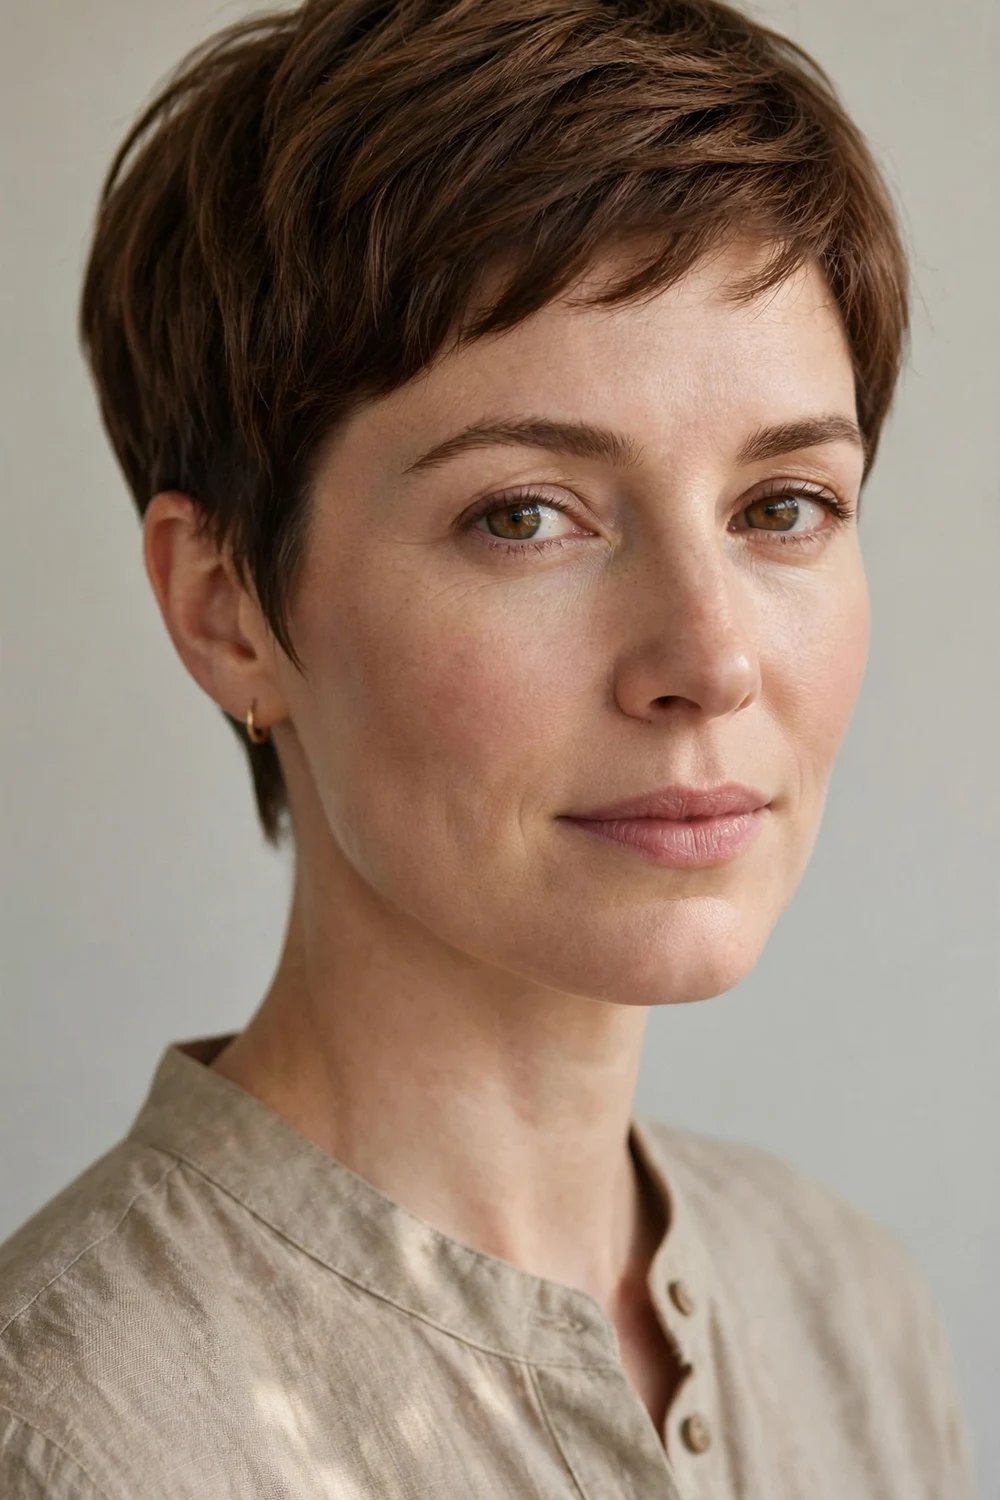
For a quieter take, the undercut hides beneath the top layer. Only the nape and lower sides get clipped short while soft, feminine layers fall over them. From most angles it looks like a regular short pixie; the shaved detail appears when hair moves or gets tucked. It is ideal if you want the option of edge without the daily visibility. The hidden undercut still needs trimming every three weeks or it starts to poke through the top layer.
Our undercut hairstyles for women guide covers more ways to wear hidden shaved sections.
Try this: tuck both sides behind your ears to reveal the hidden undercut on demand.
Difficulty: Easy | Cost: $35–$60
26. Longer-Top Pixie
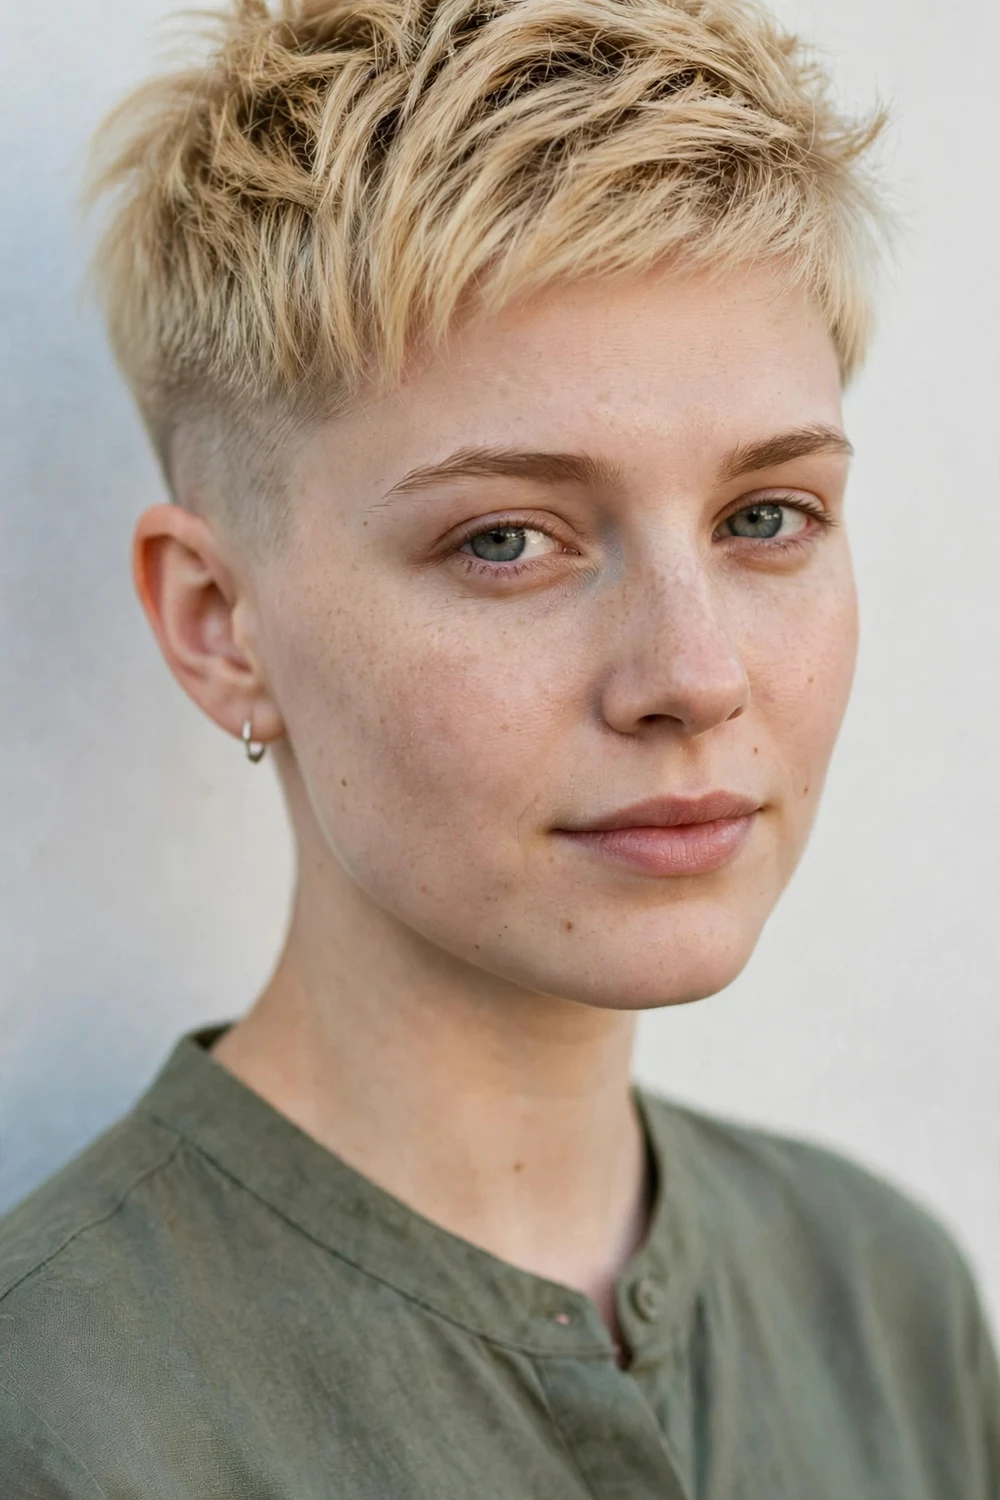
The top keeps three to five inches while everything below stays very short, which makes this the most versatile cut here. Slick it back for evenings, sweep it sideways for work, or spike it for weekends: one cut, three moods. The extra length also helps during grow-out since the top can camouflage the shaved sides as they fill in. Trims every four to six weeks keep the proportions right; the sides still want attention every three.
Try this: change your part from side to middle to get two different looks from the same length.
Difficulty: Easy | Cost: $35–$60
27. Bowl-Cut Pixie
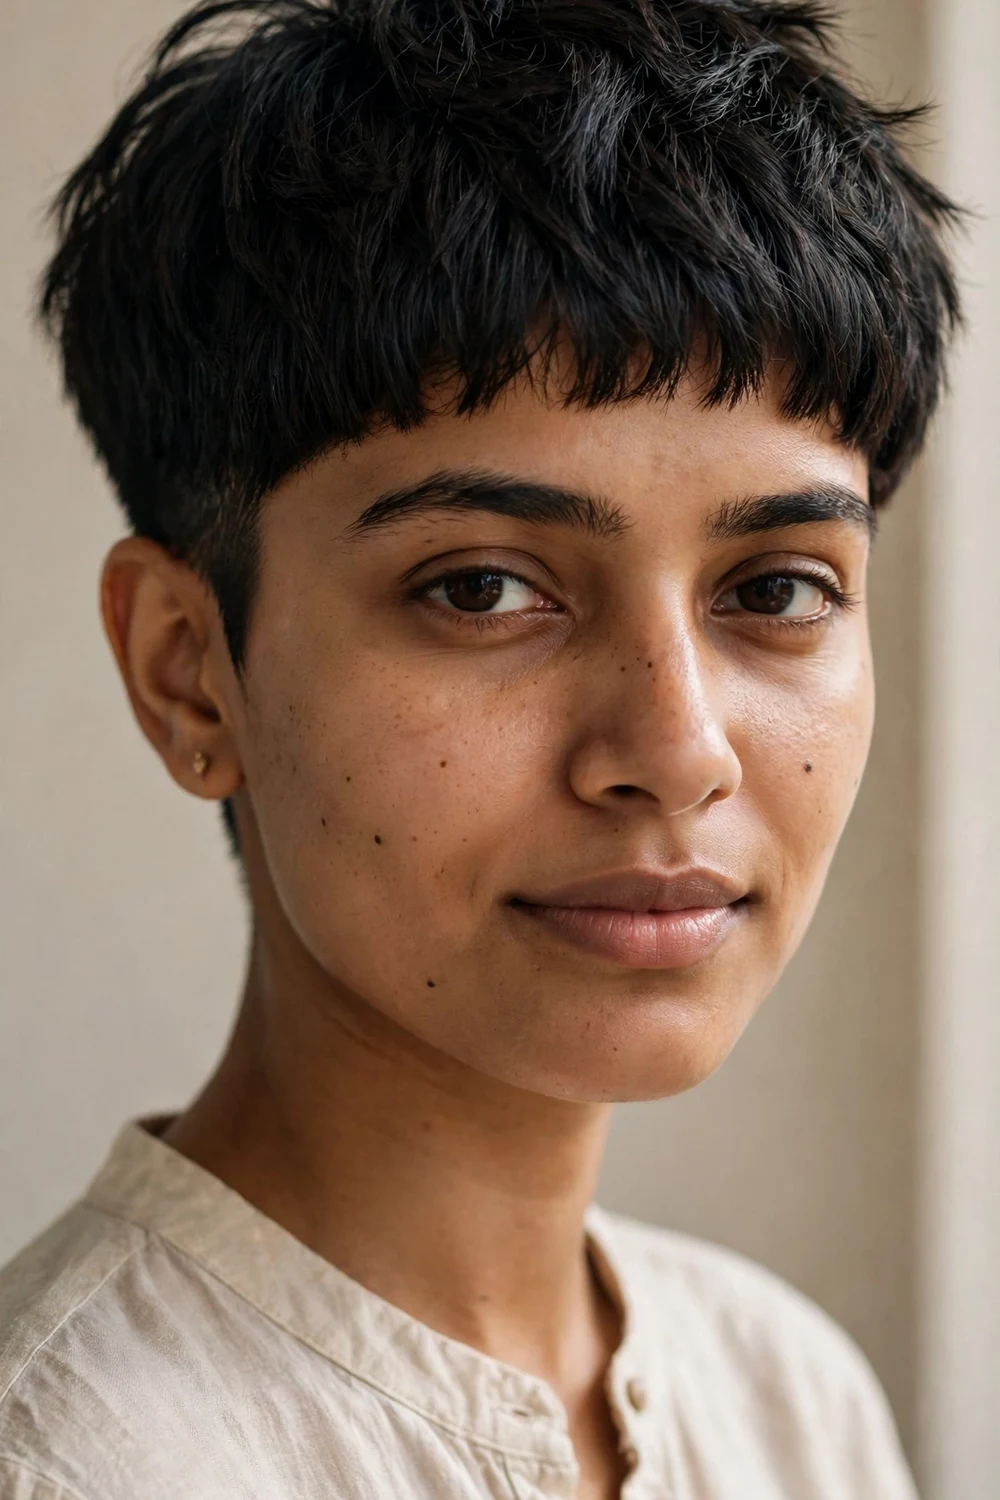
The modern bowl cut trades retro heaviness for texture. A rounded perimeter arcs around the head at brow to cheekbone level while the inside gets point-cut for movement. The sides stay very short underneath the bowl line. It is a statement cut that suits confident dressers and creative workplaces. Ask for texture through the crown so it never looks like a helmet. The geometric edge needs reshaping every three to four weeks or the perimeter goes soft.
Try this: piece out the ends with a little wax to break up the rounded edge.
Difficulty: High | Cost: $45–$75
28. Geometric Cut Pixie
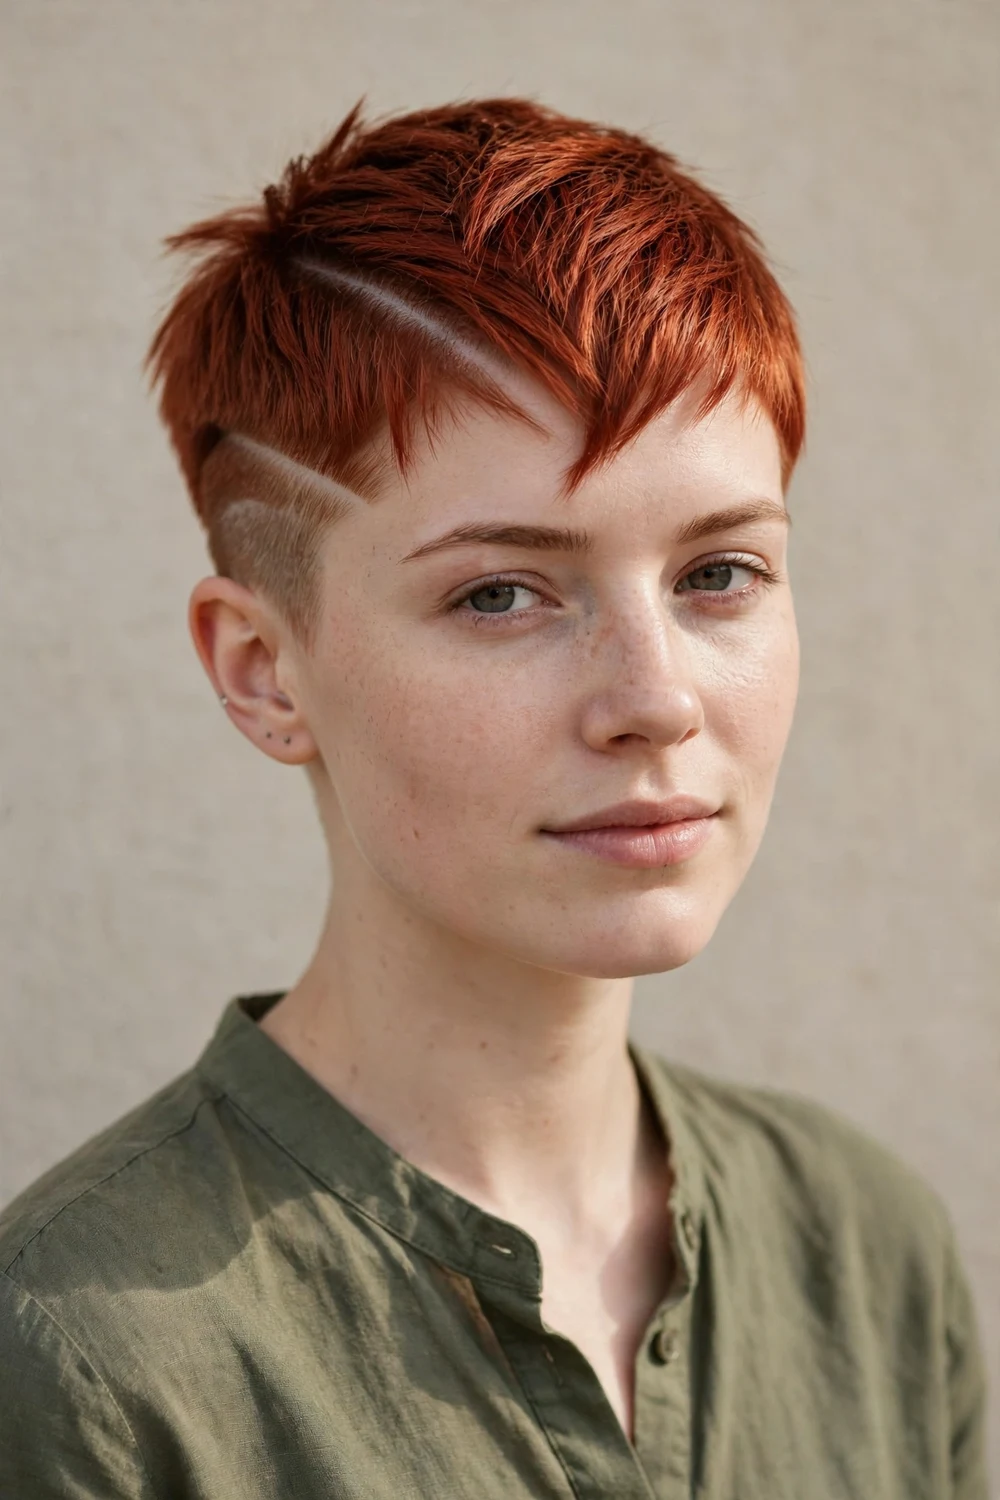
Sharp angles and clean lines define this architectural take. Asymmetric points, an angled fringe, or a carved sideburn edge turn the pixie into something sculptural. The sides fade tight so the geometry reads clearly against skin. It photographs dramatically and suits straight hair best, where every angle stays visible. This is a high-skill cut: bring reference photos and expect to pay for the precision. Touch-ups every three weeks keep the lines sharp.
Try this: keep the styling minimal so the cut lines stay the focus, not the product.
Difficulty: High | Cost: $50–$80
29. Shaved Design Pixie
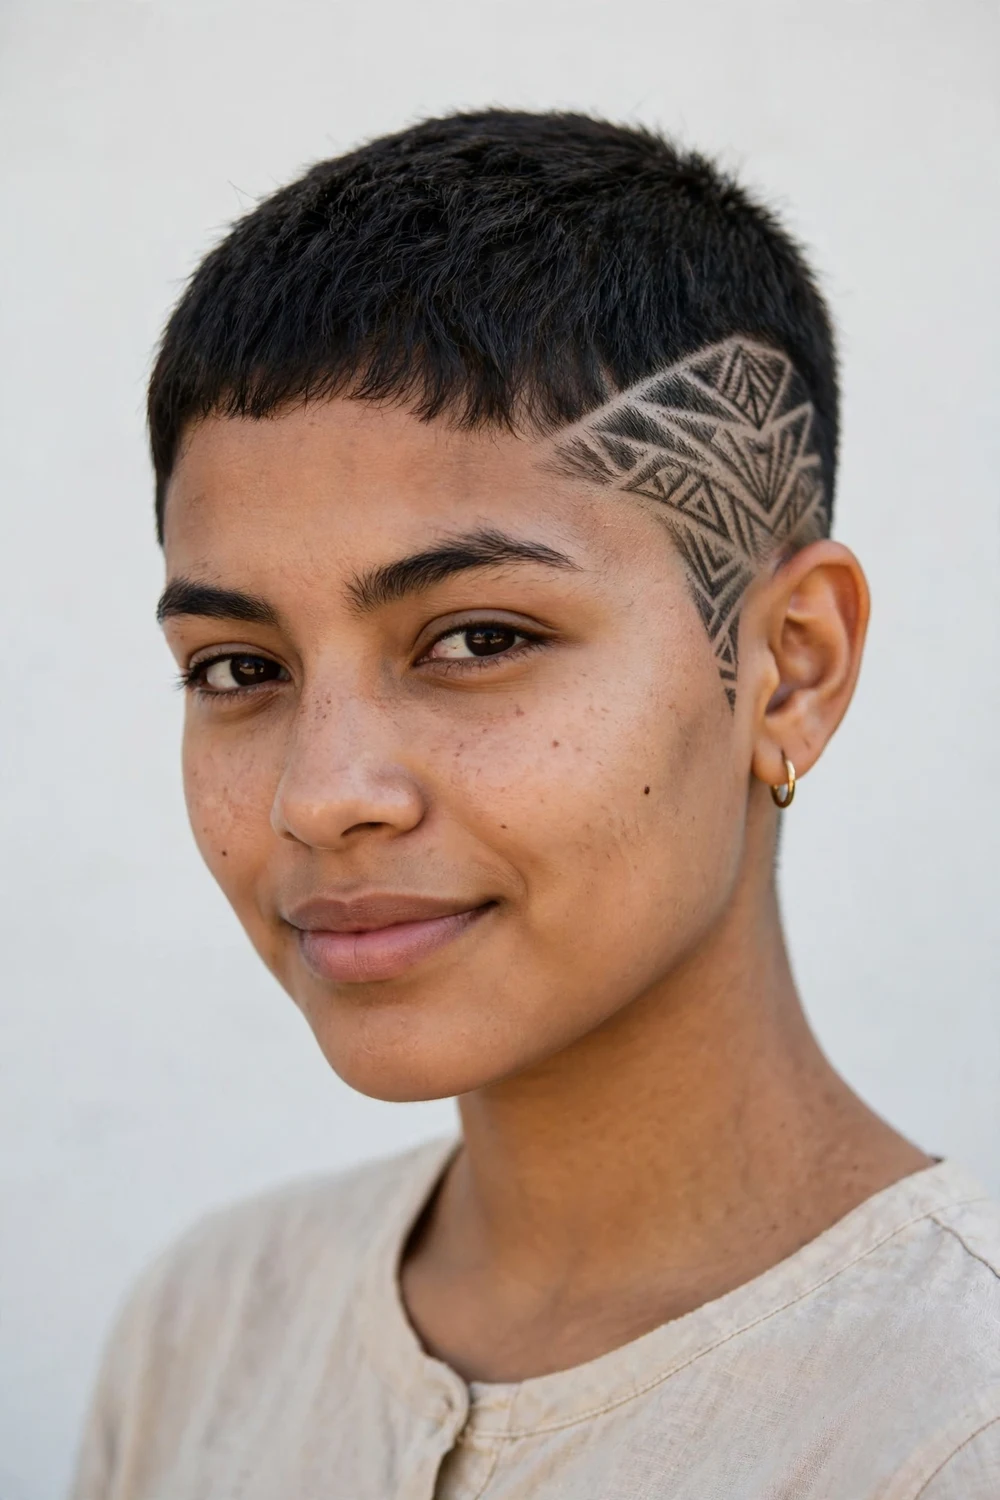
Lines, waves, stars, or geometric shapes get carved into the faded sides with trimmers. The design turns the haircut into personal artwork that you can change at every appointment. Dark hair shows designs most clearly because of the contrast with skin. Fine detail blurs fast, so expect to refresh the artwork every one to two weeks. Keep the rest of the pixie simple so the design stays the star of the show.
Try this: start with one simple line design before committing to a full pattern.
Difficulty: High | Cost: $45–$85
30. Pixie Mullet
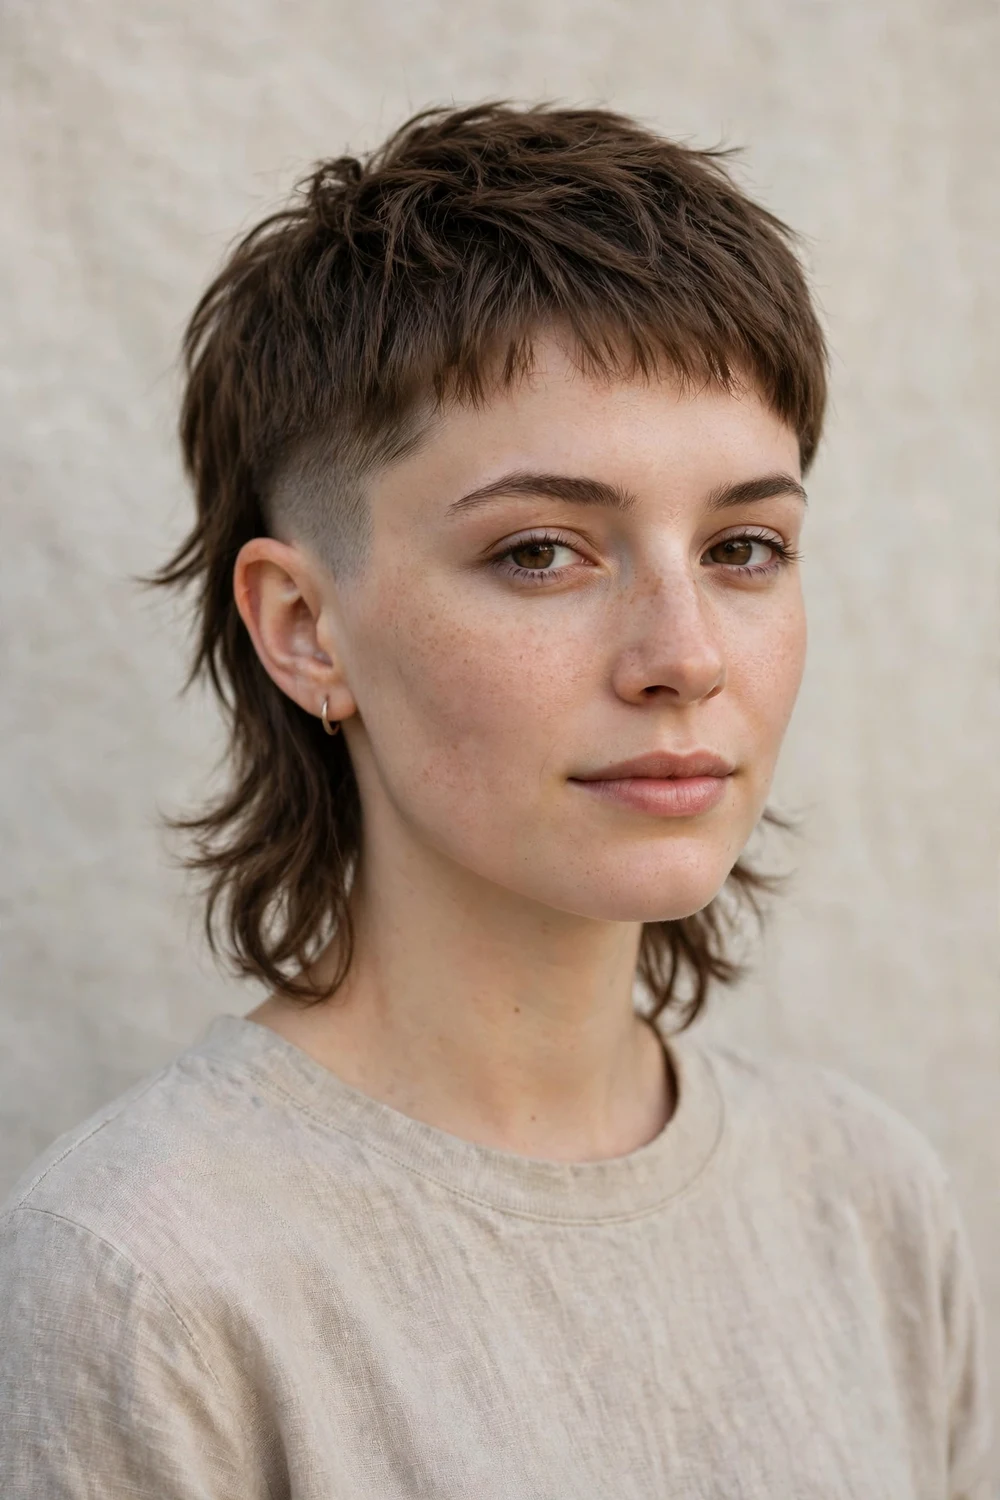
Short up front, longer at the nape: the pixie mullet keeps the party in the back. The front and sides stay very short and faded while the nape grows two to four inches with texture. It is divisive by design, which is exactly why its fans love it. The longer back needs texturizing so it moves instead of hanging flat. Balance the two zones with trims every three to four weeks.
Try this: scrunch the nape length with salt spray to emphasize the mullet texture.
Difficulty: Moderate | Cost: $40–$65
31. Androgynous Pixie
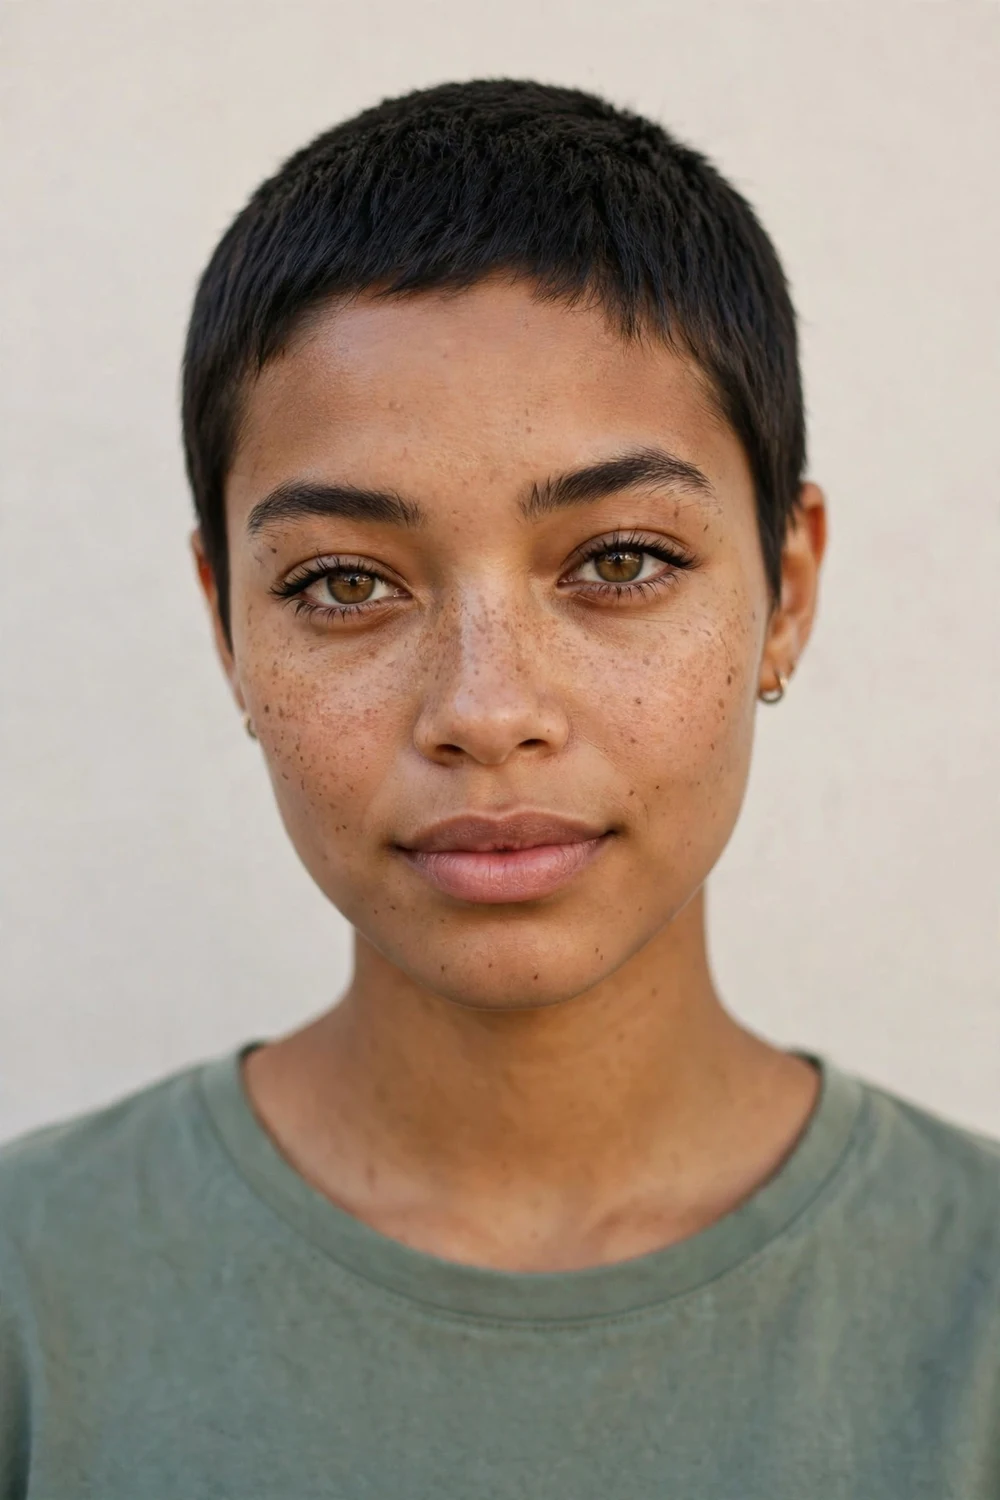
Clean, neutral, and unfussy: the androgynous pixie avoids anything coded masculine or feminine. Length stays even at one to two inches all over with tidy tapered edges. The focus lands entirely on bone structure and personal style rather than the haircut itself. It is genuinely wash-and-wear and suits anyone who wants hair that simply stays out of the way. Trims every four to five weeks keep the clean lines intact.
Try this: skip product entirely most days; this cut is designed to look good bare.
Difficulty: Easy | Cost: $30–$55
32. Swept-Up Pixie

Brushing the top up and back creates height that reads almost like an updo on very short hair. The sides stay faded tight so the lifted crown gets all the attention. It works for evenings out when you want the pixie to feel dressed up. Work a strong-hold mousse into damp roots, apply a heat protectant, then blow-dry upward to build the lift; set it with spray. The style collapses by day’s end, so treat it as a special-occasion look rather than a daily driver.
Try this: tease the roots gently before smoothing the surface for longer hold.
Difficulty: Moderate | Cost: $35–$60
33. Vintage-Inspired Pixie

Finger waves and soft pin curls bring old-Hollywood polish to the short pixie. The waves get sculpted close to the head with gel and set under a dryer, while the sides stay tapered neat. It is the dressiest idea here and suits weddings and formal events. The set holds for days if you protect it at night with a silk scarf. Ask a stylist experienced in vintage setting; the technique is specific.
Try this: add a small vintage hair clip on one side to complete the retro feel.
Difficulty: High | Cost: $50–$90
34. Curly Pixie with Shaved Sides
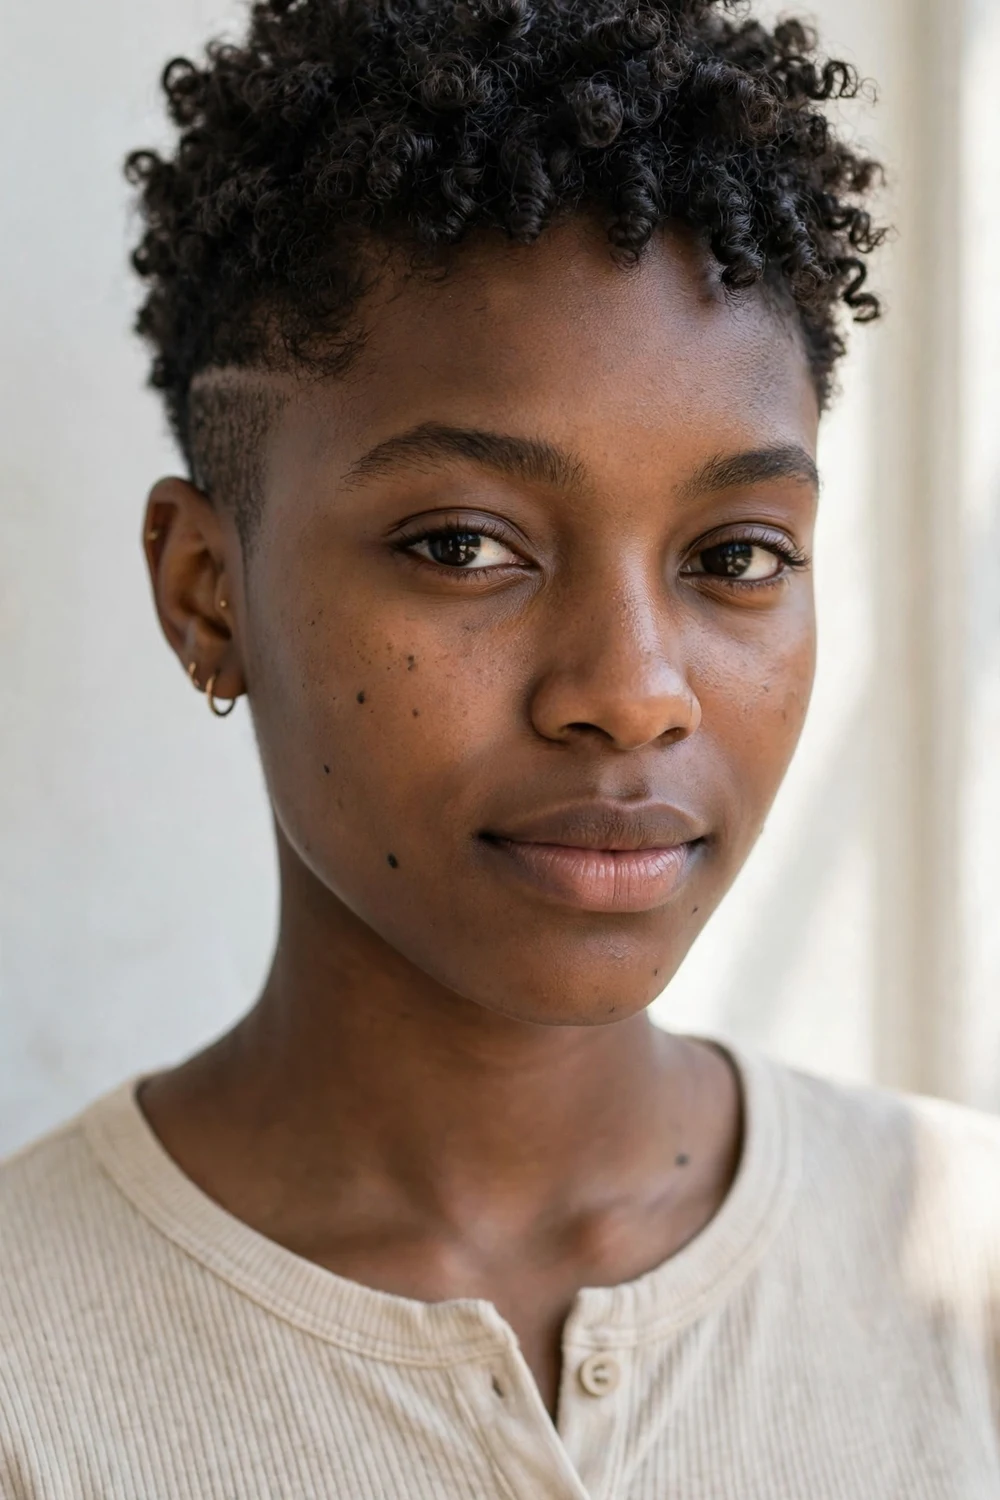
Tight curls and coils thrive in this shape. The top keeps two to four inches of curl while the sides get faded or shaved close, which removes bulk and lets the curl pattern be the star. Cut it dry or stretched so the length lands right; wet cuts spring up shorter than expected. Moisture is the maintenance story here: leave-in conditioner and curl cream keep the top defined. The shaved sides still need edging every two to three weeks.
Try this: pineapple the curls at night with a loose scrunchie to protect the shape.
Difficulty: Moderate | Cost: $40–$70
35. Wavy Pixie
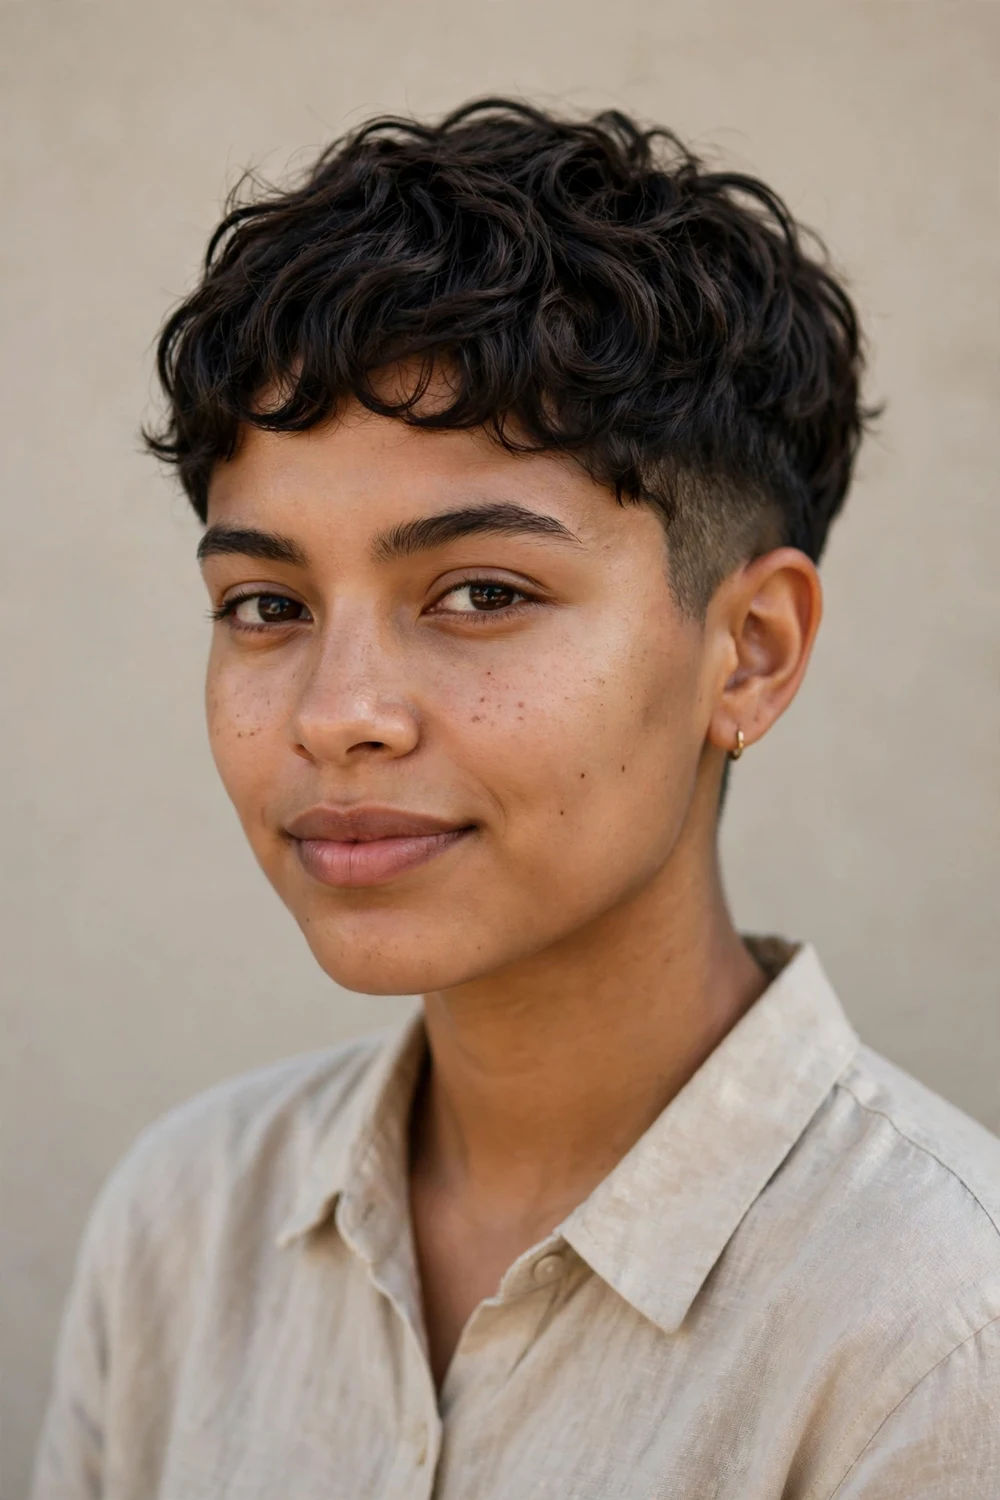
Natural waves give the short pixie built-in texture with zero effort. The cut follows the wave pattern, usually two to three inches on top with faded sides, so the waves sit where they want to. A little sea salt spray scrunched into damp hair is the entire styling routine. It grows out gracefully since waves disguise uneven length. If your waves fall flat by afternoon, a light mousse at the roots brings the bounce back.
Try this: diffuse on low heat for two minutes to boost wave definition without frizz.
Difficulty: Easy | Cost: $35–$60
36. Platinum Icy Blonde Pixie
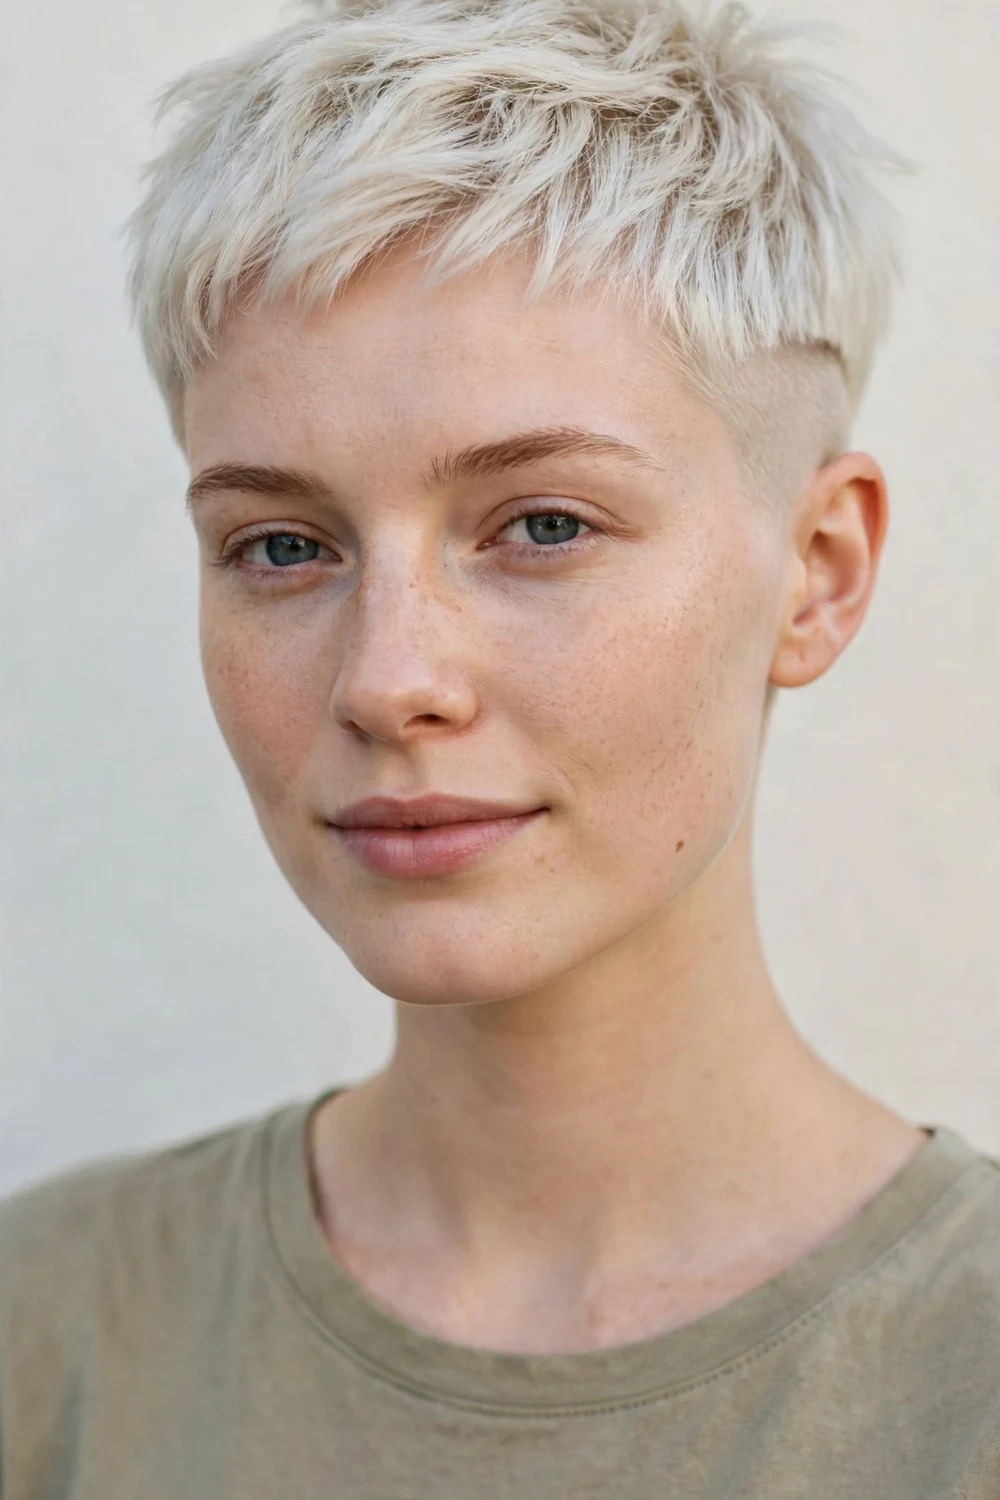
Bleached to near-white, the top turns into the focal point against shaved sides. The icy tone looks sharpest on cool skin tones and makes the clipper work pop by contrast. Bleaching very short hair is actually easier to maintain: damaged ends get trimmed away every few weeks. Purple shampoo once or twice a week keeps brassiness out. Budget for the bleach session plus toning; this is the priciest color here.
Try this: ask for a shadow root so regrowth blends instead of drawing a hard line.
Difficulty: High | Cost: $80–$150
37. Bold Copper Pixie Crop
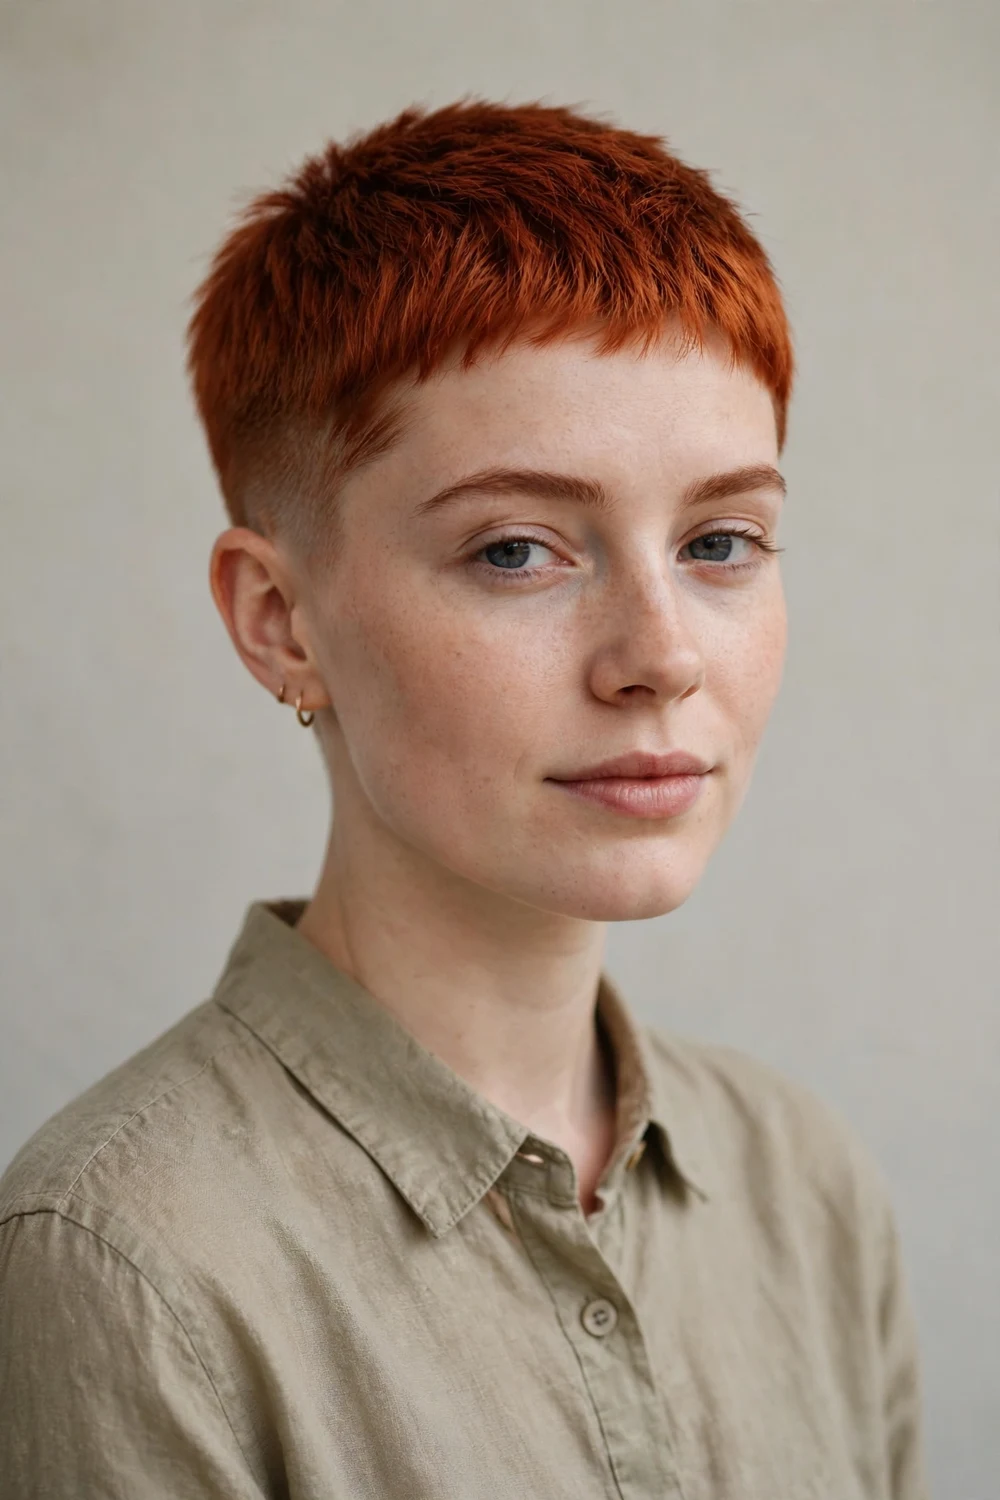
Copper red brings warmth and punch to the close crop. The shade ranges from penny bright to deep auburn; your colorist can tune it to your skin tone. Short hair takes color fast and grows it out fast too, so roots show within three to four weeks. A color-safe shampoo and a weekly mask keep the red from fading dull. The bold color means you can keep the cut itself very simple.
Try this: refresh the copper with a color-depositing conditioner between salon visits.
Difficulty: Moderate | Cost: $70–$130
38. Muted Metallic Pixie
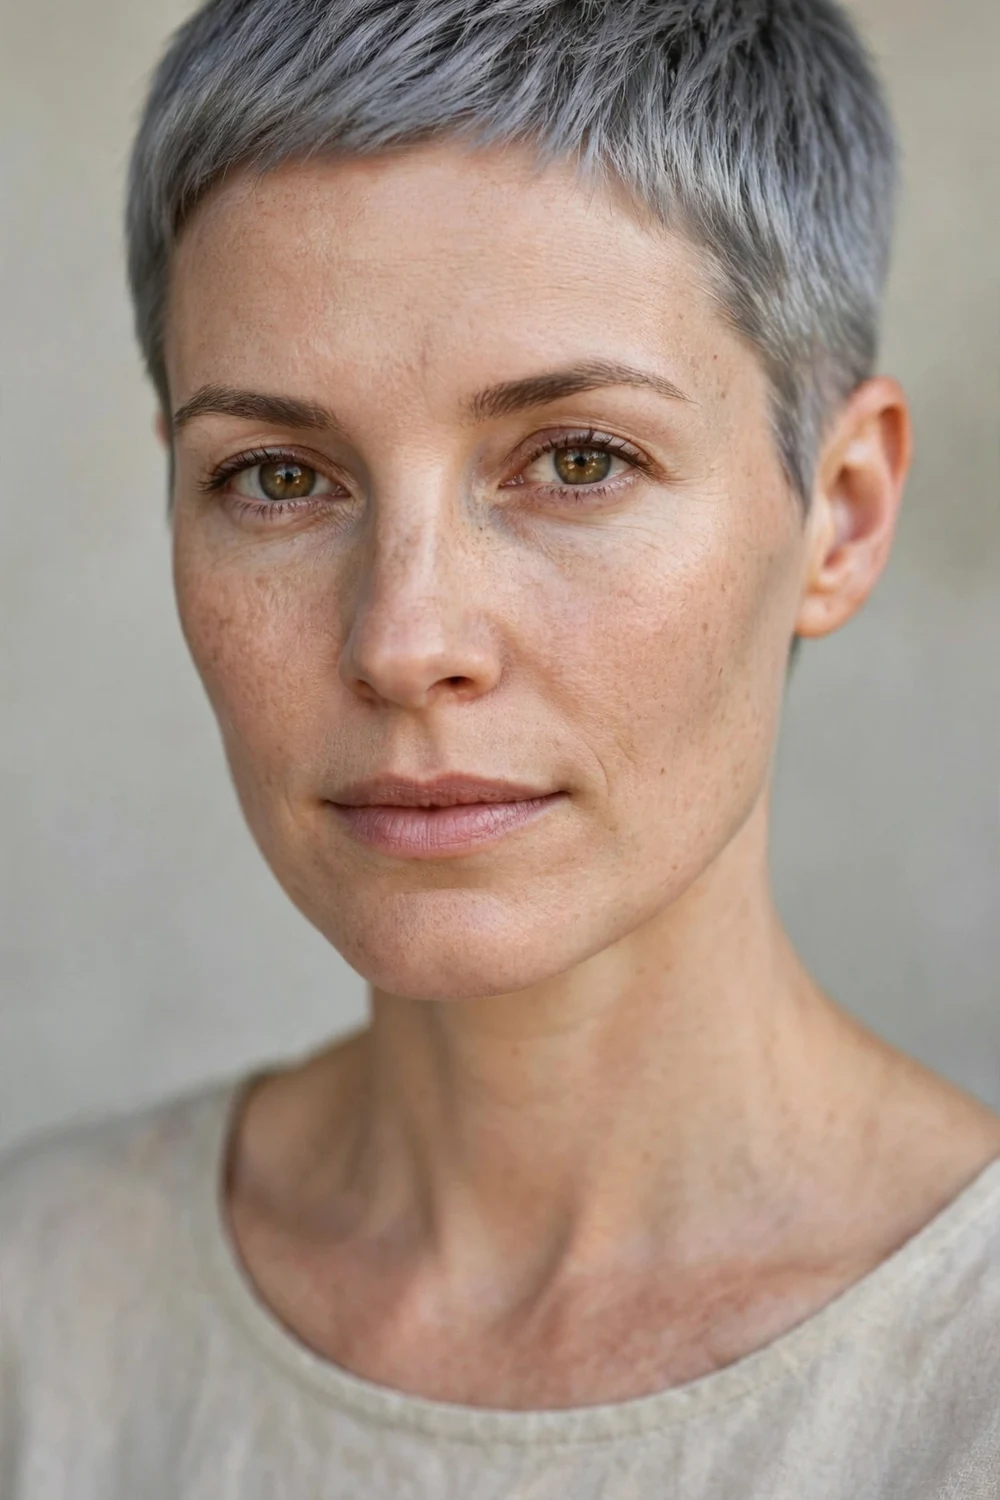
Steel grey, smoked silver, or faded rose gold give the pixie a reflective, fashion-edge finish. These muted metallics look modern without the upkeep drama of pastels. They work best over pre-lightened hair, so expect a bleach step first if you are starting dark. A silver-depositing conditioner every other wash keeps the tone from going flat. The metallic sheen also makes fine hair look a little thicker. Ask your colorist for a toner formula you can maintain at home.
Try this: pair the metallic tone with a clean skin fade so the color reads even sharper.
Difficulty: High | Cost: $80–$140
39. Pastel-Tinted Pixie
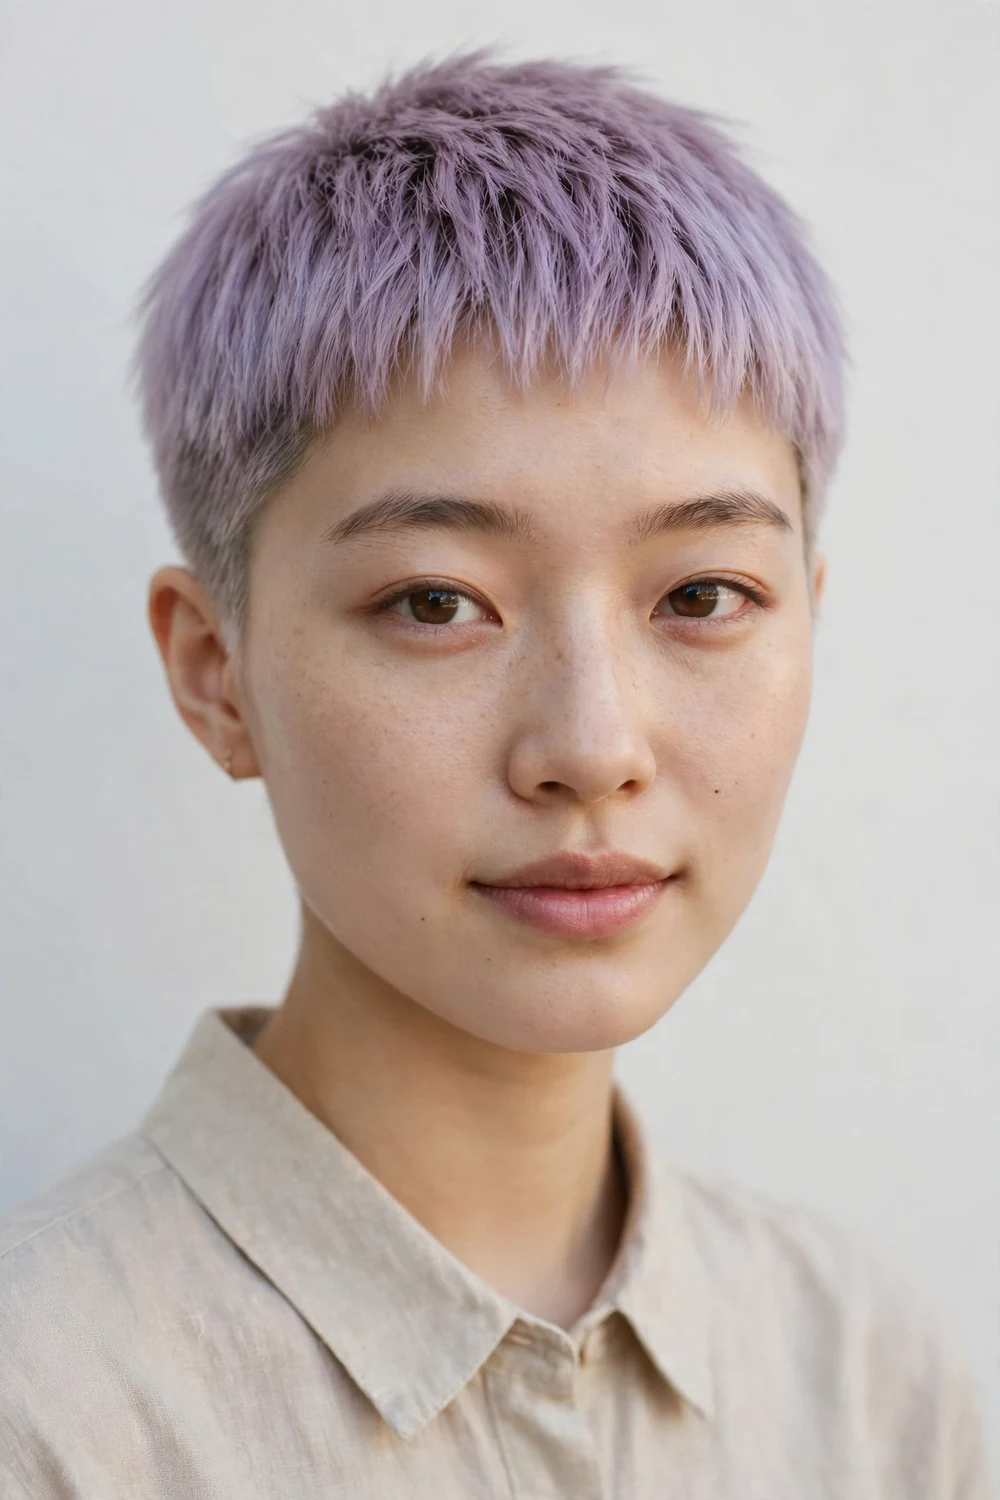
Lavender, mint, or soft pink over a cropped pixie reads playful without going neon. The short length means the color commitment is small: it grows out or gets cut away within weeks. Pastels need a near-white base, so dark hair goes through full bleaching first. Wash in cool water with sulfate-free shampoo to slow the fade. The tint softens the toughness of the shaved sides in a way that many wearers love.
Try this: try the shade as a temporary color wash before committing to permanent pastel.
Difficulty: High | Cost: $80–$140
40. Two-Tone Paneled Pixie
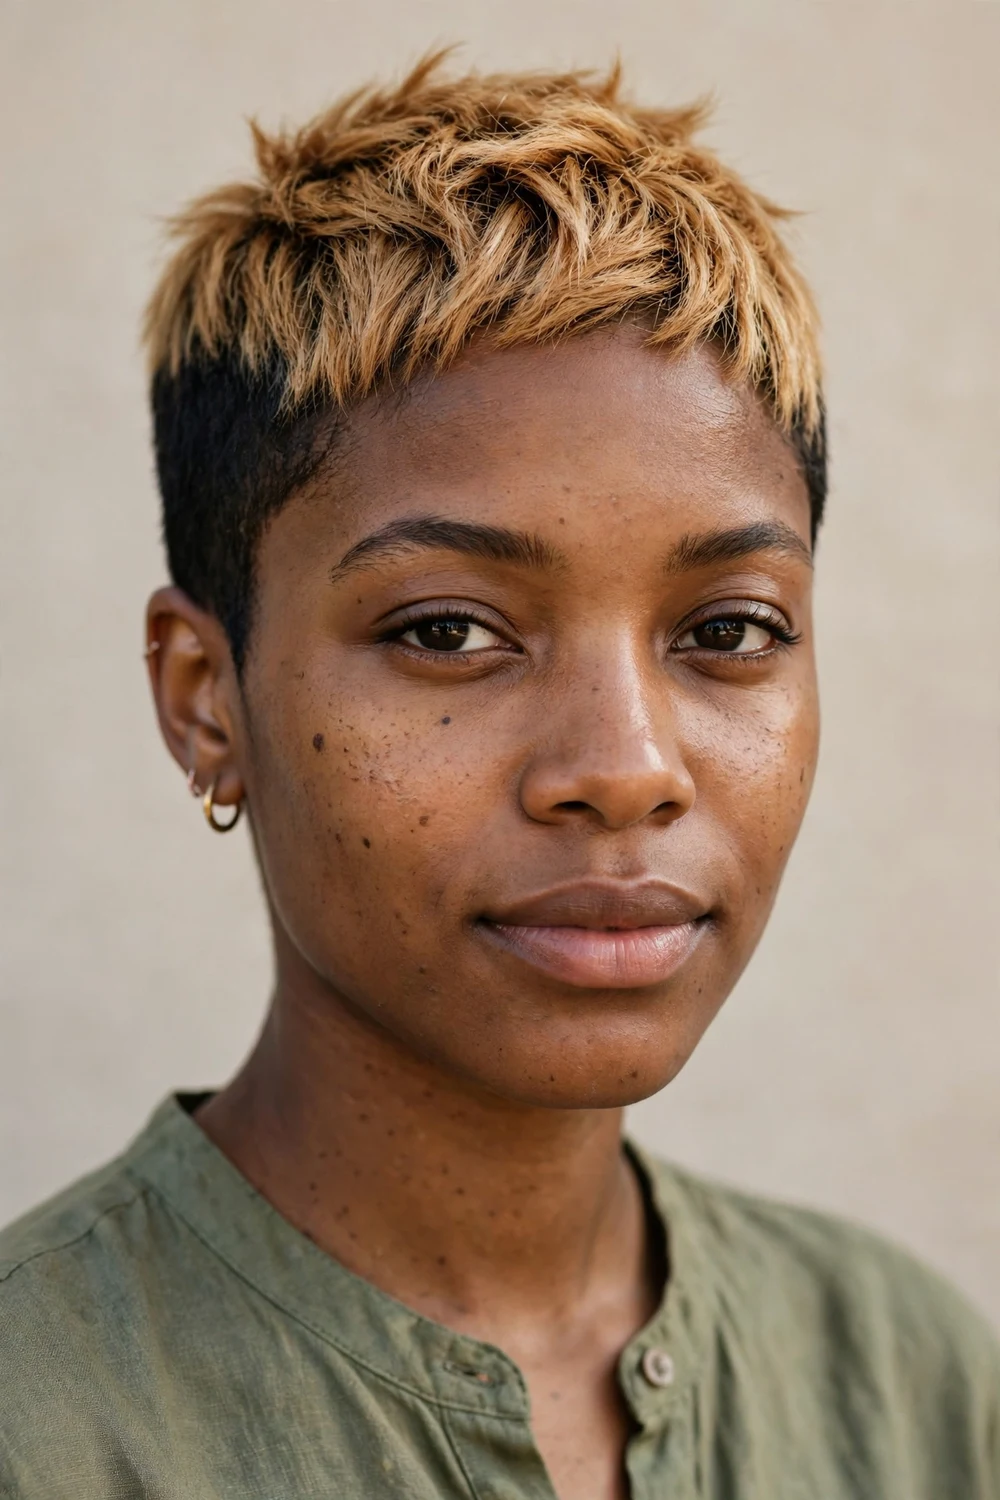
Two distinct colors split the cut into panels: dark sides with a light top is the classic combo, but any high-contrast pairing works. The color blocking emphasizes the line between the shaved sections and the longer top. Keep the boundary crisp by asking your colorist to foil the top separately. Regrowth shows at the roots within three to four weeks, so this color needs the same schedule as the cut. It is the most graphic color idea here.
Try this: match the top panel to your skin undertone, warm or cool, for the most flattering result.
Difficulty: High | Cost: $85–$150
41. Highlighted Tips Pixie
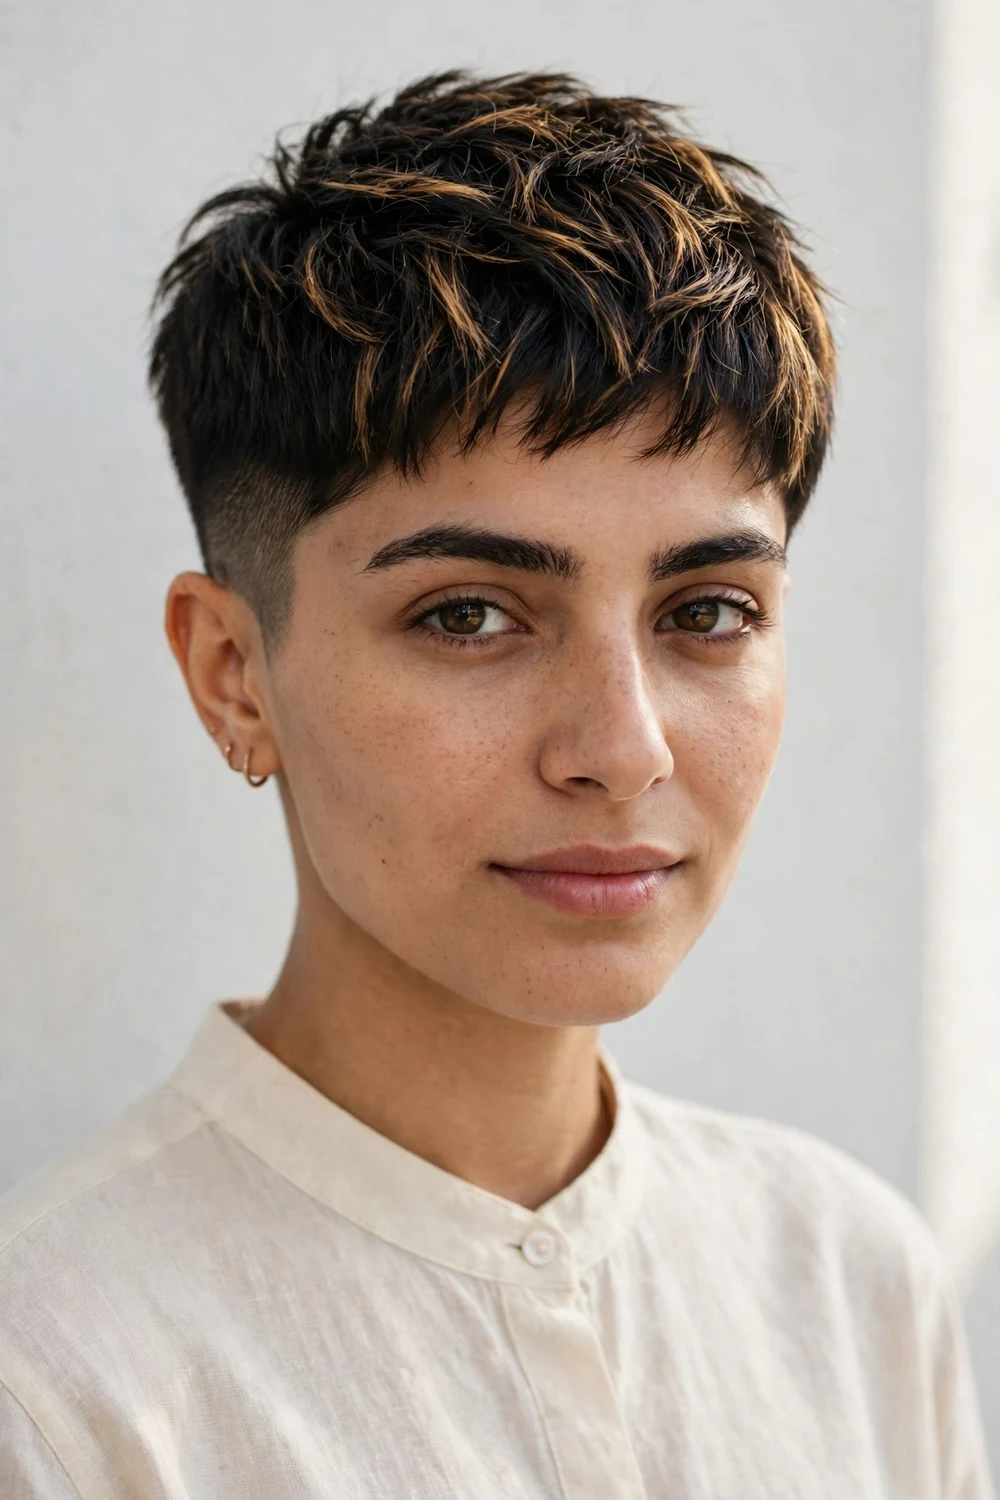
Just the tips get lightened, which adds dimension without a full color commitment. It works on any base shade and grows out with a soft, lived-in edge instead of a hard root line. Ask for balayage-style painting rather than foils for the softest blend. The effect shows best on textured tops where the lightened ends catch the light. A toning gloss every few weeks keeps the tips from turning brassy. This is the lowest-maintenance color on the list.
Try this: keep the lightened tips to the top layer only for a subtle sun-kissed effect.
Difficulty: Moderate | Cost: $60–$110
42. Salt and Pepper Pixie

Natural grey blended with your remaining dark hair looks intentional and modern at this length. The short cut shows off the salt-and-pepper pattern better than long hair, where it can read as dull. A purple-toning shampoo once a week keeps the silver bright instead of yellow. There is no root upkeep at all, which makes this the easiest color to live with. Trims every four to five weeks keep the shape fresh.
Try this: ask your stylist to blend the grow-out with subtle lowlights for extra dimension.
Difficulty: Easy | Cost: $35–$60
43. Grow-Out Buzz Pixie
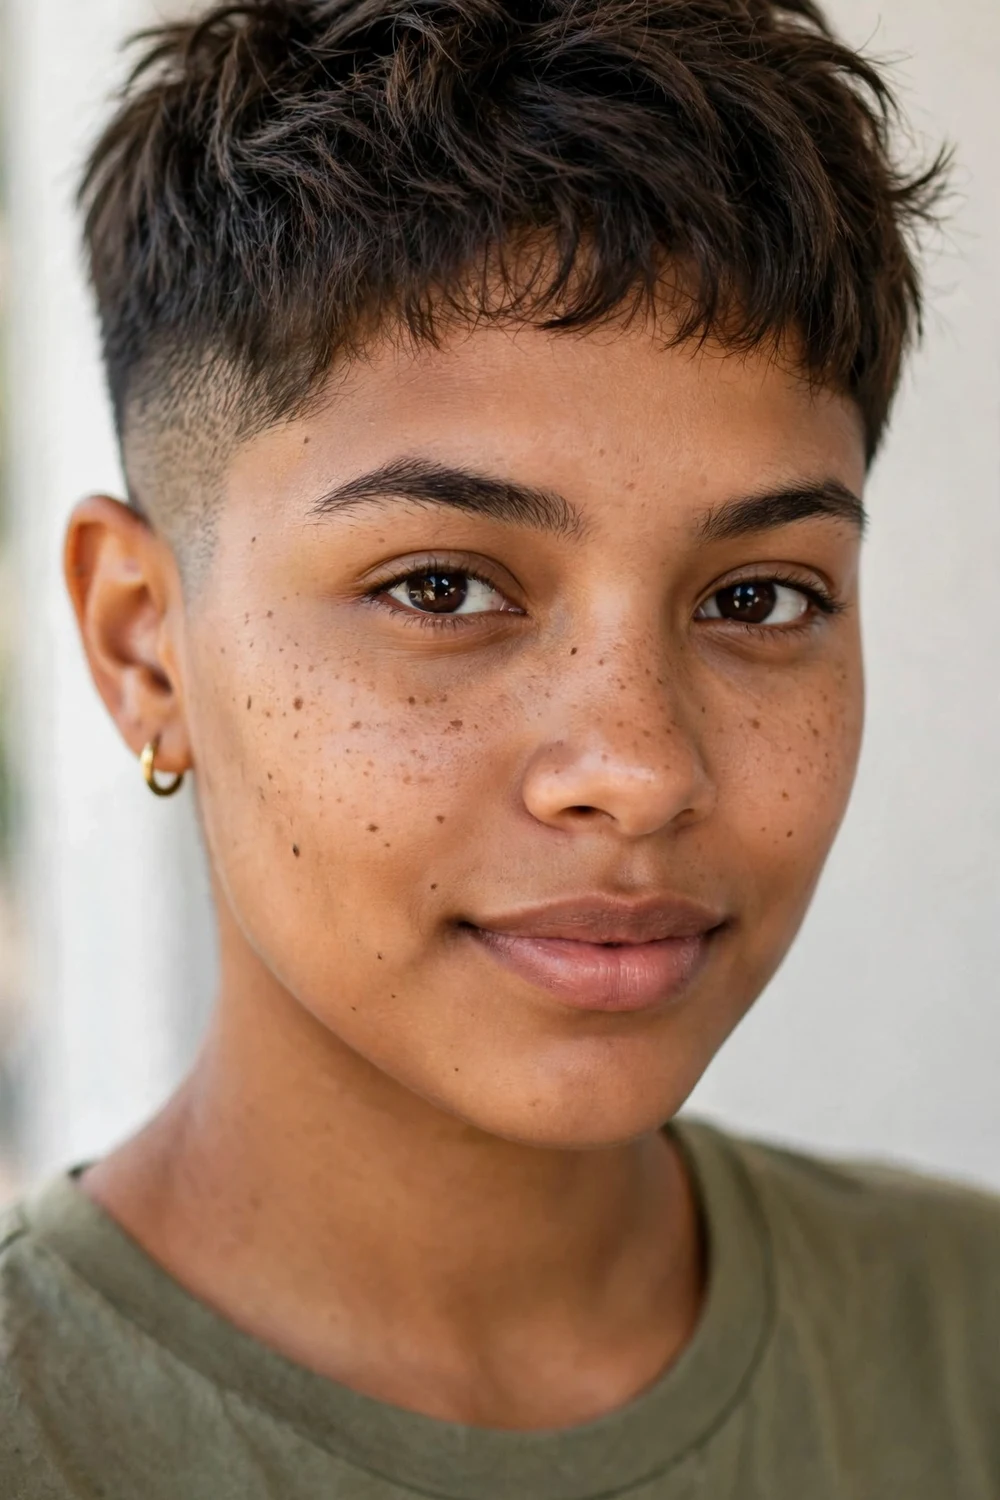
Every ultra-short cut eventually grows out, and this phase deserves its own plan. Let the top grow while keeping the sides cleaned up every two weeks; the contrast keeps it looking deliberate instead of awkward. A little texture paste adds shape as the top gains length. Around week six to eight, the top is long enough to redirect into a longer pixie or a fresh crop. This in-between stage is also the easiest time to switch to a new idea on this list.
Try this: keep one standing bi-weekly appointment just for the sides during grow-out.
Difficulty: Easy | Cost: $20–$40
How to Choose Your Very Short Pixie with Shaved Sides
Start with your face shape. Round faces gain the most from height on top, so lean toward the high fade, pompadour quiff, or spiky pixie. Oval faces can carry nearly everything here. Square faces soften with side-swept or feathered versions, while heart-shaped faces balance out with a little fringe.
Next, be honest about maintenance. Skin fades and shaved designs look incredible but need a barber every one to two weeks. If that schedule sounds like too much, pick the shadow taper or the classic cut and stretch visits to monthly.
Factor in your hair texture too. Thick and coarse hair loves the undercut and high fade because the shaved sides remove weight. Fine hair does better with choppy texture or spikes that build the illusion of density. Curly and coily hair pairs naturally with faded sides, as idea 34 shows.
Finally, think about grow-out. If you might want length later, the longer-top pixie or the grow-out buzz plan gives you an exit route. If you are still comparing lengths, look through our short pixie cuts collection to see how these ultra-short versions compare with slightly longer ones.
Shaved-Side Techniques Compared
| Technique | Clipper Work | Touch-Up Schedule | Best For |
|---|---|---|---|
| Skin fade | Blended from bare skin up through guards | Every 2 weeks | Maximum contrast and sharpness |
| Taper fade | Gradual shortening, skin only at edges | Every 3 weeks | Neat, office-friendly short pixies |
| Undercut | One short length disconnected from top | Every 2–3 weeks | Thick hair needing bulk removal |
| Temple shave | Single shaved strip above one temple | Every 2 weeks | Low-commitment edge with easy grow-out |
| Nape shave | Buzzed panel hidden under crown length | Every 2–3 weeks | Bold detail you can hide at work |
Frequently Asked Questions
How short is a very short pixie with shaved sides?
The top is usually cut with #1 to #4 clipper guards, which leaves roughly 1/8 to 1/2 inch of hair, while the sides are shaved closer or faded to the skin. Some versions keep one to three inches on top for styling, but the defining feature is how little length remains overall.
How often do the shaved sides need trimming?
Plan on a touch-up every two to three weeks. Skin fades and shaved designs blur fastest and may need attention every one to two weeks, while softer tapers can stretch to three or four weeks before they lose their shape.
Will a very short pixie with shaved sides suit a round face?
Yes, if you pick a version with height on top. The high-fade pixie, pompadour quiff, and spiky pixie all add vertical length that balances roundness. Avoid cuts that are uniformly flat all over, since they can emphasize width.
Can I get this cut with curly or coily hair?
Absolutely. Shaved sides remove bulk while the curls keep volume on top, which is a flattering combination. Ask your stylist to cut the top dry or stretched so the finished length lands where you expect, since wet curls spring up shorter.
How do I grow out a very short pixie with shaved sides?
Let the top grow while keeping the sides cleaned up every two weeks so the cut keeps looking deliberate. Around week six to eight the top is usually long enough to redirect into a longer pixie. The tousled messy pixie and longer-top pixie make the easiest transitions.
Final Thoughts
A very short pixie with shaved sides is a commitment to the clippers, but it pays back in wash-and-go ease and unmistakable shape. Pick the fade or shave that fits your maintenance appetite, keep the touch-up schedule, and let the top do the talking. Short hair grows fast, so there is little risk in going bold.

