



Thin hair does not need a long routine to look full. With a little root lift, lightweight products, and styles that work with low density instead of against it, most of the looks below take under five minutes from start to finish.
Day-old hair is your friend here. Freshly washed hair is slippery, so it slides out of elastics and falls flat. Every idea below starts from second-day texture or a quick dusting of dry shampoo at the roots. All you need is a brush, a few elastics, bobby pins, and maybe one styling product.
One safety note before you start: any time a curling iron, flat iron, or blow dryer shows up below, apply a heat protectant first. Thin strands heat up fast and break faster, so keep tools on medium heat and don’t hold them in one spot.
Quick Takeaways
- Style on second-day hair, or add dry shampoo at the roots first. Grip is everything for thin strands.
- Stick to light products: volumizing mousse, dry shampoo, or texturizing spray. Skip heavy oils and thick creams that flatten hair.
- Tease or lift the crown before pulling hair back. A little height at the roots makes every ponytail and bun look thicker.
- Loosen everything slightly after securing it. A widened braid, puffed bun, or teased ponytail reads wider and fuller.
- Use heat protectant before any hot tool, and keep the heat on medium to avoid breakage on fine strands.
1. Messy Top Knot with a Teased Crown

A high top knot is the fastest way to turn flat thin hair into a style with real height. Lightly tease the hair at the crown with a fine-tooth comb before gathering it up. That little cushion of air underneath makes the bun sit higher and look wider than the amount of hair you actually have. Pull the hair into a high ponytail, twist the length loosely around the base, and pin it in place. Don’t wrap it too tight; a soft, slightly uneven knot reads thicker than a neat, compressed one. Pull two thin strands out around your face to soften the edges.
Try this: Slip a small foam donut bun maker into the center for extra size on days when your hair feels extra fine. It weighs almost nothing and doubles the bun’s volume.
Difficulty: Very easy | Cost: $0 ($5 if you buy a donut maker) | Time: 4 minutes
2. High Ponytail with a Hidden Twist

The trick to a fuller-looking high ponytail is hiding the elastic and lifting the base. Tease the hair at the crown, smooth the top layer over it, and secure a high ponytail with a strong elastic. Take a half-inch section from underneath the ponytail and wrap it around the elastic, pinning the end underneath. That wrap hides the band and pushes the ponytail outward so it stands up instead of drooping. Flip your head upside down and shake the ends gently to separate them. The ponytail instantly looks thicker without any extra hair.
Try this: Place the ponytail higher than feels natural, near the crown’s peak. Placement alone adds the illusion of volume.
Difficulty: Very easy | Cost: $0 | Time: 3 minutes
3. Low Ponytail with Teased Roots

A low ponytail keeps thin hair looking neat, but the crown lift is what keeps it from looking flat. Work a pump of lightweight volumizing mousse through damp roots, or dust dry shampoo on dry roots, then backcomb a two-inch section at the crown with gentle downward strokes. Gather everything loosely at the nape and secure it with an elastic. Tug the hair above the elastic upward slightly to create a soft bump, and pull a few face-framing pieces free. Wrap a strand around the elastic for a cleaner finish.
Try this: Tilt your chin down while gathering the hair. It helps the crown lift sit higher and more evenly.
Difficulty: Very easy | Cost: $0 | Time: 5 minutes
4. Half-Up Twisted Crown

This style lifts the front of thin hair without pulling everything back and exposing a sparse hairline. Take a two-inch section from above each temple and twist each one back toward the crown. Cross them over each other and pin the ends flat against your head with two bobby pins. Gently pull the twists apart with your fingertips to widen them. The twisted sections create texture and height right where thin hair usually looks flattest, and the rest of your hair stays down to keep coverage.
Try this: Pin on slightly damp hair for extra hold, and hide the pins under the twist so nothing shows from the front.
Difficulty: Very easy | Cost: $0 | Time: 3 minutes
5. Half-Up Space Buns

Two small buns on the top half of your head add height and distract from flat roots. Split the top section into two equal parts, tease the base of each lightly, and twist each part into a small loose bun. Secure with mini elastics and a pin or two. Keep the buns soft and slightly messy rather than tight and polished; puffier buns look bigger on thin hair. Leave the bottom half of your hair down for coverage. This one works even on shoulder-length hair since each bun only needs a few inches.
Try this: Place the buns slightly forward of the crown’s peak so they show from the front and add visible height.
Difficulty: Easy | Cost: $0 | Time: 5 minutes
6. Lifted Half-Up Ponytail

A half-up ponytail lifts the crown while leaving most of your hair down, which keeps thin hair from looking pulled thin at the sides. Gather a small section from the top of your head and tease the roots underneath it. Secure the section with a thin elastic just below the crown’s highest point, then lift the ponytail and push it forward slightly before letting it fall back. That push creates a soft cushion of volume. Spritz the roots with dry shampoo if your hair is freshly washed and slippery.
For more quick morning styles, see the roundup of medium hairstyles for busy women.
Try this: Use a clear mini elastic. It grips fine hair better and stays hidden under the ponytail.
Difficulty: Very easy | Cost: $0 | Time: 3 minutes
7. Sleek Low Bun with Face Framers

A low bun is the most forgiving updo for thin hair because the bun’s size doesn’t matter much at the nape. Brush your hair straight back into a low ponytail, twist it into a small knot, and pin it flat. Pull two thin pieces out around your face before securing the bun; those soft strands keep the style from looking severe and add width around the cheeks. Smooth a pea-sized amount of light styling cream over the top to tame flyaways. This takes almost no hair to look finished.
Try this: Make the bun slightly off-center at the nape. An off-center placement looks intentional and draws the eye away from thin spots.
Difficulty: Very easy | Cost: $0 | Time: 4 minutes
8. Slicked-Back Bun

When thin hair won’t hold texture, go sleek instead of fighting it. Comb a dime-sized amount of light gel through damp hair from front to back, brush everything toward the nape, and twist it into a tight bun. The slicked finish makes the style about your face rather than your hair’s density, and thin strands actually slick down more neatly than thick ones. This is a good pick for humid days when volume won’t last anyway. A middle or deep side part both work; pick whichever flatters your face.
For shorter lengths, the list of short hairstyles for thin fine hair shows cuts that pair well with these updos.
Try this: Use a boar-bristle brush for the slicking step. It smooths fine hair flat without snagging.
Difficulty: Very easy | Cost: $0 | Time: 4 minutes
9. Twisted Claw Clip Updo

A medium claw clip is the ultimate low-effort tool for thin hair. Gather your hair at the back as if making a low ponytail, twist the length upward into a single rope, and fold it against your head. Clamp the clip over the fold to hold it. Leave the ends sticking out over the top of the clip for a casual finish. This takes about ninety seconds, holds all day without pulling, and the twist makes a small amount of hair look like much more. Choose a clip sized for your hair’s thickness so it grips instead of sliding.
Try this: Flip your head upside down before twisting to get natural root lift for free.
If one twist is not enough, these claw clip hairstyles for thin fine hair cover 22 clip styles built for fine strands.
Difficulty: Very easy | Cost: $5-$10 for a clip | Time: 2 minutes
10. Topsy-Tail Half-Up

The topsy tail turns a plain half-up ponytail into something that looks styled in under two minutes. Secure a small half-up ponytail with a thin elastic, then part the hair just above the elastic to make a small opening. Flip the ponytail up and push it down through the opening, then tighten. The flip creates a neat twisted detail and pulls the crown slightly upward for lift. Finish by fanning the flipped section gently with your fingers to widen it. It holds better than a plain half-up because the twist locks the elastic in place.
Try this: Do two stacked topsy tails, one above the other, for a longer decorative effect down the back of the head.
Difficulty: Very easy | Cost: $0 | Time: 2 minutes
11. Bubble Ponytail
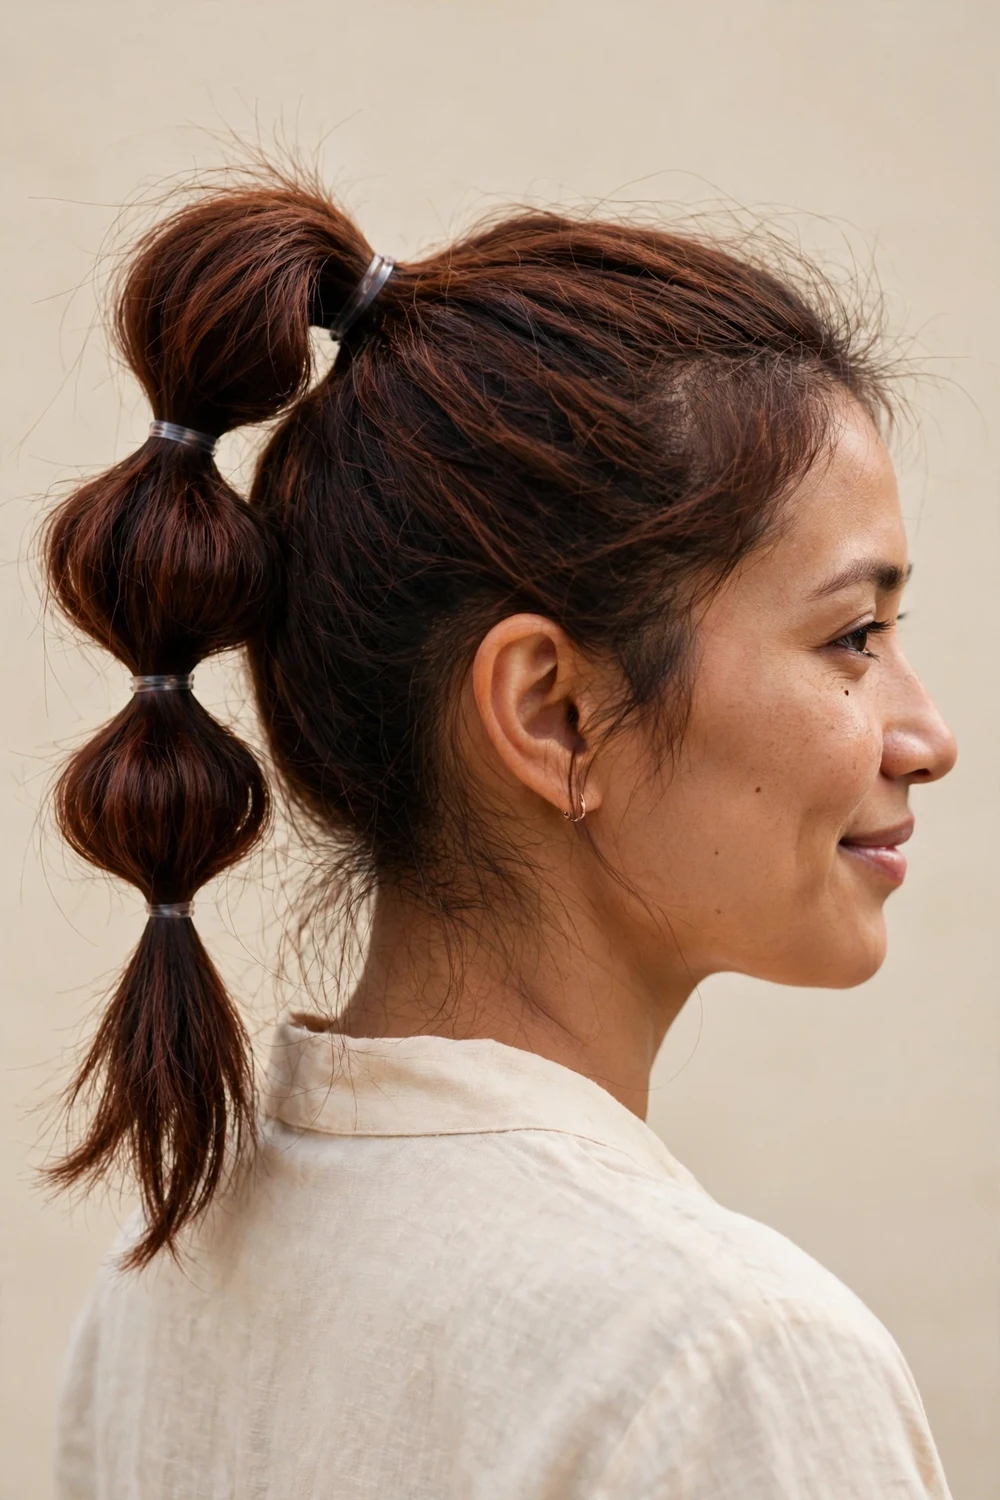
A bubble ponytail makes a thin ponytail look three times wider with almost no skill required. Secure a mid-height or high ponytail, then place small clear elastics every two inches down the length. Gently pull each section outward between the elastics to puff it into a round bubble shape. The pulled sections create width that hides how little hair is actually there. This works even on fine, straight hair since the elastics do all the structural work. Keep the bubbles even for a neat look or uneven for something more relaxed.
Try this: Tease each section lightly before pulling it out. The bubbles hold their round shape much longer.
Difficulty: Very easy | Cost: $0 | Time: 4 minutes
12. Fishtail Braid, Pancaked

A fishtail looks detailed and full on thin hair once you pancake it. Braid the hair in a fishtail pattern, keeping the sections loose rather than tight. After securing the end with a small elastic, gently pull the outer edges of each loop outward, working from the bottom up. This widens the braid noticeably and creates the textured, chunky look that makes thin hair appear much thicker. A slightly messy finish is the goal here; neat fishtails on thin hair can look skinny, so don’t be afraid to pull.
Try this: Braid over one shoulder so the widened braid sits where people can see it from the front.
Difficulty: Easy | Cost: $0 | Time: 6 minutes
13. Loose Three-Strand Braid

A classic three-strand braid is the simplest braid to learn and one of the fastest styles for thin hair. Brush the hair smooth, divide it into three sections at the nape, and braid loosely all the way down. Keep your grip relaxed so the braid stays soft; tight braiding pulls thin hair flat against the head. Once secured, widen the braid by tugging each loop sideways. The finished braid looks twice as full as it did while you were making it. This also works well as a protective style for sleeping.
Try this: Start the braid slightly to one side at the nape for a softer line that frames the neck.
Difficulty: Very easy | Cost: $0 | Time: 3 minutes
14. Braided Headband

A braid worn like a headband adds texture right where thin hair needs it most: along the hairline. Take a one-inch section from behind one ear, braid it into a thin three-strand braid, and bring it up and across your forehead to the opposite side. Pin the end flat behind the other ear and cover the pin with the hair above it. The braid creates a horizontal line of texture that draws attention across the face instead of down to flat lengths. It also keeps front pieces out of your face all day.
Try this: Pancake the braid before pinning it so the headband looks like a deliberate accessory, not a stray strand.
Difficulty: Easy | Cost: $0 | Time: 5 minutes
15. Loosened French Braid

A French braid gathers thin hair into one textured shape that looks denser than the same hair worn loose. Start at the crown and braid downward, adding small sections from the sides as you go. Keep the added sections thin and the braid relaxed so it doesn’t pull flat against the scalp. When you reach the nape, finish with a regular three-strand braid and secure it. Gently widen the loops along the whole braid for fullness. Wearing it slightly off-center keeps it from looking severe.
Try this: Practice the widening step on a simple braid first. It’s the same motion and it makes the biggest difference.
Difficulty: Easy | Cost: $0 | Time: 7 minutes
16. Sleek Side Braid

Sweeping thin hair into a side braid gives you a neat style in minutes while keeping everything to one side where it looks fuller. Part your hair on the opposite side, sweep everything over one shoulder, and braid it loosely down over the shoulder. A side placement means the braid rests against your collarbone instead of hanging flat down your back, so it reads wider. Tie the end with a thin elastic and pull a few loops loose. This is a strong option for second or third-day hair when roots have natural grip.
Try this: Wrap a small strand around the elastic at the end for a finished look that hides the band.
Difficulty: Very easy | Cost: $0 | Time: 4 minutes
17. Tousled Salt-Spray Waves

Salt spray creates grip and bend in thin hair with zero hot tools. Spritz it through damp hair from mid-length to ends, scrunch sections upward with your hands, and let your hair air-dry or use a diffuser on low heat. Flip your head upside down and shake the roots once dry to separate the waves. The rough texture makes each strand look thicker and keeps styles from slipping. If your hair is very straight, twist two-inch sections before they dry to encourage the wave pattern.
Try this: Apply the spray to damp, not soaking, hair. Too much water dilutes the product and the waves fall out.
Difficulty: Very easy | Cost: $8-$15 for salt spray | Time: 5 minutes plus drying
18. Velcro Roller Volume

Velcro rollers lift thin roots without any heat skill. Work a little volumizing mousse through damp roots, then roll two-inch sections up and away from your face, focusing on the crown. Let them sit while you get ready, about fifteen to twenty minutes, then pull them out and tousle with your fingers. The roots cool in a lifted position, which gives lasting height that a round brush can’t match on thin hair. No clips are needed; the velcro grips fine hair on its own.
Try this: Roll the front sections backward instead of forward for a softer, more modern lift at the hairline.
Difficulty: Very easy | Cost: $10-$15 for a roller set | Time: 5 minutes of work, 20 minutes of setting
19. Loose Cool-Set Curls

Loose curls add the most visible volume of any quick style, and the cool-set trick makes them last on thin hair. Curl one-inch sections with a curling iron on medium heat, then pin each curl to your head while it cools completely. Once cool, remove the pins and shake the curls out with your fingers instead of brushing them. Cooling in the curled shape sets the bend so it doesn’t drop by noon. Keep the curls loose and separated; tight ringlets shrink thin hair instead of widening it.
For more curl options that suit low-density hair, see the guide to curly hairstyles for thin fine hair.
Try this: Curl the sections away from your face on both sides for a balanced, face-opening shape.
Difficulty: Easy | Cost: $0 | Time: 10 minutes
20. Curled-Under Ends

Curling just the ends is the fastest way to fake fullness when you’re short on time. Run a flat iron or curling iron over the bottom two inches of your hair, turning the ends under. The curled-under shape pushes the ends outward, which makes the bottom edge look thicker and more deliberate. It also stops thin ends from looking wispy and straggly. Work in three or four large sections and don’t worry about uniformity; slight variation looks more natural on thin hair.
Try this: Add a light mist of flexible-hold hairspray to the ends afterward so the curl survives the day.
Difficulty: Very easy | Cost: $0 | Time: 5 minutes
21. Deep Side Part with Root Lift

Moving your part is the quickest change you can make, and it works instantly on thin hair. Flip your part to a deep side position, then lift the roots on the heavier side with your fingers while blow-drying them upward for ten seconds. The roots on the deep side have farther to fall, which creates natural-looking height. A little dry shampoo at the part line adds grip so the style doesn’t slide back by midday. This pairs well with any of the down styles above.
Try this: Train a new part by wearing it for a few days in a row. Roots settle into the new direction quickly.
Difficulty: Very easy | Cost: $0 | Time: 2 minutes
22. Teased Crown, Hair Down

When you want to wear your hair down but skip the flat look, a teased crown is the answer. Take a two-inch-wide section at the crown, hold it straight up, and backcomb the underside with three or four gentle strokes. Smooth the top layer over the teasing with a brush so the surface looks clean. The hidden cushion lifts everything above it while your lengths fall naturally around it. Finish with a light mist of hairspray on the teased section only, not the lengths.
Try this: Backcomb in small subsections rather than one big chunk. It creates a smoother, longer-lasting lift.
Difficulty: Very easy | Cost: $0 | Time: 3 minutes
23. Pinned-Back Front Sections

Pinning back just the front sections keeps thin hair out of your face while leaving full coverage at the back. Take a two-inch section from each temple, twist each one once, and pin them back at the sides of your head with bobby pins that match your hair color. Push the pinned sections slightly forward before securing to create a small puff of volume above each pin. This takes two minutes, needs no product, and works on any length from chin to waist. It’s also a good fix when bangs are growing out.
Try this: Cross two pins in an X shape at each side. The cross holds fine hair much more securely than a single pin.
Difficulty: Very easy | Cost: $0 | Time: 2 minutes
24. Air-Dried Texture with Dry Shampoo

Skipping the blow dryer can actually help thin hair, since heat often presses fine strands flat. After washing, scrunch a pea-sized amount of light mousse into damp hair and let it air-dry without touching it. Once fully dry, work dry shampoo into the roots with your fingertips and shake everything out. The result is soft, natural texture with more body than a sleek blowout would give. This is the lowest-effort style on the list and a good reset day between heat-styled looks.
Try this: Flip your part to the opposite side while the hair dries for extra root lift that costs nothing.
Difficulty: Very easy | Cost: $0 | Time: 2 minutes of work plus drying
What to Avoid with Thin Hair
Quick styles only work when the basics are right. These are the mistakes that undo your effort:
- Heavy oils, butters, and thick creams near the roots. They flatten thin strands within an hour.
- Tight, slicked ponytails pulled straight back. They expose the scalp and make hair look thinner.
- Washing every day. Daily shampoo strips the natural grip that helps styles hold. Every other day is usually enough.
- High heat without protectant. Fine hair scorches faster than thick hair, so always apply heat protectant first and stay on medium heat.
- Rough or daily backcombing. Tease gently, and give your roots a break between teased styles to avoid breakage.
Compare the Styles
| # | Hairstyle | Time | Main tool | Hair length |
|---|---|---|---|---|
| 1 | Messy Top Knot with a Teased Crown | 4 min | Fine-tooth comb, pins | Medium to long |
| 2 | High Ponytail with a Hidden Twist | 3 min | Elastic, pin | Medium to long |
| 3 | Low Ponytail with Teased Roots | 5 min | Comb, elastic | Medium to long |
| 4 | Half-Up Twisted Crown | 3 min | Bobby pins | Medium to long |
| 5 | Half-Up Space Buns | 5 min | Mini elastics, pins | Shoulder and longer |
| 6 | Lifted Half-Up Ponytail | 3 min | Thin elastic | Medium to long |
| 7 | Sleek Low Bun with Face Framers | 4 min | Elastic, pins | Medium to long |
| 8 | Slicked-Back Bun | 4 min | Brush, gel | Short to long |
| 9 | Twisted Claw Clip Updo | 2 min | Claw clip | Medium to long |
| 10 | Topsy-Tail Half-Up | 2 min | Thin elastic | Medium to long |
| 11 | Bubble Ponytail | 4 min | Clear elastics | Medium to long |
| 12 | Fishtail Braid, Pancaked | 6 min | Small elastic | Medium to long |
| 13 | Loose Three-Strand Braid | 3 min | Elastic | Medium to long |
| 14 | Braided Headband | 5 min | Bobby pins | Medium to long |
| 15 | Loosened French Braid | 7 min | Elastic | Medium to long |
| 16 | Sleek Side Braid | 4 min | Elastic | Medium to long |
| 17 | Tousled Salt-Spray Waves | 5 min + dry | Salt spray | Medium to long |
| 18 | Velcro Roller Volume | 5 min + set | Velcro rollers | Medium to long |
| 19 | Loose Cool-Set Curls | 10 min | Curling iron, pins | Medium to long |
| 20 | Curled-Under Ends | 5 min | Flat or curling iron | Medium to long |
| 21 | Deep Side Part with Root Lift | 2 min | Blow dryer | Short to long |
| 22 | Teased Crown, Hair Down | 3 min | Comb, hairspray | Medium to long |
| 23 | Pinned-Back Front Sections | 2 min | Bobby pins | Chin and longer |
| 24 | Air-Dried Texture with Dry Shampoo | 2 min + dry | Dry shampoo | Medium to long |
When easy styling meets age-specific shaping, you get cuts that flatter mature faces and fine hair at once. These hairstyles for women over 60 with thin hair show 24 options built around volume and simplicity.
Frequently Asked Questions
What is the easiest everyday hairstyle for thin hair?
The twisted claw clip updo is hard to beat. Gather your hair, twist it upward, and clamp a medium claw clip over the fold. It takes about ninety seconds, needs no skill, holds all day without pulling, and works even on very fine hair. Keep a medium clip in your bag for quick fixes during the day.
How can I make a thin ponytail look thicker?
Tease the crown before gathering, place the ponytail high, wrap a strand of hair around the elastic to hide it, and fluff the ends by shaking them out. Dust dry shampoo at the roots first if your hair is freshly washed and slippery. Each of these small steps adds a little width, and together they make a noticeable difference.
Should I style thin hair when it is freshly washed or on second-day hair?
Second-day hair almost always styles better because it has more natural grip. Freshly washed hair is slippery, so elastics slide and volume drops. If you must style clean hair, work dry shampoo or texturizing spray into the roots first to fake that second-day texture.
Are claw clips safe for thin hair?
Yes, as long as the clip matches your hair’s thickness and you don’t force a too-small clip shut. A medium, smooth-toothed clip holds thin hair without pulling at the roots. Avoid heavy metal clips that drag downward, and don’t twist the same section tightly every single day.
Which products should thin hair avoid?
Heavy oils, thick creams, and silicone-heavy serums near the roots weigh strands down and make hair look thinner within an hour. Stick to volumizing mousse, dry shampoo, and light texturizing spray, applied mainly at the roots where lift matters most.
Final Thoughts
Thin hair rewards simple techniques more than complicated styling. A teased crown, a loosened braid, or a well-placed claw clip can do more in two minutes than a long routine with the wrong products. Start with second-day texture, keep products light, and give your roots a little lift before anything else. The rest is just practice, and most of these styles get faster every time you do them.

If you would rather cut styling time to nearly zero, these low maintenance haircuts women over 50 fine hair are shaped to add fullness to thin strands with wash-and-go ease.
The right cut makes thin hair easier to live with every day; see low maintenance haircuts for busy women for 30 options that keep their shape with almost no effort.

