

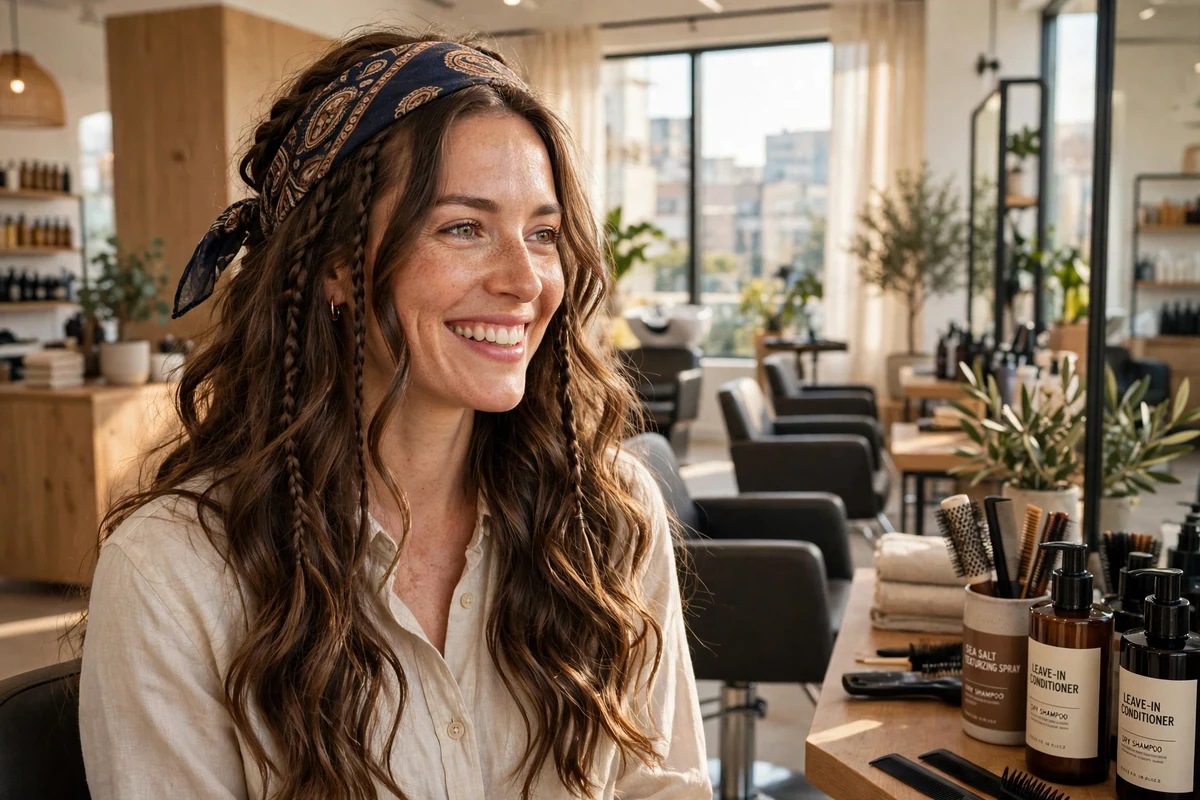
Pirate hairstyles for women work with real hair and a short list of accessories: a bandana or headscarf, a few beads or cuffs, and texture that looks wind-tossed rather than polished. Most looks in this roundup start from waves, curls, or a braid you already know how to do, then add one pirate detail on top.
The 23 ideas below run from loose waves and scarf styles to braids, ponytails, updos, and short hair options. Each one lists the hair length and type it suits, the accessories it needs, and how long it holds up at a party or outdoor event. If you are building a full costume, the broader Halloween hairstyles for women roundup covers the rest of the costume hair options side by side.
Key Takeaways
- Texture does most of the work. Sea salt spray or dry shampoo on loose waves, curls, and braids reads pirate before any accessory goes in.
- One or two accessories are enough: a bandana, a headscarf, beads, a coin clip, or a feather. Piling on more tends to look like a costume shop wig.
- Braids and low ponytails are the hat-friendly options. They sit flat enough for a tricorn hat to stay balanced.
- Short hair works fine. A bandana pixie or a headscarf over a bob needs no extensions and takes minutes.
- Second-day hair holds these styles better than freshly washed hair, since the grit keeps braids, buns, and scarves from sliding.
1. Windswept Loose Waves

Windswept loose waves are the base style of pirate hair: long waves with volume at the crown, a soft center or side part, and ends left uneven and touchable. Work sea salt spray through damp hair, scrunch, and let it air dry, or braid damp hair overnight and shake the waves out in the morning.
This suits medium to long hair of any texture that holds a wave. Keep the finish matte. Shiny, uniform curls read salon, while separated, slightly frizzy waves read sea air. Pull two thin face-framing pieces forward so the style still frames the face in photos.
Try this: finish with dry shampoo at the roots instead of hairspray. The hair should move when you walk, and a stiff spray shell kills that effect.
Difficulty: Low · Cost: $ (salon)
2. Voluminous Curls with a Headband
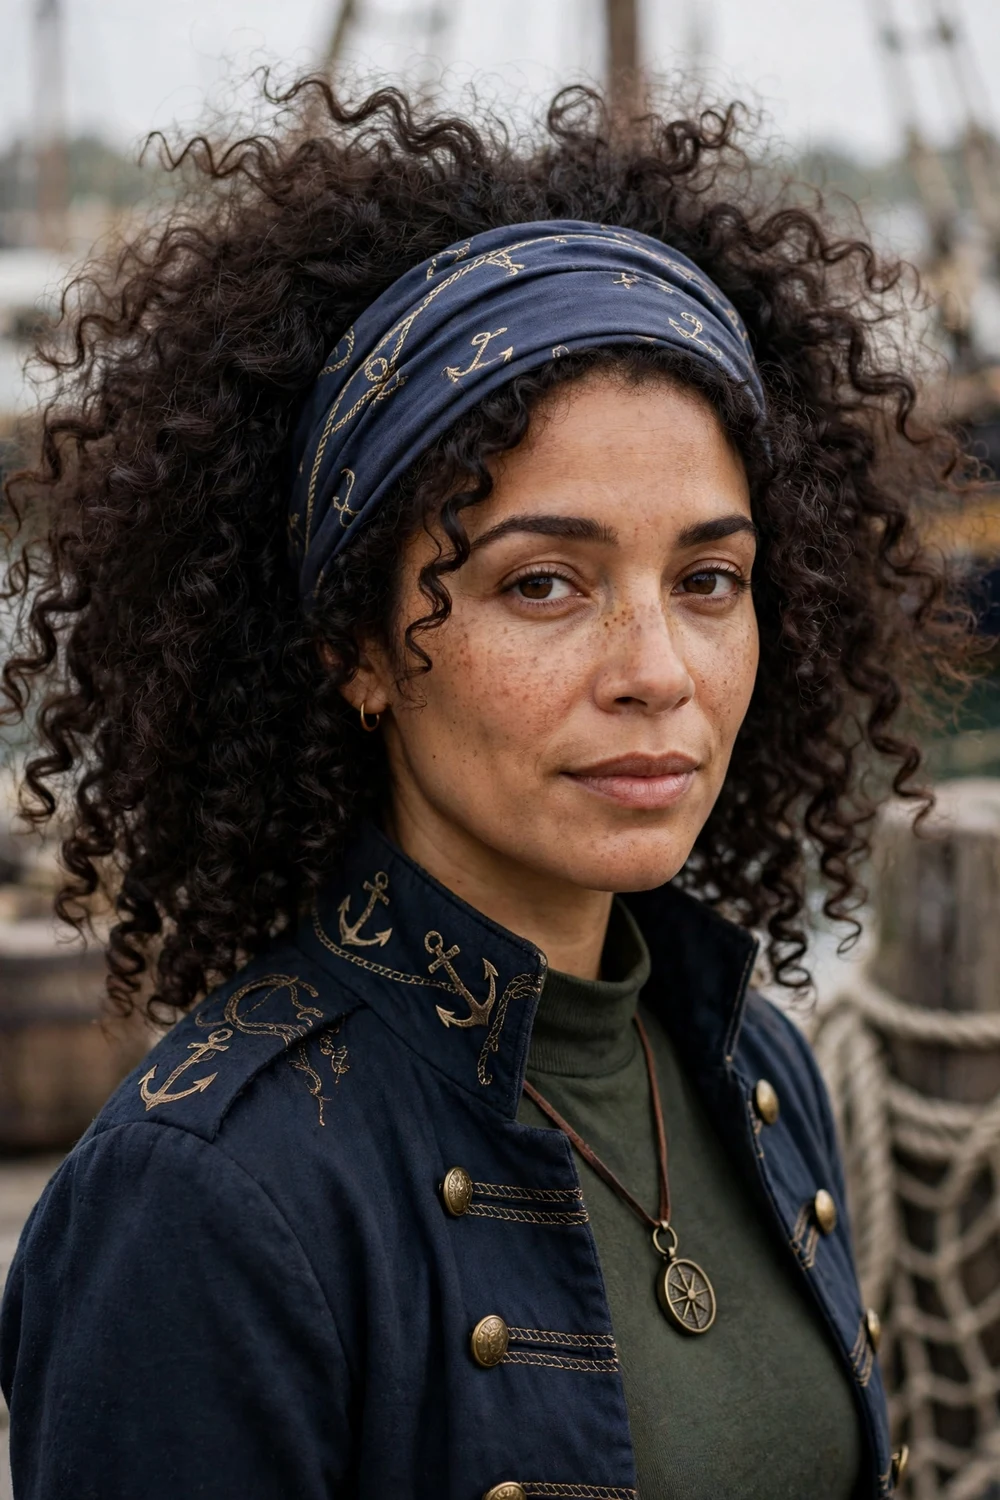
This version leaves natural curls full and loose, with a wide fabric headband pushed back from the hairline to keep the front off the face. The curls do the styling work, so the routine is about volume: diffuse on low heat or refresh day-two curls with a water and conditioner mist.
It suits curly and coily hair at any length past the chin. Choose a headband in a worn fabric such as cotton or linen in black, deep red, or a faded stripe. A satin or plastic band looks modern and breaks the costume mood.
Try this: pin the headband behind each ear with a bobby pin that matches your hair color, so it stays in place when the curls expand through the night.
Difficulty: Low to Medium · Cost: $ (salon)
3. Bandana Waves with Accent Braids
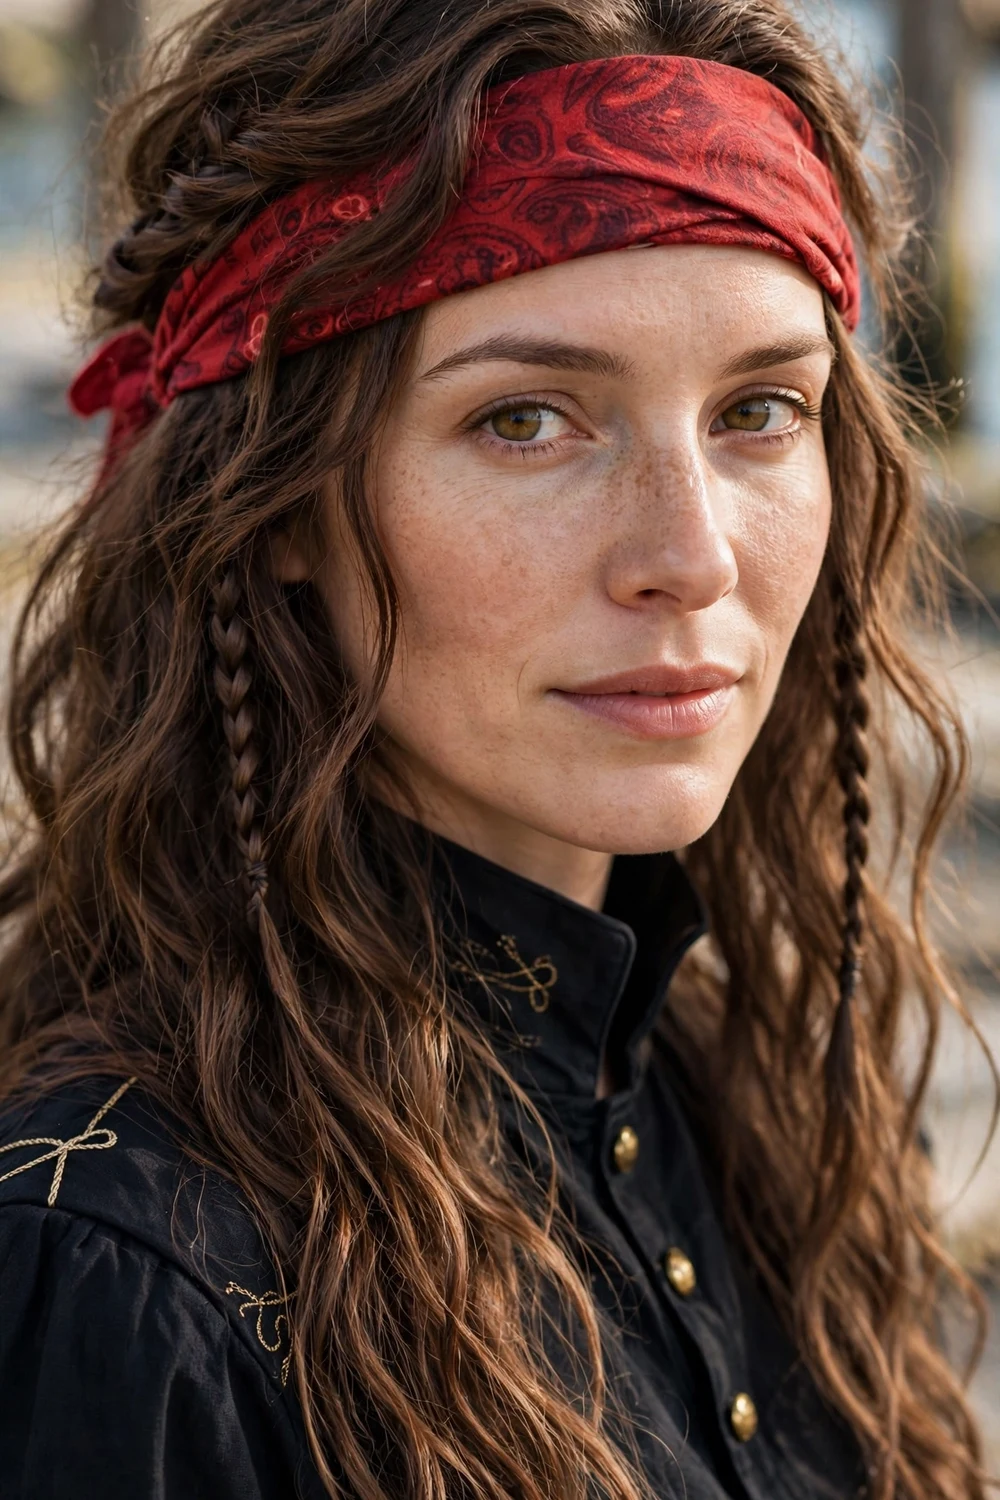
Fold a bandana into a band and tie it across the forehead or just behind the hairline, then leave long waves loose underneath. Add two or three thin accent braids at random points in the lengths, and let the ends of the waves finish in soft twists. The mix of one strong accessory and small braids is what carries the pirate signal.
This suits medium to long wavy or straight hair. Tie the bandana at the nape or the side rather than on top, since a top knot slides forward. If your hair is fine, tease the crown lightly before the bandana goes on so it has something to grip.
Try this: thread one small bead or metal cuff onto each accent braid. Two or three pieces of hardware are plenty for the whole head.
Difficulty: Low · Cost: $ (salon)
4. Side Braid with Beads

A thick side braid with beads or cuffs threaded through it is one of the fastest pirate looks to build. Sweep all the hair to one side, braid loosely so the braid stays full, and add beads at two or three points down the length rather than only at the end.
It suits medium to long hair, and it holds up well outdoors because the braid keeps the lengths contained in wind. Beads stay locked better mid-braid than at the tip, where they slide off. Wooden, bone-look, or aged metal beads read older than bright plastic ones.
Try this: pancake the braid gently, pulling each loop outward from the middle down, before you add the beads. A flat, tight braid looks school-run; a wide, loose one looks pirate.
Difficulty: Low · Cost: $ (salon)
5. Over-the-Shoulder Loose Braid with Ribbon
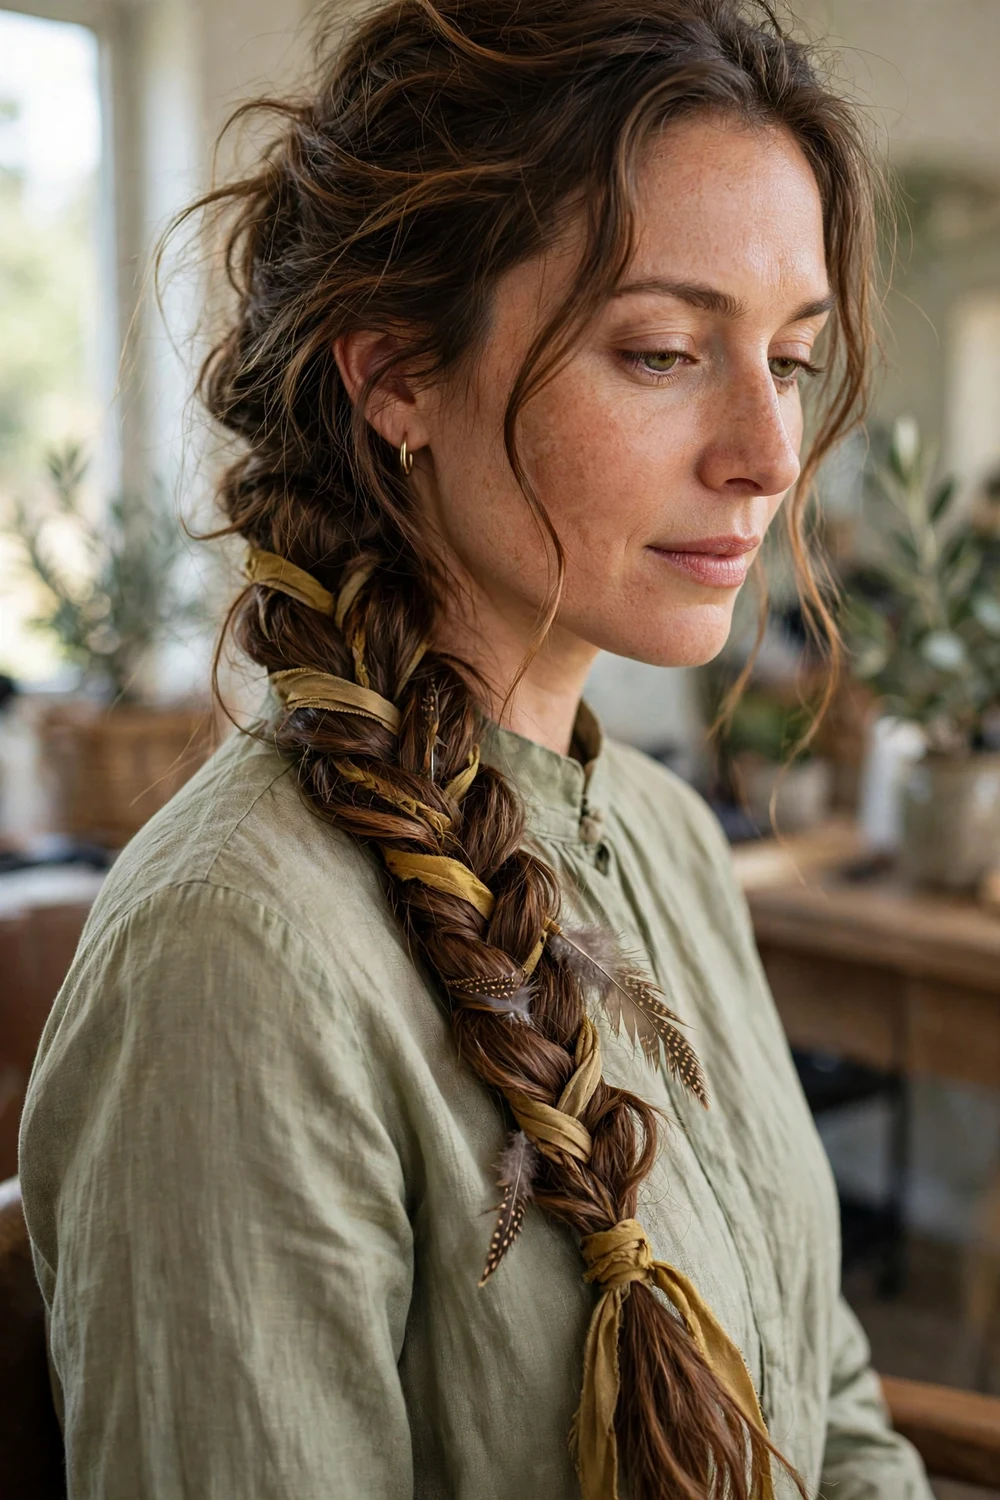
Part the hair in the middle, gather it over one shoulder, and braid loosely to the ends. Weave a thin ribbon, leather cord, or strip of twine through the braid as you go, and tuck a small feather near the tie at the bottom if you want a second detail.
This is the classic long-hair pirate braid, and it suits hair past the shoulders. The center part keeps it looking older and simpler than a side-parted fashion braid. Because the braid is loose, expect it to soften and shed a few wisps over a few hours, which suits the style rather than ruining it.
Try this: start the braid low, below the ear, instead of at the crown. A low start keeps the top of the head smooth and lets a hat or scarf sit over it later.
Difficulty: Low · Cost: $ (salon)
6. Double Braids with a Headscarf

Part the hair in the middle, braid both sides into two loose braids that fall forward over the shoulders, and tie a patterned headscarf across the forehead or over the crown. The scarf covers the part line and controls frizz at the hairline, which makes this a practical pick for humid weather and outdoor events.
It suits medium to long hair, including hair that frizzes easily. Add a bead or small coin charm near the end of each braid if you want detail, and keep the braids uneven in size for a less matched look. Readers who like scarf-led costume hair can also browse the fairy hairstyles for Halloween list for softer scarf and ribbon styles.
Try this: tie the scarf under the braids at the back, not over them, so the knot stays hidden and the braids hang clean.
Difficulty: Low to Medium · Cost: $$ (salon)
7. Mixed Braids and Loose Hair with a Bandana

Leave most of the hair loose and wavy, then add braids of different sizes at uneven intervals: one medium braid behind an ear, two thin ones near the face, one at the back. Tie a bandana over the top to pull the mix together. The uneven placement is the point; evenly spaced matching braids look styled, and this style should look gathered over time.
It suits long hair best, since you need length for the contrast between loose sections and braids to show. Add a shell, ring, or bead to one or two braids only. This style takes longer than a single braid because each small braid is placed and checked in a mirror.
Try this: braid the sections on dry, textured hair and rub a little wax between your fingers first, so the small braids do not slip out within the hour.
Difficulty: Medium · Cost: $$ (salon)
8. Box Braids with Beads and Shells

Box braids already carry the length and movement for this look. Dress them with beads, small shells, and metal rings spaced down several braids, and wear the braids loose, half up, or under a tricorn hat. The decorations do the pirate work, so the braids themselves can stay neat.
This suits anyone already wearing box braids or planning a protective style for the season, since the costume version is an add-on rather than a new install. Keep heavy pieces off the front hairline braids, where weight pulls on the edges. A salon visit covers the install; the beads and shells go in at home in minutes.
Try this: cluster the decorations on four to six braids around the face and crown, and leave the rest plain. The contrast reads as collected treasure rather than full decoration.
Difficulty: Medium to High · Cost: $$$ (salon)
9. Warrior French Braid

A single French braid down the back, firm at the crown and looser toward the ends, keeps hair fully off the face and neck for hours. It is the practical pick for active events, dancing, and warm venues, and it survives a hat being put on and taken off better than loose styles do.
It suits medium to long hair with enough thickness to fill the braid. Start the braid high at the crown for a stronger line, and pull the loops wider once the braid is tied off so it does not look tight and sporty. A ribbon or cord tied at the end adds the pirate detail without loose accessories that can fall out.
Try this: mist the braid with water and a drop of leave-in conditioner before an event, then re-pancake the lower half. The ends dry out and fray first.
Difficulty: Medium · Cost: $$ (salon)
10. Braid Crown with Loose Waves
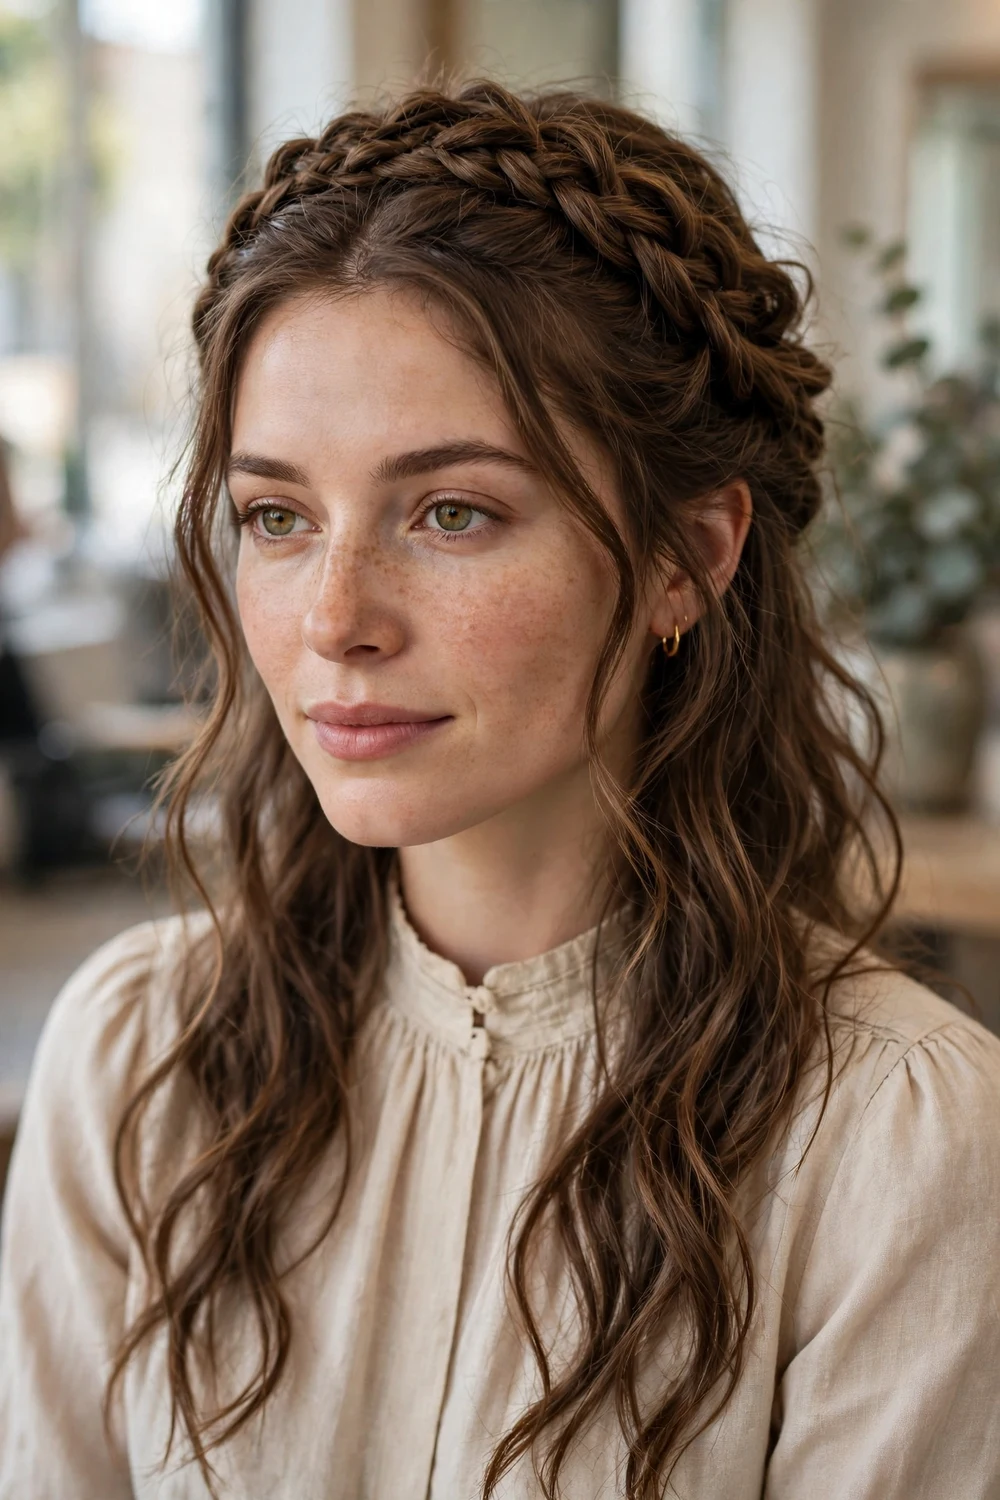
Braid one or both sides from the temple, wrap the braid along the hairline or across the back of the head like a crown, pin it in place, and leave the remaining hair in loose waves. The crown gives the style structure while the waves keep it soft.
It suits medium to long hair and works well for photos, since the braid reads clearly from the front. Pin the crown with pins that match your hair color and cross each pair of pins so the braid does not creep during the night. A small shell or charm pinned at one side of the crown is enough detail.
Try this: braid the crown on the side you part your hair, and leave the other side looser. A fully symmetrical crown can look bridal; a slightly uneven one stays pirate.
Difficulty: Medium · Cost: $$ (salon)
11. Half-Up Waves with a Coin Clip
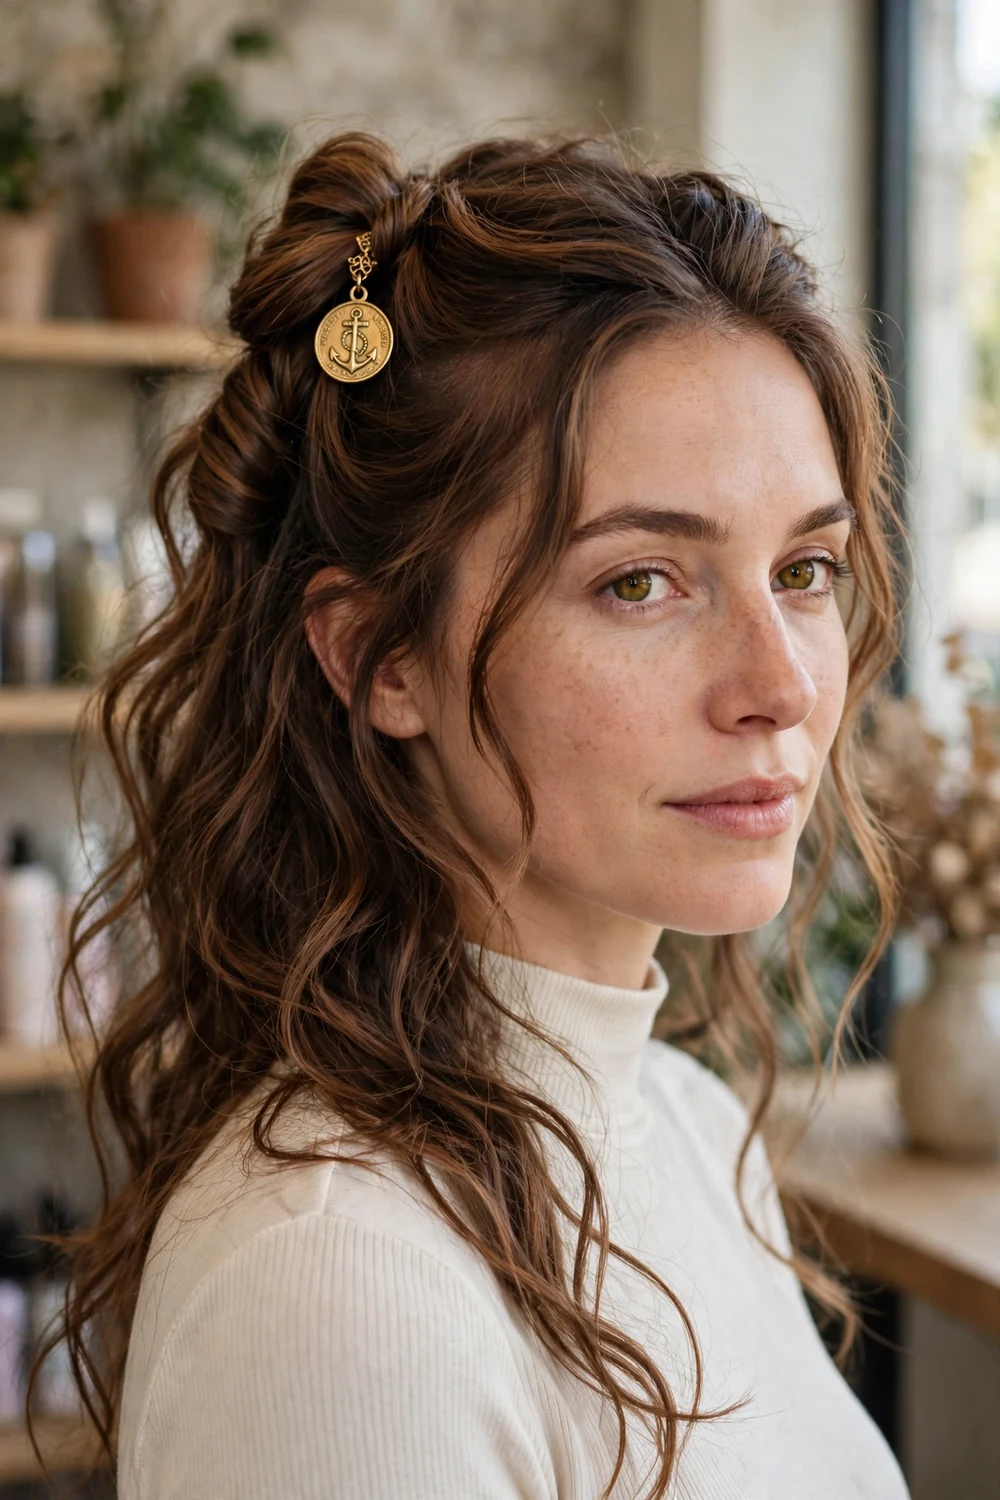
Twist the front sections of hair back from each side, join them at the back of the head, and secure the join with a coin charm clip or a small metal barrette. Leave the rest of the hair in loose waves. The coin detail is a direct nod to treasure, and it replaces a plain elastic with something that shows in photos.
It suits medium to long hair and takes under ten minutes. Keep the twists loose and slightly uneven, and let a few strands fall out near the ears. If you have no coin clip, a plain clip with a small charm threaded on a pin gives the same effect.
Try this: backcomb the top section lightly before twisting, so the half-up part has height and the clip has textured hair to hold onto.
Difficulty: Low · Cost: $ (salon)
12. Half-Up Ponytail with Beaded Braids
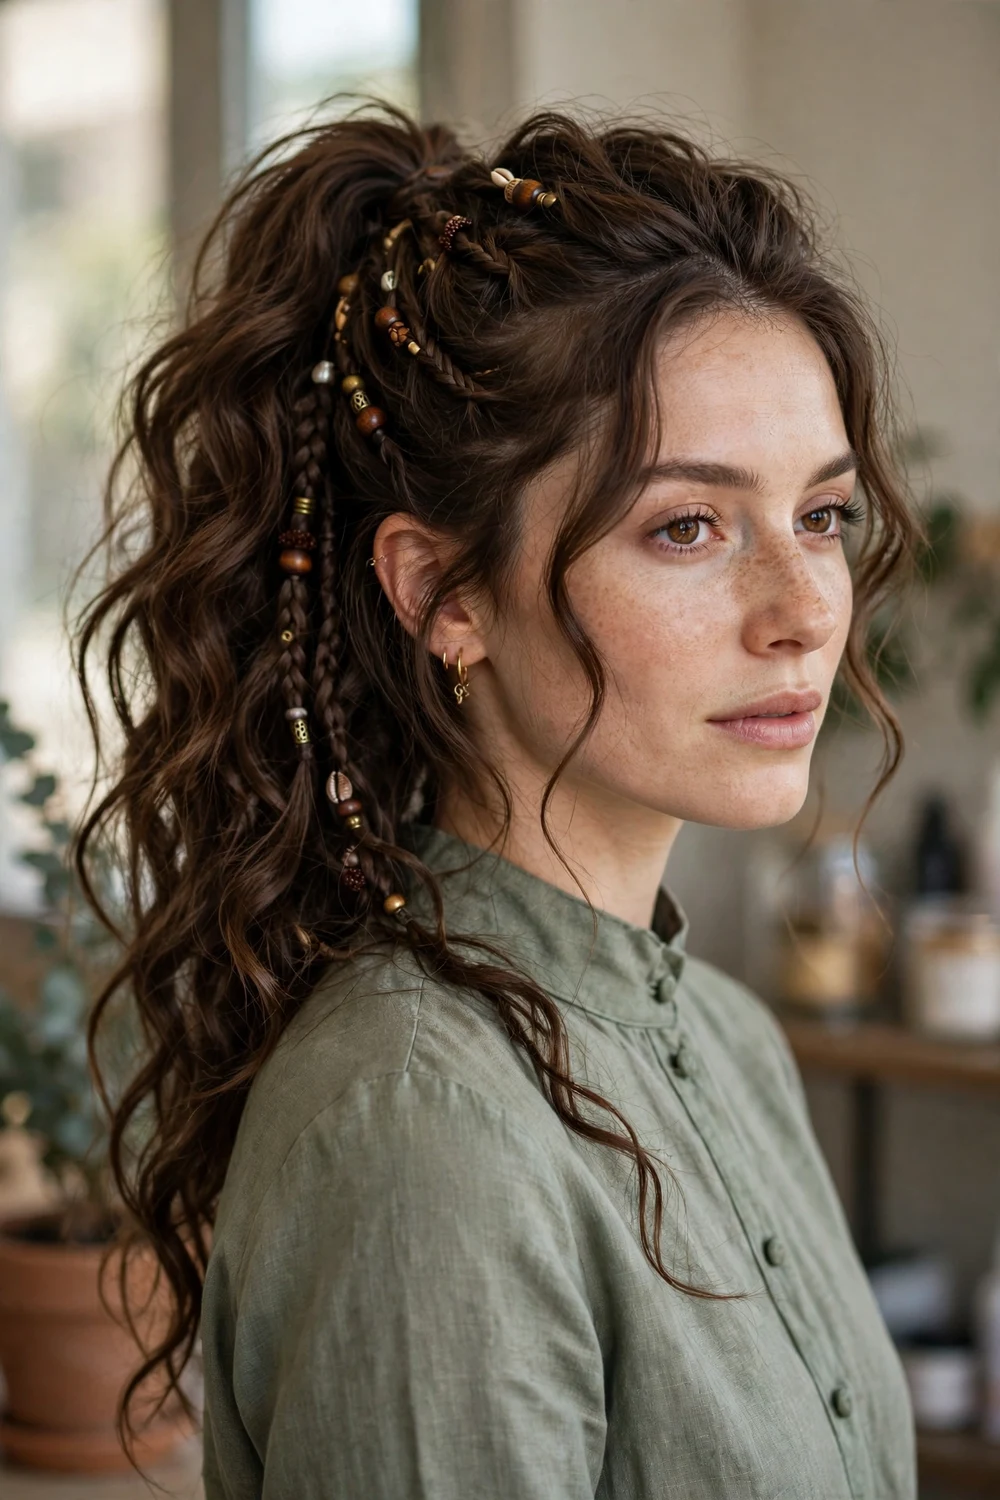
Gather the top half of the hair into a ponytail at the crown, leave the lower half loose in waves, and weave two or three small beaded braids through both sections. The ponytail lifts the face and keeps the front tidy, while the loose lower half keeps the volume that pirate hair needs.
It suits medium to long thick hair best; fine hair can look thin split into two sections, so add clip-in volume or choose the coin clip style instead. Wrap a strand of hair or a thin scarf around the ponytail base to hide the elastic.
Try this: tie the ponytail slightly higher than you think it needs to sit. It settles lower as the waves weigh it down over the first hour.
Difficulty: Low to Medium · Cost: $$ (salon)
13. Low Ponytail Under a Tricorn Hat
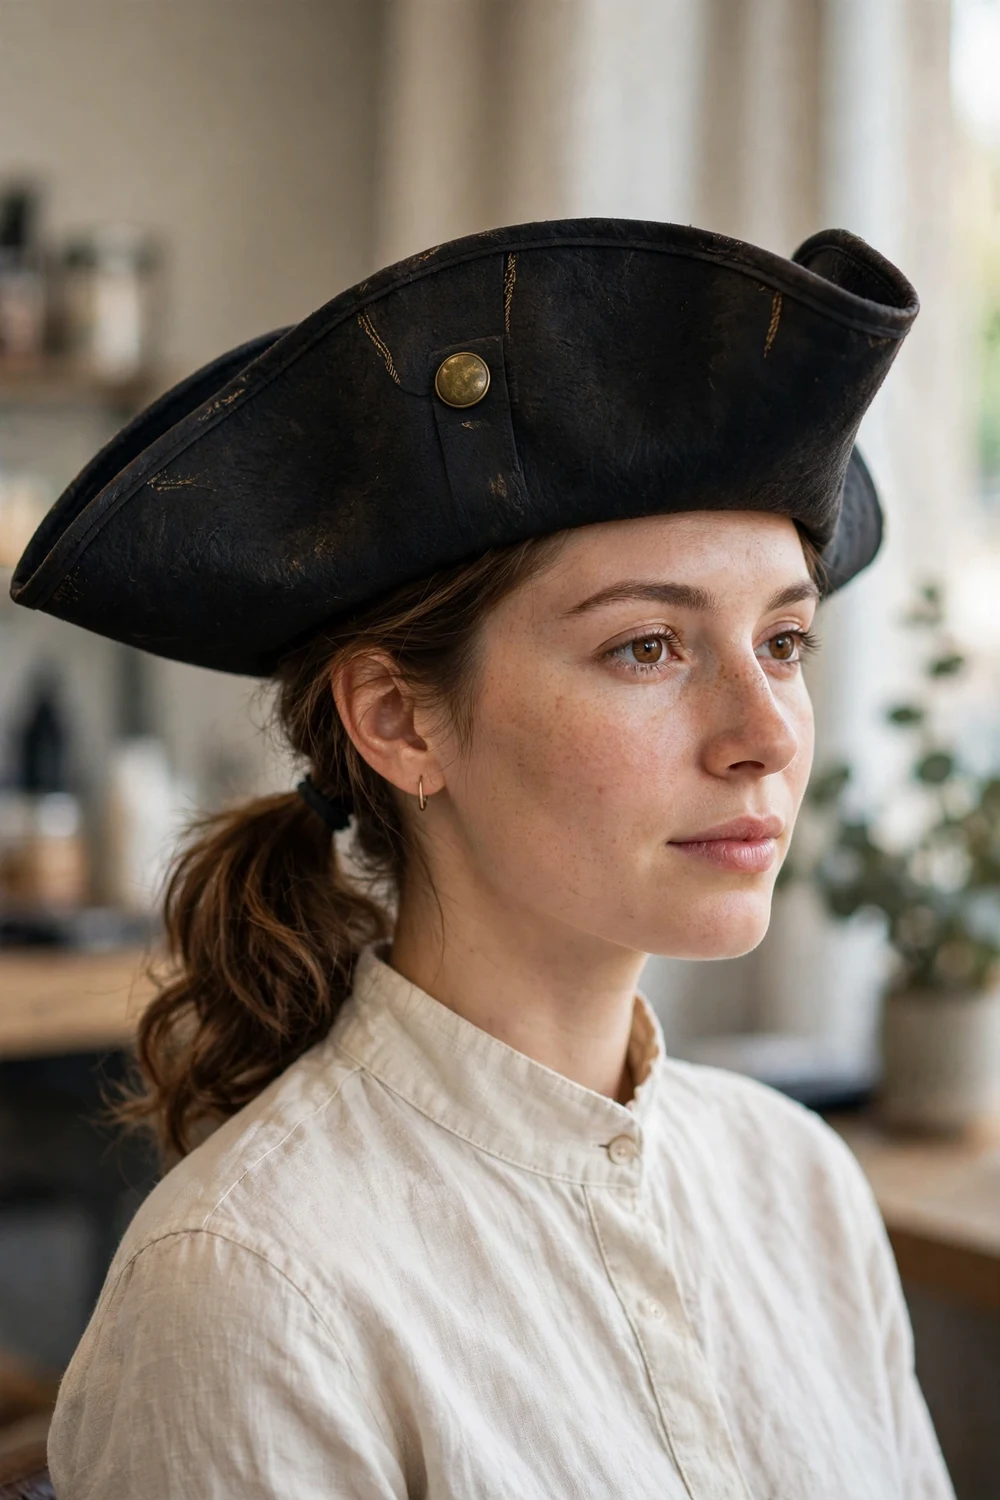
If the costume includes a tricorn or captain hat, a low ponytail at the nape is the style that lets the hat sit flat and balanced. Keep the crown smooth and soft, secure the ponytail with a strong elastic, and leave the tail loose, wavy, or in a single loose braid. The hat does most of the visual work, so the hair underneath should stay simple.
It suits any hair type long enough to reach a low ponytail. Texture spray at the crown gives the hat grip. Cross two bobby pins under the front brim once the hat is on, since a low ponytail alone will not stop a light hat from sliding in wind. The witch hairstyles for Halloween list uses the same low-base trick under pointed hats.
Try this: put the hat on before you finish the ponytail, and adjust the height of the tail so it clears the back brim without pushing the hat forward.
Difficulty: Low · Cost: $ (salon)
14. Bubble Ponytail
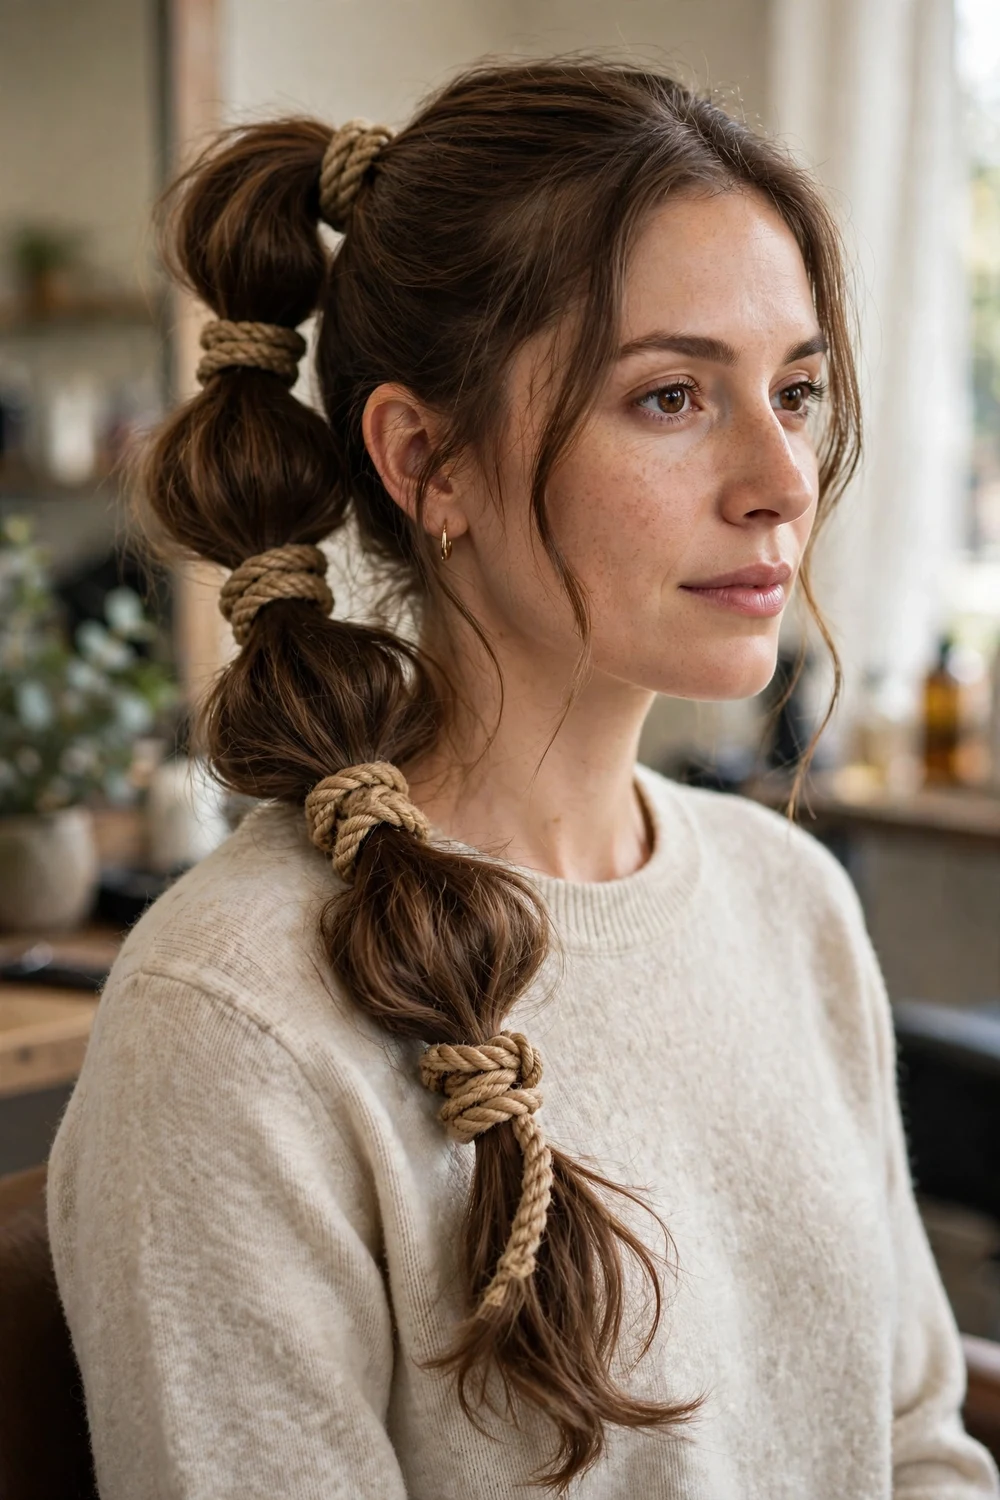
Tie a mid or high ponytail, add small elastics every few inches down the length, and pull each section outward to puff it into a rounded bubble. The segmented tail reads like rope, which fits ship rigging and gives long hair a shaped finish without braiding skill.
It suits long, straight to wavy hair, and it refreshes fast: re-puff each bubble and the style looks new again. Wrap one section with cord or ribbon instead of an elastic for a single pirate detail. Fine hair needs fewer, wider bubbles; thick hair can carry more.
Try this: use clear or hair-colored elastics and cover the top one with a wrapped strand of hair, so the mechanics stay hidden and only the bubbles show.
Difficulty: Low · Cost: $ (salon)
15. High Curly Ponytail with a Bandana

Gather curls into a high ponytail, tie a bandana at the hairline to keep the front neat, and pull a couple of curls free near the ears to frame the face. The bandana handles the hairline and the ponytail keeps the full curl volume on display.
It suits curly and wavy hair at medium to long lengths. Tie the ponytail higher than feels natural at first; curls settle, and the lift keeps the shape springy in photos. A gel or edge product along the hairline under the bandana keeps the front smooth for hours.
Try this: tie the bandana before the ponytail if your hairline frizzes fast, so the fabric locks the front down while you gather the rest.
Difficulty: Low · Cost: $ (salon)
16. Headscarf Messy Bun
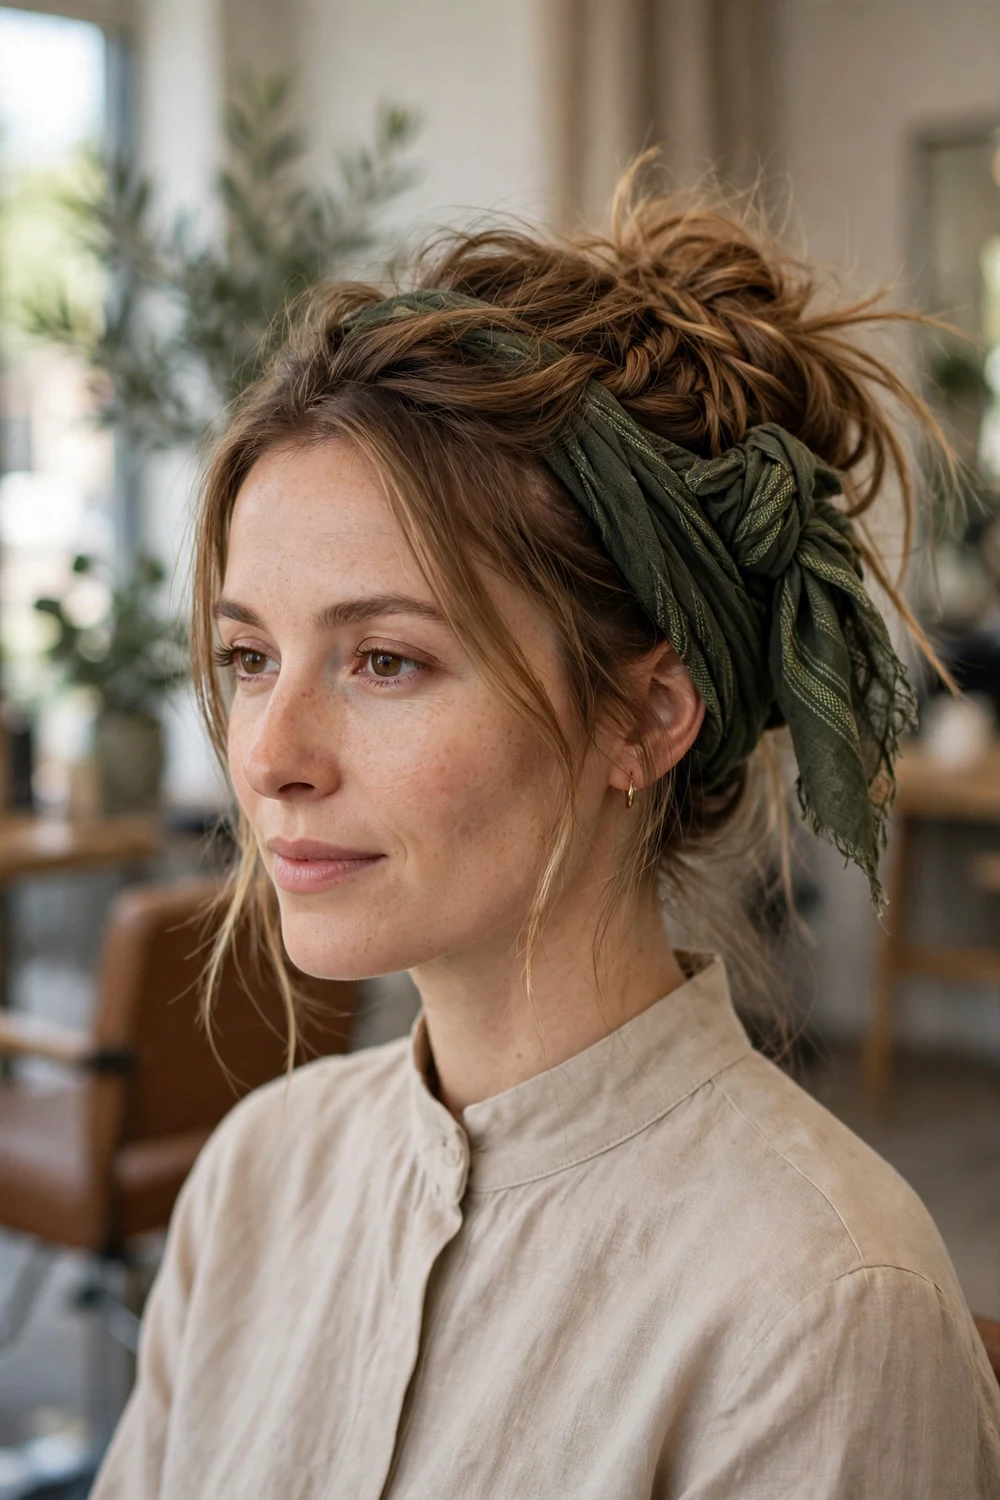
Gather the hair into a loose bun at the back or crown, then wrap a scarf around the bun and knot it at the side. Let wisps fall around the face and neck. The scarf covers the elastic and the roughest part of the bun, so the style looks finished even when the bun itself is basic.
It suits medium to long hair, and second-day hair holds it best, since clean hair slips out of both the bun and the scarf knot. This is also the warm-weather pick on this list, with the hair fully off the neck. For a more pointed, dramatic scarf-and-volume version, see the updos in the elf hairstyles for Halloween roundup and swap the accessories.
Try this: pin the scarf to the bun with two pins through the knot. Fabric on hair slides; fabric pinned to a bun stays.
Difficulty: Low · Cost: $ (salon)
17. Messy Updo with Charm Pins
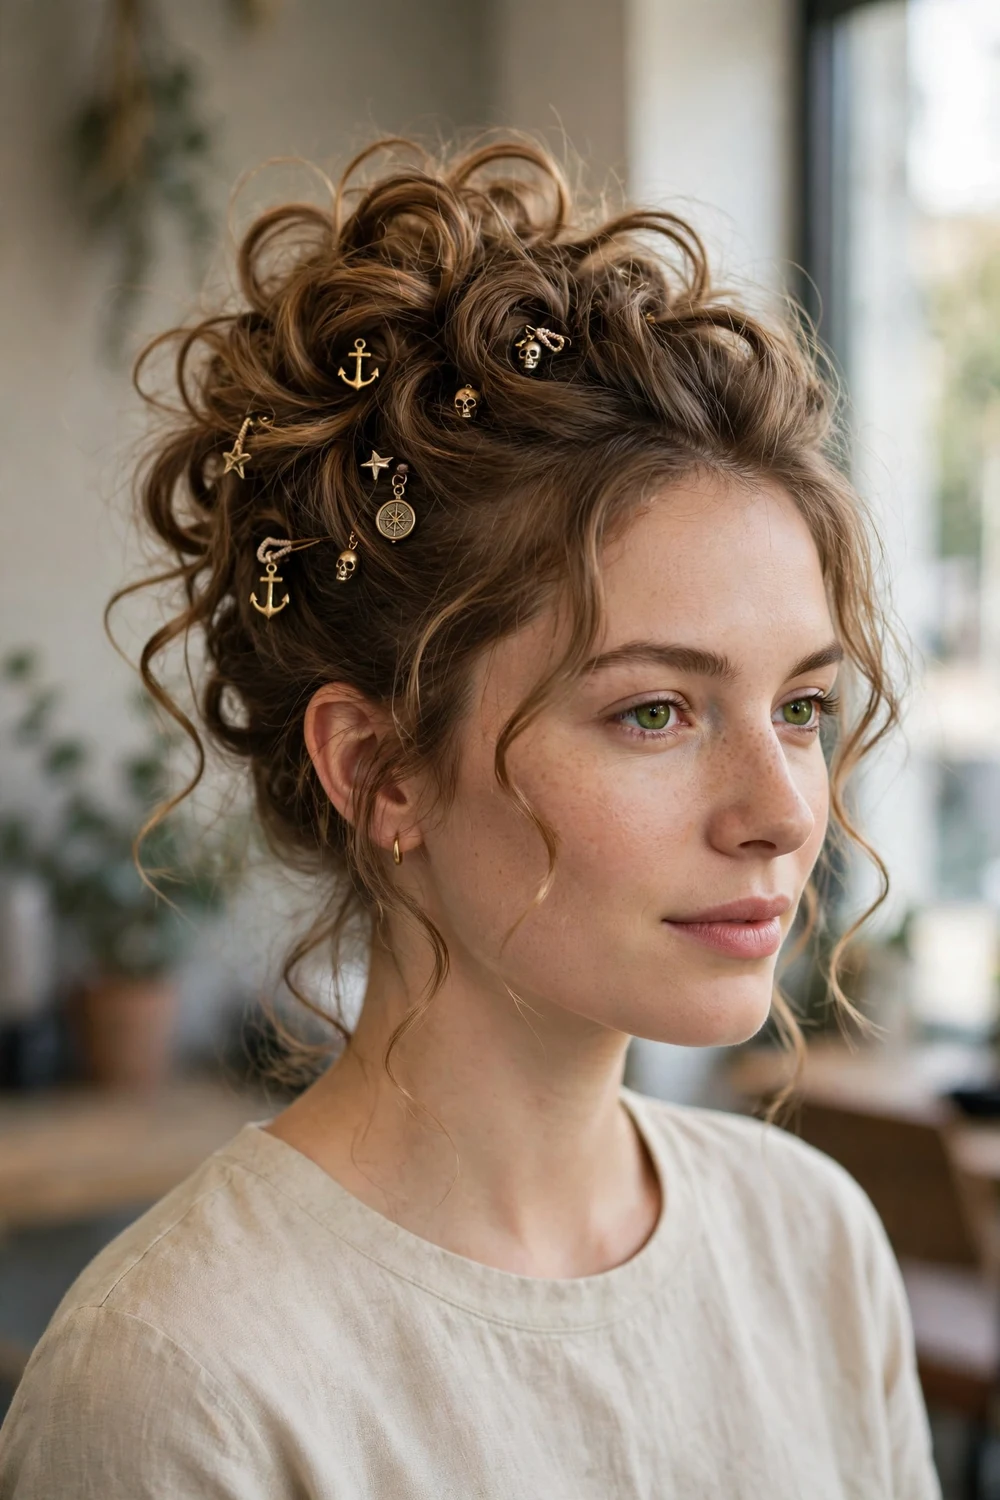
Curl or wave the hair first, gather it into a loose ponytail, then pin the curls up in sections so the updo builds in layers rather than one tight bun. Leave pieces loose around the face. Finish with a few pins that carry small charms, coins, or skull shapes on the outer surface, where they show without snagging on hair.
It suits medium to long hair and formal costume events where a braid feels too casual. Backcomb the crown lightly for height before pinning. Because the pins go in one section at a time, this takes longer than the bun styles, so build it with a mirror behind you or a second pair of hands.
Try this: keep the charm pins on one side only. A cluster at one side reads as a placed accessory; pins scattered everywhere read as clutter.
Difficulty: Medium · Cost: $$ (salon)
18. Side-Swept Waves Under a Tricorn Hat

Sweep long wavy hair to one side so it falls over one shoulder, deepen the side part, and set a tricorn hat at a slight angle on top. The side sweep softens the hat, and the hat keeps the sweep in place. This is the romantic, photo-led version of pirate hair.
It suits long wavy or curled hair. Pin the hair at the nape on the opposite side of the sweep so the lengths stay over one shoulder instead of drifting back to center. Keep the waves loose and separated; brushed-out curls go frizzy and wide rather than windswept.
Try this: set the hat after the hair is swept, and tilt it toward the bare side. Tilting it toward the hair side crushes the waves flat within an hour.
Difficulty: Low to Medium · Cost: $$ (salon)
19. Long Straight Hair with Volume Under a Hat

Straight hair can carry a pirate look with root volume and a hat. Tease or blow-dry the roots for lift, keep the lengths smooth and slightly piecey with a wax or texture cream on the ends, and let the hat supply the costume detail. The contrast between smooth lengths and a rough hat works well in photos.
It suits long straight or relaxed hair that does not hold waves. Skip heavy shine serum; a slightly matte finish keeps the style from looking like a wig. If your hair is very fine, add a small braid behind one ear for texture so the look does not rely on the hat alone.
Try this: rough up only the last few inches with texture spray. Smooth roots-to-mid-lengths with textured ends reads intentional; texture everywhere reads unbrushed.
Difficulty: Low · Cost: $ (salon)
20. Cornrow Braids with a Loose Top
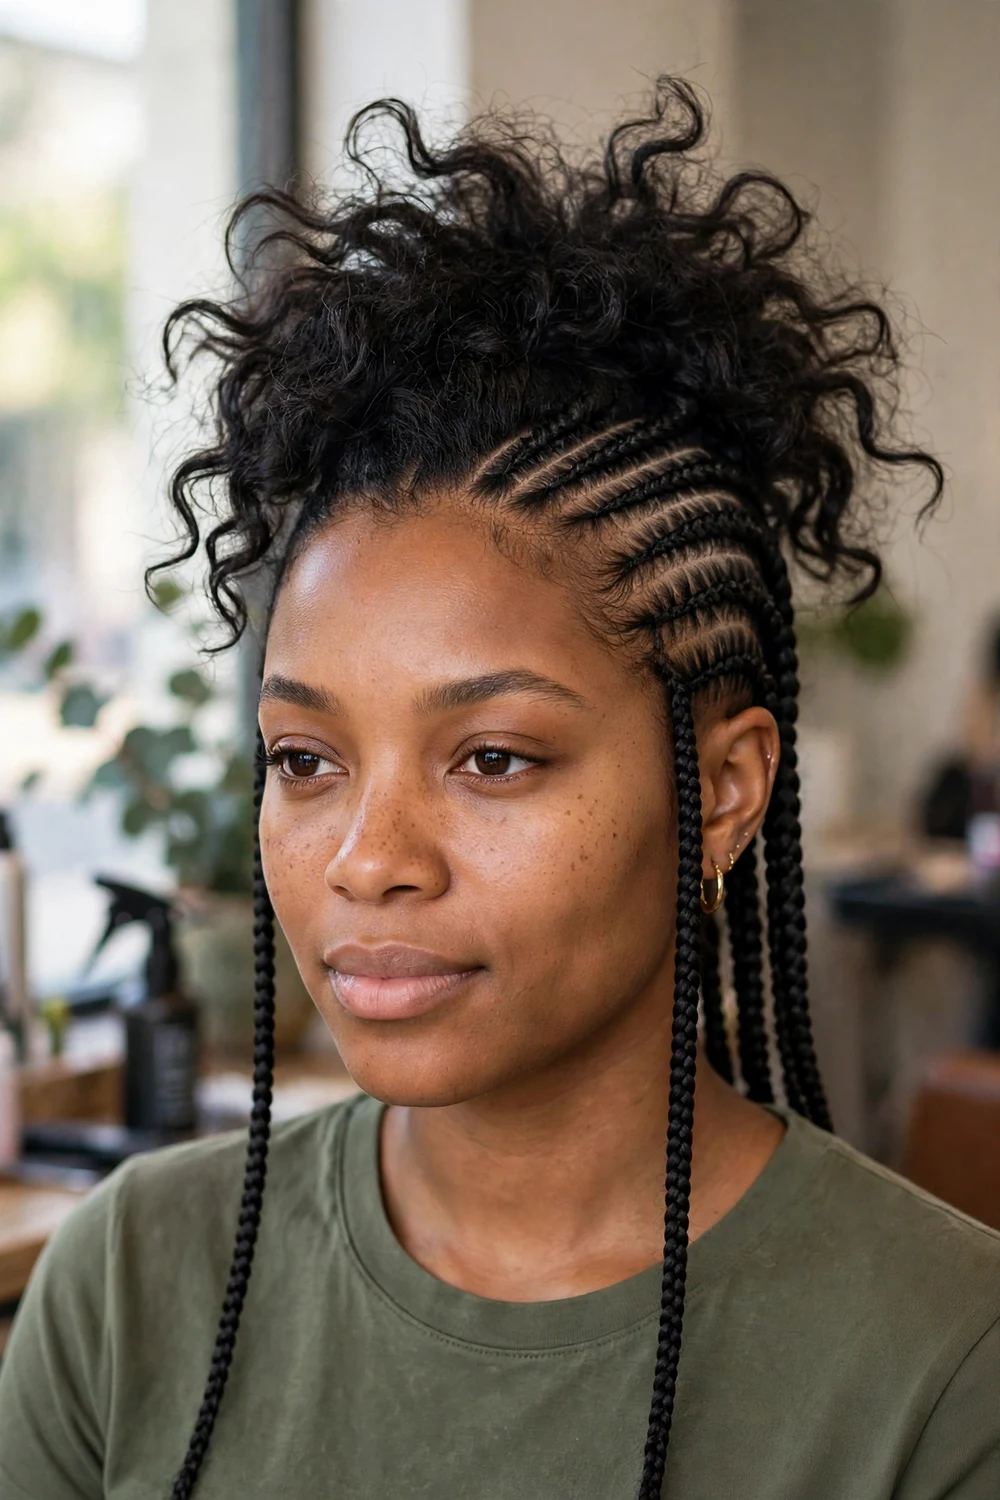
Braid cornrows along the sides or across the front of the head and leave the top or back section loose and textured. The braided sections keep the style tidy and secure for a full day, while the loose section keeps the movement and volume. Swept to one side, the same base gives a braided mohawk shape.
It suits natural and textured hair, and shorter lengths that cannot fill a long braid. Cornrows are a salon or skilled-braider job if you want clean parts, and they last well beyond a single event, so plan the costume around a style you can keep wearing after it. The Viking hairstyles for women list uses similar side braids if you want a related costume direction.
Try this: add one bead or cuff at the end of two front cornrows only, so the detail sits near the face where it shows in photos.
Difficulty: Medium to High · Cost: $$$ (salon)
21. Red Bandana Pixie
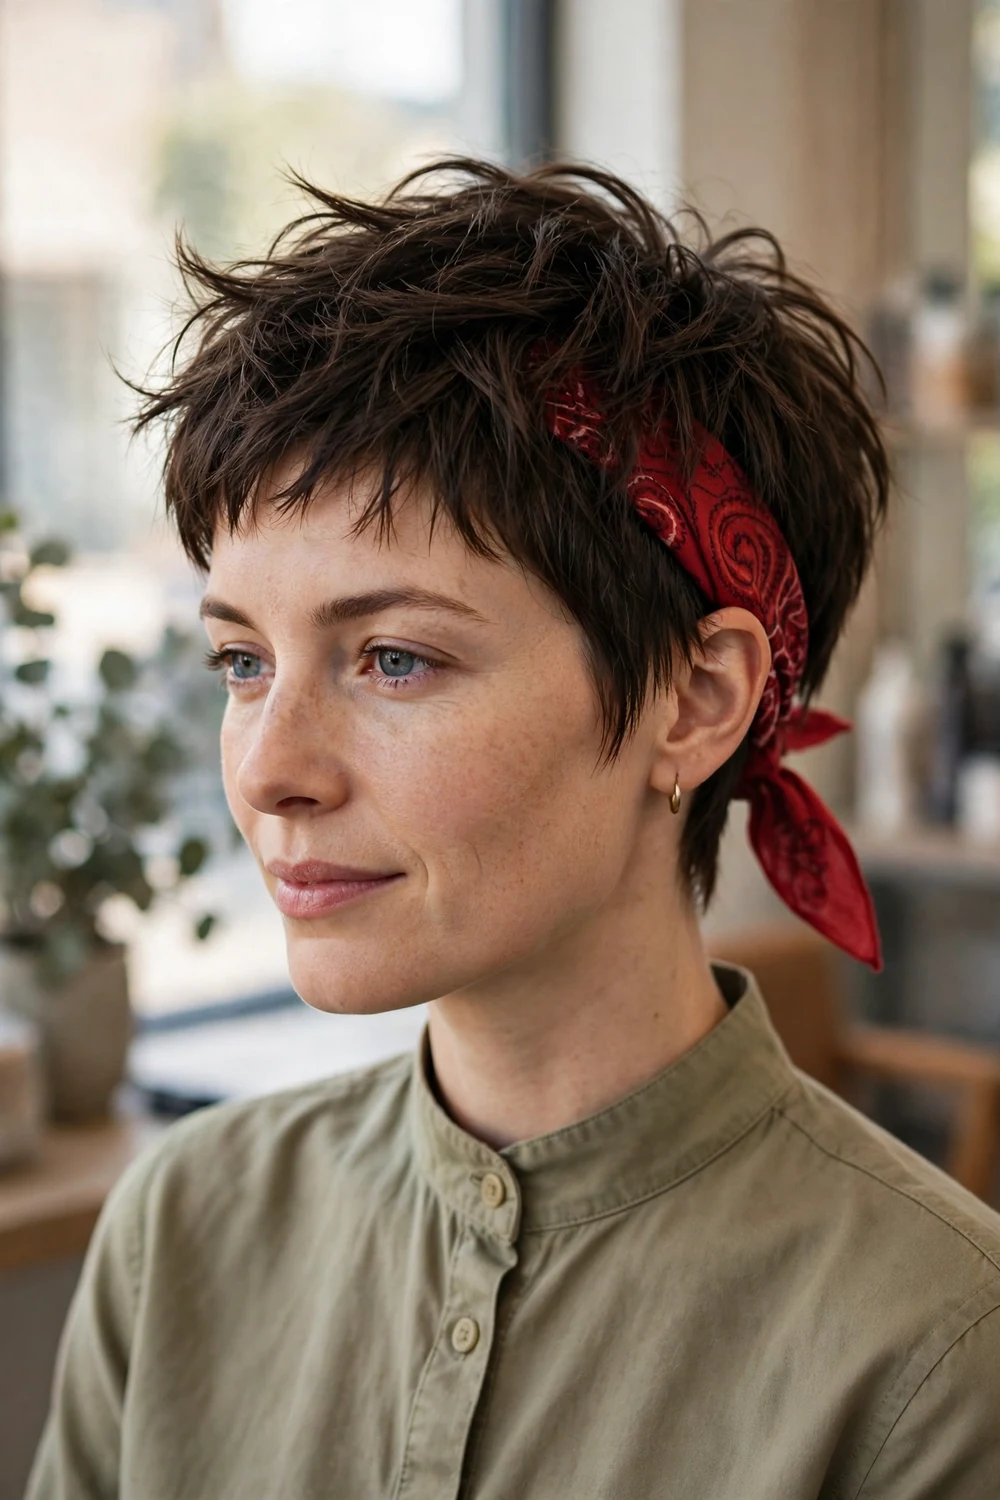
Short hair needs no wig and no extensions for a pirate look. Tie a red bandana behind the hairline or across the forehead, and work a light wax through a pixie cut to make the ends piecey and separated. The bandana supplies the costume signal and the texture supplies the attitude.
It suits pixie cuts and very short crops. A deep red bandana reads pirate fastest; black and faded stripes also work. Keep the wax on the ends only, since product at the roots makes short hair look flat under a bandana within a couple of hours.
Try this: tie the bandana, then pull a few short pieces of fringe forward under the front edge. A completely covered hairline looks like a swim cap; a broken one looks like hair and fabric.
Difficulty: Low · Cost: $ (salon)
22. Headscarf Bob
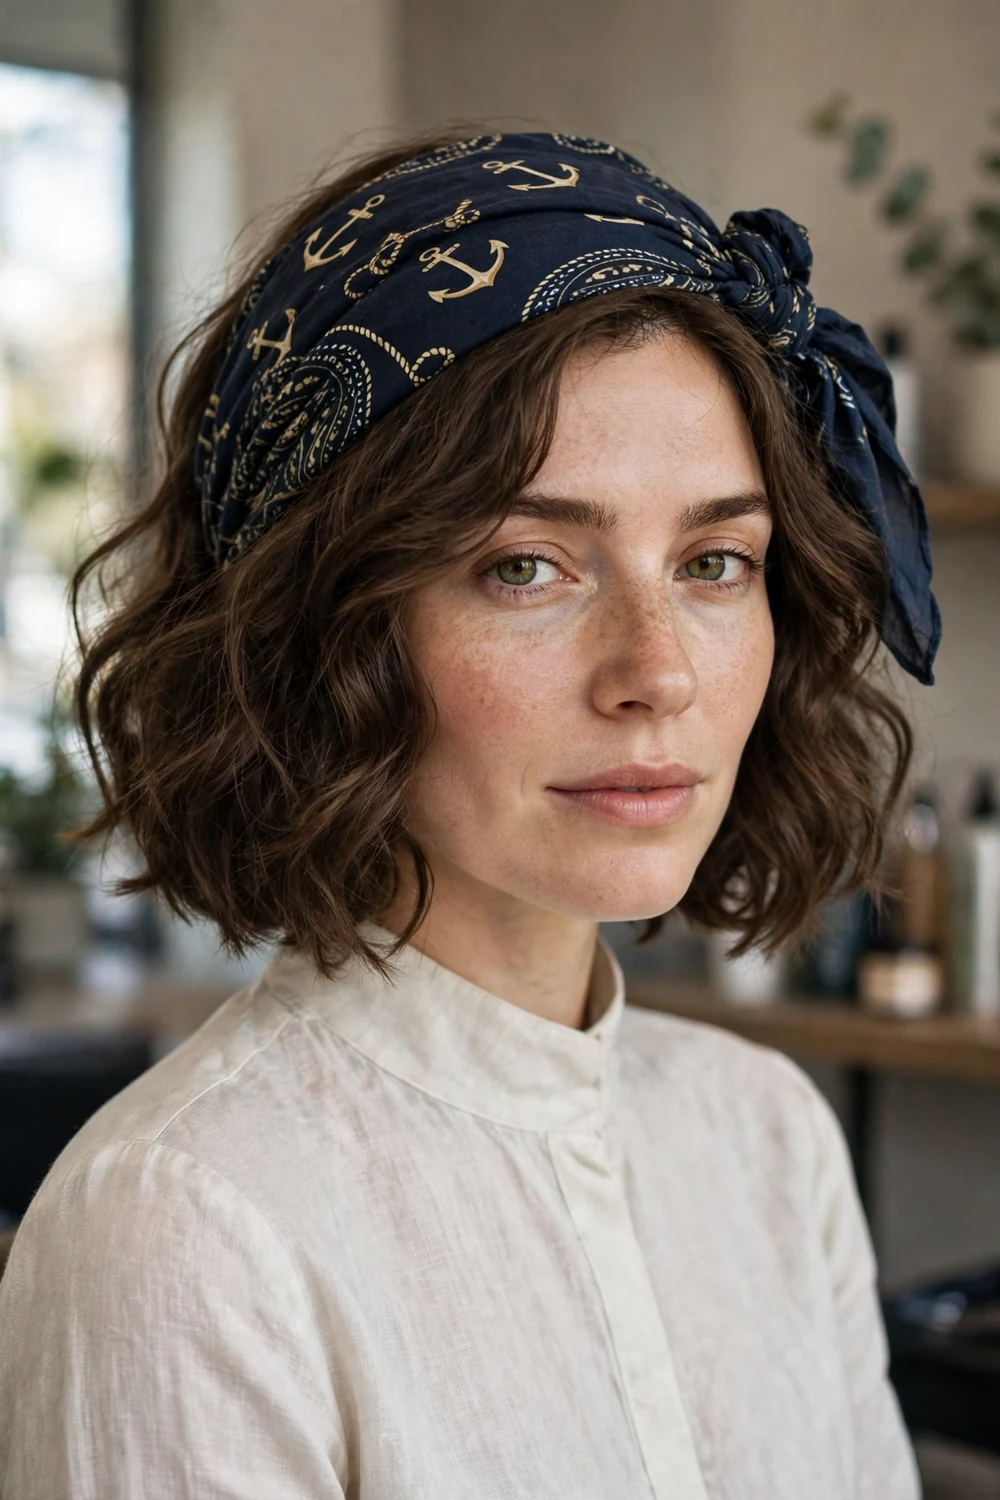
A bob becomes a pirate style with a headscarf tied over the top and knotted at the side or back, with the waves or texture of the bob left loose below it. Add one small side braid or a few pin-in beads if the bob is blunt and smooth, since very neat bobs need one rough detail.
It suits bob-length hair, including blunt, wavy, and slightly grown-out cuts. Tuck the scarf ends in at the back for a cleaner finish, or leave them hanging at the side for a stronger costume read. This is also the fastest fix on the list for a bob on a humid day, since the scarf covers the crown where frizz shows first.
Try this: choose a scarf with a rough or faded print rather than a silky one. Silk slides off short hair and looks dressy; cotton or rayon stays put and looks worn-in.
Difficulty: Low · Cost: $ (salon)
23. Fishtail Braid with a Leather Wrap

A fishtail braid splits the hair into two sections and crosses small pieces over from each side, which gives a woven, rope-like finish that fits the pirate theme well. Wear it over one shoulder, keep it loose, and wrap a thin leather cord around the last few inches instead of using a plain elastic.
It suits medium to long hair with few layers; heavily layered hair pokes out of a fishtail faster than out of a three-strand braid. The fishtail takes longer to build than a standard braid, roughly double the time, but it holds its shape well once tied and photographed.
Try this: pull each crossed piece gently outward as you finish, section by section from the top down. Even, light loosening gives the wide woven look; one hard tug distorts the whole braid.
Difficulty: Medium · Cost: $$ (salon)
| Style group | Best hair length | Main accessory | Hat friendly | Typical difficulty |
|---|---|---|---|---|
| Loose waves and curls (ideas 1 to 3) | Medium to long | Bandana, headband, or none | No | Low |
| Single and double braids (ideas 4 to 10) | Medium to long | Beads, ribbon, headscarf | Yes, low braids | Low to Medium |
| Half-up styles (ideas 11 and 12) | Medium to long | Coin clip, beads | No | Low to Medium |
| Ponytails (ideas 13 to 15) | Medium to long | Bandana, tricorn hat | Yes, low ponytail | Low |
| Buns and updos (ideas 16 and 17) | Medium to long | Headscarf, charm pins | No | Low to Medium |
| Hat-led styles (ideas 18 and 19) | Long | Tricorn hat | Yes, hat is the style | Low to Medium |
| Short and braided-base styles (ideas 20 to 22) | Short to medium | Bandana, headscarf, cuffs | Some | Low to High |
| Fishtail braid (idea 23) | Medium to long | Leather cord | Yes | Medium |
Frequently Asked Questions
What is the easiest pirate hairstyle for women?
A loose over-the-shoulder braid or a bandana over loose waves. Both take under ten minutes, need no special tools beyond an elastic and a bandana, and hold up in wind and while dancing. Add sea salt spray first so the hair has grip and texture.
Can you do pirate hair on short hair?
Yes. A red bandana over a piecey pixie, a headscarf tied over a bob, or a low ponytail under a tricorn hat all work on short hair. Short lengths often look more modern and less costume-like, and they need no wig or extensions.
How do you keep a tricorn hat from sliding off?
Start with a low ponytail or a low braid so the hat has a flat base. Tease a small section at the crown for grip, then cross two bobby pins under the front brim once the hat is on. Flexible hairspray helps, and a hat with an inner band or ties stays put longer than a loose foam one.
How do you keep a bandana or headscarf from slipping?
Tie scarves at the nape or the side rather than in a top knot, and give the hair texture first with dry shampoo or sea salt spray so the fabric has grip. Pin the fabric to the hair or to a bun with two bobby pins. Cotton and rayon scarves slide far less than silk ones.
What accessories work best for pirate hair?
Beads, metal cuffs, coin clips, small shells, feathers, and patterned scarves or bandanas in black, deep red, or faded stripes. One or two well-placed accessories read more convincing than a pile of them, so pick a main accessory and one small detail at most.
Final Thoughts
Pick the pirate style that matches the hair you already have: loose waves or curls if you want the fastest route, a braid or low ponytail if a hat is part of the costume, and a bandana style if your hair is short. Keep the texture rough, keep the accessories to one or two, and carry spare pins and one extra elastic in a pocket. That small kit fixes almost every style on this list mid-event, and the looseness that builds up over the night usually improves the look rather than ruining it.

