


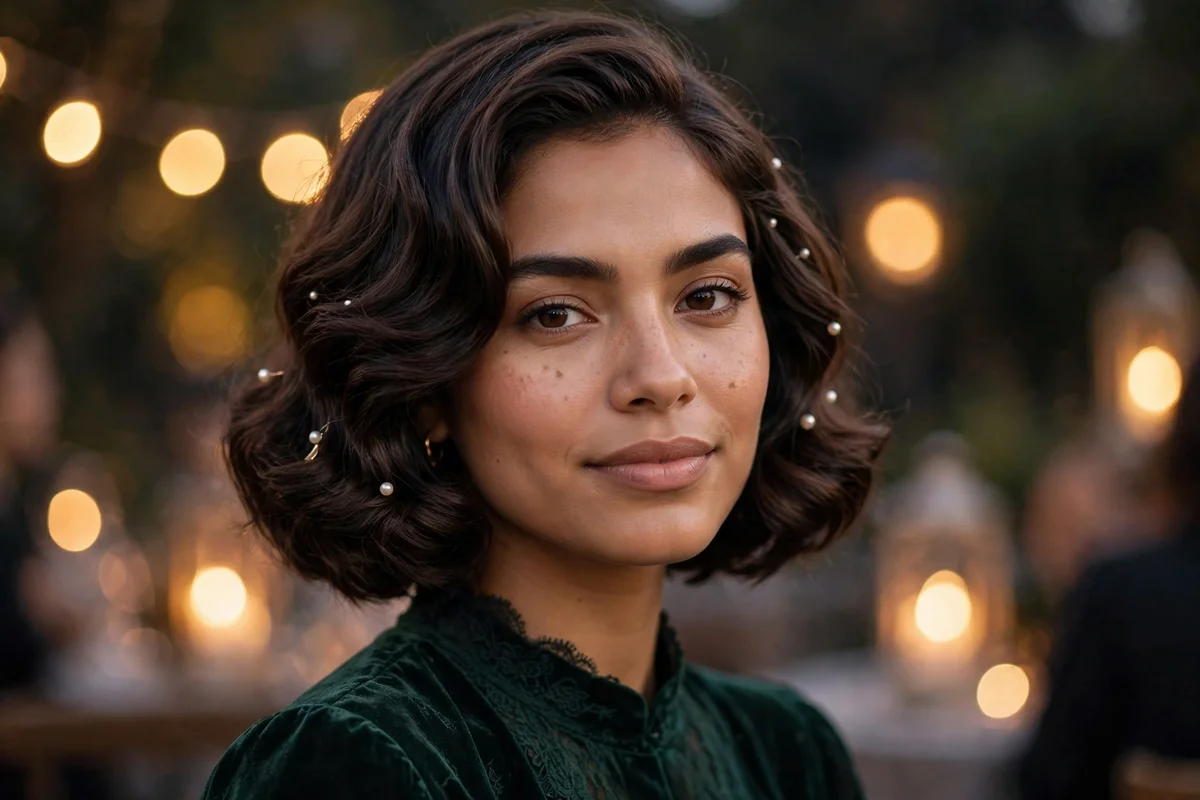
Fancy hairstyles for short hair are easier to pull off than most people think. A pixie, bob, or chin-length cut can look fully dressed-up with the right shape, a smooth finish, and one good accessory.
This guide leans glam on purpose. Every style below suits weddings as a guest, date nights, cocktail parties, and holiday events, where the hair should look intentional and a little dramatic.
If your event calls for classic formal hair instead, like office dinners or traditional ceremonies, you will find those in our guide to formal hairstyles for short hair. The 49 looks below are the fancy, party-ready side of short hair.
Quick Takeaways
- Fancy short-hair styles fall into three groups: pinned updos, half-up styles, and sleek sculpted looks. Pixies suit sculpted looks with volume, while bobs and lobs suit pinned updos.
- Accessories add the most glam for the least effort. Pearl pins, crystal clips, and jeweled headbands cost under $15 and take under a minute to place.
- Most of these styles take 10 to 25 minutes. Only intricate braided and woven updos need 30 to 40 minutes.
- Second-day hair holds pins and curls better than freshly washed hair. A dry texture spray adds grip when hair is too clean.
- Curls plus crossed bobby pins plus firm-hold hairspray survive a full evening of dancing. The detailed styles below tell you exactly where each pin goes.
49 Fancy Hairstyles for Short Hair
1. Side Braid
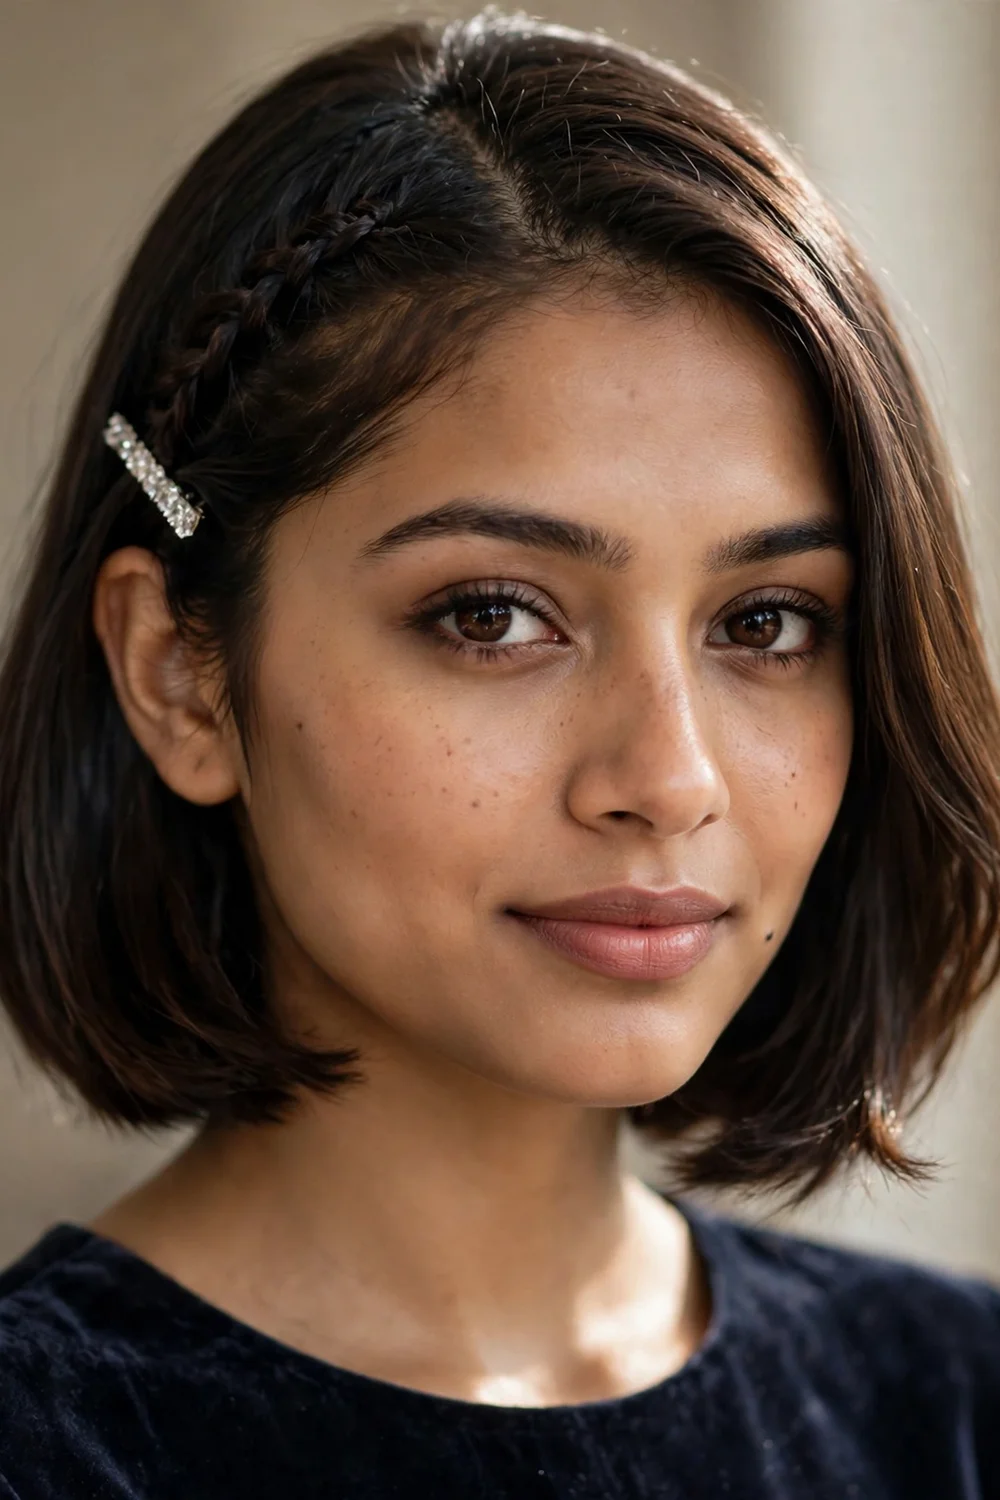
Make a deep side part and braid a thin three-strand braid along the hairline, from the part down past one ear. Pin the tail flat behind the ear and cover the pins with a small crystal barrette. This works on pixies with grown-out tops and on bobs, and it keeps hair off the face while framing the cheekbones. It takes about 10 minutes. A spritz of light hairspray along the braid keeps short flyaways flat all evening.
Try this: gently pull the braid edges outward with your fingertips to double its width.
Difficulty: Easy | Cost: $0 to $5
2. Low Chignon
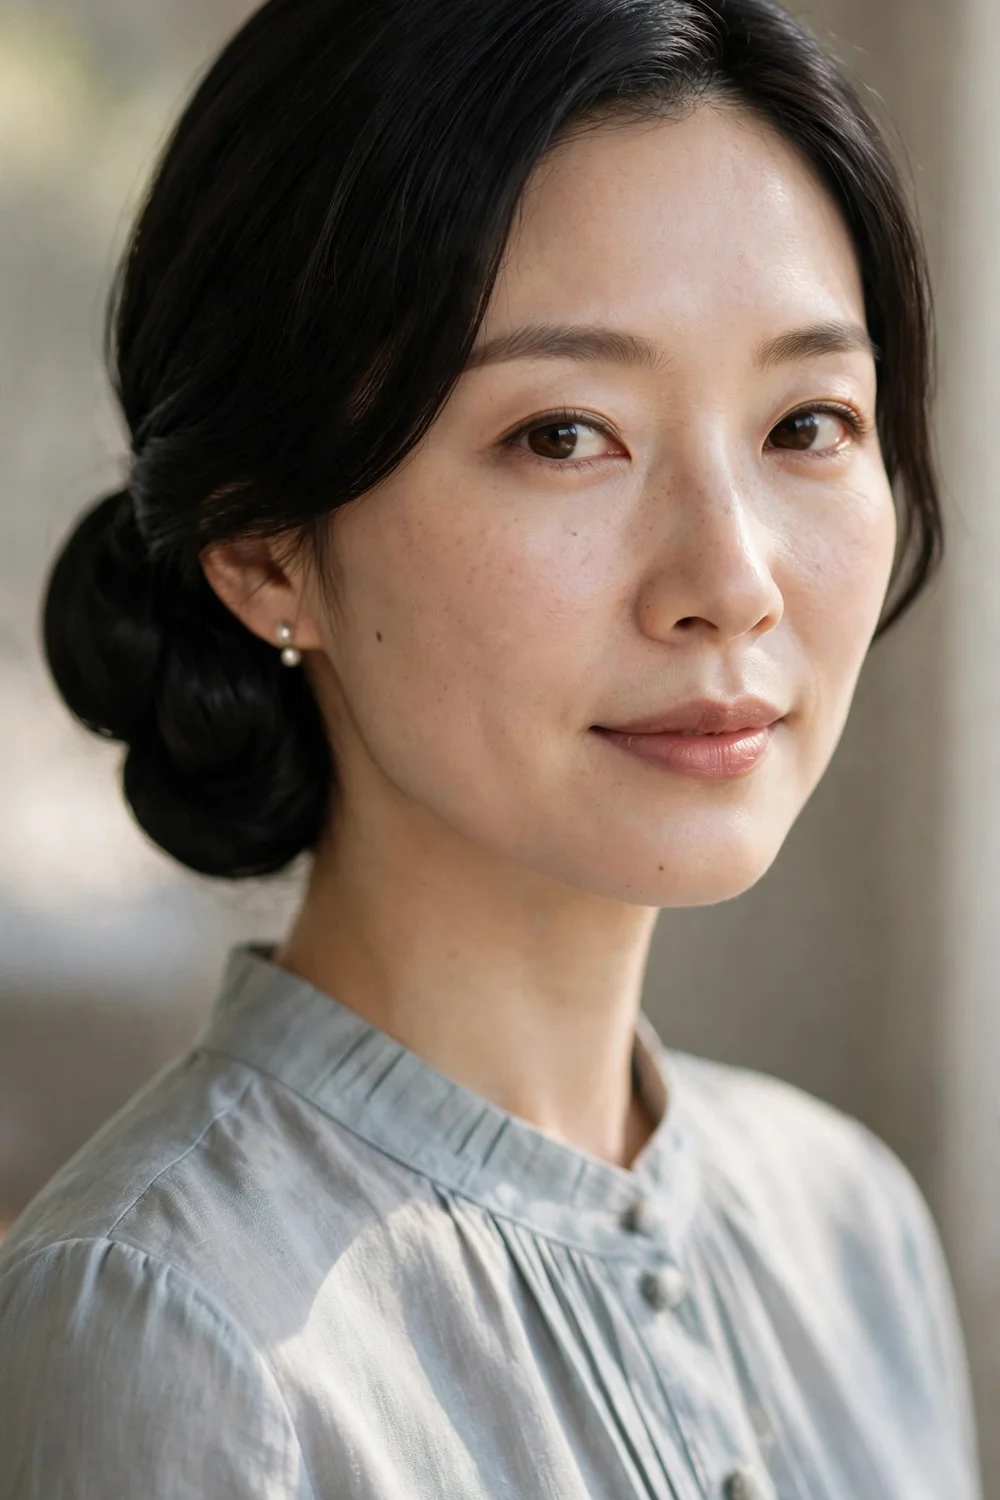
Gather chin-length or longer hair into a low ponytail at the nape, twist the tail around its own base to form a small coil, and pin it flat. Smooth flyaways with a pea-sized amount of gel and lock everything with firm-hold hairspray. The most common mistake is skipping the hairspray, which lets the coil loosen by midnight. This suits weddings and dinners. For extra security on silky hair, tease the ponytail lightly before twisting it into the coil.
Try this: cross two bobby pins in an X over each loose end for a stronger hold.
Difficulty: Easy | Cost: $0 to $5
3. Braided Ponytail
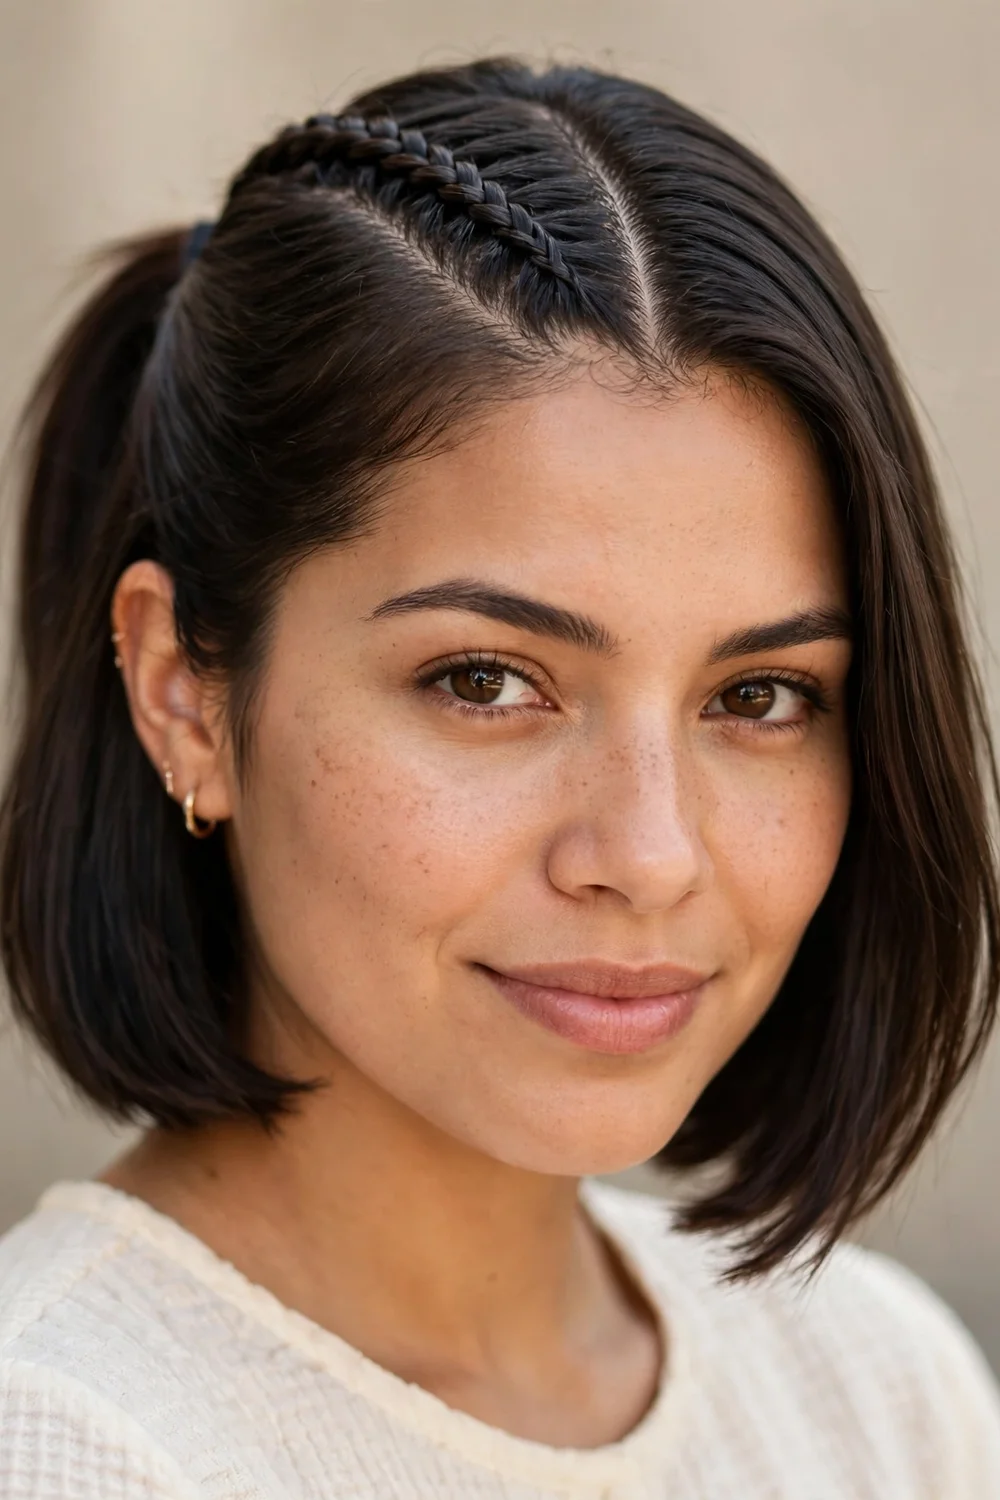
Braid a skinny accent braid down the center of the crown starting at the front hairline, then pull all the hair into a mid-height ponytail and fold the braid into it. The braid adds height and detail that a plain ponytail lacks. It works best on chin-length bobs with enough top length to braid. Keep the braid snug so it reads as one clean line. A small amount of styling cream smoothed over the finished braid keeps frizz down in humidity.
Try this: backcomb the crown lightly before braiding for extra lift.
Difficulty: Medium | Cost: $0
4. Fancy Side Ponytail
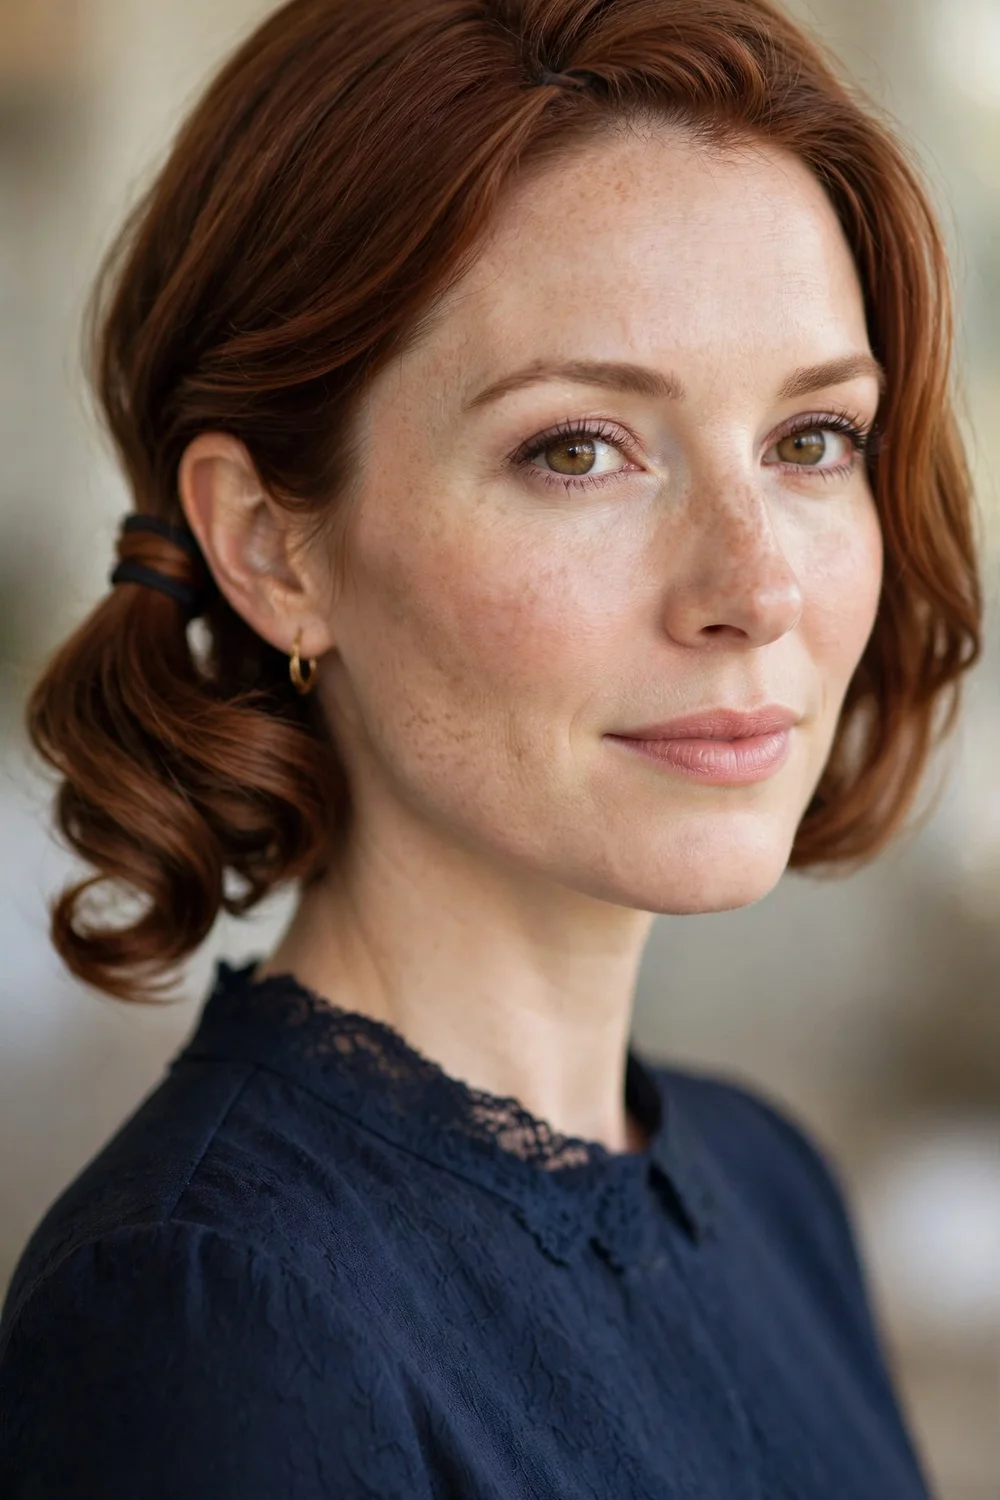
Sweep all the hair to one side and twist the top section once for texture. Secure it low behind the ear with a clear elastic, then wrap a strand of hair around the band and pin it underneath. Curl the tail with a curling iron for a party finish, and apply heat protectant before any hot tool touches your hair. The side placement shows off the neckline of an evening dress.
Try this: place the ponytail just behind the earlobe, not under it, so it shows in front-facing photos.
Difficulty: Easy | Cost: $0 to $5
5. Pixie Pompadour
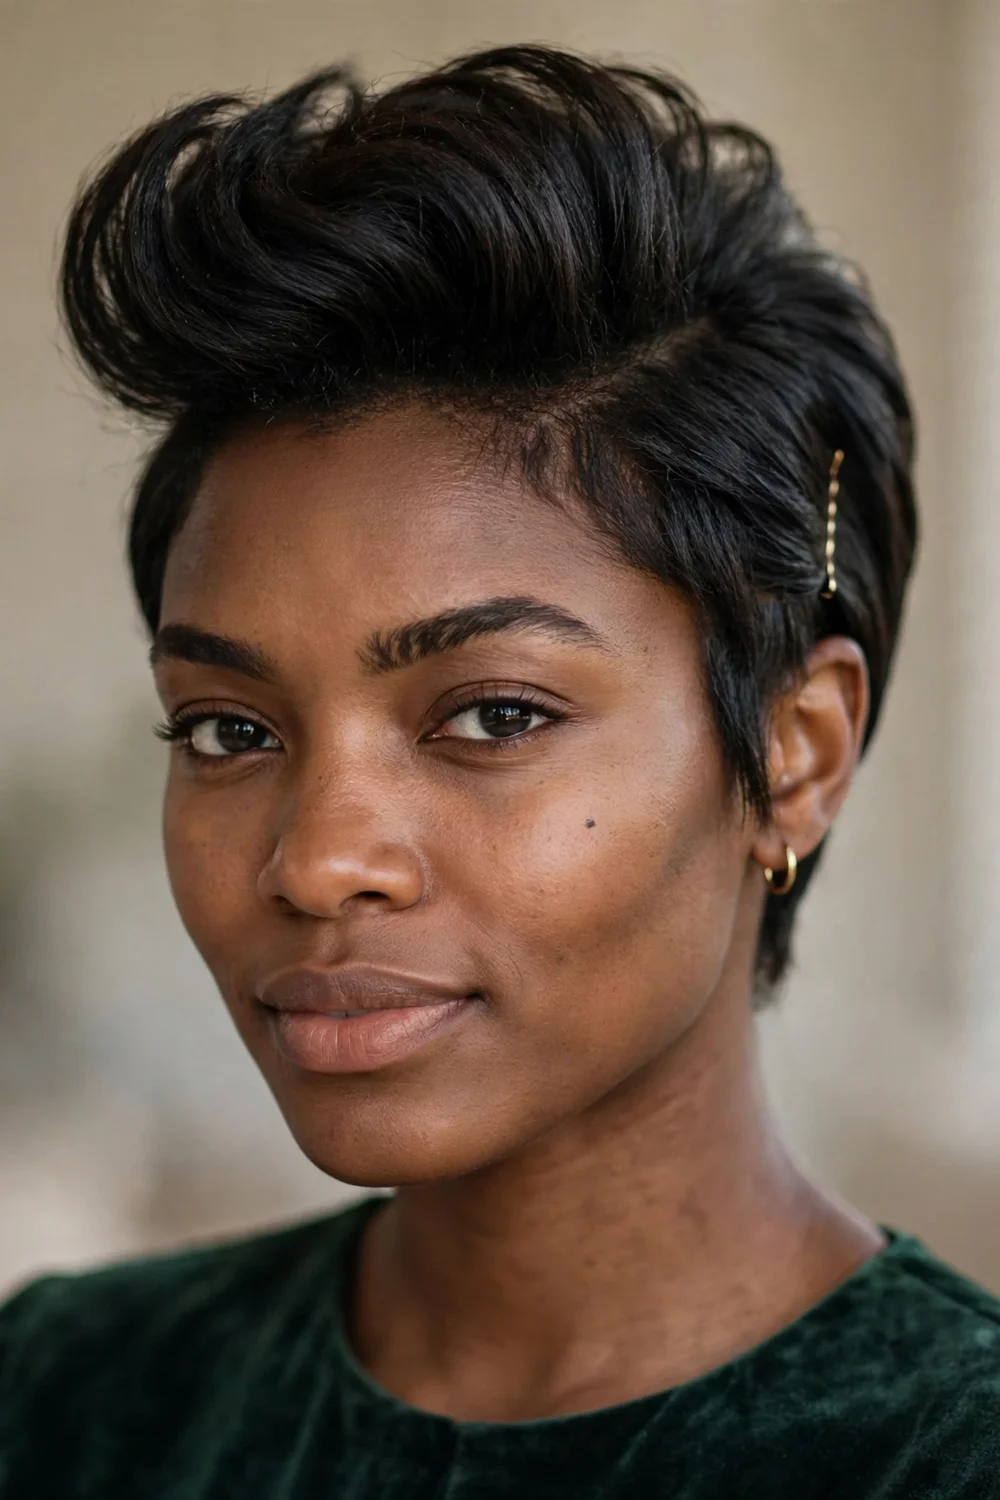
Backcomb the top and crown of a pixie with a fine-tooth comb, then smooth only the top layer back with a pea-sized amount of pomade. Push the front up and back for height, and pin the sides flat with two crossed bobby pins. The height balances round faces and catches light in photos. This is the most reliable dressed-up option for very short pixies. Finish with a firm-hold hairspray misted from 10 inches away so the height does not collapse.
Try this: work dry shampoo into the roots before backcombing so fine pixies get more grip.
Difficulty: Medium | Cost: $0 to $5
6. Double-Braided Bun
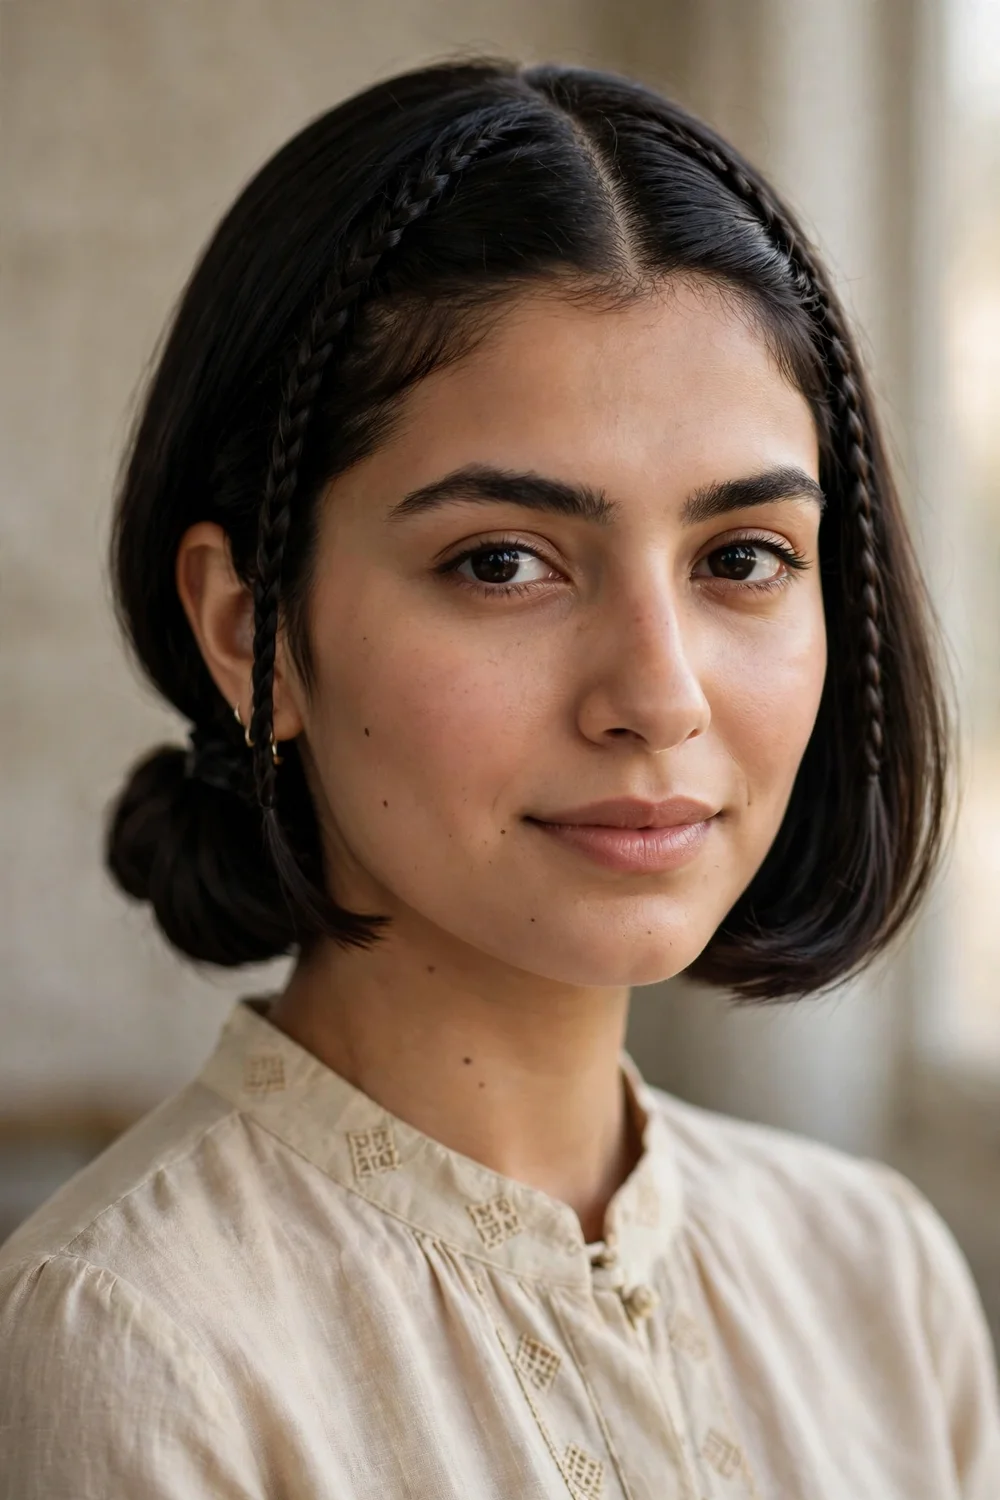
Part the hair down the middle and braid two skinny braids along each side toward the nape. Gather everything into a low mini bun and pin the braid ends into the bun. The symmetry looks tidy and formal from the front. This also tames cowlicks, since the braids pull both sides into the same direction. Keep the braids close to the scalp for a clean line. Tuck a few small crystal pins along the center part for a dressier finish at weddings.
Try this: stretch each braid gently after braiding to make it look thicker.
Difficulty: Medium | Cost: $0
7. Wet-Look Half Pony
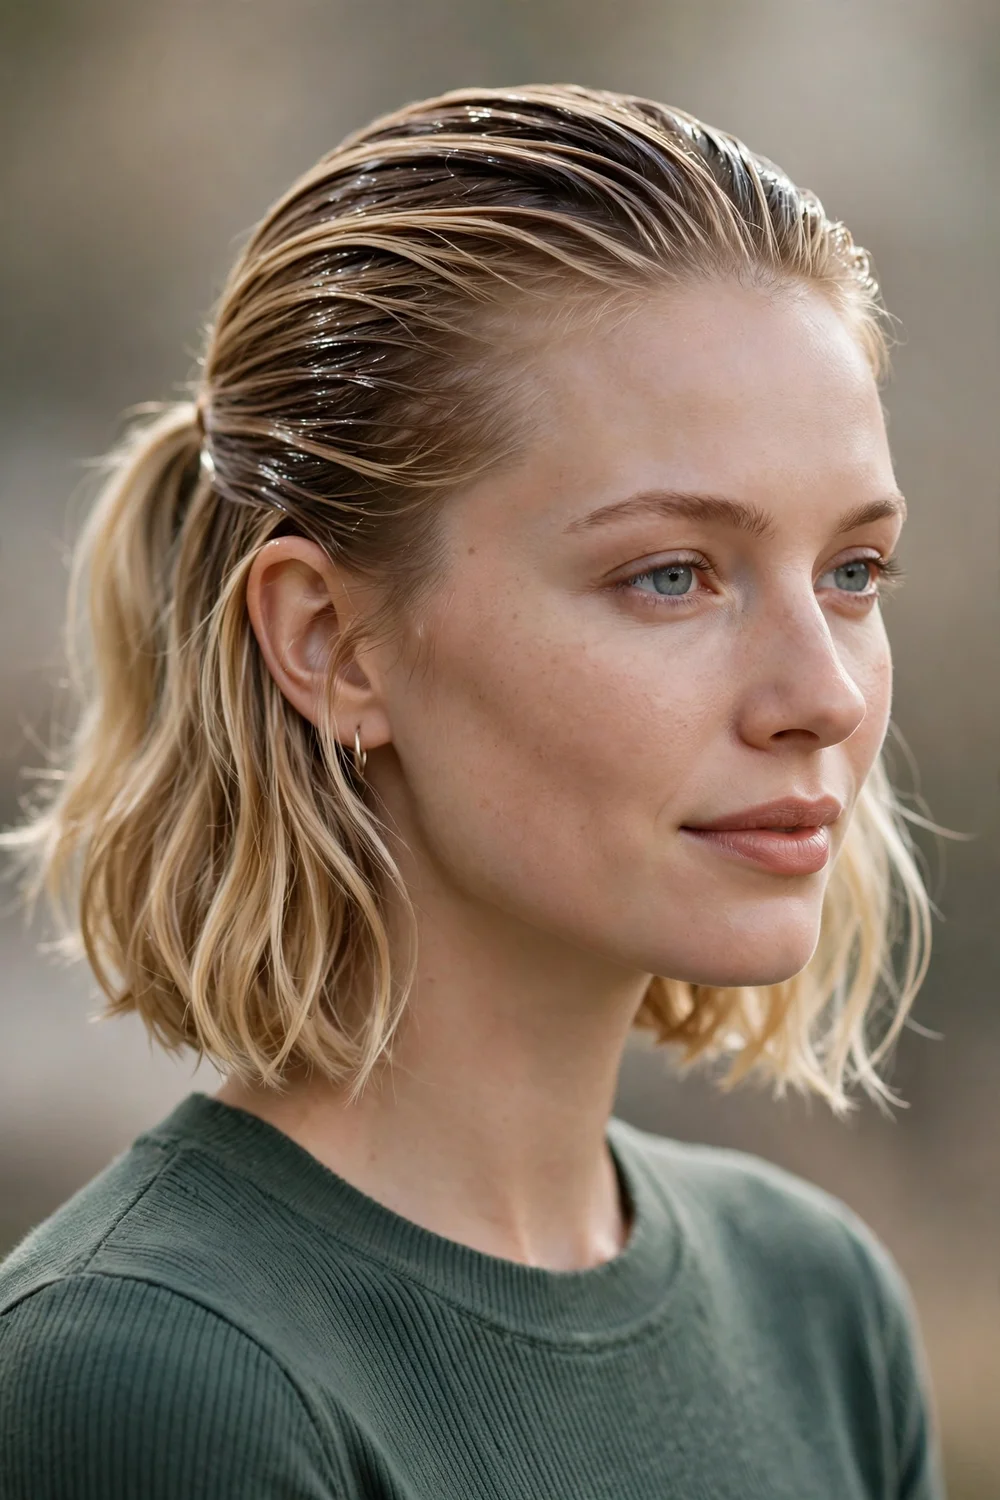
Rake a dime-sized amount of strong-hold gel through the top half of the hair with your fingers, pull that half into a small ponytail, and leave the bottom half loose and sleek. The glossy finish reads modern and editorial rather than casual. It suits bobs best and takes about 10 minutes. Avoid heavy gel on fine hair, since too much product weighs it down. Let the gel set for two minutes before touching the hair so the shine stays even.
Try this: run a fine-tooth comb over the gelled section once for a cleaner finish.
Difficulty: Easy | Cost: $0 to $5
8. Curly High Puff Ponytail

Gather natural curls into a high ponytail and let them fan out over the crown into a rounded puff. Smooth the edges with gel applied with a soft brush for a clean hairline. This works when hair reaches chin length or longer, and it defines curls for evening without any heat. The height gives the style its dressed-up feel. A satin scarf tied around the base covers the elastics and adds a retro touch.
Try this: tie the puff with two stacked elastics to lift it higher without pulling the hairline.
Difficulty: Easy | Cost: $0
9. Twisted Faux-Braid Half-Updo

Twist a section from each temple inward toward the back of the head and tie the two twists together. Add a second row of twists just below the first for a herringbone effect, then pin the tails. It reads like a braid without requiring real braiding skill. This suits chin-length hair and takes about 15 minutes. The rows of twists add texture that flat half-up styles lack. A decorative clip placed where the twists join hides the tie and adds sparkle.
Try this: alternate the twist direction between the two rows so the sections lock together.
Difficulty: Easy | Cost: $0
10. Inverted Rollup
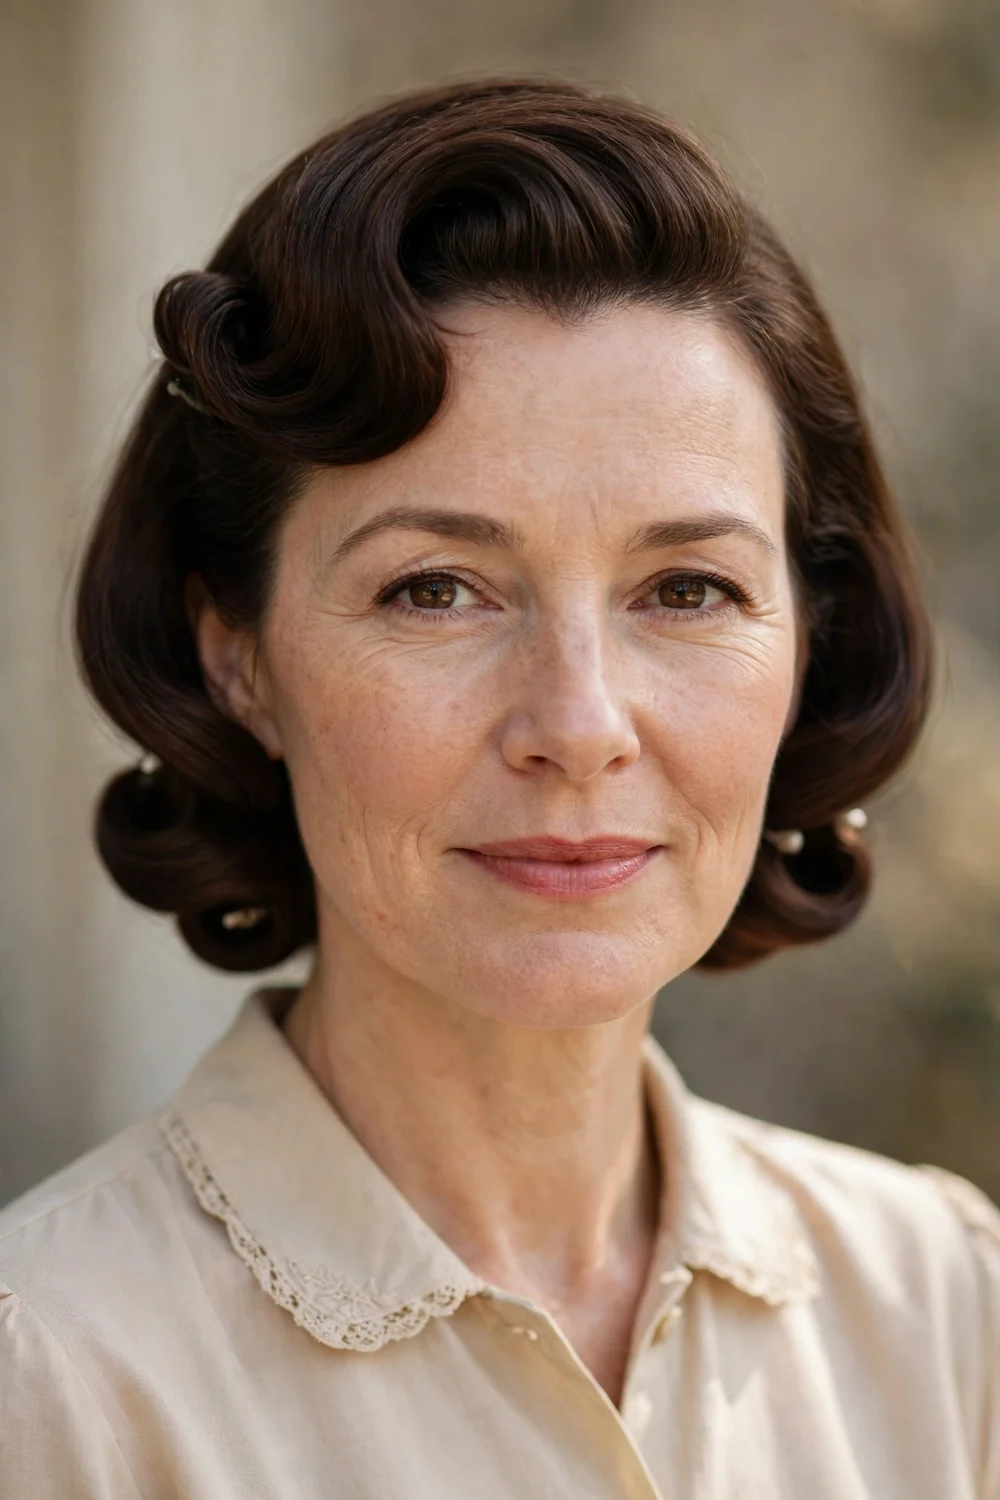
Flip the ends of a bob under and roll them upward toward the crown in one smooth motion, then pin the roll flat at the nape. The vintage flip shape suits retro-themed parties and 1950s-style events. Hair needs to reach the nape for the roll to form. Set the roll with firm-hold hairspray before and after pinning so it survives the evening. A deep side part before rolling gives the vintage shape more drama at the front.
Try this: roll over a thin foam roller for extra volume, then slide the roller out before pinning.
Difficulty: Medium | Cost: $0 to $5
11. Dimensional Loose Waves
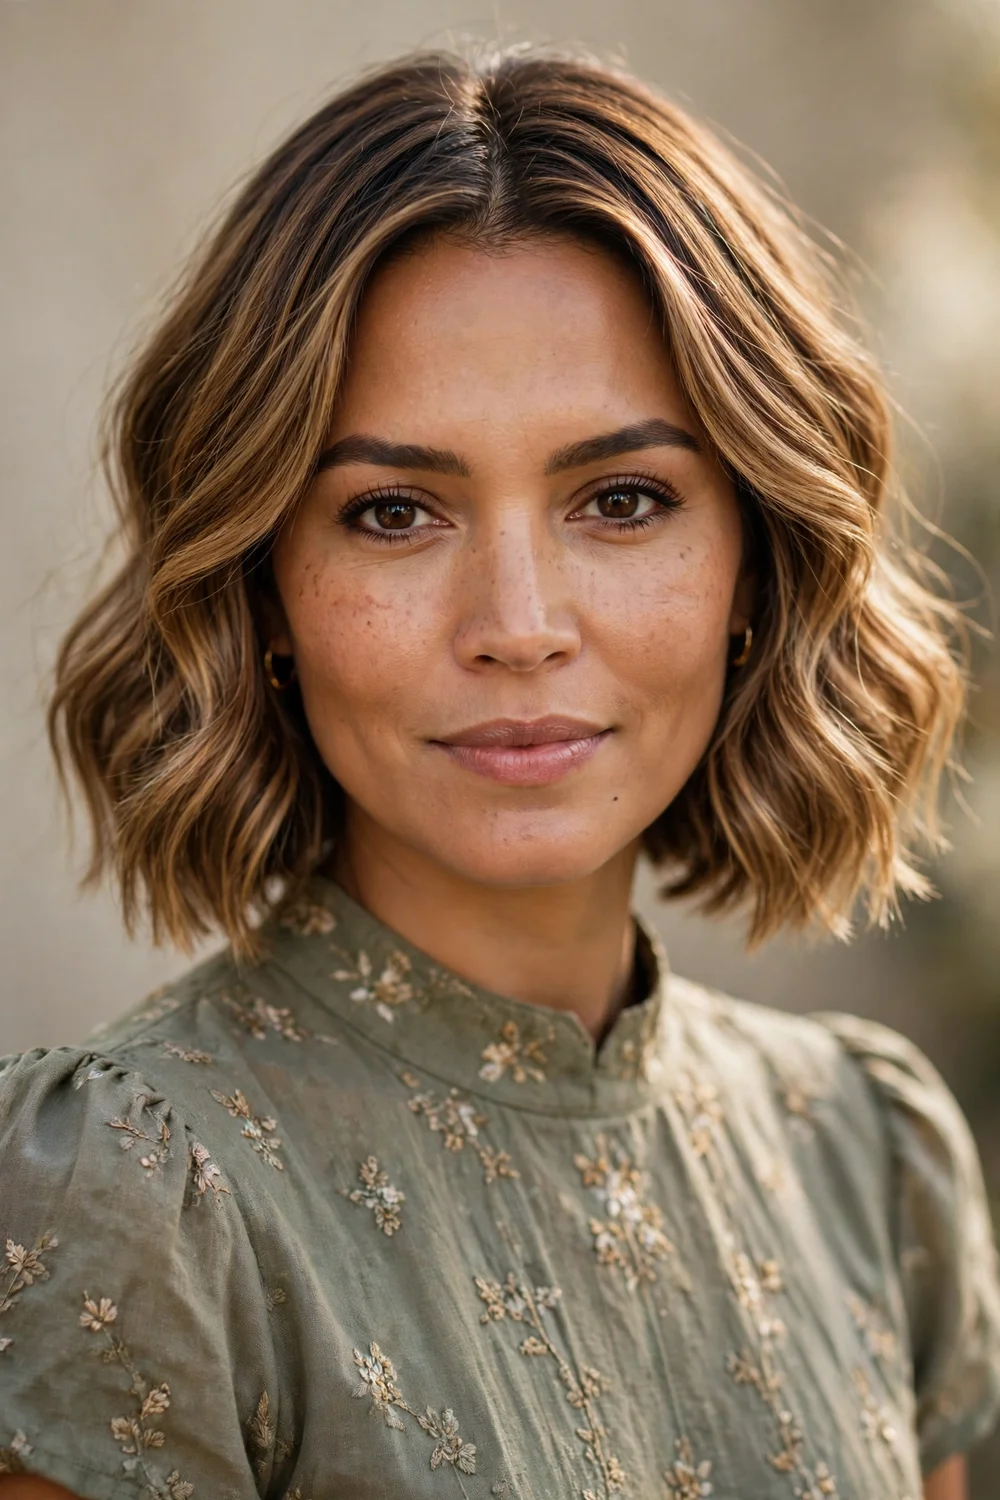
Curl sections with a 1-inch curling iron through the mid-lengths only, leaving the ends straight, then shake the waves out with your fingers for a loose finish. Always apply heat protectant before curling. Highlights or balayage show their dimension best in this shape, since the waves catch light at different angles. Hold each section on the iron for under 15 seconds to keep the waves soft. A light mist of shine spray over the finished waves makes the color dimension pop.
Try this: alternate the curl direction section by section for a fuller look.
Difficulty: Easy | Cost: $0
12. Messy Curled Chignon
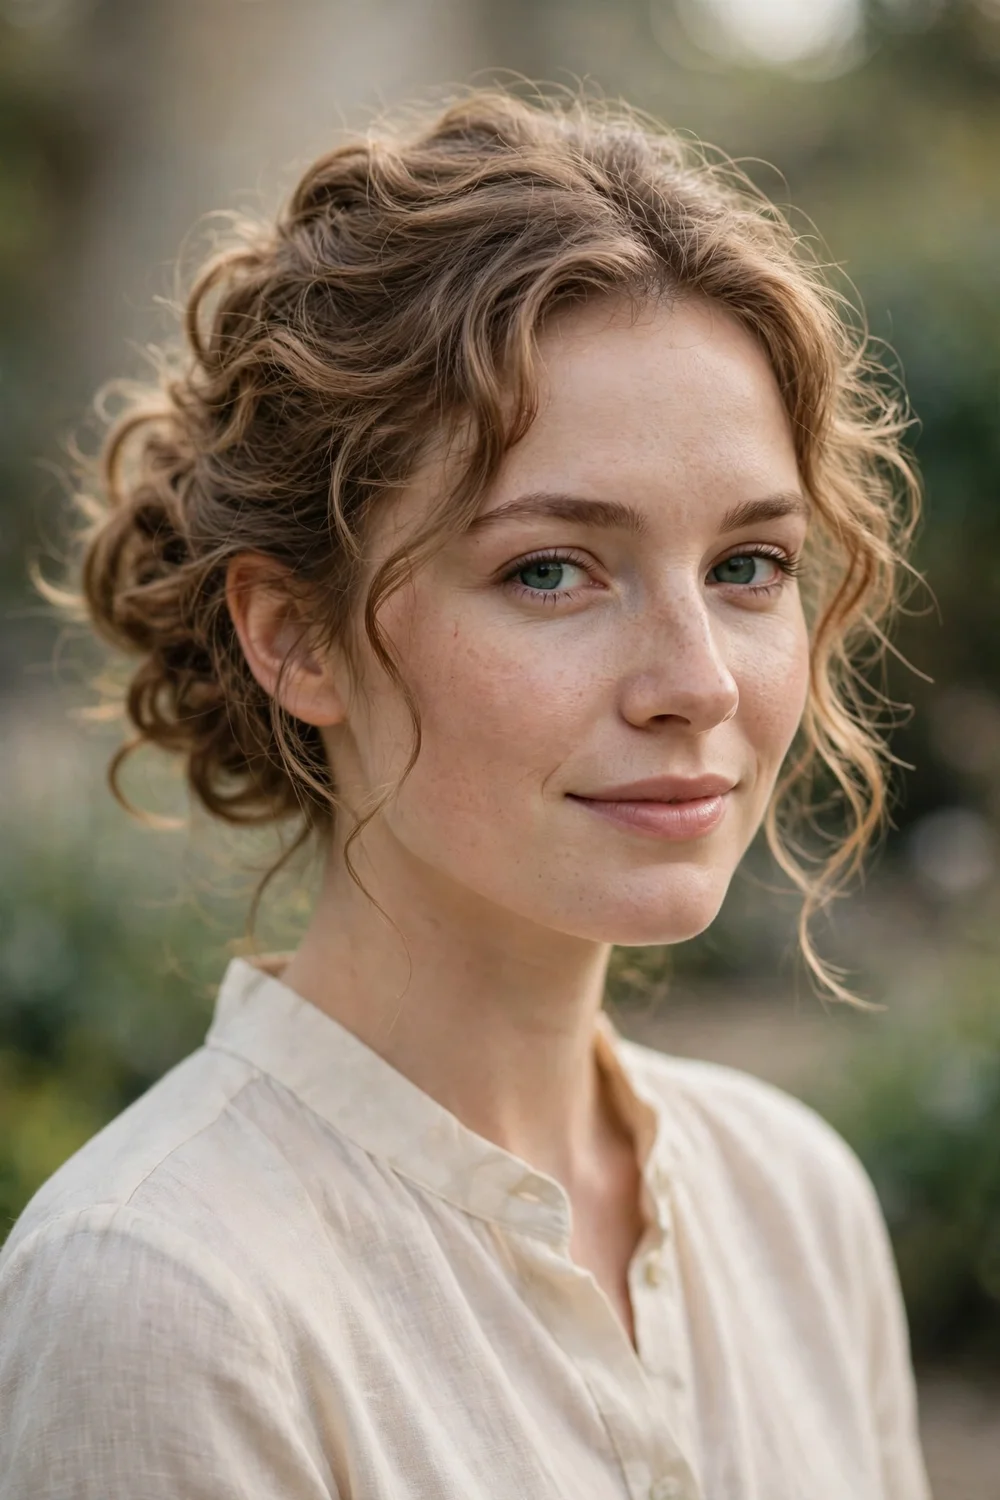
Curl the hair loosely, gather it into a low bun without pulling it smooth, and let short layers poke out naturally. Pin the bun casually rather than tightly. The undone texture suits outdoor weddings and garden parties. Pull two thin face-framing strands loose after pinning for softness. This takes about 15 minutes and hides uneven layers well. Leave the nape strands slightly looser than the crown for a naturally undone silhouette that suits outdoor light. Mist heat protectant through the hair before curling so the loose texture does not turn to frizz.
Try this: use a texturizing spray on the curls before pinning so the bun holds its messy shape.
Difficulty: Easy | Cost: $0
13. Half-Bun
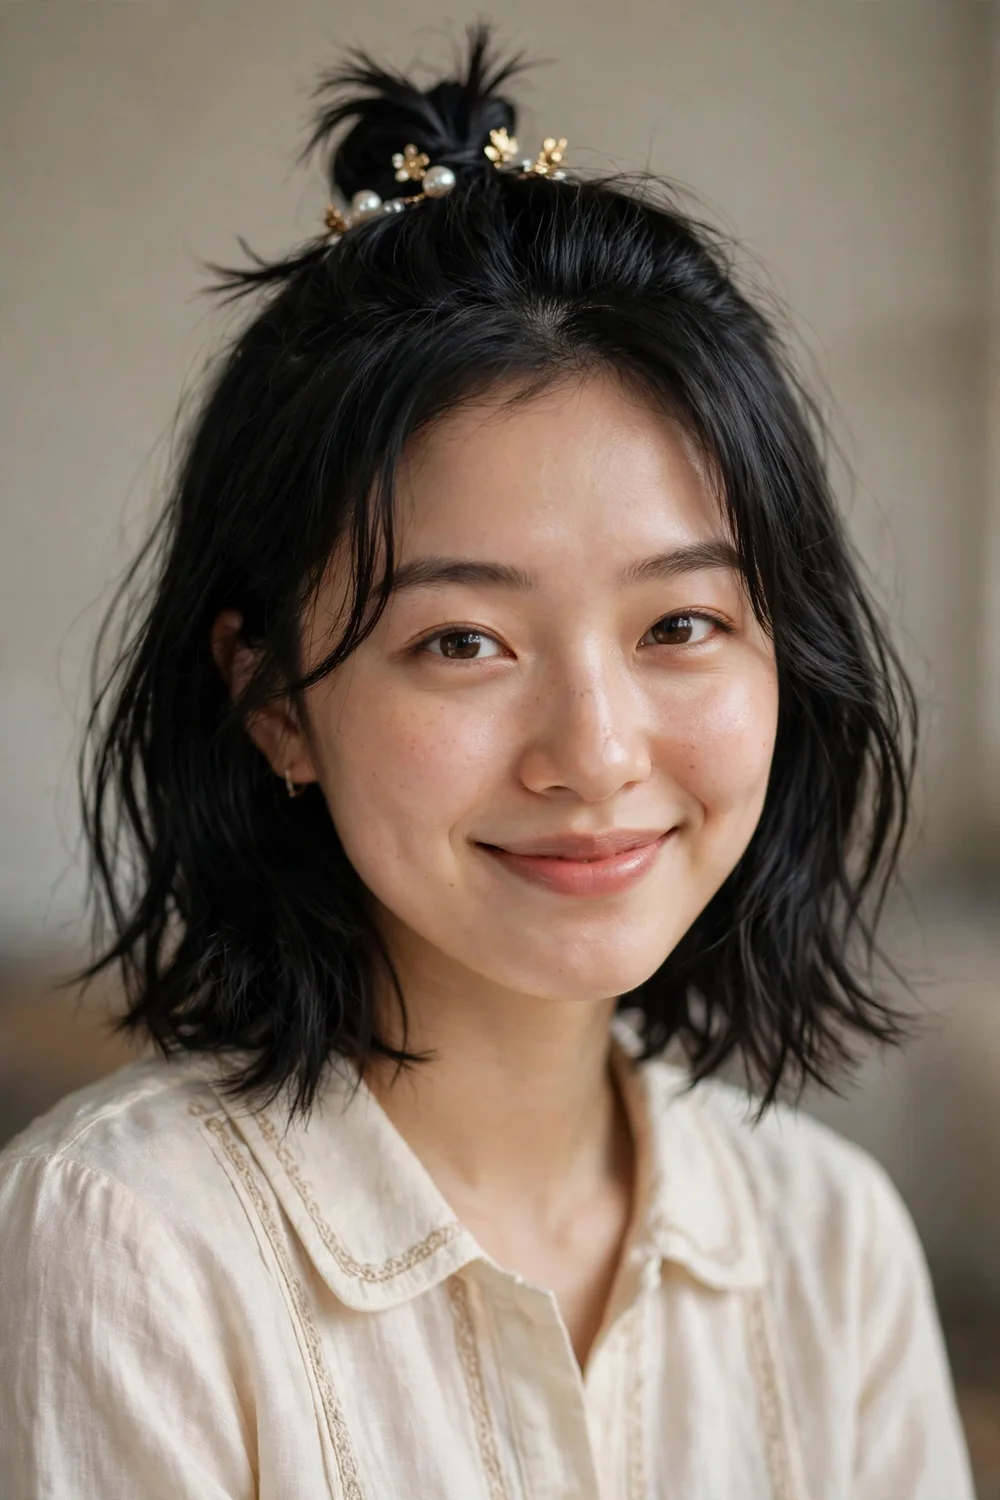
Gather the top half of the hair into a small bun at the crown and secure it with bobby pins instead of a visible elastic. Leave the rest down and add texture spray for grit. The look reads playful and party-ready rather than formal. Teasing the bun lightly before coiling makes it look bigger on thin hair. This takes about 10 minutes. Curl the loose bottom half with a wand first so the whole style has matching texture. Apply heat protectant first if you curl the bottom half with a wand.
Try this: tilt the bun slightly forward on the crown for a cuter silhouette in photos.
Difficulty: Easy | Cost: $0 to $5
14. Twisted Fringe
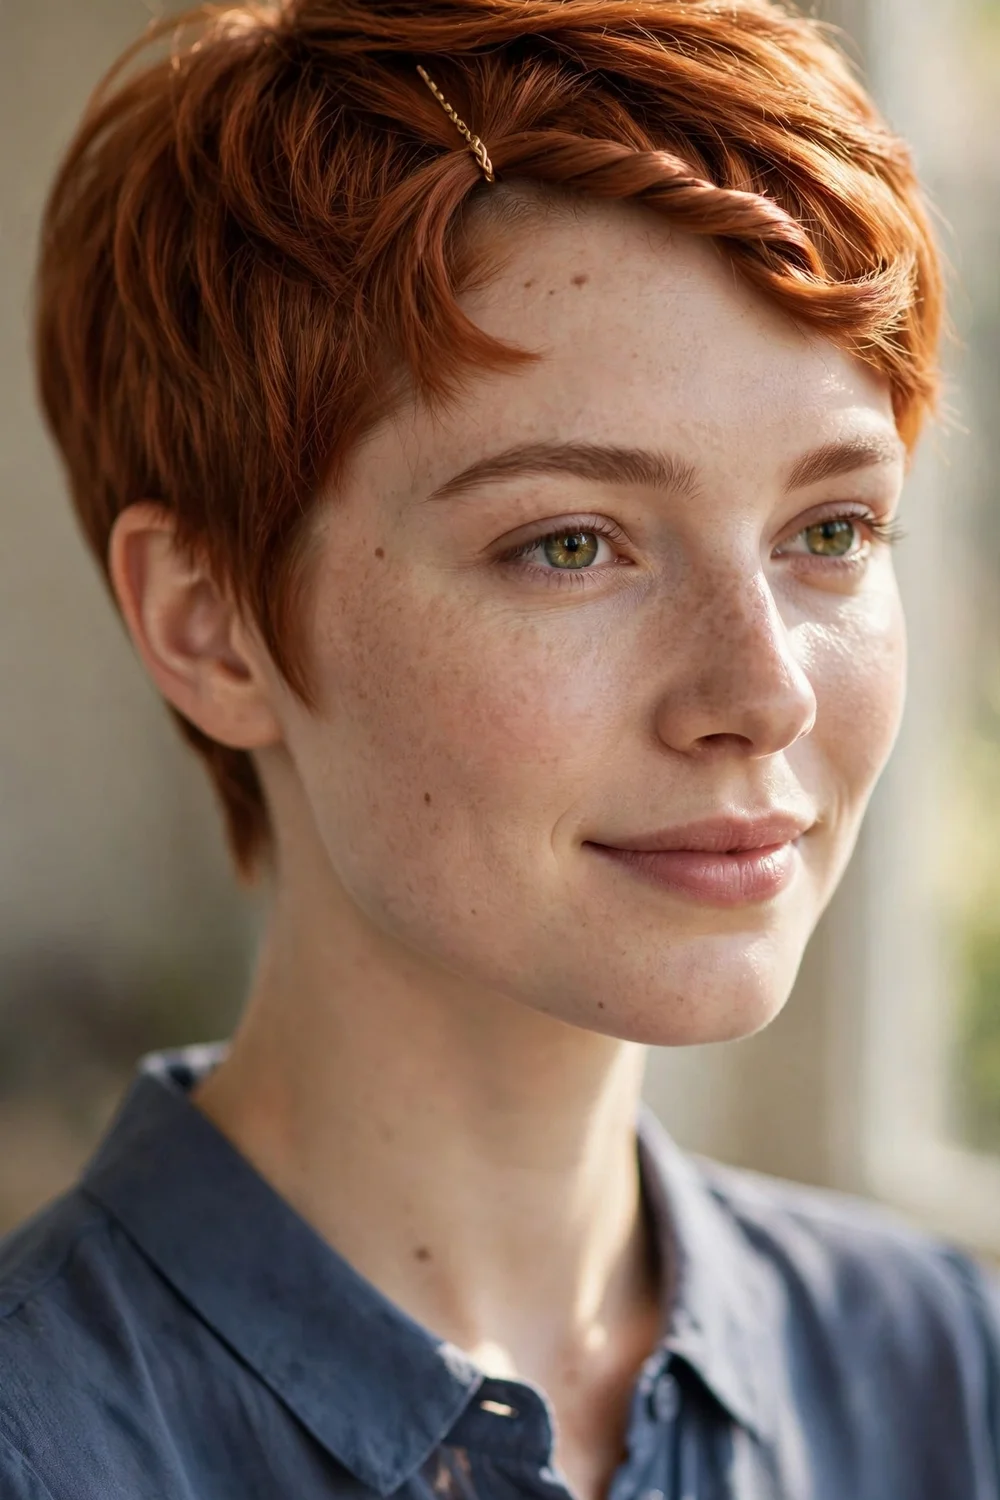
Twist the front section of a pixie or bob once or twice away from the face and pin it flat above the temple. This instantly updates grown-out bangs for an evening out and keeps hair off the forehead. For more ways to work bangs into dressed-up looks, see our guide to hairstyles for short hair with bangs. The whole style takes under 5 minutes.
Try this: mist the twist with hairspray before pinning so short layers stay tucked.
Difficulty: Easy | Cost: $0
15. Slicked Back
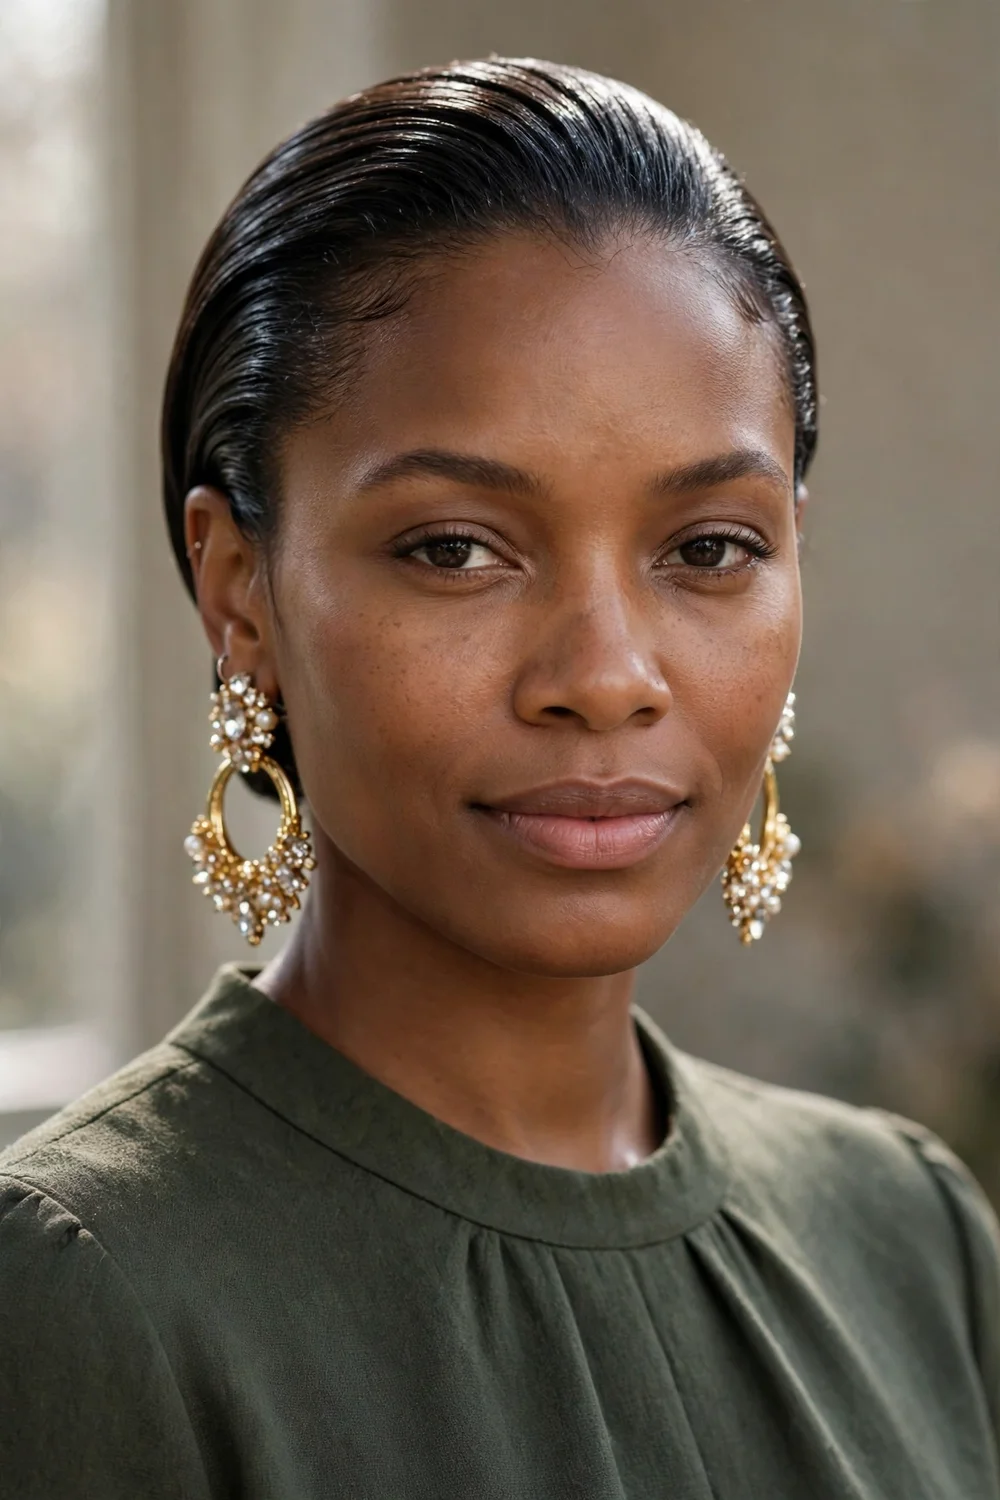
Comb a light gel through dry hair straight back from the forehead, smooth the sides behind the ears, and set everything with hairspray. The severe line shows off statement earrings and a strong jawline. This suits cocktail events and art openings. Use a light gel rather than a heavy one, since too much product makes short hair look wet instead of sleek. A center-part version with gelled sides tucked behind the ears looks sharp on oval faces.
Try this: use a boar-bristle brush for the smoothest finish before the gel sets.
Difficulty: Easy | Cost: $0 to $5
16. Pearl and Crystal Accents
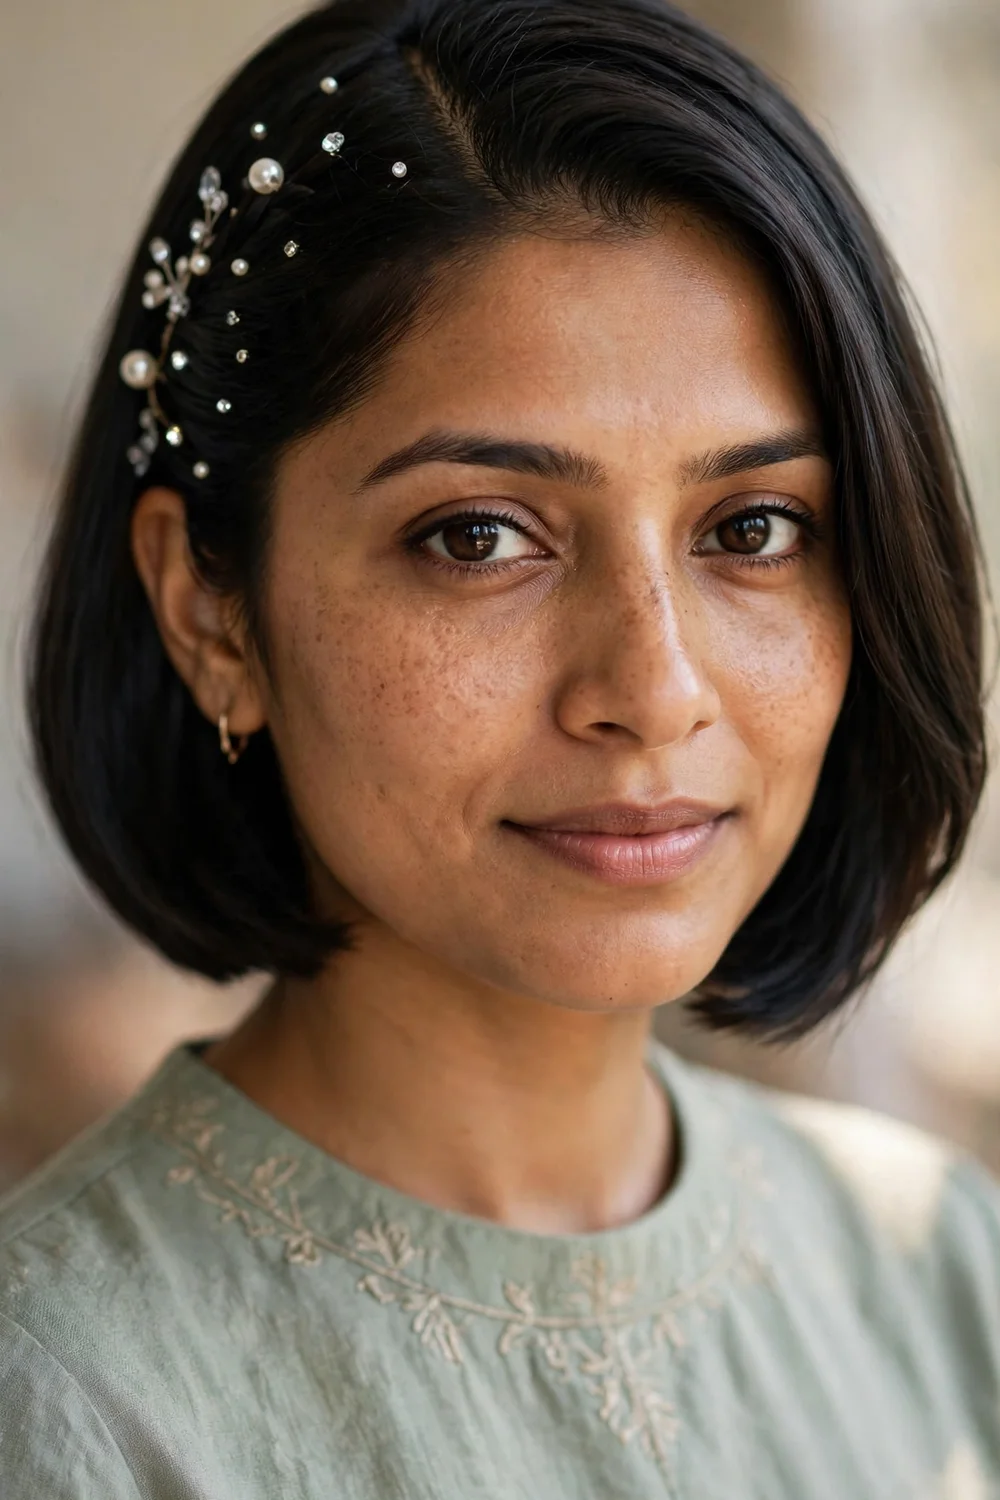
Style the hair simply, with a sleek bob or soft waves, then press small pearls or crystals along the part line or into a side twist. Stick them on with a tiny dot of eyelash glue, which washes out easily. The accessories provide most of the glam, so the base style can stay simple. This takes about 10 minutes plus placement time. Scatter a few tiny crystals near the temple for a design that catches light when you turn your head.
Try this: place three graduated sizes of pearls along one side for an asymmetrical design.
Difficulty: Easy | Cost: $5 to $12
17. Crown Braid with Mini Bun
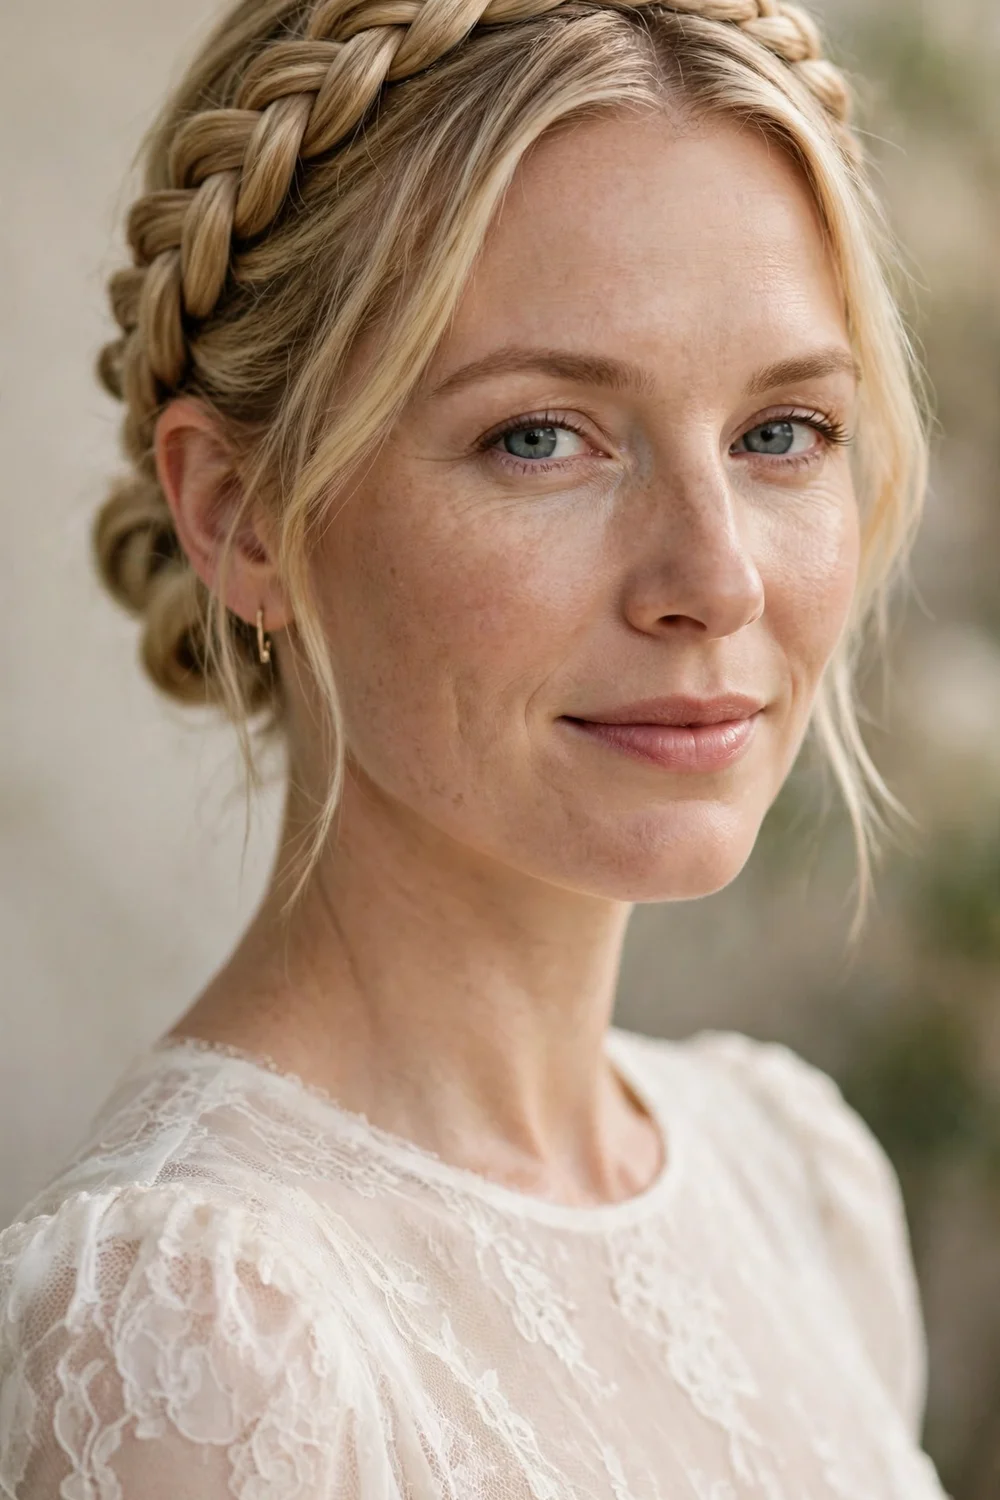
Braid a Dutch braid around the crown from one temple to the other, gathering hair as you go. Collect the remaining hair into a small bun at the nape and pin the braid tail into the bun. The result looks romantic and works for weddings. This needs chin-length hair and about 25 minutes. Pancaking the braid as you go widens it, which suits thinner hair. A light dusting of dry shampoo along the braid before an event keeps it from slipping.
Try this: start the braid behind one ear rather than at the hairline for a more comfortable fit.
Difficulty: Hard | Cost: $0 to $5
18. Twisted French Roll
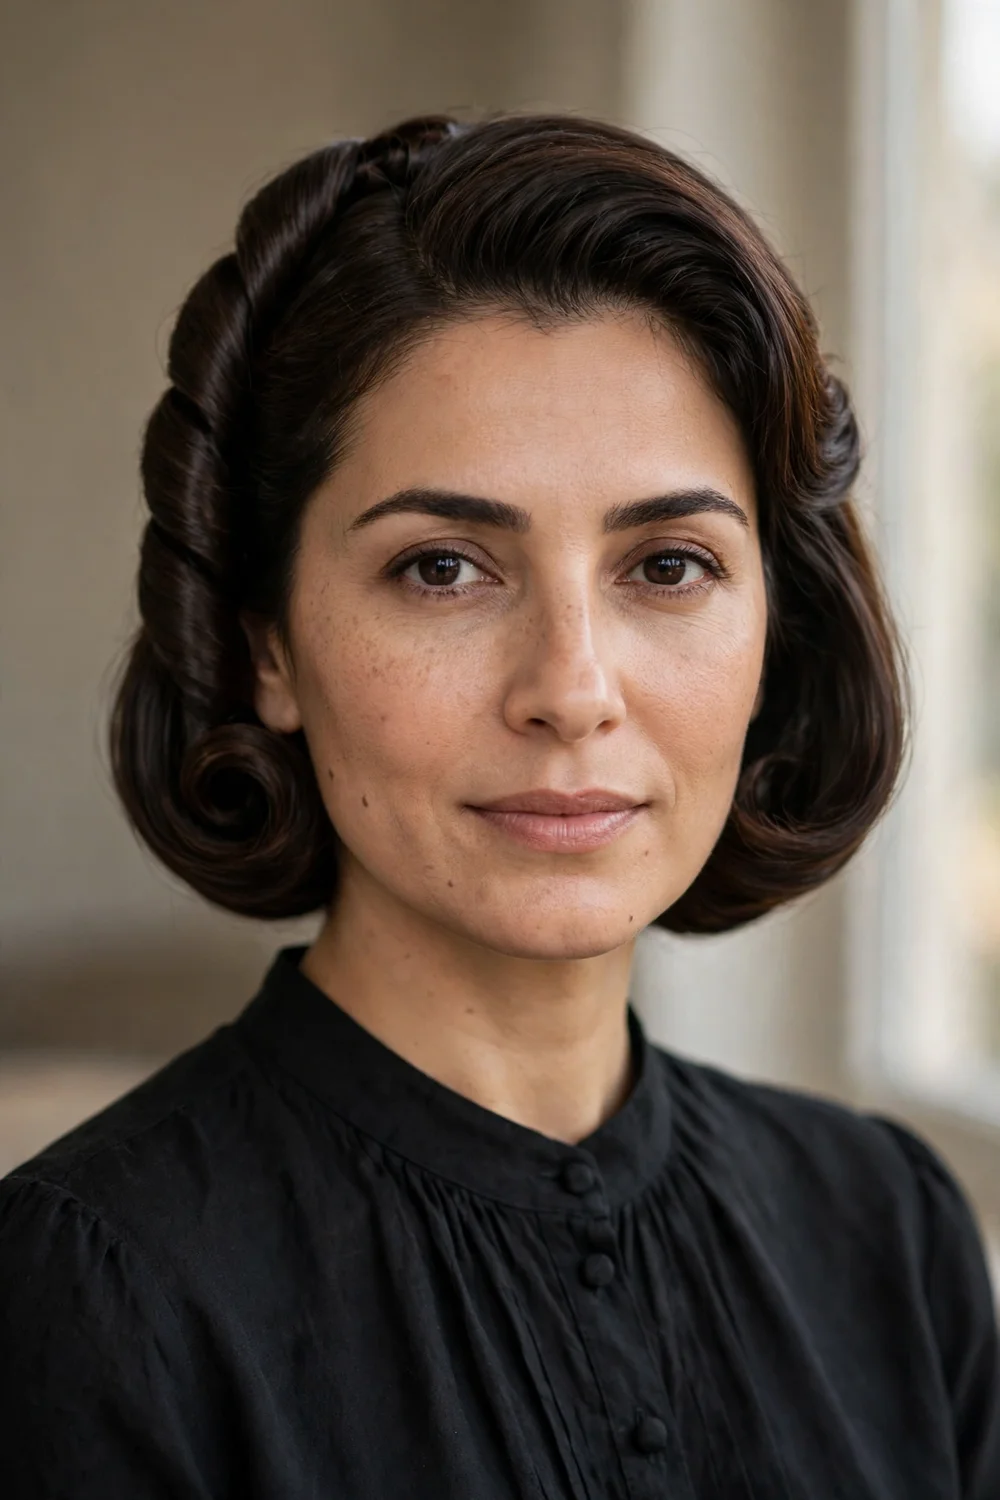
Gather the hair at the nape without a band, twist the tail upward into a vertical roll, and pin the roll against the head with the ends tucked inside. This is a true classic for black-tie events. It works on bobs that reach the nape. Insert the pins vertically along the roll’s seam, where they grip the hair best. Finish with firm-hold hairspray. Tuck a slim crystal comb into the side of the roll for black-tie polish.
Try this: backcomb the section before twisting if your hair is silky and slips out of pins.
Difficulty: Hard | Cost: $0 to $5
19. Side Bun with Braided Accents
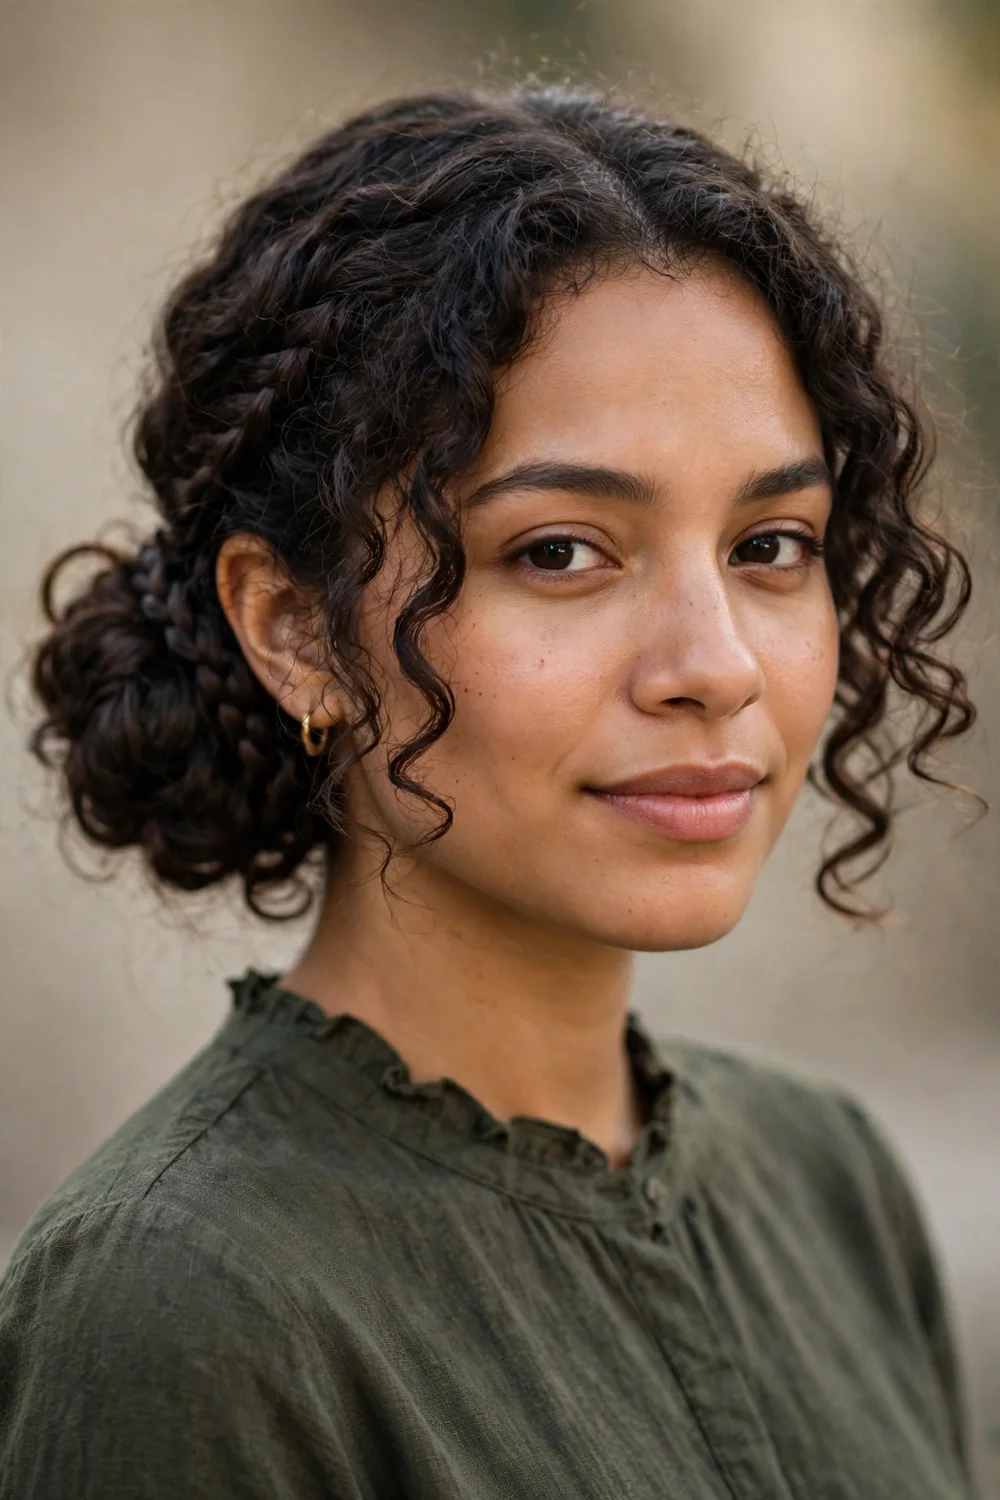
Curl the hair with a 3/4-inch iron for tighter curls that hold longer, applying heat protectant first. Sweep the curls into a low bun behind one ear and secure it with pins. Braid a thin accent braid from the front hairline, wrap it around the bun base, and tuck the end in. The braid ring hides pins and the elastic. This suits cocktail parties. A soft blush-toned scrunchie at the bun base adds color without showing elastic.
Try this: curl the front pieces away from the face so they frame it softly.
Difficulty: Medium | Cost: $0
20. Messy Top Knot
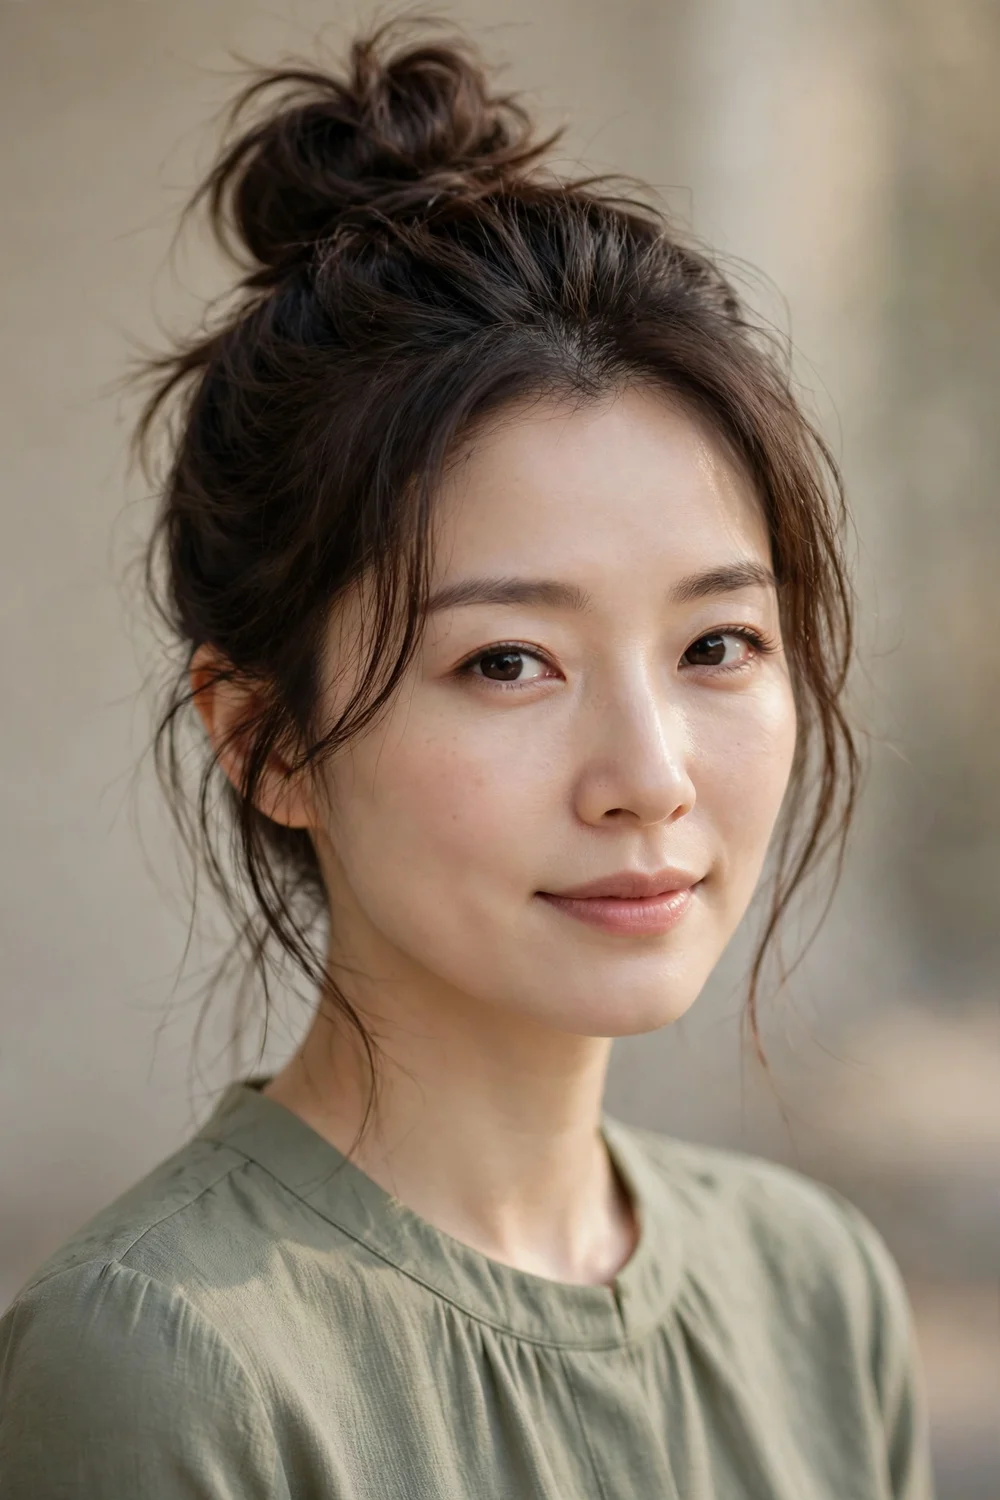
Pull the hair into a high ponytail, twist it into a loose knot, pin it in place, and pull out a few face-framing strands. The height draws the eye upward and visually lengthens the neck. If the hair is too short to coil, wrap it around a small hair donut first. This takes about 10 minutes and suits semi-formal parties. Add a crystal clip at the base for extra polish.
Try this: secure the ponytail base with two elastics stacked for a firmer foundation.
Difficulty: Easy | Cost: $0 to $10
21. Half-Up Crown Braid Ponytail
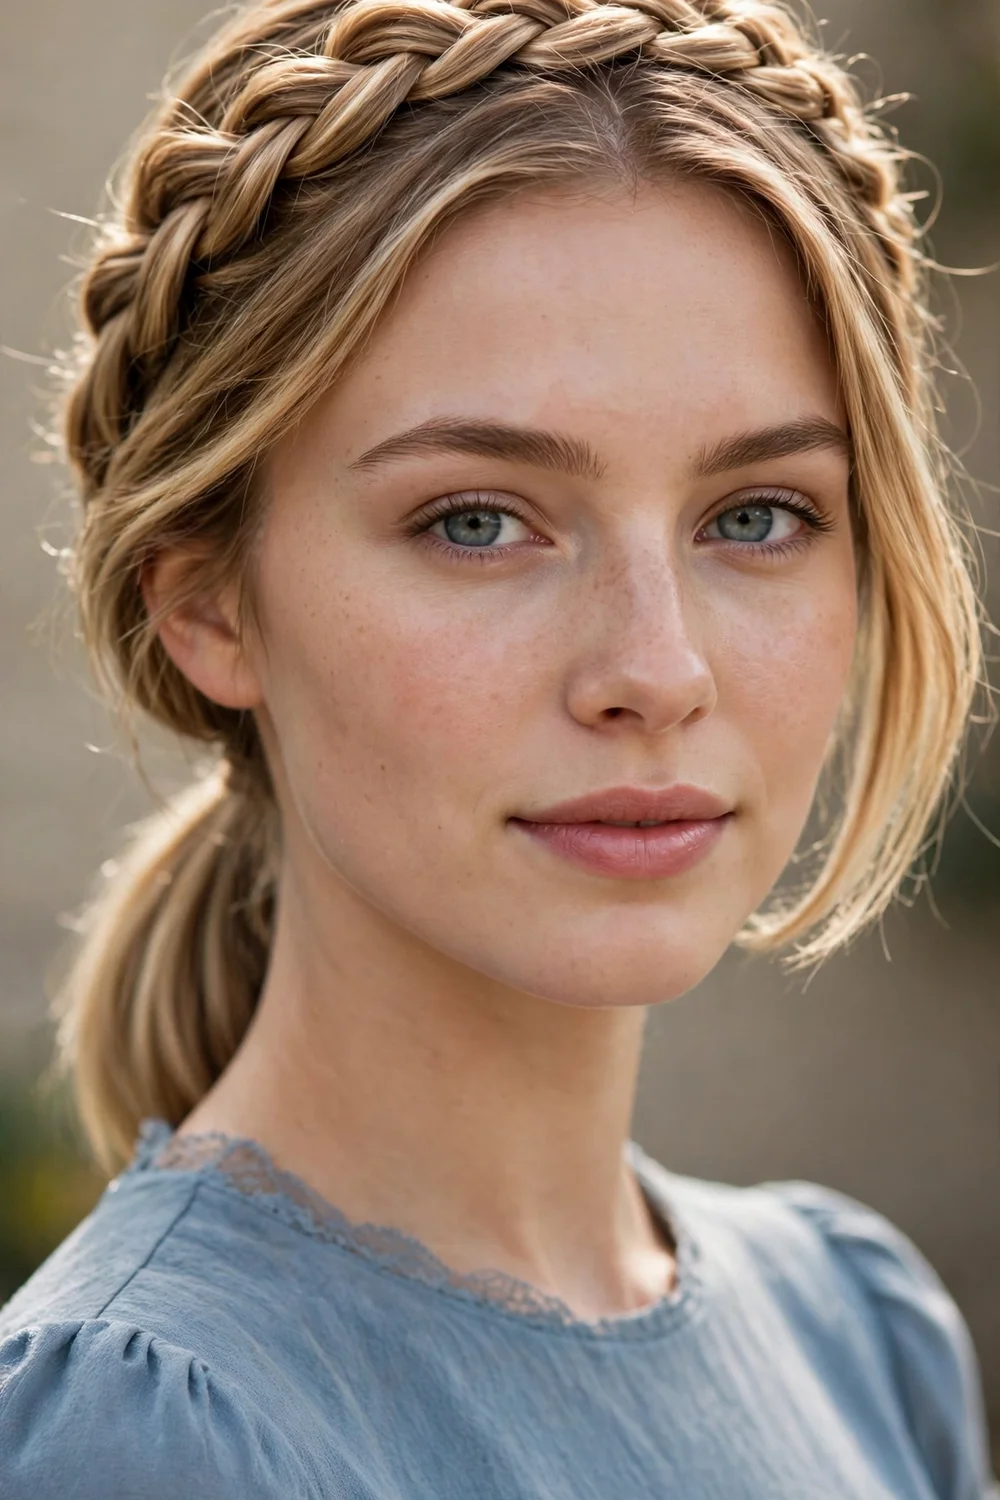
Braid the top section into a loose crown braid across the head, then gather all the hair into a sleek ponytail and smooth the tail straight. This blends formal braid detail with a simple silhouette. Keep the braid loose at the hairline to avoid tension headaches. It works on chin-length bobs and takes about 20 minutes. The style suits both proms and weddings. Curl the ponytail ends under with a large iron for a smooth, finished tail. Apply heat protectant before smoothing the ponytail tail with a straightener.
Try this: smooth a pea-sized amount of pomade over the ponytail tail for a polished finish.
Difficulty: Medium | Cost: $0
22. Half-Up French Twist with Waves
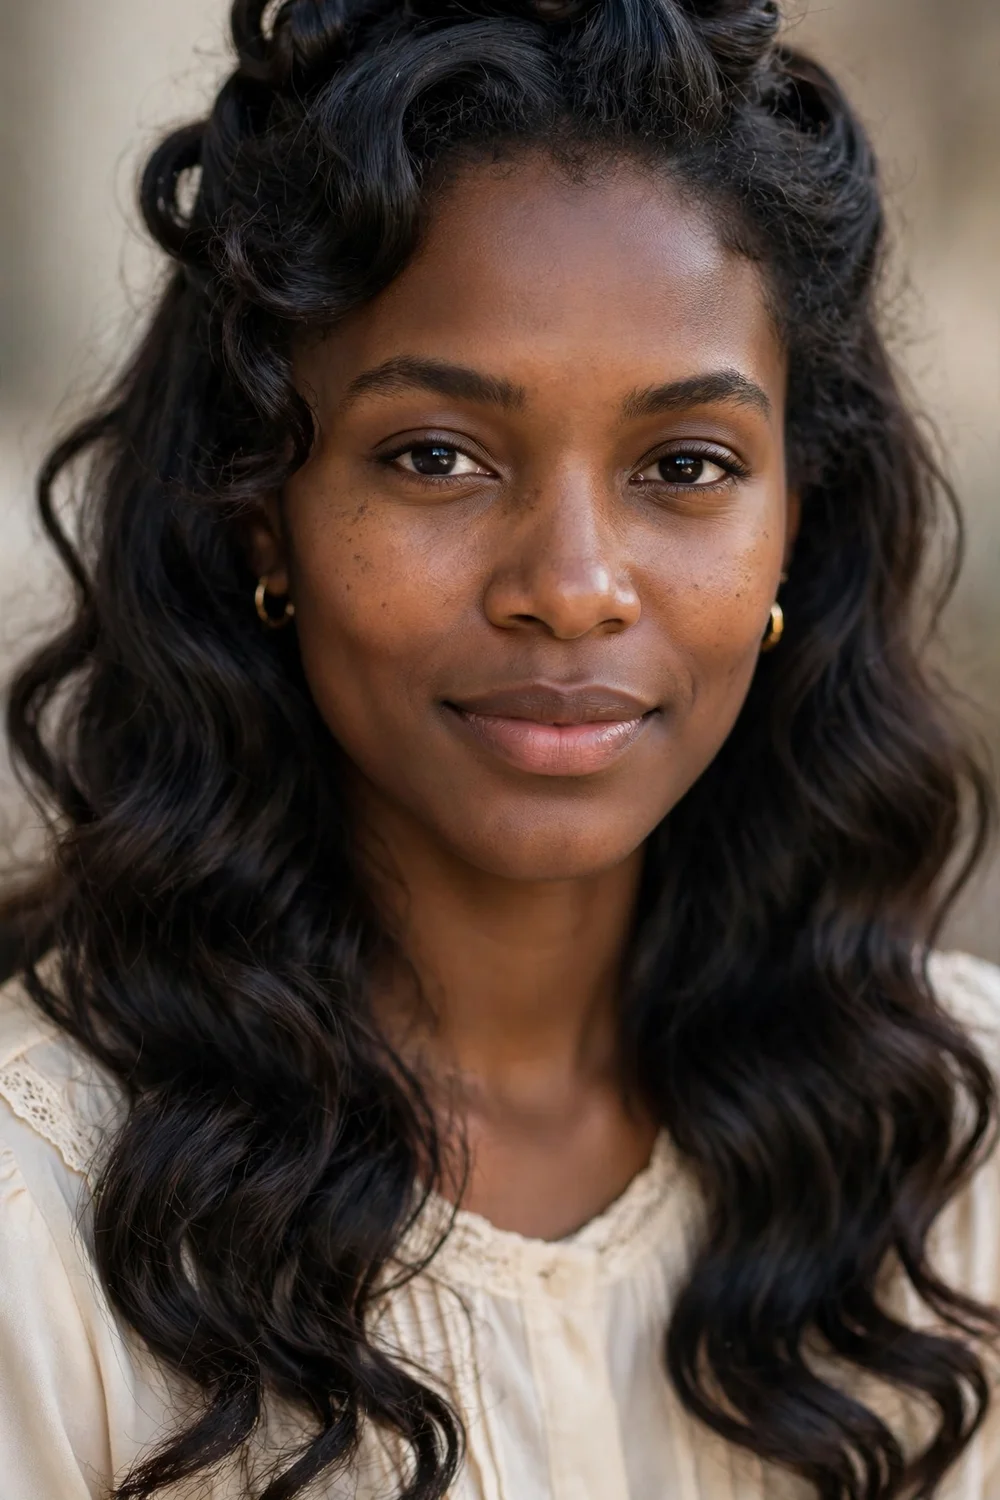
Create voluminous waves through the bottom half with a curling iron, applying heat protectant first. Gather the top half, twist it into a loose French twist, and pin it. Let the waves fall freely below the twist. The vintage combination suits themed parties and retro events. Setting the waves in pin curls for 15 minutes before twisting helps them last. Pin a small vintage brooch at the base of the twist for themed-event charm.
Try this: place the twist slightly off-center for a more modern feel.
Difficulty: Medium | Cost: $0 to $5
23. Classic Updo Curls
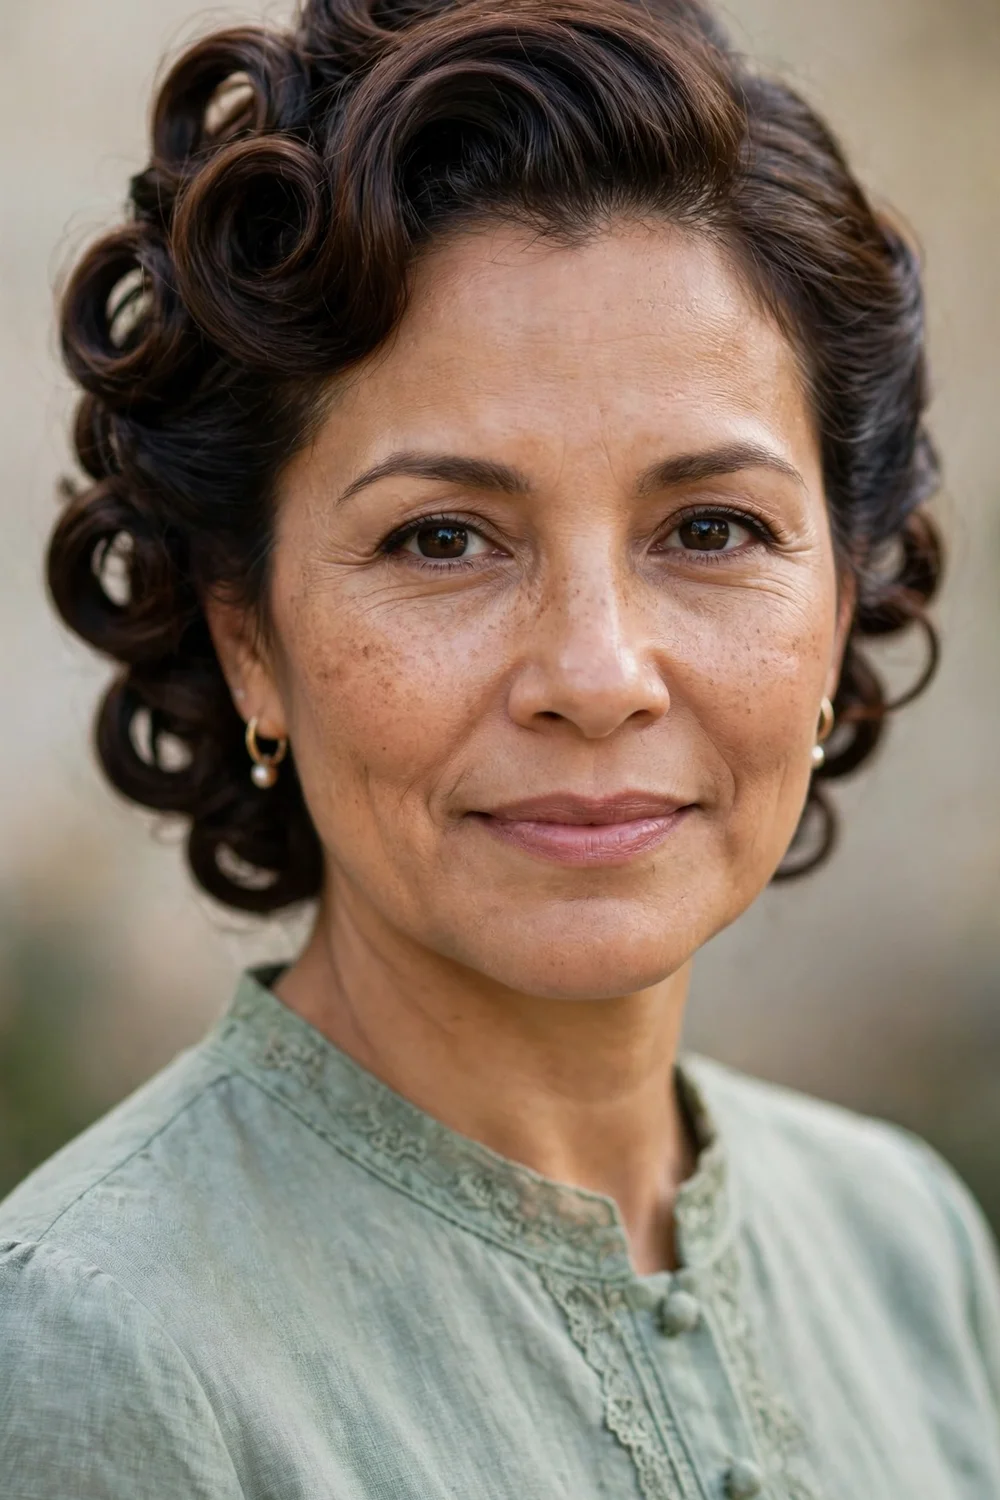
Curl the whole head lightly, then pin the curls at the back in overlapping sections to form a soft updo, tucking the ends under. Pin each curl in the direction it naturally falls to avoid fighting the shape. This timeless style suits proms and formal dances. Small accessories or fresh flowers pressed into the curls add a special touch. It takes about 25 minutes. Tuck tiny baby’s breath flowers between the curls for a wedding-ready finish. Apply heat protectant before curling so the pinned curls stay soft, not crisp.
Try this: let the curls cool completely before pinning so they hold their shape.
Difficulty: Medium | Cost: $0 to $5
24. Side-Swept Pinned Curls
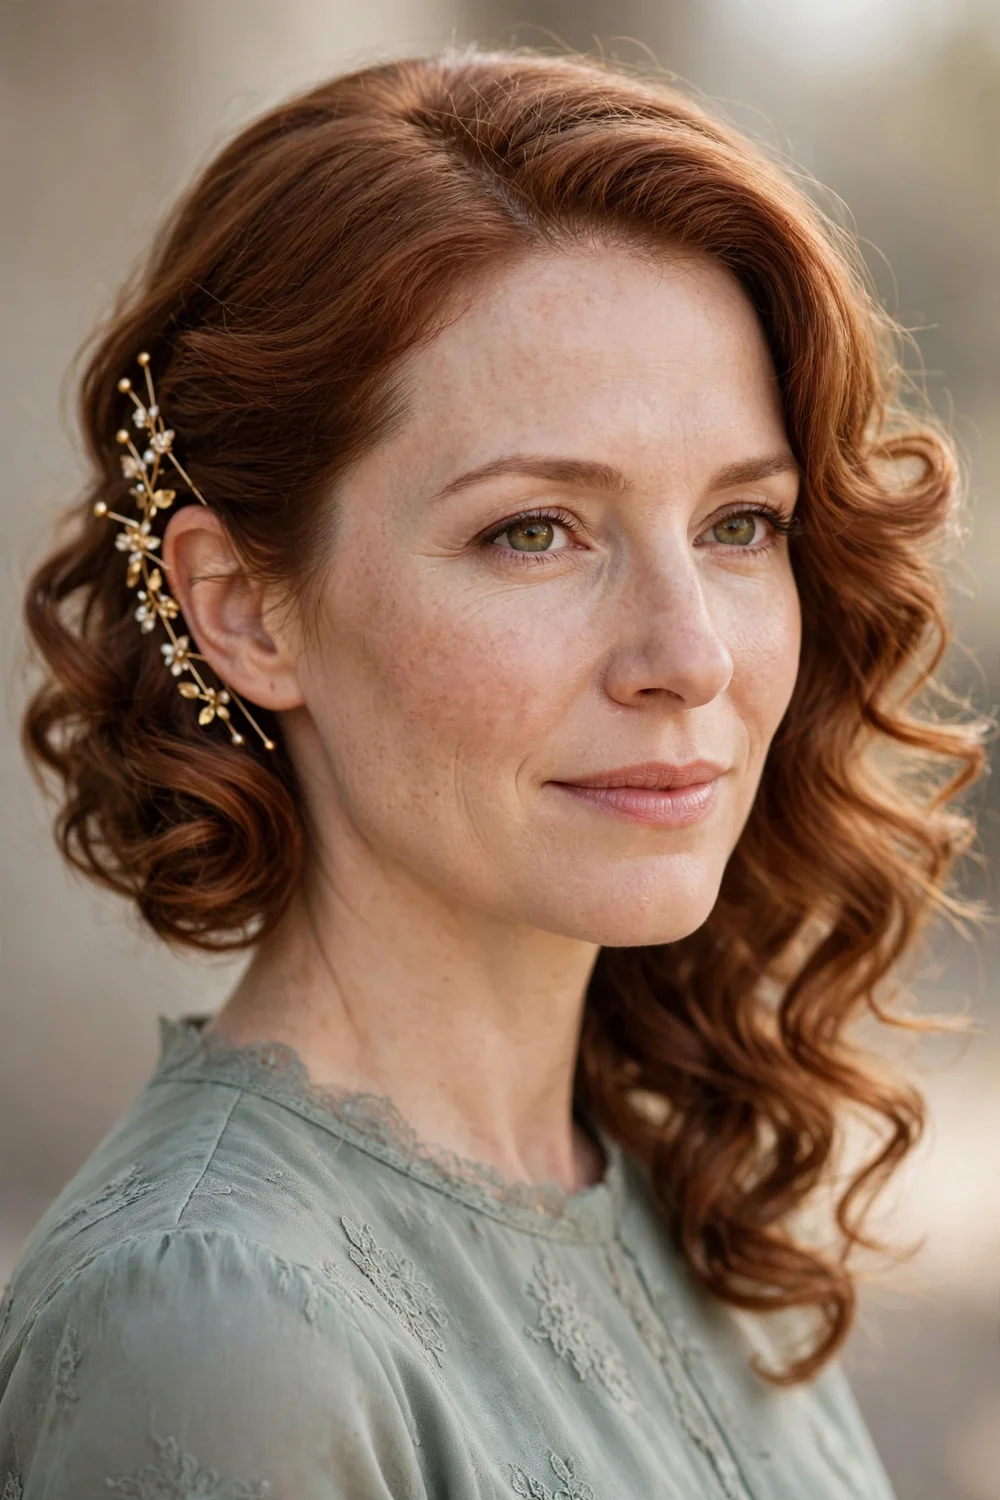
Curl the hair, sweep everything to one side, and pin the curls in a cascading line behind the opposite ear. The asymmetry shows off one earring and one side of the neckline. Use U-shaped hairpins instead of bobby pins for heavier sections, since they grip more hair. This suits one-shoulder dresses and takes about 20 minutes. A deep shine serum smoothed over the swept top adds polish to the asymmetrical shape and keeps frizz away in photos. Prep the hair with heat protectant before curling to keep the swept curls smooth and shiny.
Try this: sweep the hair to the side opposite your part for more volume at the roots.
Difficulty: Medium | Cost: $0 to $5
25. Twisted Elegant Updo
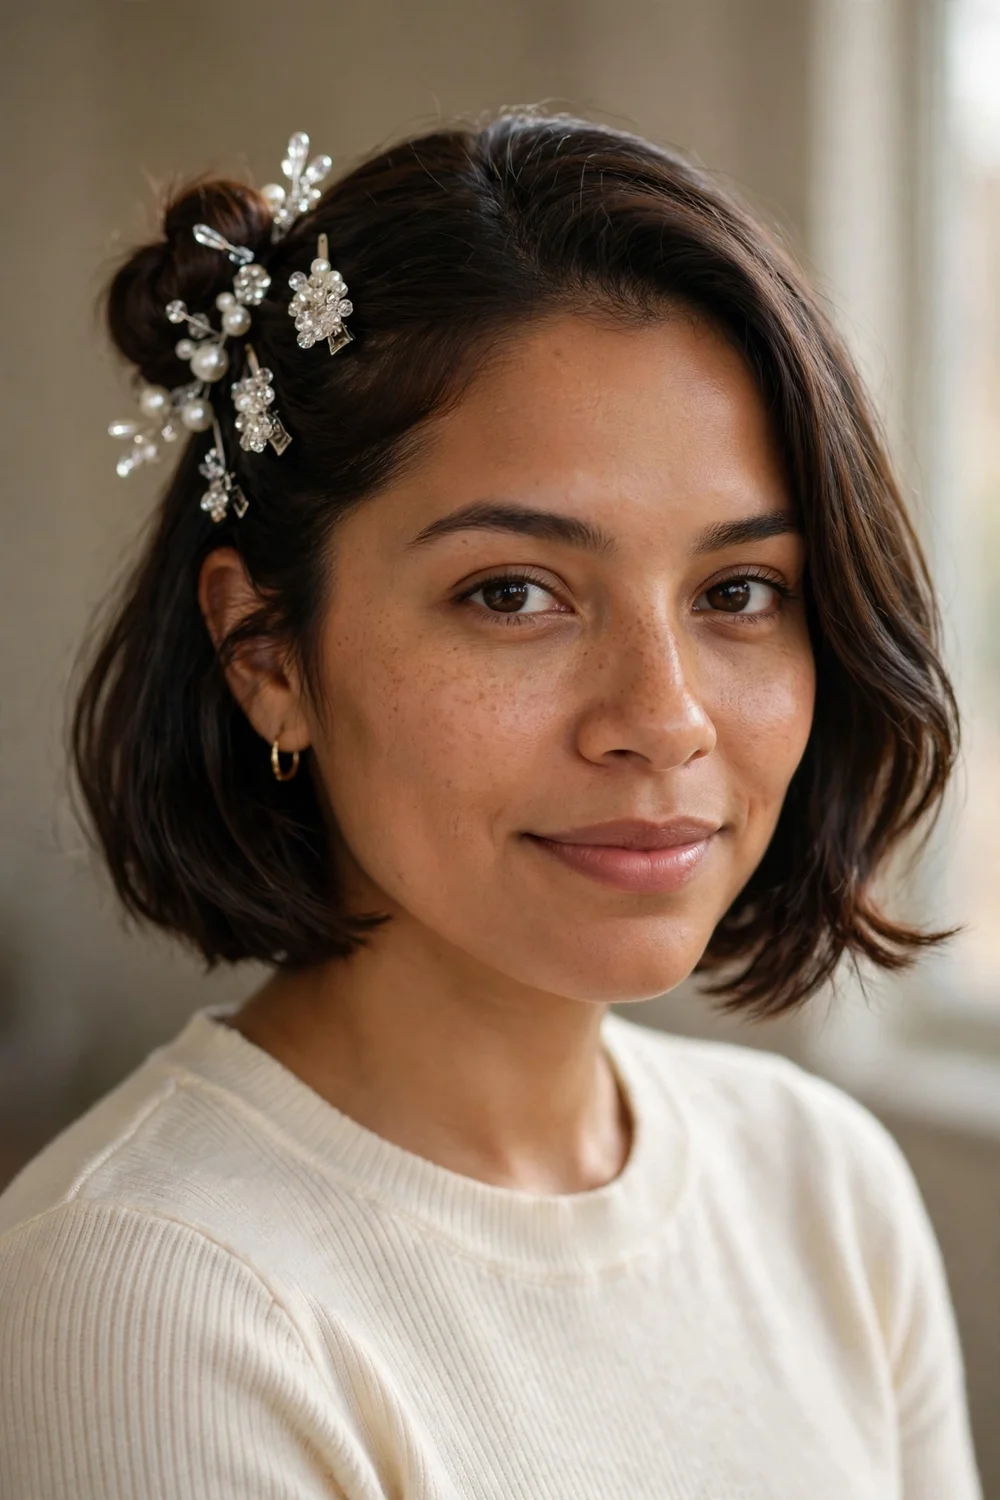
Divide the hair into small sections, twist each one, and pin the twists at the back in a neat pattern. Smooth the top layer for a tidy finish. The structured result suits ceremonies and formal dinners. Twist all sections in the same direction for a uniform rope pattern. This works on bobs and takes about 20 minutes. Curl the ends before twisting for extra volume. A row of small pearl pins along one twist adds quiet detail for ceremonies. Apply heat protectant first if you curl the ends before twisting.
Try this: apply a light mousse to each section before twisting for better hold.
Difficulty: Medium | Cost: $0
26. Vintage Hollywood Curls
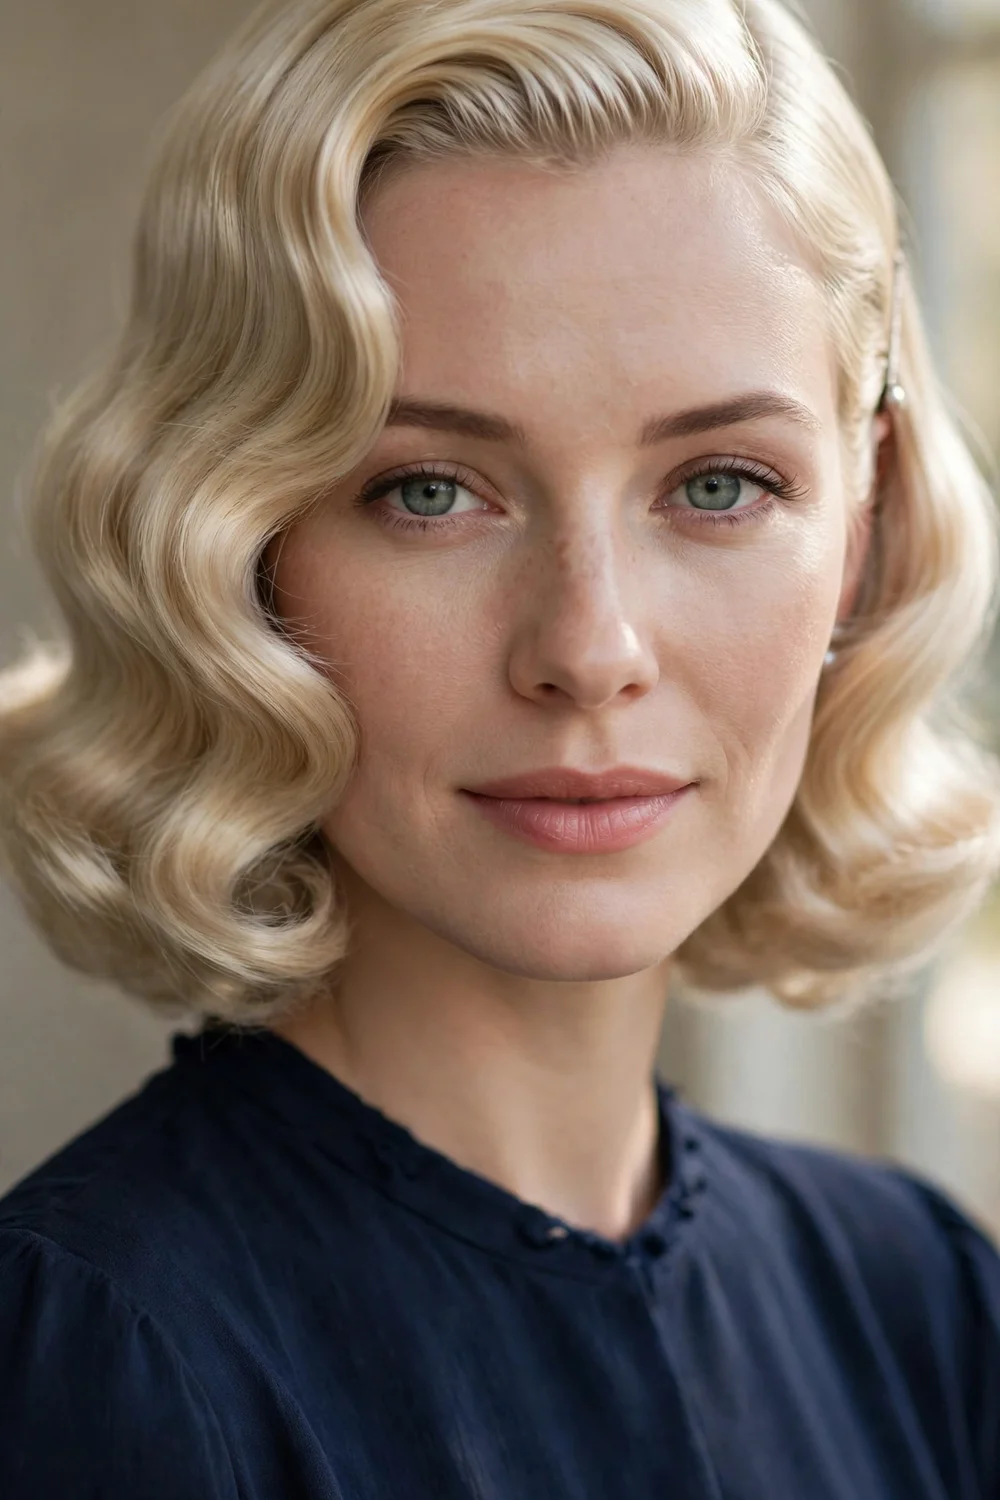
Make a deep side part and set smooth S-curve waves with a curling iron after misting heat protectant through the hair. Brush the curls out gently into waves and pin one side flat behind the ear. The old-Hollywood shape suits galas and black-tie events. Clip each curl as it cools to lock the shape before brushing. This takes about 30 minutes and rewards patience. Red lipstick and a bare neckline complete the old-Hollywood effect of this style.
Try this: finish with a light shine spray rather than heavy hairspray to keep the waves touchable.
Difficulty: Hard | Cost: $0 to $10
27. Twisted Crown Updo
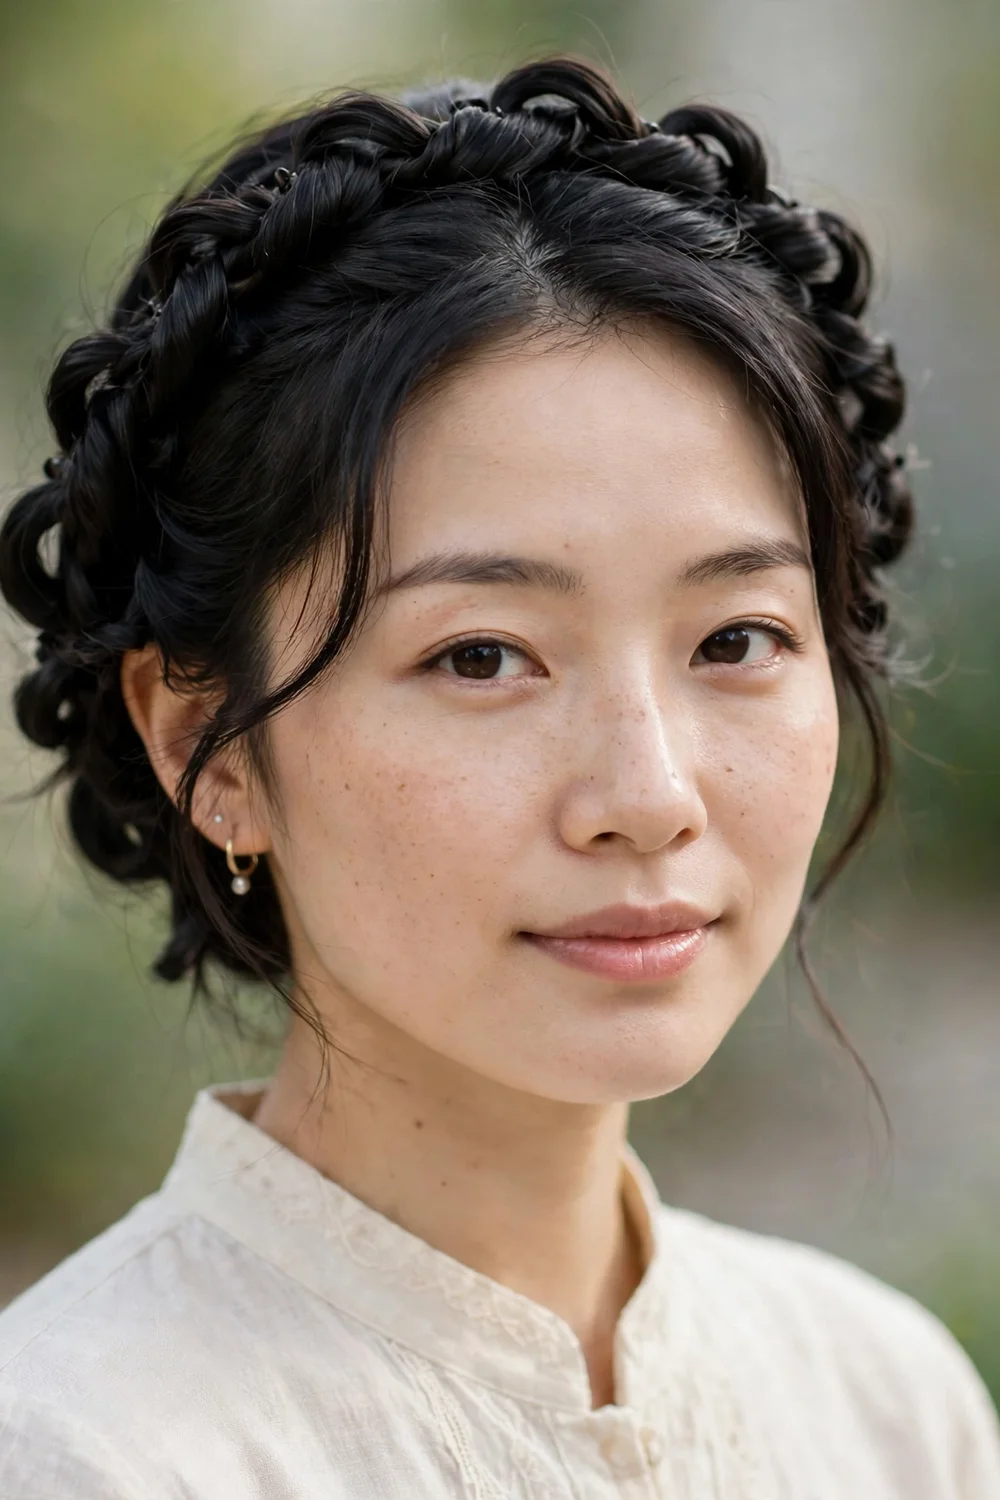
Twist sections of hair along the hairline and pin them in a ring around the head, tucking the ends under as you go. The result is softer than a braided crown and faster to create, taking about 20 minutes. Adding loose curls to the ends gives more texture. This suits garden weddings and outdoor events. It works on chin-length hair. Weave a thin ribbon through the twists before pinning for a festival-ready variation.
Try this: twist slightly damp hair with a little mousse for extra hold.
Difficulty: Medium | Cost: $0 to $5
28. Mini Bun with Decorative Clips
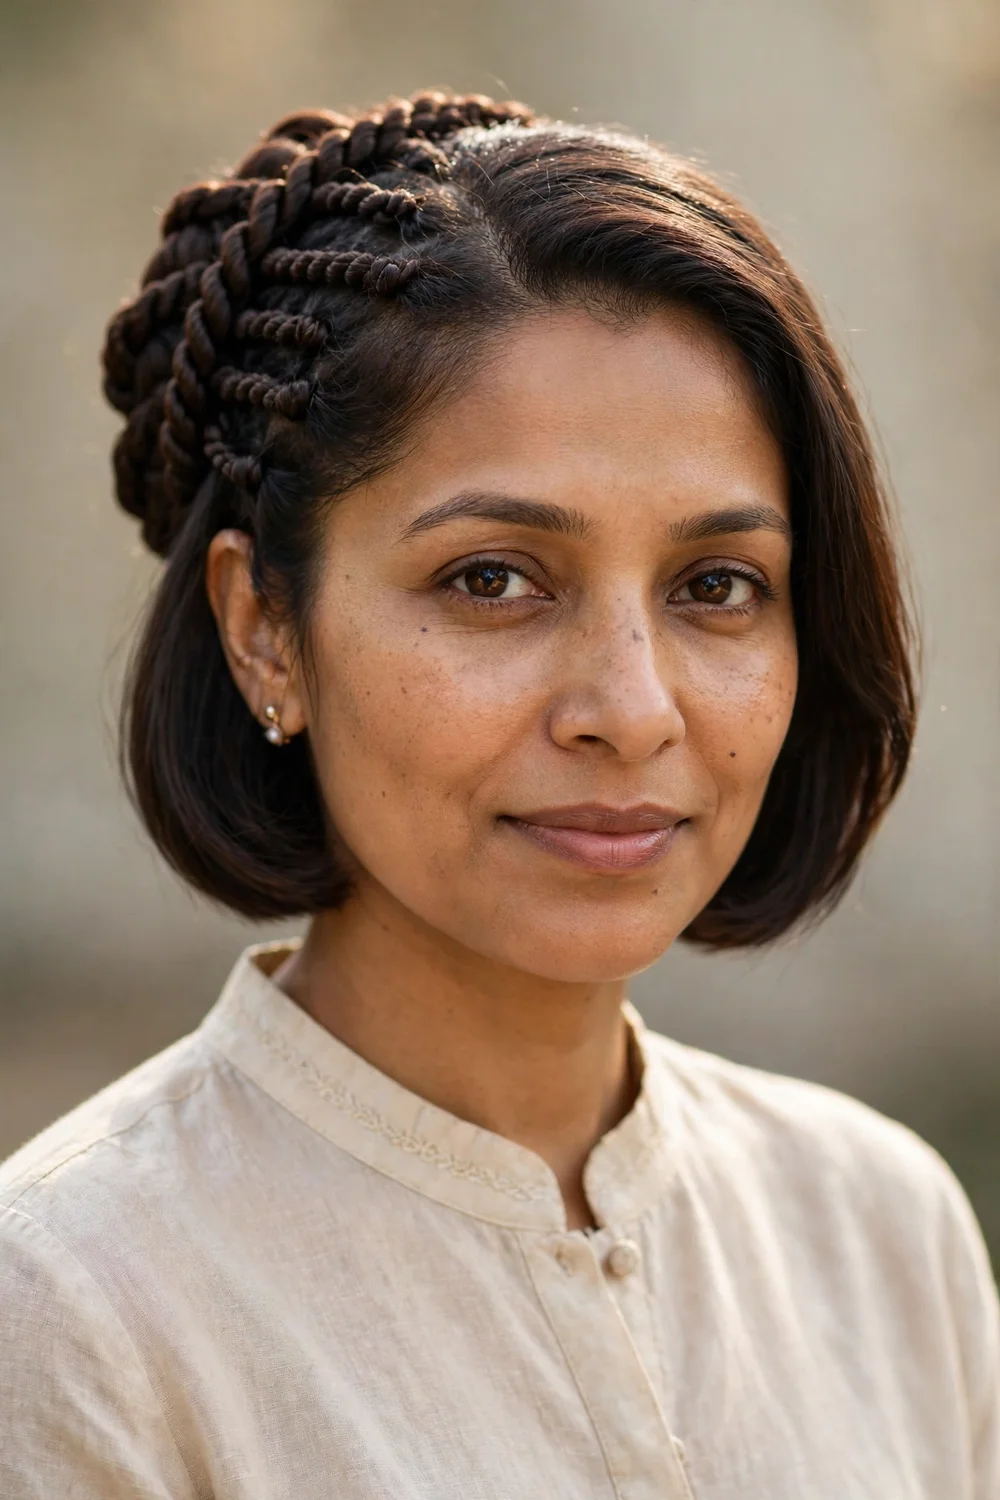
Curl the hair slightly, gather it into a small bun at the back, and slide 3 to 4 decorative crystal or pearl clips around the bun. The clips turn a basic bun into a party style in under 5 minutes. Place them asymmetrically, two on one side and one on the other, for a styled look. This suits holiday parties and New Year’s Eve. Choose clips with flat backs so they sit flush against the bun without wobbling. Apply heat protectant before the light curling step to protect the ends.
Try this: match the clip metal to your earrings for a coordinated finish.
Difficulty: Easy | Cost: $5 to $15
29. Edgy Faux Hawk
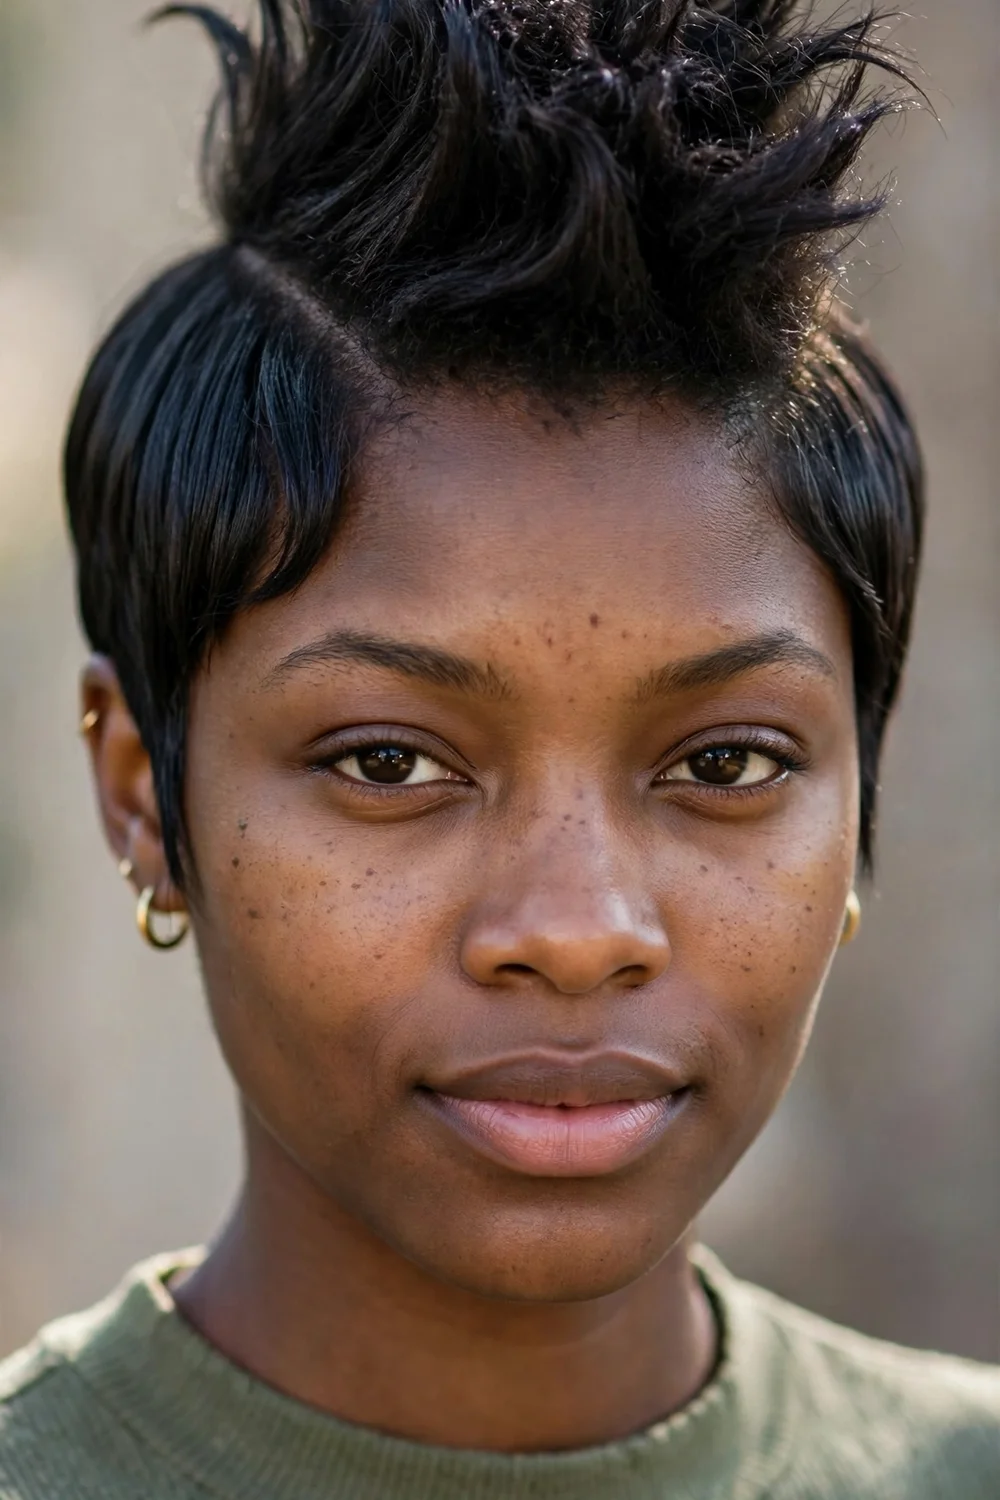
Pin the side sections of a pixie upward and inward to build a lifted center strip, tease the strip for height, and define the tips with a small amount of wax. The bold shape suits fashion-forward events and concerts. Backcomb in small sections rather than all at once for even lift. This takes about 15 minutes and shows off the cut itself. A temporary color spray on the lifted strip adds drama for one-night events.
Try this: add a crystal clip at the front of the strip for a dressed-up version.
Difficulty: Medium | Cost: $0 to $5
30. Half-Braided Half-Bun
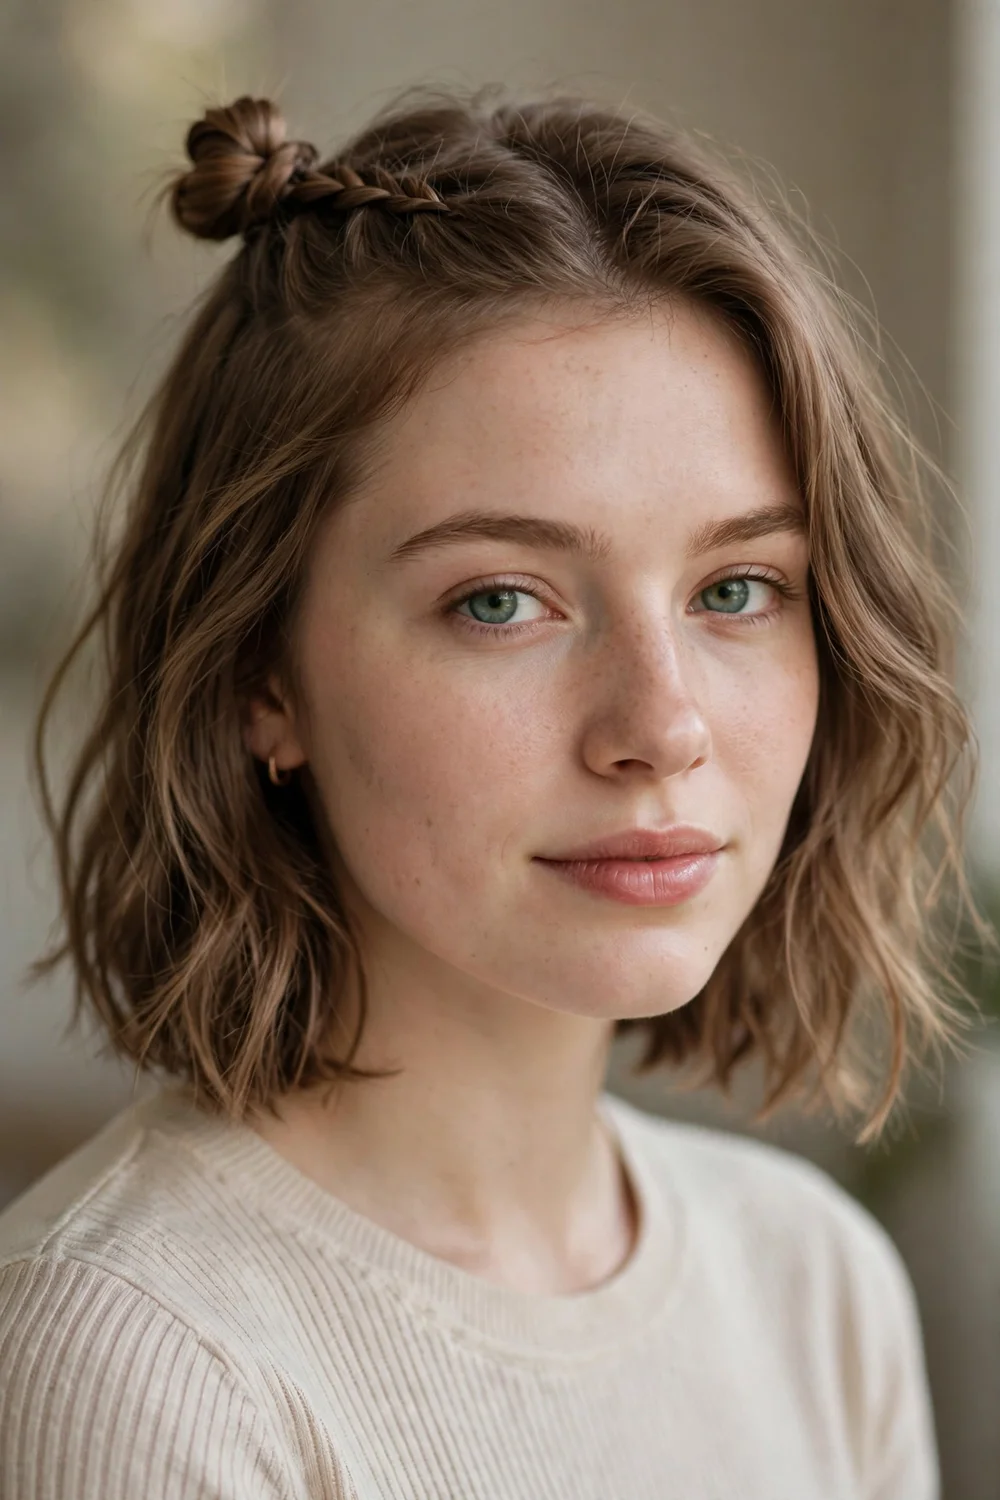
Braid one small section from the temple back toward the crown, then coil the top half of the hair into a mini bun that folds the braid in. Leave the rest loose. The single braid adds detail without much effort, and a clear elastic makes it disappear into the bun. This takes about 12 minutes and suits casual-chic parties. Curl the loose bottom half loosely so the textures of the top and bottom match. Apply heat protectant before curling the loose bottom half.
Try this: pancake the small braid to widen it before folding it into the bun.
Difficulty: Easy | Cost: $0
31. Tucked Crown
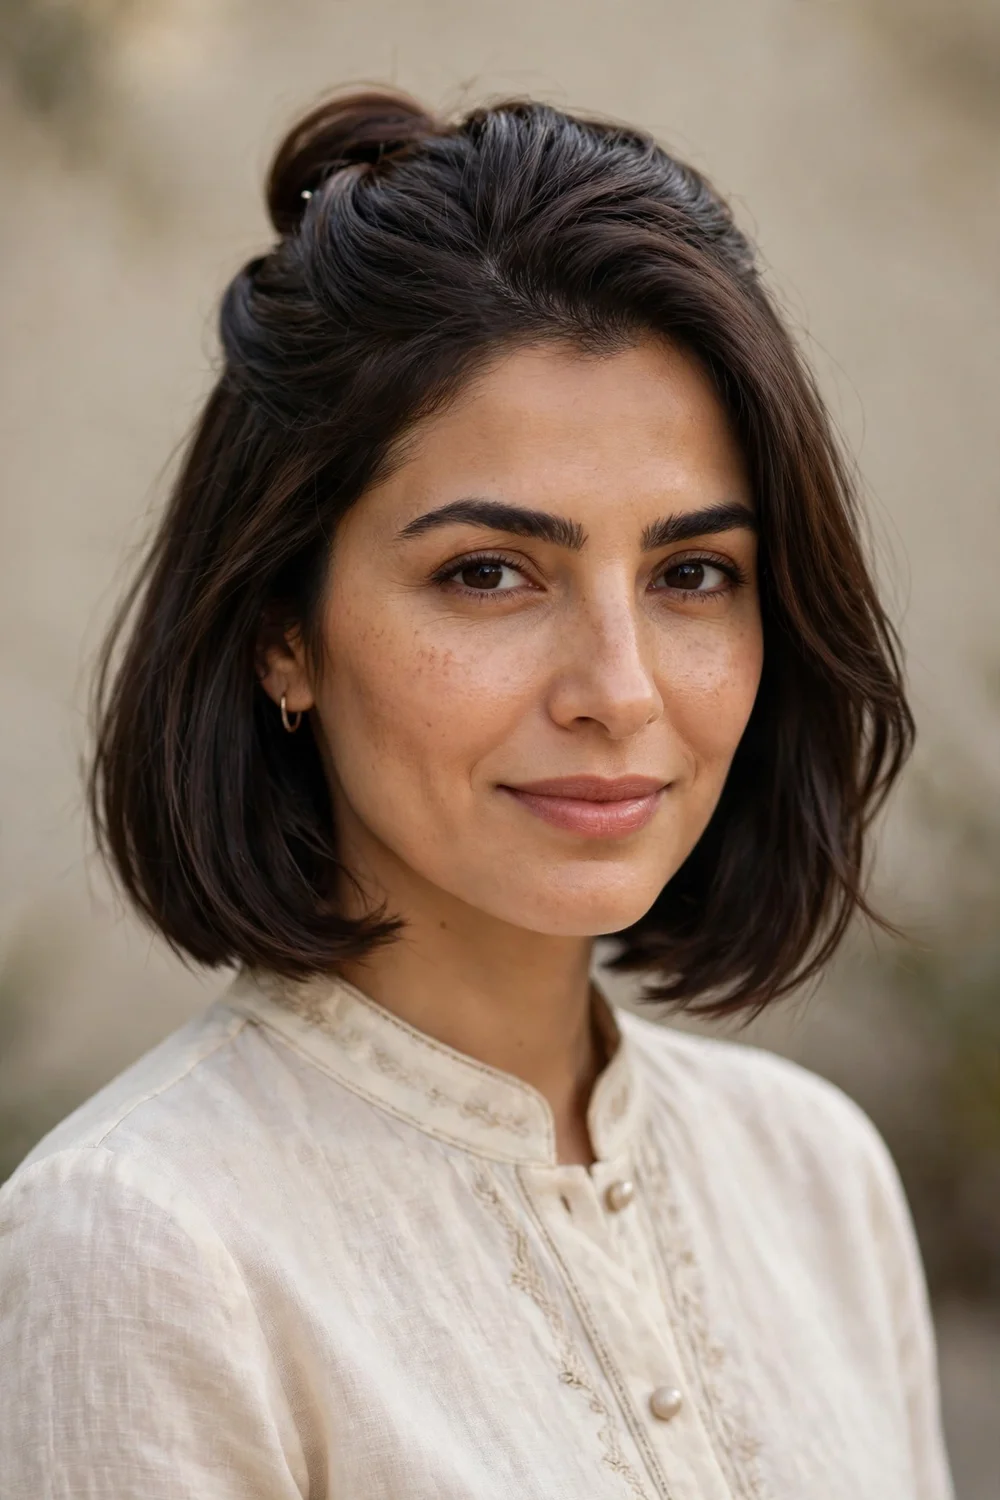
Pull the top half of the hair back, tuck and pin it at the crown to create a small bump of volume, and leave the sides and back loose. The half-up shape suits round faces by adding height on top. Tease the underside of the tucked section for a smoother bump. This takes about 10 minutes and works for daytime events that still call for polish. A thin velvet headband placed just behind the bump adds evening polish in seconds.
Try this: smooth the top layer with a soft brush after teasing for a clean finish.
Difficulty: Easy | Cost: $0
32. Sweeping Curls and Braid
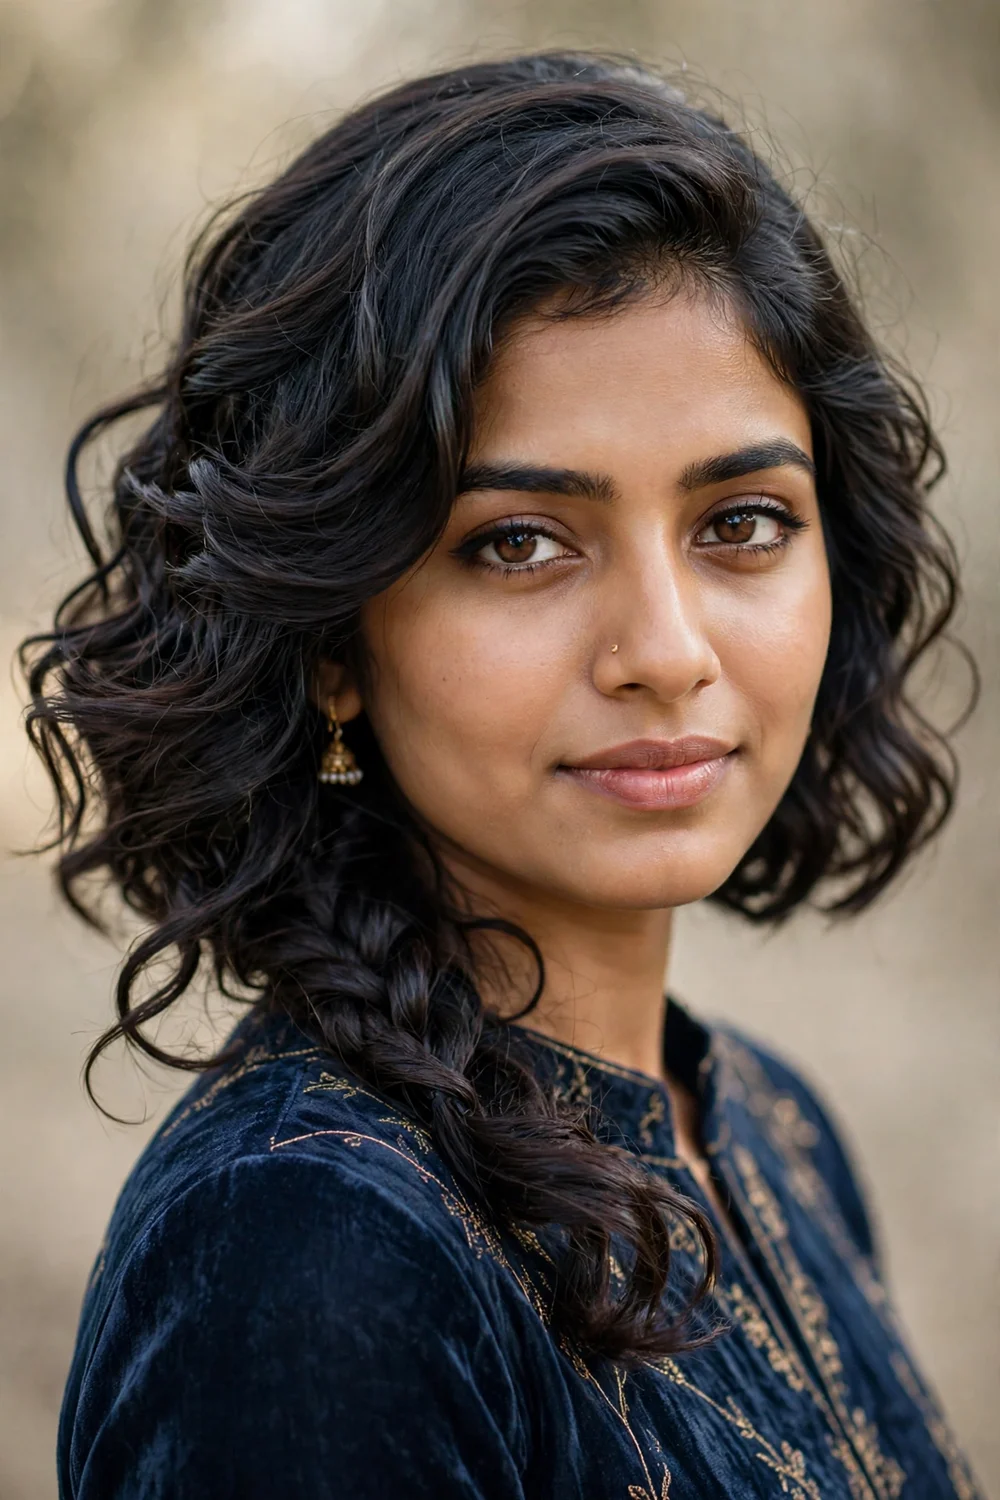
Sweep all the hair to one side in curls, then add a loose side braid that melts into the curls, pinning the braid tail underneath. The braid edge gives the curls structure and keeps them from falling flat. Braid only halfway down and let the tail blend into the curls for a seamless join. This suits evening weddings and takes about 20 minutes. Pin the braid tail under the curls with two crossed pins so no ends show.
Try this: curl with heat protectant applied, then braid on second-day texture for better grip.
Difficulty: Medium | Cost: $0 to $5
33. Dramatic Half Updo
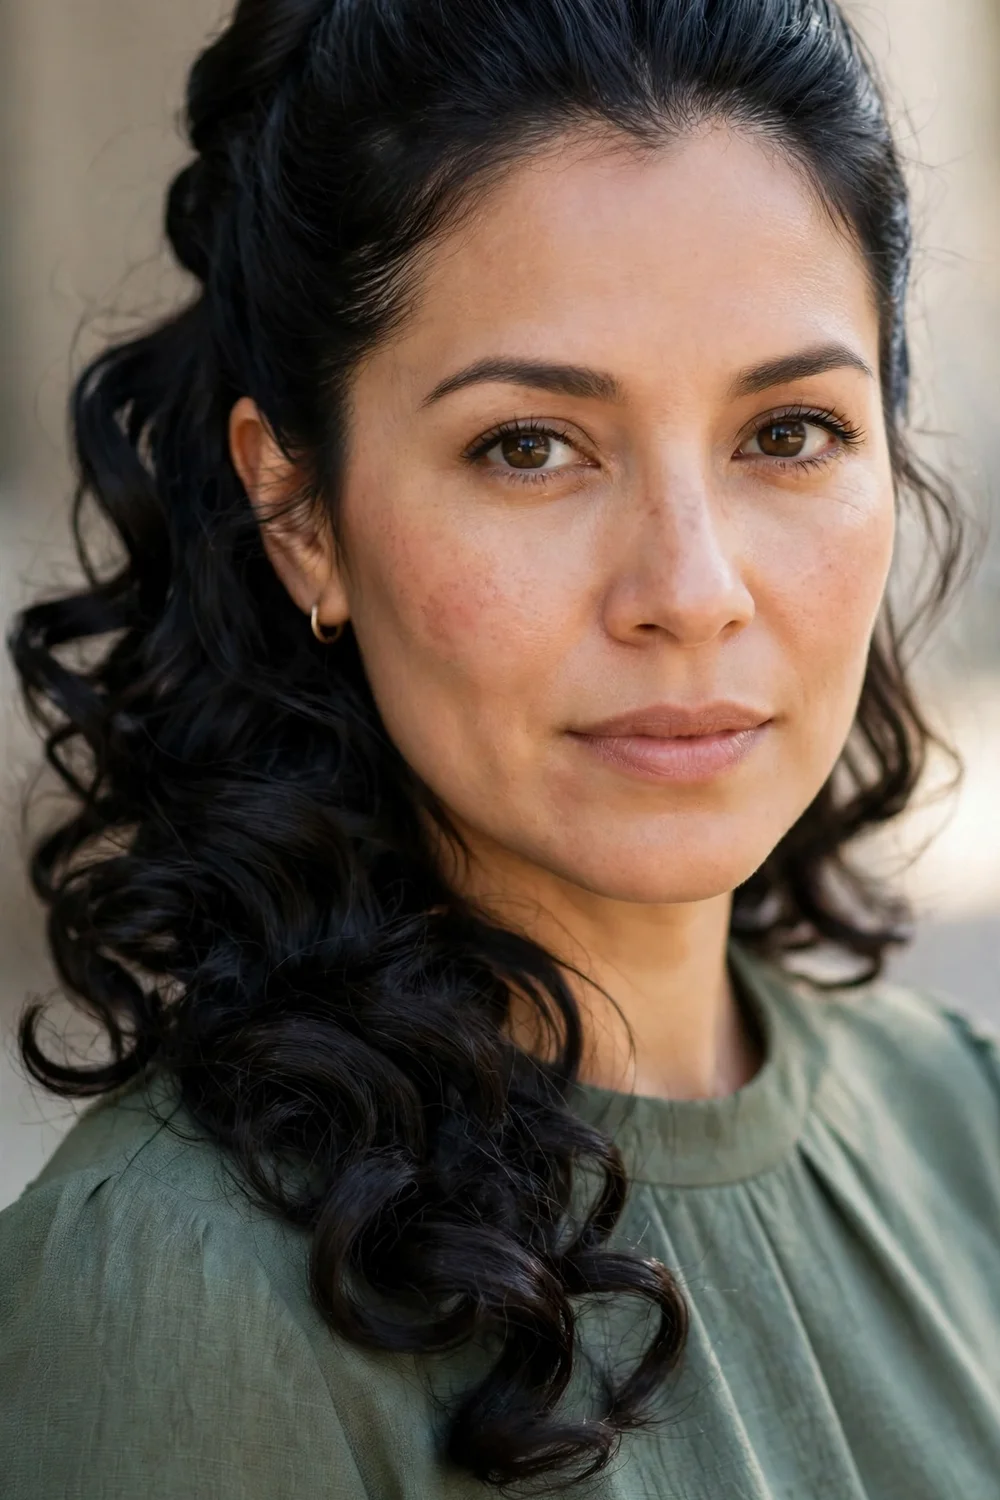
Pull the top half back tightly and smoothly and secure it, then leave the bottom half in big voluminous curls. Apply heat protectant before curling. The contrast between the sleek top and the full bottom gives the style its drama. A velvet bow at the join adds evening polish. This takes about 20 minutes and suits parties where you want visible volume. Tease the crown before securing the top half for extra height at the part.
Try this: backcomb the roots of the bottom half before curling for maximum fullness.
Difficulty: Easy | Cost: $0 to $5
34. Woven Basket Weave Updo
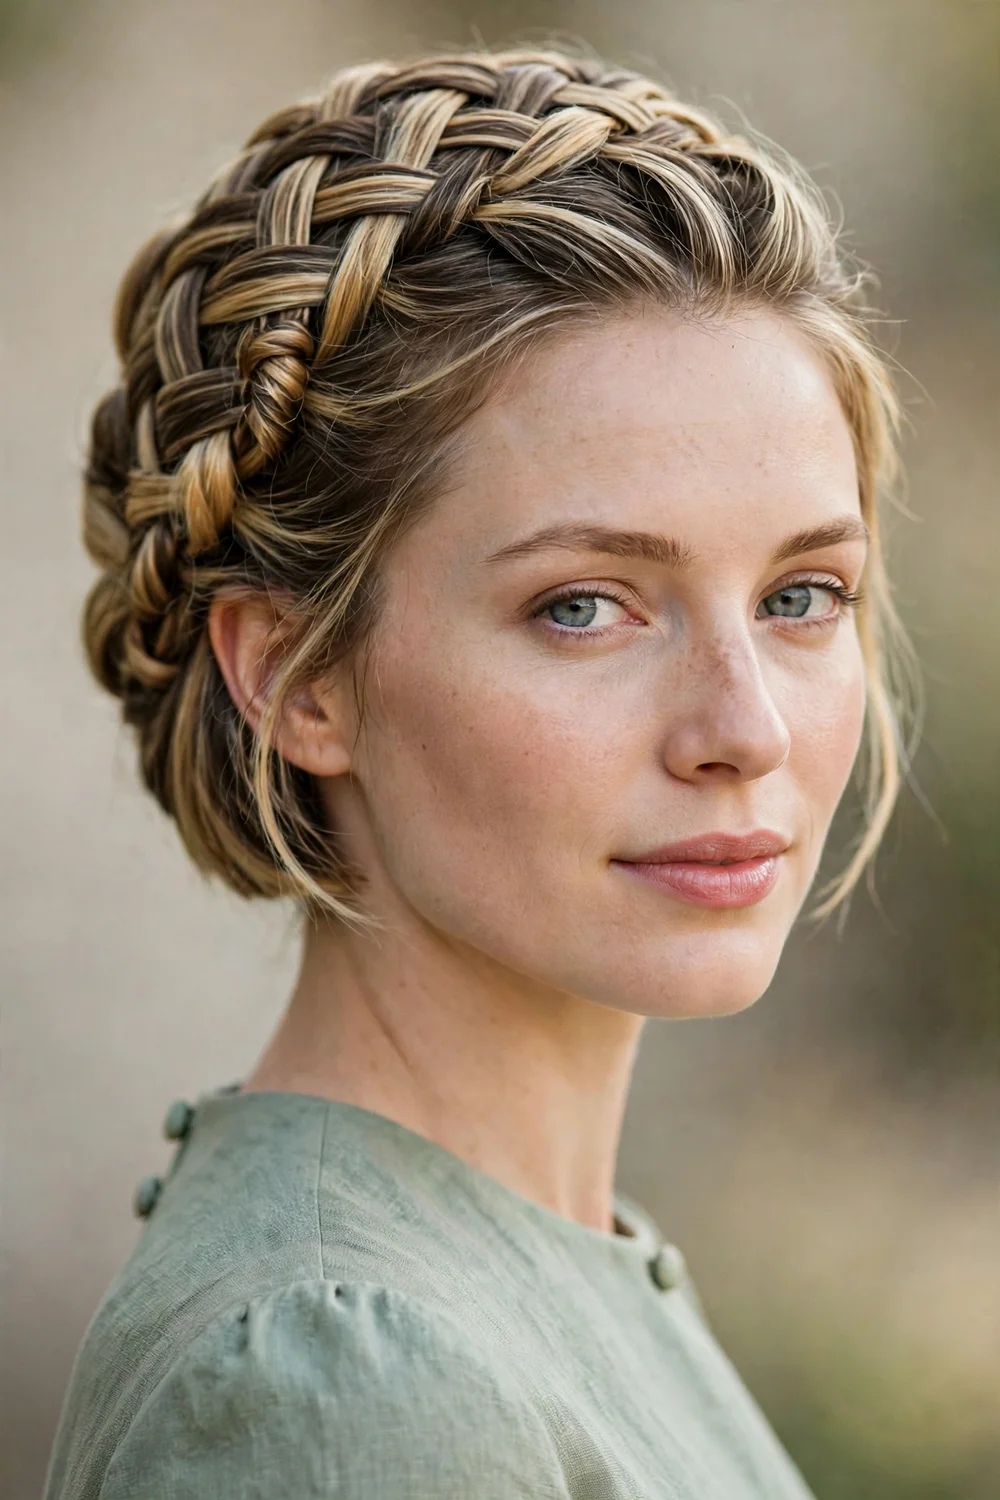
Weave small sections over and under each other across the back of the head, pinning as you go, and tuck the ends into a small base at the nape. The intricate texture photographs well and suits formal events. Keep each section no wider than an inch so the weave pattern stays visible. This takes 30 to 40 minutes and works best on chin-length hair. Mist the finished weave with strong-hold hairspray so the pattern stays crisp through the night.
Try this: practice the weave once on damp hair the day before the event.
Difficulty: Hard | Cost: $0 to $5
35. Waterfall Braid with Bow
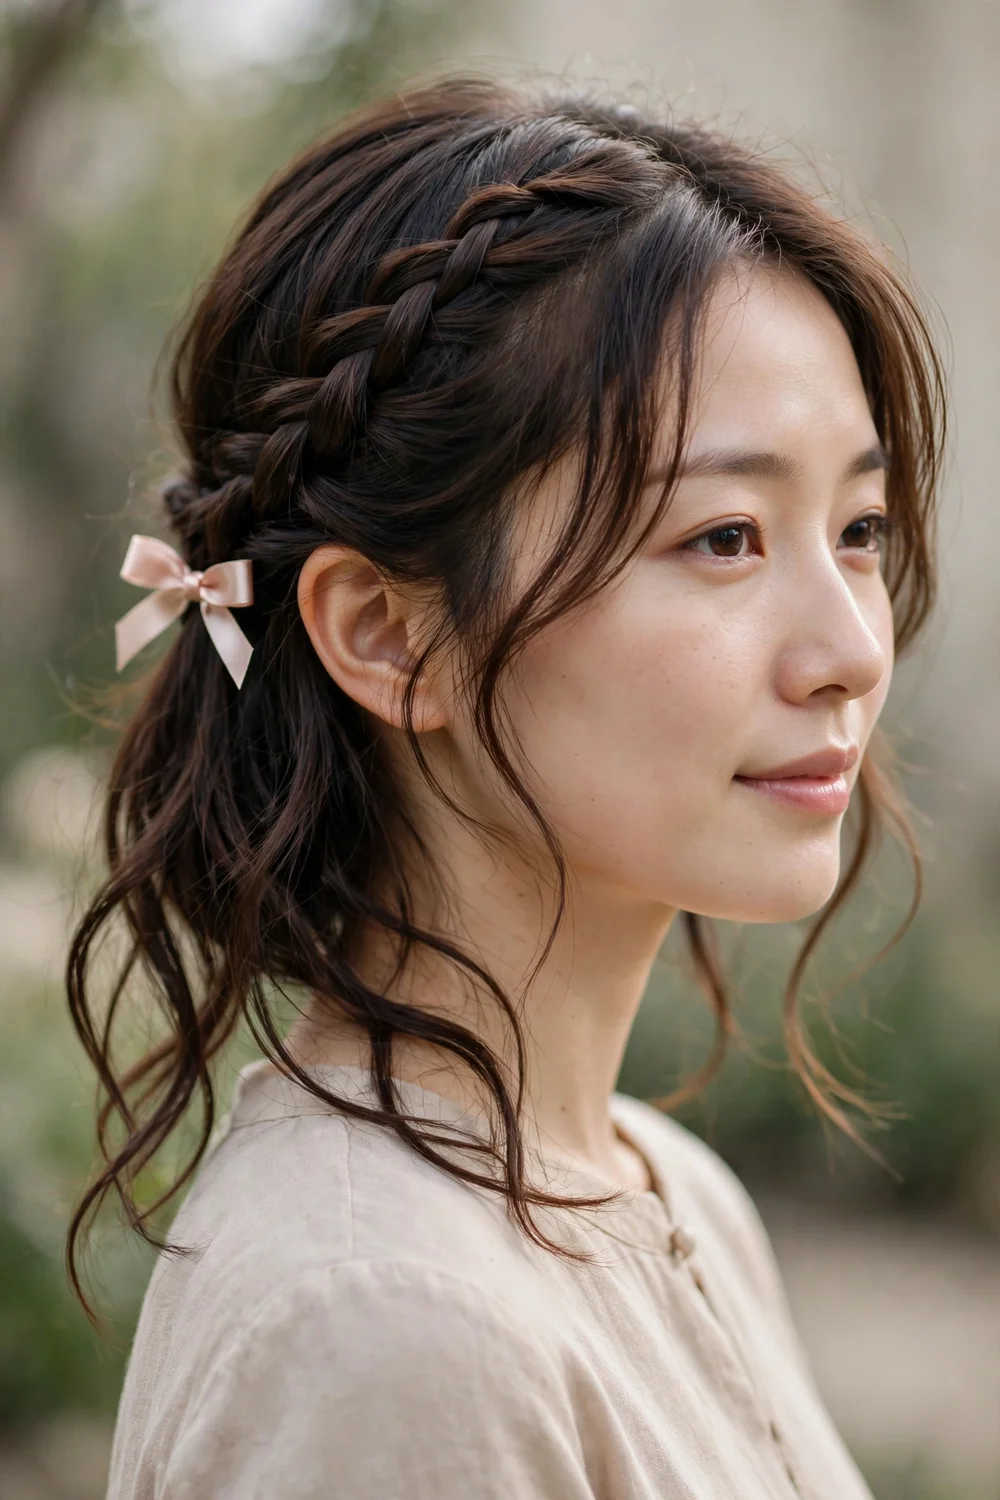
Braid a waterfall braid across the back of the head, letting strands drop through the braid as you go. Tie it off behind one ear and clip a small bow or crystal clip at the tie. The delicate shape suits bridal showers and garden parties. Stretch the braid loops gently to widen the waterfall effect. This takes about 20 minutes. A small clear elastic at the tie-off keeps the bow anchored without showing.
Try this: use a satin bow for evening or a velvet one for winter events.
Difficulty: Medium | Cost: $5 to $10
36. Loopy Braid
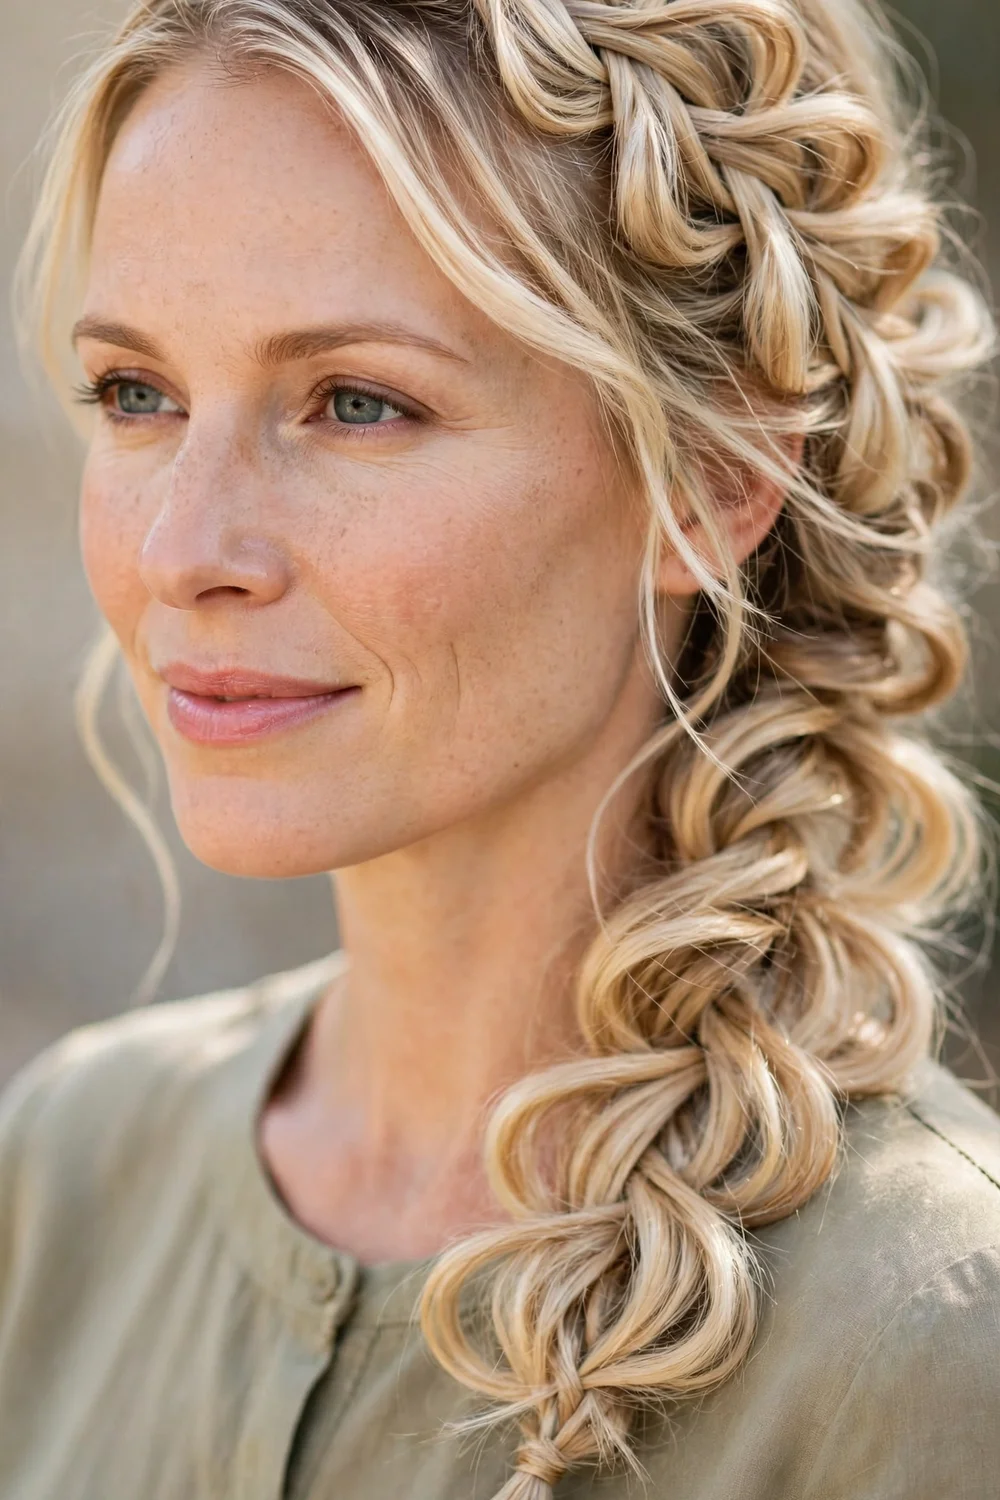
Make a loose side braid, then pull the edges of each loop outward to create big soft loops, and pin the end under. The pulled loops make thin hair look much thicker, which makes this a smart pick for fine hair. Spray each loop with light hairspray as you pull it so it holds its size. This takes about 15 minutes. Start the braid with slightly damp hair so the loops hold their pulled shape longer.
Try this: braid slightly off-center so the loops sit over one shoulder.
Difficulty: Medium | Cost: $0 to $5
37. Bouffant Updo
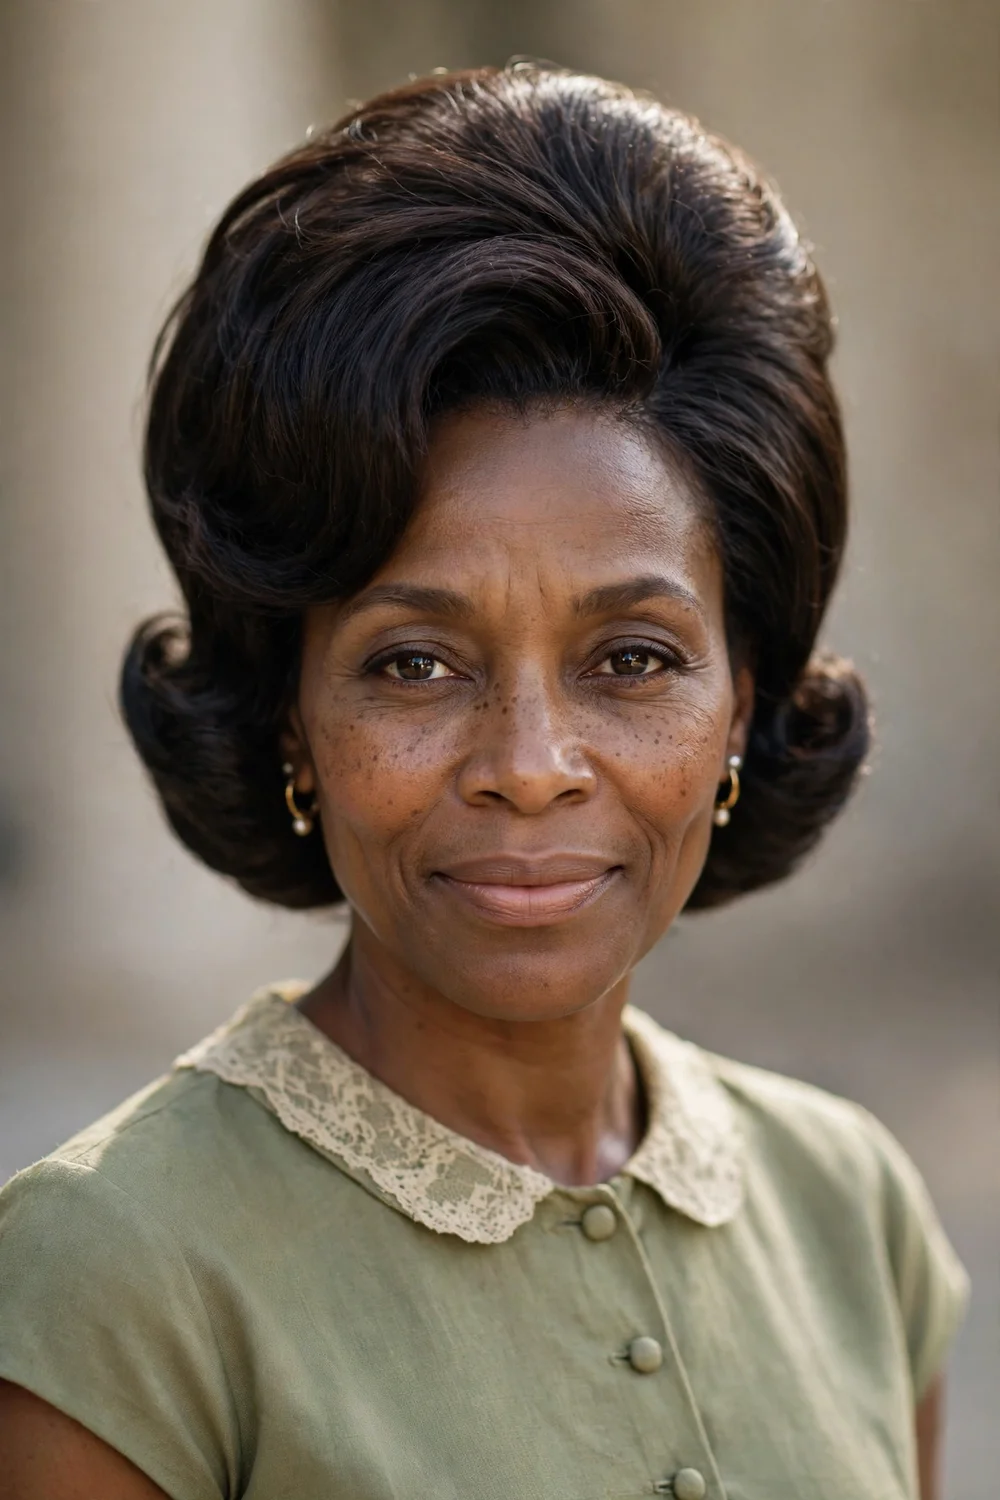
Backcomb the crown heavily, smooth the top layer over it, pin the sides up into a rounded shape at the back, and tuck the ends under. The big retro volume suits themed nights and 1960s-style parties. Insert a small foam bump under the crown section for height that lasts all evening. This takes about 25 minutes. Smooth the very top layer with a soft brush after backcombing for a clean outer finish that still shows the volume underneath.
Try this: finish with firm-hold hairspray from 10 inches away for even coverage.
Difficulty: Medium | Cost: $0 to $10
38. Fancy Downdo
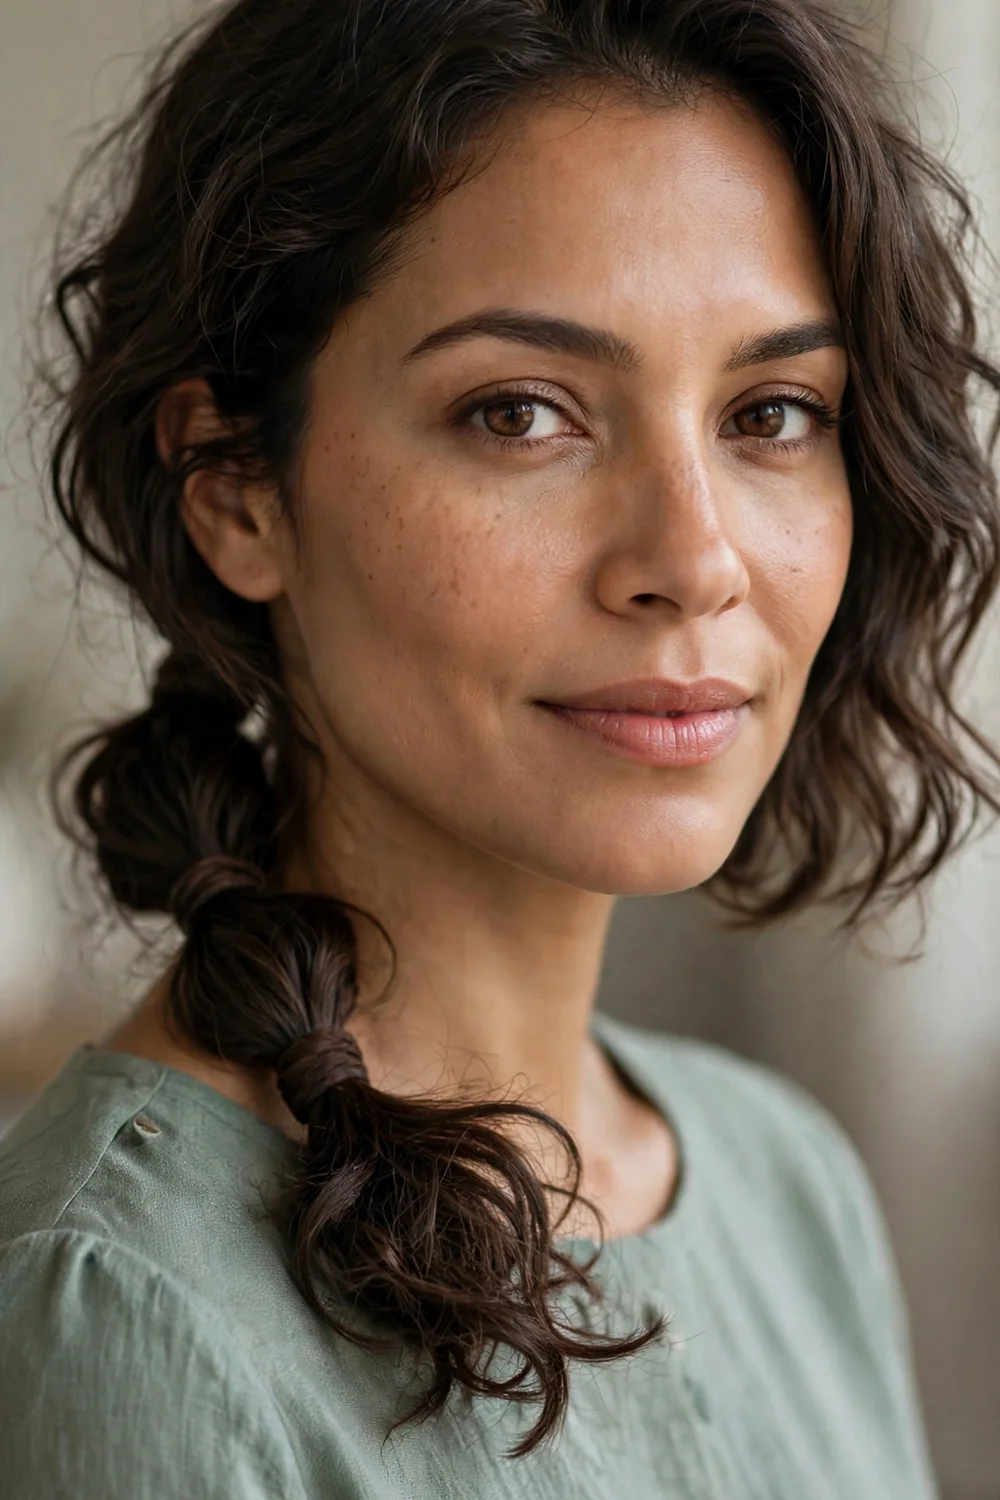
Pull the hair into a low ponytail and curl the tail messily, applying heat protectant first. Tie two loose knots in the tail, pin the knots to fluff them up, and wrap a strand of hair around the elastic. The knots give a low ponytail a fancy shape without going up. Pull a few curls forward over the shoulder for a softer front view. This takes about 15 minutes. A deep side part before gathering the ponytail gives the low style more shape.
Try this: use a clear elastic so the knots, not the band, get the attention.
Difficulty: Easy | Cost: $0
39. Boho Curls and Braid
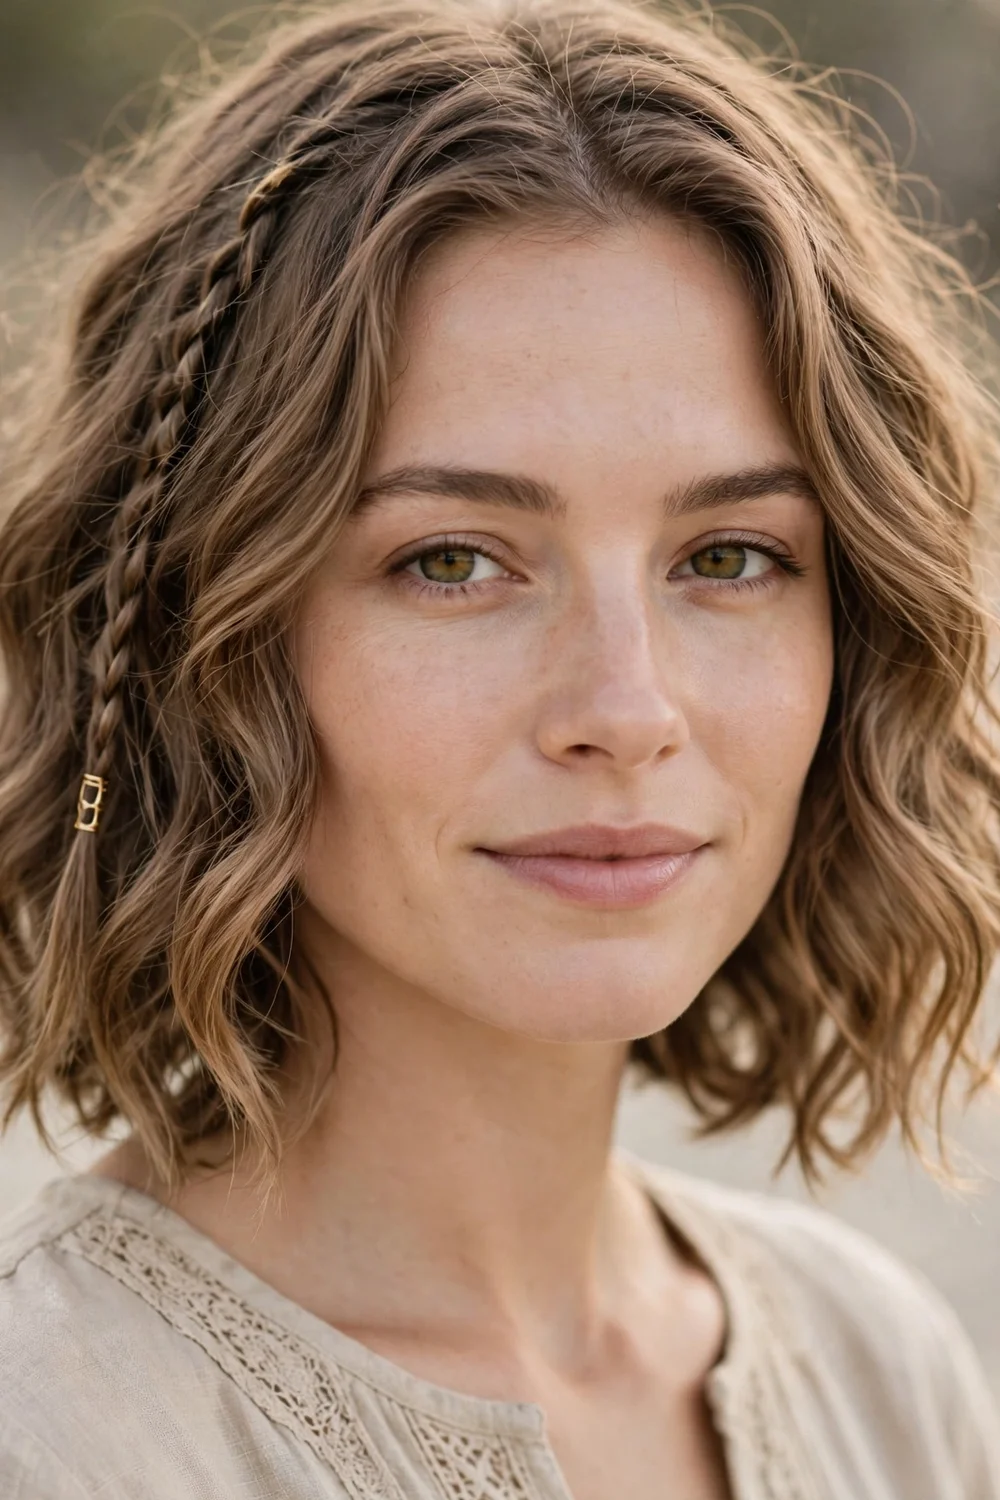
Curl the hair loosely, add two or three thin random braids through the curls, and pin one side back with a small flower or gold cuff. The relaxed combination suits beach weddings and outdoor festivals. Braid the accent braids on second-day hair so they grip better. This takes about 20 minutes and works on wavy and curly textures. A light sea-salt spray scrunched into the curls adds the lived-in texture this style needs. Work heat protectant through the hair before curling so the loose waves stay touchable.
Try this: slide a thin gold cuff onto one braid instead of tying it off.
Difficulty: Easy | Cost: $5 to $10
40. Row of Bows
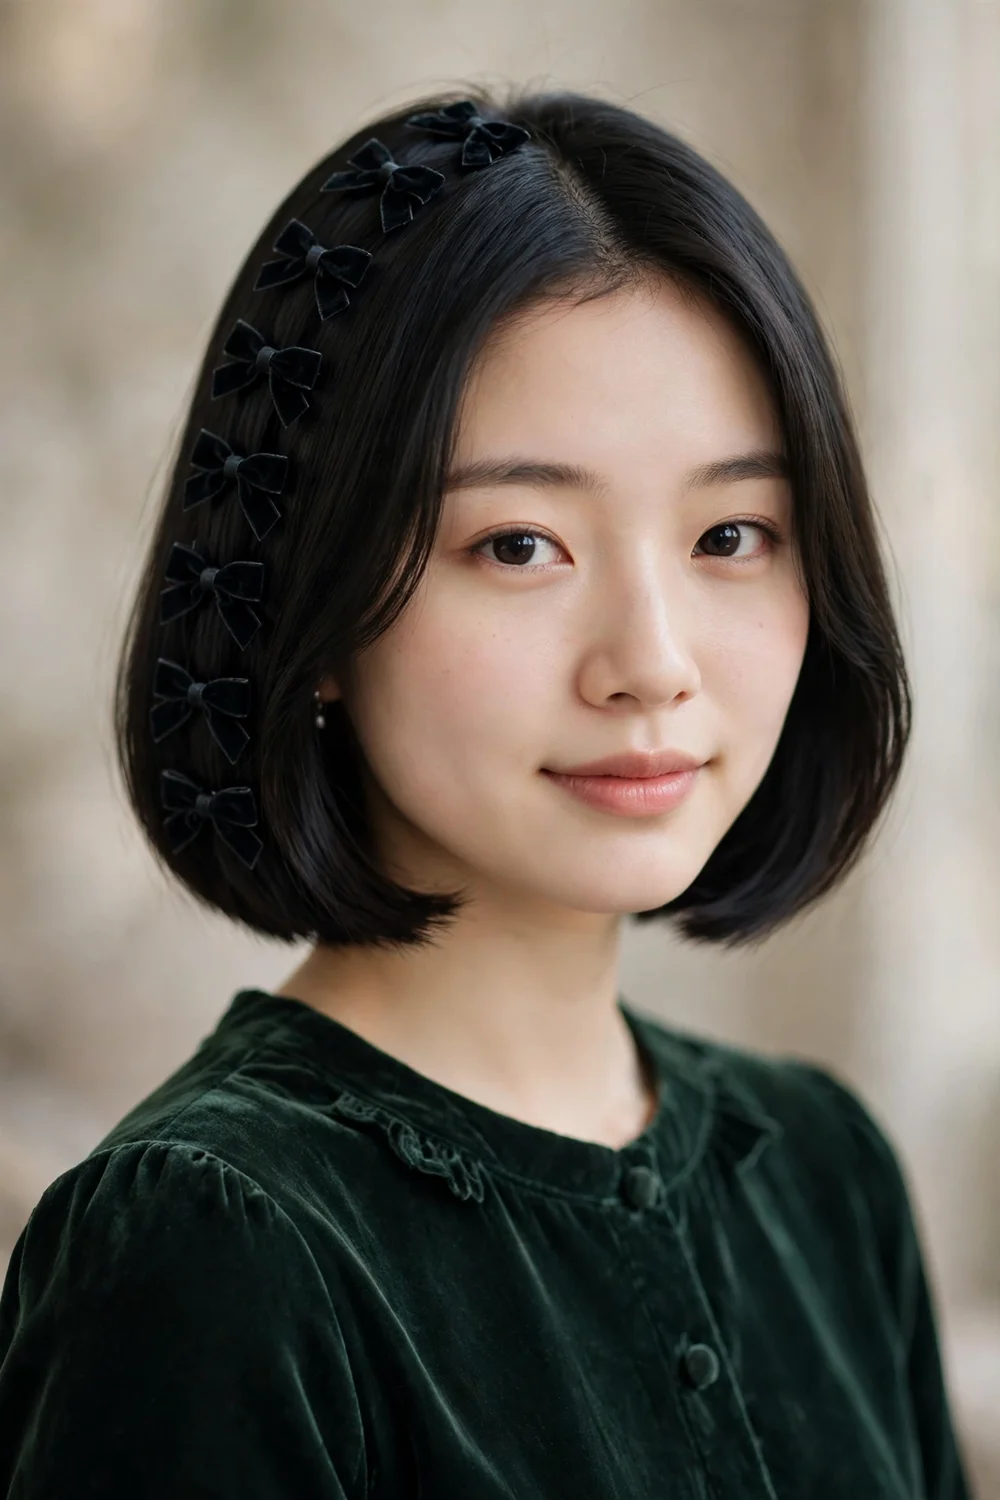
Smooth the hair back and clip a vertical row of 3 to 4 small velvet or satin bows down the back of the head. The repetition turns a simple style into a statement. Use graduated bow sizes, largest at the crown and smallest at the nape, for a styled look. This takes about 10 minutes and suits holiday parties. Space the bows about two inches apart so each one reads clearly in photos from behind.
Try this: place the bows slightly off-center for a less formal feel.
Difficulty: Easy | Cost: $5 to $12
41. Floral Side Updo

Sweep the hair into a low side bun or pinned curls behind one ear, then tuck small fresh or silk flowers along the pinned edge. This is a bridal-party favorite for weddings. Use flowers with wired stems so they stay put all evening, and keep a couple of spare pins in your bag. This takes about 20 minutes. Match the flower color to your bouquet or outfit for a coordinated wedding look.
Try this: cluster the flowers on one side rather than spreading them evenly.
Difficulty: Medium | Cost: $10 to $20
42. Simple Knot
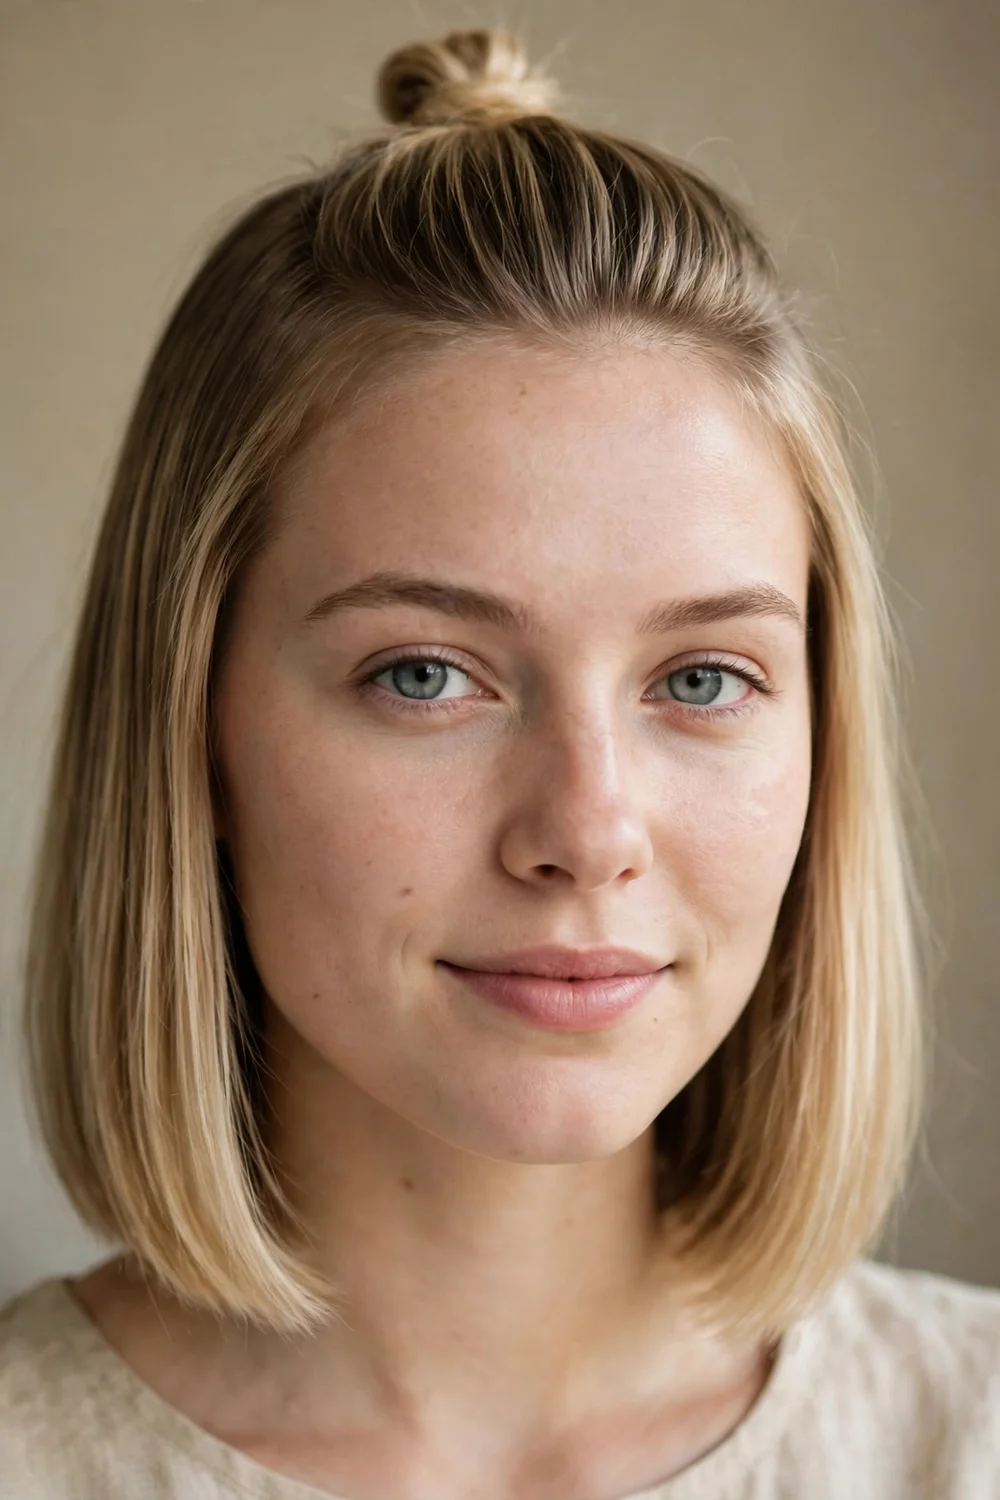
Gather the top section into a tiny knot at the crown, pin it, and leave the rest sleek and straight. The minimal style works when the outfit carries the look and the hair just needs to look deliberate. Twist the section twice before knotting for a tighter, neater knot. This takes about 5 minutes. A center part with the knot placed exactly on the crown keeps this minimal style balanced, and a drop of serum tames flyaways.
Try this: add one crystal pin at the base of the knot for evening events.
Difficulty: Easy | Cost: $0
43. Jeweled Headband Glam
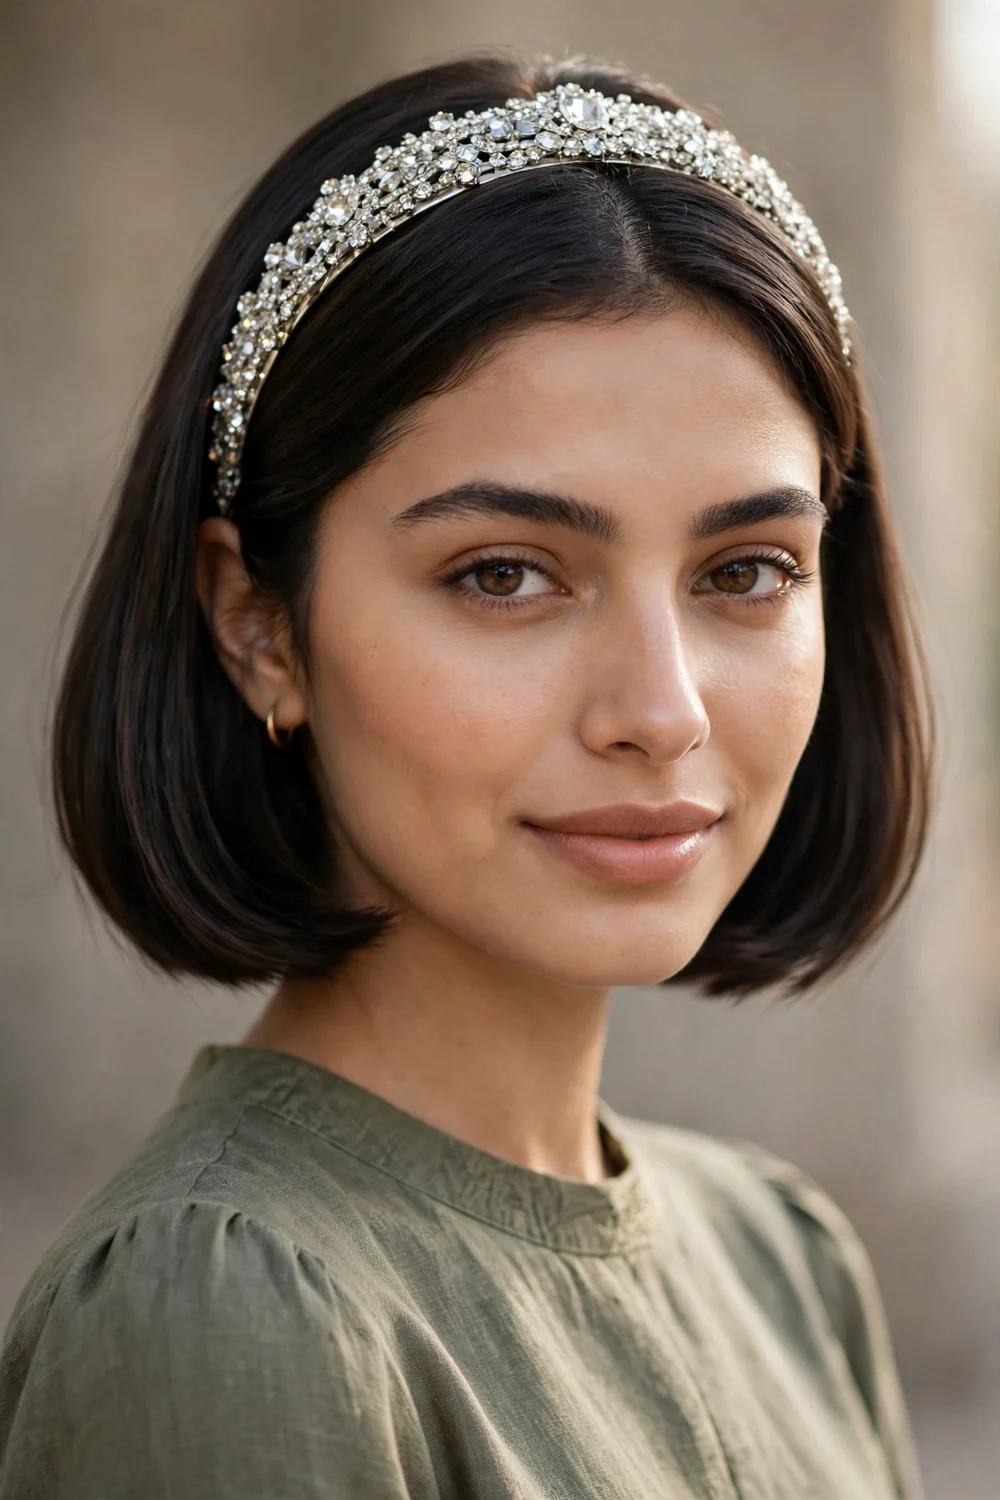
Smooth the hair, then place a wide jeweled or crystal headband 1 to 2 inches behind the hairline and tuck the front sections behind the ears. The headband does all the styling work, which makes this the fastest glam option on the list at about 5 minutes. Tease the crown slightly before placing the band so it sits without sliding. This suits pixies and bobs equally. Push the headband back slightly after placing it so a little volume shows at the front.
Try this: match the headband stones to your earrings for a coordinated look.
Difficulty: Easy | Cost: $8 to $20
44. Glitter Roots

Part the hair, apply a thin layer of hair gel along the part line, press cosmetic-grade glitter into the gel with a small brush, and seal it with light hairspray. The sparkle suits New Year’s Eve and festival nights. Use only cosmetic-grade glitter, since craft glitter can irritate the scalp. This takes about 10 minutes and washes out with one shampoo. Apply the glitter over a deep side part for an asymmetrical sparkle line.
Try this: match the glitter color to your eye makeup for a pulled-together look.
Difficulty: Easy | Cost: $5 to $10
45. Glass-Hair Sleek Bob

Flat-iron the bob in small sections until perfectly smooth and reflective, applying heat protectant first. Tuck both sides behind the ears and finish with a light shine spray. The mirror shine looks modern and expensive with zero accessories. Run the iron over each section twice, slowly, for maximum sleekness. This takes about 20 minutes on thick hair. A pea-sized amount of smoothing serum on the ends prevents the sleek finish from looking dry.
Try this: add a deep side part before ironing for extra shape.
Difficulty: Easy | Cost: $0 to $10
46. Double Mini Space Buns
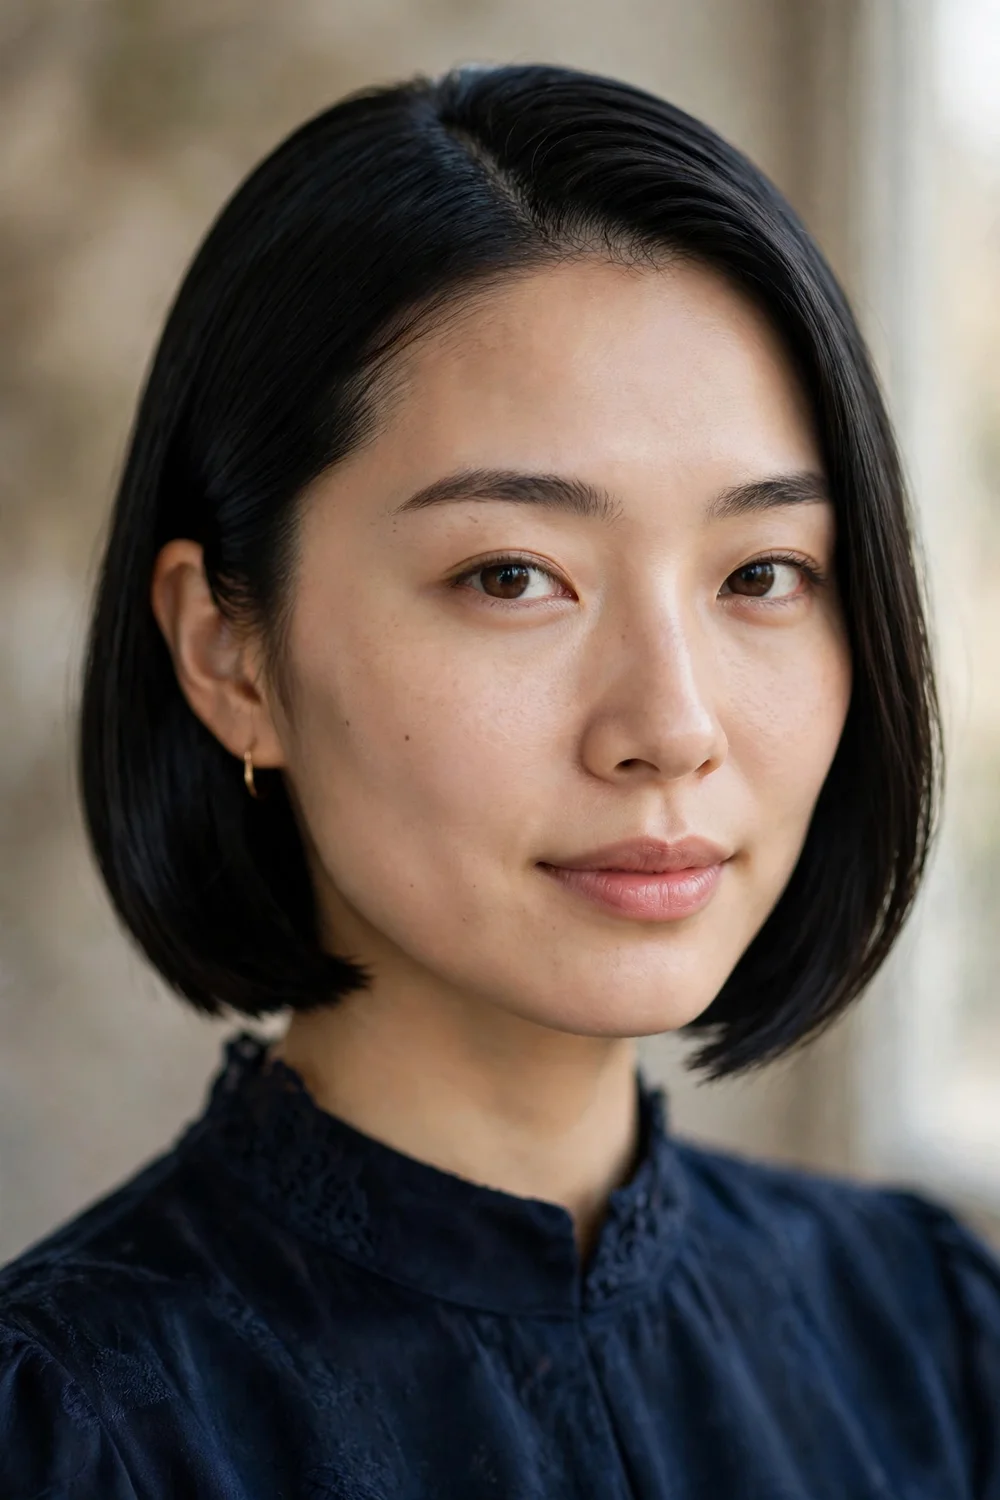
Part the hair down the middle, coil the top half of each side into two small buns high on the head, and leave the bottom halves down. The playful shape suits concerts and themed nights. Wrap a thin metallic cord around each bun base for extra detail. This takes about 15 minutes and works on chin-length hair. Pull two thin strands loose in front of the ears to soften the playful shape for evening.
Try this: tease each section before coiling so the buns look fuller.
Difficulty: Easy | Cost: $0 to $5
47. Polished Low Ponytail with Wrapped Band
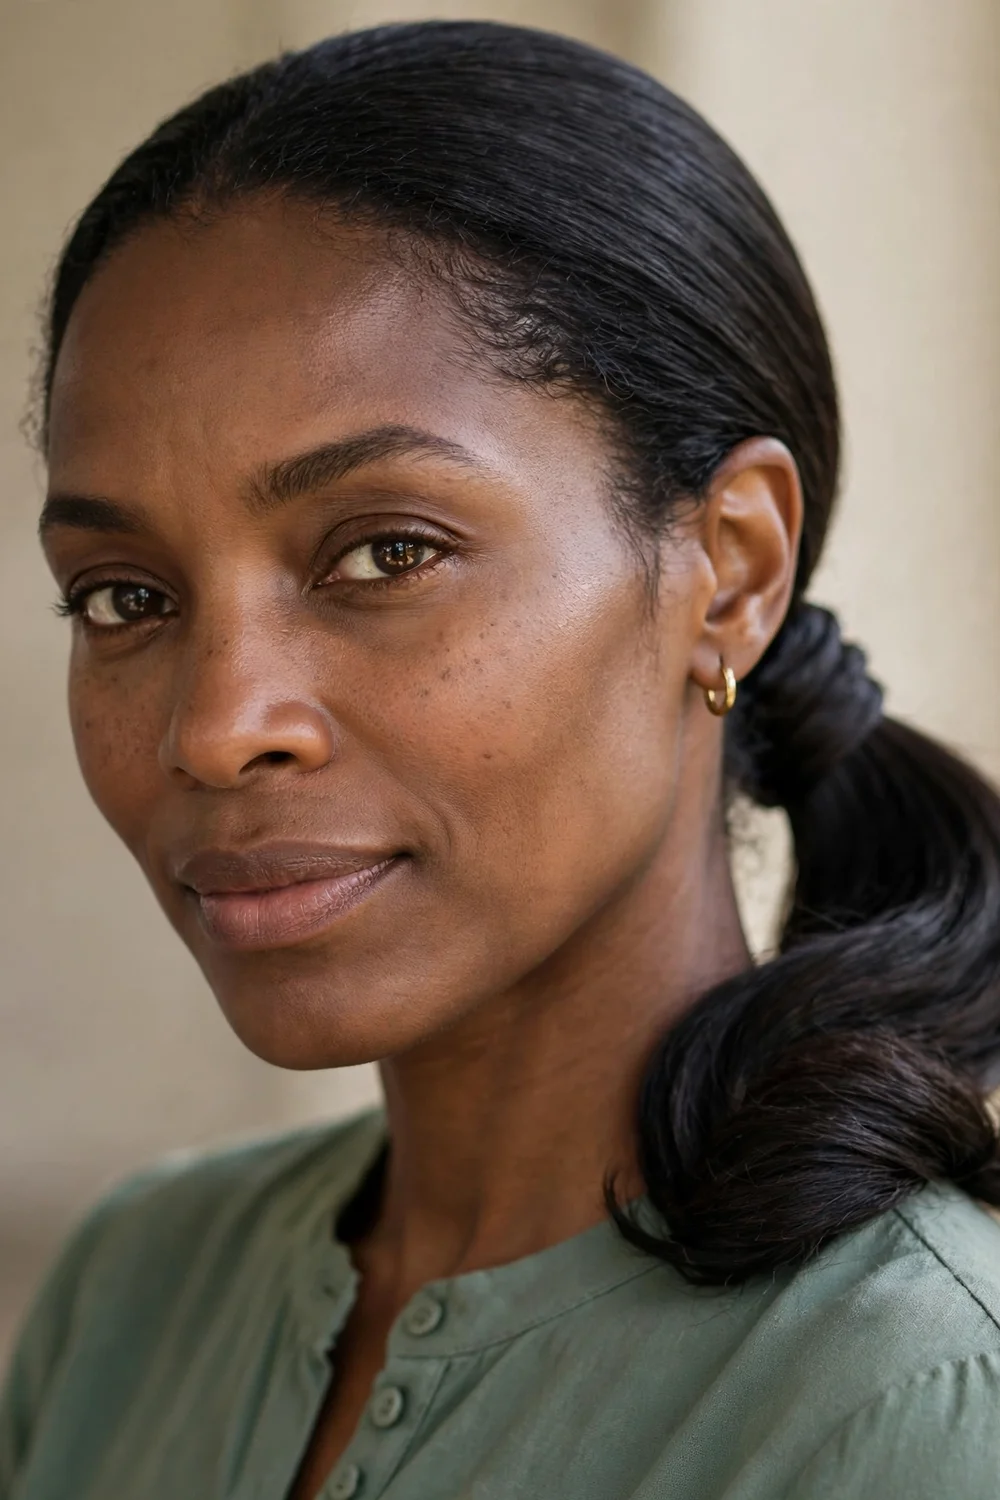
Smooth the hair into a low ponytail at the nape, wrap a 1-inch strand around the elastic, and pin it underneath. Curl the tail under slightly with a curling iron, working over hair prepped with heat protectant. The wrapped band hides the elastic and makes a simple ponytail look polished. Place the ponytail in the hollow of the nape so it sits flat. This takes about 12 minutes. A low side part before smoothing the hair back adds shape to this simple style.
Try this: smooth a drop of serum over the wrapped strand for a seamless finish.
Difficulty: Easy | Cost: $0
48. Victory Rolls
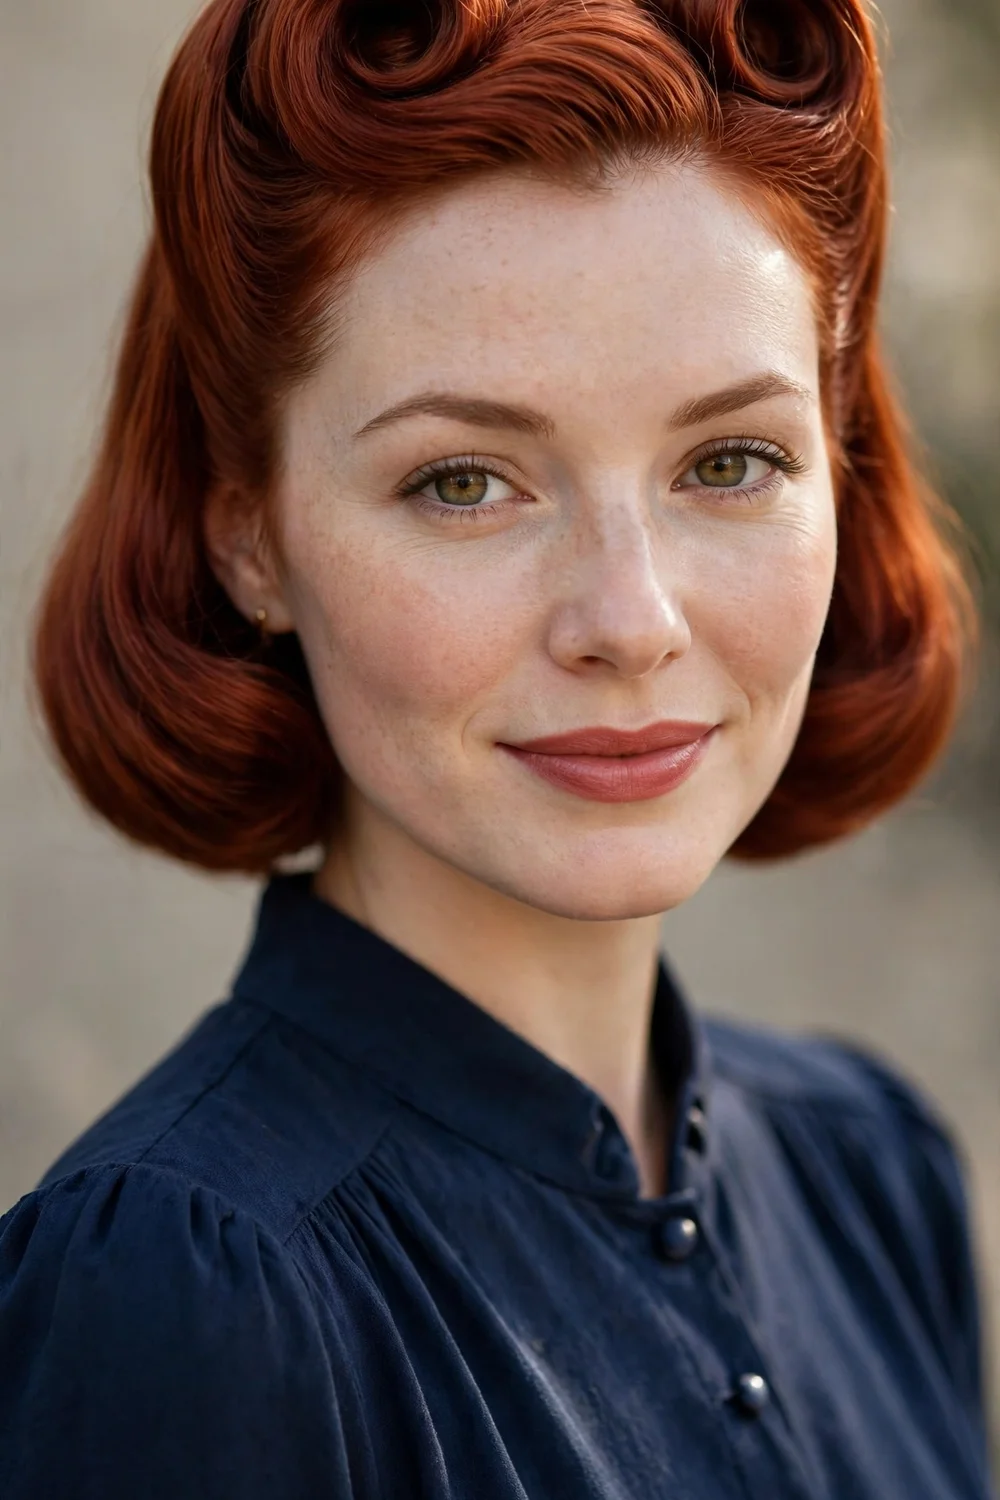
Roll the two front sections of a bob into vintage rolls above the forehead, pin them securely, and smooth the back or pin it into a low roll. The pin-up shape suits retro events and vintage-themed weddings. Backcomb each section before rolling so the rolls hold their shape all evening. This takes about 30 minutes and needs chin-length front sections. Roll both sides to the same height by checking them in a hand mirror from the front.
Try this: set each roll with hairspray before pinning, then again after.
Difficulty: Hard | Cost: $0 to $5
49. Bridal Head Chain
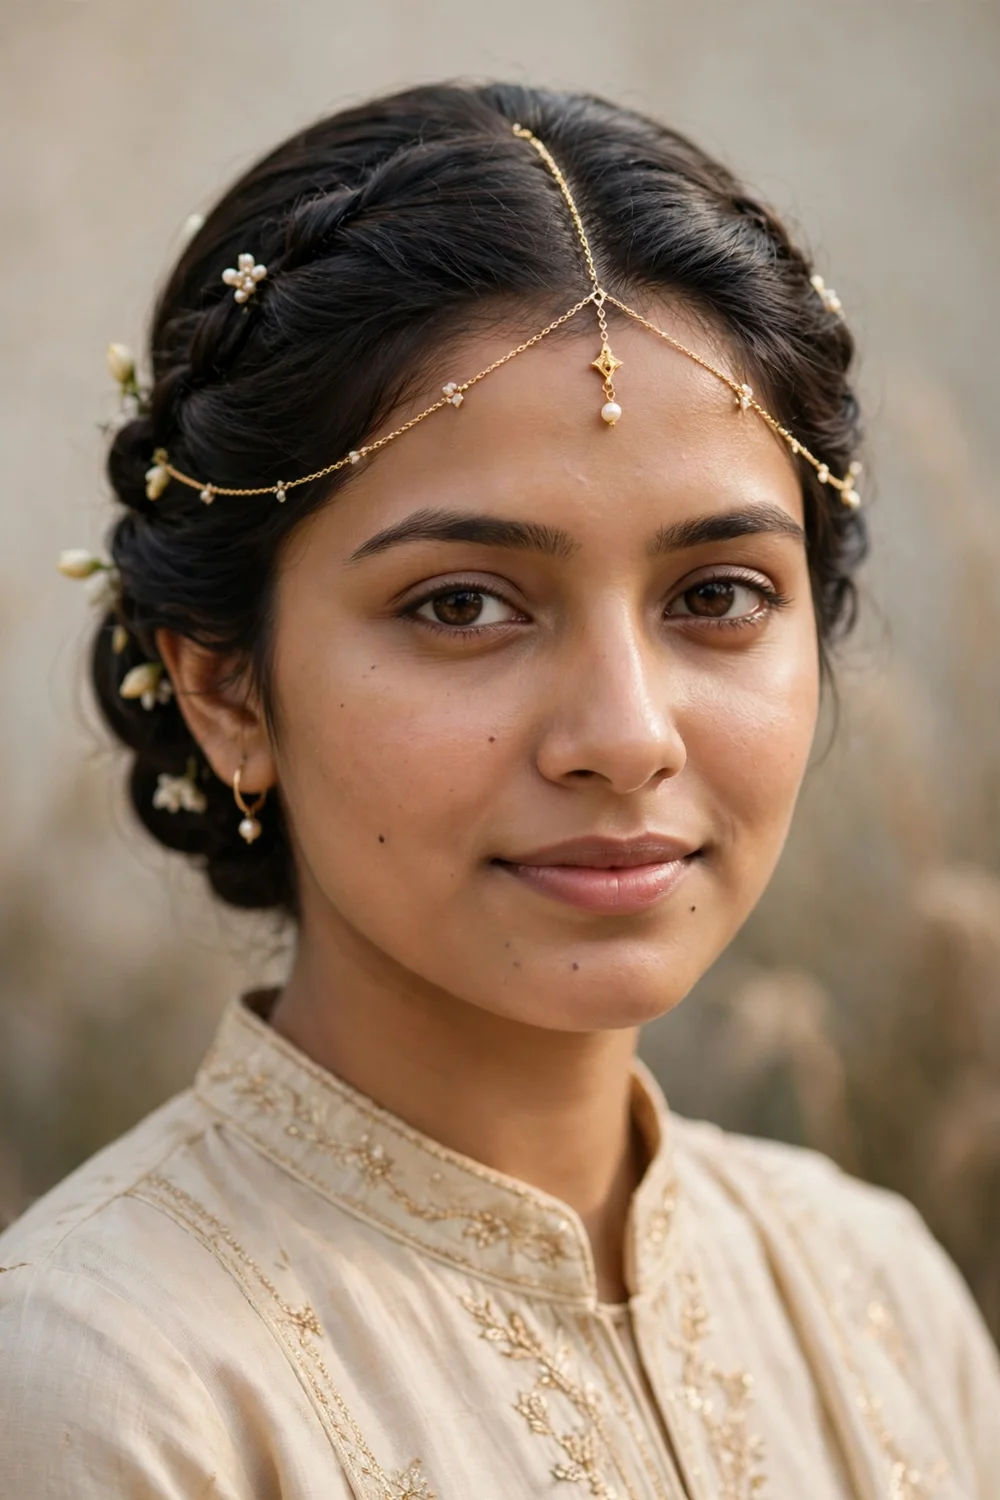
Smooth the hair back and pin it flat, then drape a delicate gold or silver head chain across the forehead or along the center part. Secure the chain ends with hidden bobby pins behind the ears. The jewelry-like detail suits weddings and formal photos. Choose a chain with a small pendant that rests at the center of the forehead. This takes about 10 minutes. Bobby-pin the chain at three points, both temples and the nape, so it cannot shift.
Try this: keep the rest of the jewelry minimal so the head chain stands out.
Difficulty: Easy | Cost: $10 to $25
How to Choose the Right Fancy Style
Start with your event. Black-tie calls for structured shapes like the French roll, vintage curls, or a polished chignon. Cocktail parties and dates allow playful options like the half-bun, space buns, or glitter roots. Outdoor weddings favor secure pinned styles, since wind undoes loose curls fast.
Next, match the style to your length. Pixies do best with volume-based looks like the pompadour and faux hawk, plus accessories. Bobs and lobs can handle braids, twists, buns, and rolls. If a style needs more length than you have, pick its closest shorter cousin from the list.
Finally, be honest about your skill and time. If you have 10 minutes and basic pinning skills, stick with the Easy styles. Save the Hard ones for a trial run the day before. If your hair is fine as well as short, start with cuts that give it more body, like the ones in our guide to short hairstyles for thin fine hair.
For a refresher on the tools and products behind these looks, read our short hair styling guide before you start.
Comparison Table: All 49 Fancy Short Hairstyles
| Hairstyle | Best For | Time Needed | Difficulty |
|---|---|---|---|
| Side Braid | Dinners, dates | 10 min | Easy |
| Low Chignon | Weddings, dinners | 15 min | Easy |
| Braided Ponytail | Outdoor parties | 15 min | Medium |
| Fancy Side Ponytail | Cocktail parties | 15 min | Easy |
| Pixie Pompadour | Any evening event | 15 min | Medium |
| Double-Braided Bun | Formal dinners | 20 min | Medium |
| Wet-Look Half Pony | Fashion events | 10 min | Easy |
| Curly High Puff Ponytail | Parties, celebrations | 10 min | Easy |
| Twisted Faux-Braid Half-Updo | Date nights | 15 min | Easy |
| Inverted Rollup | Retro parties | 20 min | Medium |
| Dimensional Loose Waves | Weddings, dates | 15 min | Easy |
| Messy Curled Chignon | Outdoor weddings | 15 min | Easy |
| Half-Bun | Casual parties | 10 min | Easy |
| Twisted Fringe | Date nights | 5 min | Easy |
| Slicked Back | Cocktail parties | 10 min | Easy |
| Pearl and Crystal Accents | Weddings, proms | 10 min | Easy |
| Crown Braid with Mini Bun | Weddings | 25 min | Hard |
| Twisted French Roll | Black-tie events | 20 min | Hard |
| Side Bun with Braided Accents | Cocktail parties | 20 min | Medium |
| Messy Top Knot | Semi-formal parties | 10 min | Easy |
| Half-Up Crown Braid Ponytail | Proms, weddings | 20 min | Medium |
| Half-Up French Twist with Waves | Themed parties | 25 min | Medium |
| Classic Updo Curls | Proms, dances | 25 min | Medium |
| Side-Swept Pinned Curls | Evening weddings | 20 min | Medium |
| Twisted Elegant Updo | Ceremonies, dinners | 20 min | Medium |
| Vintage Hollywood Curls | Galas, black-tie | 30 min | Hard |
| Twisted Crown Updo | Garden weddings | 20 min | Medium |
| Mini Bun with Decorative Clips | Holiday parties | 10 min | Easy |
| Edgy Faux Hawk | Concerts, fashion events | 15 min | Medium |
| Half-Braided Half-Bun | Casual-chic parties | 12 min | Easy |
| Tucked Crown | Daytime events | 10 min | Easy |
| Sweeping Curls and Braid | Evening weddings | 20 min | Medium |
| Dramatic Half Updo | Parties | 20 min | Easy |
| Woven Basket Weave Updo | Formal events | 35 min | Hard |
| Waterfall Braid with Bow | Showers, garden parties | 20 min | Medium |
| Loopy Braid | Parties, dates | 15 min | Medium |
| Bouffant Updo | Themed nights | 25 min | Medium |
| Fancy Downdo | Dinner parties | 15 min | Easy |
| Boho Curls and Braid | Beach weddings | 20 min | Easy |
| Row of Bows | Holiday parties | 10 min | Easy |
| Floral Side Updo | Weddings | 20 min | Medium |
| Simple Knot | Low-key events | 5 min | Easy |
| Jeweled Headband Glam | Any evening event | 5 min | Easy |
| Glitter Roots | New Year’s Eve, festivals | 10 min | Easy |
| Glass-Hair Sleek Bob | Cocktail parties | 20 min | Easy |
| Double Mini Space Buns | Concerts, themed nights | 15 min | Easy |
| Polished Low Ponytail with Wrapped Band | Dinners, dates | 12 min | Easy |
| Victory Rolls | Retro events | 30 min | Hard |
| Bridal Head Chain | Weddings, formal photos | 10 min | Easy |
Frequently Asked Questions
Can I do a fancy updo with a very short pixie cut?
Yes, with limits. Styles that need pinning and volume, like the pixie pompadour, twisted fringe, and pearl accents, work on pixies with at least 2 inches on top. Braided crowns, buns, and rolls need chin-length hair, so those are not options for very short pixies. Focus on volume, texture, and accessories instead of pinned shapes.
How do I make a fancy short hairstyle last all night?
Start with day-old hair or add dry texture spray, since clean hair slips out of pins. Anchor every pin by crossing two bobby pins in an X, and finish with a firm-hold hairspray. Carry 4 to 5 extra bobby pins and a travel-size hairspray in your bag for quick fixes. Avoid touching your hair during the event, since handling breaks the hold.
What accessories make short hair look fancy the fastest?
Crystal clips, pearl pins, jeweled headbands, and small silk flowers. They add glam in under a minute and hide bobby pins at the same time. For a scattered pearl look, stick pearls to styled hair with a tiny dot of eyelash glue, which washes out easily. Keep the metal tones consistent with your jewelry.
How long does it take to do a fancy short hairstyle?
Most take 10 to 25 minutes. Simple styles like the twisted fringe, slicked back, and pearl accents take under 10 minutes. Braided crowns, French rolls, and woven updos need 30 to 40 minutes. If you are new to pinning, practice once the day before the event.
Can these fancy styles work on thin or fine short hair?
Yes. Backcombing, dry texture spray, and root-lifting powder add grip and fullness before you start. Loopy braids, messy chignons, and bouffant styles flatter fine hair because they rely on teasing rather than density.
Final Thoughts
Short hair never limits how dressed-up you can look. Pick one style from the list that matches your length and your evening, gather your pins and one good accessory, and give yourself enough time to enjoy the process. The fanciest hair is the kind you feel comfortable wearing all night. If you want toned-down versions of these looks for everyday wear, browse our cute easy hairstyles for short hair.

