


Fine hair after 55 has its own rules. Strands get finer, the crown lies flatter, and a cut that worked for years can start to look thin at the ends and flat at the roots. The good news is that shape does most of the work. Shorter lengths remove weight, blunt ends make the bottom line look dense, and layers placed only where lift is needed leave the rest of the hair at full thickness.
This list collects 25 hairstyles for older women with fine hair and explains, for every cut, why it works on fine strands in particular. You will find blunt bobs, pixies, layered crops, lobs, and a few longer options that keep their ends full. Every idea notes who it suits, how to ask for it, and how much daily styling it takes, so you can pick by your routine as much as by the photo.
Key Takeaways
- Blunt ends make fine hair look thicker. One even hemline reads as density, while feathered ends can look see through.
- Layers belong at the crown. Crown layers lift fine hair, while heavy layers through the ends thin the bottom line.
- Shorter lengths lift on their own. Pixies, crops, and bobs remove the weight that pulls fine hair flat.
- A deep side part is a free volume trick. It shifts hair over the crown and covers a thinning part line.
- What to avoid: long one length hair past the shoulders, heavy layers through the ends, razor cut ends, and heavy oils or creams that coat fine strands and clump them together.
1. Blunt Chin-Length Bob
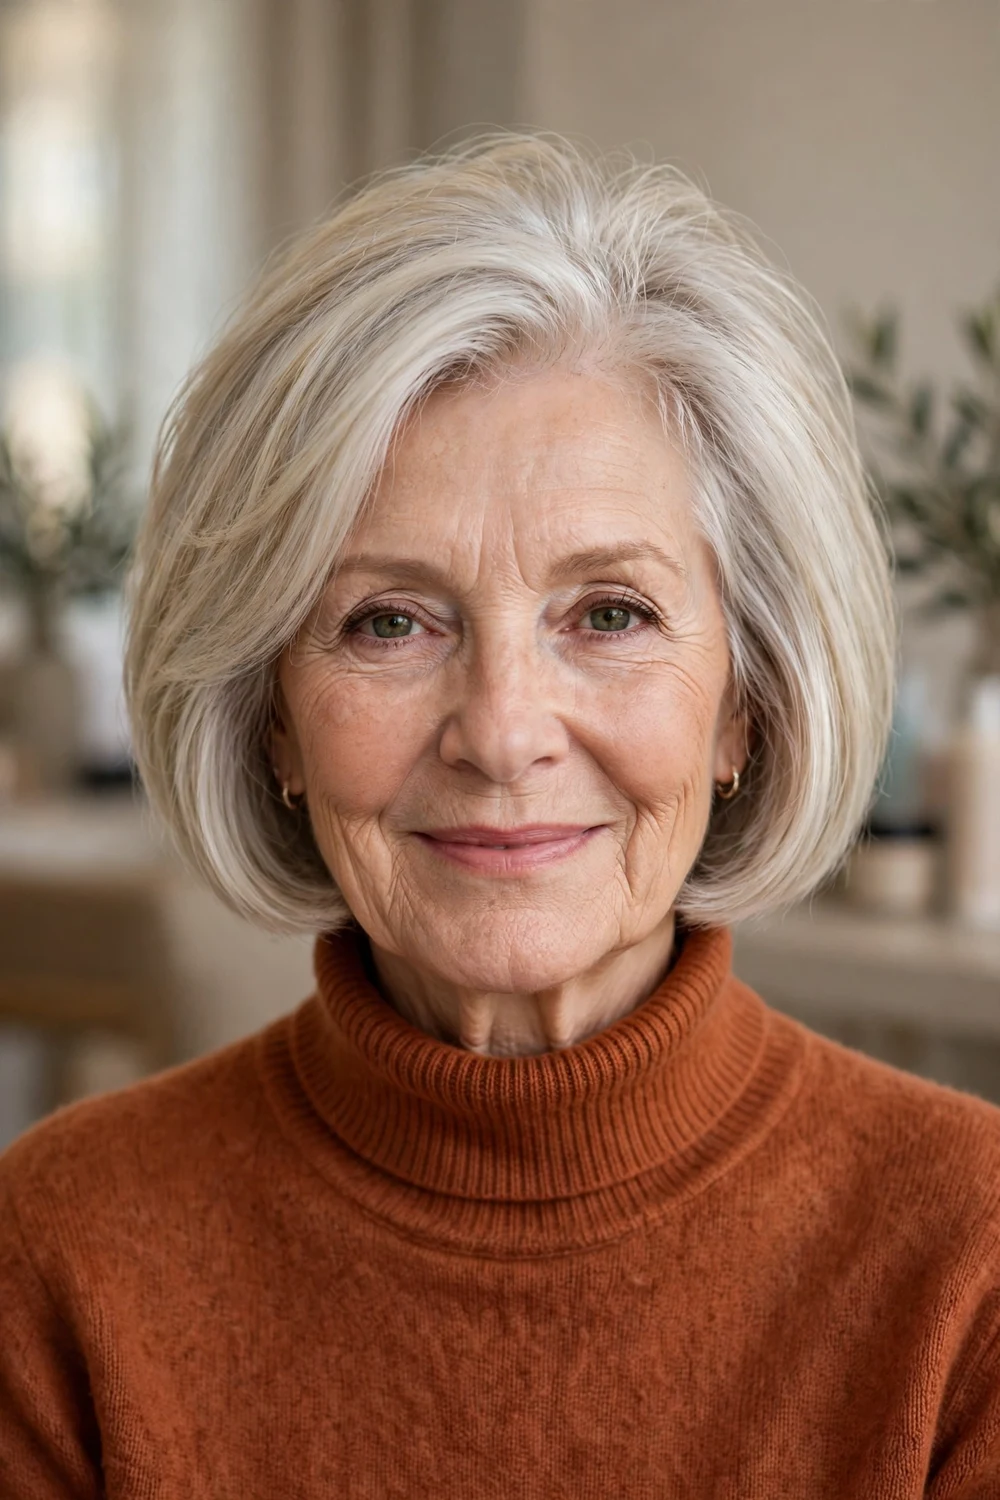
The blunt chin-length bob ends in one strong, even line at the chin, and that single line is what does the work on fine hair. When every strand ends at the same point, the bottom edge reads as dense, and the wispy look that fine ends often get disappears. The cut has no layers through the lengths, so none of the thickness you have is cut away.
Ask for the perimeter cut blunt and only two or three long layers at the crown if you want lift on top. Blow dry with a round brush, turning the ends slightly under, and the shape holds through the day. This length suits oval, heart, and square faces, and it works with natural grey, blonde, or brunette color.
Try this: flip your part to the opposite side after drying. Fine hair trained in one direction lifts higher at the root when you change the direction.
Difficulty: Low to Medium · Cost: $$ (salon)
2. Layered Bob with Crown Layers
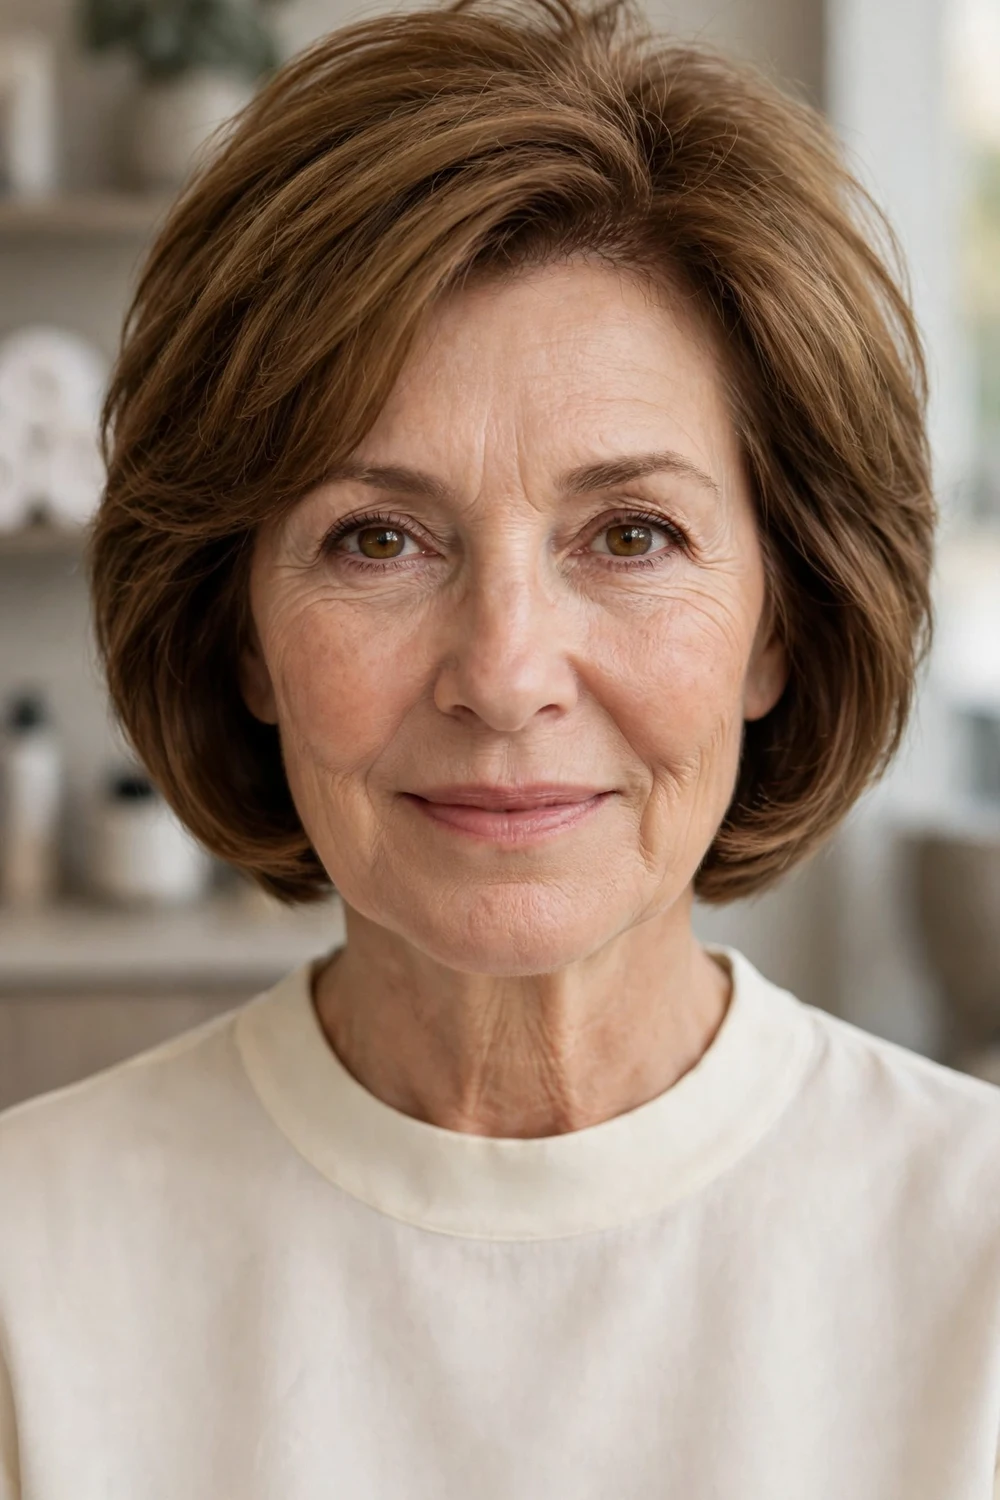
This layered bob keeps the lengths mostly one length and places short, light layers only at the crown. That placement matters for fine hair. Layers scattered through the ends thin the hemline, while layers at the crown let the top hair stand up and give the whole cut a rounded shape.
Style it by blow drying the crown first, lifting small sections up and away from the scalp with a round brush. The sides and ends need only a quick smooth pass. The cut suits round and oval faces, and it grows out softly for six to eight weeks before the crown layers need a tidy.
Try this: use a pea sized amount of lightweight mousse at the crown roots only. Product through the ends weighs fine hair down and undoes the lift the layers built.
Difficulty: Medium · Cost: $$ (salon)
3. Feathered Short Bob

The feathered short bob sits between a pixie and a chin bob, with soft, feathered edges through the top and around the face. Feathering removes bulk in small, tapered pieces, so the outline stays soft while the hair near the scalp keeps its fullness. For fine hair, that soft edge also hides a sparse front hairline better than a hard line does.
Ask your stylist to keep the feathering light and to leave the back and sides close and neat. At home, towel dry, work in a small amount of light styling cream, and dry with your fingers while lifting the top. The routine takes about five minutes, and second day hair usually needs only a quick finger comb.
Try this: dry the front section forward, then sweep it back once it is dry. That small change in direction gives fine fringe area hair more height.
Difficulty: Low · Cost: $$ (salon)
4. Tousled Wavy Bob
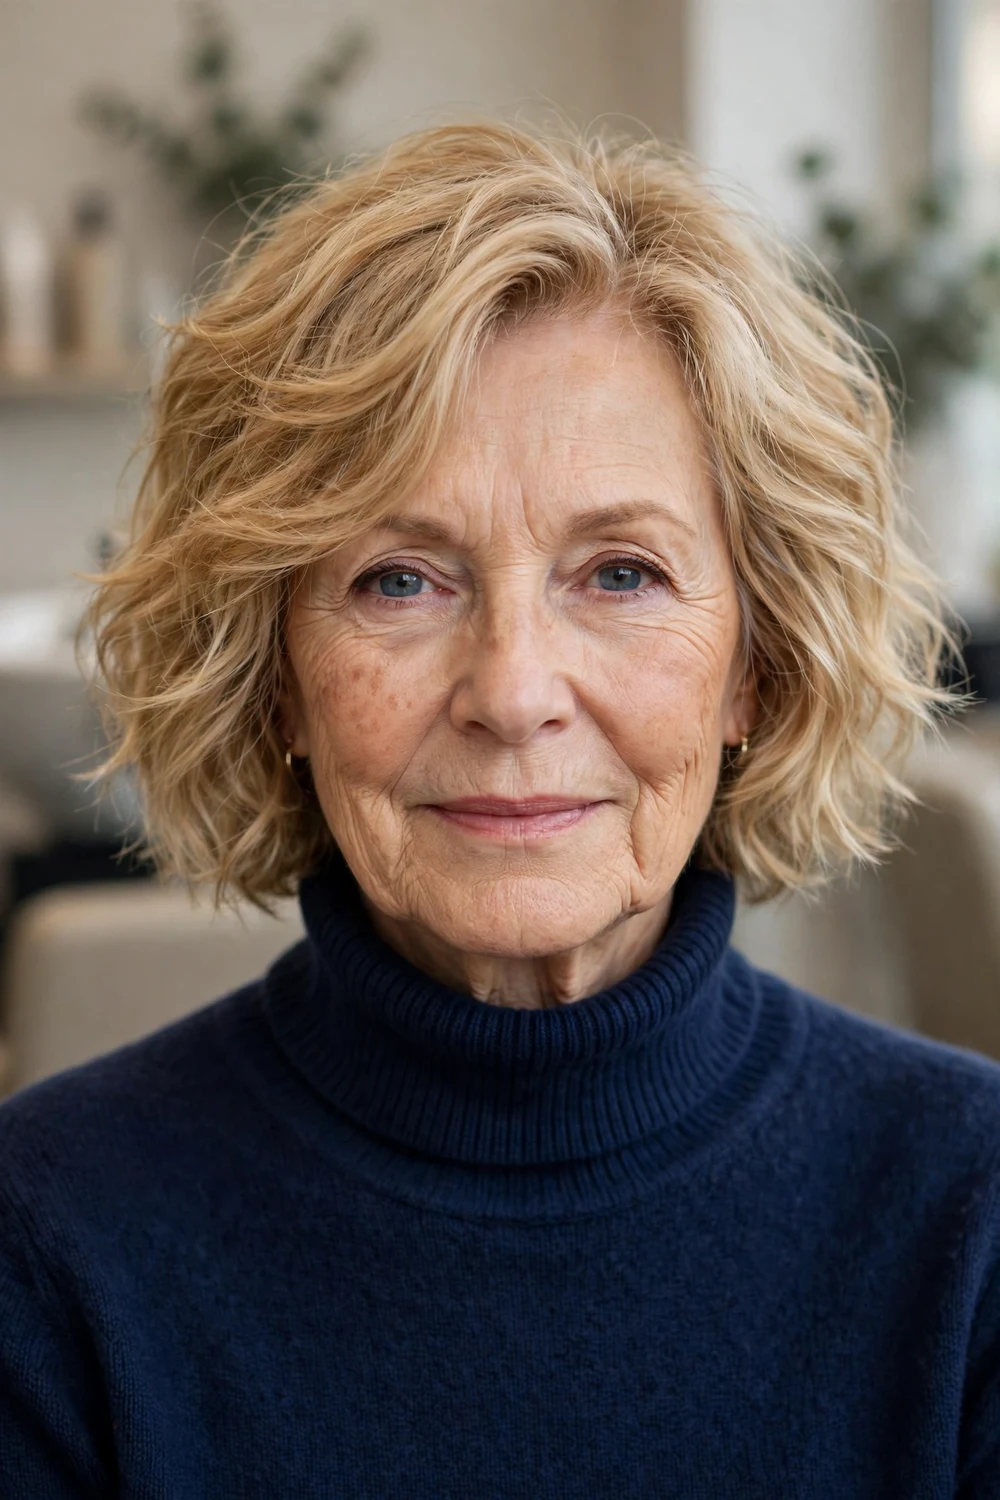
A tousled wavy bob uses bends and loose waves to make fine hair look fuller. Every bend catches light from a different angle and covers the spaces between strands, so hair that lies flat and straight in the morning can look twice as full with wave added. The length stays at the chin or jaw, which keeps the ends thick.
Create the waves with a large barrel iron on the mid lengths only, leaving the ends out, or braid damp hair loosely overnight for a heat free version. Break the waves up with your fingers rather than a brush. A light texture spray at the roots holds the movement without coating the strands.
Try this: spray texture spray onto your hands first, then scrunch it into the hair. Spraying fine hair directly can wet it down and flatten the waves you just made.
Difficulty: Medium · Cost: $$ (salon)
5. Deep Side-Part Bob

The deep side-part bob is a blunt or lightly layered bob worn with the part placed well to one side. Moving the part shifts a larger share of hair over the crown, and that extra hair on top reads as volume. The diagonal line also covers a thinning part line, since the hair falls across the scalp instead of opening along it.
Ask for a clean perimeter and a part cut in on the side you prefer, so the hair is trained to fall that way. Blow dry the top section over to the opposite side first, then flip it back into place for extra root lift. The style suits most face shapes and pairs well with glasses.
Try this: change your part side every few days. Rotating the part stops fine hair from settling flat along one line and keeps the roots responsive.
Difficulty: Low · Cost: $$ (salon)
6. Stacked Bob
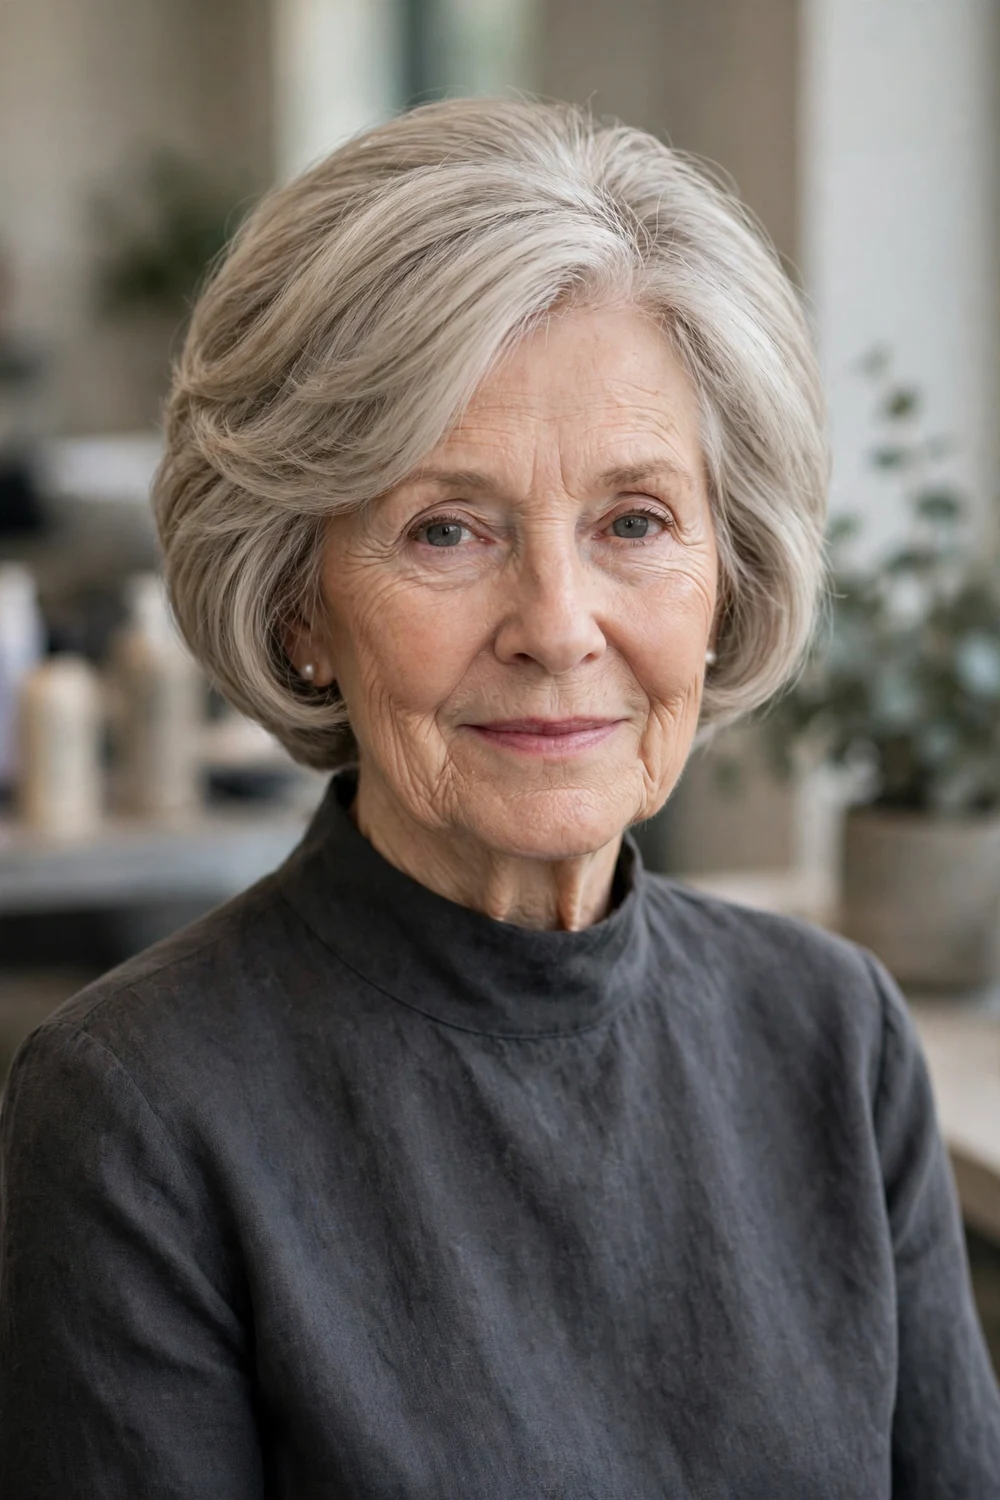
A stacked bob is cut shorter and layered in close steps at the nape, then grows longer toward the front. The stacking builds a rounded shape at the back of the head, which is where fine hair often lies flattest. Because the back is short, the weight that pulls fine hair down is gone, and the front lengths keep the cut feminine.
Tell your stylist you want the stack gradual rather than steep if you prefer a softer profile. At home, dry the back first with a small round brush, lifting at the roots, then smooth the front sections forward. The stacked back needs a trim every five to six weeks to keep its shape.
Try this: ask for the front to end at the jaw if you wear glasses. Jaw length front pieces frame the face without catching on frames.
Difficulty: Medium · Cost: $$ (salon)
7. Asymmetrical Bob
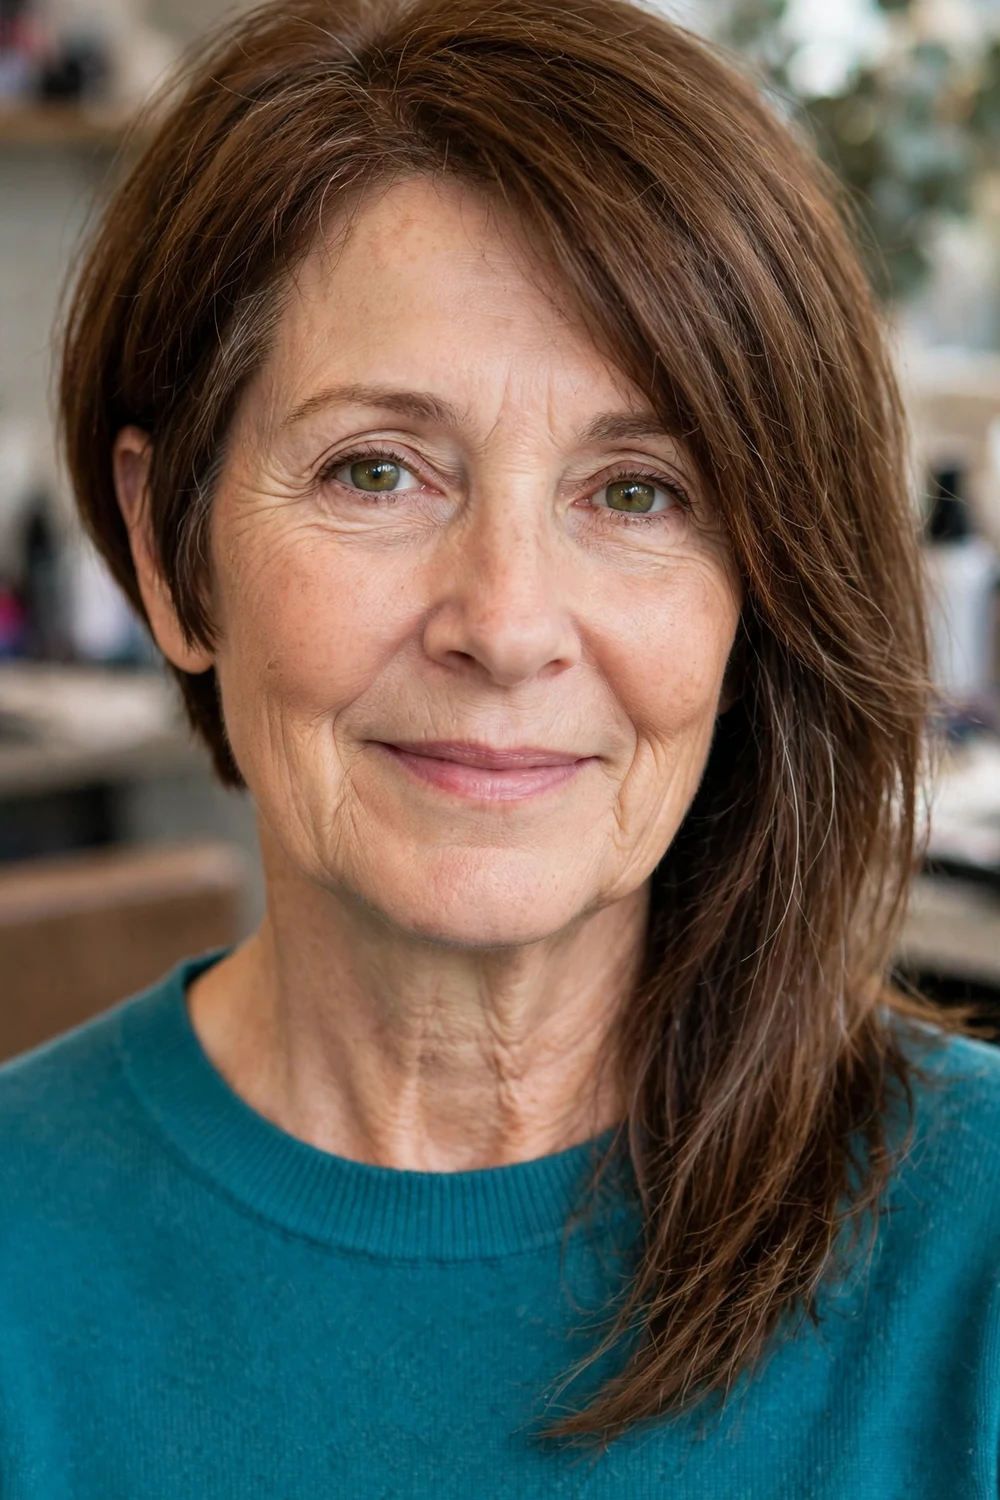
An asymmetrical bob is longer on one side than the other, or longer at the front than at the back, and the uneven line adds movement to fine hair. The longer side carries more visible hair across the face, which makes that side look fuller, while the shorter side keeps the cut light and easy to lift at the root.
Wear it with a side part on the shorter side to get the most lift from the shape. Style with a quick blow dry and a small amount of smoothing cream on the ends only. The cut suits oval and round faces, and it is a good choice if a standard bob has started to feel plain.
Try this: keep the difference between the two sides modest, around an inch. A small difference reads as intentional and stays easy to grow out.
Difficulty: Medium · Cost: $$ (salon)
8. Shaggy Chin Bob with Wispy Fringe
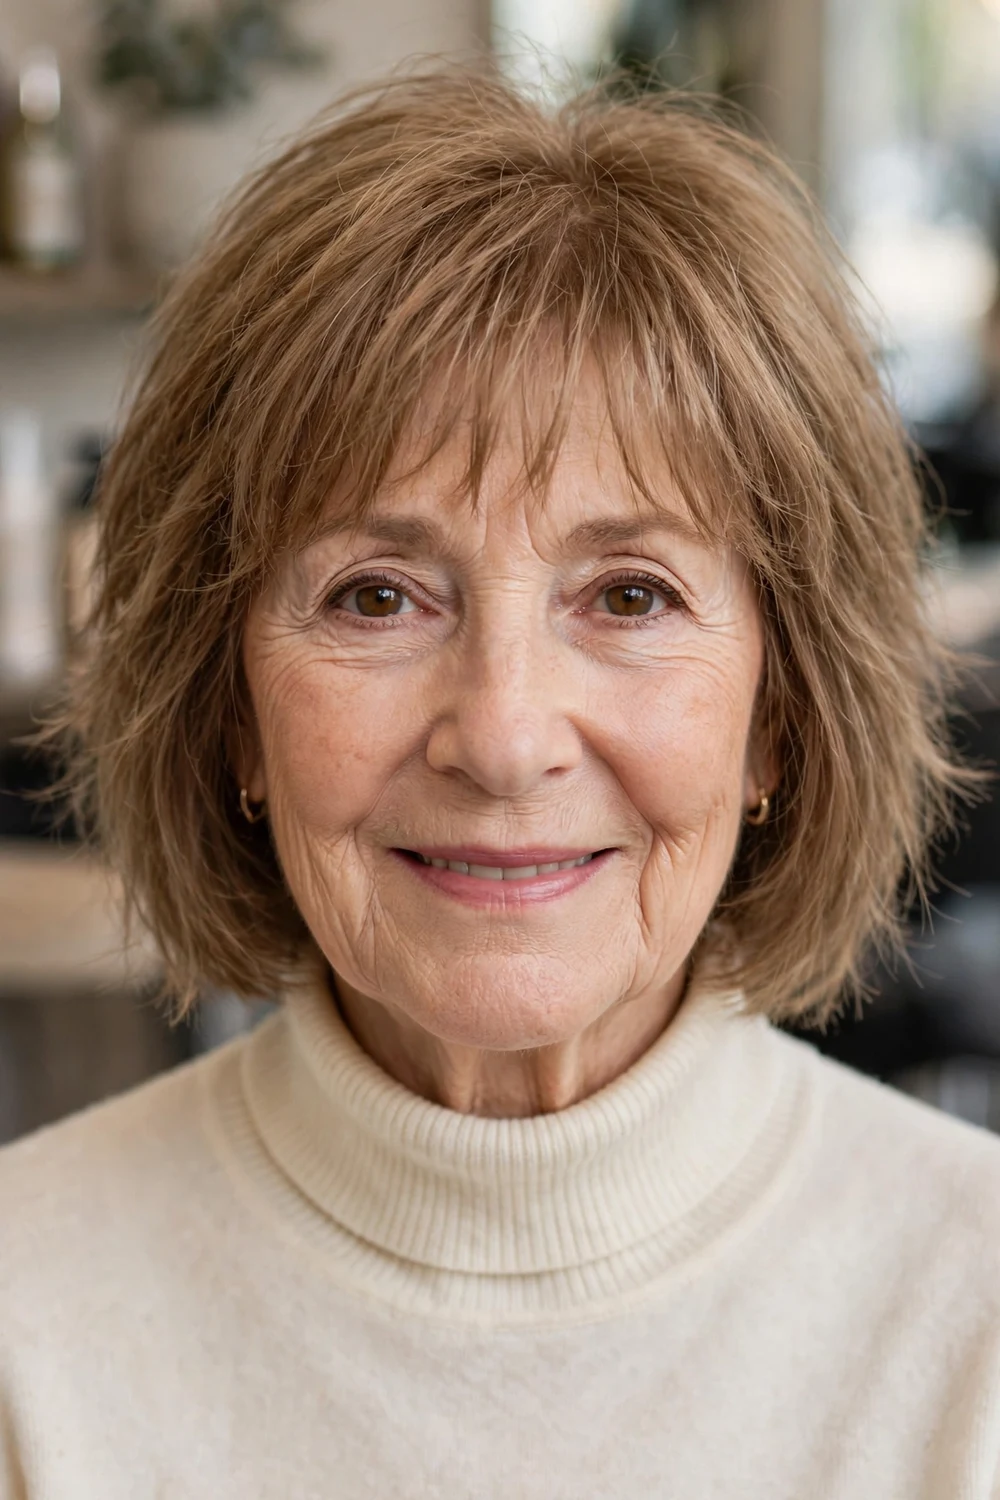
This chin length bob borrows the shag idea of choppy, piecey layers and keeps it short and controlled. The choppy texture scatters light across the hair, so fine strands look less see through, and the wispy fringe softens the forehead without taking a thick section of hair away from the top.
Ask for the fringe cut piecey and see through rather than solid, and for the layers to stop above the ends so the bottom line stays full. Scrunch in a light mousse and air dry or diffuse on low heat. The undone finish means the style looks fine on day two with a quick mist of water and a scrunch.
Try this: pinch the ends of the fringe with a tiny amount of styling cream to separate the pieces. Separated pieces read as texture rather than thinness.
Difficulty: Low to Medium · Cost: $$ (salon)
9. Bixie Cut
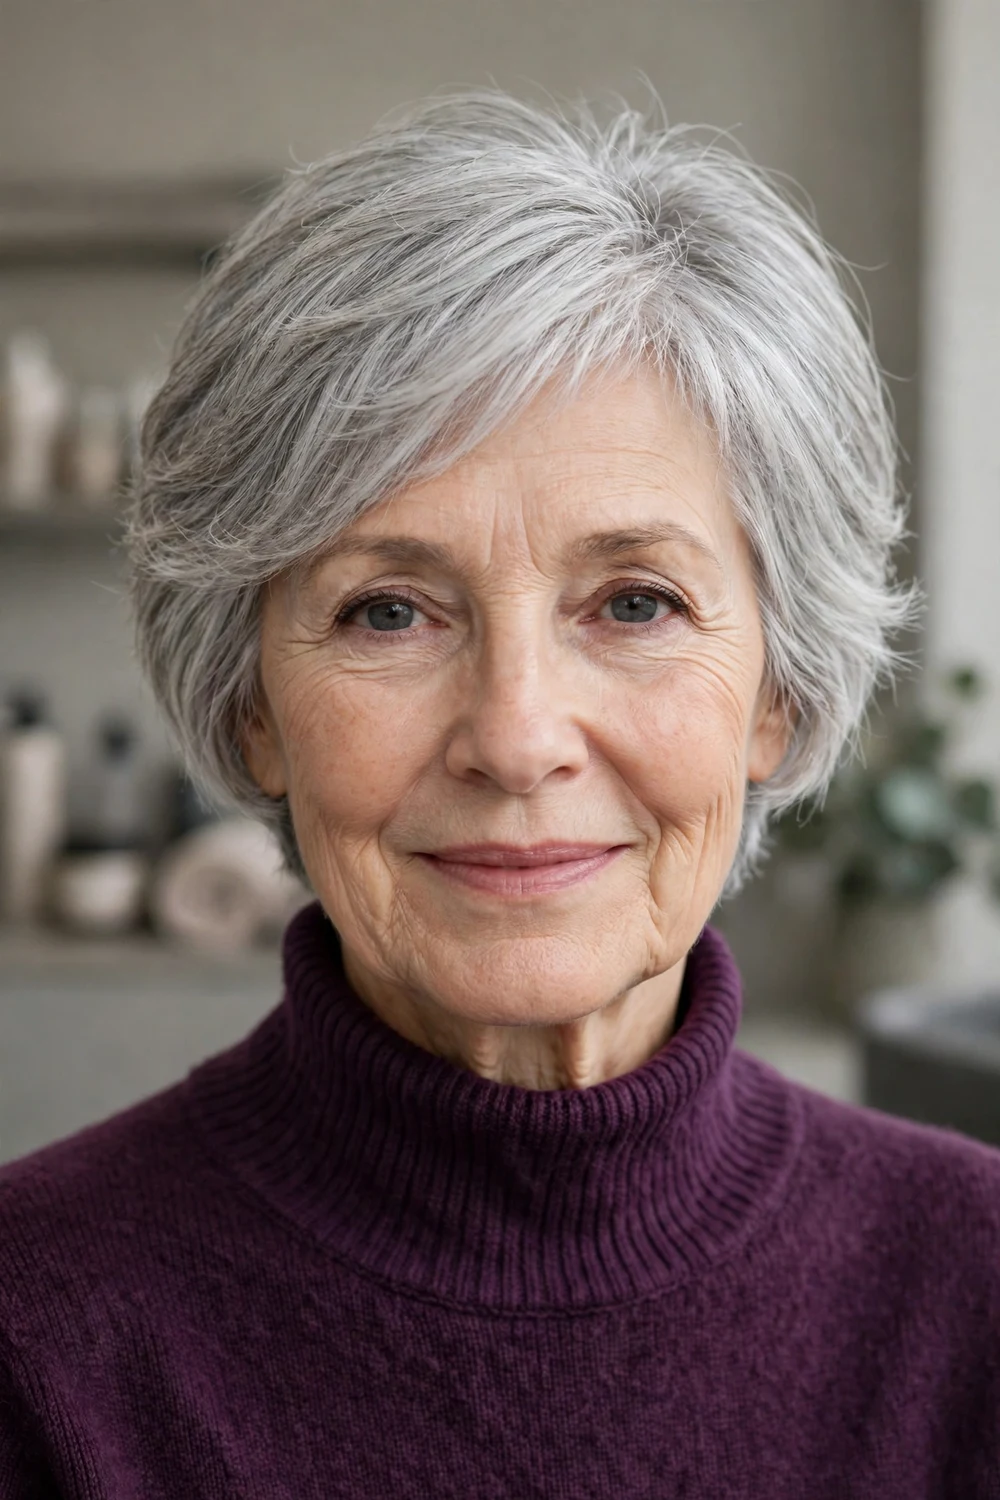
The bixie sits between a bob and a pixie: longer and softer than a pixie, shorter and lighter than a bob. For fine hair, that middle length removes enough weight for the crown to lift, while the longer top and front pieces keep coverage at the hairline and ears. It is a practical first step if you are moving from a bob toward shorter hair.
Ask for the back and sides taken in close, with length left on top to sweep or tuck. Style by drying the top forward, then pushing it back with your fingers and a dab of light paste. If you want the fuller shag direction later, the trendy shag haircuts for fine hair roundup shows how this length grows into that shape.
Try this: take a photo of the bixie from the side at your first appointment. The side profile is where this cut lives, and the photo helps your stylist repeat it exactly.
Difficulty: Medium · Cost: $$ (salon)
10. Silver Pixie-Bob with Side Sweep

This pixie-bob is cut for natural silver and white hair, with a longer top that sweeps across the forehead. Silver strands reflect light strongly, and the sweep gathers that light across the front, so the hair reads as bright and full. The close sides and back keep the shape tidy and stop fine ends from straggling.
Ask for the top left long enough to sweep and tuck, and the sweep cut to blend into the side rather than end in a step. A small amount of smoothing cream and a two minute blow dry across the forehead is the whole routine. The cut suits oval and heart faces and looks polished with very little daily work.
Try this: use a purple toning shampoo once a week only if your silver hair picks up a yellow cast. More often than that can dry fine strands.
Difficulty: Low · Cost: $ (salon)
11. Soft Wispy Pixie
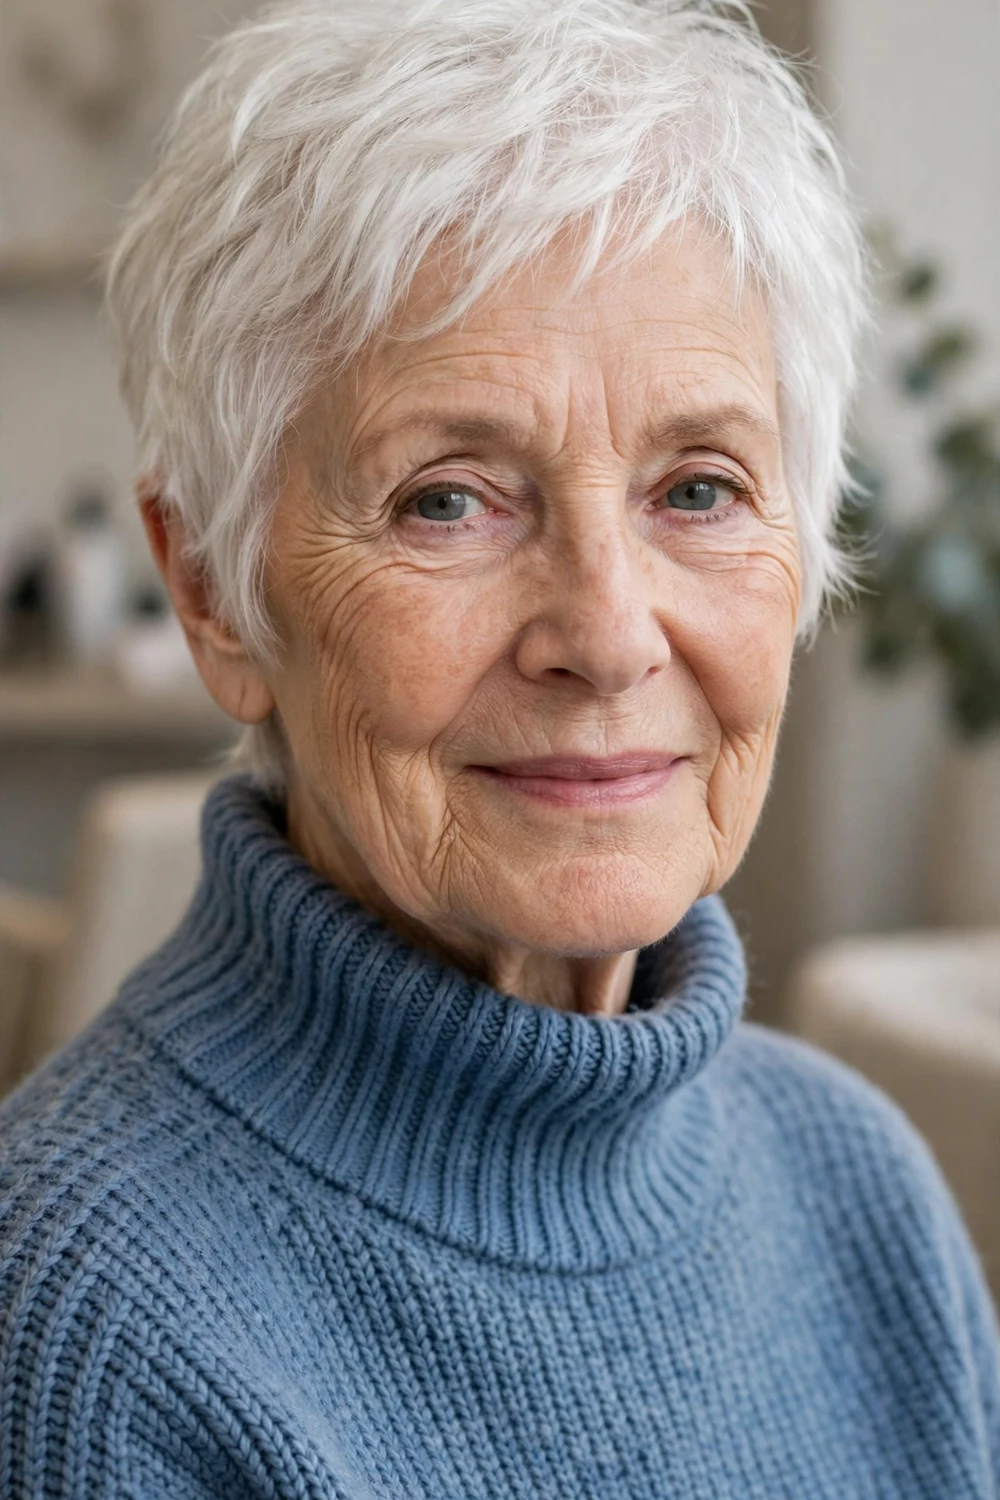
The soft wispy pixie keeps the classic pixie shape and softens every edge. Feather light ends at the front and around the ears stop the cut from looking severe, and the short length removes the weight that pulls fine hair flat. With so little length to weigh it down, fine hair stands away from the scalp on its own.
Ask for texture at the ends rather than length taken off with thinning shears, since thinning shears can make fine hair look sparser. At home, dry with your fingers, lifting the top as you go, and finish with a fingertip of light cream. Trims every five to six weeks keep the soft outline in place.
Try this: if you worry a pixie will feel too exposed, ask to keep the top and fringe a little longer at the first cut. You can always go shorter at the next visit.
Difficulty: Low · Cost: $ (salon)
12. Textured Crown Pixie

The textured crown pixie puts choppy, piecey texture on top of the head and keeps the sides close. Fine hair usually goes flat at the crown first, and short textured pieces there stand in different directions, which builds a lifted, rounded shape that smooth hair cannot hold. The close sides make the top look fuller by contrast.
Ask your stylist to point cut the crown pieces rather than slicing them, so each piece keeps a strong end. Style with a pea sized amount of matte paste worked into dry hair, pinching the crown pieces upward. The cut is forgiving on busy mornings because the texture is meant to look piecey, and the wash and wear haircuts guide covers similar low routine shapes.
Try this: apply paste to your fingertips, not your palms, and pinch only the crown. Paste spread everywhere flattens the sides against the head.
Difficulty: Low to Medium · Cost: $ (salon)
13. Sleek Side-Swept Pixie
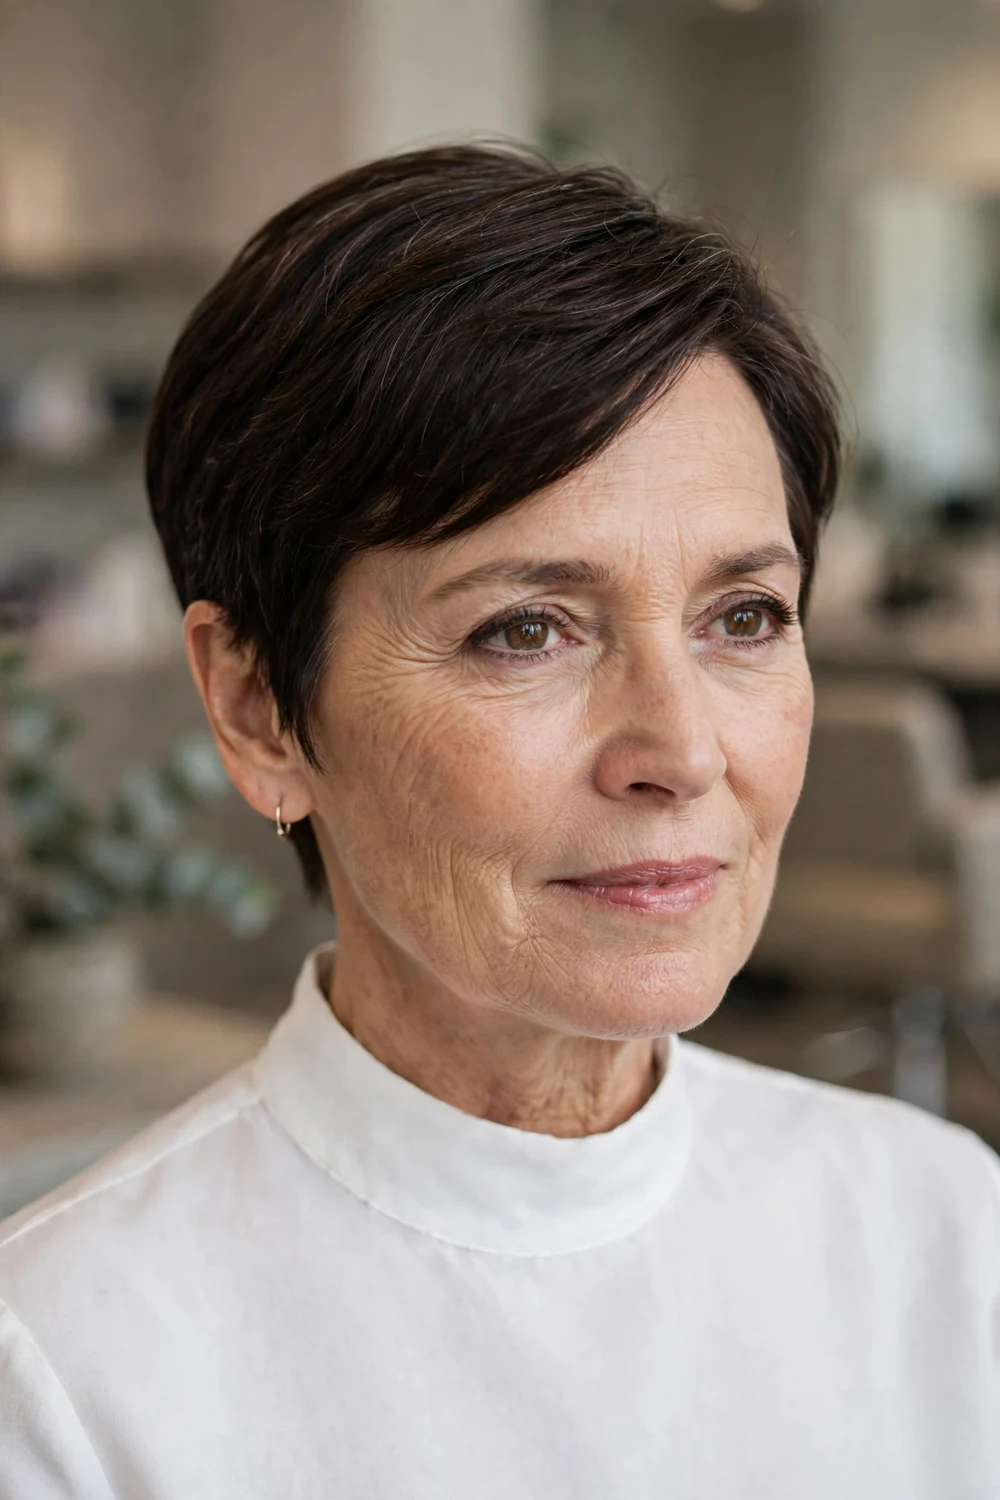
The sleek side-swept pixie is the polished version of the pixie family. The top is left long, combed smoothly to one side, and the nape is tapered clean. On fine hair, a smooth finish makes the surface look even and deliberate, and the deep sweep covers the part line and the front hairline in one move.
Ask for the top long enough to reach across the forehead and for the tapered nape to be blended, with no hard line. Dry the top across to one side with a flat brush, then add a drop of smoothing serum on the surface only. This version suits oval and long faces and works well for dressier occasions.
Try this: tuck the longer side behind your ear on day two and let the sweep fall forward again on day three. The small change refreshes the shape without restyling.
Difficulty: Low to Medium · Cost: $$ (salon)
14. Curly Crop Pixie

The curly crop pixie keeps natural curls close at the sides and lets them spring up on top. Each curl adds its own bend and shadow, so fine curly hair gains visible body without any heat styling. Keeping the sides short stops fine curls from spreading thin at the edges, where they can look wispy.
Ask for the cut done on dry hair, curl by curl, so the length is judged as you wear it. Scrunch in a light curl cream on damp hair and air dry or diffuse briefly on low. For more curl focused short cuts, the pixie haircuts for curly natural hair collection shows longer and shorter versions of this shape.
Try this: refresh second day curls with a mist of water and a scrunch rather than more product. Extra product builds up fast on fine curls and pulls them down.
Difficulty: Low · Cost: $ (salon)
15. Wash-and-Wear Crop

The wash-and-wear crop is a short, textured cut shaped to follow your natural growth pattern, so it dries into place with almost no styling. For fine hair, the short length is the point: strands this short cannot lie heavy and flat, and the textured top gives the eye movement instead of a smooth, thin surface.
Ask for a precise cut and be honest about wanting near zero daily styling, since the shape has to do all the work. Towel dry, add a fingertip of light cream, and push the top into place with your fingers. A trim every six weeks keeps the crop falling into shape on its own.
Try this: book your next trim before you leave the salon. This cut stays easy only while the shape is fresh, and a set date keeps it that way.
Difficulty: Low · Cost: $ (salon)
16. Soft Shag
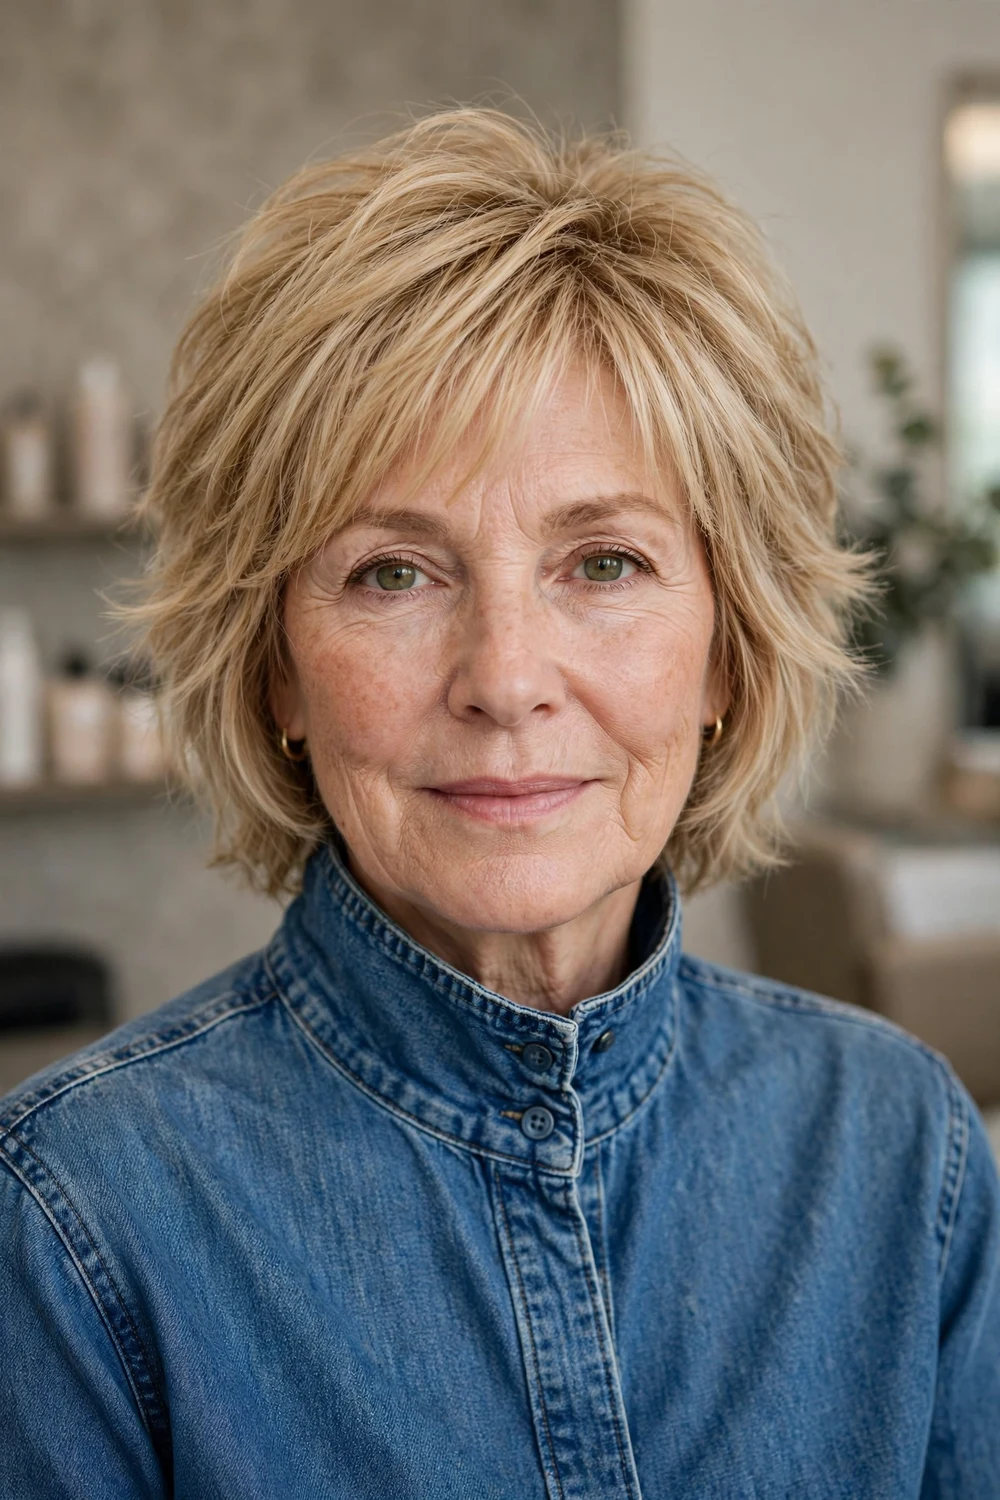
The soft shag concentrates shorter layers at the crown and keeps the ends at jaw to shoulder length with their weight intact. Crown layers are the volume engine on fine hair, since they shorten the hair that needs to lift, while full ends stop the bottom of the cut from looking thin. Kept soft, the shag reads modern rather than retro.
Ask for the shortest layers at the crown only, and for the ends left blunt underneath the shaggy surface. Scrunch in mousse and air dry, or diffuse briefly while lifting at the roots. This cut suits wavy fine hair especially well, since natural wave fills out the layers.
Try this: if your hair is straight, bend only the top layer with a large iron in a few places. The crown movement is what sells the shag, and the rest can stay smooth.
Difficulty: Medium · Cost: $$ (salon)
17. Lob with Wispy Bangs
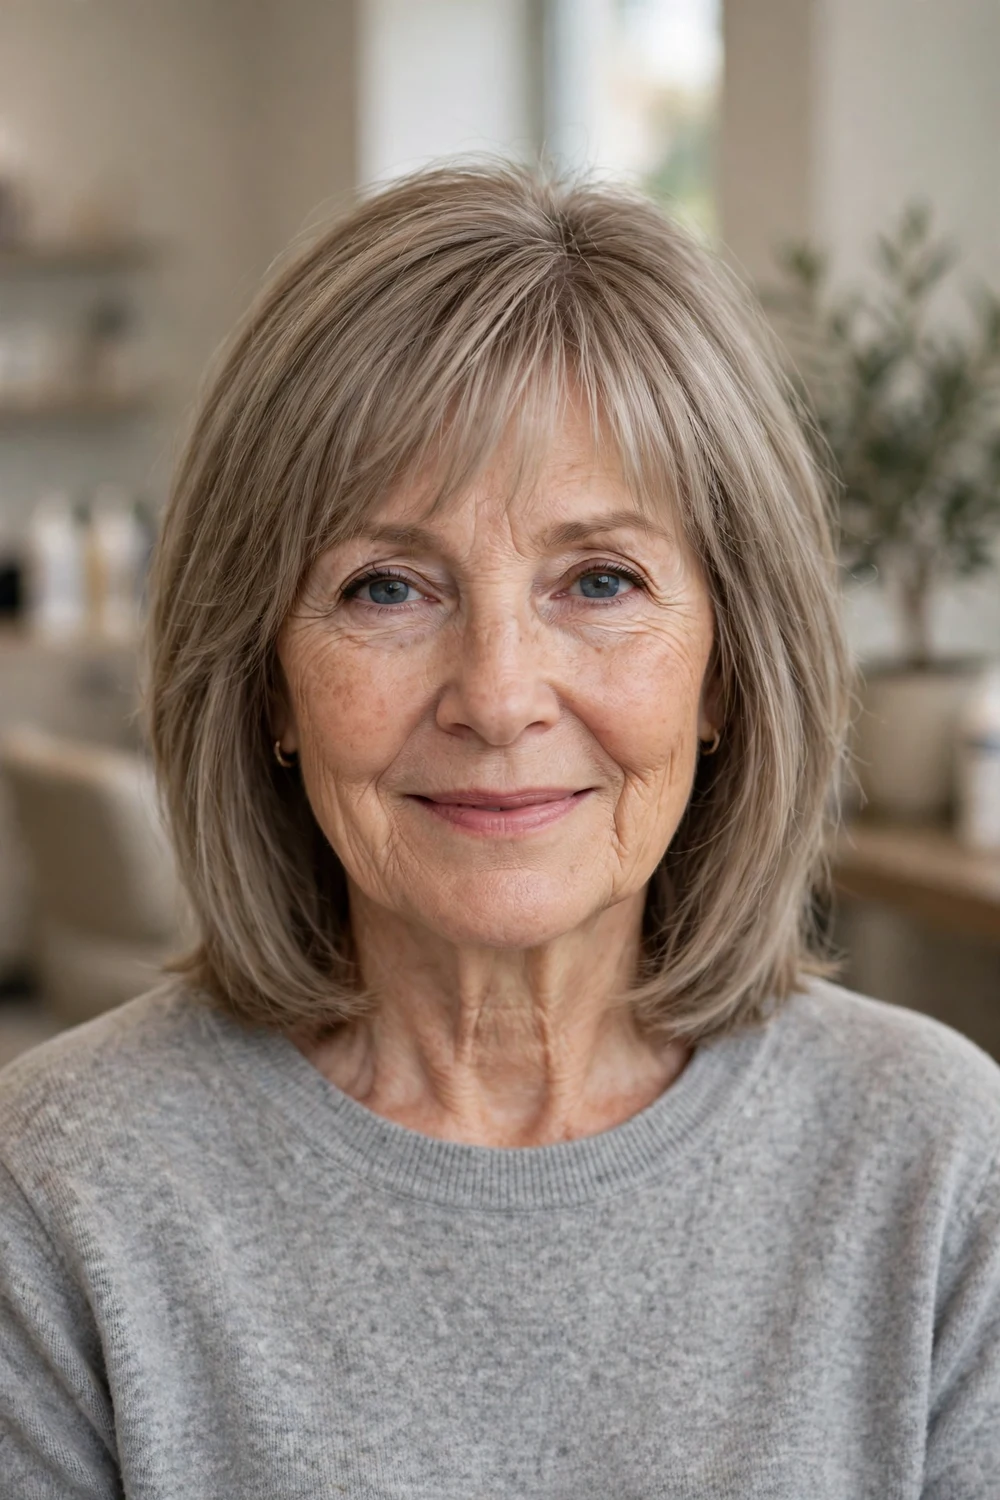
The lob with wispy bangs stops at the cheekbones to collarbone, depending on the version you choose, and pairs that length with a light, see through fringe. The lob length keeps enough hair for an updo on warm days, while the wispy bangs soften the forehead and draw attention to the eyes. On fine hair, the bangs are cut from a shallow section, so they do not steal density from the crown.
Ask for the ends kept fairly blunt under any surface movement, and the bangs cut long at first so they can be shortened once you see them dry. Blow dry the bangs first, side to side, then dry the lengths with a round brush for a slight bend. Round and oval faces suit this pairing well.
Try this: dry shampoo on the bangs the night before, rather than in the morning, keeps fine fringe from looking flat or separated by midday.
Difficulty: Medium · Cost: $$ (salon)
18. Layered Lob with Face-Framing Pieces
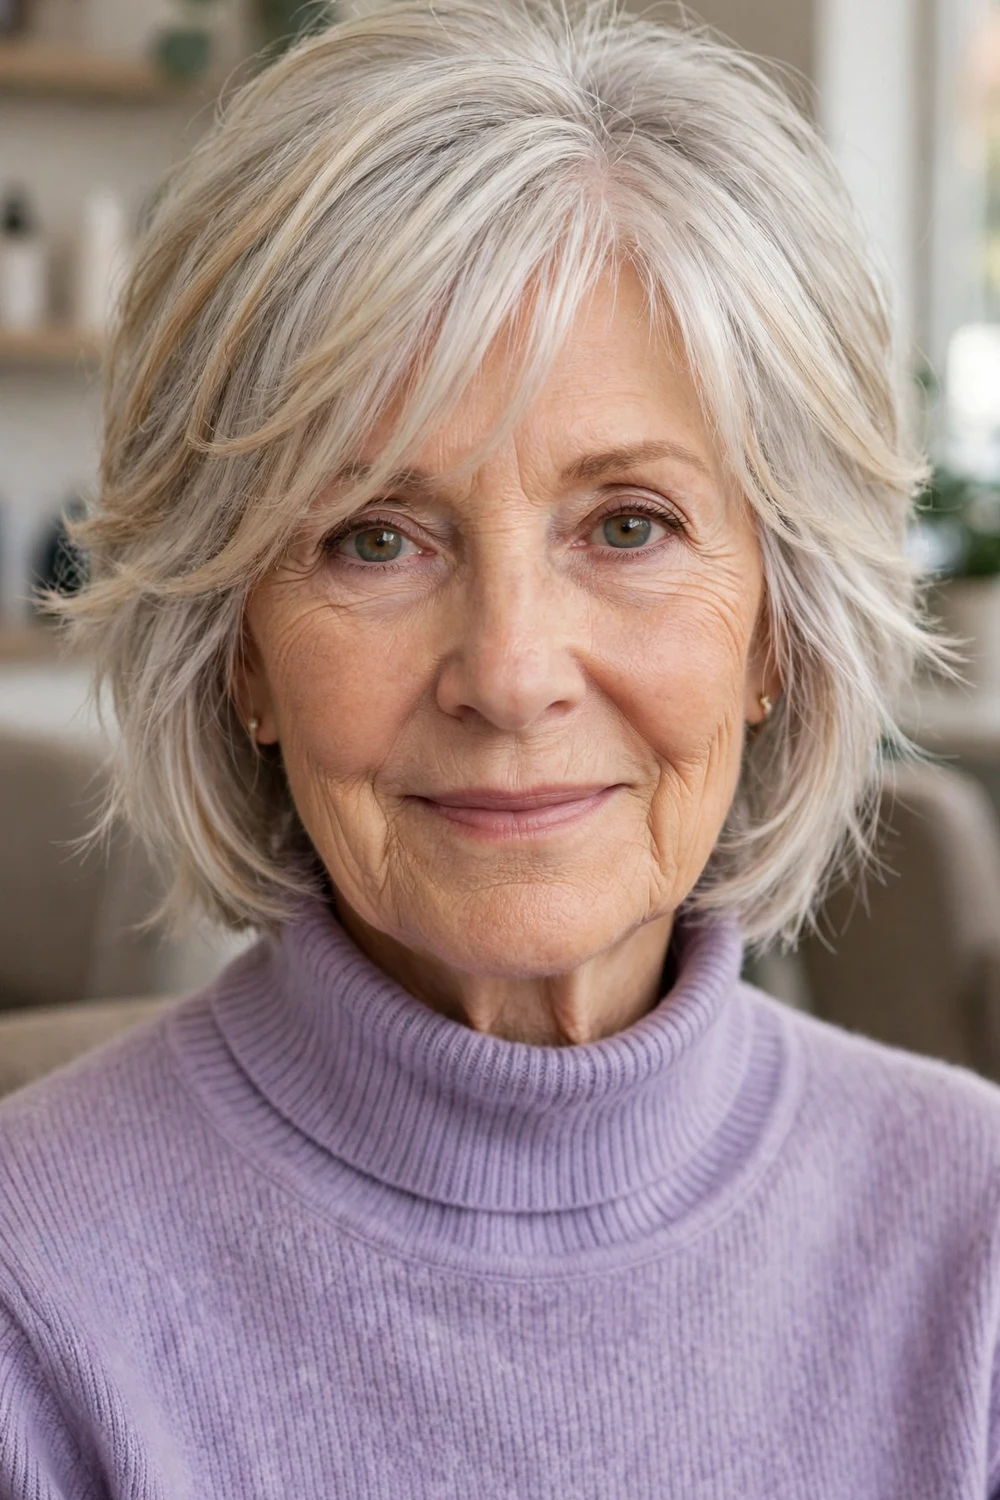
This layered lob keeps a one length base at collarbone level and adds longer front pieces that curve in toward the cheeks and jaw. The full base protects thin ends, which is where fine hair loses density first, and the face framing pieces add movement at the front without layers cut through the whole head.
Ask for the framing to start at the cheekbone or jaw, not higher, so the top keeps its weight. Add soft bends with a large barrel iron on the front pieces only, and let the rest fall smooth. The detailed face framing layers haircut guide for fine thin hair explains where the first layer should start for different face shapes.
Try this: curl the face framing pieces away from the face on one side and toward it on the other, then compare in the mirror. One direction will lift your features more.
Difficulty: Medium · Cost: $$ (salon)
19. Shoulder-Length Soft Waves
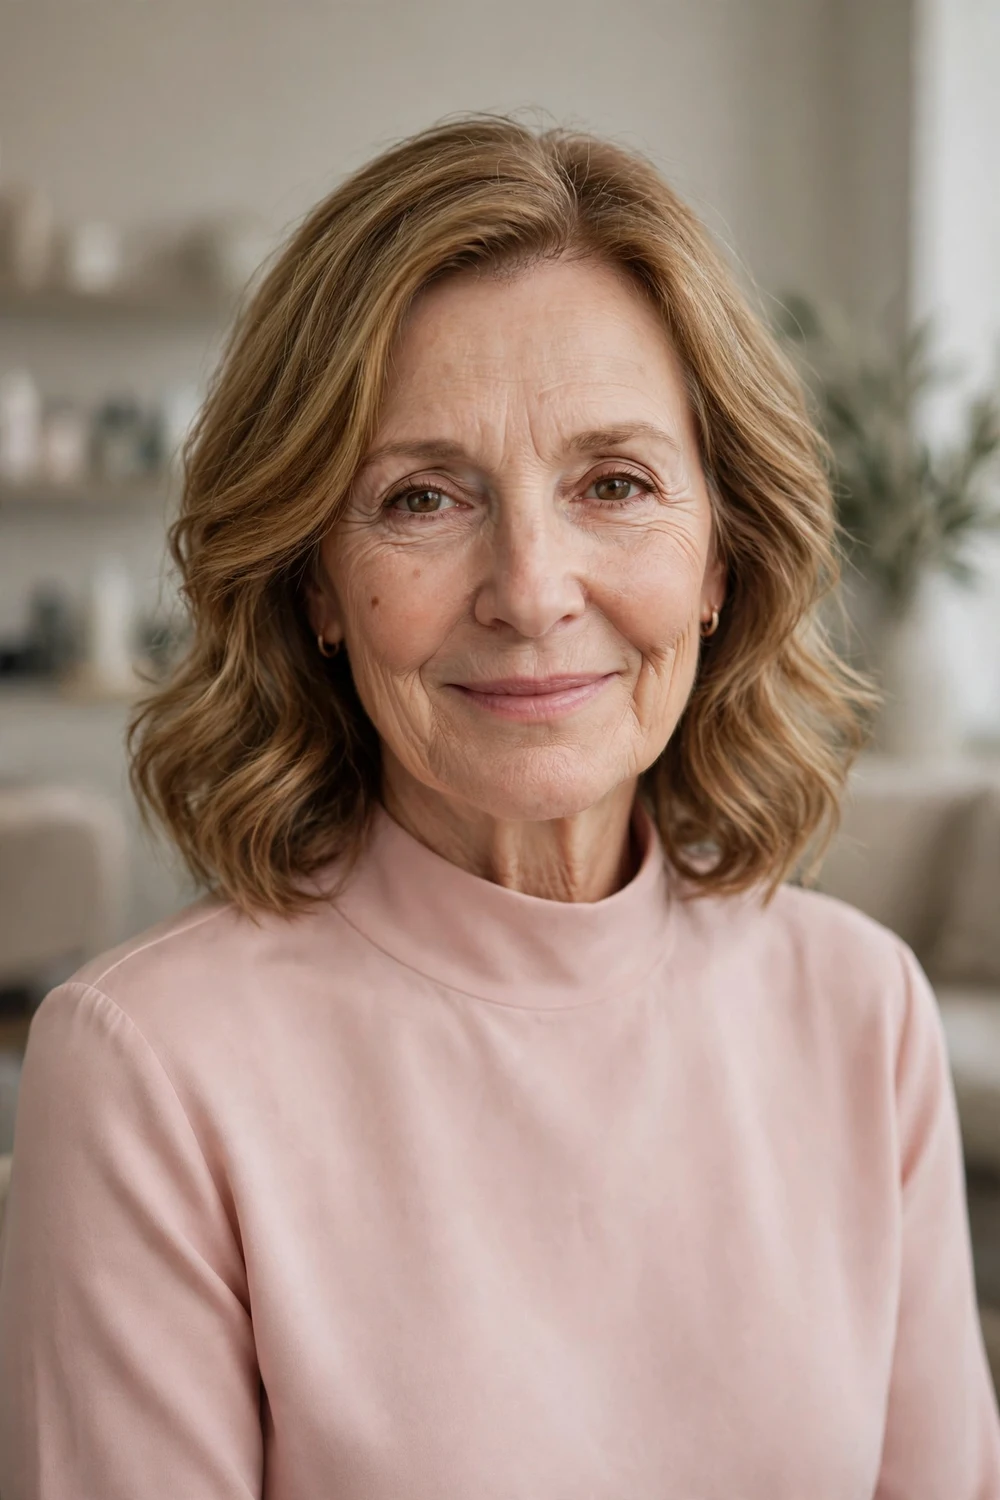
Shoulder length soft waves are about the longest version of fine hair that still holds body for most women. The waves do the volumizing work, since each bend hides the gaps between strands, and keeping the length at the shoulder stops the ends from dragging the whole style down.
Keep layers long and blended, starting low, and ask for the perimeter left full. Make the waves with a loose overnight braid on damp hair, or with a large iron held for a few seconds per section. A light mousse before braiding helps fine hair hold the bend until morning.
Try this: sleep with the braid loose rather than tight. A tight braid gives crimped, separated waves that make fine hair look thinner.
Difficulty: Medium · Cost: $$ (salon)
20. Silver Shoulder-Length Layers
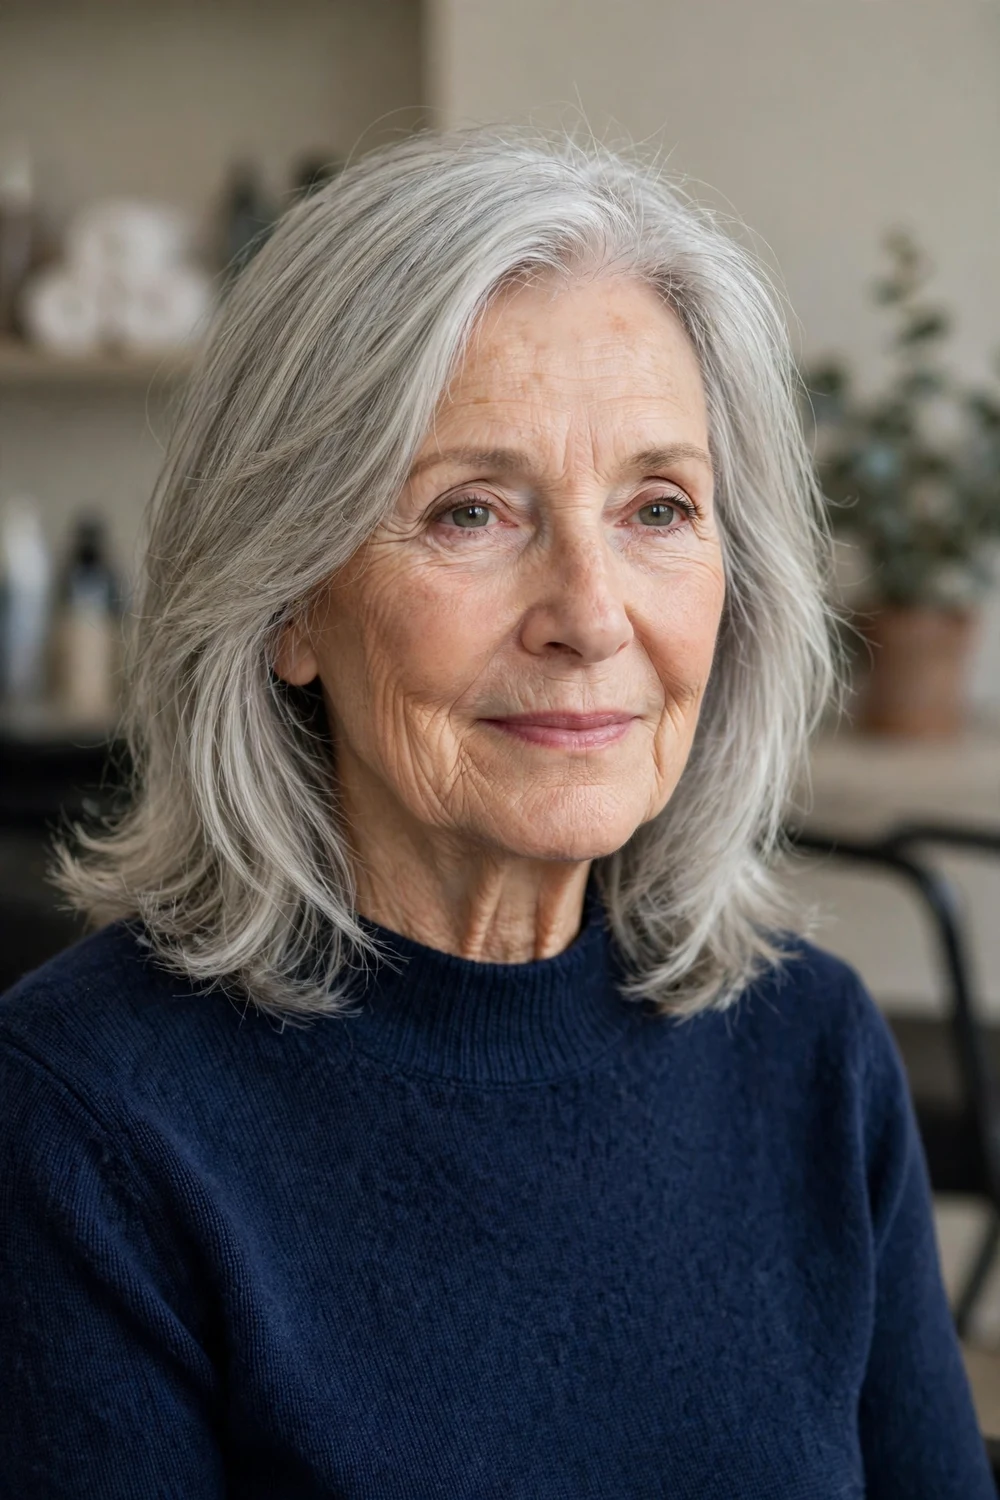
Silver shoulder length layers keep the length at the shoulders and use long, soft layers to add movement. Natural silver and grey hair reflects light in varied tones, and layers let those tones separate, which reads as depth and thickness. The layers stay long, so the ends keep enough weight to look full.
Ask for layers that start below the chin and for no razor cutting on the ends, since razors can shred fine ends. Blow dry with a round brush at the roots only and let the ends fall as they are. The style suits women growing out color who want the grey to look planned and polished.
Try this: a clear gloss service adds shine to silver hair without changing the color. Dull grey can look thin, while glossy grey reads as thick and healthy.
Difficulty: Medium · Cost: $$ (salon)
21. Shoulder Bob with Soft Bangs

The shoulder bob with soft bangs grazes the shoulders and pairs a clean bob outline with a soft, light fringe. The clean outline is the thickness trick: a bob that ends in one place looks denser than the same hair in long layers. The soft bangs cover forehead lines and a sparse front hairline while keeping the eyes open and visible.
Ask for the bangs cut see through and a little long, and for the bob ends turned under slightly at the cut so they curve in on their own. Dry the ends with a round brush rolling inward, and the shape holds with little effort. Square and oval faces suit the shoulder length version well.
Try this: trim the bangs every three to four weeks between full cuts. Bangs grow into the eyes fast, and a quick fringe trim is usually a short, low cost visit.
Difficulty: Low to Medium · Cost: $$ (salon)
22. Long Curtain Layers with a Full Perimeter

Long curtain layers are the option for women who want to keep length past the shoulders. The parting falls softly in the center, the framing opens at the cheekbones, and the layering starts low, around the chin or below. Starting low is what makes long fine hair work, since the top and mid lengths keep their density and only the front is shaped.
Ask in plain words for a full perimeter, meaning the bottom edge stays thick and blunt rather than feathered. Style the curtain pieces with a round brush, drying them forward and then sweeping them back. Be honest with yourself about trims: long fine hair needs the ends cut every eight weeks to stop them looking stringy.
Try this: wear the curtain pieces tucked behind your ears on flat days. Tucking changes the silhouette and hides a limp front section until wash day.
Difficulty: Medium to High · Cost: $$$ (salon)
23. Face-Framing Layers on a Medium Cut
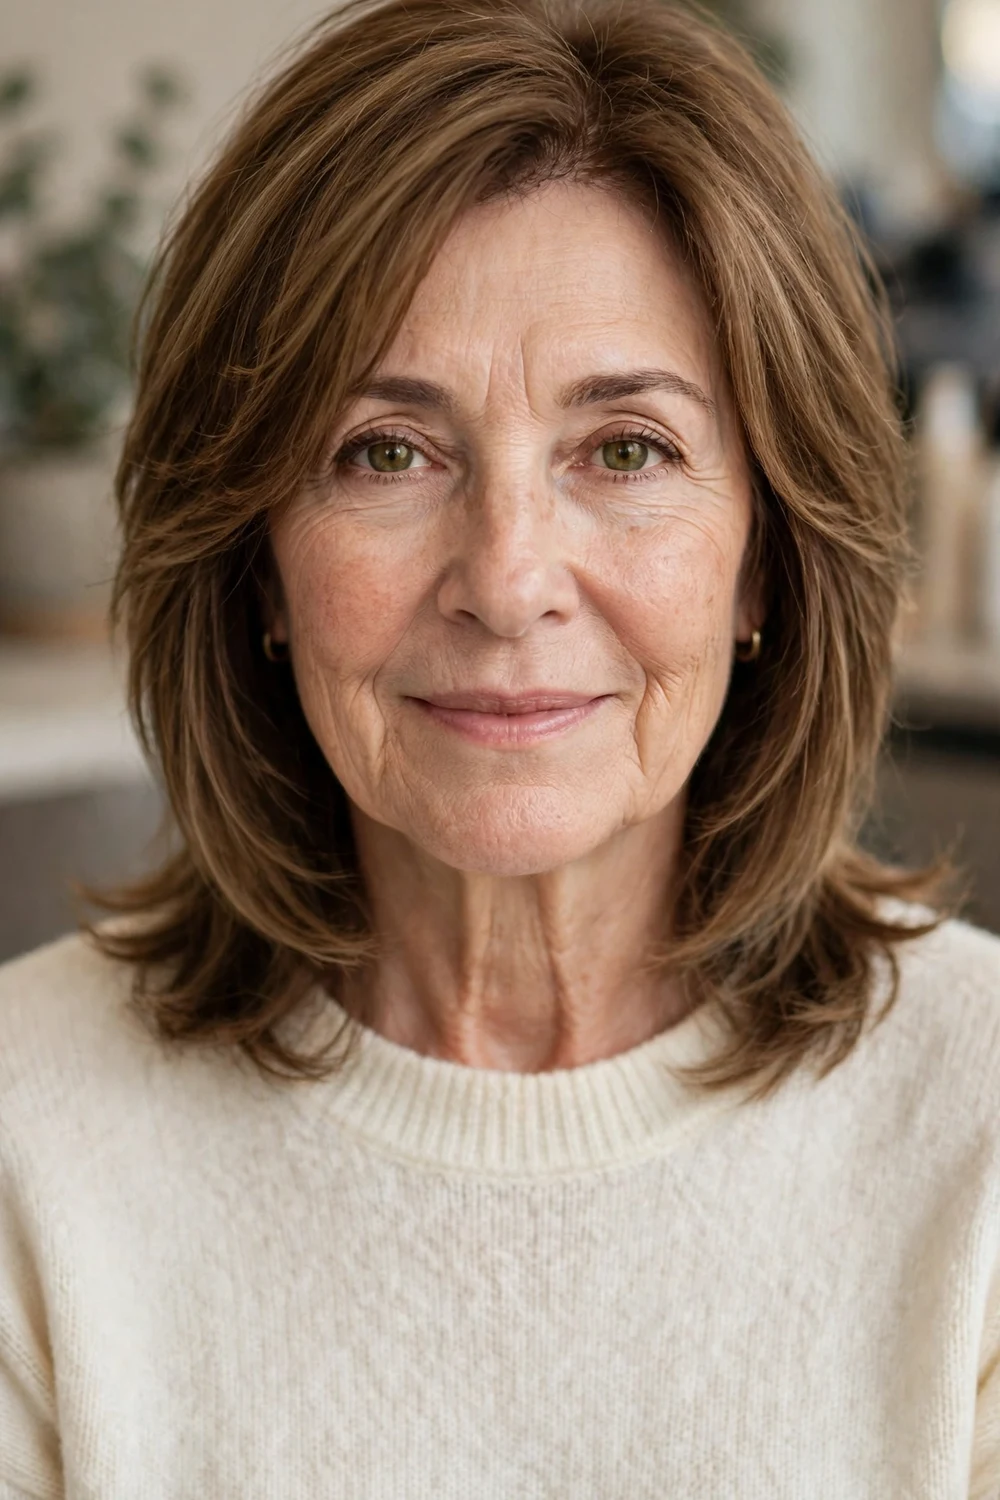
Face-framing layers on a medium cut add soft, shaped pieces around the face while the rest of the hair stays at one length between the jaw and shoulders. For fine hair, this is a low risk way to get movement, since only the front sections are layered and the back keeps all of its thickness.
Ask for the shortest framing piece at the cheekbone if you want lift there, or at the jaw if you want the face to look slimmer. Blow dry the front pieces with a round brush, rolling them back away from the face, and leave the back smooth. The cut suits most face shapes because the starting point of the layers can move up or down.
Try this: part your hair slightly off center with this cut. A center part splits fine framing pieces evenly and can make both sides look thinner.
Difficulty: Low to Medium · Cost: $$ (salon)
24. Tapered Nape Crop with a Longer Crown

The tapered nape crop takes the back in close at the neckline and leaves the crown and top noticeably longer. Fine hair at the nape often grows thin and wispy, and tapering removes that weak section entirely, while the longer crown gives you hair to lift, sweep, and shape. The contrast between the neat nape and the fuller top makes the top look thicker.
Ask for the taper blended gradually, with no hard line between the nape and the crown. Style the crown with a small amount of mousse and a short blow dry, lifting at the roots. This crop suits women who wear glasses and prefer hair off the neck, and it grows out neatly for about six weeks.
Try this: show your stylist how your hair grows at the nape before the cut. A taper that follows your growth pattern sits flatter and lasts longer.
Difficulty: Low · Cost: $ (salon)
25. Blunt Collarbone Cut with Minimal Layers

The blunt collarbone cut keeps medium length hair in one even line at the collarbone, with minimal layers anywhere. It is the medium length answer to the blunt chin bob: the single strong hemline makes fine ends look thick, and the collarbone length still allows a low ponytail. Minimal layering means almost no thickness is cut away.
Ask for internal texture only if your hair sits too flat, and keep it away from the last two inches. Dry with a paddle brush, then bend the ends under with a round brush for a finished edge. This cut is a good choice if you are growing out a bob and want the extra length without the thin look that long layers can give fine hair.
Try this: wear it tucked behind both ears with a side part for the fullest look. Tucking shows the blunt hemline, which is the part that reads as thickness.
Difficulty: Low to Medium · Cost: $$ (salon)
The table below sums up the main families on this list, so you can compare length, lift, and daily effort before you book.
| Cut family | Best lengths | How it adds volume to fine hair | Daily styling | Trim cycle |
|---|---|---|---|---|
| Blunt bobs | Chin to collarbone | One even hemline makes ends look dense | Low to medium | 6 to 8 weeks |
| Layered bobs and shags | Jaw to shoulder | Crown layers lift the top while ends stay full | Medium | 6 to 8 weeks |
| Pixies and crops | Very short to ear length | Short strands stand away from the scalp | Low | 5 to 6 weeks |
| Lobs and medium cuts | Cheekbone to collarbone | Full base with face framing movement at the front | Medium | 6 to 8 weeks |
| Longer layered cuts | Shoulder to below shoulder | Low starting layers keep density, waves hide gaps | Medium to high | 8 weeks |
Frequently Asked Questions
What is the best hairstyle for older women with fine hair?
Shorter, shaped cuts tend to work best, such as a blunt chin length bob, a layered pixie, or a textured crop. Shorter lengths remove the weight that pulls fine hair flat, blunt ends make the bottom line look dense, and light layers at the crown add lift. The right pick also depends on how much daily styling you want to do.
Should older women with fine hair avoid layers?
No, but the placement matters. Light layers at the crown help fine hair lift and hold a rounded shape. Heavy layers cut through the mid lengths and ends are the version to avoid, since they remove thickness from the hemline and can make fine ends look see through. Ask for crown layers and a full perimeter.
How can I make fine hair look thicker without a new cut?
Start with a deep side part, which shifts hair over the crown and covers a thinning part line. Blow dry the roots in the opposite direction to how the hair will fall, use a lightweight mousse at the roots only, and add bends or soft waves, since movement hides the spaces between strands. Heavy oils and thick creams tend to coat fine hair and make it look flatter.
How often should fine hair be trimmed after 55?
Most short shapes on this list hold best with a trim every five to six weeks, while bobs, lobs, and medium cuts usually go six to eight weeks. Fine hair shows split, thin ends sooner than thicker hair does, and regular trims keep the bottom line looking dense, which is a large part of how full the hair reads.
Can older women with fine hair wear their hair long?
Yes, with conditions. Long fine hair works when the layering starts low, around the chin or below, the bottom edge stays blunt and full, and the ends are trimmed on schedule. Long hair worn one length with feathered ends is the version that tends to look stringy. Soft waves also help, since bends add the look of body along the lengths.
Final Thoughts
For fine hair after 55, the cut has to do the lifting, and the cuts on this list are built to do exactly that. Pick a blunt bob if you want a strong, dense looking hemline, a pixie or crop if you want the lowest daily routine, and a lob or low layered cut if you want to keep length without thin looking ends. Take a photo of your favorite two or three options to your stylist, say how many minutes you will honestly spend styling each morning, and ask them to protect your ends. That conversation, plus a trim schedule you keep, will do more for volume than any single product.

