


Thick hair at medium length can feel like a good trade on paper and a lot of work in the mirror. I look for cuts that take weight out from the inside first, because the fullness is the part worth keeping. The shape around the face, the back, and the ends can then do different jobs, from a clean blunt line to loose layers that air-dry well.
This list brings together 24 medium length haircuts for thick hair, from layered lobs and shags to U-cuts, V-cuts, and a hidden nape undercut. Every idea sits between the shoulders and the collarbone unless it says otherwise, and every idea names where the bulk comes out, so you can talk through the plan with your stylist before any cutting starts.
Key Takeaways
- Interior and invisible layers remove weight without thinning the surface, which is the safest starting point for thick hair.
- Collarbone length is the easiest medium zone: long enough to tie back, short enough to dry and shape without a long routine.
- Layers that start below the chin help prevent the wide triangle shape that thick hair can form at shoulder length.
- Blunt lines still work on thick hair when the weight removal happens underneath the perimeter.
- Pick the cut around your real routine: shags and choppy cuts air-dry well, while sleek and blowout styles need heat.
The table groups the 24 ideas by the main job each cut does, so you can shortlist by your hair type and styling time before reading the full list.
| Cut family | Ideas | Best for | Daily styling |
|---|---|---|---|
| Layered lobs and long layers | 1, 4, 5, 13, 14 | Thick straight or wavy hair that feels heavy through the middle | Low to medium |
| Blunt and one-length lines | 2, 15 | Straight thick hair that suits a clean, tidy edge | Medium |
| Shag, wolf and choppy texture | 3, 12, 22 | Hair that air-dries wavy and suits a lived-in finish | Low |
| Bobs with shaped backs | 10, 11, 16, 20, 21 | Bulk at the back of the head and neck | Medium |
| Bangs and face framing | 6, 17, 18, 24 | Opening up a solid front around the face | Low to medium |
| Wavy and curly shapes | 7, 8, 9, 19, 23 | Natural wave and curl, plus a hidden fix for very dense hair | Low to medium |
1. Layered Lob with Interior Layers

This lob sits at the collarbone and keeps its outer shape while layers are cut into the interior. That hidden layering lifts weight from the middle of the hair, so the sides sit closer to the head and the ends move instead of hanging in one solid block.
Ask for the shortest interior layer to start near the cheekbone or lower. Layers that start higher can push thick hair outward at the jaw. The perimeter stays long, so you keep a clear lob line and you can still tie the hair back.
Try this: Blow-dry with the nozzle pointing down and lift only the roots with your fingers. The interior layers do the rest, so you need less round-brush work than a one-length lob.
Difficulty: Medium · Cost: $$
2. Blunt-Edge Collarbone Lob

The ends are cut in one clean line at the collarbone, with quiet thinning underneath where no one sees it. The blunt edge keeps thick hair looking full and tidy, while the hidden weight removal stops the bottom from feeling heavy by midday.
This shape suits straight and slightly wavy hair best. Cut with shears to hold the line, and keep the length just above or just at the collarbone. Hair that rests right on the shoulders tends to flip outward through the day.
Try this: Run a flat iron once through the ends only, after a smooth blow-dry. One pass keeps the edge sharp without flattening the body through the top.
Difficulty: Low · Cost: $$
3. Textured Shag with Wispy Bangs
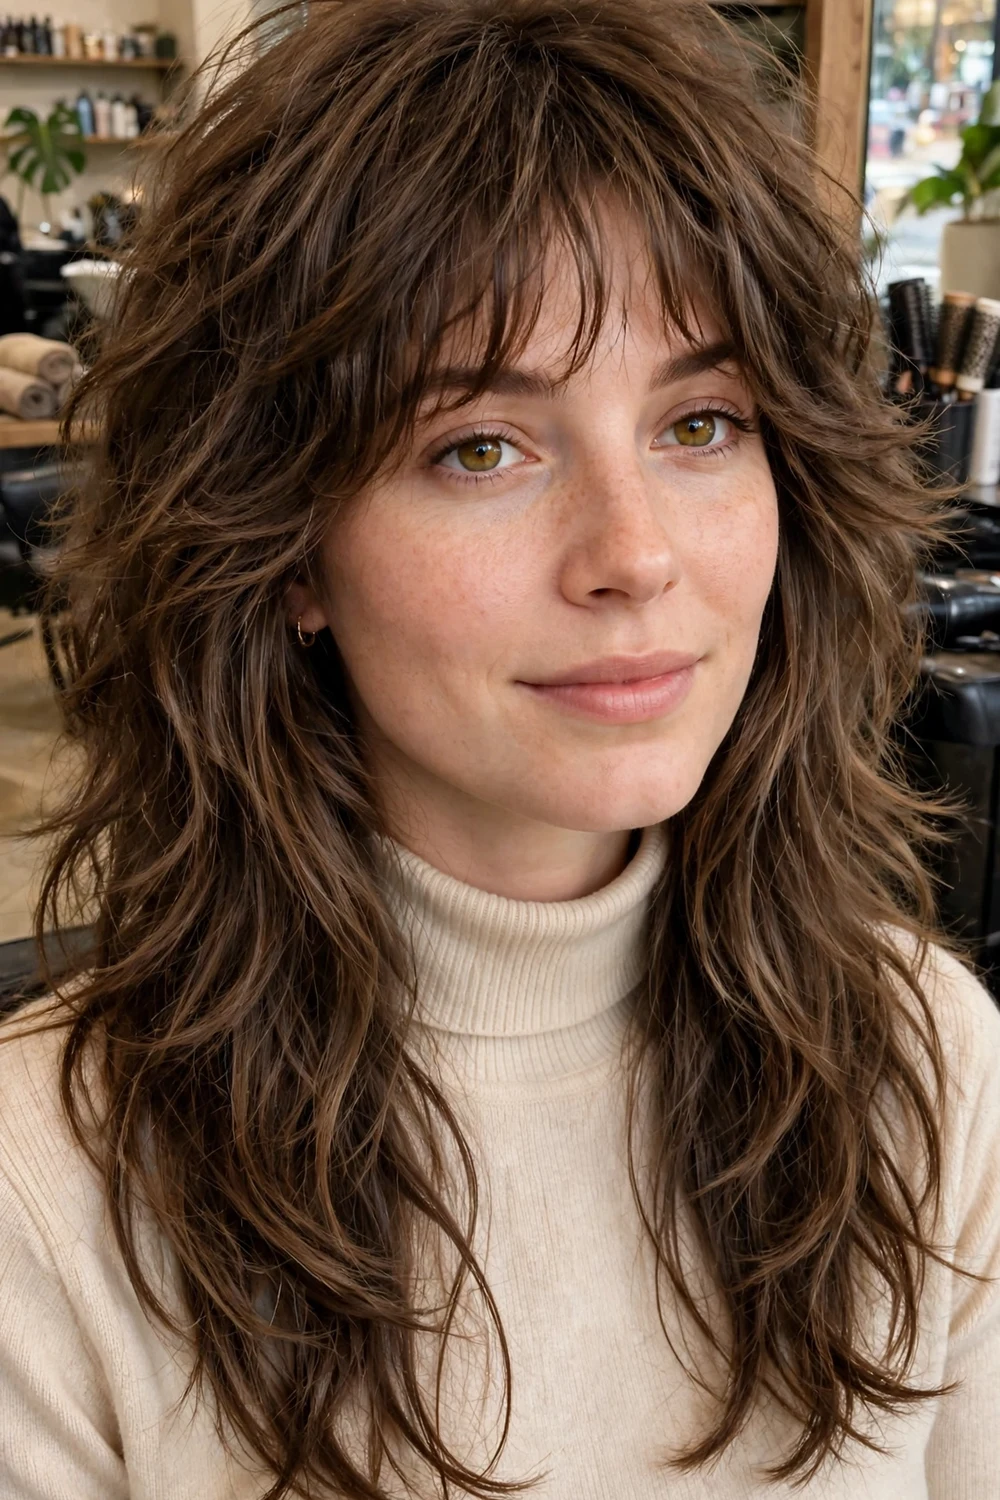
Layering starts higher in a shag, often near the crown, so density is broken up from root to tip. Choppy ends and wispy bangs keep the front light, and the whole cut is built for movement rather than a polished finish. If you like the family, the medium length shag haircuts collection shows more versions at this length.
Thick hair holds this shape well because there is enough hair to blend the layers without gaps. Keep the bangs wispy and broken, with space between the pieces, so the forehead does not get a heavy fringe.
Try this: Scrunch a small amount of texturizing cream into damp hair and air-dry or diffuse on low heat. Skip heavy oils, which pull the choppy ends down.
Difficulty: Medium · Cost: $$
4. U-Cut with Long Layers
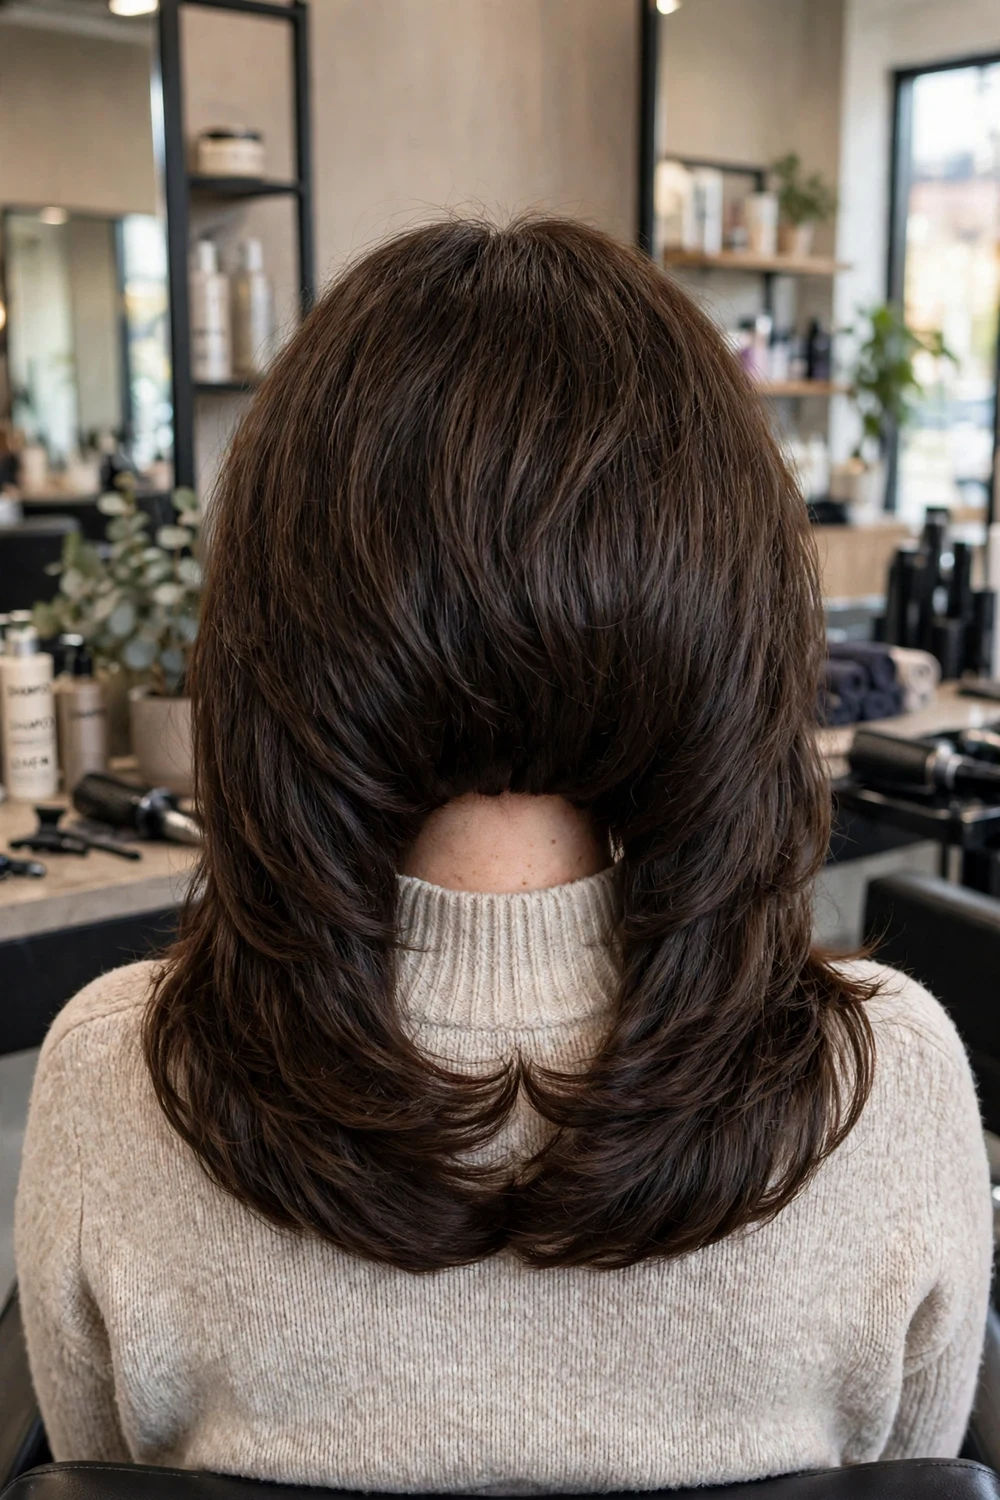
The back is cut into a soft U shape, longer in the center and slightly shorter at the sides, with long layers through the last third of the hair. The curve stops the back from reading as one wide panel, which is a common issue with thick hair at shoulder length.
Long layers keep the ends full while the U shape removes corner weight at the sides. This is a good pick if you wear your hair down most days and want movement when you turn your head.
Try this: Curl only the bottom third with a large barrel, then brush through once. The U shape shows best when the ends bend in the same direction.
Difficulty: Low · Cost: $$
5. Soft Layers Starting Below the Chin
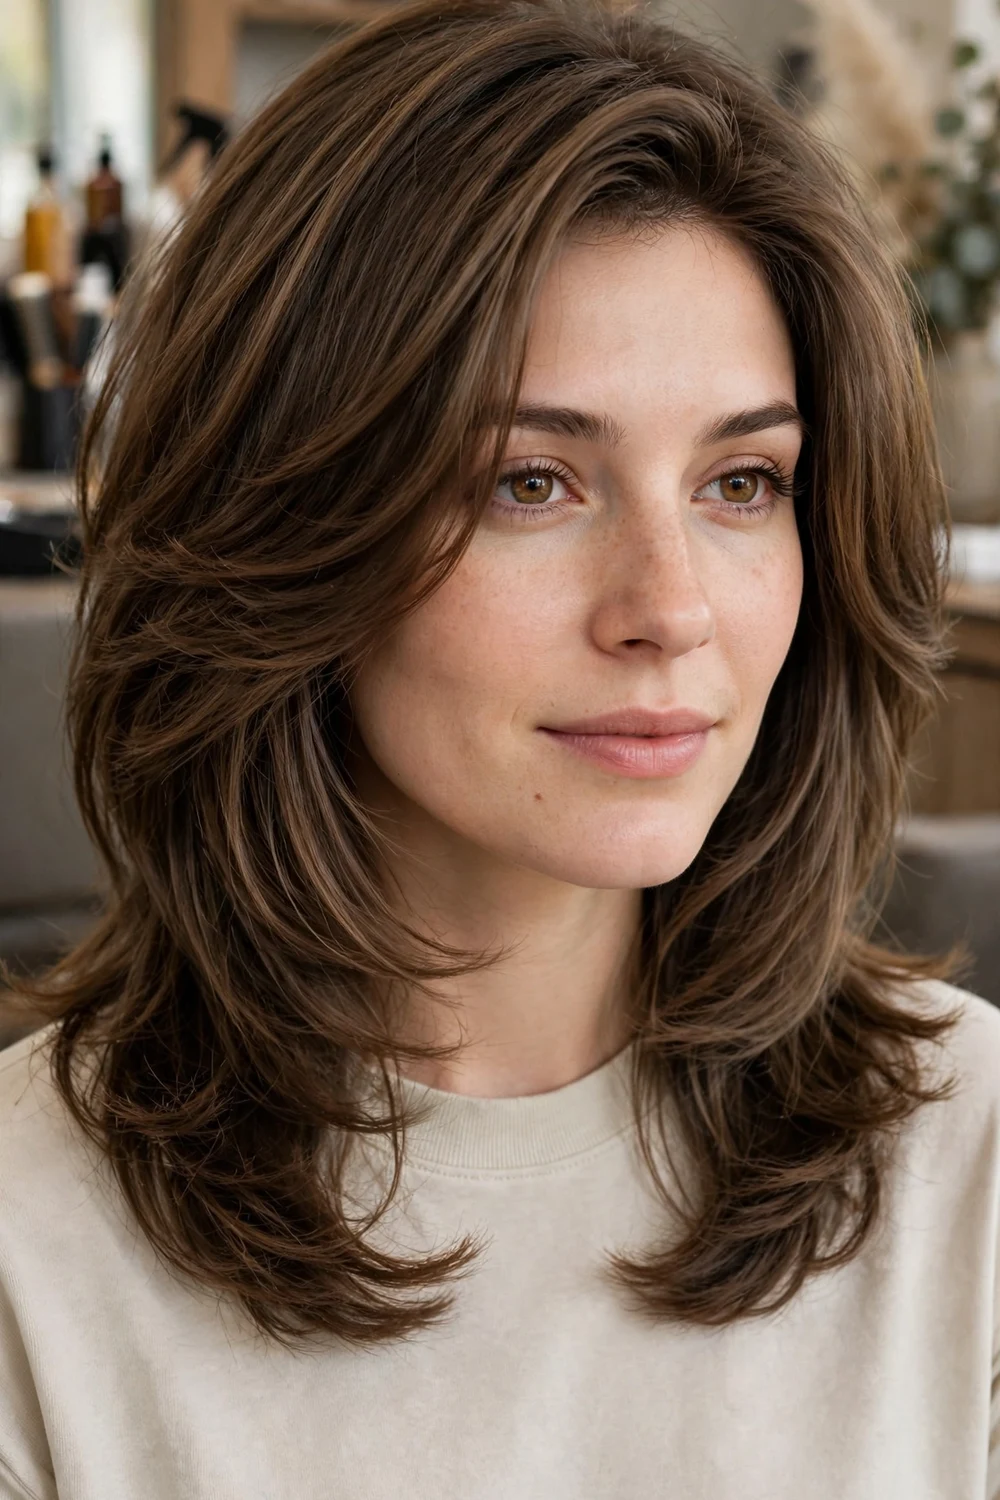
Soft layers use a small gap between lengths, so hair feels lighter without obvious steps. On thick hair the first layer should start below the chin. Starting at the cheekbone can add width right where many people want less of it.
The finish works straight, wavy, or air-dried, because the layers are blended rather than choppy. It is also a forgiving grow-out cut, since there is no hard line to lose. More blended options sit in the layered hairstyles for medium hair guide.
Try this: Part the hair where you wear it before the cut is checked in the mirror. A layer map that works for a center part can sit unevenly with a side part.
Difficulty: Low · Cost: $
6. Collarbone Cut with Curtain Bangs

Curtain bangs are longer at the sides and shorter near the center part, so they blend into the rest of the cut as they grow. Paired with a collarbone length, they break up the solid front that thick hair can create around the face.
Keep the main length in one or two long layers so the bangs carry the detail. A center part suits this cut best, since the bangs are shaped around it. Pushing them into a deep side part fights the shape they were cut for.
Try this: Blow-dry the bangs forward first, then sweep them back and outward with a round brush. That two-step sets the curtain curve and stops them falling straight down.
Difficulty: Medium · Cost: $$
7. Feathered Layers with Soft Ends
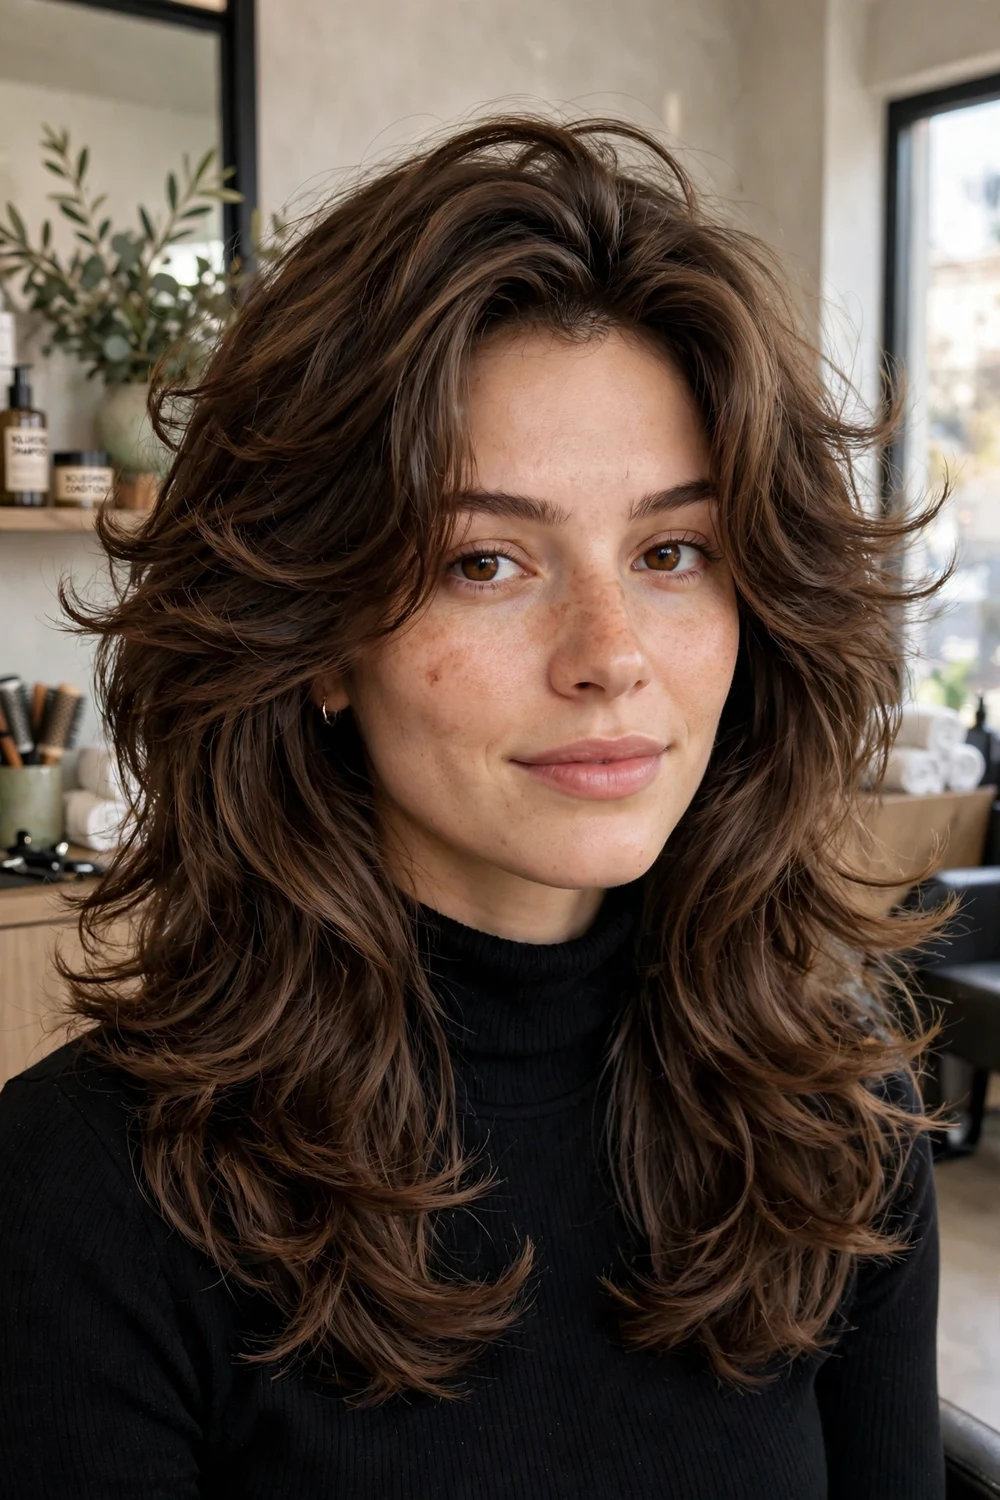
Feathering blends one layer into the next until there is no clear line between them. The last few inches flick outward slightly, so the hair around the jaw and shoulders looks lighter while the crown keeps its fullness.
Thick hair suits feathering because there is enough density to blend without see-through ends. Ask for feathering through the ends and lower mid-lengths only, and keep the top layers longer for a current finish.
Try this: Blow-dry with a round brush pulling hair up and back. Flat-ironing the whole head can smooth the feathered ends flat and hide the work in the cut.
Difficulty: Medium · Cost: $$
8. Wavy Lob with Loose Waves

A wavy lob uses light interior layering first, then loose waves on top. The layering matters more than the styling tool here, because waves added to a solid block of thick hair tend to widen the shape instead of softening it.
Thick hair holds a wave longer than fine hair, so a light mousse or texturizing spray is usually enough hold. A barrel around 1 to 1.5 inches gives a loose bend that fits this length. The medium hairstyles with waves roundup has more wave finishes at shoulder length.
Try this: Alternate the direction of each waved section. Uniform curls can clump together on thick hair, while mixed directions read looser and wider apart.
Difficulty: Low · Cost: $$
9. Curly Cut with Rounded Layers
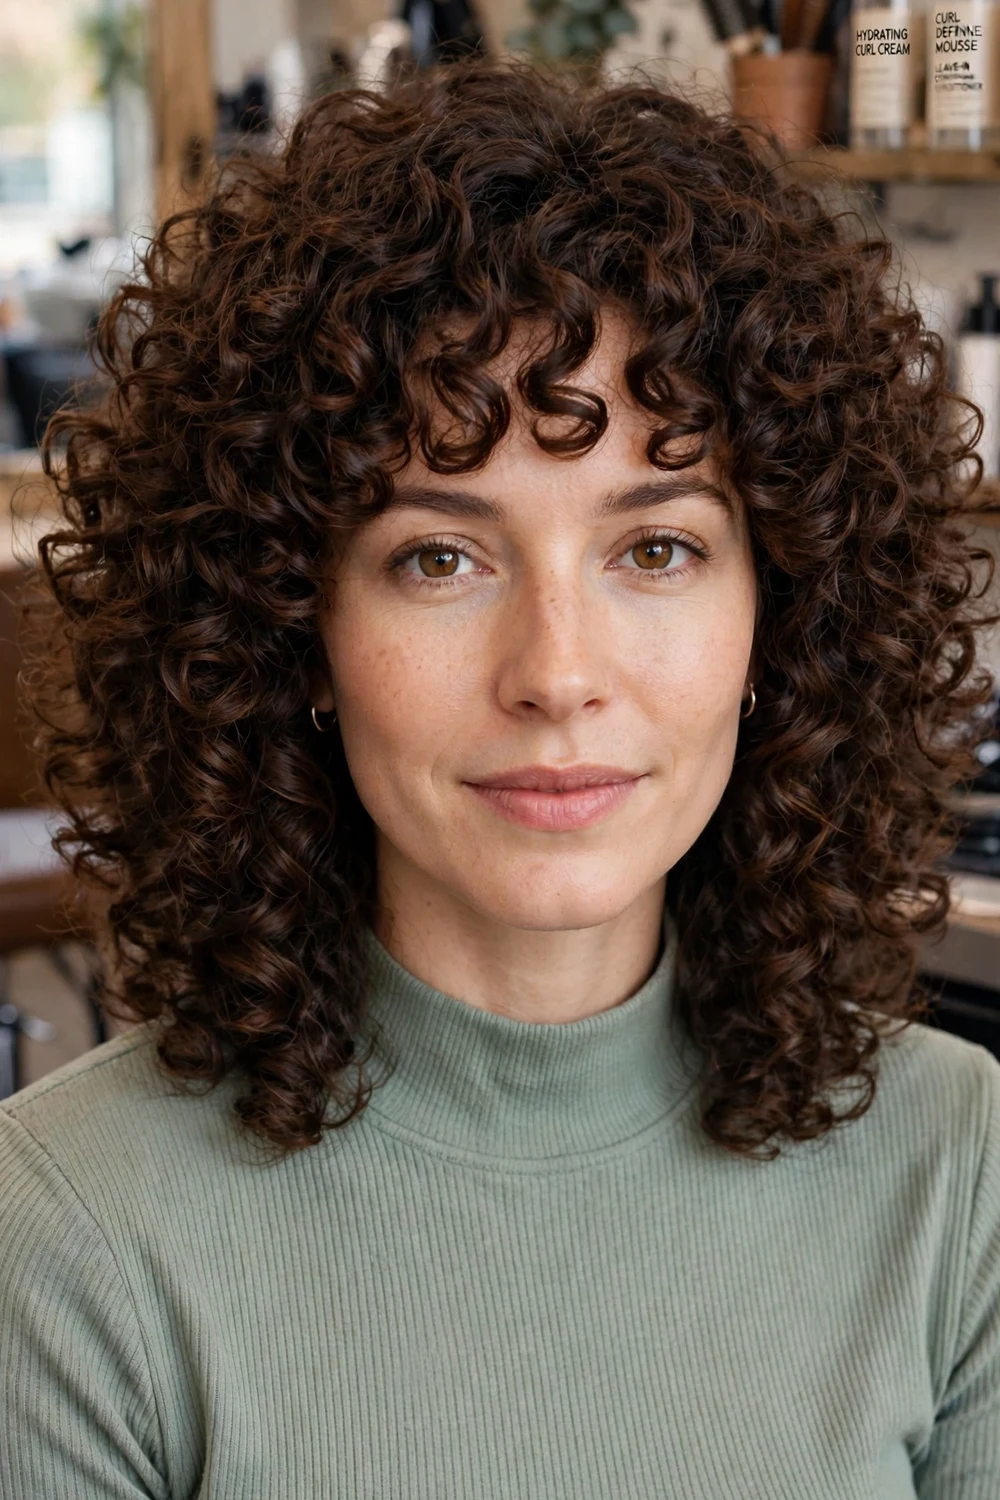
Rounded, even layers give each curl room to sit on its own instead of stacking into a pyramid. The outline stays curved at the sides and back, which keeps medium curly hair balanced rather than wide at the bottom and flat at the top.
Cutting curl by curl, or at least checking the shape dry, helps because thick curls shrink as they dry. Keep enough length past the shoulders when wet, since the dry length will sit higher.
Try this: Apply leave-in conditioner to soaking wet hair, then scrunch and diffuse on low heat and low speed. Touching curls while they dry adds frizz at the surface.
Difficulty: Medium · Cost: $$
10. A-Line Bob with Longer Front
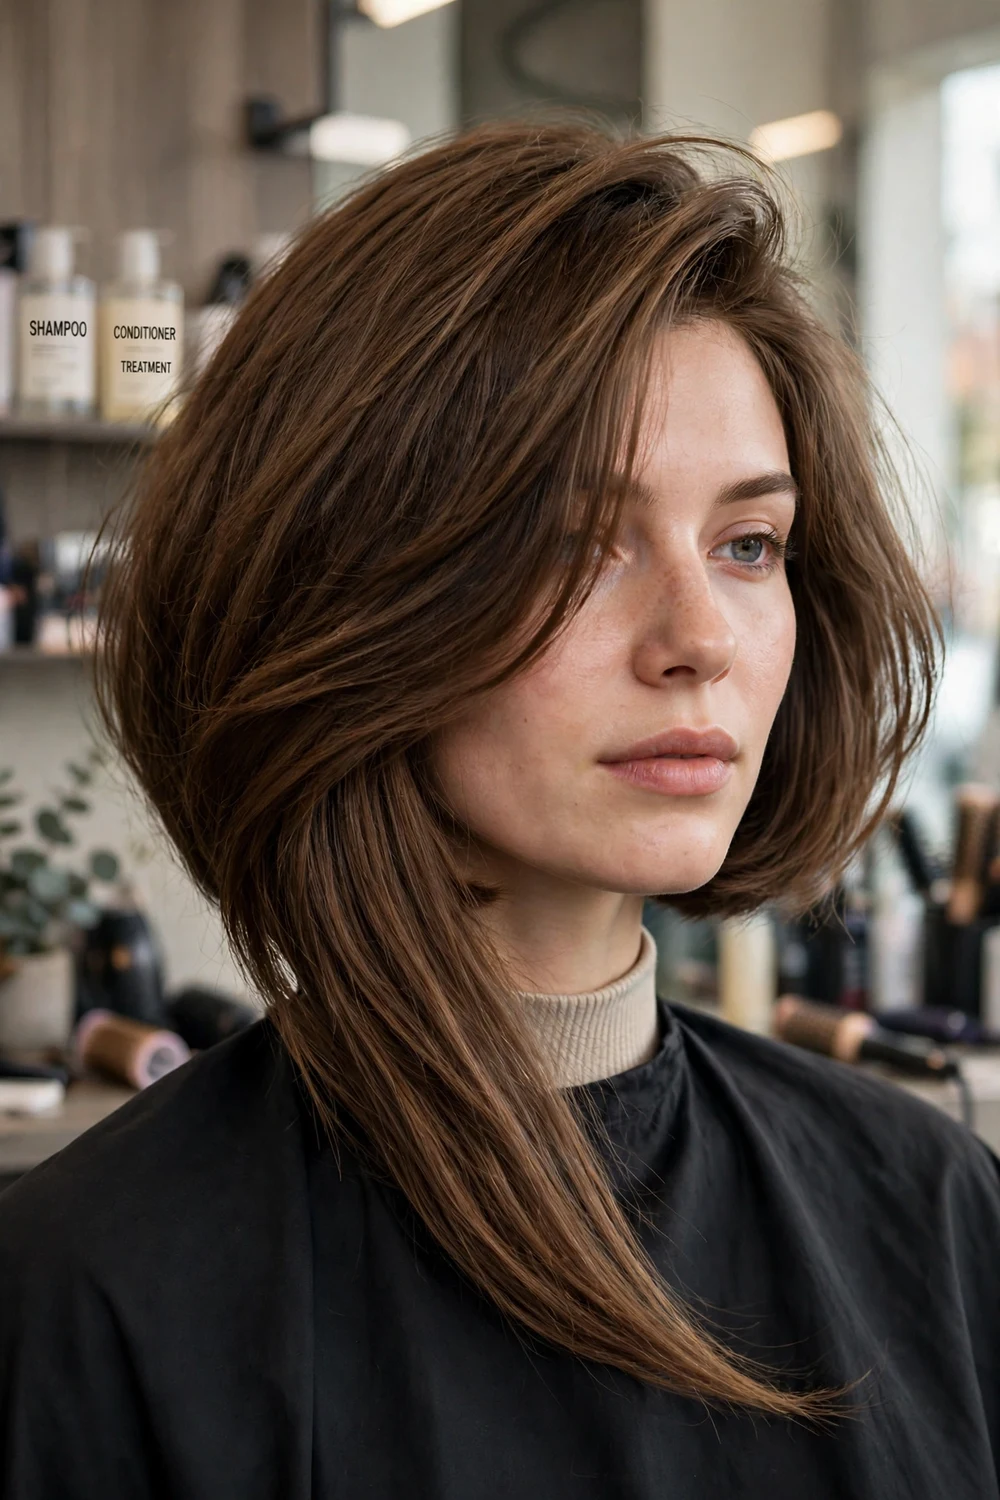
The front sits one to three inches longer than the back, with a clean diagonal line between them. That gap removes weight at the back of the head, where thick hair often feels heaviest, while keeping length around the face.
A subtle angle keeps more overall length and suits most jawlines. A steeper angle reads sharper and needs more precise trims. A center part keeps the symmetry of the line clear.
Try this: Blow-dry the back down and slightly forward, following the angle of the cut. Drying it straight back can push the shorter back out against the longer front.
Difficulty: Medium · Cost: $$
11. Inverted Bob with Stacked Back
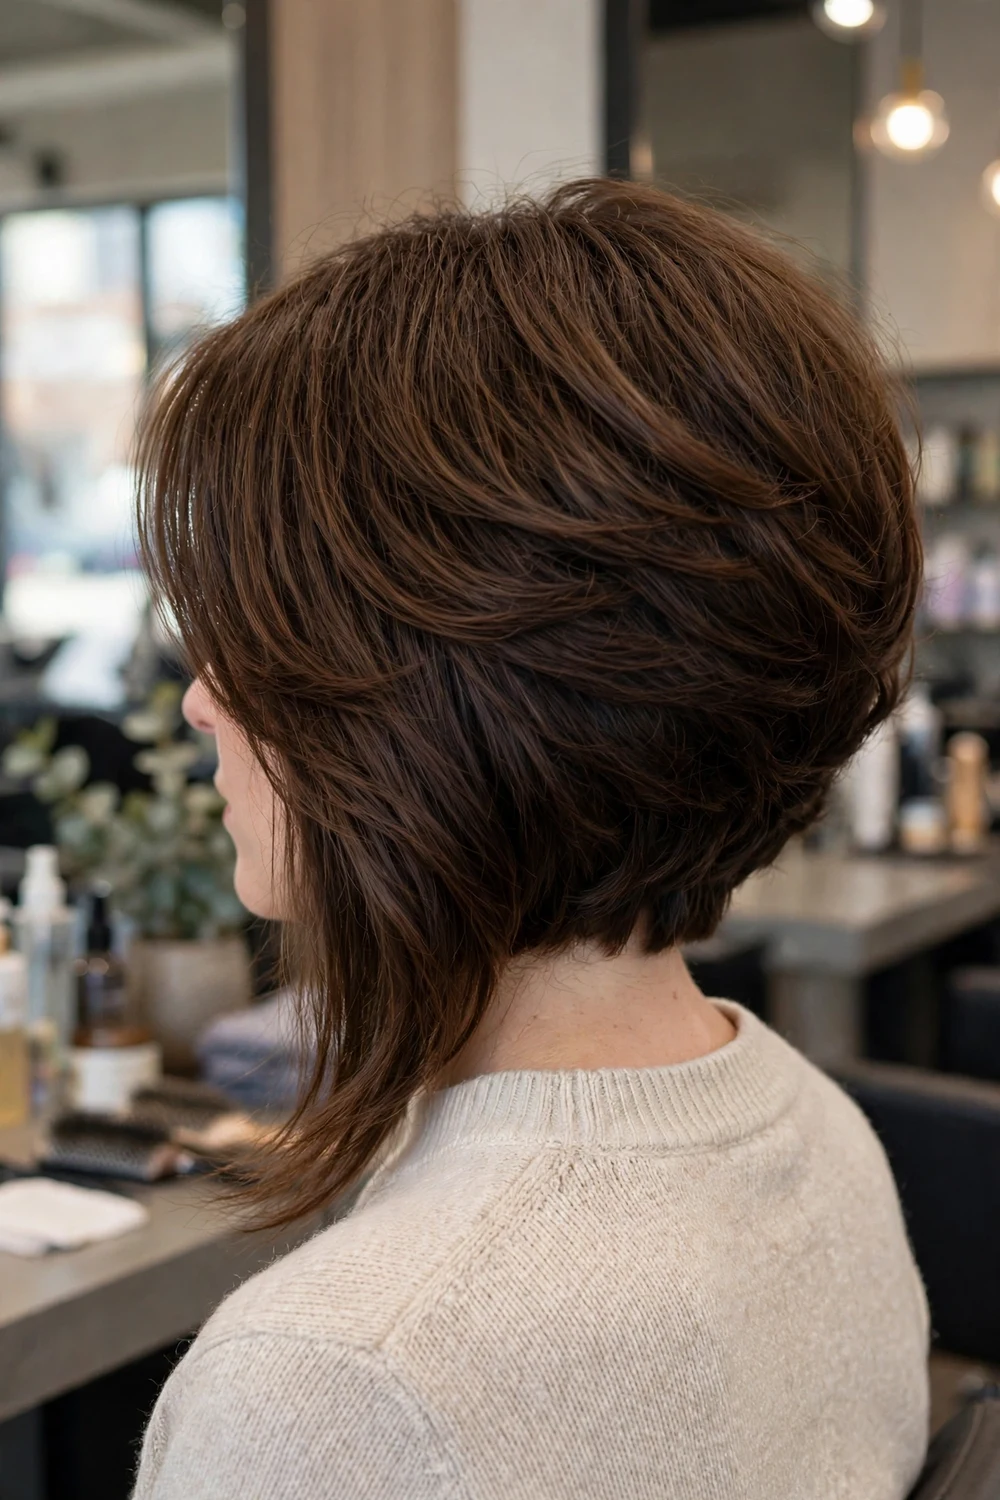
The back layers are cut shorter and stacked at the nape, which creates a clear step and lifts a lot of bulk off the neck. Longer front pieces keep the cut in the medium range and frame the jaw.
Stacking is the part that does the weight removal, so this cut needs a stylist who is confident with graduation on dense hair. Plan trims around every six weeks, because the stack loses its shape as it grows.
Try this: Use a small round brush at the back crown for lift, then smooth the front pieces with a flat iron. The contrast between the two zones is the look.
Difficulty: Medium · Cost: $$
12. Choppy Cut with Point-Cut Ends

Point-cutting cuts into the ends at an angle instead of straight across, breaking a solid line into smaller, textured pieces. Thick hair holds this jagged finish well, where fine hair can look thin with the same technique.
Keep the base length at the shoulders or collarbone and let the ends carry the texture. This is one of the lower upkeep cuts on this list, because the finish is meant to look a little uneven.
Try this: Work texturizing spray through damp hair and let it air-dry. Brushing choppy ends smooth after drying removes the piecey finish you paid for.
Difficulty: Low · Cost: $
13. Butterfly Cut with Long Face Frame
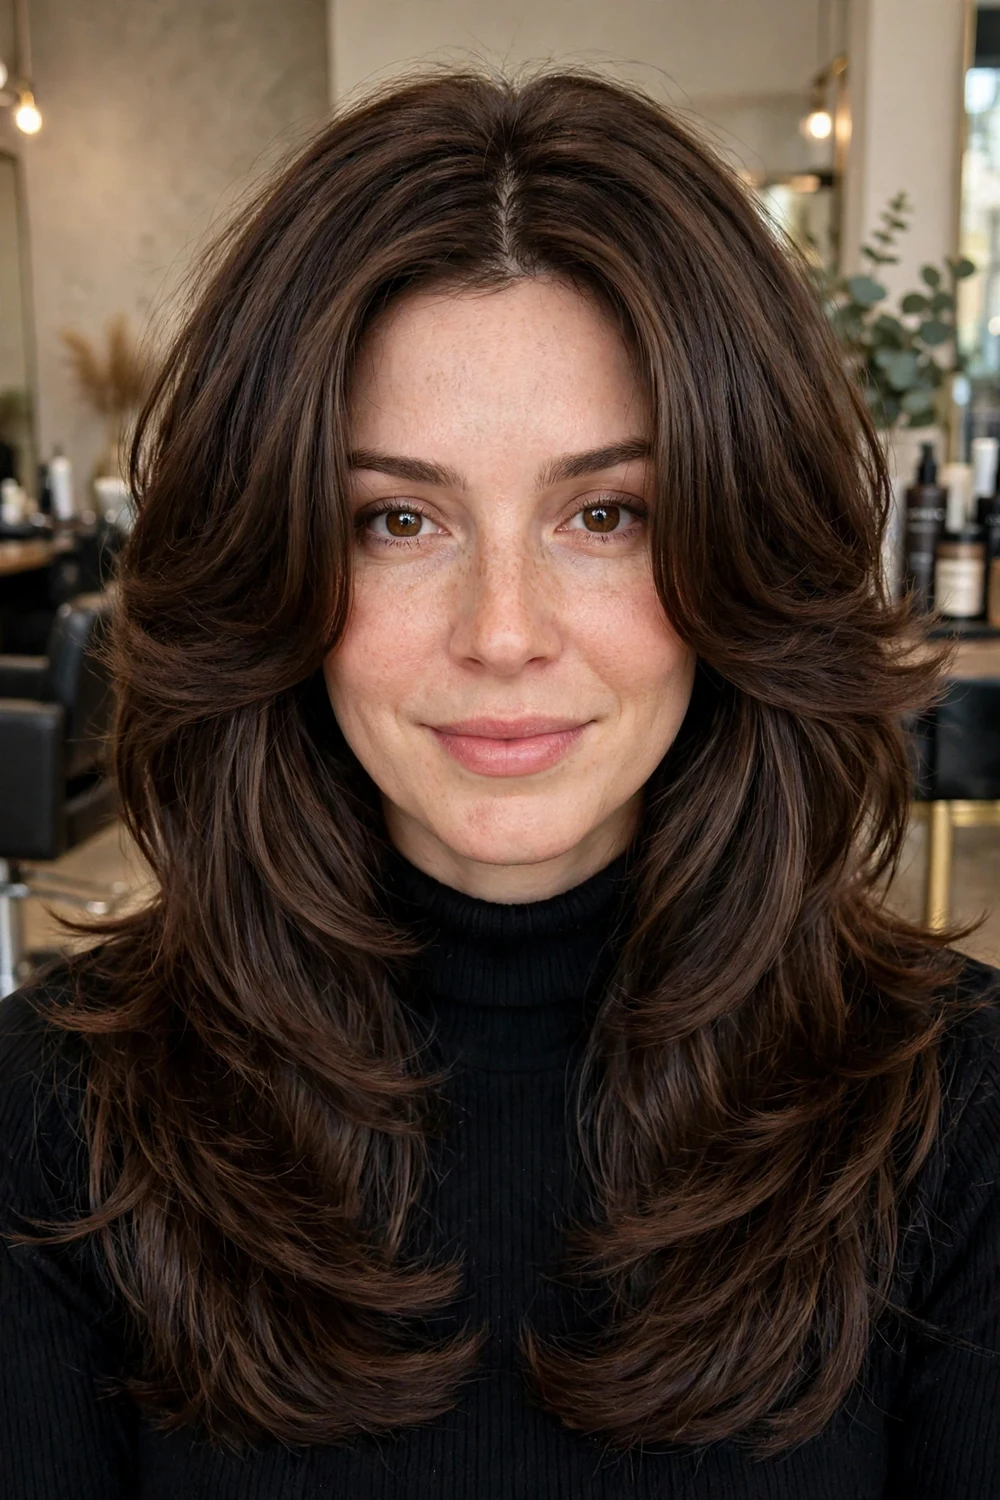
Shorter layers around the face sit over much longer layers at the back, like two wings when the hair is parted in the center. On thick hair, that split removes front weight while the back keeps its length and fullness.
The front layers usually start at the chin and blend down in steps. This cut needs heat or a round brush to show the wing shape, so it suits people who style the front of their hair most days.
Try this: Blow-dry the face frame forward, then roll it back away from the face and hold for a few seconds. That set is what creates the swept wing on each side.
Difficulty: Medium · Cost: $$
14. V-Cut Back with Cascading Layers
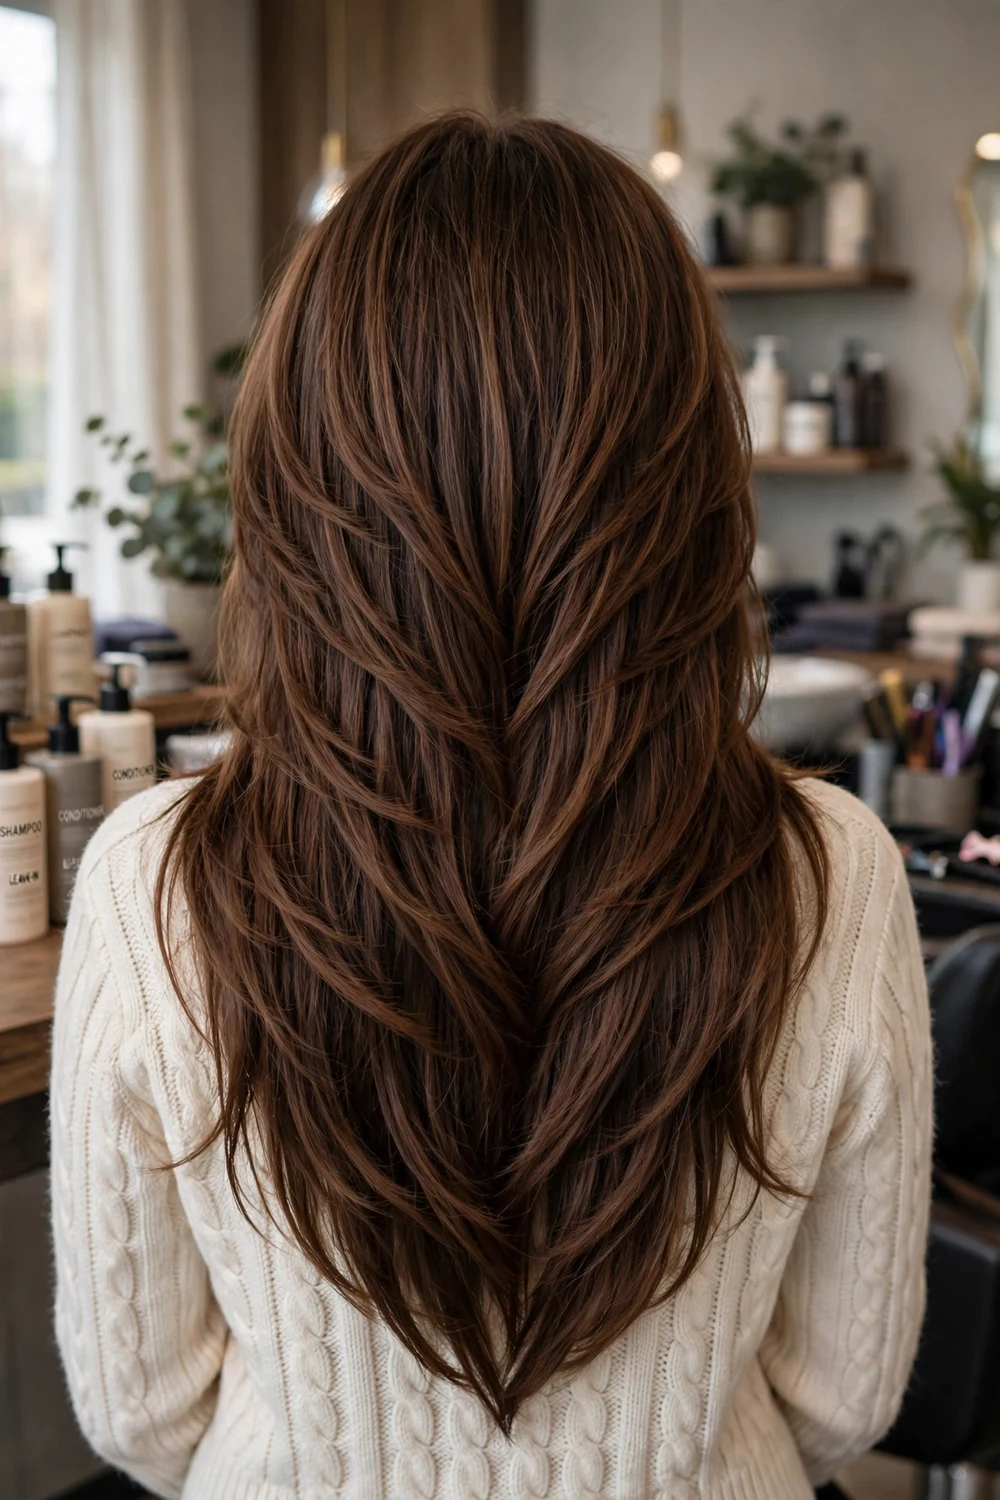
The back comes to a soft point in the center, with layers cascading down toward it. The V removes weight from the outer corners, so thick hair at this length looks narrower from behind and moves in one direction.
This shape shows best on hair worn down and straight or in loose waves, where the back point stays visible. If you wear a ponytail often, check that the shorter side pieces still reach your tie.
Try this: Ask to see the back with a hand mirror before you leave. The point should sit centered, and both sides should fall at matching angles.
Difficulty: Medium · Cost: $$
15. Sleek One-Length Cut with Internal Thinning
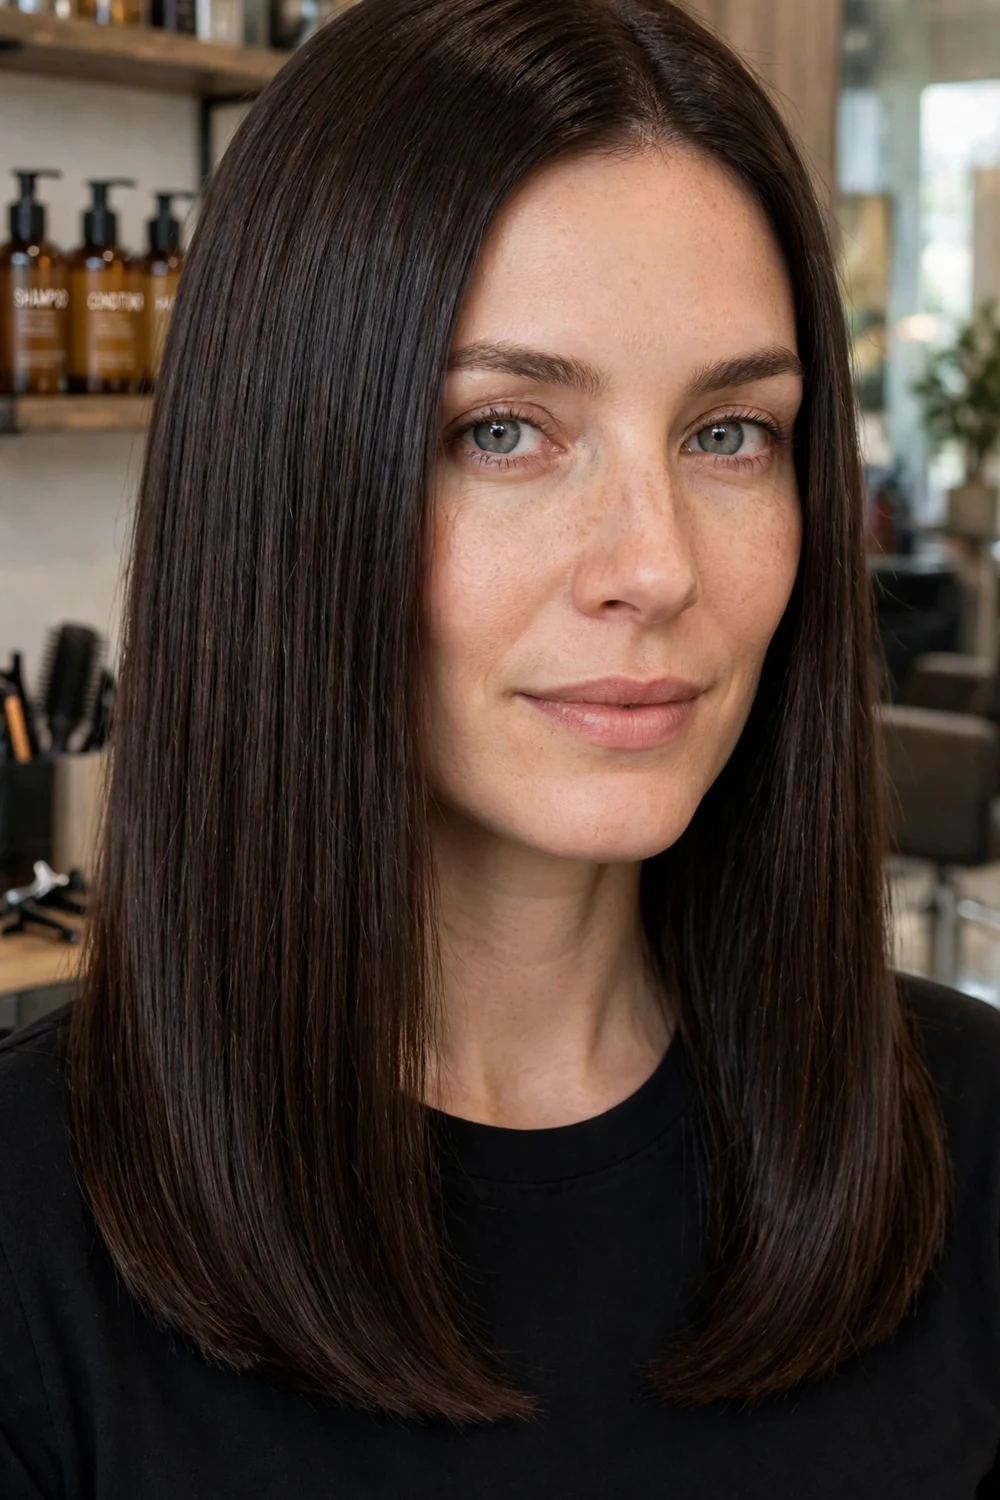
The outer length stays even and smooth, while thinning is done inside the hair where it cannot be seen. That gives thick straight hair a flat, tidy fall without the wide triangle that a plain one-length cut can create. For more polished finishes, see the sleek straight medium hairstyles for women list.
Heat protectant matters with this style, since the finish relies on a blow-dry and often one flat iron pass. Work in small sections, around half an inch, for a smoother result than large sections give.
Try this: Sleep with the hair in a low, loose ponytail using a soft tie. It keeps the surface smooth overnight without leaving a strong crease at the back.
Difficulty: Low · Cost: $$
16. Angled Bob with Tapered Back
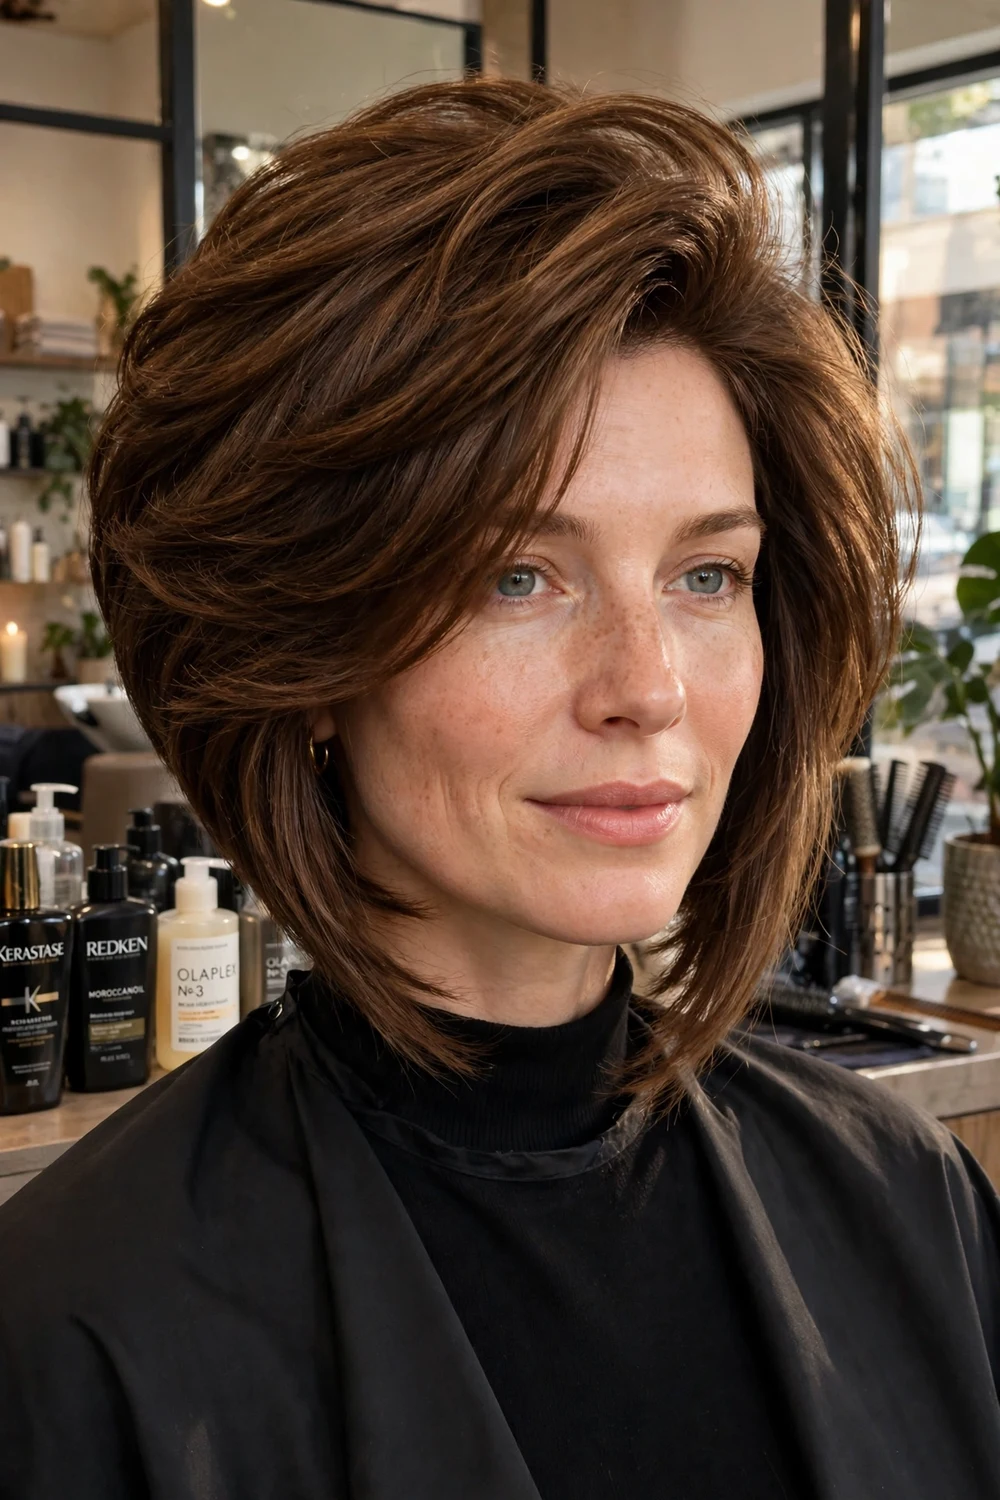
This bob is cut progressively longer toward the front, with the back tapered close at the nape. The taper takes out the bulkiest zone on thick hair, and the longer front keeps the cut soft around the face.
It differs from an A-line bob in the back finish: tapered and close, rather than stacked or blunt. That makes the neckline look clean even as the front grows longer between trims.
Try this: Blow-dry the front pieces down and forward with a paddle brush. Directing heat forward follows the angle and keeps the longer pieces lying flat.
Difficulty: Medium · Cost: $$
17. Face-Framing Cut with Cheekbone Layers
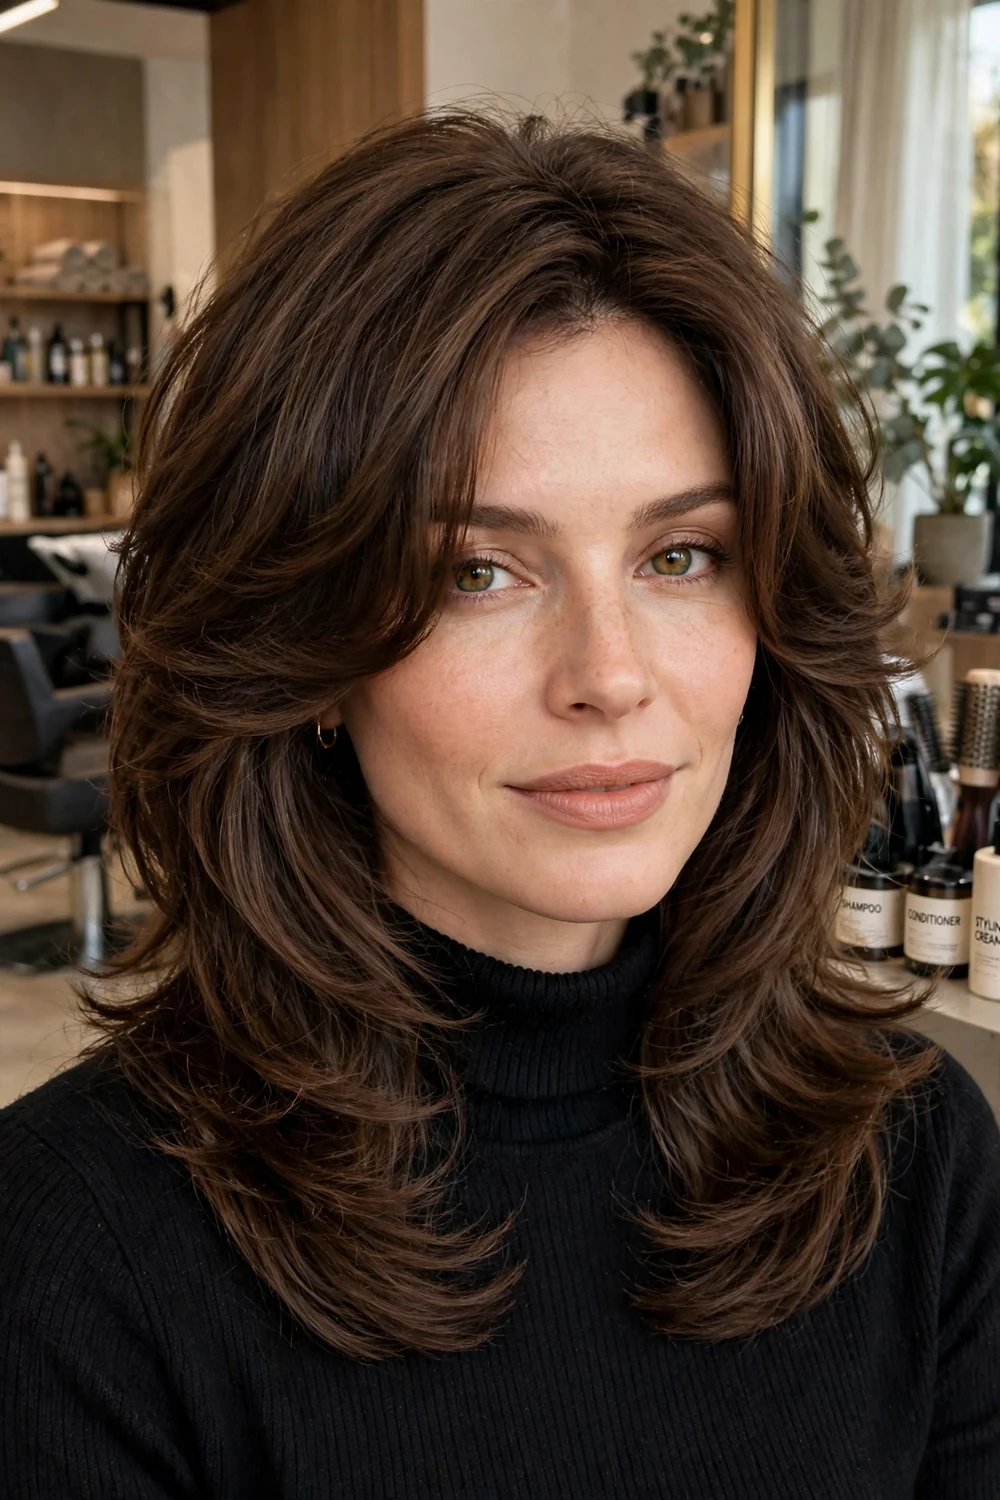
Layers begin near the cheekbones and angle down past the jaw, opening up the front of the hair. The back stays longer and fuller, so the change is focused where thick hair tends to cover the face.
On very dense hair, start the face frame below the chin if your hair tends to pouf outward. A higher start can add width at the cheeks. Bring a photo of the exact start point you want, since cheekbone and chin starts give different results.
Try this: Curl or wave only the face-framing pieces, even on a straight day. The bend at the front shows the layering and softens the line next to the face.
Difficulty: Low · Cost: $
18. Lob with Side-Swept Bangs

A long side-swept fringe blends into a collarbone lob and takes weight off one side of the front. The bangs need enough length to tuck behind the ear, which gives you an off-the-face option on busy days.
A deeper side part gives the sweep more length and a softer fall. Keep the rest of the cut simple, with long layers only, so the fringe stays the main detail at the front.
Try this: Blow-dry the bangs across the forehead, in the direction of the sweep, before drying the rest. If they air-dry straight down first, they rarely sit in the sweep later.
Difficulty: Low · Cost: $$
19. Razor-Cut Lob with Tapered Ends

A razor cuts each strand at an angle, creating a soft taper at the ends instead of a blunt line. On coarse, thick hair that taper removes bulk while keeping the collarbone length, and the ends move more freely.
This technique suits straight and wavy thick hair best. Very curly hair is usually shaped with shears instead, since razor work can disturb the curl pattern at the ends. Trims every six to eight weeks keep the taper from growing blunt.
Try this: Use a light cream on the ends only, scrunched in while damp. Heavy product through the whole head can make tapered ends look stringy.
Difficulty: Medium · Cost: $$
20. Asymmetrical Lob with One Longer Side
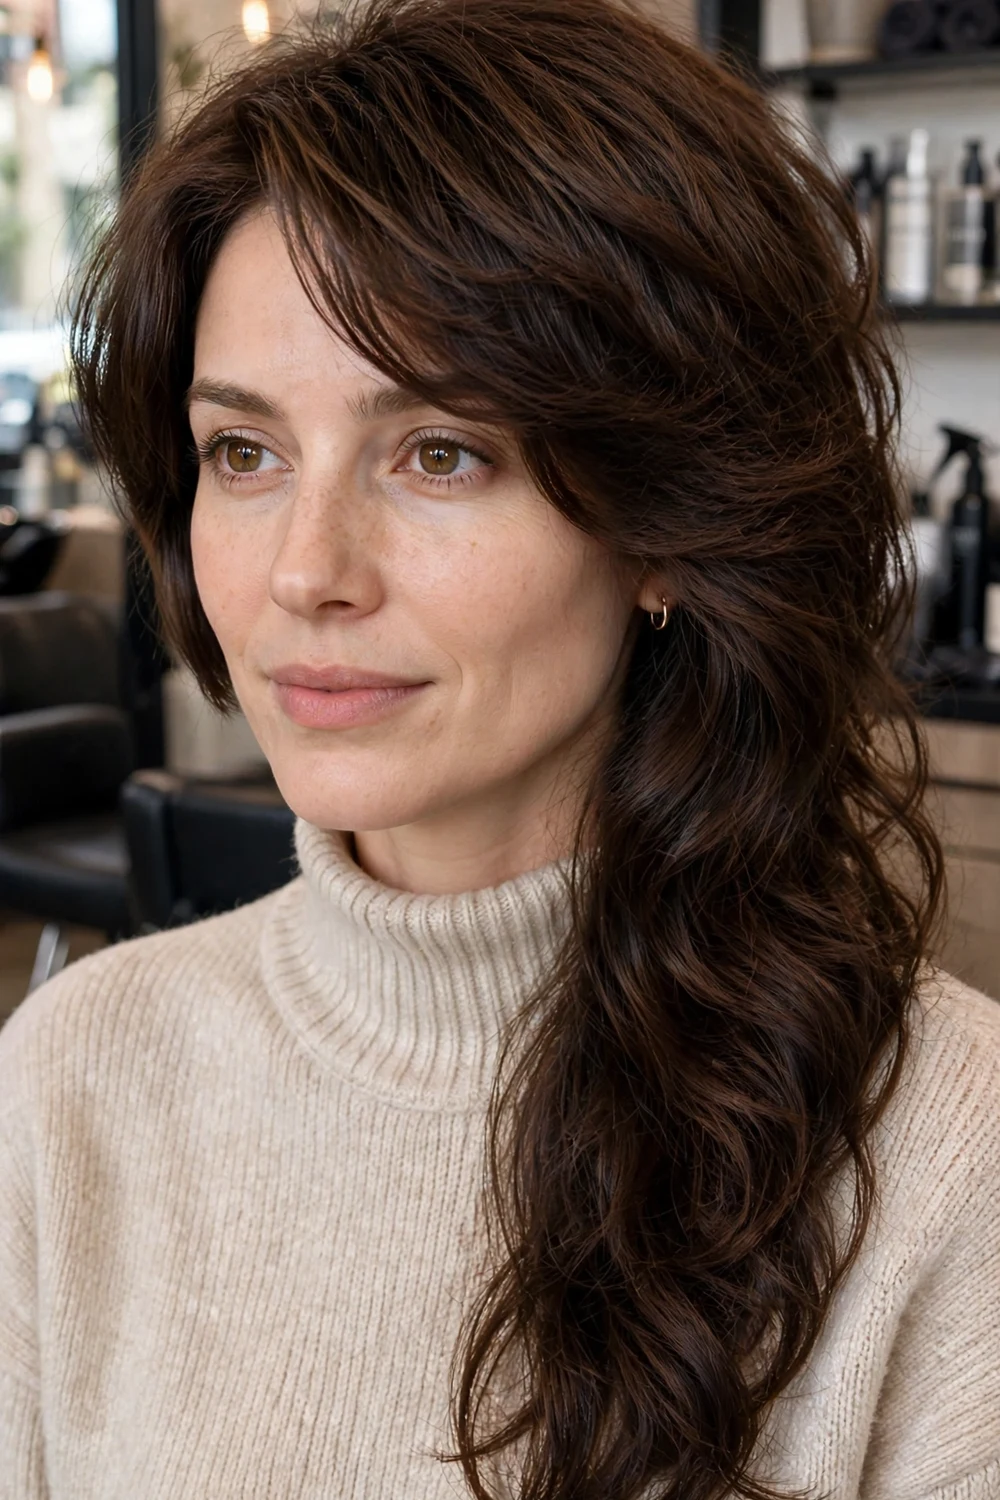
One side is left clearly longer than the other, usually by an inch or more at the front. The diagonal line draws the eye across the face, and the shorter side automatically carries less weight, which helps balance very thick hair.
Pick your longer side before the cut, based on your usual part and the side you tuck back. Uneven growth shows faster on this shape, so expect tidier, more frequent trims than a standard lob needs.
Try this: Style both sides toward the longer side with a round brush. Styling each side in mirror image softens the asymmetry that makes this cut stand out.
Difficulty: Medium · Cost: $$
21. Graduated Lob with Crown Lift

Graduated layers stack at the back and crown, building a rounded shape, while the front tapers into longer, softer pieces. A side part adds lift at the root on top, which balances the fullness through the sides of thick hair.
This is a structured cut, so the back needs shaping at each trim to keep the rounded outline. It suits straight and wavy hair that can hold a blow-dry shape through the day.
Try this: Apply mousse to damp hair before blow-drying, then lift the crown with a round brush. Spray applied only at the end rarely holds the graduated shape on dense hair.
Difficulty: Medium · Cost: $$
22. Soft Wolf Cut with Blended Layers

A softer take on the wolf cut keeps heavy layers at the crown and longer, blended layers at the back, with a lighter fringe than the classic version. Thick hair gives this cut the volume at the top that it needs, without teasing or heavy product.
Keep the contrast between the top and back layers moderate. A very strong gap can look disconnected on dense hair once it grows for a few weeks. Wispy or curtain fringe both work at the front.
Try this: Diffuse or air-dry with a texturizing cream and leave the layers alone while they dry. Over-brushing blends the top and back together and loses the two-zone shape.
Difficulty: Medium · Cost: $$
23. Hidden Nape Undercut Lob
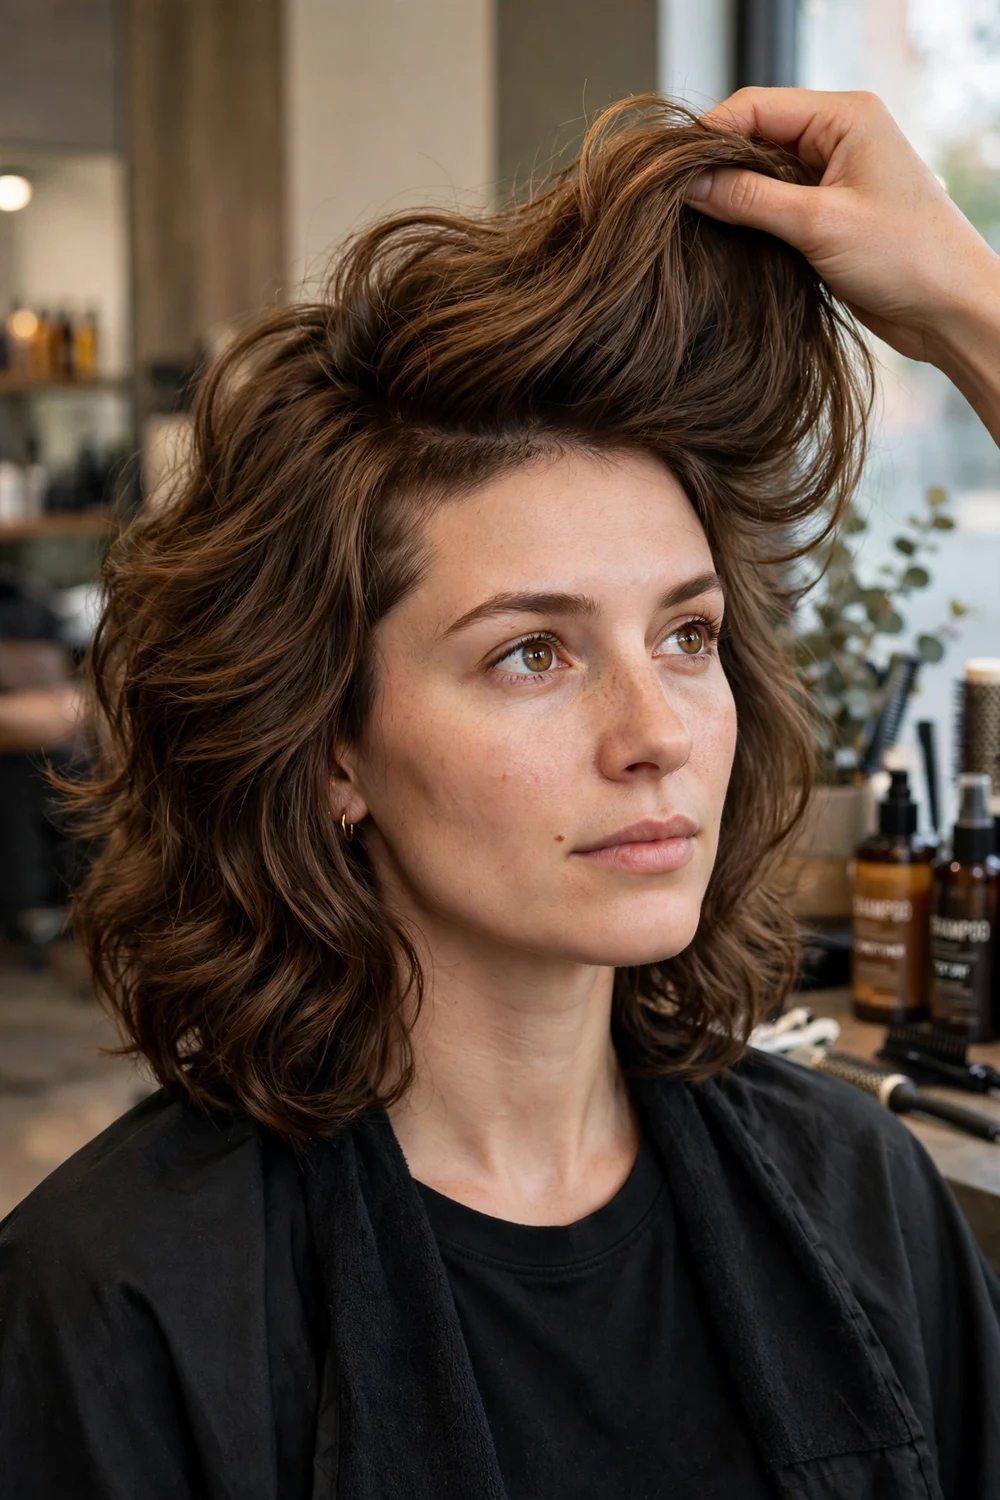
A section at the nape is cut much shorter underneath, hidden by the lob that falls over it. This removes a surprising amount of weight and heat at the neck, while the visible cut still looks like a standard collarbone lob when the hair is down.
This is a practical option many roundups skip, yet it solves a real problem for very dense hair that feels hot and heavy at the back. The trade-off is grow-out: the hidden section needs clipping at regular trims, and high ponytails will show it.
Try this: Decide your usual ponytail height before choosing this cut. If you wear your hair up daily and want the undercut hidden, a low ponytail keeps the longer top layer over it.
Difficulty: Medium · Cost: $$$
24. Blowout Lob with Graduated Layers

Long graduated layers through the back and sides give thick hair the movement a blowout needs, without thinning the ends. The finish is bouncy and rounded, with the ends curving under or flicking slightly depending on the brush work.
Because the shape comes from styling, this cut suits a routine that includes a round brush blow-dry two or three times a week. On air-dried days the same layers fall softer and straighter, which still looks tidy at collarbone length. Wavy versions pair well with the ideas in the hairstyles for thick wavy hair guide.
Try this: Blow-dry in sections with a large round brush, rolling each section and letting it cool before moving on. Cooling in the roll is what holds the bounce on heavy hair.
Difficulty: Medium · Cost: $$
More Ideas to Explore
Frequently Asked Questions
What is the best medium length haircut for very thick hair?
A layered lob or collarbone cut with interior layers suits most people with very thick hair. The interior layers remove weight where it builds up, the outer length keeps the cut looking full, and the collarbone length is long enough to tie back and short enough to dry in a reasonable time.
Which length in the medium range is easiest for thick hair?
Collarbone length, or just past the shoulders, is usually the easiest zone. Hair that sits right on the shoulders often flips outward and needs daily work. A little longer settles under its own weight, and a little shorter can feel bulky at the jaw if the layering is not right.
How often do medium cuts for thick hair need a trim?
Every eight to twelve weeks suits most layered and one-length medium cuts, since thick hair hides grow-out well. Structured shapes such as stacked, graduated, and asymmetrical cuts sit closer to six weeks, and bangs usually need a tidy every three to four weeks.
Will thinning shears damage thick hair?
Used with care in the interior of the hair, thinning and texturizing work is a standard way to remove bulk from thick hair. Problems tend to come from thinning too close to the surface or through the ends, which can leave the outer layer looking frizzy or thin. Ask your stylist where they plan to remove weight before they start.
How do I stop medium thick hair from forming a triangle shape?
Ask for weight removal through the lower mid-lengths and interior, with layers that start below the chin. A blunt, one-length cut with no interior work is the shape most likely to widen at the bottom. Styling helps too: blow-dry the sides down and slightly back, rather than out and round.
Can medium length thick hair air-dry well?
Yes, if the cut carries the shape. Shags, choppy cuts, wavy lobs, and soft layered cuts are built to air-dry with a small amount of cream or texturizing spray. Sleek one-length and blowout styles need heat to reach their intended finish, so pick the cut around the routine you will actually follow.
Final Thoughts
I would start any salon conversation with one clear point: where does your hair feel heaviest, at the sides, the back, or through the ends? The answer points straight to the right family on this list, interior layers for side weight, a tapered or stacked back for nape weight, and point-cut or razor ends for heavy tips.
Take two or three photos from this list rather than one, and keep the length talk specific, collarbone, just past the shoulders, or right at the shoulders. With the length and the weight plan agreed first, the rest of the cut, bangs, part, and finish, becomes a much simpler set of choices.

