


A shaggy pixie mixes short pixie length with the choppy, uneven layers of a shag. For women over 50, those layers do useful work: they lift the crown, add movement to fine hair, and soften the outline around the face. The finish is meant to look lived-in, so styling stays short and forgiving.
This list merges the shaggy pixie shapes that show up again and again in current roundups, from razor-cut ends to longer wolf-cut versions. If you want the broader short version first, see the collection of short shaggy pixie haircuts, and for finer hair, the cuts in pixie cuts for thin hair over 50 pair well with shaggy layering.
Key Takeaways
- Choppy layers through the crown are the core of every shaggy pixie. They build fullness without backcombing.
- Razor and point cutting keep the ends wispy, which softens the outline around the face and jaw.
- Fine hair gains the most from this cut, since short shaggy layers remove weight that pulls hair flat.
- Trims run every five to seven weeks. The uneven layers hide grow-out better than blunt cuts do.
- Style with fingers and a small amount of texturizing product. Brushes tend to flatten the texture out.
1. Classic Textured Pixie Shag

Soft, choppy layers run through the crown and sides, grazing the nape at the back. It is the standard shaggy pixie shape, balanced enough for a first move into textured short hair.
The fringe can be wispy or side-swept depending on your forehead and glasses. On fine to medium hair the layers lift at the root on their own, so daily styling is a quick finger tousle with a little texturizing cream.
Try this: Ask for the layers shortest at the crown. That is where the lift comes from, and it keeps the sides from puffing.
Difficulty: Low | Cost: $ | Time: 3 minutes
2. Short Layered Pixie Shag with Airy Micro Fringe

Ear-length diagonal layers build lift at the crown, finished with a see-through micro fringe that sits lightly on the forehead. The fringe is cut airy rather than solid, so it never looks heavy.
This one suits straight to slightly wavy hair and oval faces. Because the fringe is short, it stays clear of glasses and needs only a quick pat down in the morning.
Try this: Keep the fringe product-free. Even a little cream can make a micro fringe clump into points.
Difficulty: Low | Cost: $$ | Time: 3 minutes
3. Bronde Shaggy Pixie with Dimensional Color

Bronde, a blend between brown and blonde, is worked through the shaggy layers so each choppy piece catches light differently. The layered cut and the multi-tone color reinforce each other.
Because bronde grows out without a hard root line, color appointments can stretch further apart than with an all-over shade. The cut itself is the standard shaggy shape: short sides, layered top, wispy ends.
Try this: If you color at home, place the lighter pieces only around the crown and front, where the layers are longest.
Difficulty: Low | Cost: $$ | Time: 2 minutes
4. Shaggy Pixie with Soft Highlights

Soft highlights are painted through the top layers of a shaggy pixie, framing the face and showing off the texture. The placement follows the layers, so the color looks built into the cut.
Keep the highlights one to two shades lighter than your base for a soft result that grows out gently. The shaggy layers do the daily work; the color simply makes them easier to see.
Try this: Ask for the brightest pieces at the front hairline, where they frame the face, and softer pieces at the back.
Difficulty: Low | Cost: $$ | Time: 2 minutes
5. Shaggy Pixie with Tapered Sides

Playful shaggy layers sit on top while the sides are tapered close, which keeps the outline tidy and stops the texture from widening the face. The contrast makes the top layers look fuller by comparison.
It is a sensible middle ground if you like shag texture but want a cleaner finish at the ears and nape. Styling is a finger tousle on top; the tapered sides need nothing.
Try this: Have the taper blended gradually rather than clipped in a hard line. A soft blend grows out far more gently.
Difficulty: Low | Cost: $ | Time: 3 minutes
6. Razor-End Messy Pixie Shag

A razor is used on the ends instead of scissors, which leaves each piece feathered and slightly uneven. The result is a messy, piecey finish that looks deliberate even when you have done almost nothing to it.
Razor cutting works best on straight and wavy hair in good condition; very fine or fragile ends can look thin if razored too much, so ask your stylist to razor only the last part of each layer.
Try this: Pinch the ends with a tiny amount of paste in the morning to separate the pieces the razor created.
Difficulty: Low | Cost: $ | Time: 2 minutes
7. Shaggy Pixie Bob with Gentle Fringe

Halfway between a pixie and a bob, this cut keeps shaggy layers with a gentle fringe and longer pieces around the ears. It suits women who want shag texture with a little more coverage at the sides.
The longer side pieces help balance wider cheeks or a stronger jaw. Readers comparing lengths may also like the shapes in short pixie haircuts for older women, which sit a touch shorter than this hybrid.
Try this: Tuck one side behind the ear and leave the other down. The small asymmetry suits the shaggy finish well.
Difficulty: Low | Cost: $$ | Time: 3 minutes
8. Silver Shaggy Crop with Spiky Crown

The crown is cut to stand in short, textured spikes while the sides stay cropped close, and the shaggy, unfinished edges keep the crop from looking severe. In natural silver, the texture shows clearly.
It is a strong option for fine silver hair that lies flat in smoother cuts. A fingertip of matte product holds the crown texture; the rest of the cut needs nothing.
Try this: Work the product in while the crown is slightly damp, then pinch upward. Dry hair absorbs paste less evenly.
Difficulty: Low | Cost: $ | Time: 2 minutes
9. Razor-Cut Shaggy Pixie for Thin Hair

Heavier layering, cut with a razor, creates the look of more hair by keeping every layer in motion. The feathery ends around the face soften the outline and stop thin hair from looking stringy.
The key limit is length: thin hair in a shaggy pixie should stay short, since longer thin layers separate and show the scalp. Keep the crown layers the shortest and fullest part of the cut.
Try this: Use mousse rather than paste on thin hair. Paste can clump fine strands together and undo the fullness.
Difficulty: Low | Cost: $ | Time: 3 minutes
10. Very Short Curly Pixie Shag

Curly hair cut short with shaggy layers keeps its spring, since the layers remove weight that would otherwise pull curls down and out at the sides. The shape stays rounded and close.
Ask for the cut to be done on dry curls so the length is judged accurately. Daily care is a small amount of curl cream scrunched in, then air drying with no touching until the curls set.
Try this: Refresh with a light water mist and a scrunch on day two. Curly shags usually look better on the second day.
Difficulty: Low | Cost: $$ | Time: 3 minutes
11. Tousled Pixie Shag with Side-Swept Bangs

Textured layers are tousled forward and finished with a side-swept bang that falls across the forehead. The sweep adds width at the top of the face and covers a thinning front hairline well.
For thin hair, the longer swept bang creates the impression of more hair at the front, where thinning is most visible. Keep the back and sides short so the front sweep stays the focus.
Try this: Dry the bang in the opposite direction first, then sweep it into place. That small step gives it lift at the root.
Difficulty: Low | Cost: $ | Time: 3 minutes
12. Long Pixie Wolf Cut with Shaggy Perimeter
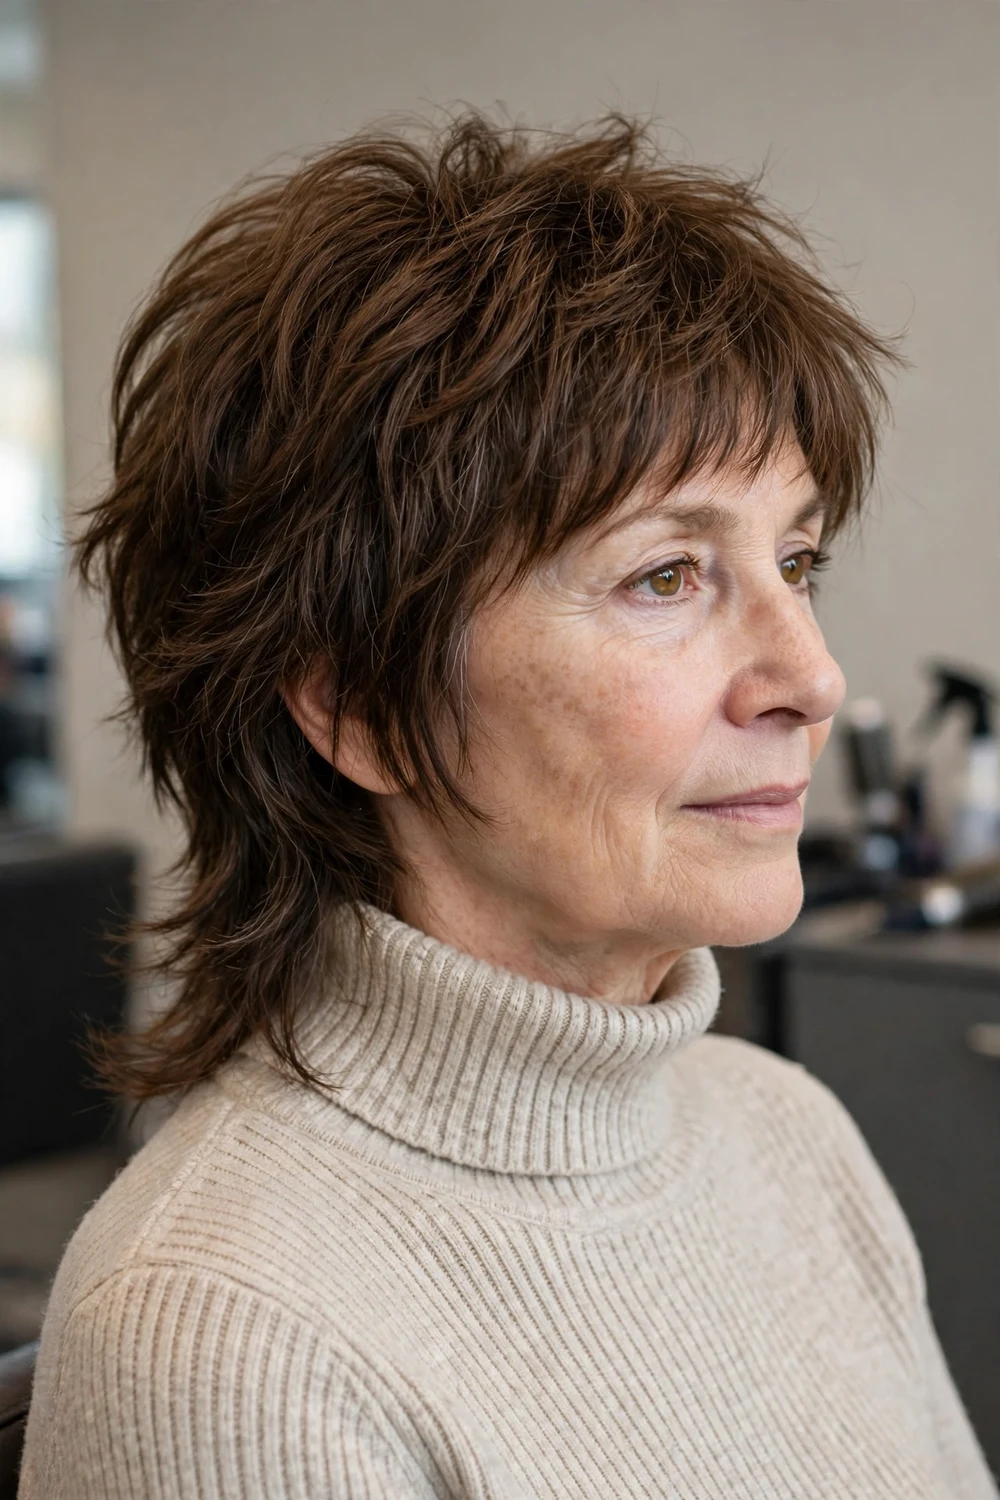
The wolf cut brings a shaggy, layered perimeter and a longer back to pixie length. It keeps more length than any other cut on this list, with choppy layers through the whole shape.
It suits medium to thick hair, which holds the layered perimeter without separating. Fine hair can wear a softer version with fewer layers at the back. Styling is a scrunch and a rough dry to keep the texture loose.
Try this: Ask for the back layers to be thinned at the ends only, so the length stays but the weight does not.
Difficulty: Medium | Cost: $$ | Time: 5 minutes
13. Shaggy Pixie Mullet with Feathered Back
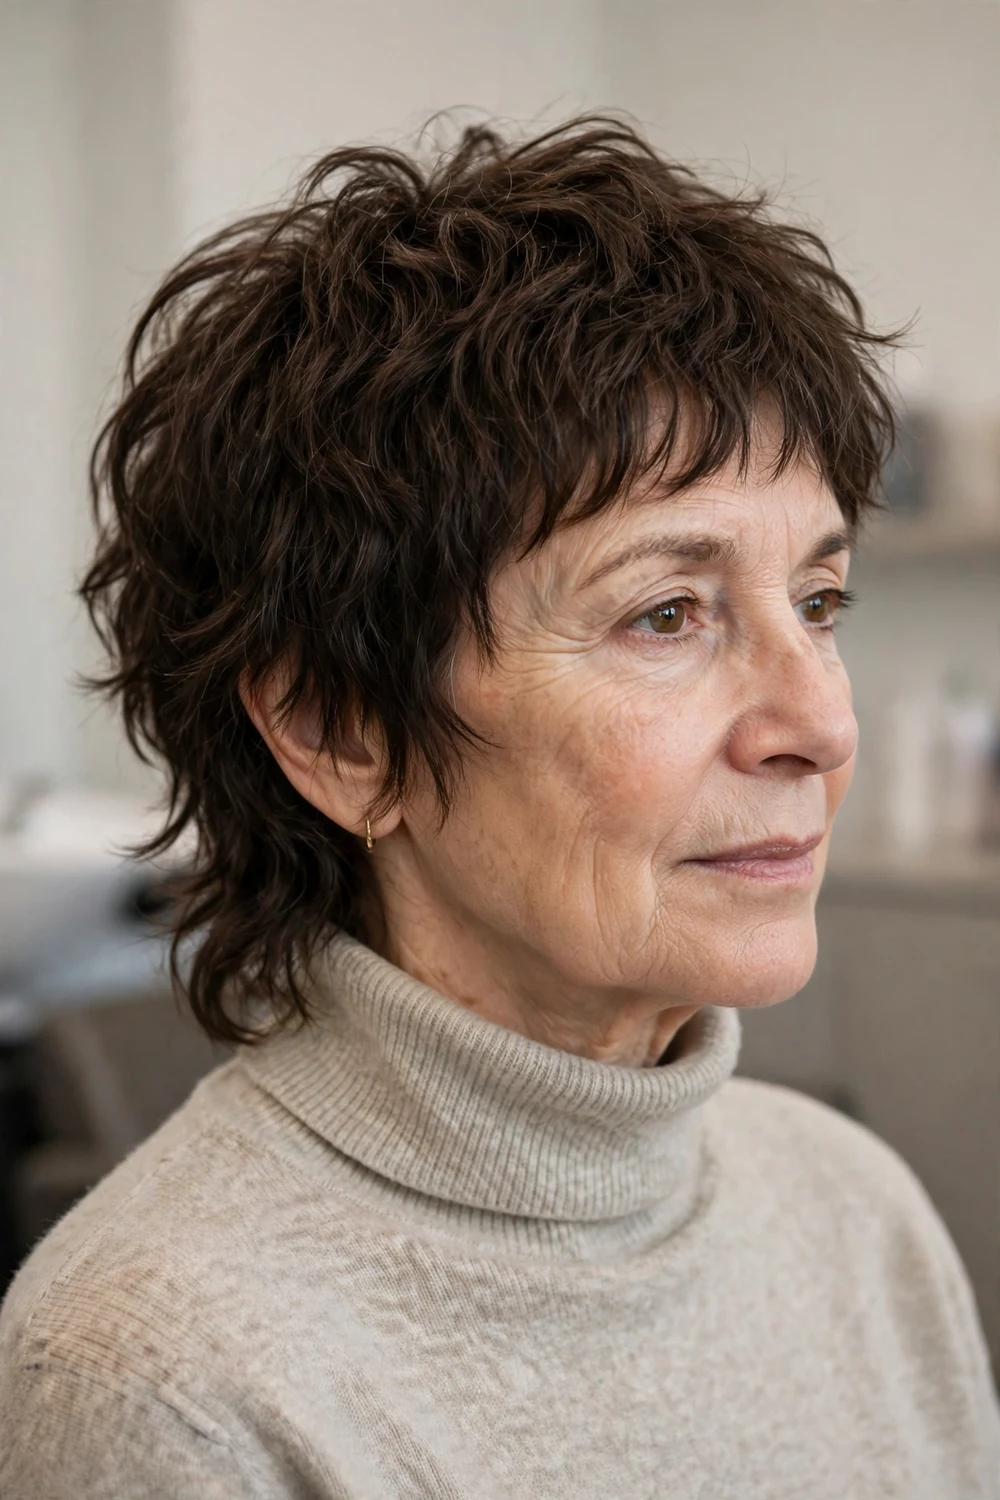
Short choppy layers on top flow into a longer, feathered back in this pixie mullet. The tapered nape of a standard pixie is replaced by length that moves, which gives the cut its distinct outline.
It works best on medium to thick straight or wavy hair. The crown layers build fullness on top, so the longer back reads as a style choice rather than grow-out.
Try this: Keep the back conditioned and lightly oiled at the ends. Longer feathered pieces show dryness first.
Difficulty: Medium | Cost: $$ | Time: 5 minutes
14. Asymmetrical Shaggy Pixie in Copper Tones

One side is cut shorter while the longer side carries shaggy layers and a sweeping fringe, and copper tones run through the longer pieces. The asymmetry gives the shag a clear direction.
Copper shades fade faster than browns, so a color-safe shampoo helps hold the tone between appointments. The longer side flatters longer faces by adding width at cheek level.
Try this: Part it on the short side to show the contrast, and let the long side fall across. The cut is planned around that part.
Difficulty: Low | Cost: $$ | Time: 3 minutes
15. Shaggy Pixie for Gray Hair with Wispy Ends

Wispy, point-cut ends keep gray hair looking soft in a shaggy pixie, where blunt ends can make gray strands look wiry. The layers are kept light and uneven all through the cut.
Gray hair often has a coarser texture than pigmented hair, and the shaggy layering helps those strands sit with the rest instead of poking out. No color upkeep is needed, which keeps the whole style simple. Similar natural-color ideas appear among pixie haircuts for women over 60.
Try this: A pea-size amount of smoothing cream on the ends tames wiry gray strands without flattening the layers.
Difficulty: Low | Cost: $ | Time: 2 minutes
16. Shaggy Pixie with Curtain Fringe

A curtain fringe parts in the middle and falls to both sides, blending straight into the shaggy layers at the cheeks. It covers the forehead softly while keeping the face open.
The curtain shape grows out more gracefully than a straight fringe, since the two sides simply get longer and tuck away. It suits oval and long faces, and it sits well above most glasses frames at the center.
Try this: Dry the fringe forward first, then split it with your fingers. Drying it already parted can make it sit flat.
Difficulty: Low | Cost: $$ | Time: 3 minutes
17. Ear-Length Shaggy Pixie with Piecey Layers

Layers stop right at ear length, cut into separate pieces that show clearly around the face. The piecey finish gives straight hair, which can look flat in a pixie, a defined pattern to catch light.
Ask for the pieces to be cut at slightly different lengths; uniform pieces read as a bowl shape. A small amount of texturizing spray at the roots keeps the separation through the day.
Try this: Define the pieces after drying, not before. Paste on wet hair can glue the pieces together instead of separating them.
Difficulty: Low | Cost: $ | Time: 3 minutes
18. Shaggy Pixie for Thick Hair with Texturized Ends

Thick hair needs the weight taken out of the ends, not the crown, in a shaggy pixie. Texturizing the ends lets the layers move and stops the cut from forming a solid, heavy shape at the sides.
Keep the interior layers longer so the fullness sits where thick hair looks best, at the top. Daily styling is a light cream to smooth the ends, then a finger tousle.
Try this: Tell your stylist if the sides tend to puff by midday. Extra texturizing at the sides, done at the first cut, prevents it.
Difficulty: Low | Cost: $$ | Time: 3 minutes
19. Shaggy Pixie with Long Sideburn Pieces
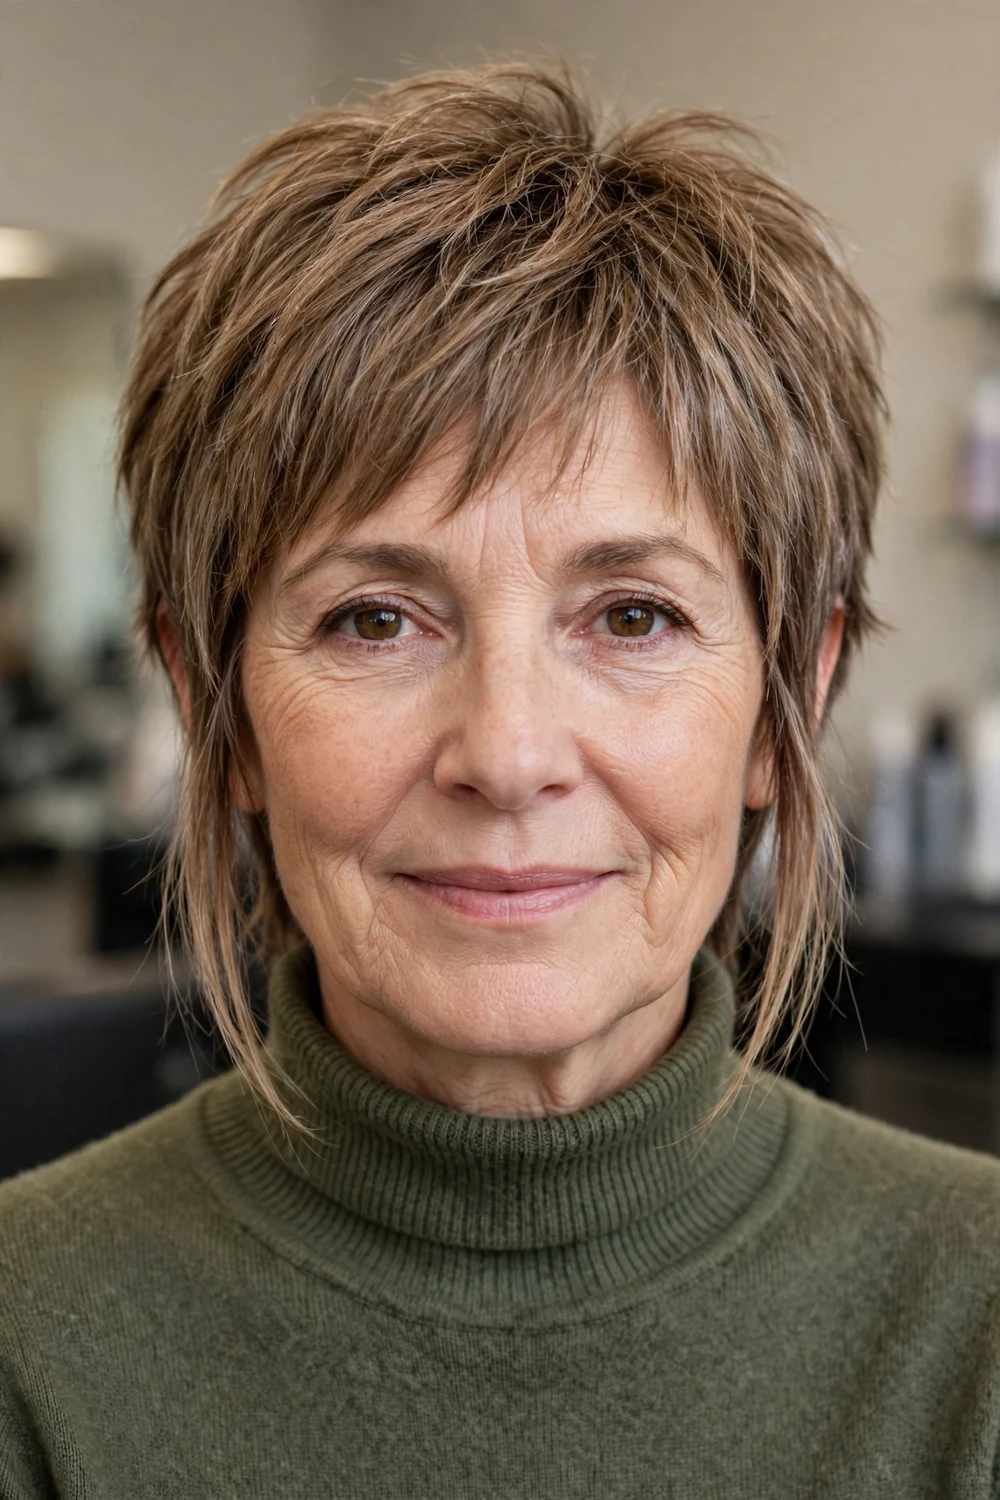
Longer pieces are left in front of the ears, reaching toward the cheekbones, while the rest of the cut follows the standard shaggy shape. Those two pieces soften a square jaw and frame the cheeks.
The sideburn pieces also give you something to tuck, pin, or leave loose, which adds options without adding length anywhere else. They grow out slowly and can be trimmed alone between appointments.
Try this: Keep the pieces point-cut and light. Heavy, blunt sideburn pieces can look dated against a soft shag.
Difficulty: Low | Cost: $ | Time: 2 minutes
20. Low-Part Shaggy Pixie for Round Faces
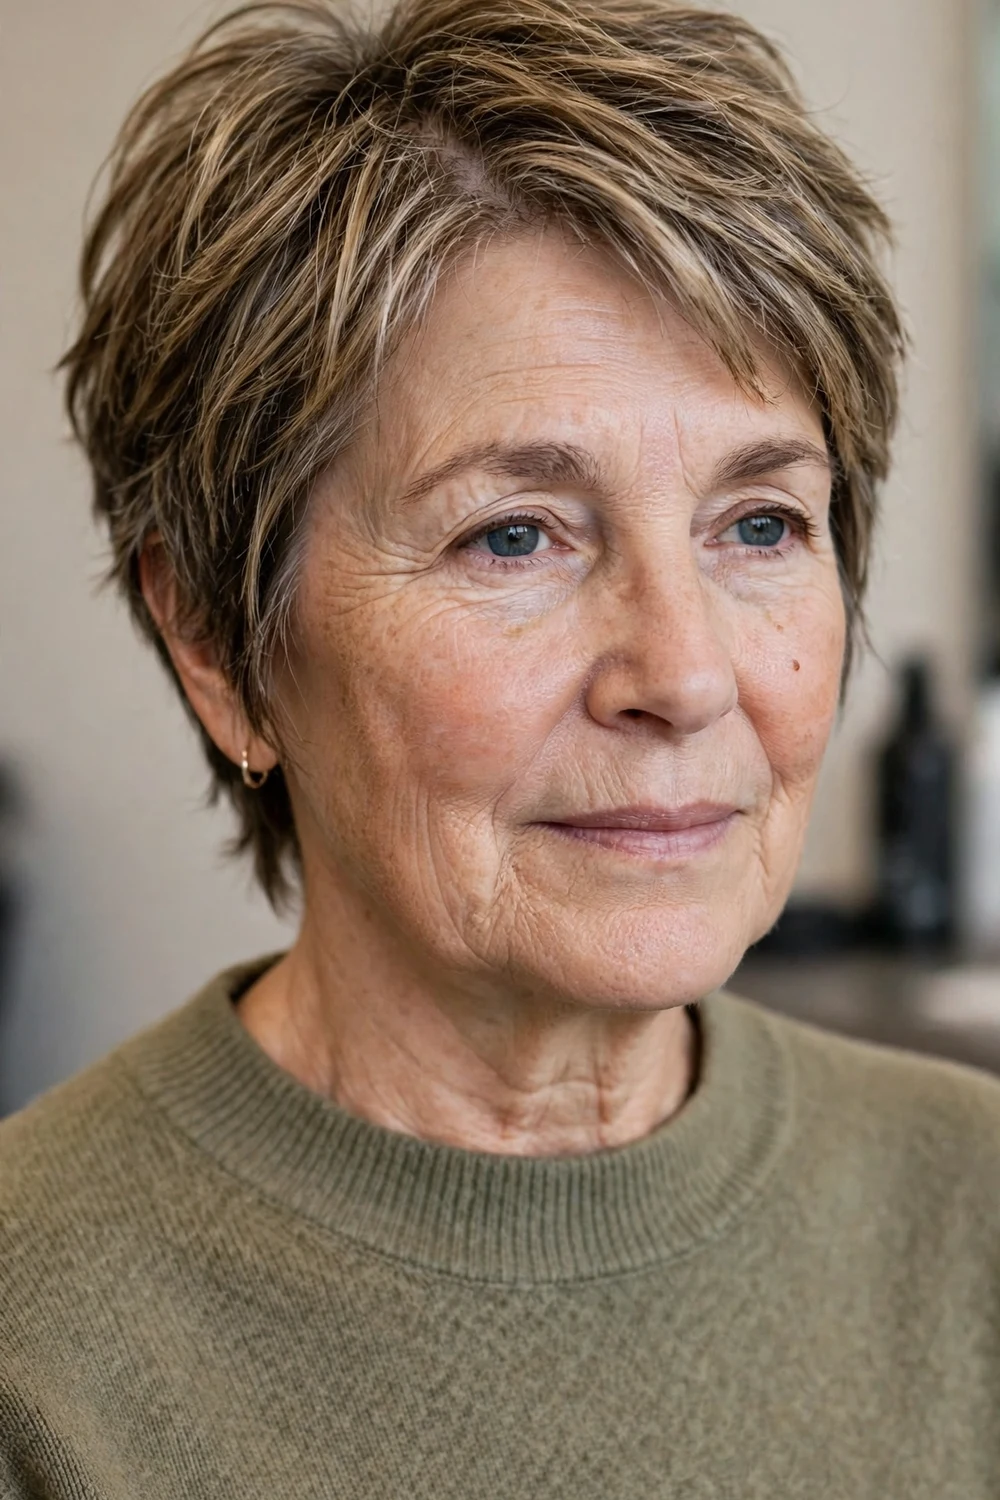
A low side part sends the shaggy top layers diagonally across, which adds height at the crown and breaks up the symmetry of a round face. The sides stay closer to the head to avoid extra width.
Volume belongs at the crown in this cut, never at the cheeks. The diagonal fringe line also draws the eye upward, which is why the low part matters more here than in other shaggy shapes.
Try this: Set the part while the hair is wet. A shaggy pixie will dry into whatever part it starts with and resist changes later.
Difficulty: Low | Cost: $ | Time: 3 minutes
21. Shaggy Pixie with Feathered Nape
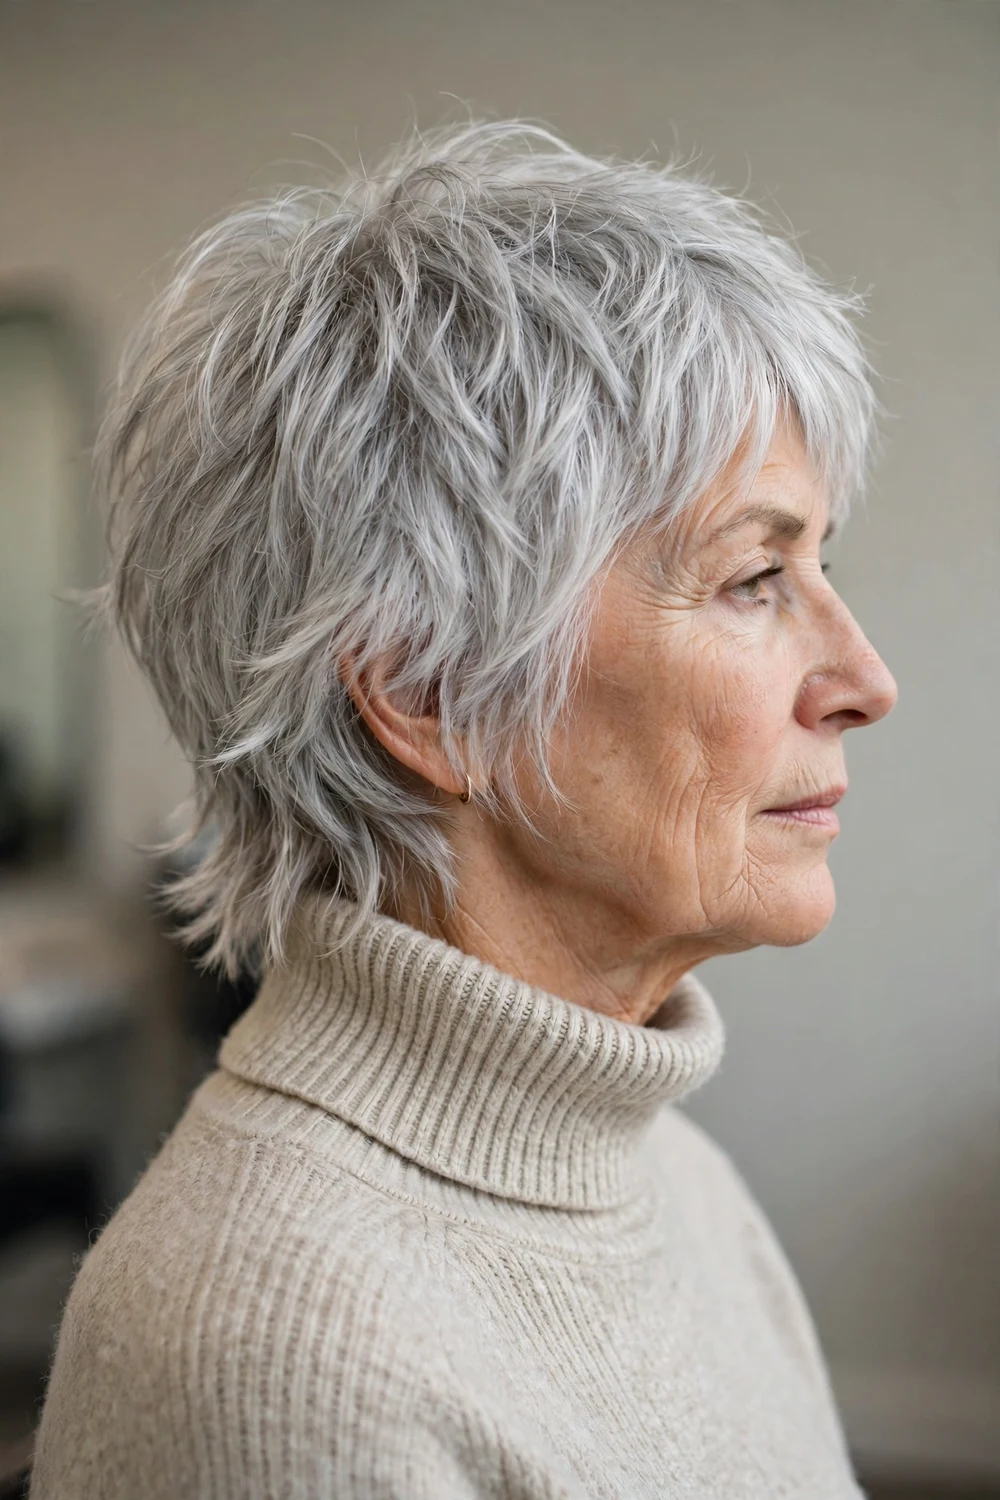
The back of this cut is feathered into soft points at the nape instead of a blunt or tapered line. It is a small detail that changes how the whole cut reads from behind and from the side.
A feathered nape grows out more softly than a hard neckline, so it is a good pick if you prefer longer gaps between trims. The top follows the usual shaggy layering and can carry any fringe on this list.
Try this: Ask for the nape points to be kept wispy. If they are cut too thick, they can stick out as they grow.
Difficulty: Low | Cost: $ | Time: 2 minutes
Comparison Table
| Style | Best For | Upkeep | Cost Band |
|---|---|---|---|
| Classic Textured Pixie Shag | Fine to medium hair, first shaggy cut | Trim every 5-6 weeks | $ |
| Short Layered Pixie Shag with Airy Micro Fringe | Straight hair, small foreheads | Trim every 5-6 weeks | $$ |
| Bronde Shaggy Pixie with Dimensional Color | Brunette bases, low color upkeep | Trim every 6-7 weeks | $$ |
| Shaggy Pixie with Soft Highlights | Dark bases, added dimension | Trim every 6-7 weeks | $$ |
| Shaggy Pixie with Tapered Sides | Round faces, neat outlines | Trim every 5-6 weeks | $ |
| Razor-End Messy Pixie Shag | Straight or wavy hair, piecey texture | Trim every 6-7 weeks | $ |
| Shaggy Pixie Bob with Gentle Fringe | Longer short hair, soft framing | Trim every 6-7 weeks | $$ |
| Silver Shaggy Crop with Spiky Crown | Natural silver hair, fine texture | Trim every 5-6 weeks | $ |
| Razor-Cut Shaggy Pixie for Thin Hair | Thin hair, maximum movement | Trim every 5-6 weeks | $ |
| Very Short Curly Pixie Shag | Natural curls, short lengths | Trim every 6-8 weeks | $$ |
| Tousled Pixie Shag with Side-Swept Bangs | Thin hair, side parts | Trim every 5-6 weeks | $ |
| Long Pixie Wolf Cut with Shaggy Perimeter | Thicker hair, longer pixies | Trim every 6-7 weeks | $$ |
| Shaggy Pixie Mullet with Feathered Back | Wavy hair, statement shapes | Trim every 5-6 weeks | $$ |
| Asymmetrical Shaggy Pixie in Copper Tones | Copper color, longer faces | Trim every 5-6 weeks | $$ |
| Shaggy Pixie for Gray Hair with Wispy Ends | Natural gray hair, soft finishes | Trim every 6-7 weeks | $ |
| Shaggy Pixie with Curtain Fringe | Center parts, forehead coverage | Trim every 5-6 weeks | $$ |
| Ear-Length Shaggy Pixie with Piecey Layers | Straight hair, defined texture | Trim every 5-6 weeks | $ |
| Shaggy Pixie for Thick Hair with Texturized Ends | Thick hair, reduced bulk | Trim every 5-6 weeks | $$ |
| Shaggy Pixie with Long Sideburn Pieces | Square jaws, cheek framing | Trim every 6-7 weeks | $ |
| Low-Part Shaggy Pixie for Round Faces | Round faces, crown height | Trim every 5-6 weeks | $ |
| Shaggy Pixie with Feathered Nape | Short backs, soft necklines | Trim every 6-7 weeks | $ |
More Ideas to Explore
Frequently Asked Questions
What makes a pixie shaggy rather than classic?
The layering. A classic pixie uses smoother, more even layers, while a shaggy pixie uses choppy, uneven layers with wispy ends, so the finish looks textured and lived-in instead of polished.
Is a shaggy pixie good for fine hair over 50?
Yes. Short shaggy layers remove weight that pulls fine hair flat, and the texture at the crown creates the look of more fullness. Keep the cut short and use mousse rather than heavy paste.
How often does a shaggy pixie need trimming?
Every five to seven weeks for most versions on this list. The uneven layers hide grow-out well, so shaggy pixies are more forgiving between appointments than blunt short cuts.
Can a shaggy pixie work with natural gray hair?
Yes. Wispy point-cut ends keep gray strands looking soft, and the layered texture helps coarse gray hair sit in line. Natural gray also removes color appointments from the upkeep entirely.
Does a shaggy pixie need heat styling?
No. Most versions on this list are finger-styled with a small amount of product and air dried or roughly dried. The texture is cut in, so heat tools are optional rather than required.
What should I ask my stylist for?
Ask for choppy layers through the crown, wispy point-cut or razor-cut ends, and a fringe matched to your face shape and glasses. Bring photos of two or three favorites from this list to anchor the conversation.
Final Thoughts
A shaggy pixie earns its place after 50 because the texture is built into the cut, not added each morning. Choose the version that matches your hair density first, then your fringe preference, and take clear photos to your appointment. Ask how the layers will grow out over seven weeks, since a good shaggy cut should still look settled on the day of your next trim.

