


A long pixie is not a short pixie that grew out. It is a different haircut with different physics: the extra length, falling past the ears and sometimes grazing the jaw, gives fine hair something to lift against, but it also gives gravity more to pull on. Cut like a regular pixie, it goes limp. Cut for the length, it can look fuller than either a short pixie or a bob. I have spent years studying how short cuts behave on fine hair, and the long pixie is the most misunderstood of them.
This list rounds up 29 long pixie haircuts for fine hair, and every one is chosen for how it solves volume and length at the same time. Expect stacked backs that prop the crown up, nape work that removes weight where it drags, textured ends that stay separated instead of stringy, and root-lift cutting that builds height from the scalp. Pick the one that matches your density, your face shape, and the styling time you actually have.
Quick Takeaways
- The extra length of a long pixie needs a counterweight: stacked or graduated layers underneath keep fine hair from collapsing under its own weight.
- Point-cut or razor-textured ends stop fine hair from clumping into see-through strands, while over-thinning shears do the opposite and should be skipped on top.
- A darker root or root shadow creates the shadow-and-light contrast the eye reads as density on fine hair.
- Style the roots, not the ends: mousse at the scalp and upward blow-drying build lift; heavy product on the ends just drags them down.
- Long pixies hold their shape longer than short ones, so trims stretch to 6 to 8 weeks instead of 4.
1. Stacked Crown Long Pixie

The technique here is stacking: the back is cut shorter and graduated so each layer sits on the one below it, which pushes the longer crown hair upward instead of letting it lie flat. On fine hair this is the single most reliable way to get height that survives past noon, because the volume is built into the cut’s architecture rather than sprayed on each morning. The front pieces stay long enough to sweep forward, keeping the pixie-bob length that makes this cut different from a standard pixie.
It suits oval and heart-shaped faces best, since the height sits on top and the sides stay close. Ask your stylist for stacked layering concentrated through the back and crown, and commit to reshaping every five to six weeks, since a grown-out graduation is what makes this cut fall flat. A round brush and a cool shot from the dryer are all the daily styling it asks for. If your hair is very straight, ask the stylist to keep the stacking slightly higher, since straight strands show graduation more clearly and the extra height reads as fullness from every angle.
Try this: dry the stacked back sections straight up with a round brush, directing them away from the scalp so the layers cool into their lifted position.
Difficulty: Medium · Cost: $$ (salon)
2. The Bixie (Pixie-Bob)

The bixie merges two cuts: a pixie-short stacked back and bob-length pieces through the front and sides. The technique is silhouette contrast, and it works because fine hair reads fuller when the outline has somewhere to go. The short back keeps the nape neat and weight-free, while the longer front frames the face and gives the eye length to follow. It is the longest-looking cut on this list while still being a true short haircut, which is exactly the territory a long pixie is meant to claim.
It flatters round and heart-shaped faces, since the longer front pieces add line around the cheeks and jaw. Ask for a short stacked back with the front kept at ear-to-jaw length, and keep the texturizing light: too much slicing turns the front pieces wispy. Blow-dry the back with lift and let the front fall forward for the signature shape. This cut is forgiving on second-day hair: the longer front pieces hide oily roots better than a cropped pixie, and a quick blast of dry shampoo at the crown is usually enough to refresh it.
If you like the bob half of this hybrid, these short french bobs show how bob shapes adapt to fine hair at similar lengths.
Try this: tuck one front piece behind your ear when you want the cut to read more pixie, and let both fall forward when you want it to read more bob.
Difficulty: Medium · Cost: $$ (salon)
3. Point-Cut Textured Long Pixie

Point-cutting is the technique that saves fine hair at longer pixie lengths. Instead of cutting straight across, the stylist snips into the ends vertically, creating separated tips that catch light at different angles. The eye reads that broken-up surface as density, which is the whole trick: blunt ends on fine hair clump into one thin sheet, while point-cut ends stay piecey and individual. Ask for it by name, and ask the stylist not to follow it with thinning shears, which remove the bulk you just paid for.
It works on straight to slightly wavy hair and suits most face shapes, since the texture is in the ends rather than the outline. A light texturizing spray on dry hair separates the points without weighing them down. This is one of the easiest cuts on the list to style, because the texture is doing the work that product would otherwise have to do. Because the texture lives in the ends, the cut grows out softly, and you can stretch trims to seven weeks before the points start looking ragged instead of piecey.
Try this: pinch small sections of the ends between your fingers and twist lightly after styling to keep the point-cut separation visible.
Difficulty: Low · Cost: $ (salon)
4. Graduated Nape Long Pixie

Nape graduation is the quiet workhorse of the long pixie. By cutting the hair at the neckline on a graduated angle, your stylist removes the weight that pulls fine hair downward right where it tends to go stringy and separate. The top keeps its full long-pixie length, so the contrast between the close nape and the longer crown is what builds the rounded shape. On fine hair, this is often the difference between a cut that grows out into a shapeless wedge and one that holds its line for weeks.
It suits straight to wavy hair and is especially good if your hair goes limp at the back first. The graduation grows out soft, so trims stretch comfortably to six or seven weeks. Dry the nape sections flat against the head and lift only at the crown, which keeps the graduated shape reading as intentional rather than grown-out. If you wear glasses, mention it in the consultation, since the graduated nape changes how the cut sits against frames and your stylist can adjust the perimeter accordingly.
Try this: smooth the nape with a flat brush while directing heat downward, then switch to lifting the crown so the graduation stays crisp underneath.
Difficulty: Low · Cost: $ (salon)
5. Side-Swept Long Pixie
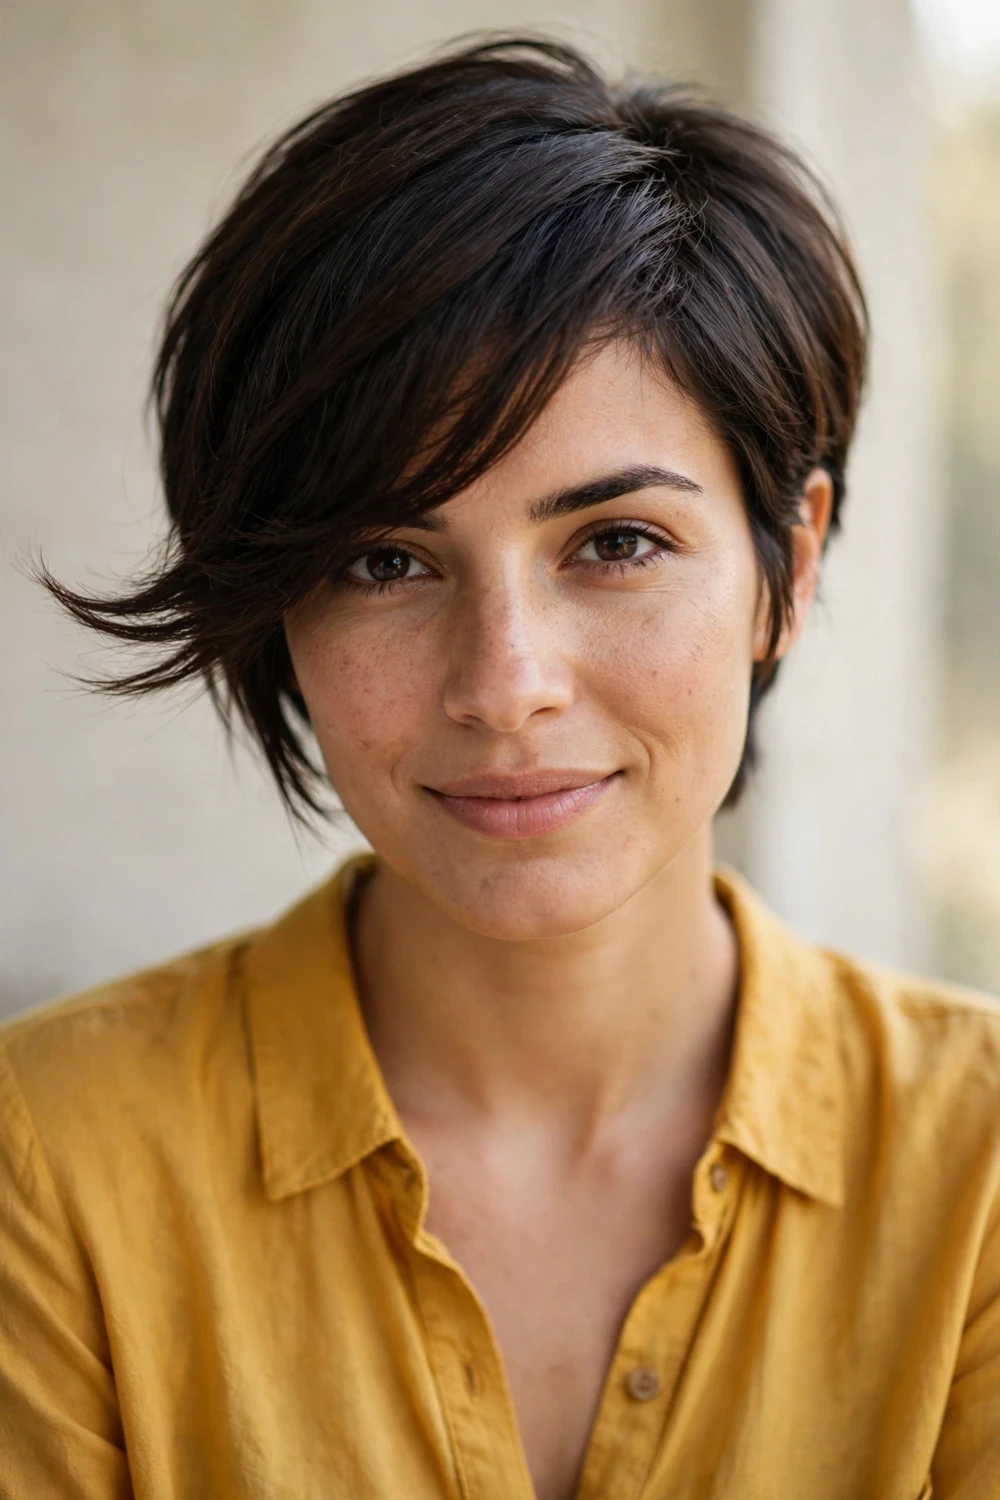
The diagonal line is one of the oldest volume tricks in the book, and the side-swept fringe is how it shows up in a long pixie. A fringe that travels across the forehead instead of sitting straight creates a diagonal path for the eye, which reads as movement and fullness instead of a flat front. Because the fringe is long, it blends into the longer top layers rather than sitting on top of them, so the whole front of the cut moves as one piece instead of separating into a fringe plus hair.
It is a strong choice for high or wide foreheads and for round faces, where the diagonal sweep breaks up width. Blow-dry the fringe to the side with a small round brush so it falls into its sweep on its own, and have it trimmed every five weeks since an overgrown sweep starts falling into the eyes and losing its line. The sweep also works as a styling shortcut on busy mornings: a side part and two minutes with a round brush give you a finished look that reads as far more effort than it took.
Try this: train the sweep while the hair is damp by clipping the fringe in place for five minutes, which sets the direction without heat.
Difficulty: Low · Cost: $ (salon)
6. Deep Side-Part Long Pixie

This cut uses part placement as the technique. Hair flipped across the head from a deep side part always looks thicker than the same hair split down the middle, because the longer sweep has to travel farther and builds lift at the root as it goes. The crown is cut long enough to flip over, which is the requirement: without that extra top length, there is nothing to flip. This is a case where the long-pixie length is not decorative, it is structural.
It suits fine, straight hair that falls flat with a center part, and it is a smart way to work with a cowlick instead of fighting it. Train the part on damp hair for the first few days and it will start falling into place on its own. Ask your stylist to keep the crown long enough to cross the head, since a crown cut too short cannot hold the flip.
Try this: flip the crown to the opposite side while blow-drying, then flip it back, which builds root lift on both sides of the part.
Difficulty: Low · Cost: $ (salon)
7. Curtain Fringe Long Pixie

The curtain fringe parts in the center and sweeps to both sides, widening the front of the cut in a way that adds face-framing fullness around the forehead and temples. On a long pixie this works especially well because the fringe pieces are long enough to blend into the sides, so nothing looks disconnected. The technique is adding width where fine hair tends to look narrowest, right at the hairline, and it does it without adding a heavy solid fringe that would need daily management.
It suits narrow or long faces by adding width, and it is the most forgiving fringe for grow-out since curtain pieces blend into face-framing layers on their own. Blow-dry the fringe forward with a round brush and part it in the center for the signature sweep. Trim every four to five weeks to keep the sweep landing at the right spot on the forehead. Curtain pieces also make an excellent bridge if you are growing out a shorter fringe, since they blend into the sides instead of sitting awkwardly against them.
Try this: wrap each curtain piece around a round brush away from your face while drying to get the outward sweep instead of a flat part.
Difficulty: Medium · Cost: $ (salon)
8. Wispy Bang Long Pixie

Wispy bangs use feathering instead of weight: the fringe is point-cut into thin, separated pieces that let a little forehead show through. On fine hair this is safer than a solid bang, because a thick straight-across fringe on fine hair often reads sparse anyway, while a deliberately wispy one looks intentional. The separated pieces catch light individually, which is the same density illusion that point-cut ends create, just moved to the front of the cut.
It suits straight fine hair best, since the wispy separation needs smooth strands to read clearly. The bangs grow into the eyes faster than the rest of the cut, so plan a bang trim every three to four weeks between full cuts. Keep product off the fringe entirely: even a little cream makes wispy pieces clump and defeats the purpose. The wispy finish also suits first-time bang wearers, because separated pieces are far more forgiving than a solid line if you decide bangs are not for you.
Try this: dry the bangs side to side with your fingers first, then let them fall forward, which keeps them separated instead of settling into one sheet.
Difficulty: Low · Cost: $ (salon)
9. Feathered Shag Lixie
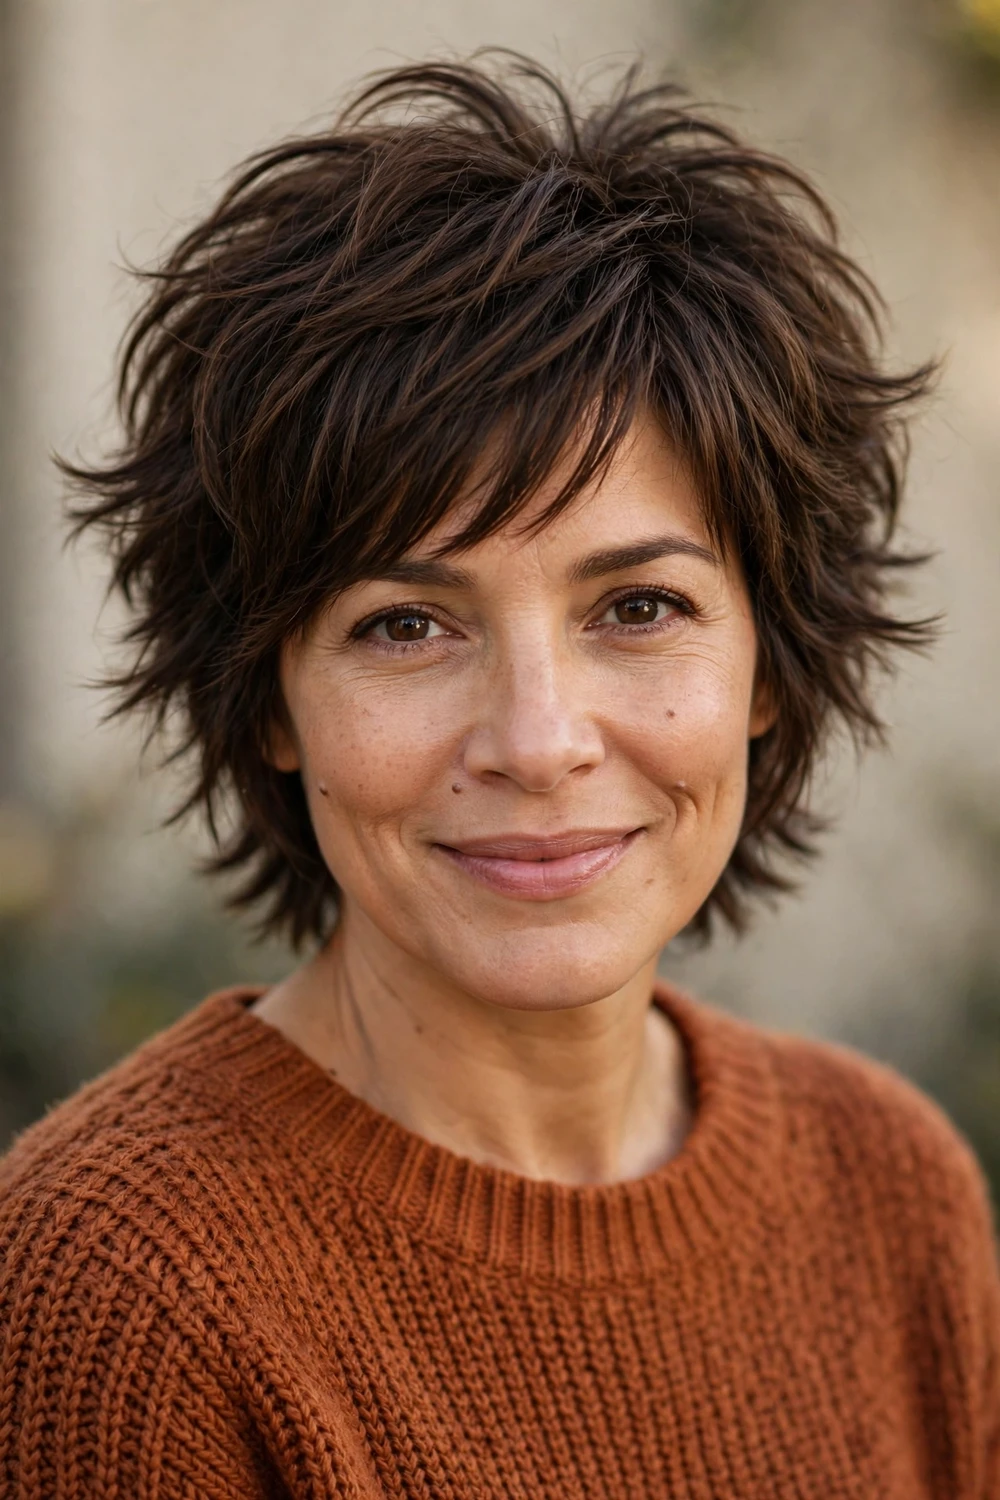
Shag layering is feathering taken to the whole head: layers are cut to flick outward in soft feathers, and each feather rests on the layer beneath it, so the crown looks lifted even when the hair itself is fine. The technique suits the long pixie because the extra length gives the feathers something to work with; on a short pixie there is barely enough hair to feather. The result is a cut where the volume comes from layer direction, not from product or backcombing, and it holds up through the whole day.
It works on straight to wavy hair and is one of the most forgiving cuts for grow-out, since shag layers just get shaggier. Ask your stylist to concentrate the feathering at the crown and keep the sides closer, which reads all the fullness on top. Dry the top layers forward, then flick just the ends back with your fingers: that contrast is what makes the feathering visible. Because shag layers are meant to look undone, this cut handles humidity and second-day texture better than precision cuts, which makes it a practical pick for wavy fine hair.
If shaggy texture appeals to you, these short shag hairstyles for women show how shag layering works across different short lengths.
Try this: use a light volume spray at the root and nothing on the ends, since product on feathers makes them separate into stringy pieces.
Difficulty: Medium · Cost: $$ (salon)
10. Soft-Wave Long Pixie Bob
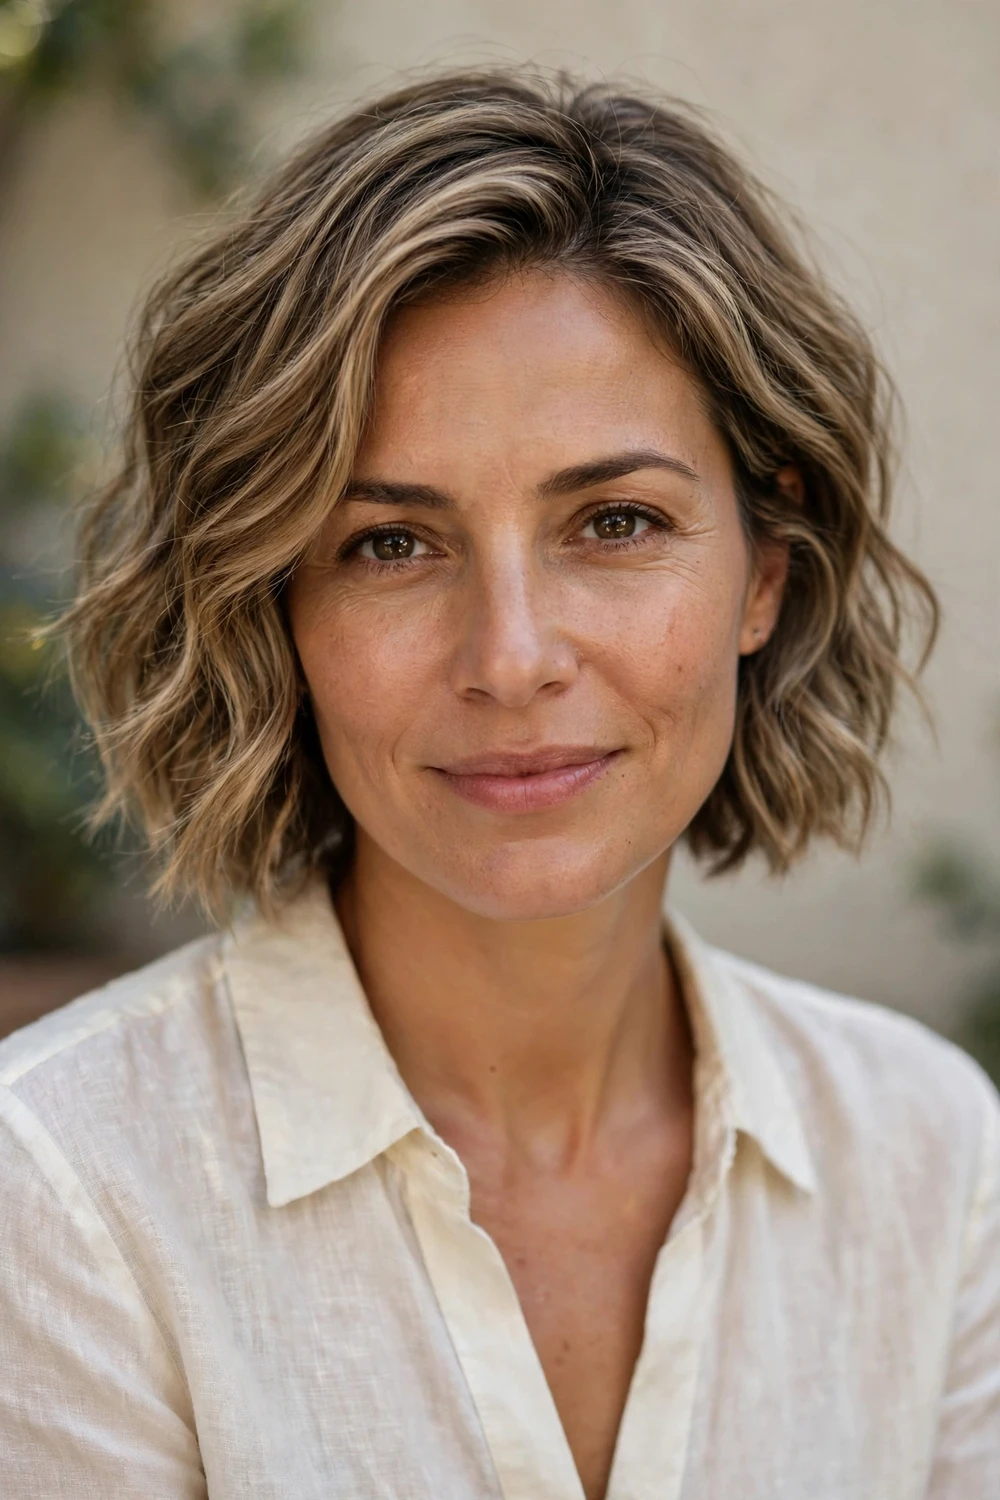
The technique here is using wave as a volumizer. Fine hair that hangs straight shows every gap, but the same hair bent into soft waves catches light on each curve and reads noticeably thicker. A long pixie is the shortest cut that still gives you enough length to wave properly, which is why this version works here and would not on a cropped pixie. The wave pattern does the volumizing work, so you do not need heavy layering underneath; the cut itself can stay relatively simple.
It suits naturally wavy hair best, though straight hair can get there with a flat iron or curling wand on the longer pieces. Skip conditioner on the scalp, which is the classic mistake that makes this cut fall flat, and use a light texturizing spray after waving. The longer front pieces hold the wave best, so concentrate the styling there and keep the back simple. On days you skip heat entirely, the longer front pieces can be twisted into two loose bends while damp, which gives a soft wave with zero tools.
Try this: wrap the longer front sections around a one-inch curling iron away from your face, then break them up with your fingers instead of brushing.
Difficulty: Medium · Cost: $$ (salon)
11. Asymmetrical Long Pixie

Asymmetry is a diagonal cut: one side stays long, often sweeping past the ear, while the other is cropped close. The technique works on fine hair because the diagonal line forces the eye to travel, and hair in motion reads fuller than hair sitting still. The long side also gets to act as the volume piece, since all the length is concentrated there instead of being spread thin around the whole head. It is a statement cut, but on fine hair it is a strategic one.
It suits oval and square faces, where the diagonal softens strong lines. The asymmetry needs to stay sharp to read as intentional, so plan trims every four to five weeks, and the close side may need touching up between visits if it was faded. Style with a smoothing product on the long side only, keeping the close side clean. The long side also gives you a styling fallback: on rushed mornings, tuck the close side behind your ear and let the long side do all the talking.
Try this: ask your stylist which side your hair naturally wants to fall on before committing, since fighting the growth pattern makes asymmetry high maintenance.
Difficulty: Medium · Cost: $$ (salon)
12. Disconnected Lixie

Disconnected layering means the layers are cut at deliberately different lengths with no blending between them, which creates airy separation that reads as movement. On fine hair the trick is restraint: disconnection gives the impression of more pieces than there are, so thin hair looks intentionally textured instead of thin. The long-pixie length is what makes this possible, since you need enough hair for the disconnected sections to be visible as separate pieces rather than just raggedy.
It suits straight to wavy hair and anyone who styles with fingers rather than brushes, because the finish is meant to look separated. Ask your stylist to keep the disconnection in the top and crown, not the perimeter, so the outline still looks deliberate. A pea-sized amount of wax on the ends defines the separation without weighing it down. Ask your stylist to show you the separation with dry hair before you leave the chair, since disconnection reads differently dry than wet and you want to approve the final texture.
For more cuts built on layered shapes, these short layered hairstyles for women over 60 show how layering adds fullness at any age.
Try this: style it the night before and sleep on it, since disconnection looks even better slightly lived-in the next day.
Difficulty: Medium · Cost: $$ (salon)
13. Tapered Long Pixie
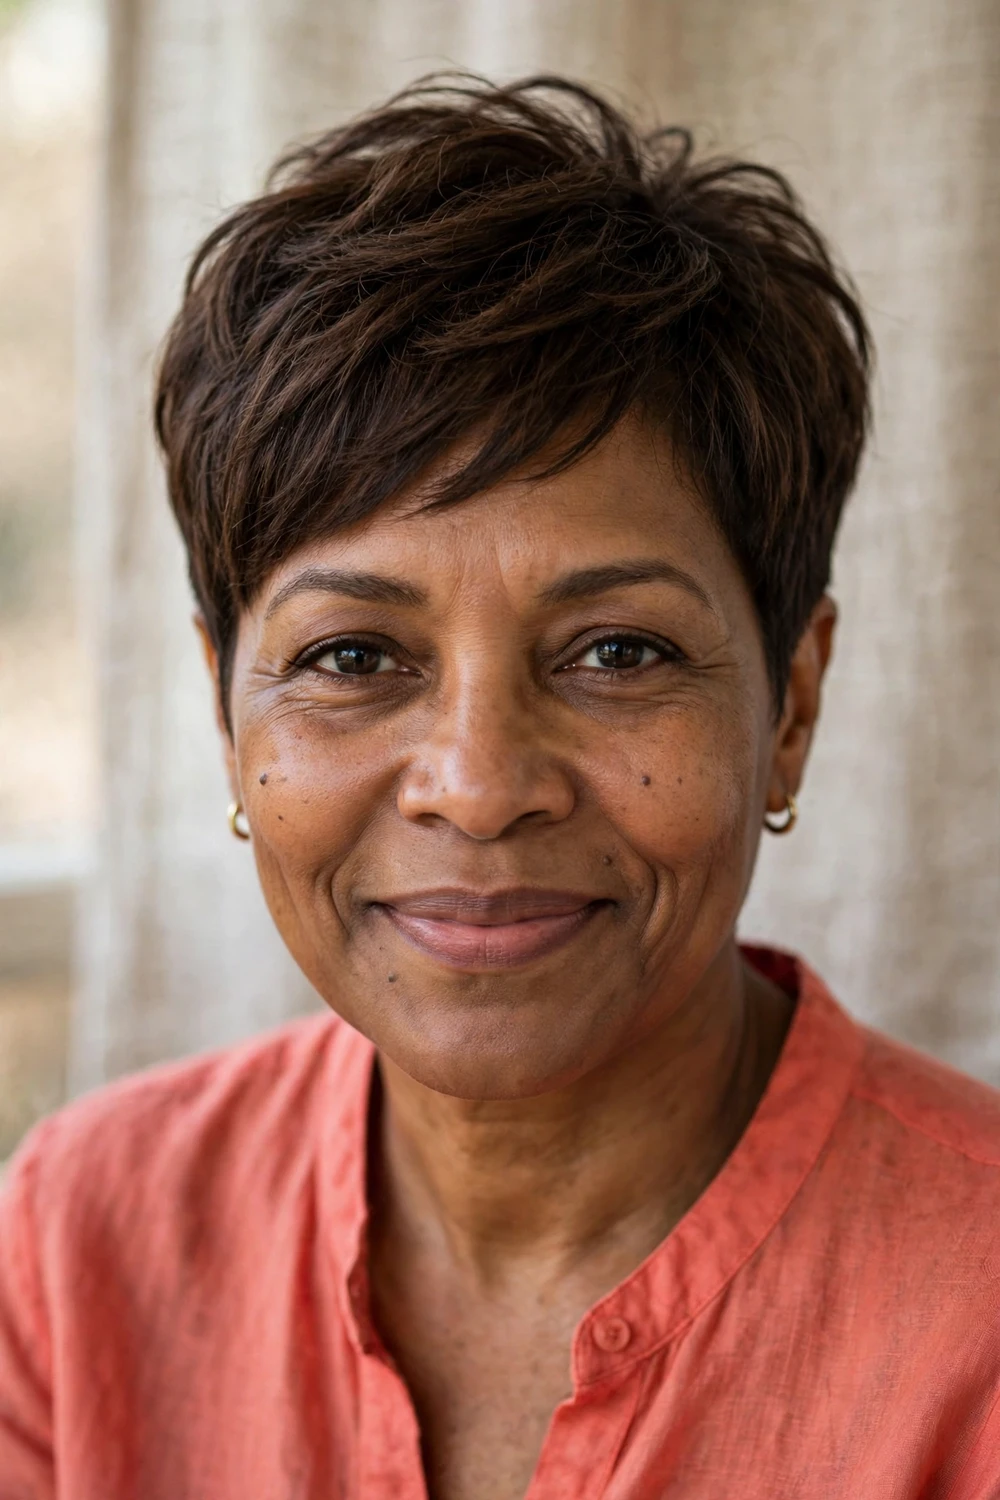
Tapering graduates the sides and nape neatly into a fuller top, and the technique is about contrast: keeping the perimeter close makes the longer crown look denser by comparison. This is one of the most precise ways to handle fine hair at long-pixie length, because it removes exactly the hair that would go wispy and flat around the ears and neckline, and keeps every bit of length where it counts. The result reads polished and deliberate all day, which is why it works so well in professional settings.
It suits straight fine hair and petite features especially well. Ask for the sides tapered close but not clippered, with fullness left through the top and crown, and plan trims every four to five weeks to keep the taper sharp. Blow-dry the top upward with a small round brush for lift, and smooth the tapered sides flat with a dab of cream. The taper also keeps the cut office-friendly without extra effort: the neat perimeter reads polished even on days you skip styling the top beyond a quick finger-comb.
Try this: run a flat iron over just the tapered sides in the morning for a clean edge that makes the crown look fuller by contrast.
Difficulty: Medium · Cost: $$ (salon)
14. Undercut Long Pixie

The undercut is the bold version of the taper: the sides and nape are clipped short or faded, and all the length stays on top. As a volume technique it is pure contrast engineering. Removing the bulk underneath makes the top look dramatically fuller, because there is no longer hair at the perimeter competing with the crown for attention. On fine hair with decent density, this is one of the fastest ways to get visible height, and it keeps the neckline cool and clean in a way a graduated cut cannot match.
It suits dense fine hair and confident dressers; very low-density hair cannot hide a faded side gracefully, so be honest about your density in the consultation. Ask for the fade kept soft rather than skin-tight if you want it office-friendly. The fade needs a touch-up every three to four weeks, which is the real upkeep cost of this cut. Between fade appointments, clippers at home can tidy the very lowest edge of the nape, though most people find the regular salon rhythm easier to keep.
If an undercut feels like a big step, these short pixie haircuts for older women gather softer low-maintenance pixie options with the same easy upkeep.
Try this: sweep the long top to the side opposite the fade for maximum contrast between the clipped side and the full crown.
Difficulty: Medium · Cost: $ (salon)
15. Razored Lixie

Razor-cutting is the technique behind the softest texture a long pixie can have. Where shears cut cleanly, a razor frays each strand into a feathered edge, which creates the wispiest possible finish without removing bulk from the body of the hair. That distinction matters for fine hair: razor texture on the ends gives you movement, but razor-thinning through the top would hollow the cut out. Ask for razor work at the ends only, and say so out loud in the chair.
It suits fine hair that needs softness rather than sharpness, and it grows out more forgivingly than scissor texture, so trims can stretch to six weeks. Style with your fingers and a light cream, and skip the brush, since brushing fluffs razor-cut ends into frizz. This is a good pick if you want texture that looks soft up close, not choppy. Razor texture also takes color well, since the feathered ends catch light at different angles and make even single-process color look dimensional.
Try this: twist the razor-cut ends lightly between damp fingers while air-drying to set the feathered finish without heat.
Difficulty: Medium · Cost: $$ (salon)
16. Choppy Long Pixie

Chunky layering is the opposite of blending: the stylist cuts deliberate, uneven pieces throughout the top so the hair can never settle into one flat sheet. On fine hair this is genuinely useful, because flat is the default state you are fighting. Every chunky piece catches light differently, which breaks up the surface and stops the eye from seeing through to the scalp. The key instruction is the same as with point-cutting: chunky texture on the ends and through the mid-lengths, but no over-thinning on top where the body lives.
It suits straight hair that lies flat and anyone who styles with fingers rather than brushes. Ask for piece-y texture with the top left full, and expect trims every four to six weeks, since choppy ends show growth unevenly. A matte paste worked through dry hair defines the chunks without making them shiny and separated. The chunky finish is also kind to cowlicks, since the uneven pieces disguise growth patterns that a smooth cut would expose.
Try this: flip your head upside down and scrunch in a little paste, which builds the chunky separation at the roots where fine hair needs it most.
Difficulty: Low · Cost: $ (salon)
17. Long Fringe Layered Long Pixie
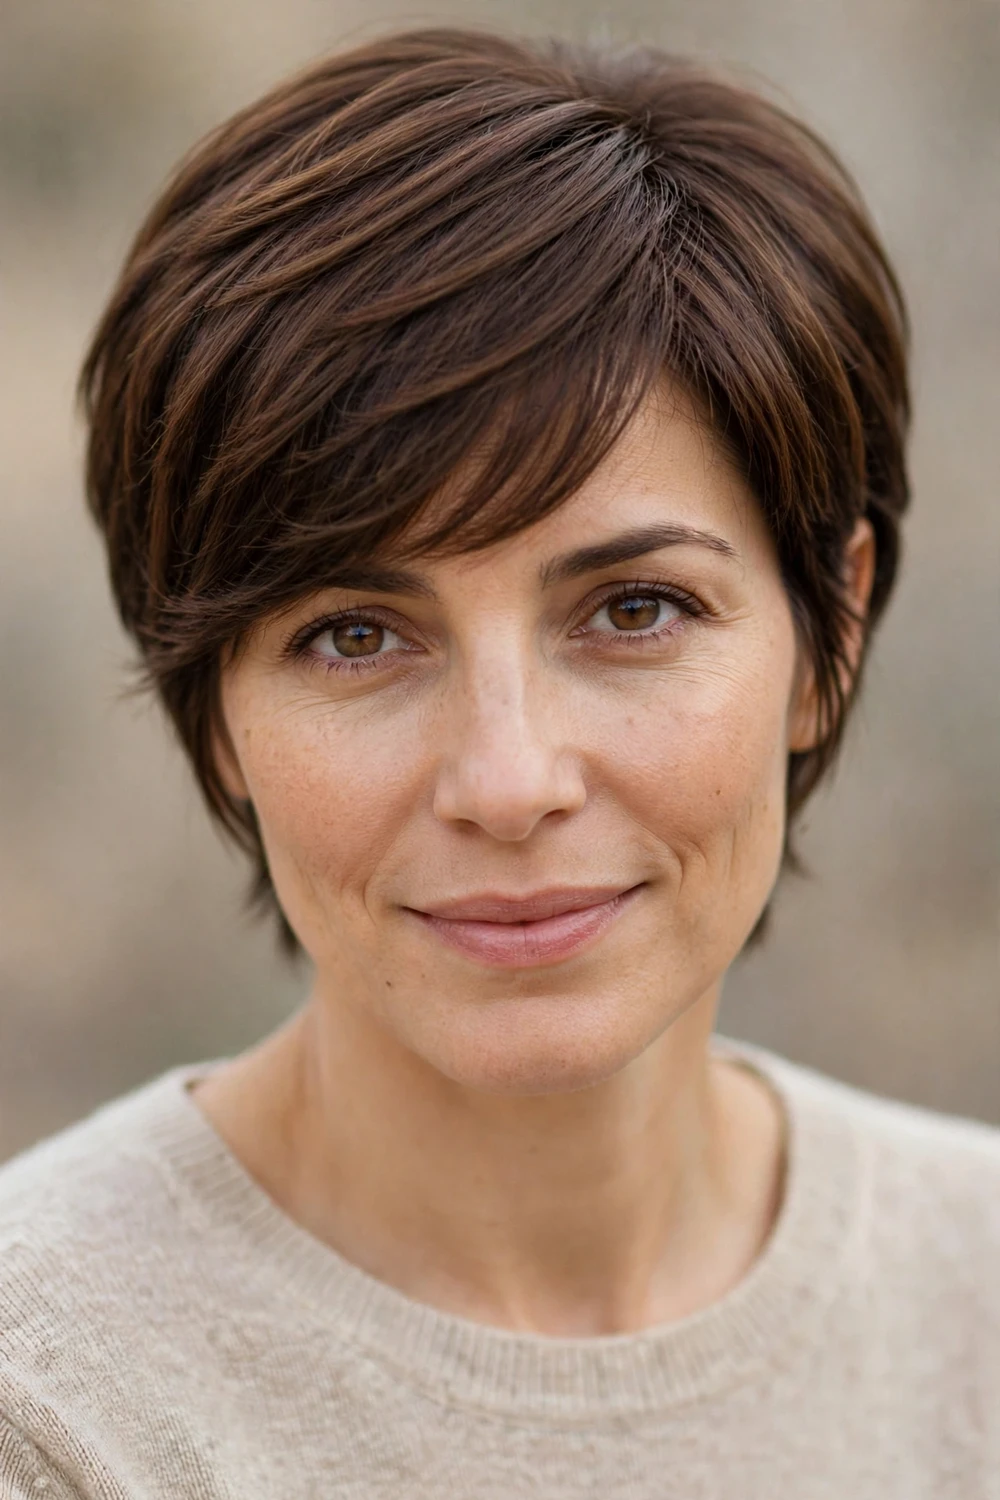
This cut keeps the fringe long, falling past the brow and blending into the cheek-skimming layers, and the technique is forward motion. Everything on top is directed forward and slightly down, which piles visual weight across the forehead and crown, the two places fine hair looks thinnest. It is different from a side-swept fringe, which travels diagonally, and from wispy bangs, which separate: this fringe stays together as a piece, and its solidity is what fakes the density.
It suits oval and heart-shaped faces, where the long fringe balances a narrower chin. Ask your stylist to keep the fringe long enough to graze past the brow and to blend it into the sides, not cut it as a separate piece. A volumizing mousse on damp roots with the hair dried forward in different directions builds the most body and lift. If your fringe tends to split in the middle, ask the stylist to cut it with a slight curve, which encourages the pieces to stay together as one forward-falling panel.
Try this: dry the fringe straight forward first, then sweep it to your preferred side, which keeps the roots lifted instead of plastered down.
Difficulty: Low · Cost: $ (salon)
18. Micro Fringe Long Pixie
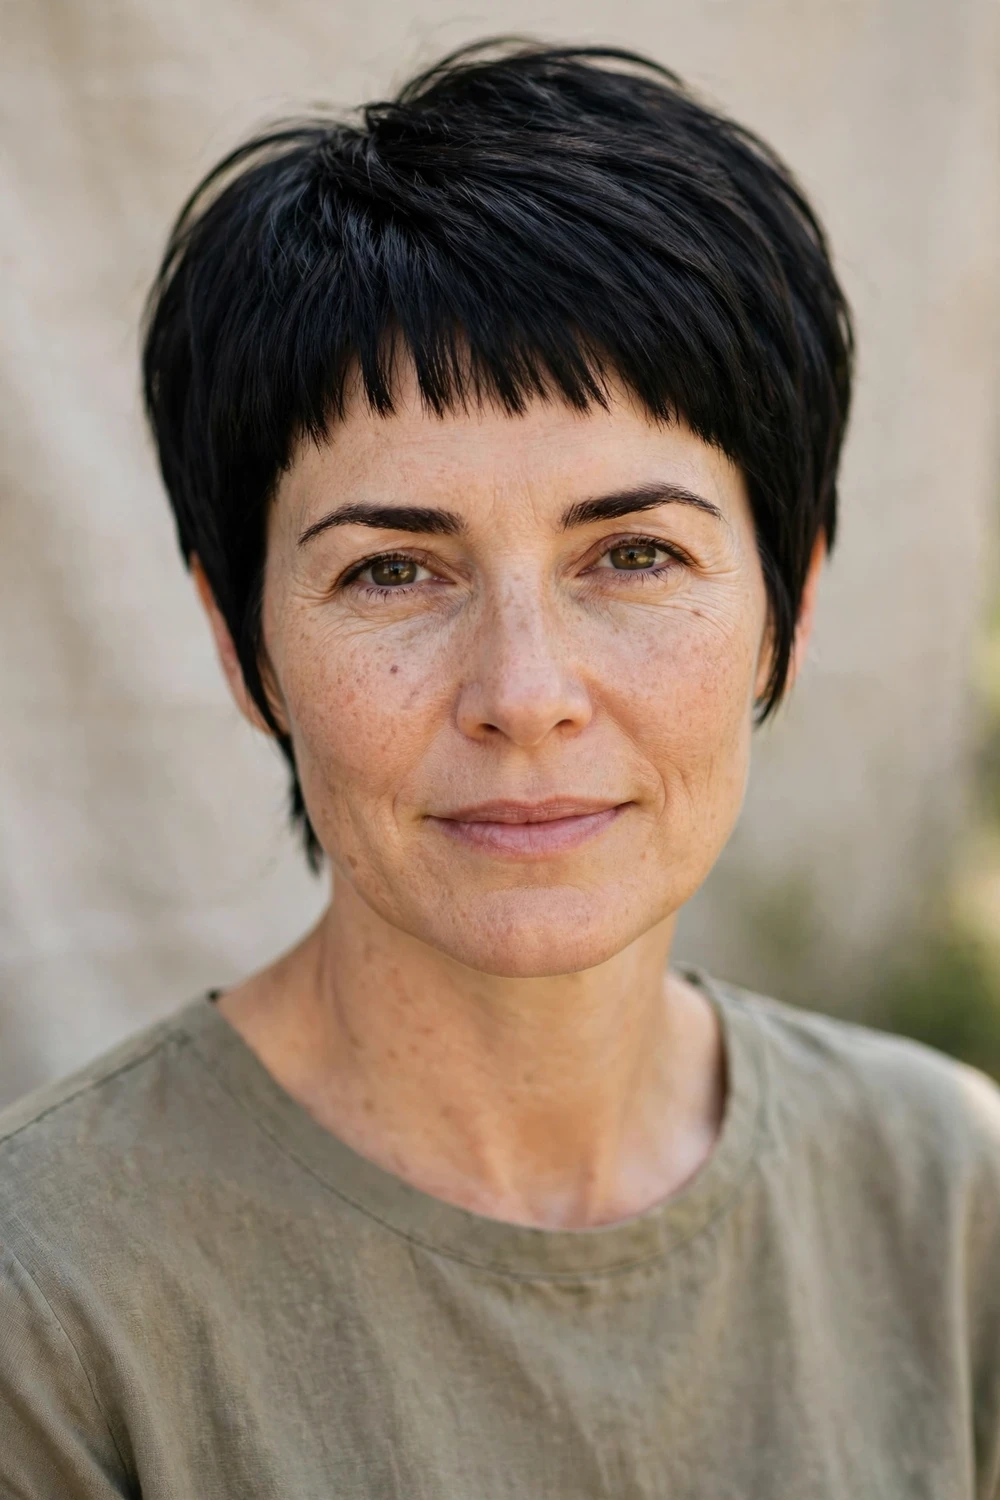
The micro fringe sits well above the brow, feathered and spread wide across the forehead, and its technique is proportion play. By keeping the fringe short and wide, the cut throws all the length to the top and sides, which makes the crown look longer and fuller by comparison. On fine hair the fringe has to be point-cut thin rather than blunt, because a thick blunt micro fringe on fine hair exposes the sparseness it is meant to hide. Feathered, it creates the illusion of more hair than exists.
It suits oval and heart-shaped faces, where the short fringe opens up the face without shortening it. Commit to trims every three to four weeks, since a micro fringe grows out of line faster than any other bang. This is the boldest fringe on the list, so try it if you want the long pixie to read edgy rather than soft. Pair it with a defined brow, since the short fringe puts your eyebrows on display and strong brows balance the boldness of the cut.
Try this: keep the micro fringe slightly piecey with a touch of paste on dry hair, since a perfect straight line looks harsher as it grows.
Difficulty: Medium · Cost: $ (salon)
19. Extra-Long Blonde Lixie
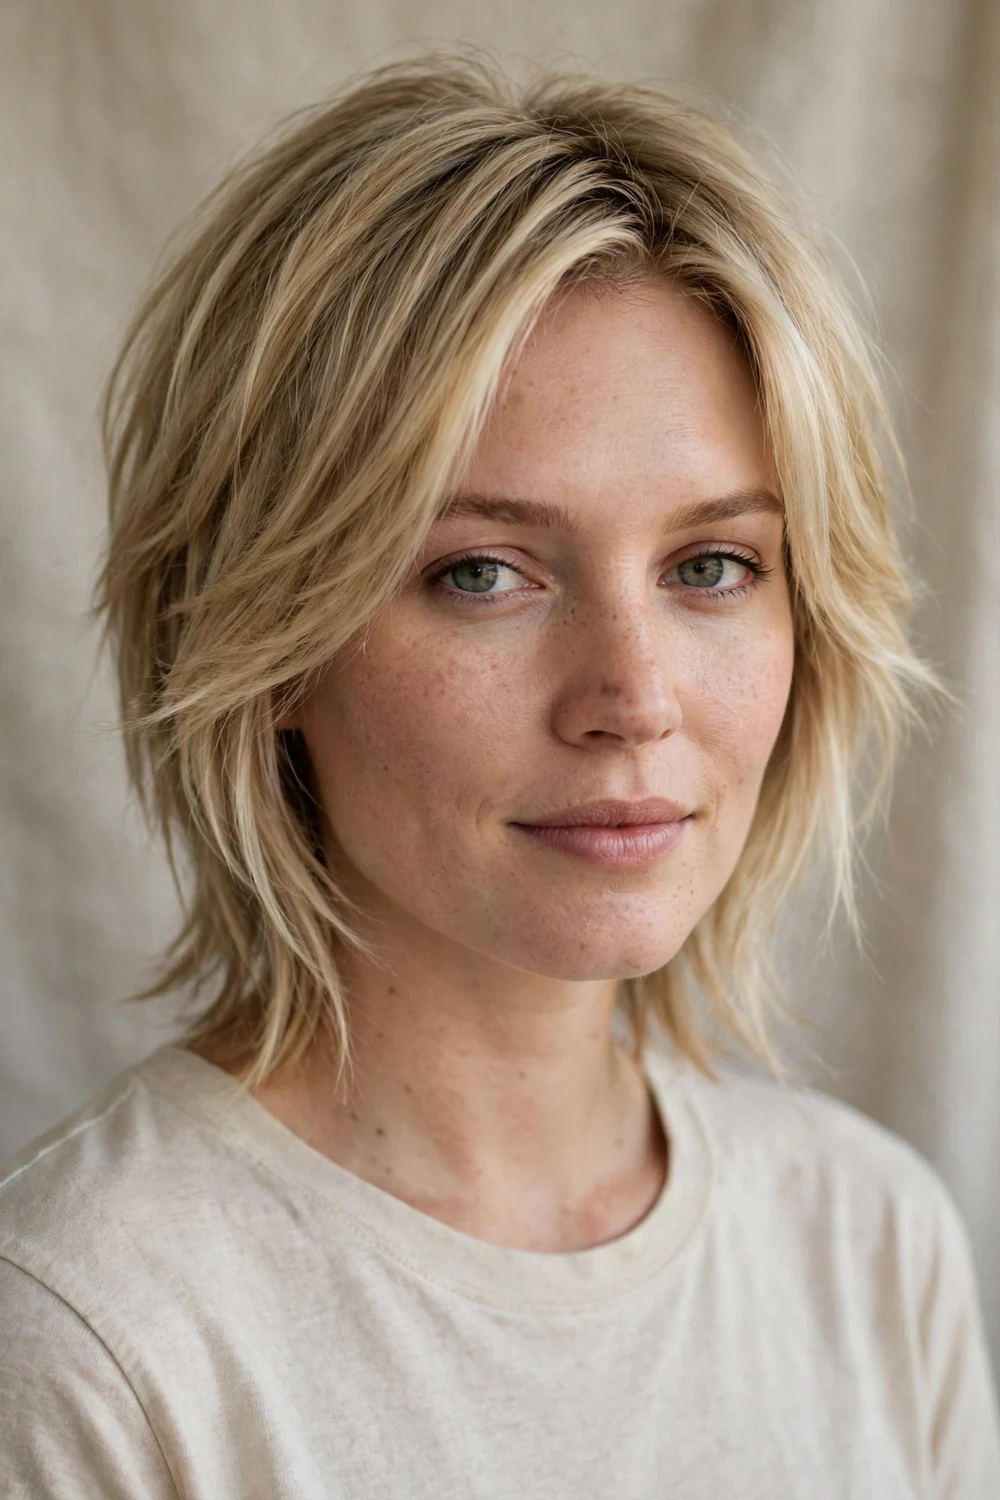
This is the longest a pixie can go before it becomes a bob: the back sits between the ear and the neck, the top runs several inches, and the side bang falls past the cheek. The technique that keeps fine hair from going limp at this length is root lift, applied as a discipline rather than a product suggestion. Root-lifting spray on damp hair, blow-dried in the opposite direction with a round brush, then flipped once dry, is what creates the volume; without it, the extra length just hangs. The length also means this is the most styling-versatile cut on the list.
It suits anyone nervous about going short, since it tucks behind the ears and can even pull into the tiniest twist. Blonde helps here too: lighter pieces through the top catch light and fake dimension. Avoid drying the hair flat to the scalp, which is the one move that kills this cut instantly. The length also makes this the best long pixie for evening styling in disguise: the front pieces can twist back with pins, something no shorter pixie can offer.
Try this: apply root-lift spray only at the crown and front, never at the nape, so the lift concentrates where the eye looks first.
Difficulty: Medium · Cost: $$ (salon)
20. Grey/Silver Lixie

Grey hair is often finer than the hair it replaced, so the technique here is working with that instead of against it. Textured layers give each fine silver strand somewhere to sit apart from its neighbors, which is what reads as fullness on hair that has no pigment to create depth. Keeping some natural root depth, or a slightly darker shadow at the scalp, stops the color from looking washed out where the hair is thinnest. The long-pixie length is kind to grey: it is short enough to look modern, long enough to stay soft.
It suits anyone growing out their natural grey or going silver by choice. Use a purple shampoo once a week to keep the tone clean rather than yellow, and ask your stylist for texture through the top with the perimeter kept soft. This is one of the lowest-maintenance cuts on the list, since grey needs no root touch-ups. Silver hair also pairs well with bolder lip or earring choices, since the neutral tone acts as a backdrop that lets accessories stand out.
Try this: switch to purple shampoo once a week and follow with a moisturizing mask, since grey hair runs drier and dryness makes fine strands look thinner.
Difficulty: Low · Cost: $ (salon)
21. Wavy Long Crown Pixie
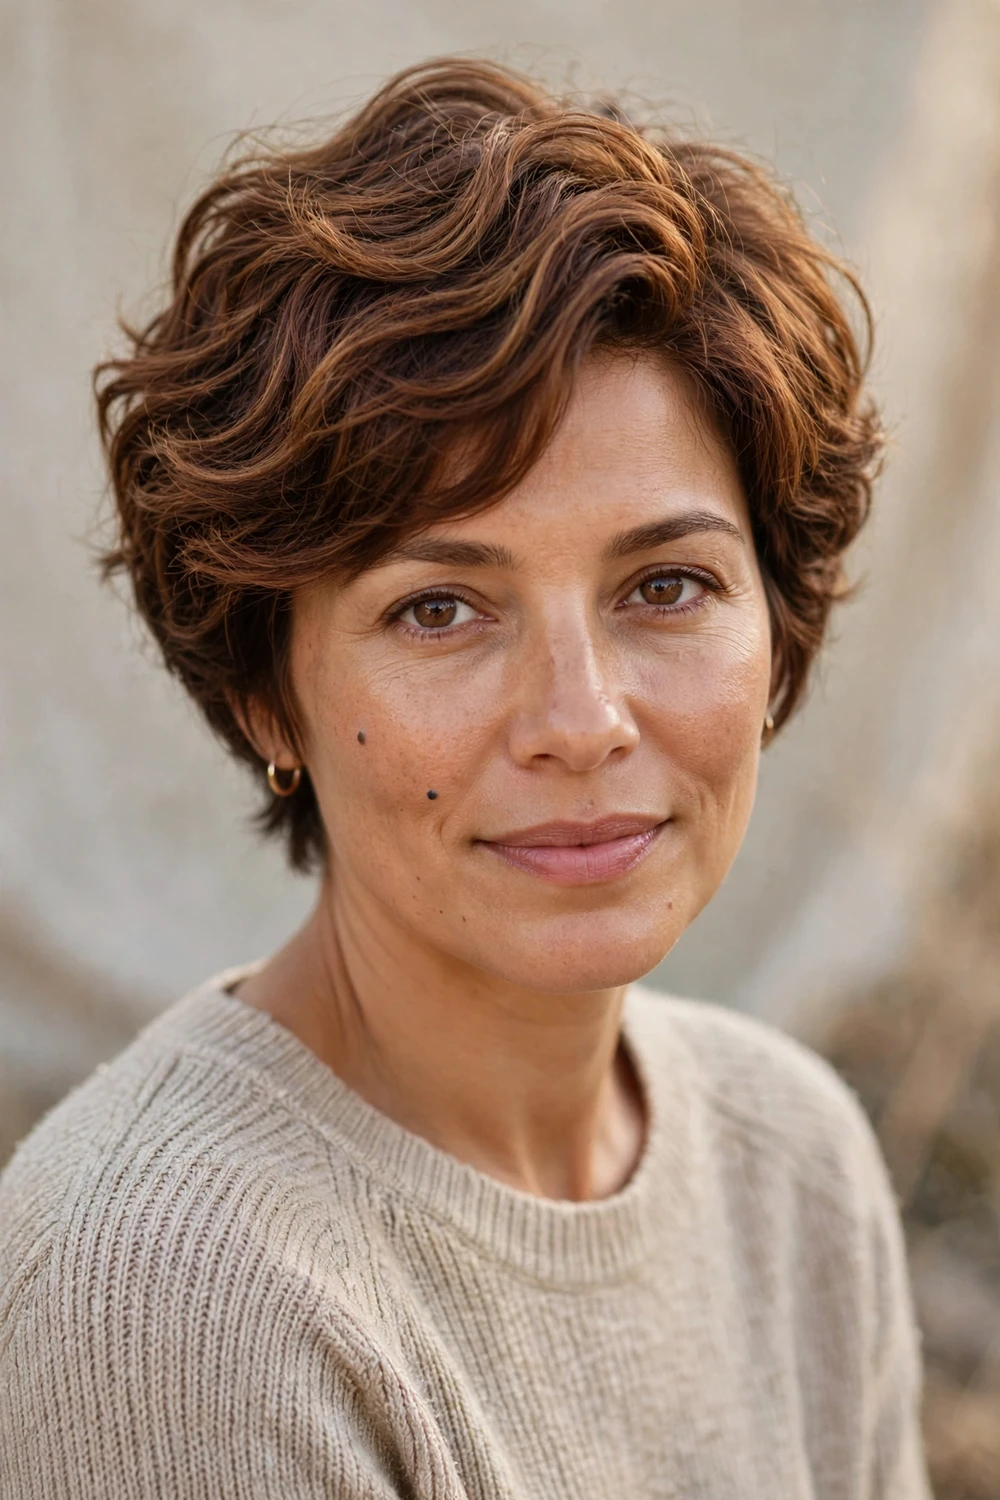
The technique is selective length: the sides stay neat and short while the crown is kept long enough for natural wave to form. Each wave is its own little volume unit, and fine hair that bends instead of hanging straight always reads thicker. This cut asks the least of your styling routine if you already have some wave, because the cut is simply getting out of the texture’s way. A quick scrunch with texturizing spray on damp hair is genuinely the whole routine on good days.
It suits slight to moderate natural wave and anyone between straight and curly who never knows what to ask for. Tell your stylist to keep the crown long for the wave and shape the sides close, and consider having it cut on mostly dry hair so the wave pattern is visible during the cut. Sea salt spray enhances the texture without the crunch of gel. If your wave is stronger on one side, tell your stylist, since cutting with the wave pattern visible lets them place the length where the texture is strongest.
Try this: scrunch the crown with texturizing spray while it is still damp, then do not touch it again until it is fully dry.
Difficulty: Low · Cost: $ (salon)
22. Swept-Back Long Pixie

The whole top is brushed back off the face, and the technique is direction: hair swept backward lifts away from the scalp along its entire length, which exposes the face and builds root volume at the same time. On fine hair this works because there is no fringe to go limp against the forehead; every strand is pointed in the same lifting direction. It is a confident, clean-lined cut that shows off earrings and bone structure, and it suits silver and salt-and-pepper hair particularly well.
It suits fine hair with decent density, since the swept-back direction exposes the hairline. Ask your stylist to keep the top long enough to sweep and the sides neat enough not to puff out. A light mousse at the roots, dried backward with your fingers, sets the direction; a little paste on dry hair keeps the sweep from falling forward by evening. The swept-back direction also keeps hair off your face in wind and humidity, which makes it a practical warm-weather pick despite the polished look.
Try this: backcomb just the under-layer at the crown with two or three strokes before smoothing the top layer over it, which hides the lift.
Difficulty: Low · Cost: $ (salon)
23. Long Pixie with Tapered Sideburns

Tapered sideburns are a detail cut: the hair in front of the ears is feathered into soft, narrow points that frame the cheekbones while the crown keeps its rounded fullness. The technique is framing contrast. The sideburns draw the eye to the cheekbones and away from the crown, where fine hair is thinnest, and the feathered taper keeps the perimeter from looking blunt or heavy. It is a small change that makes a standard long pixie look custom, and it costs nothing extra in styling time.
It suits most face shapes, since the sideburn length can be adjusted to the cheekbone. Ask your stylist to taper and lightly feather the sideburns rather than cutting them blunt, and keep the crown textured for the contrast to read. This detail grows out fast, so mention it at every trim or it disappears by week five. Sideburns also give you a built-in styling cue at home: smooth them down and forward each morning and the whole perimeter of the cut looks freshly shaped.
Try this: smooth a tiny amount of cream down the sideburns in the morning to keep the feathered points defined instead of fluffy.
Difficulty: Low · Cost: $ (salon)
24. Sleek Straight Lixie
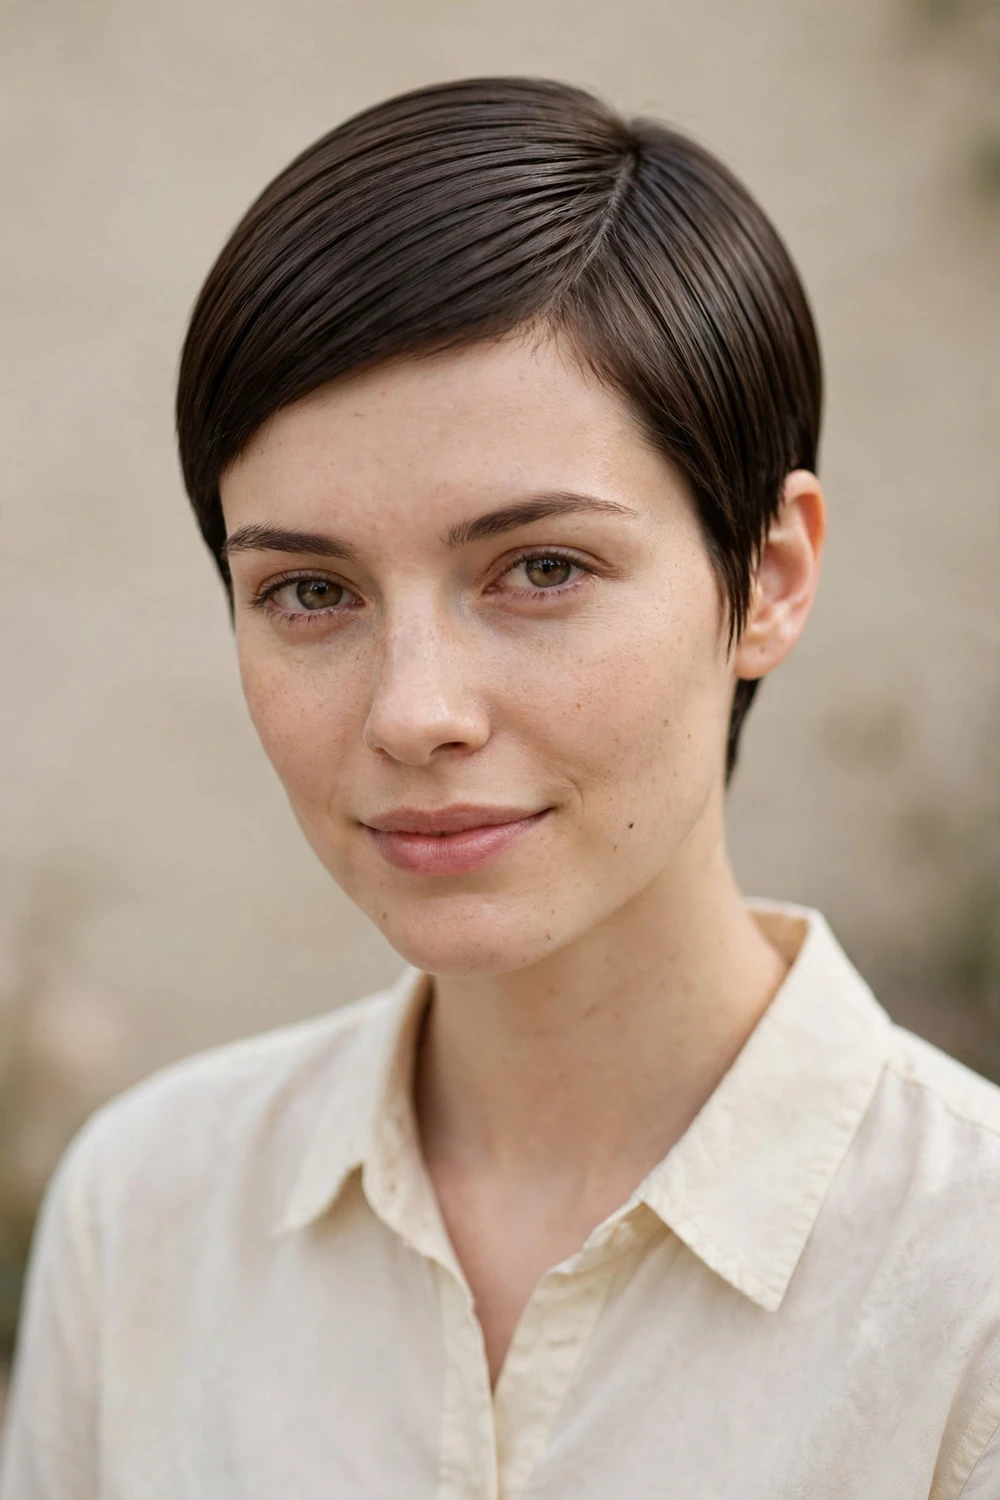
The sleek lixie goes the other way from texture: the technique is precision and polish, with clean lines and a smooth finish that reads as expensive rather than full. On fine hair this works when the cut is kept solid, with minimal texturizing, because a solid shape is what makes thin hair look thicker, a point stylists repeat for good reason. The sleekness has to be deliberate, though: flat-ironed smooth with shine, not just unstyled and limp. Heat protectant is non-negotiable before the flat iron.
It suits straight hair and square or rectangular faces, where the clean lines complement strong jawlines. Ask for a solid shape with the texturizing kept minimal, and keep the ends trimmed so the sleek line stays sharp. A smoothing serum on the mid-lengths and ends gives the reflective finish that makes this cut read as polished instead of plain. The sleek finish also photographs well, which is worth knowing if you have events coming up: the reflective surface catches light in a way textured cuts do not.
Try this: flat-iron in small sections with the iron moving down and slightly under at the ends, which keeps the sleek shape from flipping out.
Difficulty: Medium · Cost: $$ (salon)
25. Root-Shadow Long Pixie

The root shadow is a color technique doing a cutting job: the root is kept one shade darker than the lengths, or the natural root is left untouched under lighter pieces. The eye reads the shadow at the scalp as depth, and depth reads as thickness, which is why this is the most recommended color trick for fine hair. One flat light color from scalp to tip does the opposite, exposing every gap. Paired with a long pixie, the shadow also makes the grow-out softer, since there is no harsh regrowth line.
It suits any face shape, since the technique is in the color, not the outline. Ask your colorist for a root melt or shadow that sits close to your natural shade, with lighter pieces woven through the top layers only. A gloss every four to six weeks keeps the blend fresh, and the darker root means touch-ups are far less urgent than with all-over color. A root shadow also softens the line of demarcation as color grows out, which means fewer emergency salon visits and a more relaxed maintenance rhythm.
Try this: ask for the lightest pieces to sit through the crown and fringe, which is where the eye looks first and where the depth contrast pays off most.
Difficulty: Medium · Cost: $$ (salon)
26. Windswept Long Pixie

The windswept cut is styled with direction as the technique: every layer is cut to move the same way, swept to one side with separated, airy pieces. On fine hair this matters because uniform direction creates the look of motion, and hair in motion reads fuller than hair sitting still. The separation comes from razor or point-cut work on the ends, which keeps the pieces individual instead of clumping. Short tapered sides open up the cheekbones, while the longer top does all the sweeping.
It suits oval and heart-shaped faces and straight to wavy hair. This is not a wash-and-go cut: it needs a texturizing product and a quick directional blow-dry every morning to look like itself. Ask your stylist which direction your hair naturally wants to sweep, and build the cut around that instead of fighting it. Keep a travel-size texturizing spray in your bag, since the windswept pieces separate best when refreshed midday rather than overloaded with product in the morning.
Try this: blow-dry the top in the sweep direction with a flat brush, then pinch the separated ends with a little paste to define the windswept pieces.
Difficulty: Medium · Cost: $$ (salon)
27. Messy Layered Long Pixie

The messy long pixie uses undone texture as the whole point: layers are cut to sit slightly unsettled, and the crown volume comes from the hair being tousled rather than from heavy layering underneath. On fine hair this is honest styling, because a little texture spray and finger-styling is all it takes, and the lived-in finish hides the fact that the hair is fine in the first place. Nobody looks at a deliberately messy cut and counts strands. It is also the most forgiving cut on the list for second-day hair.
It suits straight to wavy hair and anyone who hates fussy styling. Ask for textured layers with the ends point-cut so they stay separated, and skip heavy products that would turn messy into greasy. A dry shampoo at the roots on day two refreshes the lift without a full wash, which fine hair appreciates. The messy finish also makes this the most hat-friendly long pixie on the list: a beanie flattens it into something that still looks intentional when the hat comes off.
Try this: spray dry shampoo at the roots before bed, which gives the messy texture grip and lift by morning.
Difficulty: Low · Cost: $ (salon)
28. Long Pixie with Bold Textured Bangs

Bold bangs on fine hair only work when they are textured, and that is the technique here. The fringe is cut dense and layered in overlapping sections that fake thickness, then point-cut through the bang area so the pieces stay separated and airy instead of exposing the forehead underneath. Caramel or lighter pieces woven through the front catch light exactly where thin hair tends to look flat, adding a color assist to the cutting. The top layers are left slightly longer than the fringe, creating a forward-falling motion that builds fullness from behind.
It suits oval and heart-shaped faces, since the fringe sits wide and would close in a round face. The sides stay cropped close to the ear with almost no weight, so all the volume lives in the crown and front. Plan on the fringe losing its line by week four or five: this is the highest-maintenance bang on the list, and it is worth it only if you will book the trims.
Try this: dry the bangs with a round brush pulling them slightly forward and down, which keeps the layered overlap sitting the way it was cut.
Difficulty: High · Cost: $$ (salon)
29. Grow-Out Transitional Long Pixie

The transitional long pixie is the cut for growing out a shorter pixie without an awkward stage, and its technique is staged length. The nape is kept clean and shaped while the top and fringe are left long enough to tuck, wave, or sweep, so the grow-out reads as a style instead of a phase. On fine hair this matters more than on thick hair, because grown-out fine hair goes wispy at the perimeter fast; keeping the nape tidy while the top grows is what prevents that. It is also the safest first step into short hair if you are nervous about the chop.
It suits anyone between cuts, and it holds its shape longer than a true pixie, so trims stretch to six or eight weeks. Ask your stylist to keep length on top and in the fringe and to clean up the nape, which is the entire brief. A light styling cream gives the longer pieces enough weight to sit neatly without going flat. Keep photos of each stage of the grow-out on your phone, since showing your stylist where you started helps them shape the transitional cut around your end goal.
Try this: when the top gets long enough to tuck behind your ears, do it on one side only for an easy asymmetric look that costs nothing.
Difficulty: Low · Cost: $ (salon)
At a Glance: 29 Long Pixies Compared
| Cut | Best for | Fine-hair perk | Upkeep |
|---|---|---|---|
| Stacked Crown Long Pixie | Oval and heart faces | Volume built into the cut itself | Reshape every 5 to 6 weeks |
| The Bixie (Pixie-Bob) | Round and heart faces | Longer front reads fuller overall | Trim every 5 to 7 weeks |
| Point-Cut Textured Long Pixie | Straight to wavy hair | Separated ends read as density | Texturizing spray on dry hair |
| Graduated Nape Long Pixie | Hair that goes limp at the back | Removes dragging weight at the neck | Trim every 6 to 7 weeks |
| Side-Swept Long Pixie | High or wide foreheads | Diagonal line fakes movement | Fringe trim every 5 weeks |
| Deep Side-Part Long Pixie | Fine straight hair, cowlicks | Flipped crown builds root lift | Train the part on damp hair |
| Curtain Fringe Long Pixie | Narrow or long faces | Adds width at the hairline | Trim every 4 to 5 weeks |
| Wispy Bang Long Pixie | Straight fine hair | Feathered fringe hides sparseness | Bang trim every 3 to 4 weeks |
| Feathered Shag Lixie | Straight to wavy hair | Feathers stack into crown lift | Volume spray at the root |
| Soft-Wave Long Pixie Bob | Naturally wavy hair | Waves catch light as thickness | Skip scalp conditioner |
| Asymmetrical Long Pixie | Oval and square faces | Length concentrated on one side | Trim every 4 to 5 weeks |
| Disconnected Lixie | Finger-stylers | Separation reads as more pieces | Looks better lived-in |
| Tapered Long Pixie | Straight hair, petite features | Close sides make crown look denser | Trim every 4 to 5 weeks |
| Undercut Long Pixie | Dense fine hair | Contrast makes the top look fuller | Fade touch-up every 3 to 4 weeks |
| Razored Lixie | Hair needing softness | Feathered ends without losing bulk | Trim every 6 weeks |
| Choppy Long Pixie | Flat-lying straight hair | Chunks break up the flat sheet | Matte paste on dry hair |
| Long Fringe Layered Long Pixie | Oval and heart faces | Forward weight piles over thin spots | Mousse, dry forward in sections |
| Micro Fringe Long Pixie | Oval and heart faces | Wide fringe throws length to the crown | Trim every 3 to 4 weeks |
| Extra-Long Blonde Lixie | First-time short cuts | Most length, most styling options | Root-lift spray at crown and front |
| Grey/Silver Lixie | Growing out grey | Texture works with finer grey strands | Purple shampoo weekly |
| Wavy Long Crown Pixie | Natural wave | Each wave is a volume unit | Scrunch with spray, leave alone |
| Swept-Back Long Pixie | Decent density, strong features | Backward direction lifts every strand | Mousse at roots, dry backward |
| Long Pixie with Tapered Sideburns | Most face shapes | Frames cheekbones, hides thin crown | Mention at every trim |
| Sleek Straight Lixie | Straight hair, strong jawlines | Solid shape reads thicker than layers | Heat protectant plus flat iron |
| Root-Shadow Long Pixie | Colored hair | Root depth fakes thickness | Gloss every 4 to 6 weeks |
| Windswept Long Pixie | Oval and heart faces | Uniform direction reads as motion | Daily directional blow-dry |
| Messy Layered Long Pixie | Low-effort stylers | Undone finish hides fine strands | Dry shampoo on day two |
| Long Pixie with Bold Textured Bangs | Oval and heart faces | Layered fringe fakes front density | Fringe trim every 4 to 5 weeks |
| Grow-Out Transitional Long Pixie | Growing out a pixie | Tidy nape hides wispy grow-out | Trim every 6 to 8 weeks |
How to Choose Your Long Pixie
Start with your density, not just your strand width. Fine hair with decent density can handle close sides, undercuts, and bold bangs, because there is enough hair to make contrast work. Fine hair with low density needs the opposite: extra length kept on top, a darker root for depth, and no closely cropped areas that expose the scalp. Part your hair in a bright mirror and look at how much scalp shows; that thirty-second check tells your stylist more than any photo can.
Next, match the cut to your face shape and your routine. Round faces do well with height on top and diagonal lines, like a stacked crown or an asymmetrical cut. Long faces suit width at the sides, which a curtain fringe or fuller bixie front provides. Be honest about styling time: windswept and stacked cuts need a few minutes with a dryer every morning, while messy, wavy, and grow-out pixies genuinely air-dry. Pick the maintenance schedule you will keep, since a grown-out precise cut looks worse than a fresh easy one.
Finally, bring the right words to the chair. Say “point-cut the ends” instead of just “add texture,” ask for stacking or graduation by name, and say out loud that you do not want thinning shears on top. Stylists cut what you describe, and fine hair rewards precise requests. A photo helps, but the technique words are what get you the volume.
Fine Hair Care at Longer Pixie Length
Washing. Fine hair at longer pixie length gets weighed down fastest at the scalp, so keep conditioner off the roots entirely and concentrate it on the mid-lengths and ends. A volumizing shampoo helps, but the bigger win is washing with lukewarm water and not over-washing: fine hair goes limp faster when it is stripped, and your scalp’s natural oils are not the enemy when the cut is short enough to stay clean-looking for two days.
Styling. Build volume at the root and leave the ends alone. Mousse or root-lift spray goes on damp roots, the hair gets dried upward and away from the scalp, and the ends get nothing heavier than a pea-sized amount of paste or cream. Overworking the ends is the classic mistake: it separates fine strands into piece-y, sparse-looking bits. When in doubt, style less, not more.
Color and trims. Keep your root depth, whether that is your natural root or a shadow your colorist paints on, because the darker-to-lighter contrast is doing quiet work for your density every day. On the cutting side, trims every five to seven weeks keep the shape that is doing the volumizing; a long pixie that has lost its graduation or stacking is just long hair on top of flat hair. Book the next appointment before you leave the salon.
Frequently Asked Questions
Are long pixies good for fine hair?
Yes, when they are cut for fine hair. The extra length gives the stylist material to build volume with: stacked layers at the crown, graduation at the nape, and long pieces that can be swept, flipped, or waved. A long pixie cut like a standard short pixie will go limp, but one cut with stacking, point-cut texture, and root lift can look fuller than either a cropped pixie or a bob. The length is an advantage only when the cutting strategy accounts for it.
What should I ask my stylist for with a long pixie for fine hair?
Use technique words, not just style names. Ask for stacked or graduated layers at the crown for lift, point-cut or razor texture on the ends for separation, and a kept root depth or root shadow for the illusion of density. Say explicitly that you do not want thinning shears used on top, since they remove the bulk the cut needs. Mention your density honestly, and ask whether your face shape suits height on top, width at the sides, or a diagonal fringe.
How often does a long pixie need trimming?
Every five to seven weeks for most versions, which is more forgiving than a short pixie’s four-week cycle. Stacked backs and micro fringes grow out fastest and need the earlier end of that range, while messy, wavy, and grow-out transitional cuts can stretch toward eight weeks. The rule is simple: the cut stops doing its volumizing work the moment the graduation grows out, so book before the shape disappears.
Will a long pixie work if my hair is thinning, not just fine?
It can, with the right choices. Keep extra length on top, since longer hair covers the scalp better than cropped hair. Keep your root depth or add a root shadow, because the depth contrast hides sparseness. Avoid very close-cropped sides, undercuts, and heavy layering through the top, and skip cuts that expose the scalp by design. A stylist can confirm your density in seconds, so ask directly whether your thinning needs the top kept longer.
How do I stop my long pixie from going flat or stringy at the ends?
Two things cause it: blunt ends that clump, and product weighing the ends down. Ask for point-cut or razor-textured ends, which stay separated instead of sheeting together. Then style the roots, not the ends: mousse or root-lift spray at the scalp, dried upward, and nothing heavier than a light paste on the tips. Skip conditioner on the scalp and heavy creams on the ends, and refresh day-two roots with dry shampoo instead of re-wetting the whole cut.
Final Thoughts
The long pixie rewards fine hair that is cut with intention: stacked layers underneath for lift, texture on the ends instead of thinning through the top, weight removed at the nape where it drags, and a root with enough depth to read as full. Pick the version that matches your density and your routine, learn the two or three technique words that describe it, and you get a cut that looks fuller at the end of the day than it did in the salon chair.

