


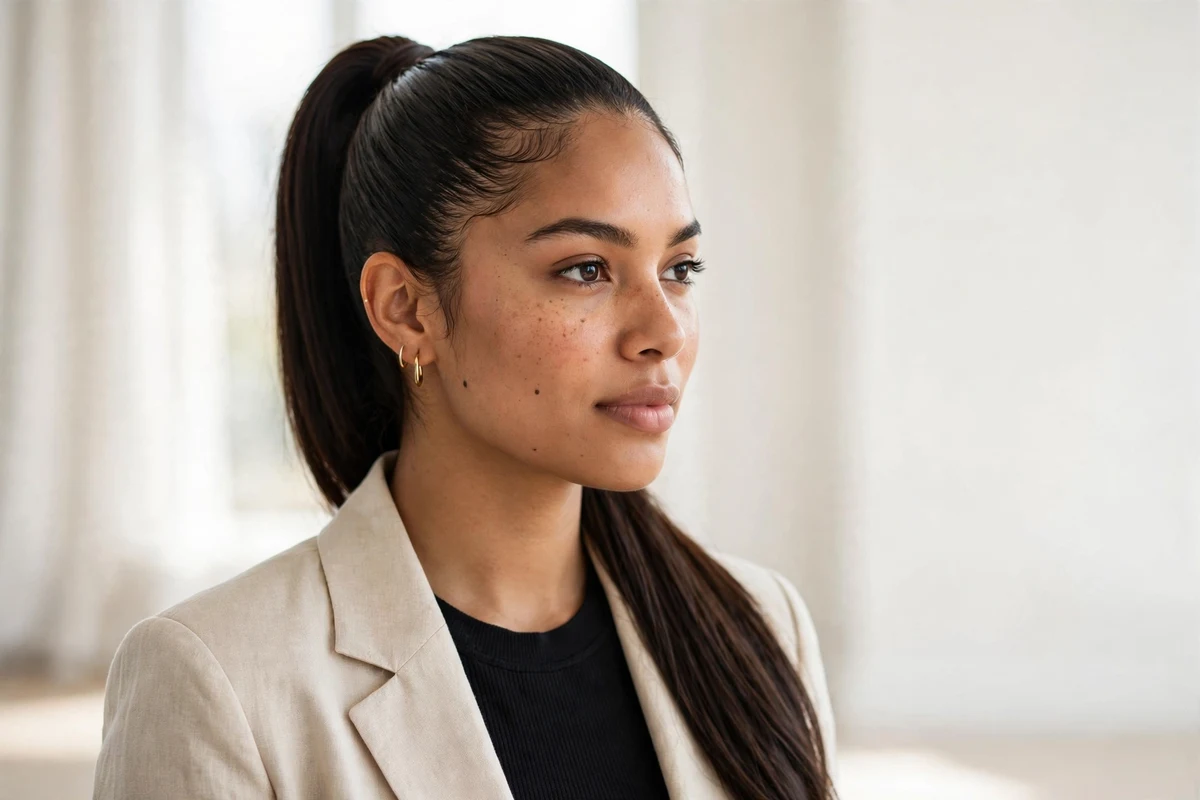
Baddie hairstyles are the bold, polished looks that took over Instagram and TikTok feeds. Think glass-smooth ponytails, laid edges, sharp parts, and braids with real attitude. This list covers 29 ideas that work on straight, wavy, curly, and coily hair.
Every style below comes from current baddie trends, and I have tested most of these sleek styles in humid weather, so the tips reflect what actually holds up. Pick one that fits your hair type, your schedule, and how much effort you want to put in.
Quick answer: The most iconic baddie hairstyle ideas are the sleek high ponytail, the middle-part sleek bun, the swoop ponytail, jumbo box braids, and space buns. They share three things: smooth roots, defined edges, and a deliberate part. Most take 10 to 30 minutes with gel, edge control, and a boar bristle brush.
Quick Takeaways
- Sleek roots and laid edges are the signature of almost every baddie style.
- A swoop or two face-framing pieces instantly upgrades ponytails, buns, and braids.
- Most baddie looks take 10 to 30 minutes with basic tools you already own.
- Protective styles like box braids and faux locs keep the look low maintenance for weeks.
- Accessories like claw clips and rhinestone clips make simple styles look intentional.
What Makes a Hairstyle “Baddie”?
A baddie hairstyle is a confident, polished look built on smooth roots, a clean part, and styled edges. The vibe comes from streetwear and Instagram culture, where small details like a curved swoop or a wrapped ponytail base turn a basic style into a statement.
The three basics never change: brush or slick the hair back with gel, lay the edges with edge control, and pick a part that flatters your face. A boar bristle brush, a toothbrush for edges, strong hair ties, and bobby pins cover most of the list. Add a flat iron or curling wand for the heat-styled looks.
You do not need long hair or a salon visit. Short hair, natural texture, and second-day hair all work, since many of these styles rely on slicking and pinning rather than length.
1. Sleek High Ponytail
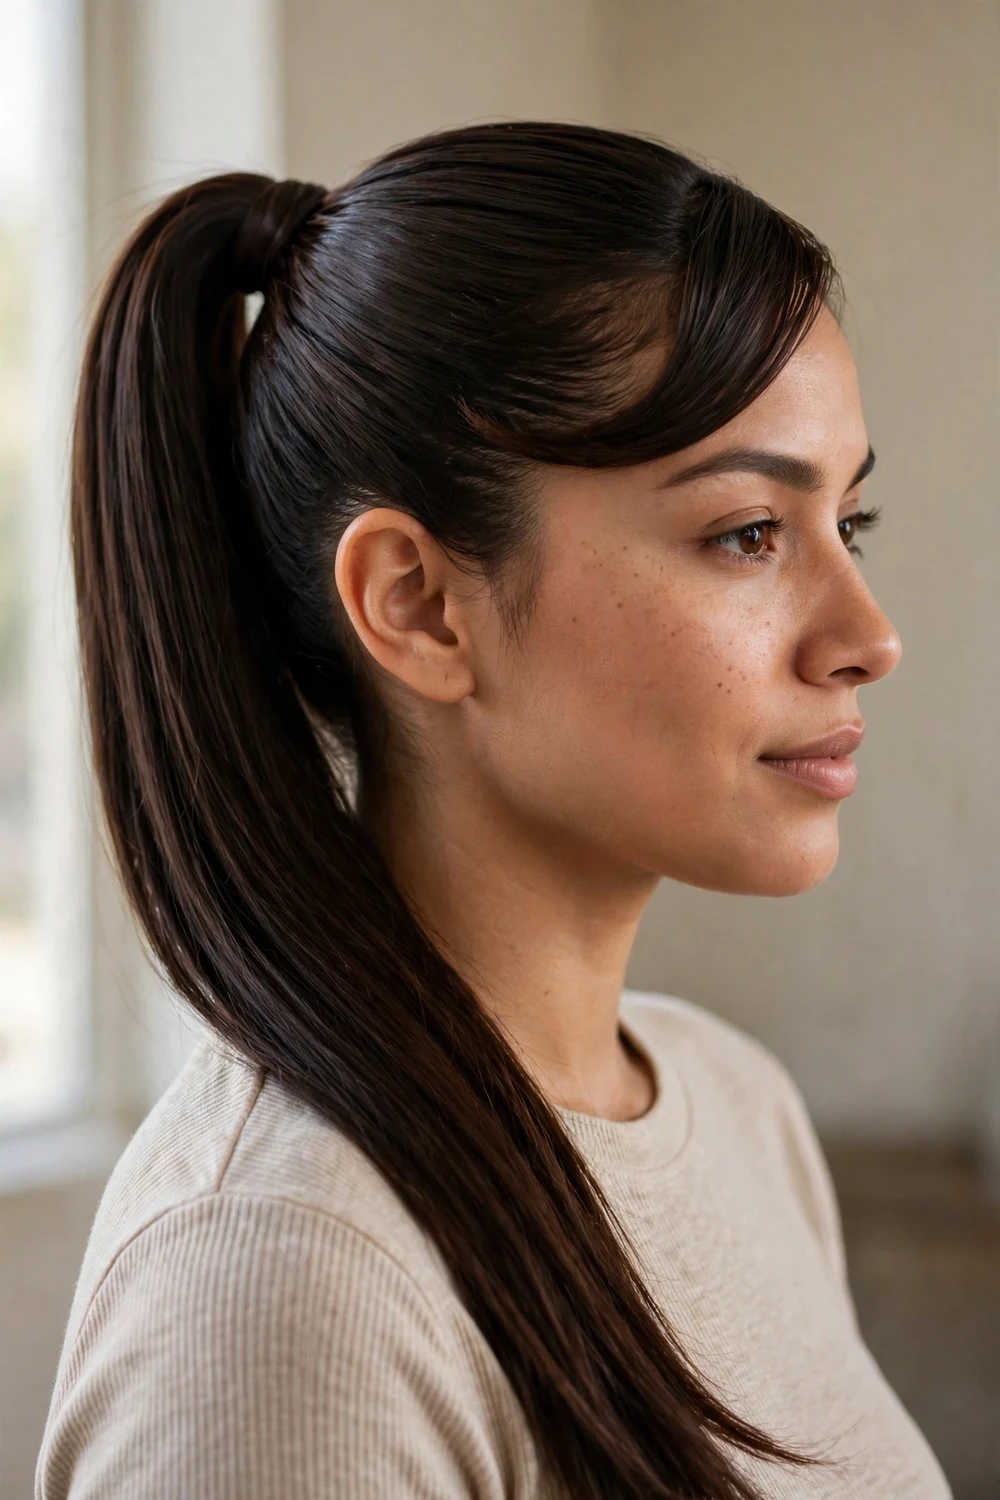
Few looks read as baddie faster than a glass-smooth high ponytail. Brush the hair straight up to the crown while it is slightly damp, secure it with a strong elastic, then wrap a small strand around the base to hide the tie. The height is what lifts the face, so aim for the top of the crown, not the back of the head. For extra length, clip in one weft of extensions at the base before wrapping the strand, and run the flat iron over the ponytail so the whole tail falls in one smooth sheet.
Try this: Add a side swoop by leaving the front section out, slicking it with gel, and curving it across the forehead. Finish with shine spray for a mirror-like finish.
If you want the full history behind this look’s roots, browse 90s black women hairstyles for the era that made swoops and sleek ponytails iconic.
2. Jumbo Box Braids
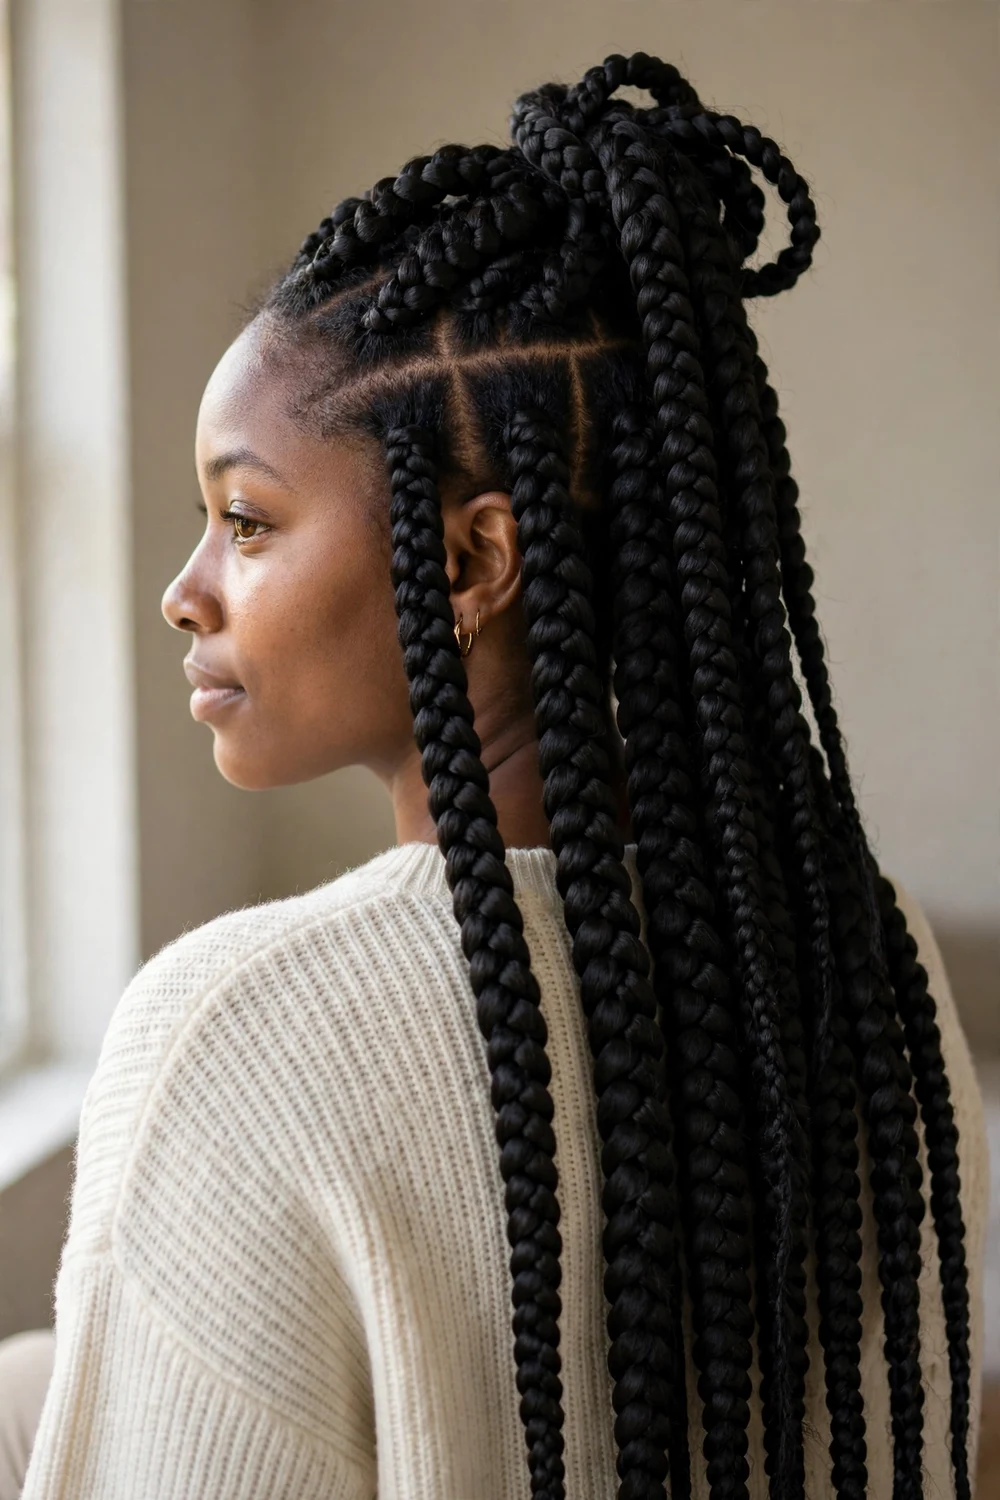
Jumbo box braids are the protective style that keeps you in full baddie mode for weeks with almost no daily work. The large square sections cut braiding time down to about 3 to 4 hours in a chair, and the thick parts read bold rather than delicate. Wear them down, in a high ponytail, or twisted into a big bun on lazy days. Because the parts are large, the scalp gets airflow, and you can wash the braids every week or two with diluted shampoo to keep the style fresh for the full wear time.
Try this: Leave two thin braids out in front and curl their ends for a face-framing detail. Gold cuffs on a few braids add instant polish.
For more braid-heavy inspiration across textures and lengths, see cute black woman hairstyles for puffs, twists, bobs, and more.
3. Long Layered Waves
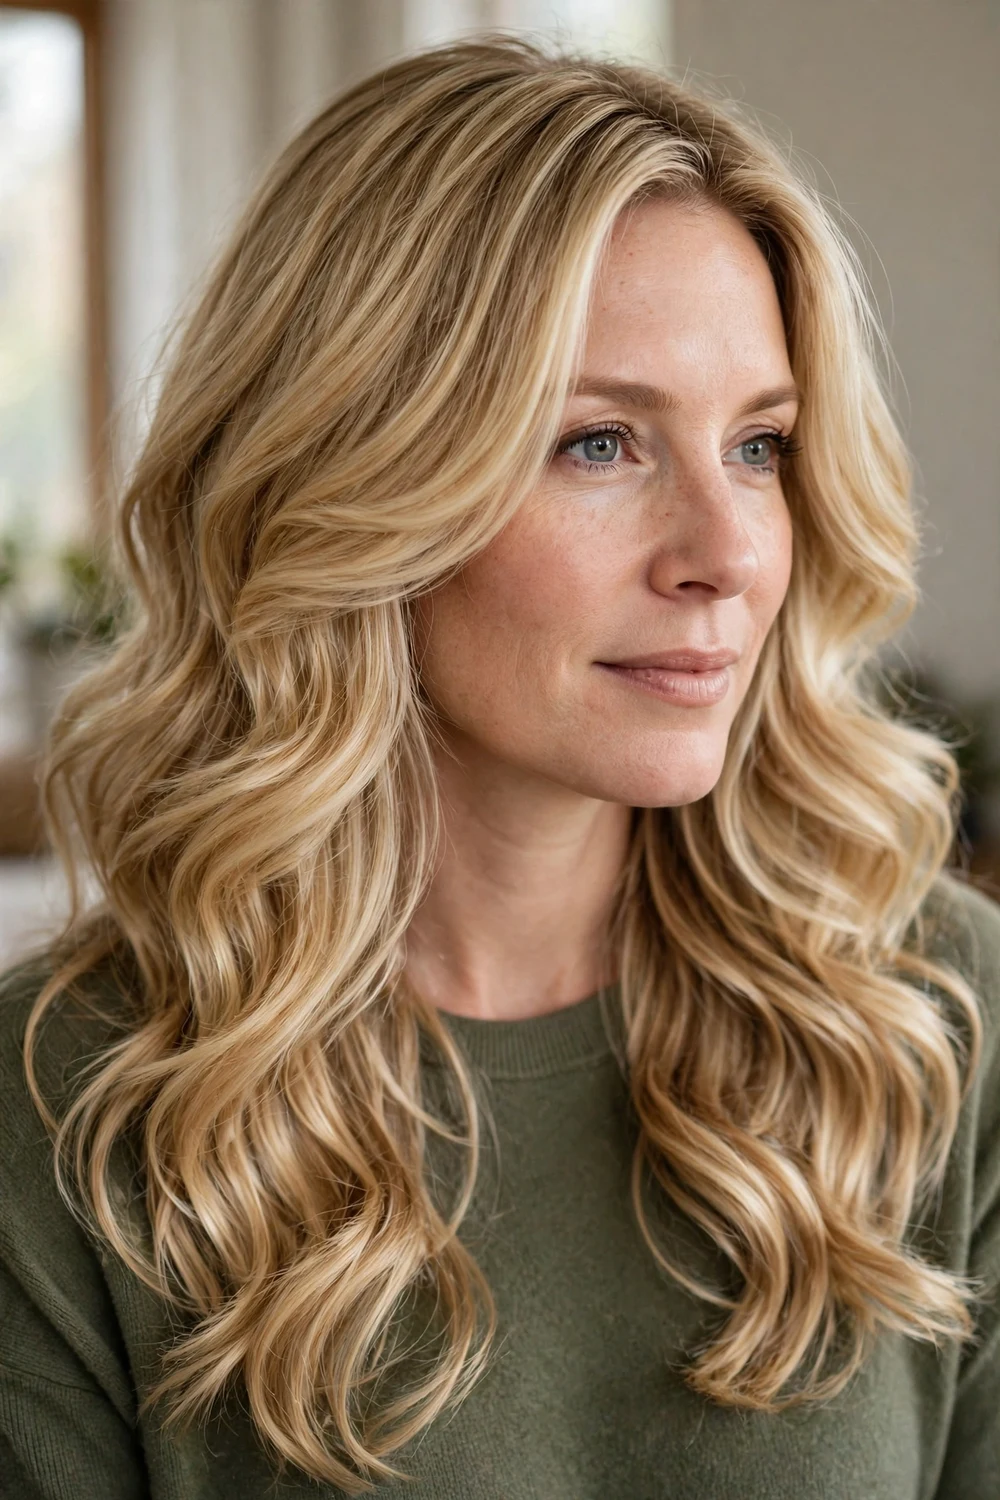
Long layered waves give that expensive blowout look without needing a salon appointment every week. The layers keep the hair from lying flat, and a large-barrel curling iron turned into loose waves reads polished, not beachy. This style works best on medium to long hair with at least some layering around the face. A round brush and blow dryer give the smoothest base before curling, and a light mist of flexible-hold hairspray after brushing keeps the waves from falling flat by evening.
Try this: Curl away from the face in 2-inch sections, then brush through the curls with a paddle brush for soft movement that lasts about 2 days.
4. Bubble Ponytail
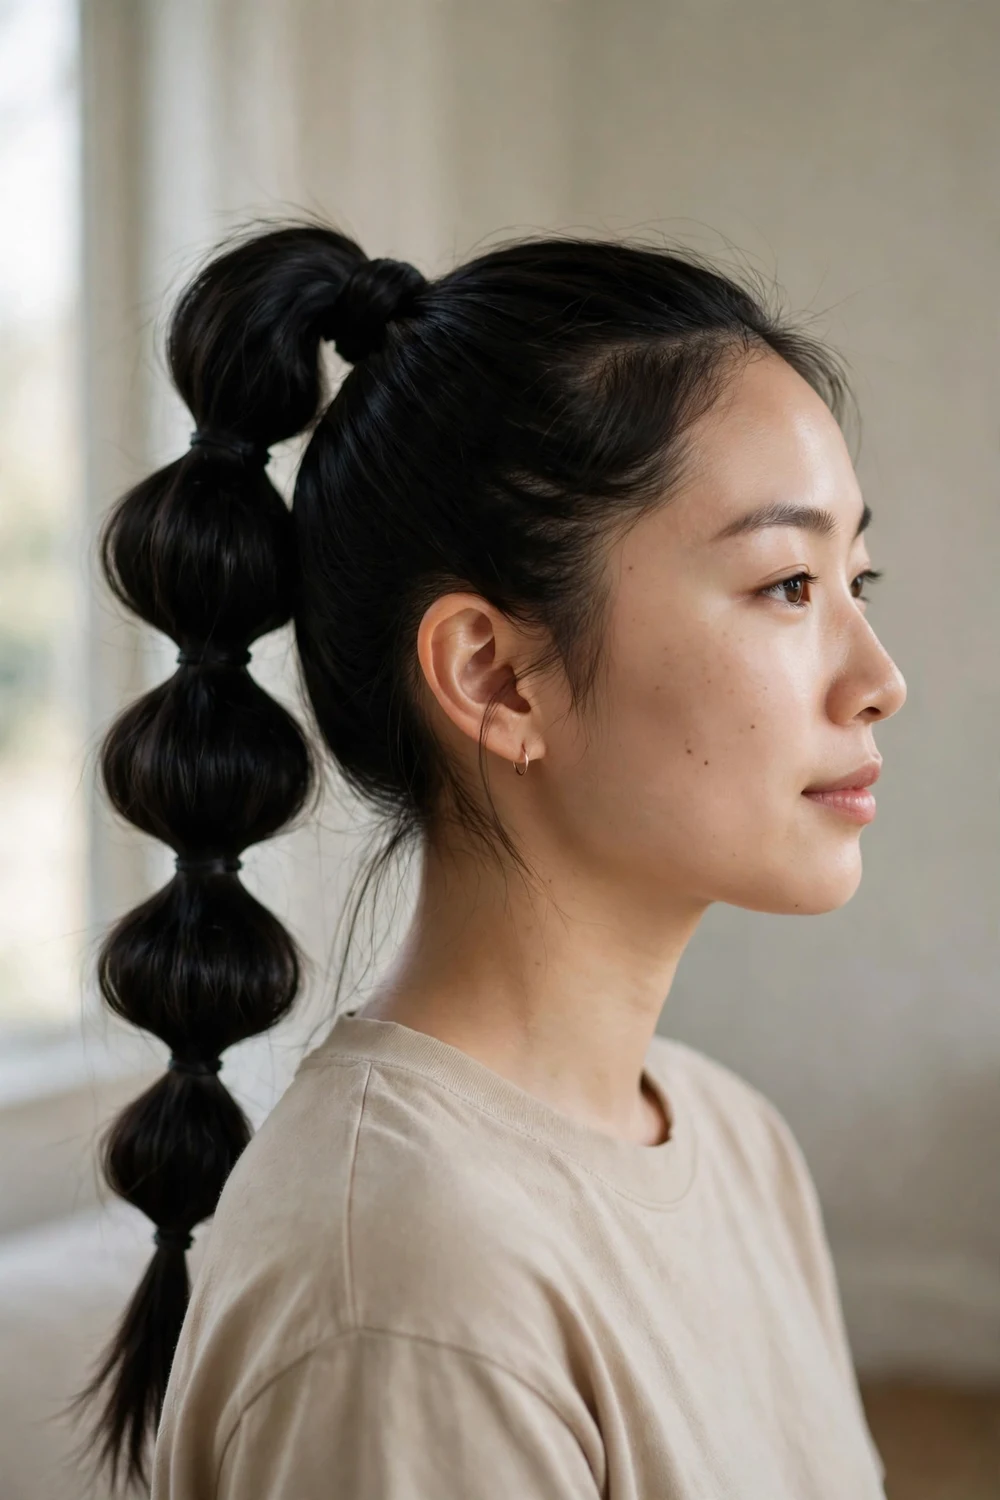
The bubble ponytail looks far more detailed than it is. Pull the hair into a high ponytail, then add small clear elastics every 2 to 3 inches down the length. Gently tug each section outward so it rounds into a bubble shape. The whole thing takes under 10 minutes and reads playful but still sharp. Clear mini elastics disappear into the hair better than black ones, and spacing them closer together near the top creates a graduated bubble effect that photographs well.
Try this: Keep the elastics evenly spaced and tease each bubble slightly for maximum roundness. A spritz of flexible-hold hairspray keeps the bubbles from deflating.
5. Middle-Part Sleek Bun
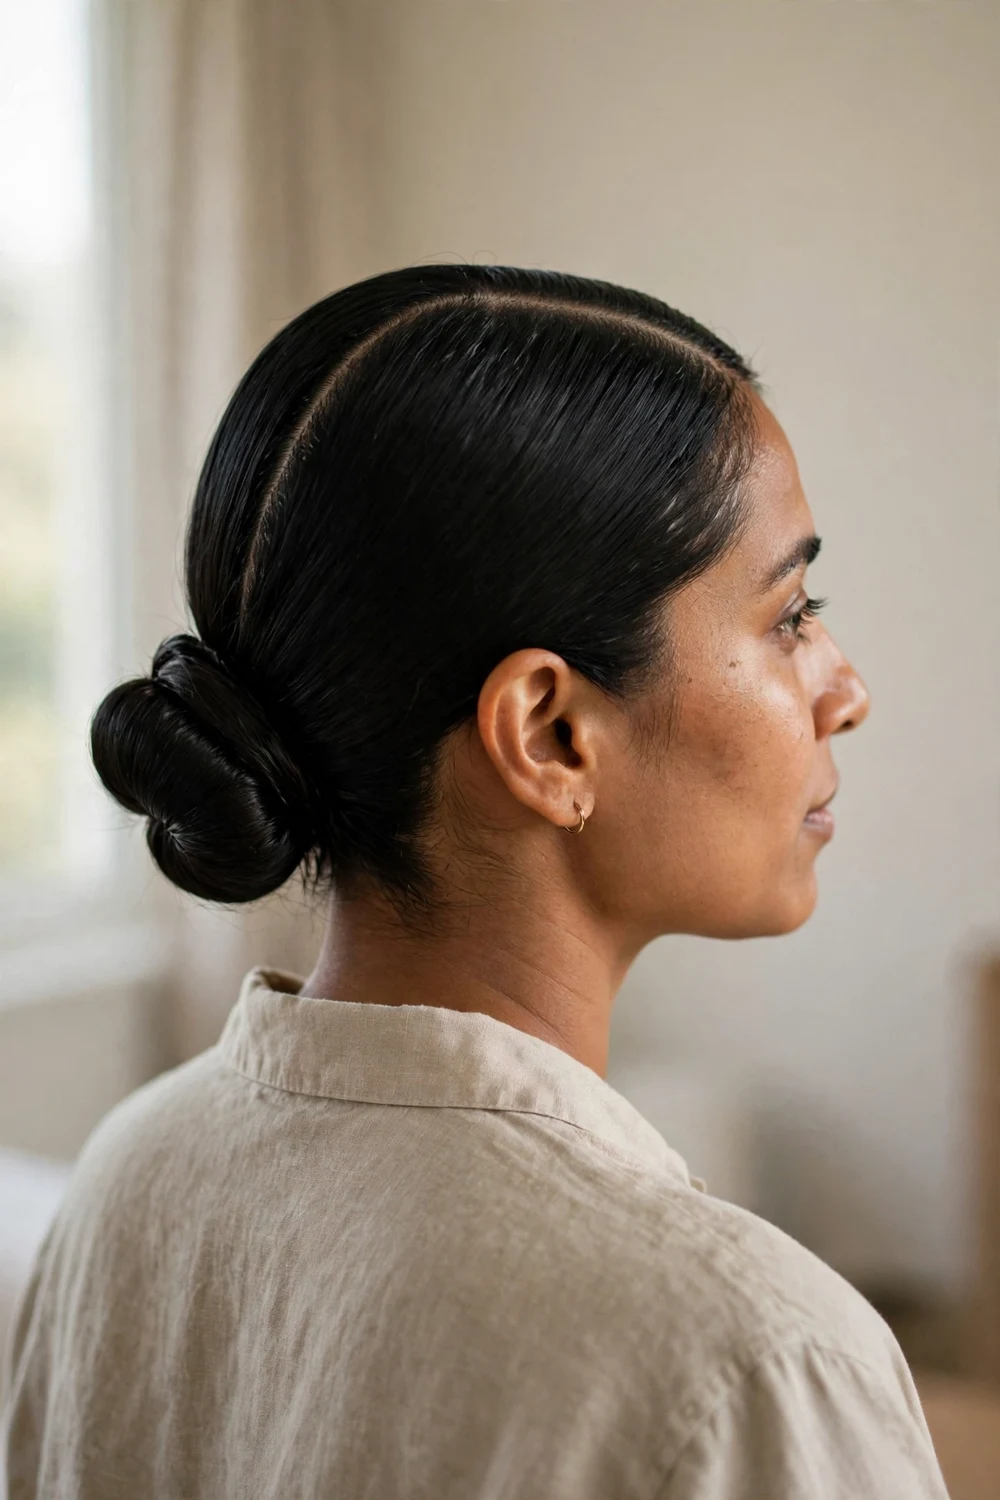
Split the hair down the exact middle, slick both sides back with gel, and twist the length into a neat low bun at the nape. The symmetry is what makes this one striking: no stray volume, no messy texture, just clean lines. It works for office days, dinners, and nights out with equal ease. Tuck the bun ends underneath and pin them flat so no stray pieces stick out, since the whole point of this style is the unbroken sleek line from part to bun.
Try this: Use a rattail comb to get the part razor straight, then set the bun with two crossed bobby pins and a light gel layer over the crown.
6. Half-Up, Half-Down with Loose Curls
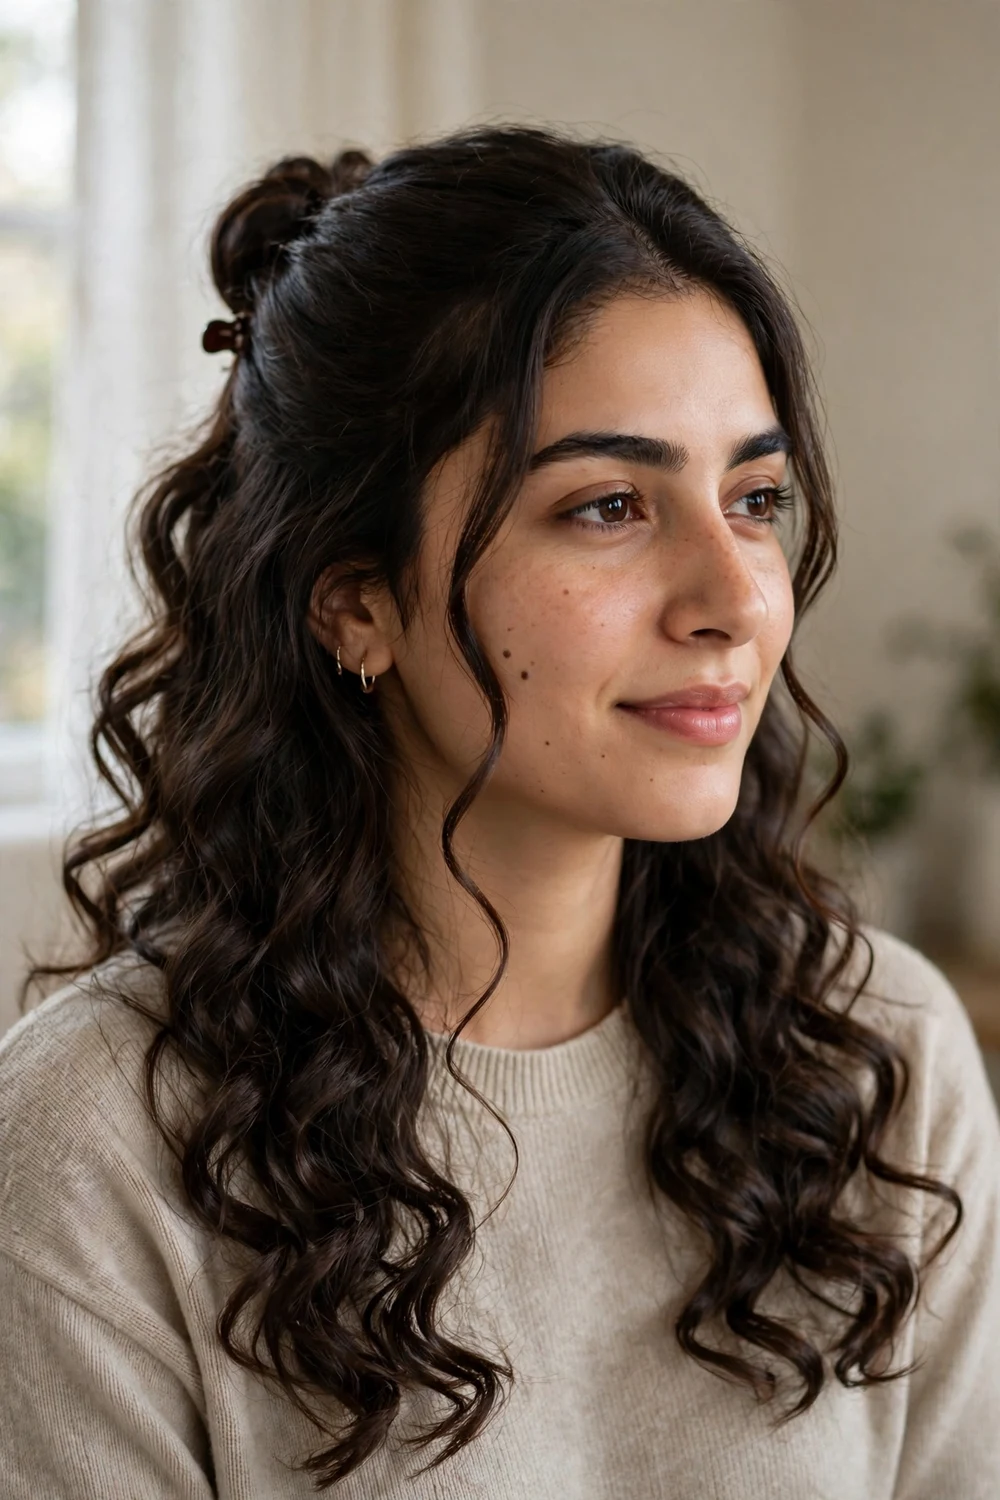
Half-up, half-down keeps the hair out of your face while showing off the length, which is why it never leaves the baddie rotation. Gather the top section into a ponytail or small bun, then curl the loose bottom half with a wand for bounce. Leave two thin front pieces out to soften the frame around the face. If your hair is fine, a light tease at the crown before securing the top section adds the lift this style needs, and a dime-sized drop of serum on the ends keeps the curls defined.
Try this: Tease the crown lightly before securing the top section so the style has lift instead of lying flat against the head.
7. Cornrow Ponytail
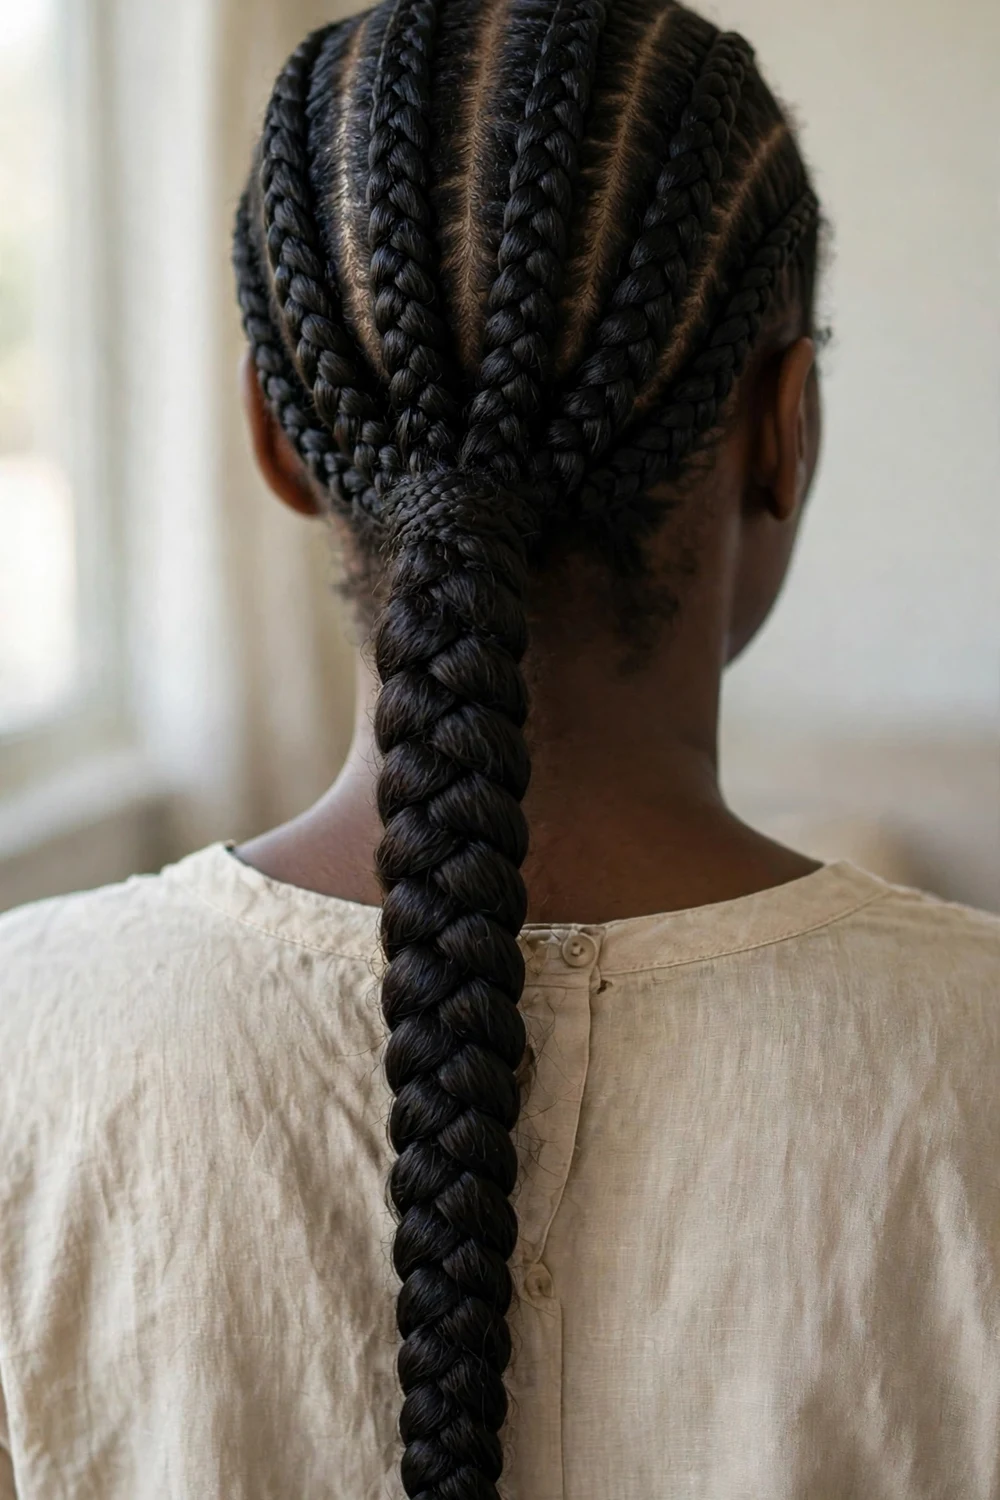
Cornrows braided straight back into a high ponytail combine a protective style with serious drama. The braided scalp detail does the visual work, so the ponytail itself can stay simple. This style holds for 1 to 2 weeks, survives workouts and humidity, and looks sharp the entire time. Edge control along the hairline keeps the style crisp between washes, and sleeping in a silk scarf preserves the cornrows so the ponytail looks fresh for the full two weeks.
Try this: Ask for 6 to 8 straight-back cornrows feeding into the ponytail, and wrap the ponytail base with braiding hair for a thicker, longer finish.
8. Sleek Straight Hair with a Sharp Part
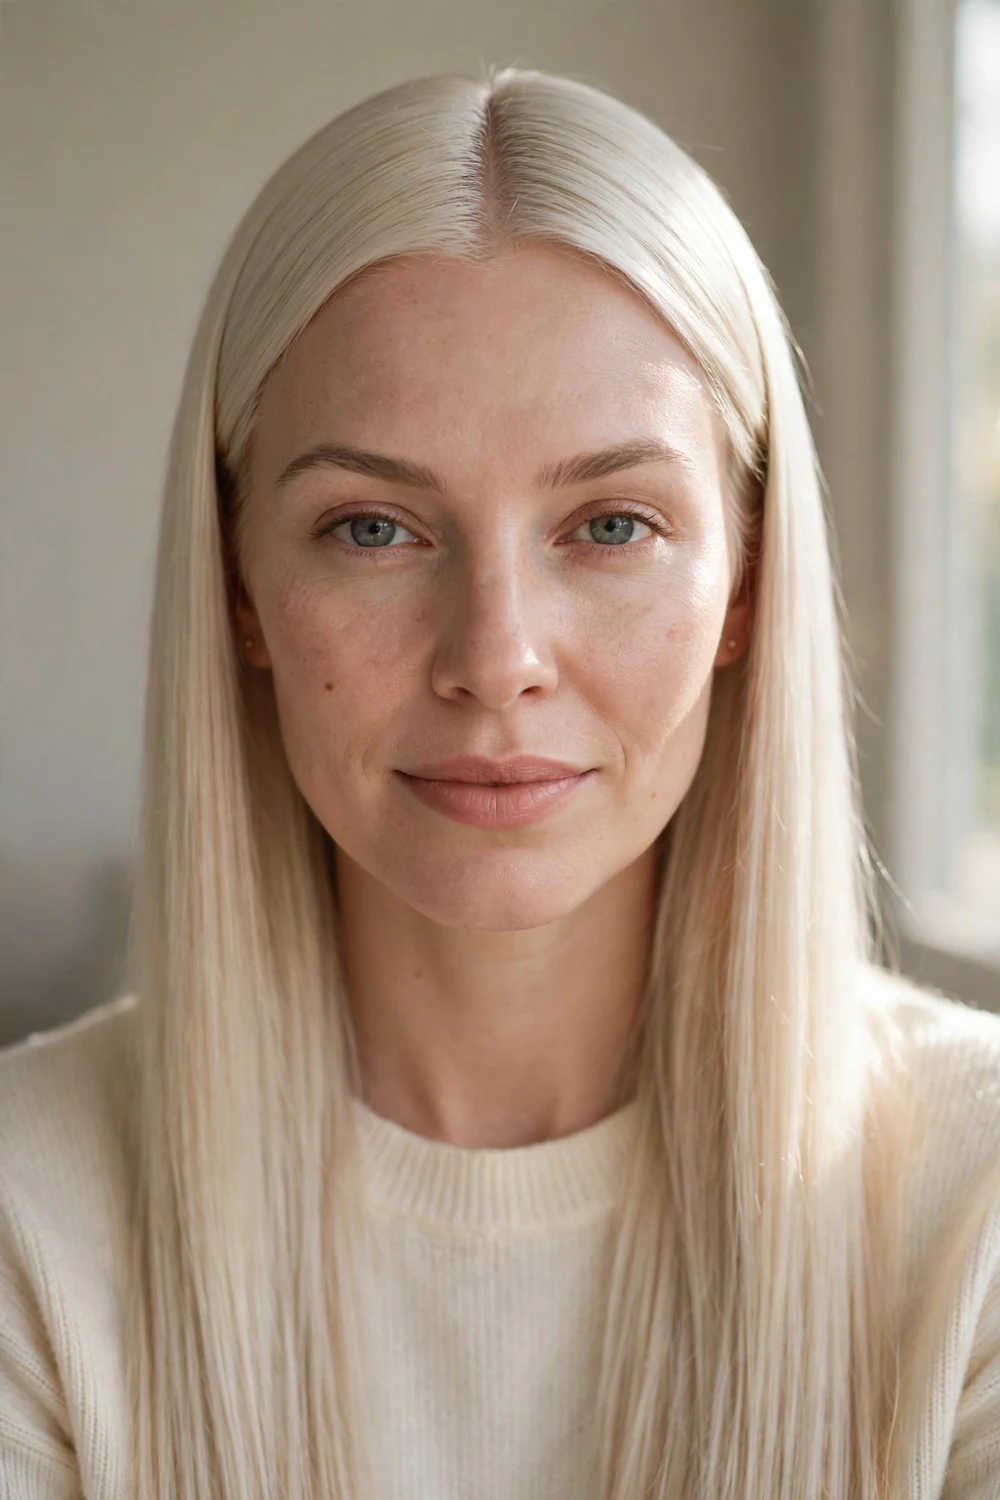
Pin-straight hair with a razor-sharp part is the minimalist baddie look. Run a flat iron through small sections with heat protectant, then set the part with a rattail comb while the hair is still warm. The result reads expensive and deliberate, especially with a deep side part for extra drama or a middle part for symmetry. Work in 1-inch sections so the iron heats evenly, and let each section cool in your hand for 5 seconds before moving on, which sets the straightness without extra passes.
Try this: Apply a pea-sized amount of shine serum to the ends only, never the roots, so the top stays sleek without looking greasy.
9. Messy Bun with Tendrils
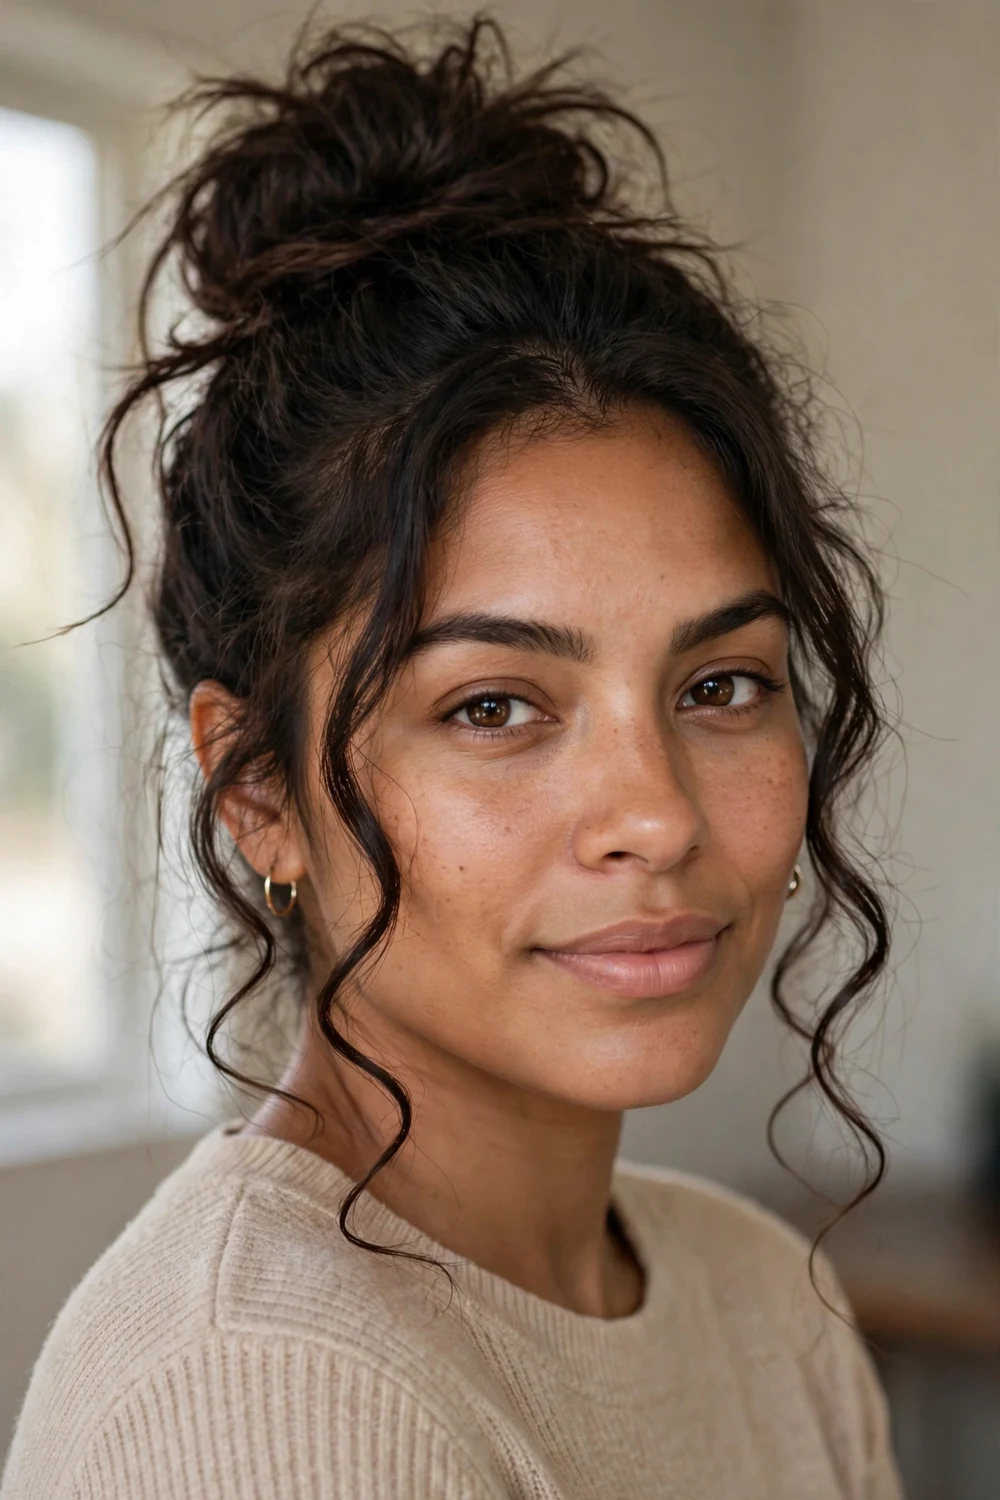
The trick to a baddie messy bun is making the mess look planned. Gather the hair into a high ponytail, twist it loosely into a bun, and pin it so the shape stays big and airy. Then pull out two thin front sections and curl them with a wand so they frame the face instead of hanging limp. A few bobby pins crossed at the bun base keep the shape from sliding down during the day, and a light oil on the tendrils stops them from frizzing in humidity.
Try this: If the bun looks small, fan it out by gently pulling the twisted loops wider. Bigger bun, bigger energy.
10. Space Buns
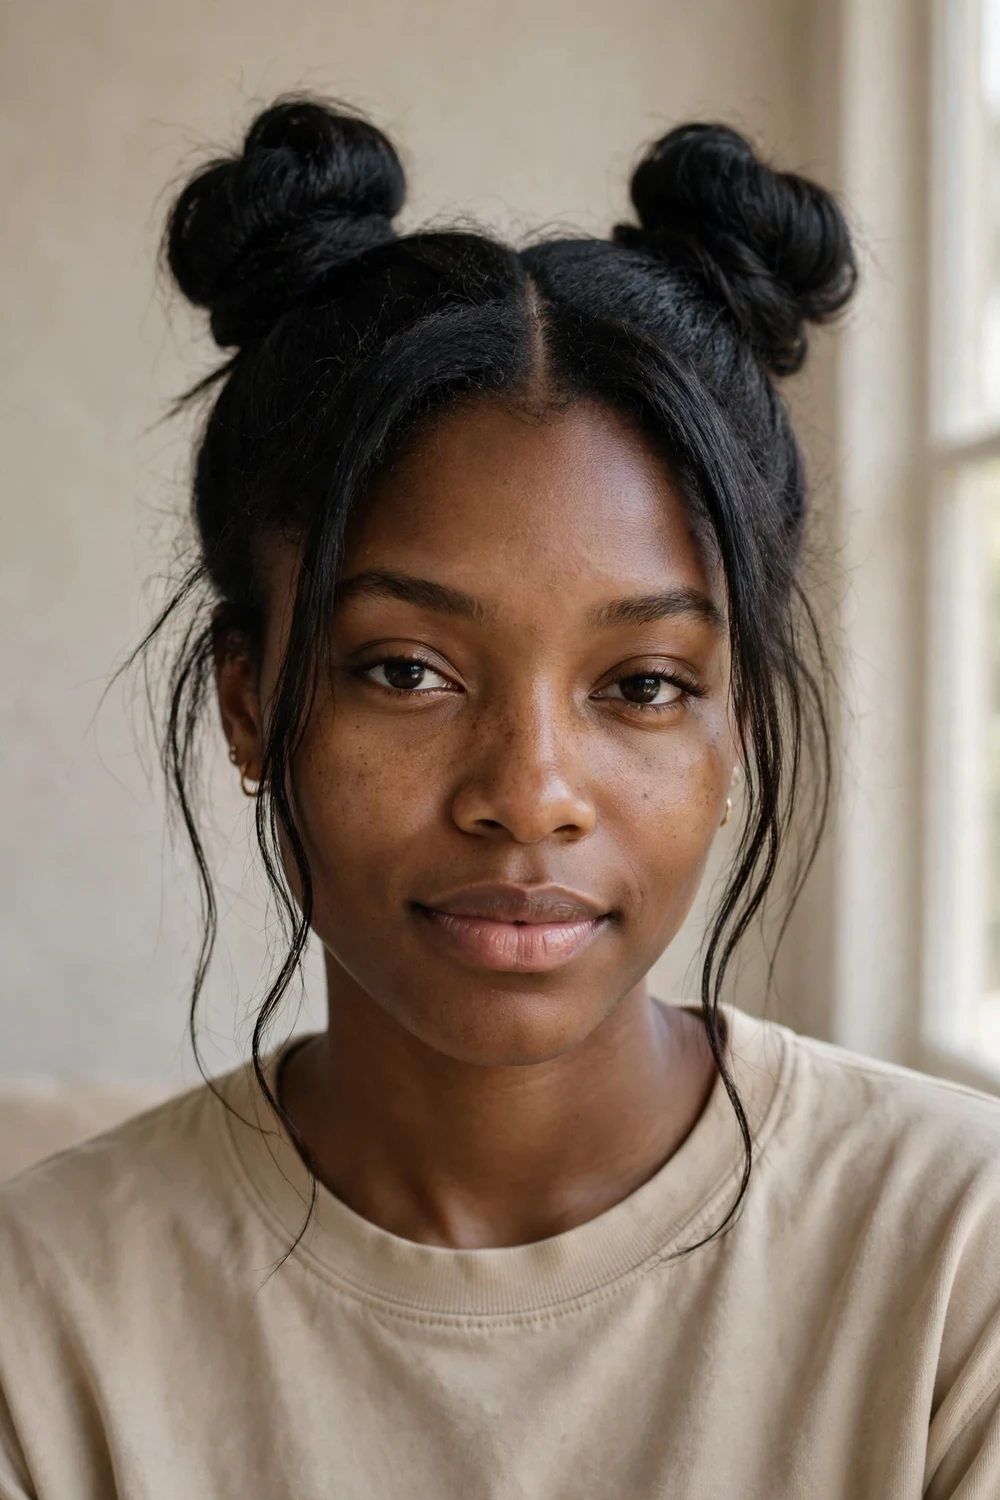
Part the hair down the middle and twist each side into a bun sitting high on the head. Space buns work on nearly every hair length: short hair makes cute mini buns, and long hair can go big and dramatic. They are a go-to for festivals, concerts, and days when one bun feels boring. Twist each section in the same direction so the buns mirror each other, and pin any loose ends underneath for a clean finish that still looks playful.
Try this: Leave a few strands out around the face and slick the baby hairs into soft curves. That contrast between playful buns and sharp edges is the whole look.
11. Sleek Side Part with Curls
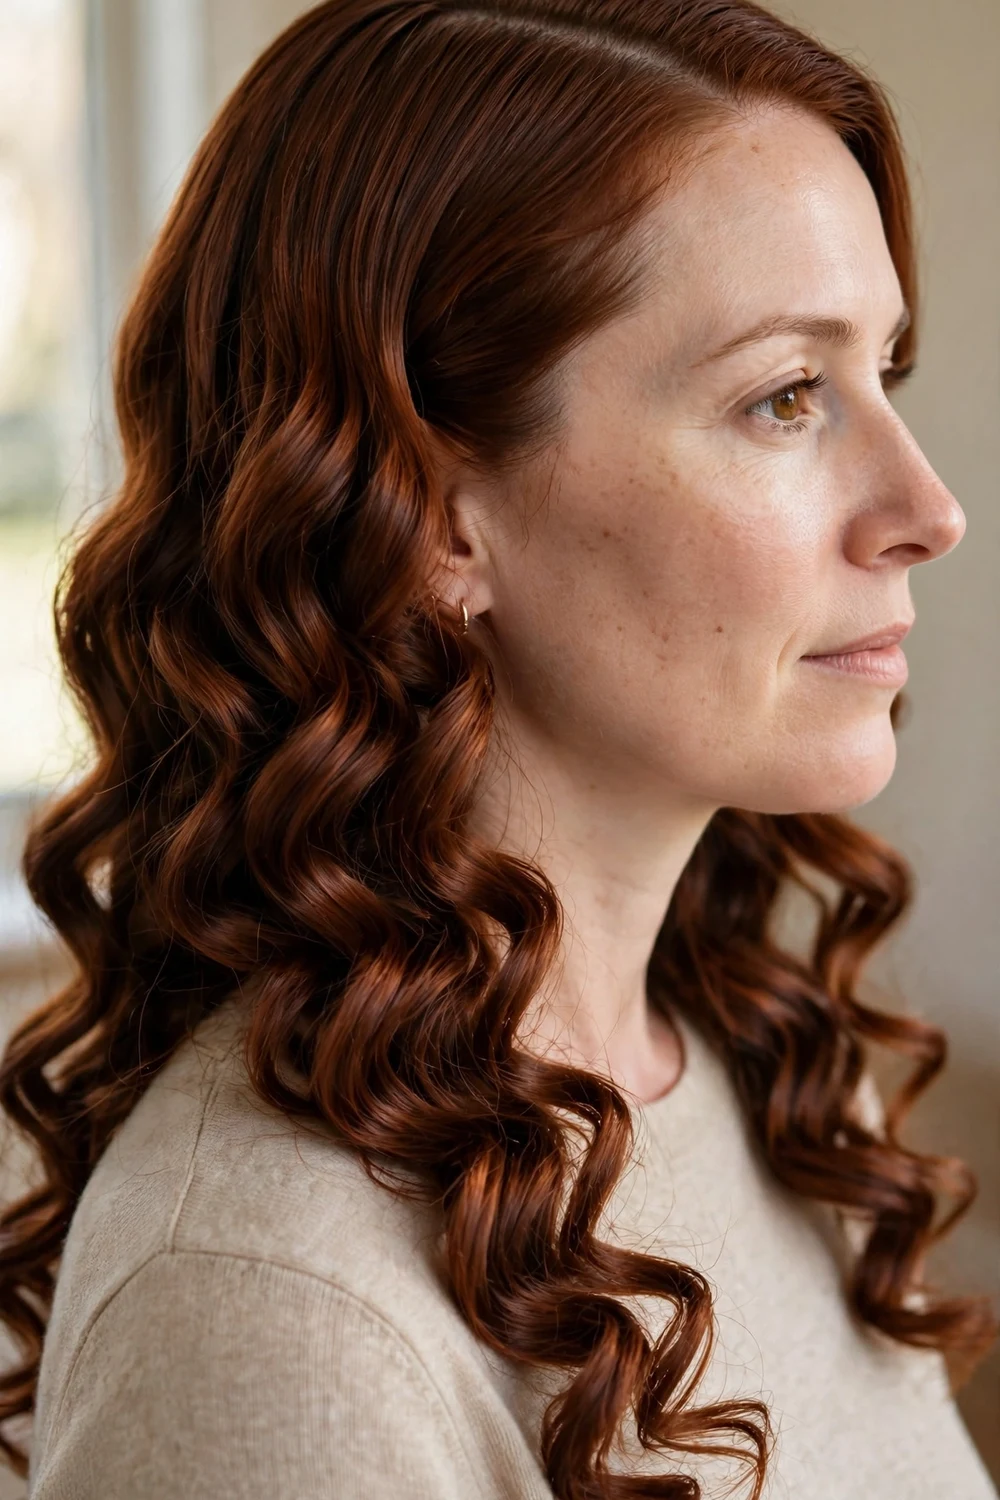
A deep side part with polished curls borrows old Hollywood glam and gives it a baddie edge. Set the part far to one side, curl the hair in uniform sections, and brush the curls out just enough to form smooth waves. Keep the roots flat and glossy so the contrast between sleek top and full curls stays sharp. Let each curl cool pinned for a minute before brushing out, which sets the shape longer, and finish with shine spray on the lengths only to keep the roots from looking greasy.
Try this: Pin one side flat behind the ear with a decorative clip. It shows off the jawline and keeps the heavy side from falling forward.
12. Braided Crown
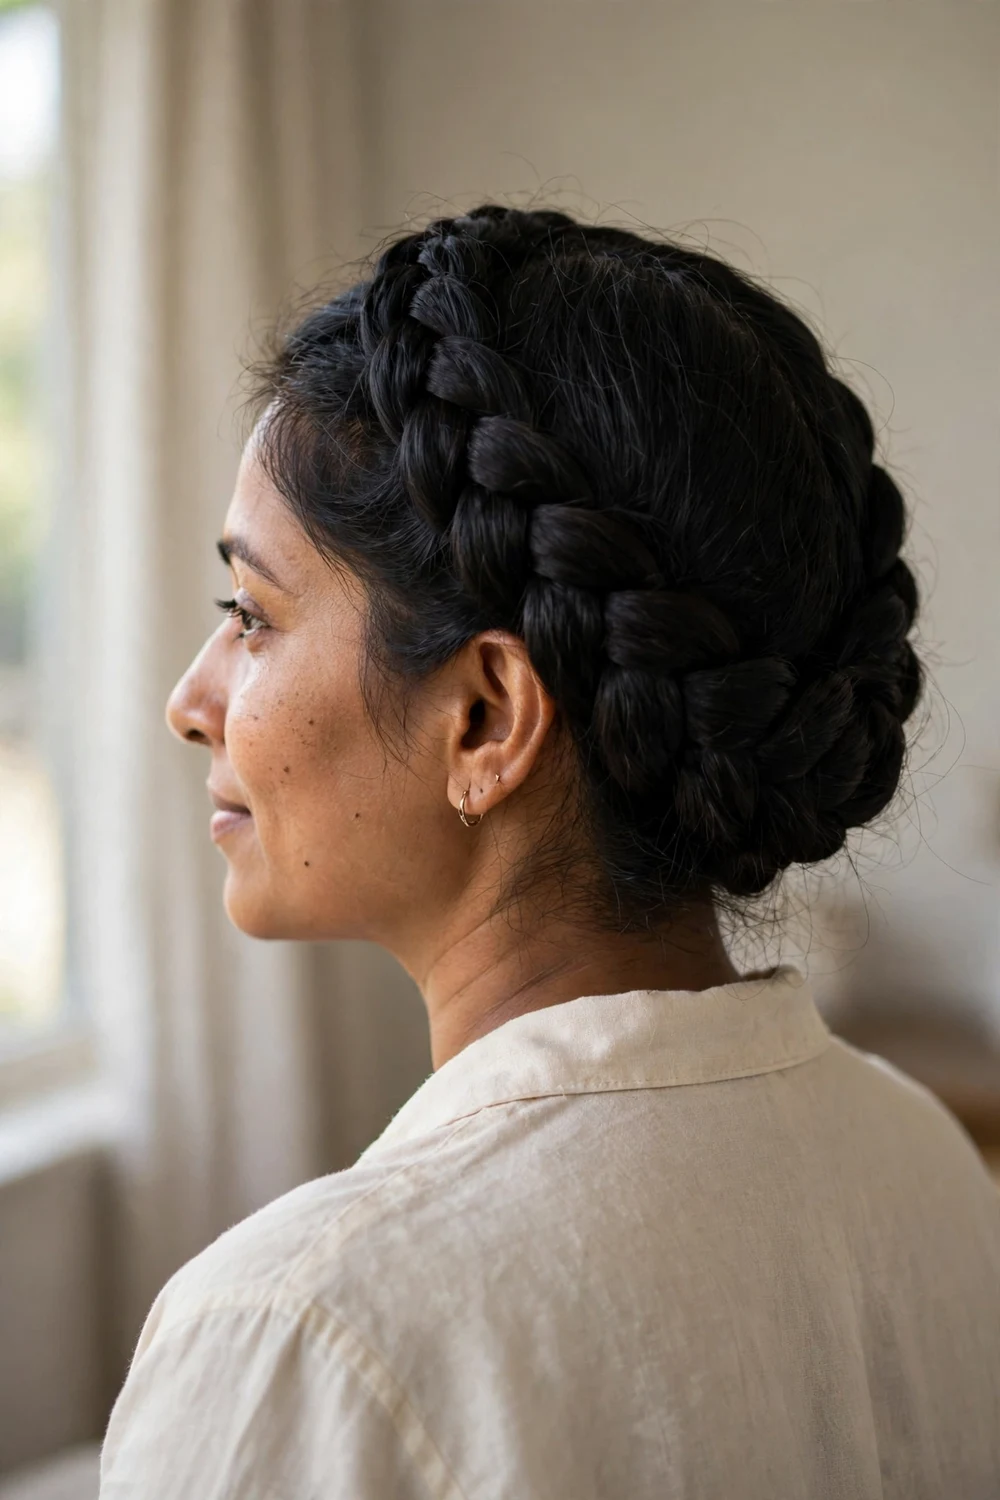
A braided crown wraps one thick braid around the head like a headband, which makes it a strong pick for weddings, photoshoots, and formal events. Dutch-braid along the hairline from one ear to the other, then pin the tail underneath. Pancaking the braid, pulling each loop slightly wider, makes it look twice as full. Work the braid slightly loose as you go rather than pulling tight, since a tight crown braid looks severe while a fuller one photographs softer and more romantic.
Try this: Braid on second-day hair or add dry shampoo at the roots first. The extra grip keeps the braid from slipping during a long event. Secure the braid tail with pins that match your hair color so they vanish into the style, and a light hairspray mist keeps flyaways flat through photos and dancing.
13. Faux Locs
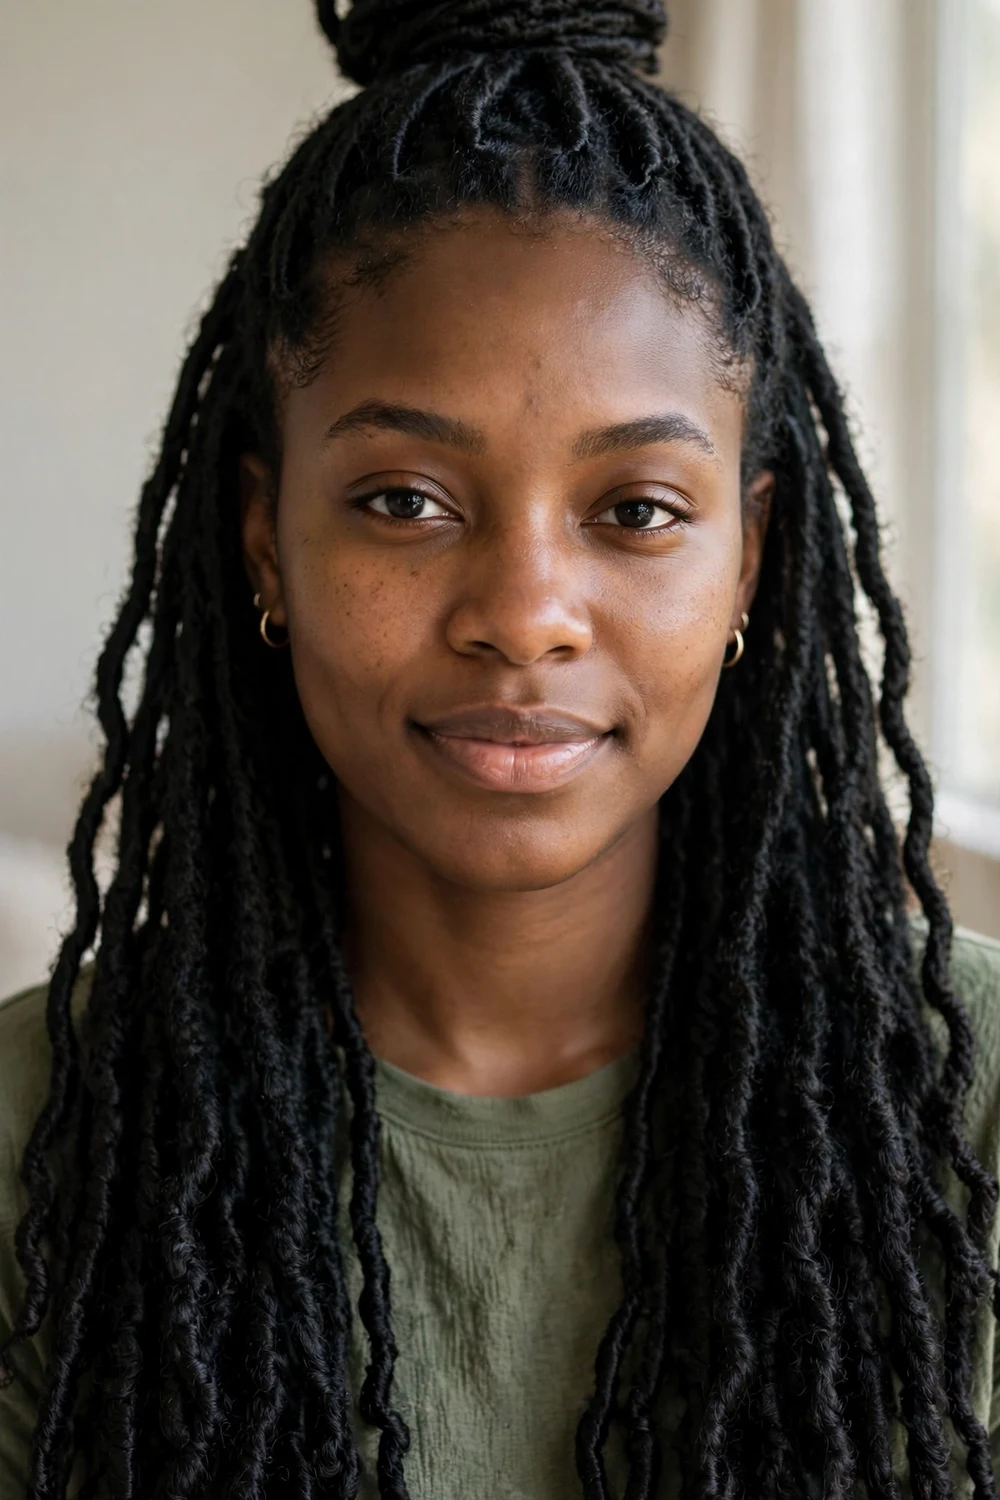
Faux locs wrap your natural hair in crochet or braided locs for a boho-baddie look that lasts 4 to 8 weeks. They are lighter than they look, fully protective, and easy to restyle: try a half-up bun, a high ponytail, or a side sweep when you want a change without redoing the install. Moisturize your natural hair before the install and oil the scalp weekly, since healthy hair underneath is what makes the locs look good for the full 8 weeks.
Try this: Style them in a half-up bun for events. The pulled-back top shows off the locs’ texture while keeping hair off your face.
14. Sharp Bob Cut
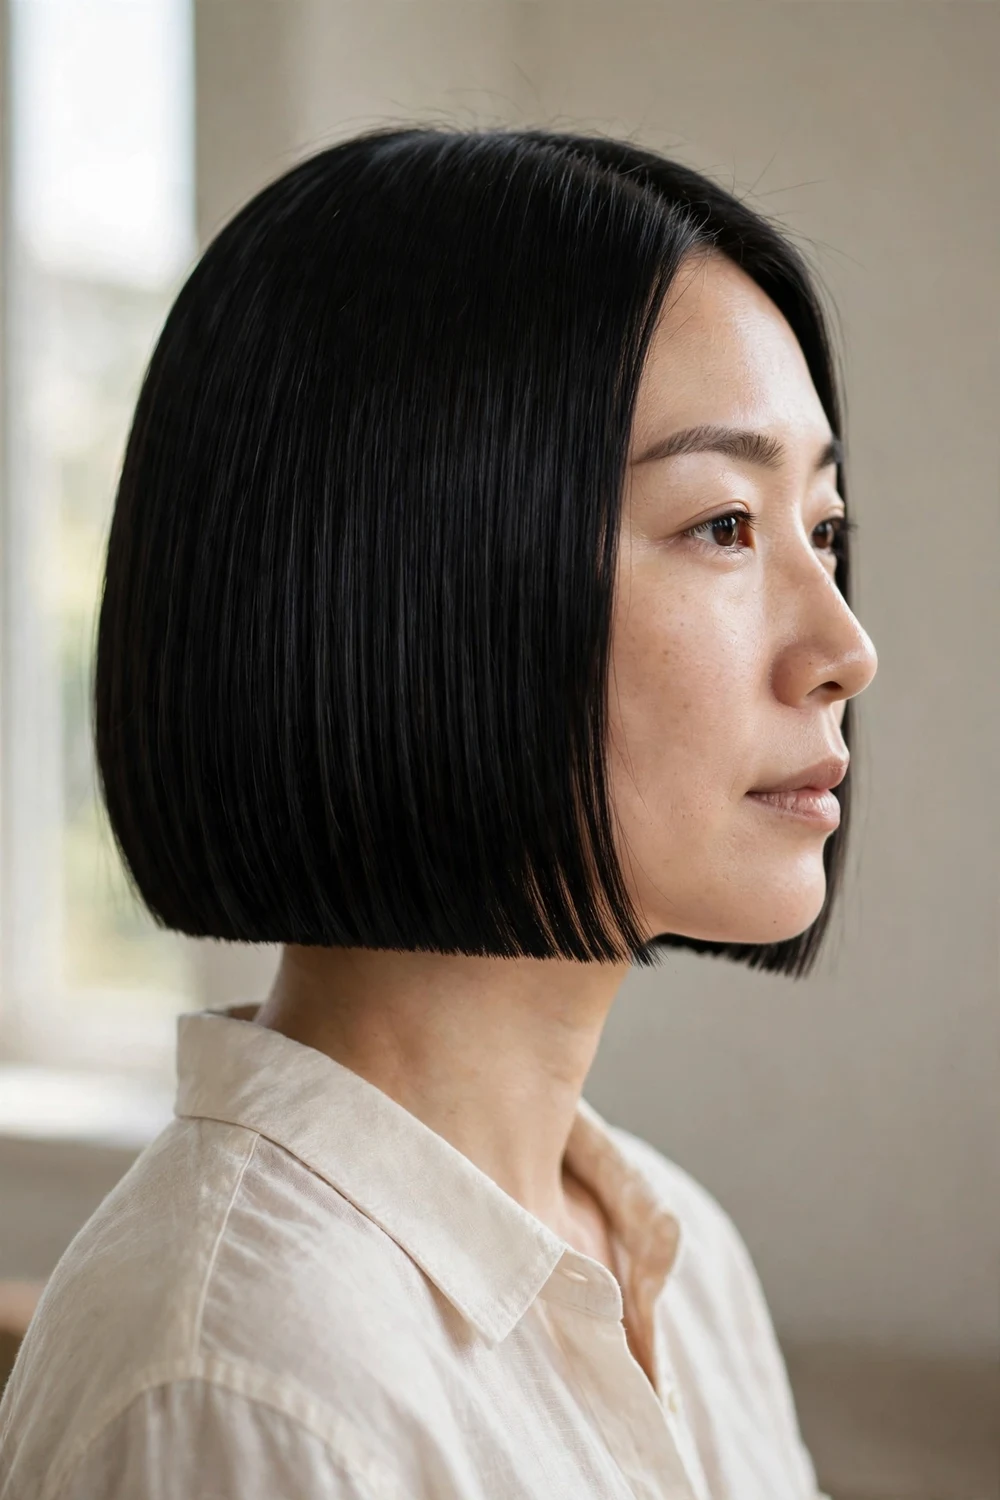
A blunt bob with razor-clean lines is one of the boldest baddie moves for short hair. The cut does all the work: keep it chin to jaw length, ends cut straight across with no layering, and flat-iron it smooth so the outline stays crisp. Pair it with a middle part for symmetry or a deep side part for drama. Blow dry with a paddle brush pointing downward to keep the ends tucked under, and the clean line of this cut makes earrings and bold lipstick stand out more.
Try this: Get the ends trimmed every 6 weeks. A blunt bob loses its edge fast once the line grows uneven.
For edgier takes on short statement cuts, look through asymmetrical hairstyle ideas for women for bobs with an uneven, fashion-forward twist.
15. High Bun with Laid Edges
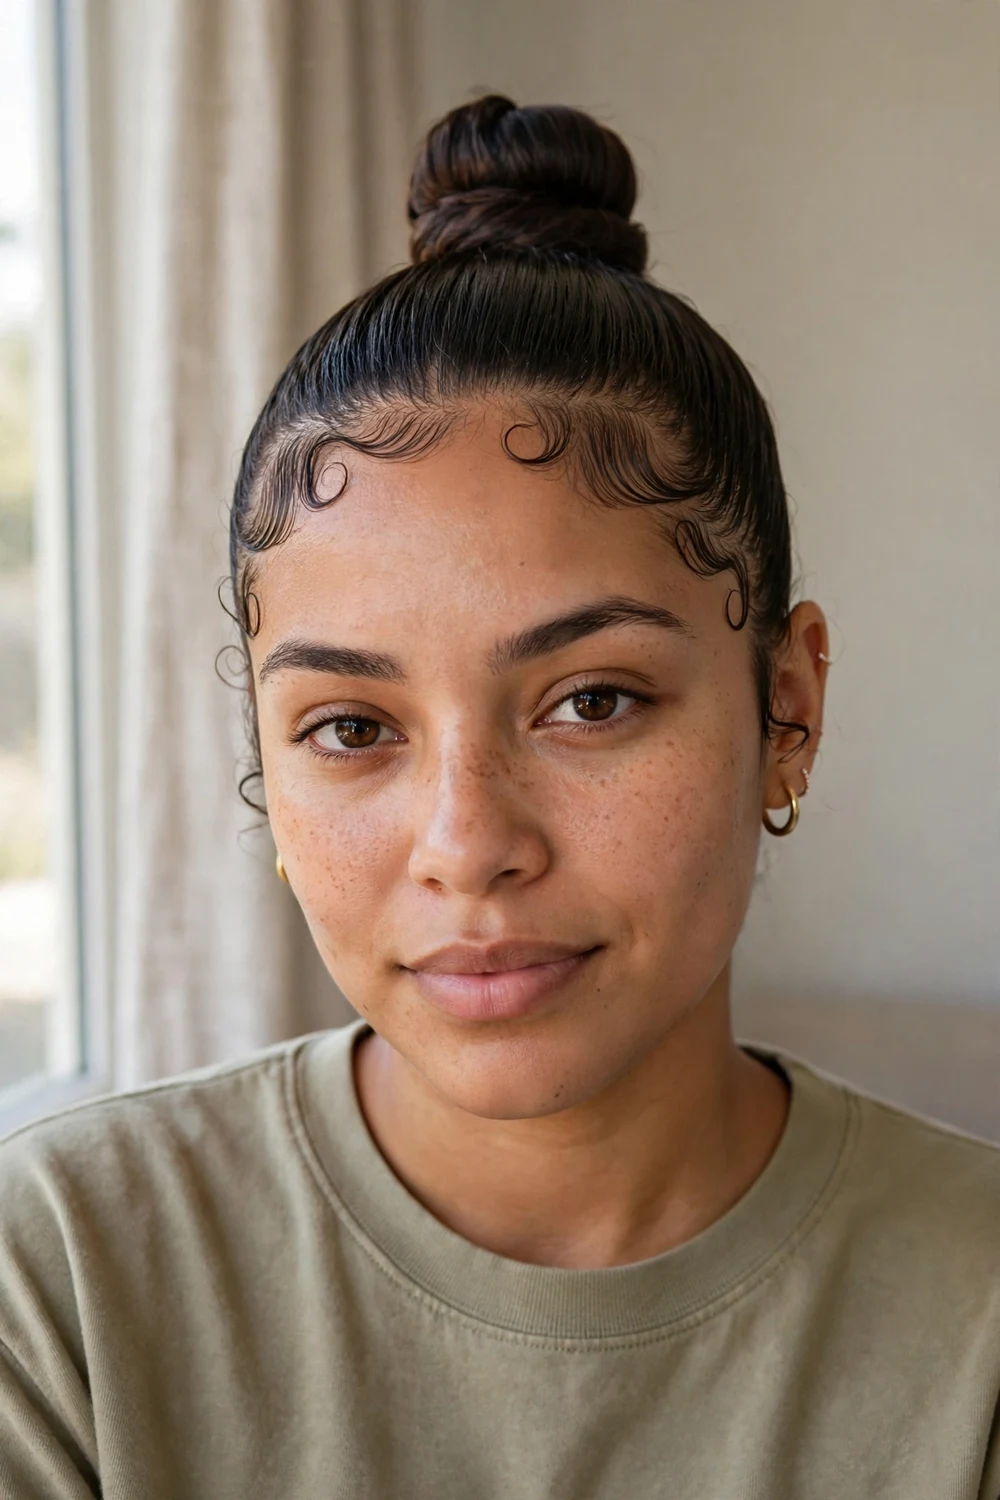
Slick everything straight up into a tight high bun and spend the real effort on the edges. Swirl the baby hairs into curves with edge control and a small brush, then tie a silk scarf around the hairline for 10 minutes to set them. This style puts the face front and center, so it pairs well with bold makeup. A second layer of gel over the crown after the scarf comes off locks everything in, and this style lasts longest when you avoid touching the hairline during the day.
Try this: Work on slightly damp hair with a strong-hold gel. Dry hair fights the brush, and damp hair lays flatter with less product.
16. Loose Beach Waves
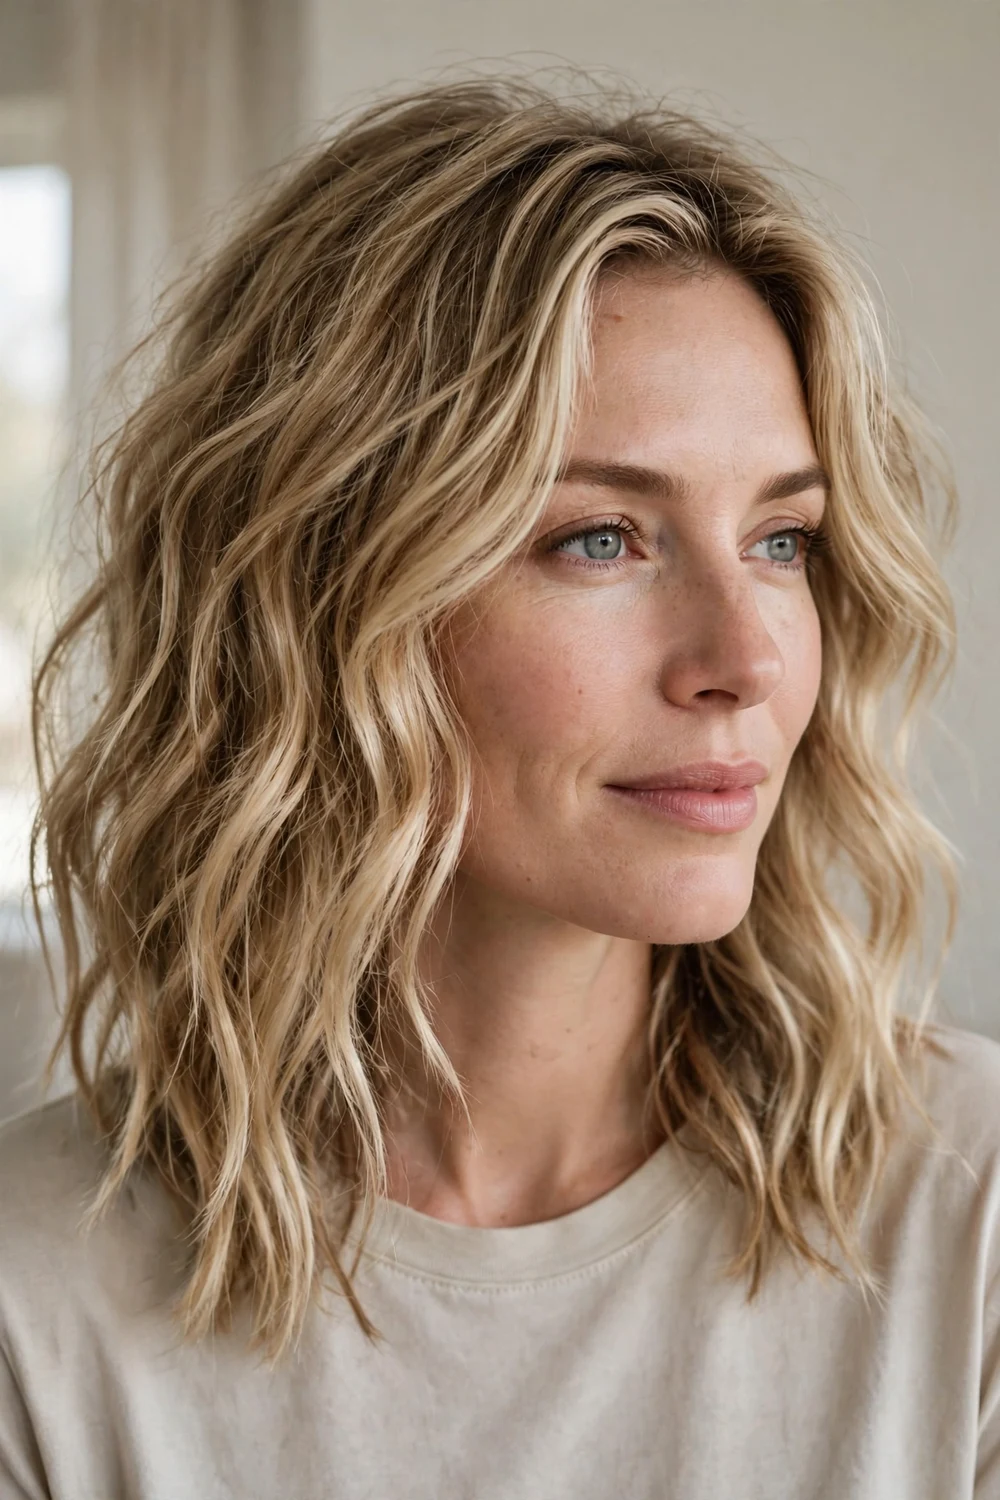
Beach waves are the softer, undone cousin of polished layered waves. Mist the hair with salt spray, twist random sections around a curling wand leaving the ends out, then shake everything loose with your fingers. The texture should look a little windswept, never uniform. This is the lowest-effort style on the list. Scrunch the hair upward while it is still warm from the wand to encourage the wave pattern, and skip brushing so the pieces stay separated and textured.
Try this: Alternate the curl direction section by section. Curls that all twist the same way clump together; mixed directions create separation.
17. Braided Ponytail
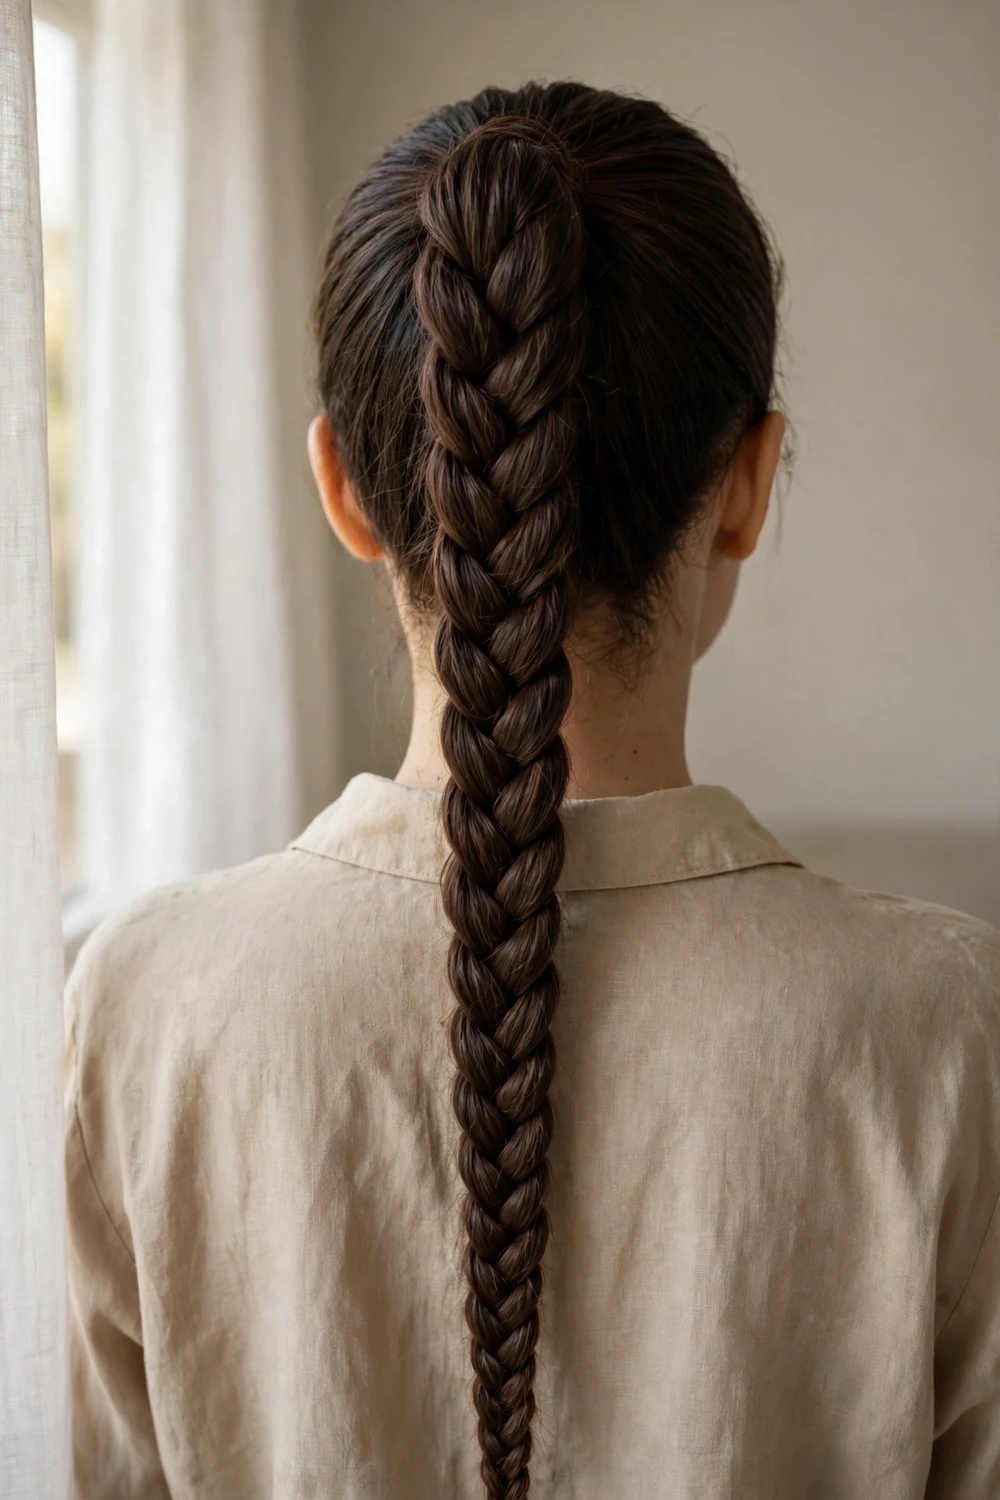
Take a high ponytail and braid the tail itself for a style that works from the gym to a night out. A three-strand braid keeps it classic, while a fishtail or rope braid adds texture. Feed-in braiding hair at the base if you want extra length and thickness without waiting for a grow-out. Start the braid right at the elastic so there is no loose bump at the base, and a small amount of edge control smoothed over the crown keeps the top sleek all day.
Try this: Wrap a strand of hair around the ponytail base to hide the elastic, then pancake the braid loops for a fuller finish.
18. Statement Hair Clips with Loose Hair
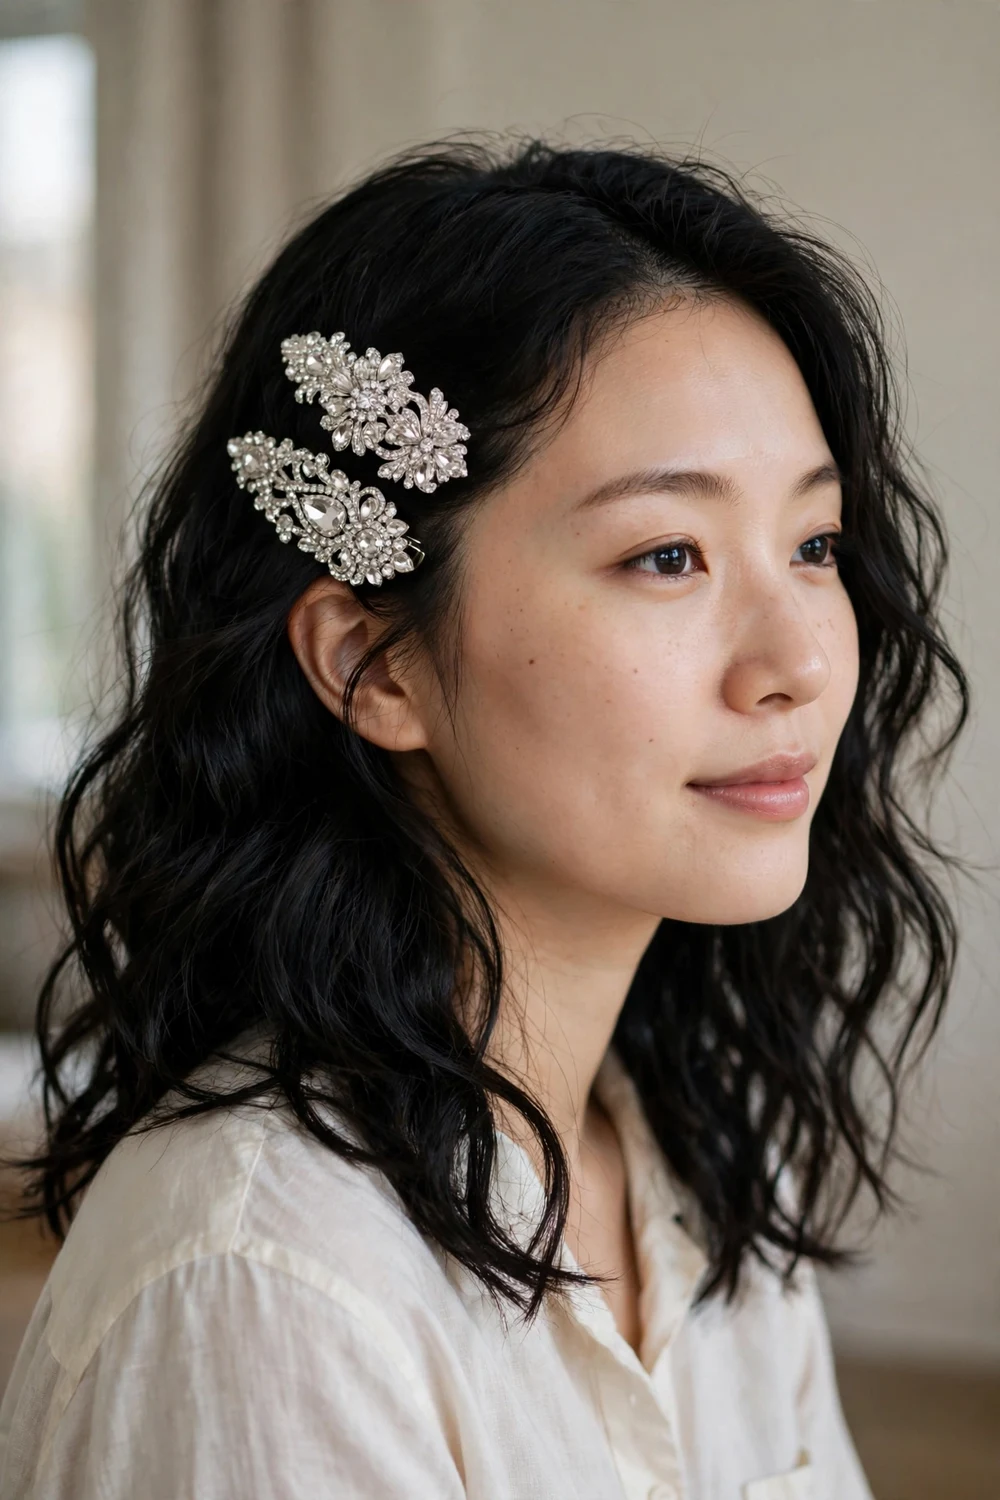
When the hair is down and simple, oversized clips do the styling. Part the hair, smooth the roots, and clip one side back with large pearl, rhinestone, or tortoiseshell barrettes. Stack two or three on one side for a layered effect. The whole look takes about 5 minutes and reads instantly put together. Press the clips in close to the scalp so they grip well, and choose clips with a strong hinge since cheap ones slide out of smooth hair within an hour.
Try this: Match the clip finish to your jewelry: gold clips with gold hoops, silver with silver. The coordination makes a simple style look planned.
19. Sleek Low Ponytail
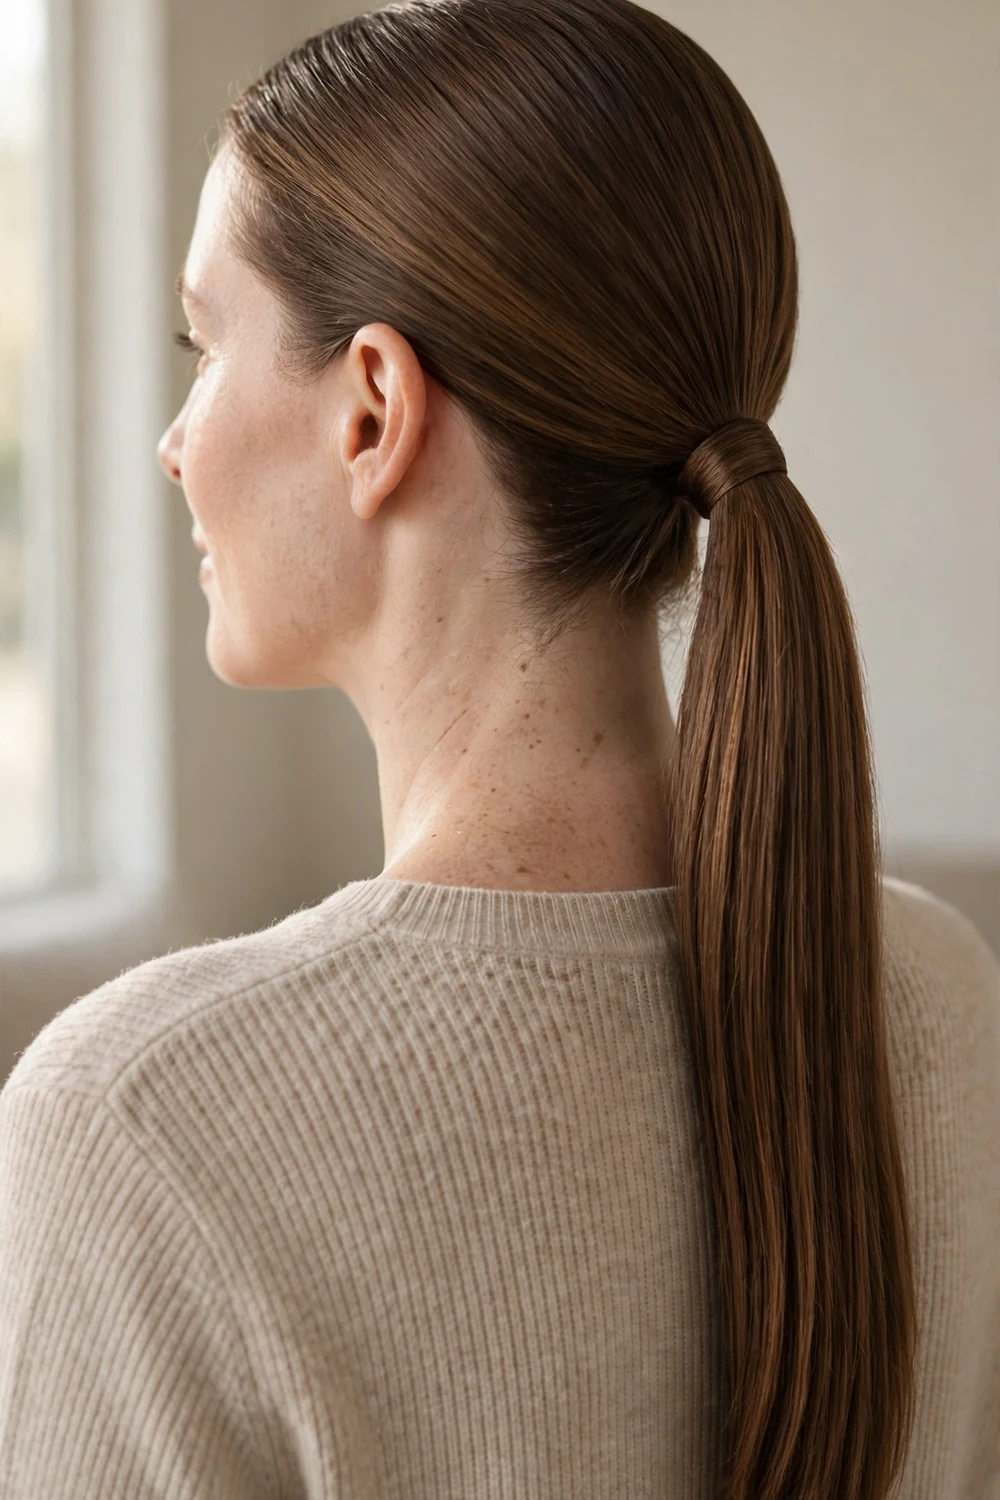
The low ponytail is the quiet-luxury entry on this list. Brush the hair straight back to the nape, secure it low, and flat-iron the tail so it falls in one clean sheet. Because the style sits close to the head, every bump shows, so take an extra minute smoothing the crown with a boar bristle brush. Hide the elastic completely with the wrapped strand and a bobby pin underneath, since a visible tie ruins the clean minimal effect this style depends on.
Try this: Add a center part before pulling the hair back. The symmetry keeps a low ponytail from looking like an afterthought.
20. High-Volume Curls
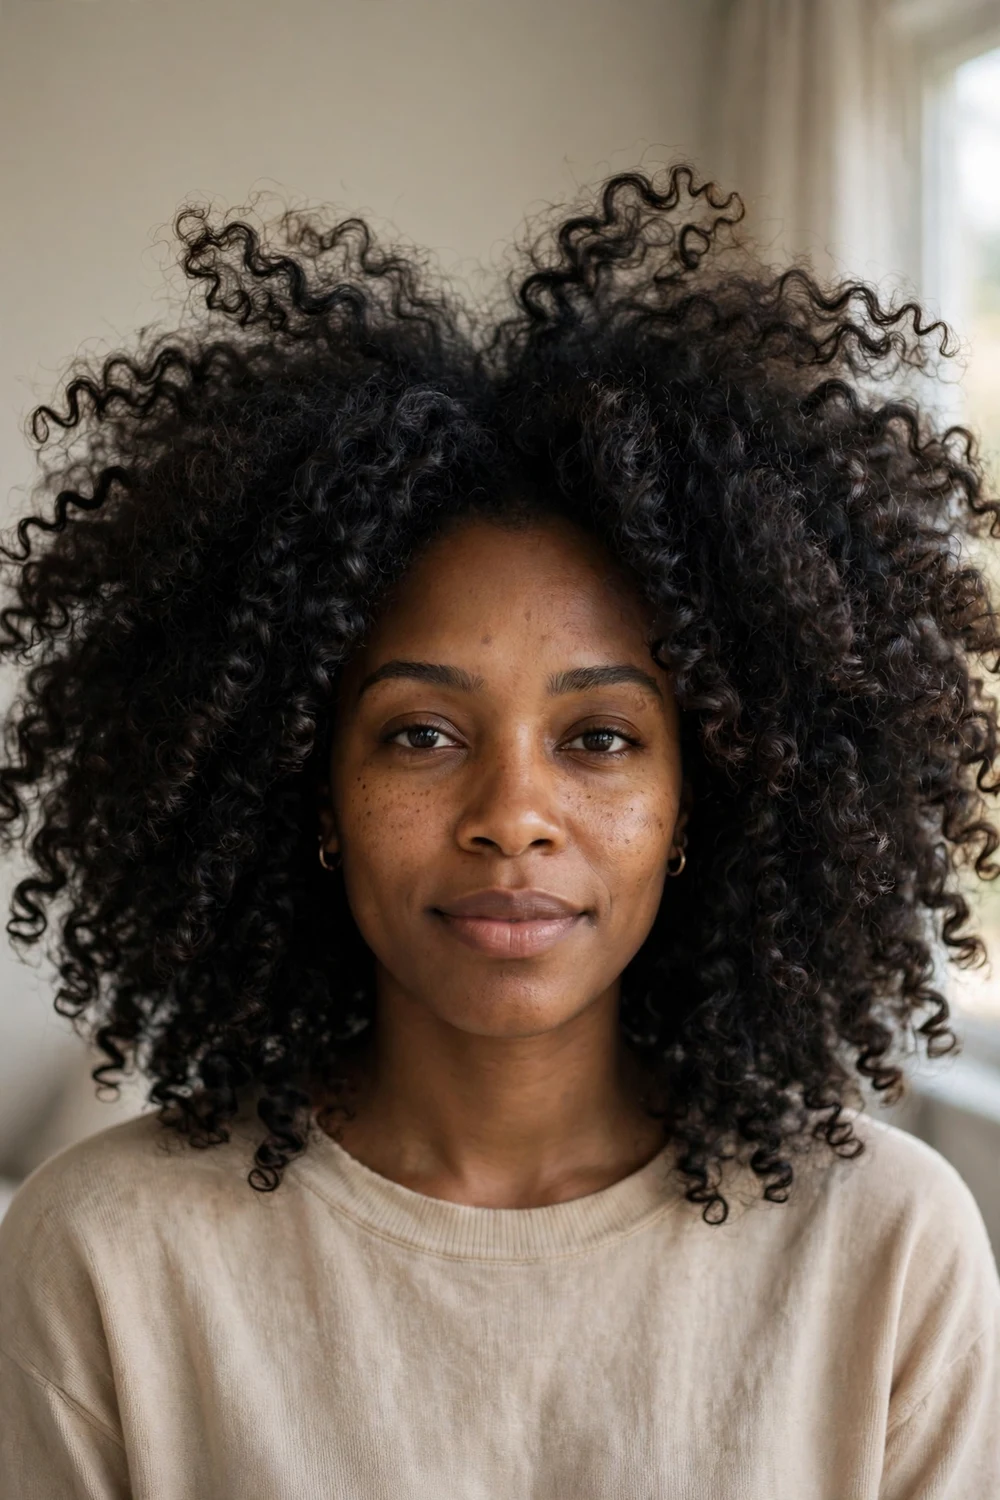
Big curls are pure main-character hair. Whether you diffuse natural curls or build them with a small-barrel iron, the goal is maximum body: lift at the roots, separated ringlets, and a wide silhouette. A pick at the roots adds height that makes the whole style look larger and more dramatic. Use a heat protectant on every section before curling, and let the curls cool fully before shaking them out so the volume holds for hours instead of falling flat.
Try this: Flip your head upside down and shake the roots gently after styling. It breaks up clumps and adds volume without extra heat.
21. Two Braids with Extensions
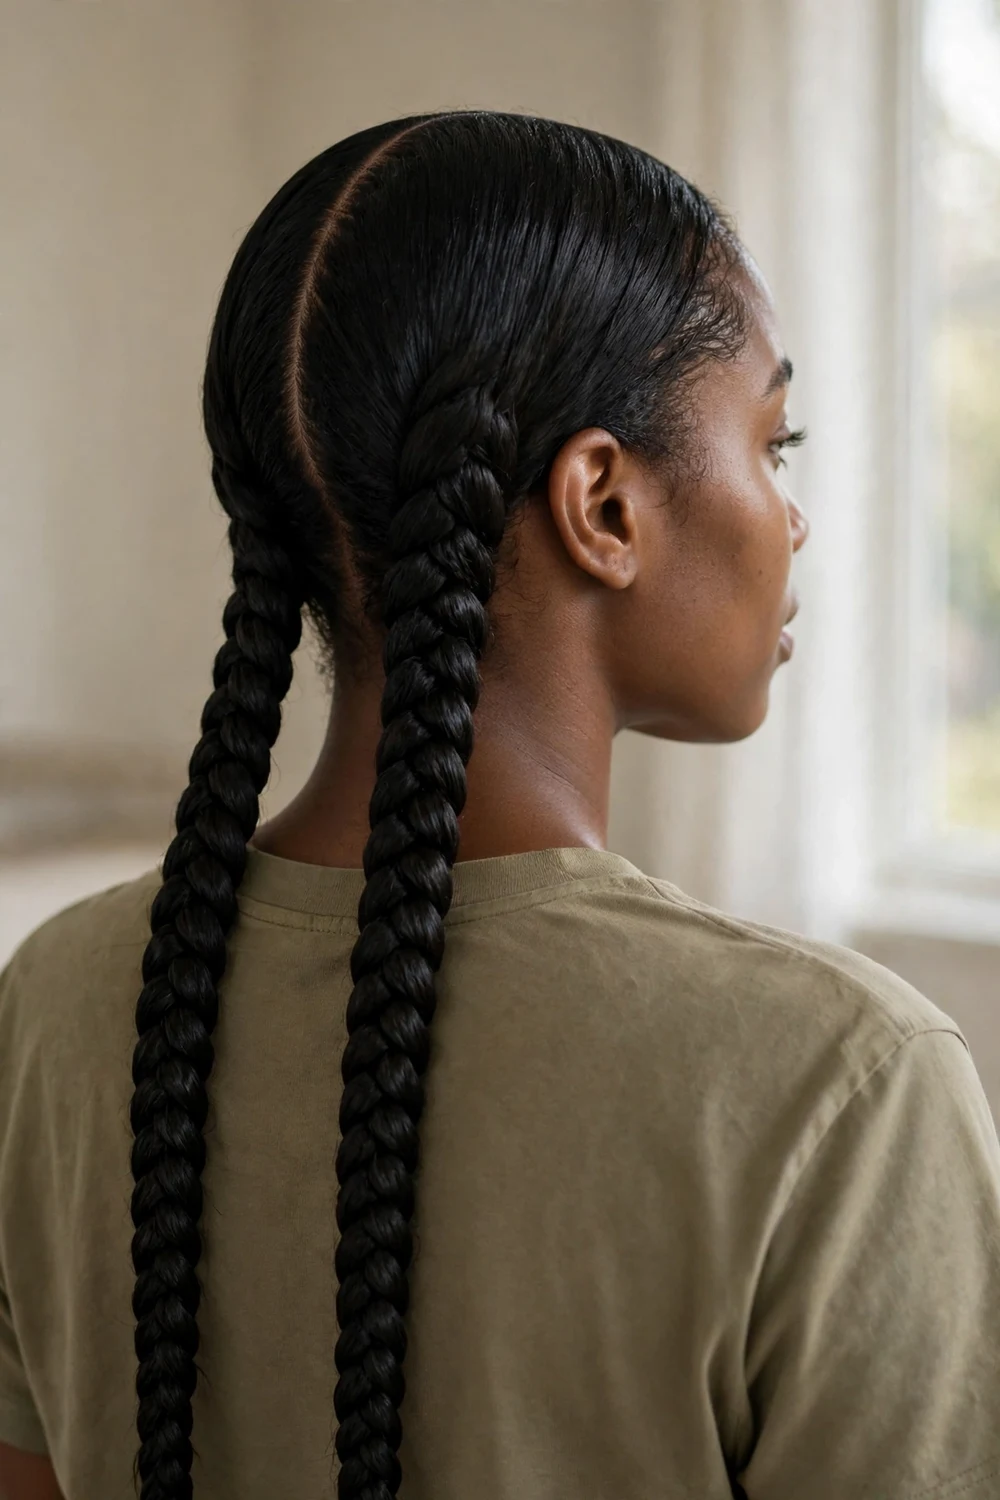
Two long braids down the back are sporty, youthful, and easy to maintain. Part the hair down the middle, feed in braiding hair at the crown, and braid straight down past the shoulders. The extensions give you length and thickness in about an hour of braiding, and the style lasts 1 to 2 weeks. Seal the braid ends with a small elastic and a drop of mousse to stop unraveling, and re-gel the hairline every few days to keep the style looking fresh.
Try this: Add one colored extension strand, like honey blonde or burgundy, for a pop that shows in photos.
22. Wet Hair Look
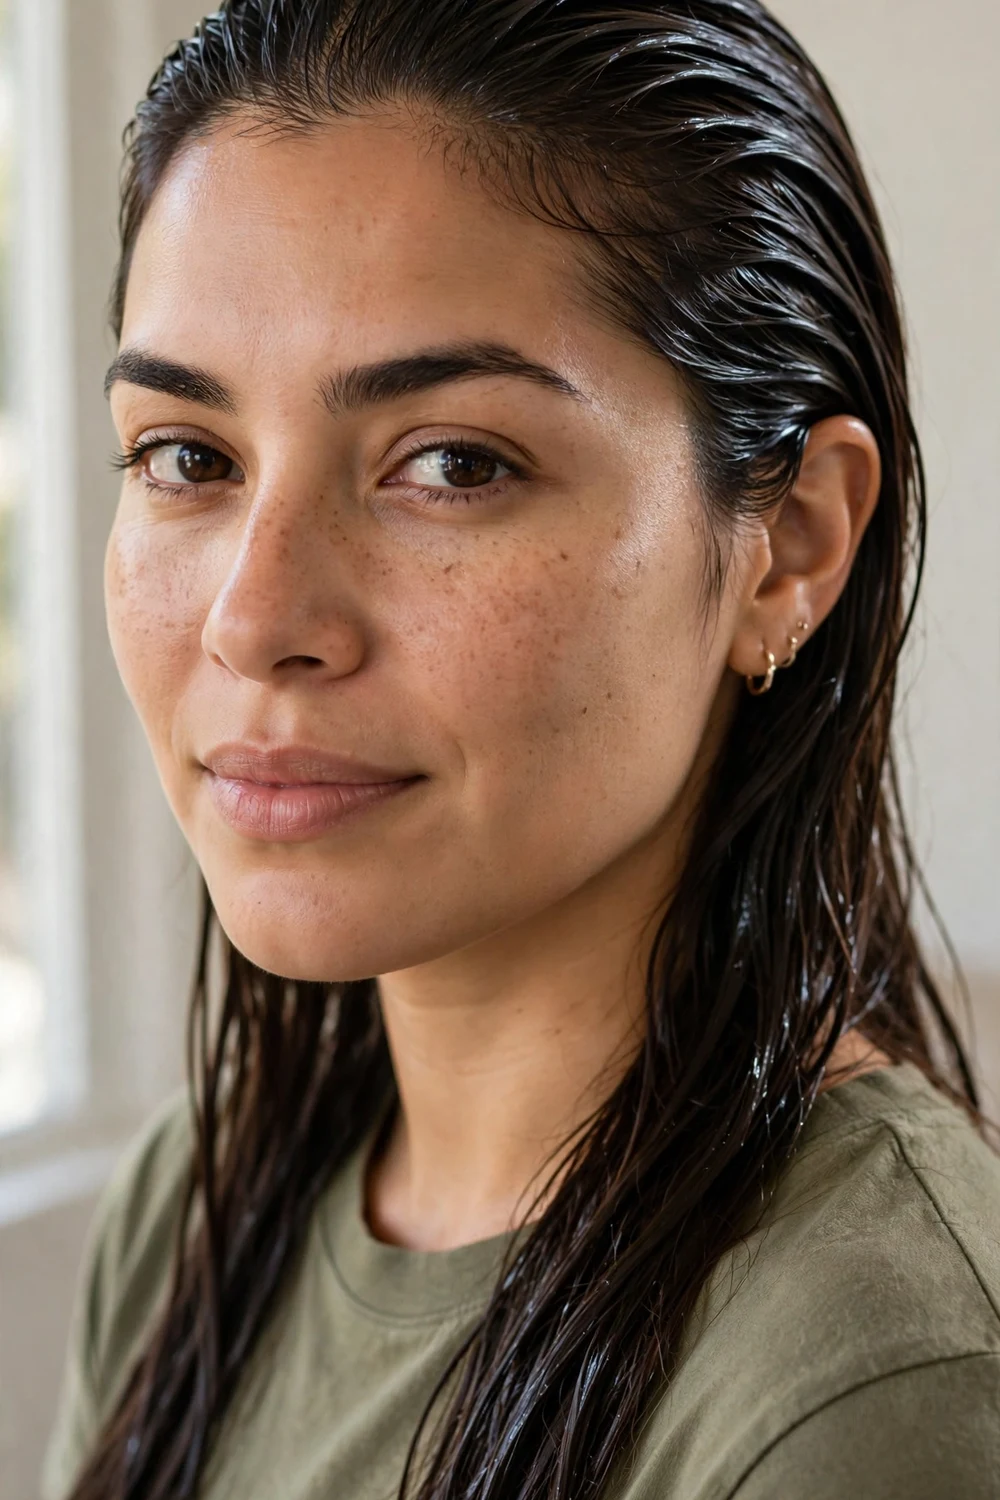
The wet look mimics just-out-of-the-shower hair: glossy, piecey, and slicked straight back. Work a generous amount of gel or styling cream through damp hair, comb it back, and let it air dry without touching it. The finish should look shiny and separated, never stiff or crunchy. Comb the product through with a wide-tooth comb for even coverage, and avoid touching the hair while it dries so the pieces set in separated glossy strands.
Try this: Mix gel with a drop of shine serum before applying. The serum keeps the hold flexible so the style moves instead of cracking.
23. Two Pigtails with a Swoop
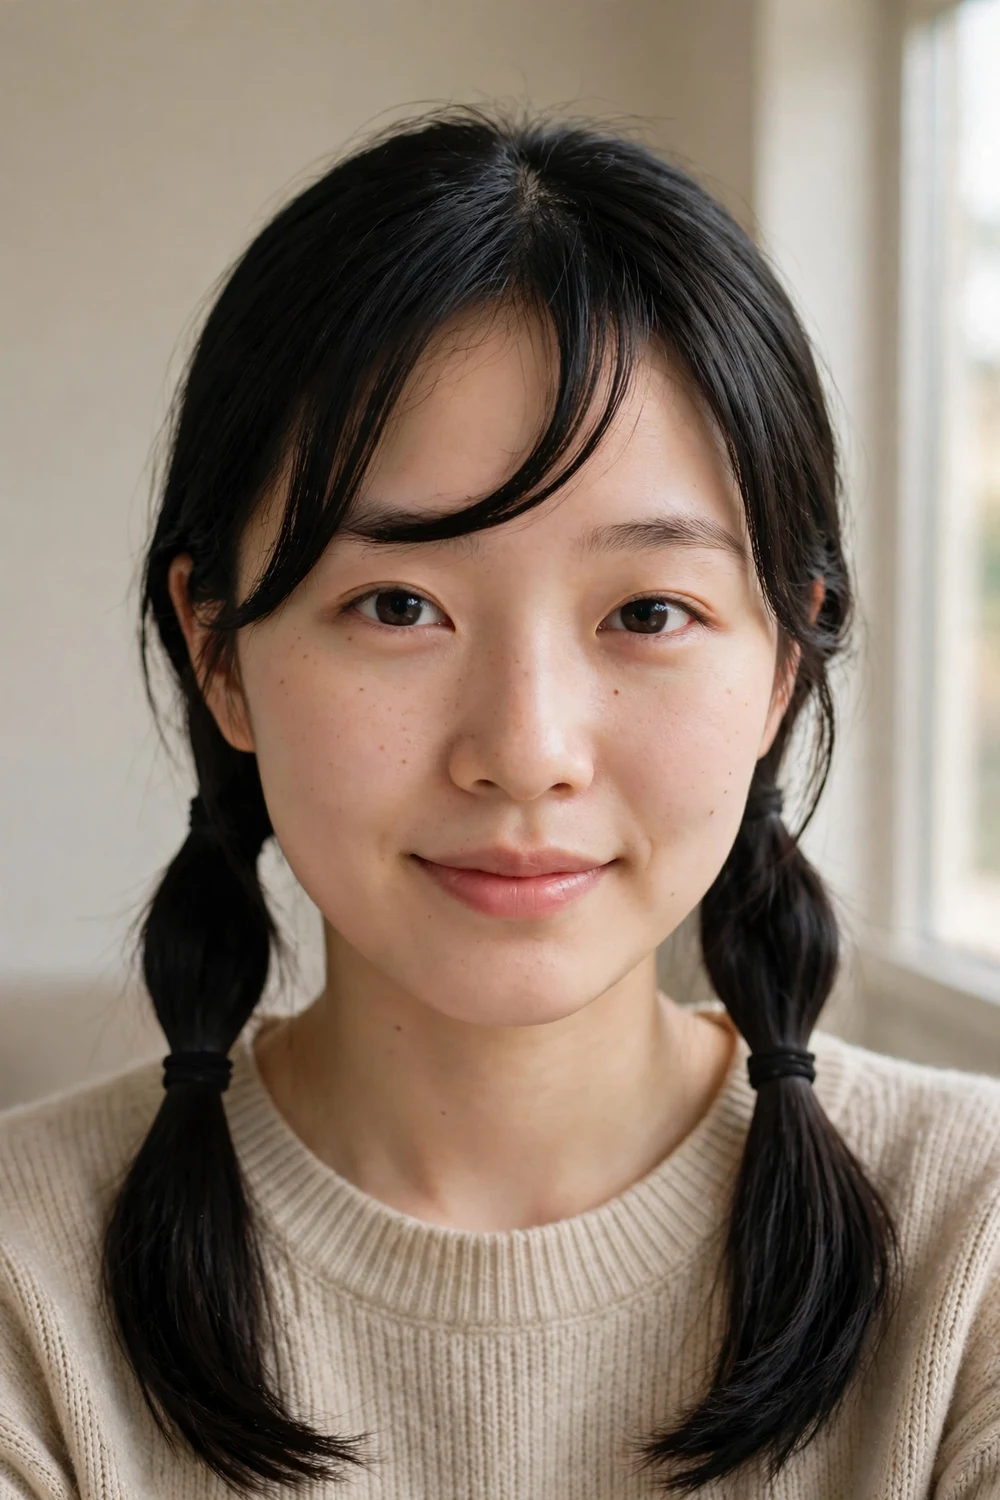
Two pigtails turn baddie the moment you add a swoop. Make a clean middle part, secure the pigtails low or mid-height, and keep the bases tight. Then style the front into a side swoop or two curved face pieces with gel. The swoop is what separates this from a schoolgirl look. Keep the pigtails even by parting with a rattail comb first, and a small elastic in a matching color keeps the base neat without drawing attention.
Try this: Pull a tiny bit of hair at the crown loose after tying the pigtails. The slight lift softens the shape and keeps it from looking flat.
24. Pigtails with Hair Down
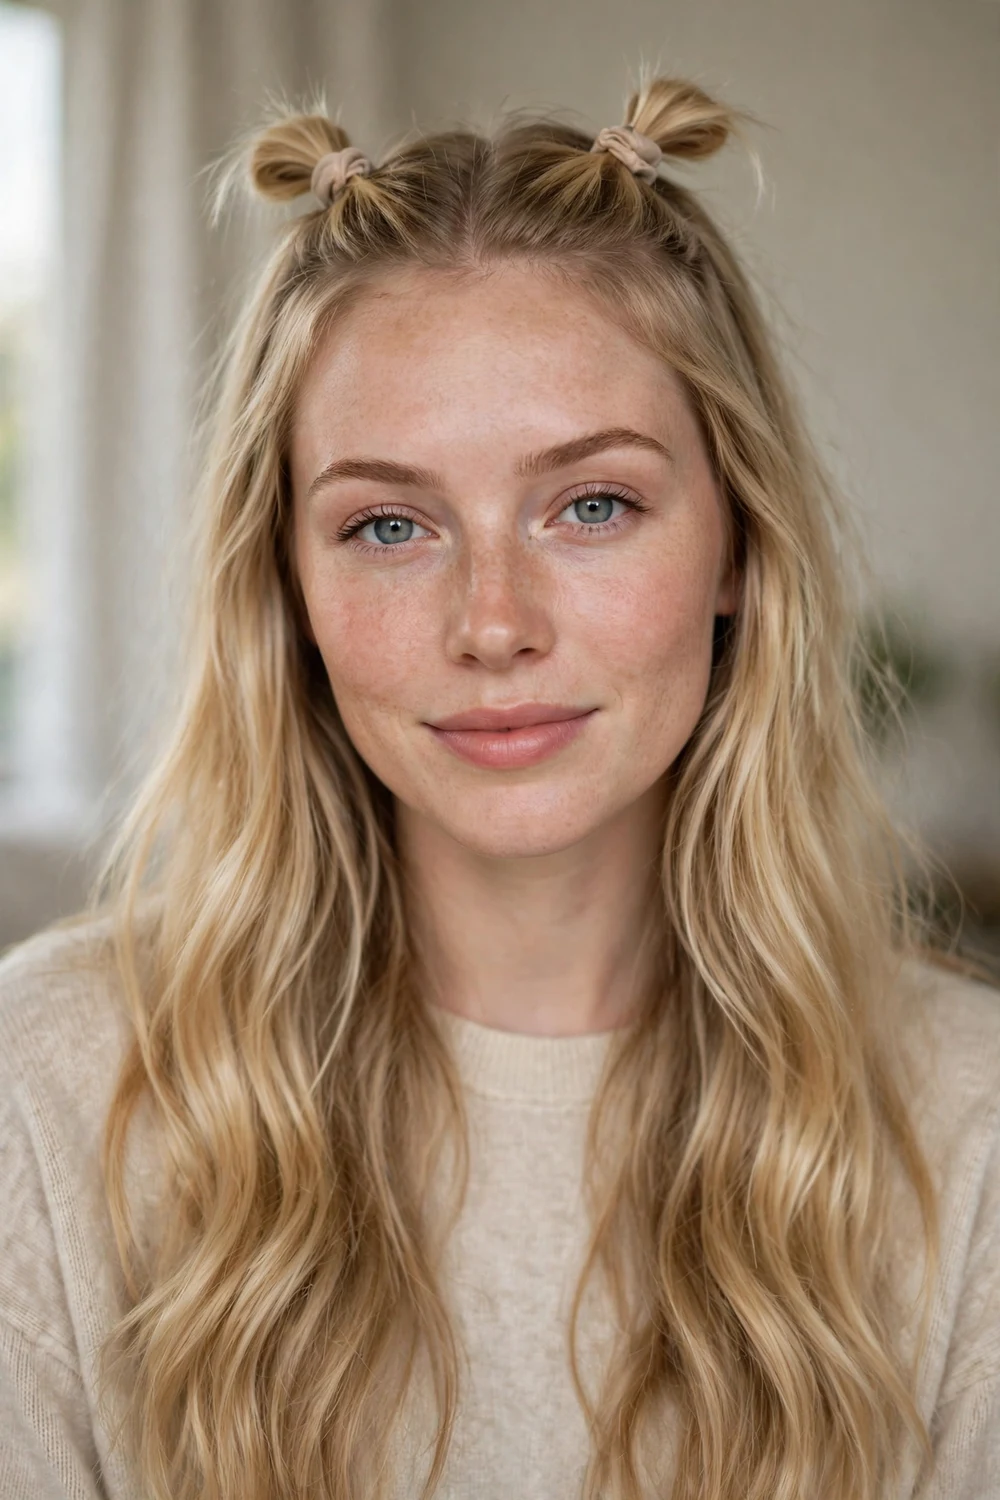
If full pigtails feel like too much, take two small sections from the top and tie them into mini pigtails while the rest stays down. It reads cute and effortless, works on straight or wavy hair, and takes about 3 minutes. Tease the mini pigtails lightly at the base for a bit of lift, and leave the front pieces slightly longer than the pigtails so the frame stays soft. Keep the mini pigtails lifted so the head shape looks snatched, not weighed down.
Try this: Bend the ends of the loose hair slightly with a straightener so the down section has movement instead of hanging straight.
25. Half-Up Top Knot Bun
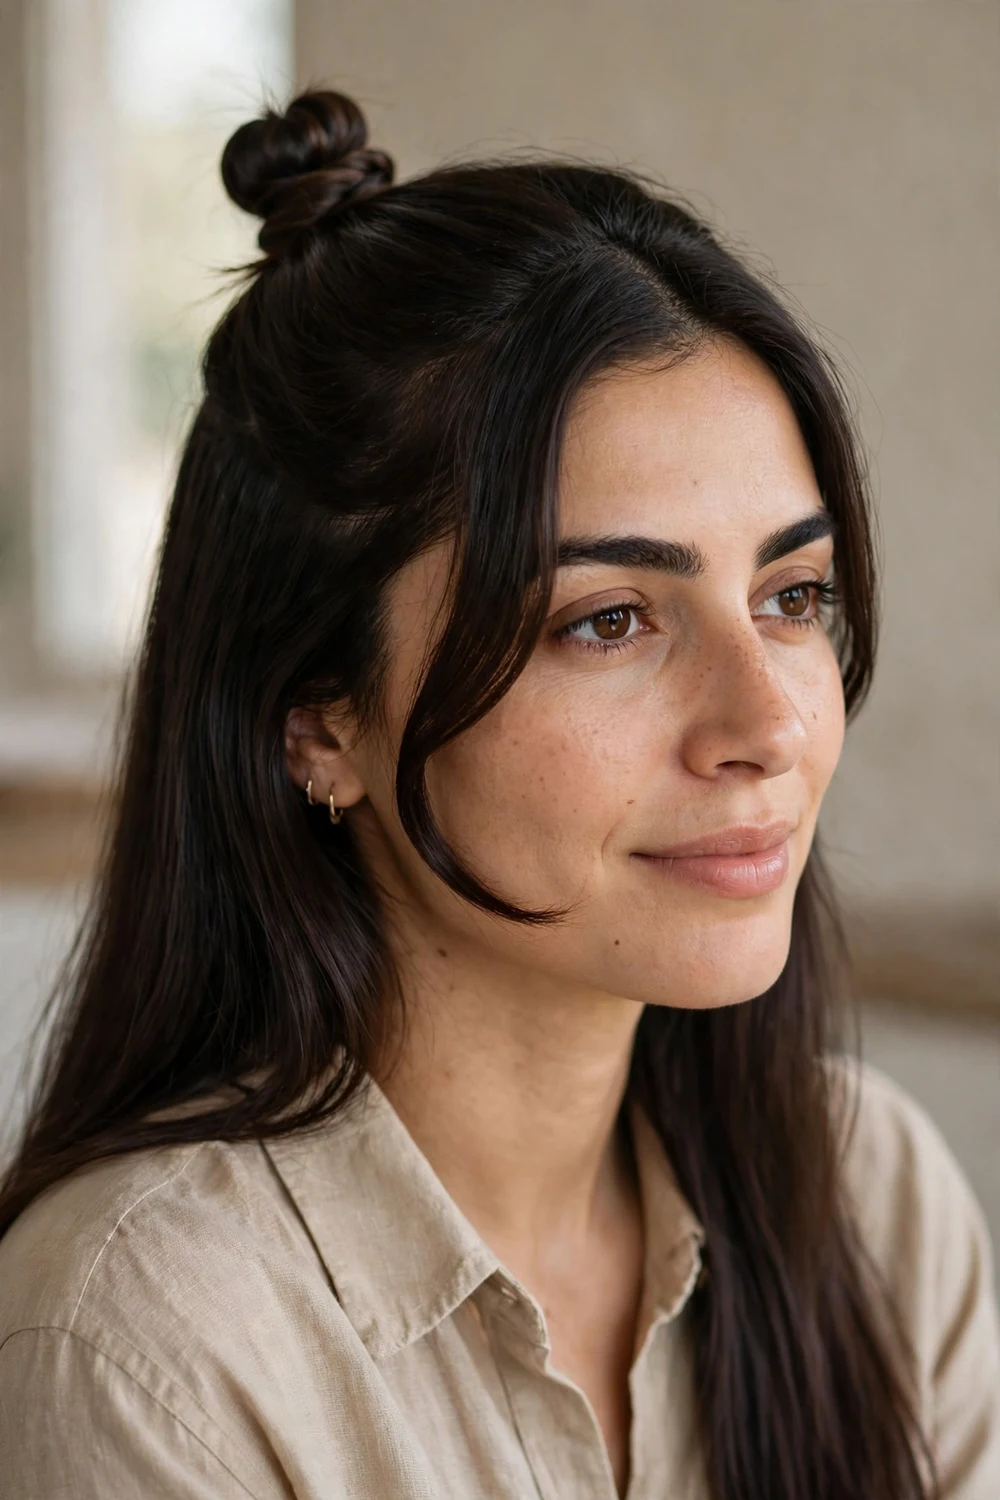
Pull the top half into a tight little bun at the crown and leave the bottom smooth or softly waved. This is the clean-girl version of half-up, half-down: the slicked top reads polished while the loose length keeps it relaxed. It also rescues second-day hair, since the bun hides roots that are not freshly washed. Smooth the top section with gel before twisting so the bun looks polished, and pin the bun base twice in an X pattern so it survives a full day of wear.
Try this: Add a small swoop or two curved front pieces. Without them the style can look plain; with them it looks styled.
26. Slick Back with Braids
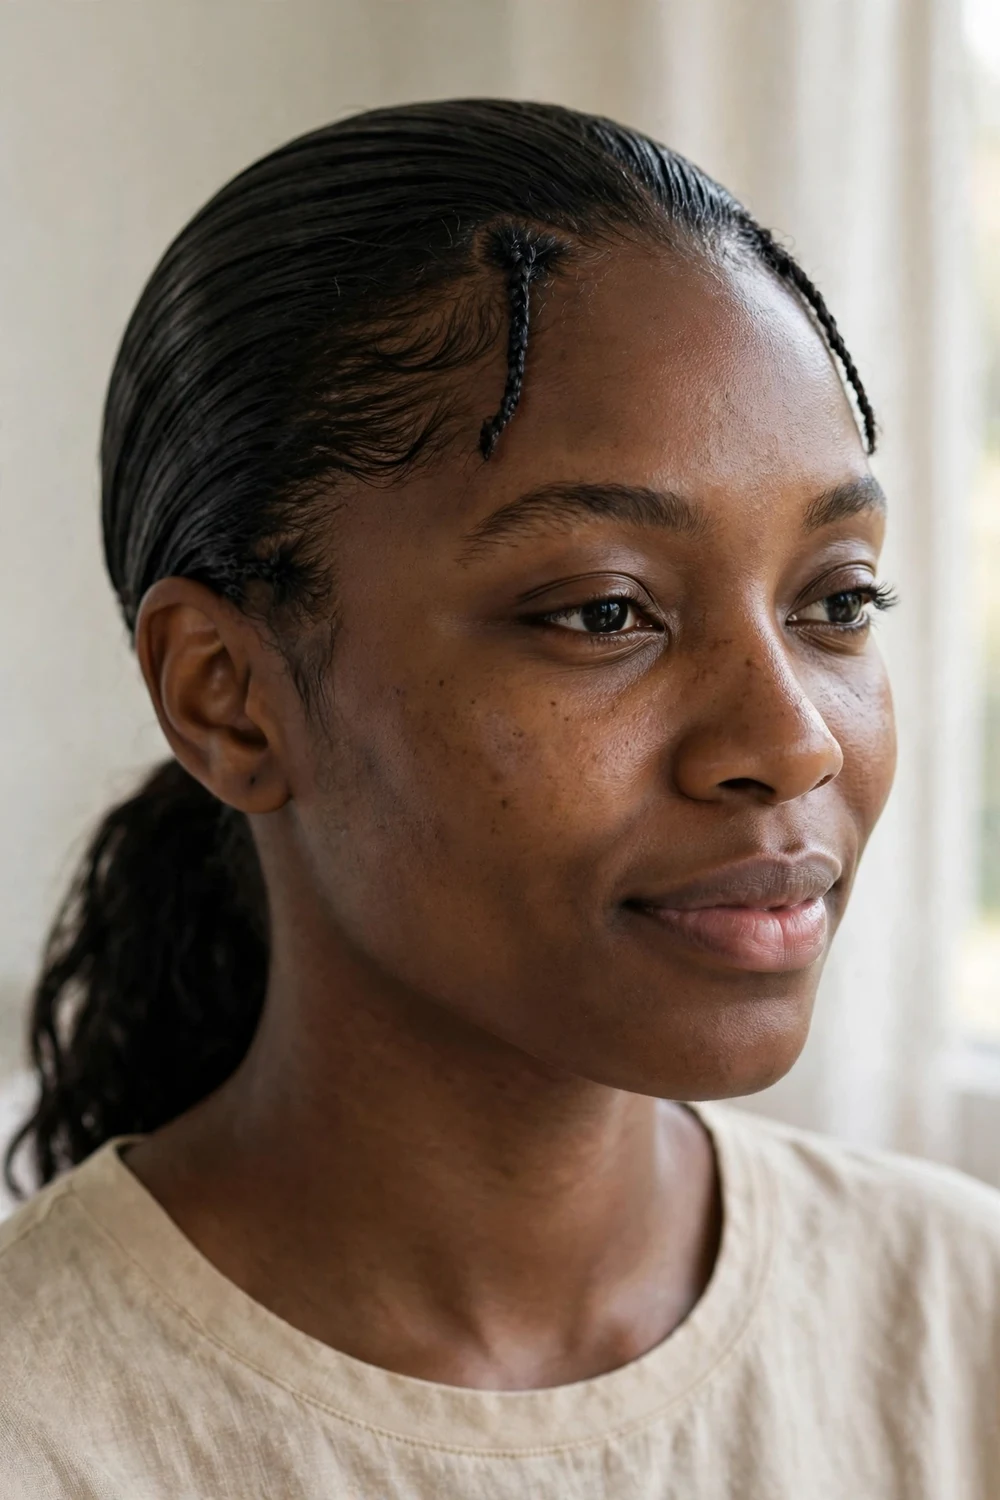
Slick the hair back with gel, then braid two small accent sections at the front before pulling everything into a low ponytail or leaving it down. The braids add detail without taking over, and the slicked base keeps the whole look sharp. It photographs well and survives a full day without touch-ups. Add a drop of shine serum over the gelled top layer for extra gloss, and keep the accent braids thin so they read as detail rather than a second style.
Try this: Use a fine-tooth comb to smooth the gel through the top layer only. The underlayer stays soft, so the style does not feel helmet-like.
27. Claw Clip Ponytail with Face Pieces
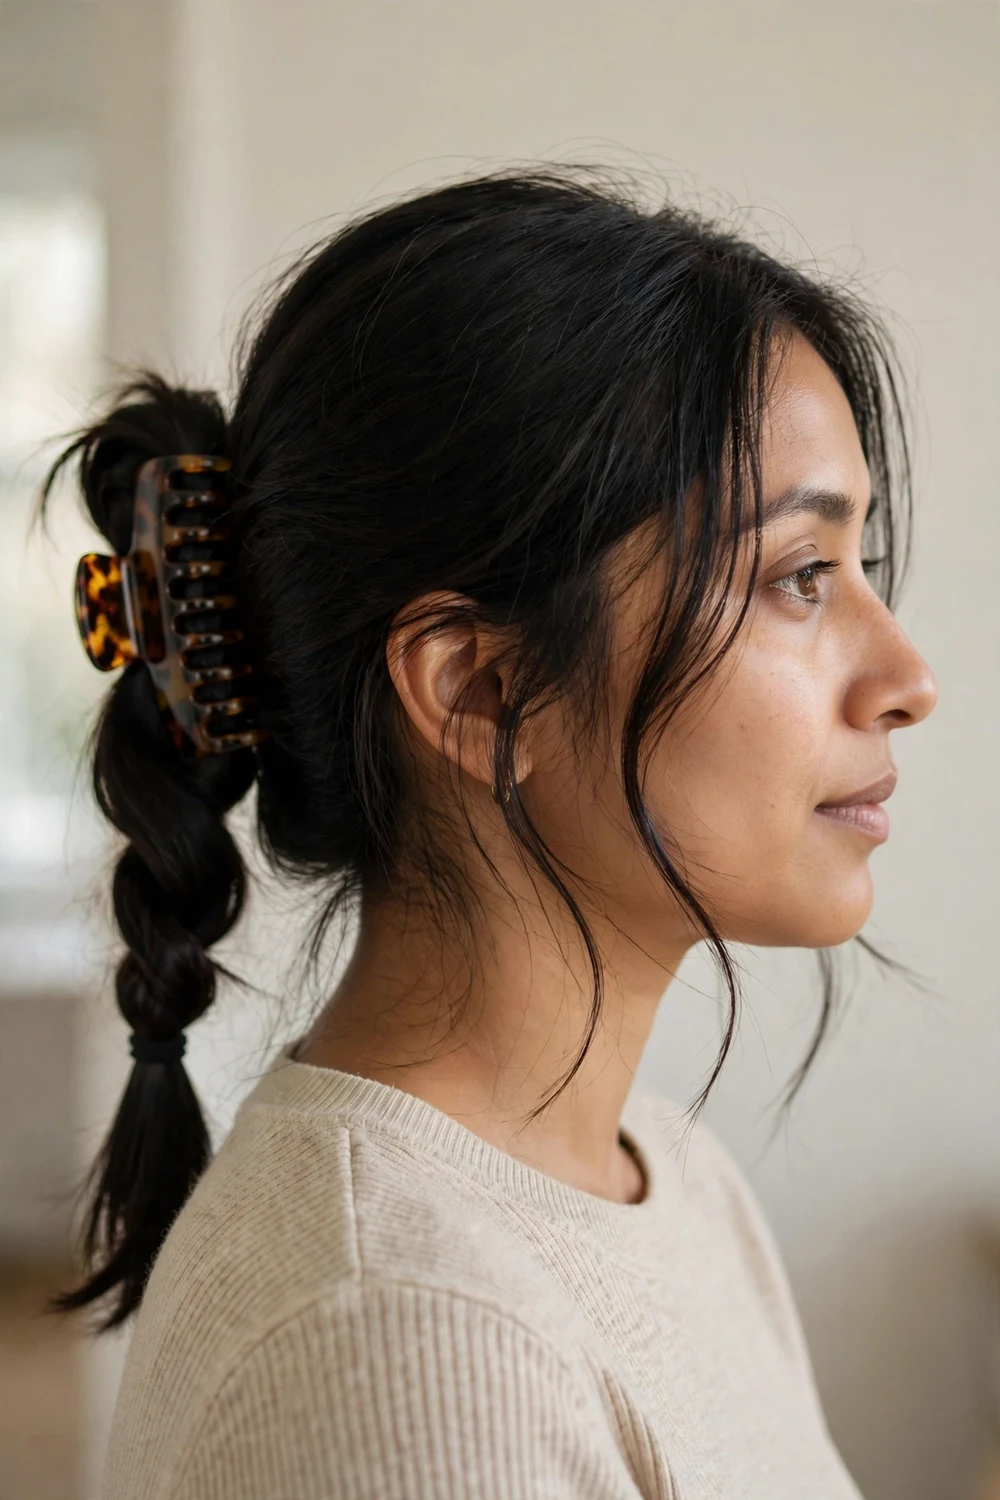
Gather the hair like a low ponytail, twist it once, and clamp a large claw clip over the twist. Pull out wispy pieces around the face and near the ears, keeping them even on both sides. The result takes about 2 minutes and works on curly, coily, straight, and wavy hair alike. Choose a claw clip with strong teeth that match your hair thickness, since fine hair slips out of oversized clips and thick hair needs the extra grip.
Try this: Smooth the top lightly with gel before clipping. A flat crown with soft face pieces looks intentional; a bumpy crown looks rushed.
28. Two Bubble Braids with Hair Down
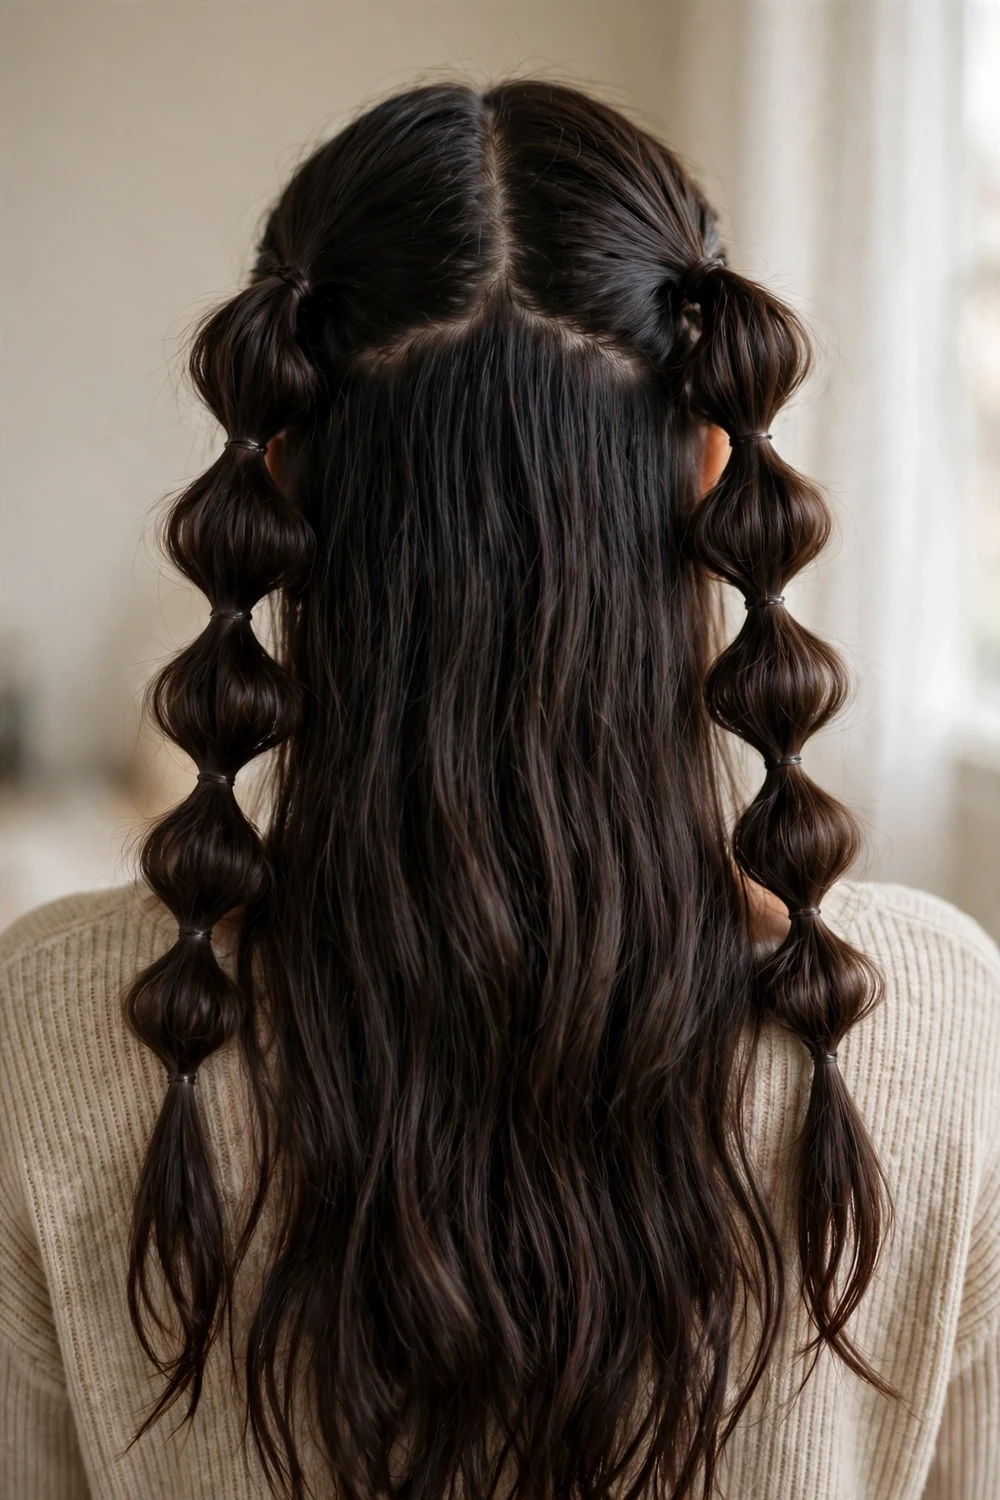
Part the hair down the middle, make a bubble braid on each side like pigtails, and leave the back section flowing loose. Tie small elastics every 2 inches and puff each section for roundness. The slick braids keep the look baddie while the loose hair adds volume and movement. Match the elastic color to your hair so the ties disappear, and puff each bubble starting from the bottom so the top sections do not deflate while you work.
Try this: Keep the top of each braid sleek with gel and make the bubbles big. Small, tight bubbles read childish; large ones read trendy.
29. High Curly Puff with Laid Edges
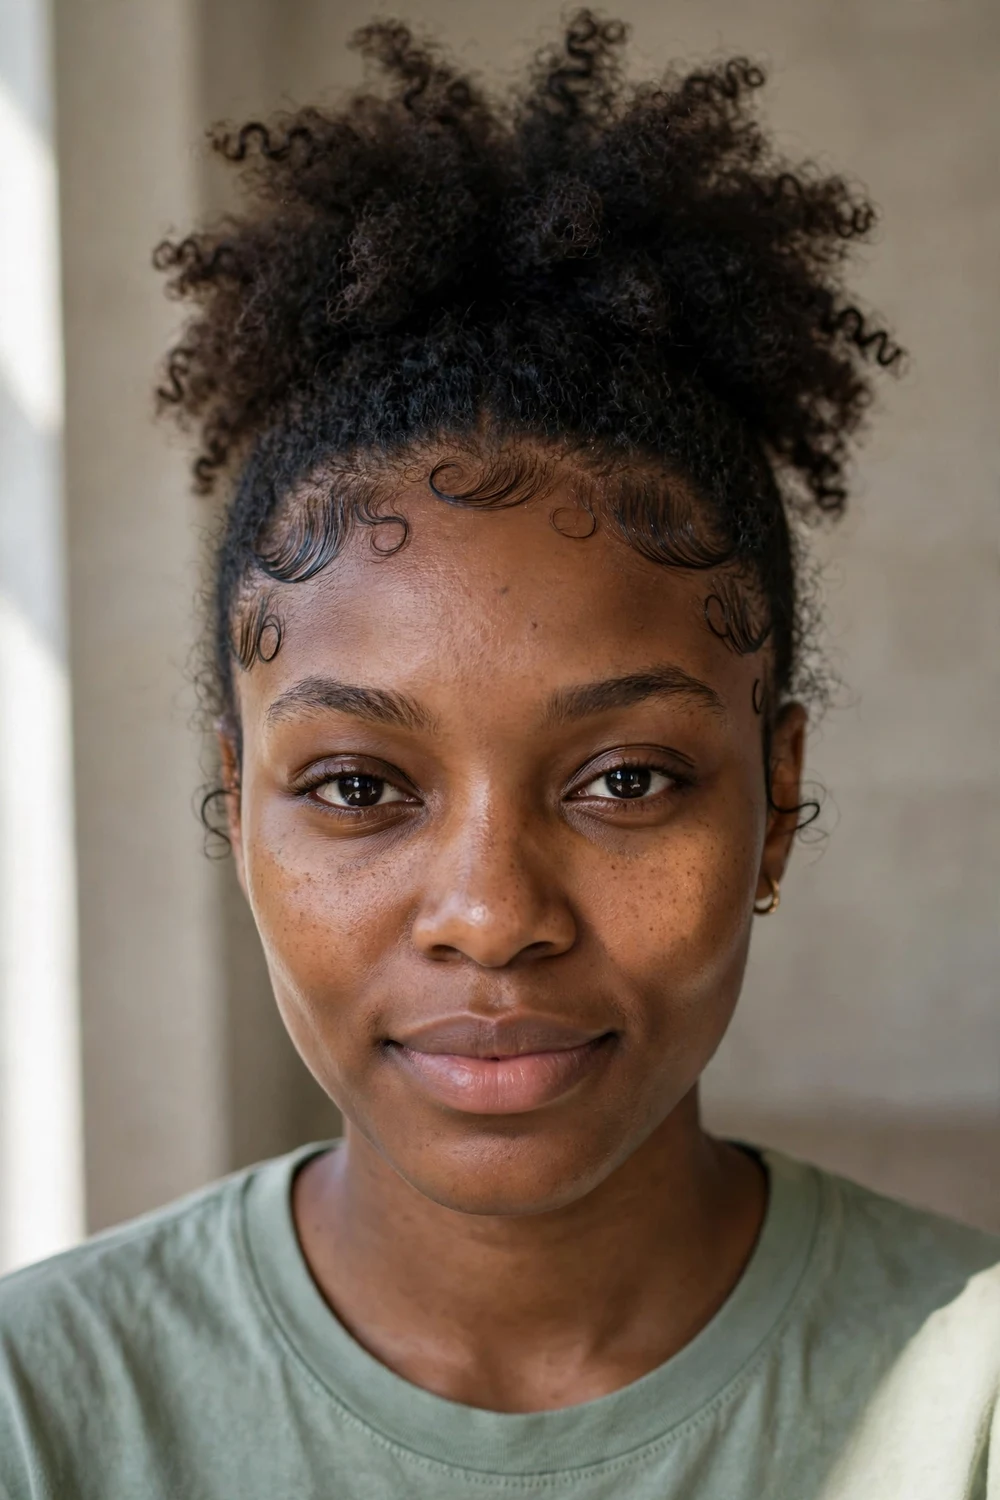
Gather natural curls into a high puff at the crown, fluffing the shape wide for maximum presence, then lay the edges into swoops with edge control. This style celebrates texture instead of fighting it, and it takes about 10 minutes once you know your curl pattern. A satin scrunchie or stretched hair tie protects the curls at the base. Stretch the hair gently with the tie before fluffing to avoid breakage at the base, and refresh the puff on day two by lightly misting the curls with water.
Try this: Pick the roots with an afro pick before gathering the puff. The extra lift is what turns a simple puff into a statement.
Baddie Hairstyle Ideas Comparison at a Glance
| Style | Best For | Difficulty | Hold Time |
|---|---|---|---|
| Sleek High Ponytail | Nights out, events | Easy | All day |
| Jumbo Box Braids | Long wear, low upkeep | Hard | 3 to 6 weeks |
| Long Layered Waves | Dinners, dates | Medium | 1 to 2 days |
| Bubble Ponytail | Parties, festivals | Easy | All day |
| Middle-Part Sleek Bun | Work, formal events | Easy | All day |
| Half-Up, Half-Down with Loose Curls | Everyday, school | Easy | 1 day |
| Cornrow Ponytail | Hot weather, workouts | Hard | 1 to 2 weeks |
| Sleek Straight Hair with a Sharp Part | Minimalist looks | Easy | 1 to 2 days |
| Messy Bun with Tendrils | Casual days | Easy | 1 day |
| Space Buns | Festivals, concerts | Easy | All day |
| Sleek Side Part with Curls | Formal nights | Medium | 1 day |
| Braided Crown | Weddings, photoshoots | Medium | 1 day |
| Faux Locs | Long wear, boho vibe | Hard | 4 to 8 weeks |
| Sharp Bob Cut | Bold short hair | Easy | Until trim |
| High Bun with Laid Edges | Makeup-forward looks | Easy | All day |
| Loose Beach Waves | Casual, weekends | Easy | 1 day |
| Braided Ponytail | Gym, nights out | Easy | 1 to 2 days |
| Statement Hair Clips with Loose Hair | Quick glam | Easy | 1 day |
| Sleek Low Ponytail | Office, minimal looks | Easy | All day |
| High-Volume Curls | Drama, events | Medium | 1 day |
| Two Braids with Extensions | Sporty, long wear | Medium | 1 to 2 weeks |
| Wet Hair Look | Nights out | Easy | 1 evening |
| Two Pigtails with a Swoop | Playful days | Easy | All day |
| Pigtails with Hair Down | Quick cute looks | Easy | 1 day |
| Half-Up Top Knot Bun | Second-day hair | Easy | 1 day |
| Slick Back with Braids | Clean sharp looks | Easy | All day |
| Claw Clip Ponytail with Face Pieces | Busy days | Easy | 1 day |
| Two Bubble Braids with Hair Down | Trendy outings | Easy | All day |
| High Curly Puff with Laid Edges | Natural texture | Easy | 1 to 2 days |
How to Choose the Right Baddie Hairstyle for You
Start with your hair type and how much time you have. Straight or wavy hair slicks easily, so ponytails, buns, and the wet look come together fast. Curly and coily hair shines in high puffs, wash-and-go volume, and protective styles like box braids or faux locs that hold for weeks.
Think about the occasion next. Sleek buns and low ponytails fit work and formal settings. Space buns, bubble braids, and pigtails fit festivals and casual days. If you are not sure, half-up, half-down works almost anywhere.
Consider your comfort with heat and upkeep. No-heat options like claw clips, braids, and slick backs protect the hair and take minutes. Heat styles like layered waves and straight looks need a flat iron and heat protectant every time.
If you want a bolder edge than these styling ideas offer, a cut can change the whole vibe. Browse undercut hairstyles for women for shaved and hidden-undercut options that pair well with the baddie aesthetic.
Mistakes to Avoid
Skipping edge control is the most common miss. A sleek ponytail with fuzzy edges reads unfinished, while two minutes with a toothbrush and gel changes the whole look. Do not overload the roots with product either; too much gel flakes by midday.
Another mistake is choosing a style your hair type fights. Tight slick backs on very curly hair need more product and time than most people expect, so pick styles that work with your texture or set aside the extra 15 minutes.
Finally, do not sleep in tight high ponytails or buns. The tension breaks hair at the hairline over time. Take the style down at night and re-slick in the morning, or switch to a loose braid before bed.
Frequently Asked Questions
What exactly is a baddie hairstyle?
A baddie hairstyle is a bold, confident look inspired by streetwear and Instagram culture. It usually features sleek roots, laid edges, a sharp part, and polished details like a swoop or wrapped ponytail base. Popular examples include sleek high ponytails, middle-part buns, box braids, and space buns.
What do I need to style baddie hairstyles at home?
The basics are a boar bristle brush, a strong-hold gel, edge control, strong hair ties, bobby pins, and a toothbrush or edge brush for baby hairs. A flat iron or curling wand covers the heat-styled looks, and shine spray adds the glossy finish. Most styles on this list need only the basics.
How do I make my edges stay down all day?
Use a thick edge control pomade rather than a watery gel, since thin gels let baby hairs curl back up. Swoop the edges with a small brush, then tie a silk scarf around your hairline for 10 minutes to set them. Avoid touching the hairline during the day so the style holds.
Can short hair work for the baddie aesthetic?
Yes. A sharp blunt bob or a slicked-back pixie reads just as fierce as long styles. Statement clips, laid edges, and a clean part do most of the work on short hair. Colored braids or extensions can add length when you want to switch things up.
Which baddie hairstyles last the longest?
Protective styles last longest: jumbo box braids hold 3 to 6 weeks, faux locs hold 4 to 8 weeks, and cornrow ponytails hold 1 to 2 weeks. For daily styles, sleek ponytails and buns hold all day with gel and edge control, while heat-styled waves usually last 1 to 2 days.
Final Thoughts
Baddie hairstyles are about confidence more than any single technique. Start with the sleek high ponytail or a claw clip style, learn to lay your edges, and build from there. I have found that once the swoop clicks, every other style on this list gets easier. Try one this week and make it yours.
For a version of this trend built around protective styles and textured hair, see baddie hairstyles for black women.

