


A fuller face has full cheeks, a soft jawline, and width that sits lower than a classic round face shape. Edgy pixie haircuts for chubby faces work when they respect that layout: height at the crown, close or tapered sides beside the cheeks, and one clear diagonal from a side part, a sweep, or an uneven front. Those three choices add angles without hiding your features.
This list focuses on that specific job. Every idea below explains where the length sits beside full cheeks, which texture it suits, and how to style it at home. For longer lengths that use the same placement logic, see our guide to hairstyles to slim a round face, and compare the sharper shapes in our roundup of edgy pixie haircuts for round faces, which covers round face shape rather than fuller cheeks and a soft jawline.
Key Takeaways
- Height at the crown and close sides beside the cheeks are the two moves that add length to a fuller face.
- A diagonal from a deep side part, a long sweep, or asymmetry breaks up even, full cheeks.
- Keep light color, highlights, and volume on top. Placing them at the sides adds width at cheek level.
- Front pieces that pass the cheeks, and ideally the chin, frame a soft jawline better than pieces that stop at the cheekbone.
- Short shapes need trims every four to six weeks. Fades and shaved temples need a tidy-up at two to four weeks.
How to Choose Your Pixie
Start with the feature you want most. Shaved temples, low fades, and hidden undercuts give the strongest edge. Choppy, razored, and feathered layers give texture without any clipping. Lavender, silver, and money-piece color carry the look when you would rather keep the cut itself simple.
Then check the front length. On a fuller face, the front pieces do the framing, so note where each idea places them: across the forehead, past the cheekbone, or down to the jaw and chin. Our general guide to pixie haircuts shows the wider family of shapes if you want to compare lengths before you commit.
1. Height-First Textured Pixie with Close Cheek Line

The crown keeps two to three inches of textured length while the sides sit close beside the cheeks. That placement matters for a fuller face: volume goes up, and the cheek line stays clean, so the eye reads height before width.
Ask for point-cut layers through the top and a scissor taper at the sides. Straight and wavy hair hold the lift well, and thick hair needs the sides thinned enough that they lie flat by midday.
Try this: Blow-dry the crown up and slightly back with mousse at the roots, then press the sides down with your palms while they cool.
Difficulty: Easy | Cost: $ | Time: 5 minutes
2. Lavender Asymmetrical Pixie with Sharp Side Part

One side sweeps long across the forehead in lavender, and the other side crops close above the ear. The sharp part sets a clear diagonal, which breaks up the symmetry of full cheeks and gives the face a longer outline.
Lavender needs a light base, so plan toning at trims to keep the shade cool. Keep the long side in one piece with point-cut ends, since heavy layering splits the sweep apart.
Try this: Train the part while the hair is damp. Drying the sweep in its final direction for a week makes it fall that way on its own.
Difficulty: Medium | Cost: $$ | Time: 10 minutes
3. Espresso Asymmetrical Pixie with Choppy Crown Layers

Espresso brown keeps the focus on shape. One side brushes the cheekbone, the other stays short and neat, and choppy layers lift at the crown without adding width at the sides.
This version suits medium to thick hair that can hold a diagonal sweep. Ask your stylist to keep the longer side light at the ends so it skims the cheek instead of sitting on it.
Try this: Work a pea-size amount of matte paste through the crown only, and smooth the long side with a flat brush.
Difficulty: Medium | Cost: $ | Time: 5 to 10 minutes
4. Shaved Temple Pixie with Lifted Top
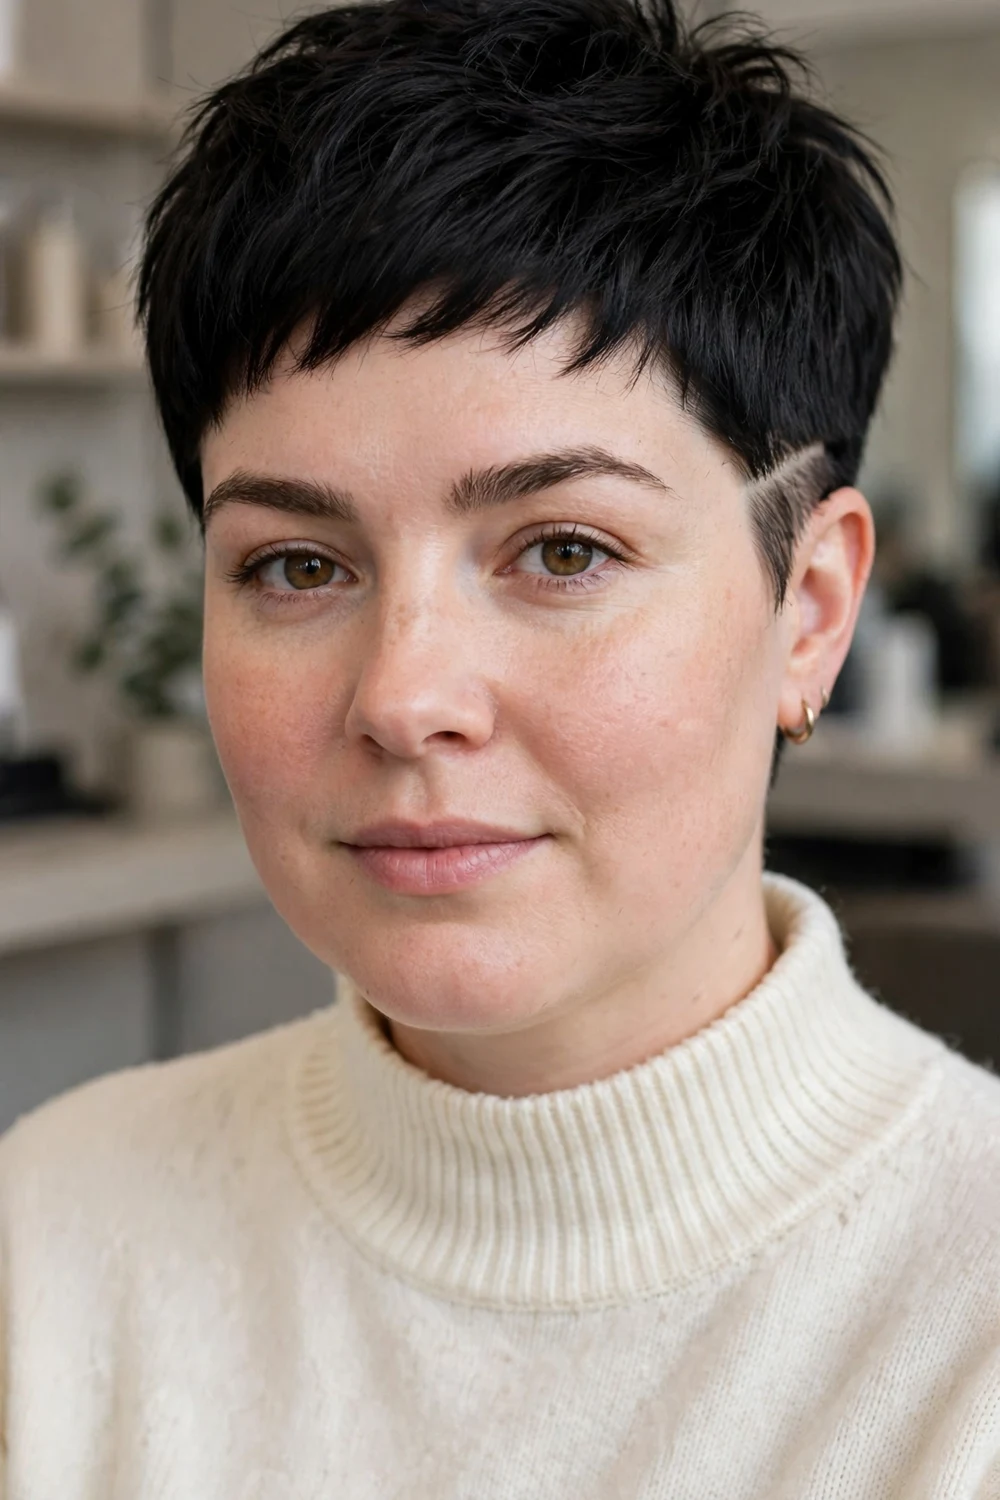
A small shaved section at one temple gives this pixie its edge, while the top stays lifted and textured. The exposed temple narrows the outline at cheek level and draws attention upward.
Keep the shaved area small for the first cut, about an inch above the ear. It needs a tidy-up every two to three weeks, while the top can go four to five weeks between trims.
Try this: Decide the shaved side from your natural part, and sweep the top away from it so the detail stays visible.
Difficulty: Medium | Cost: $ | Time: 5 minutes
5. Ultra-Short Pixie with Soft Piecey Texture
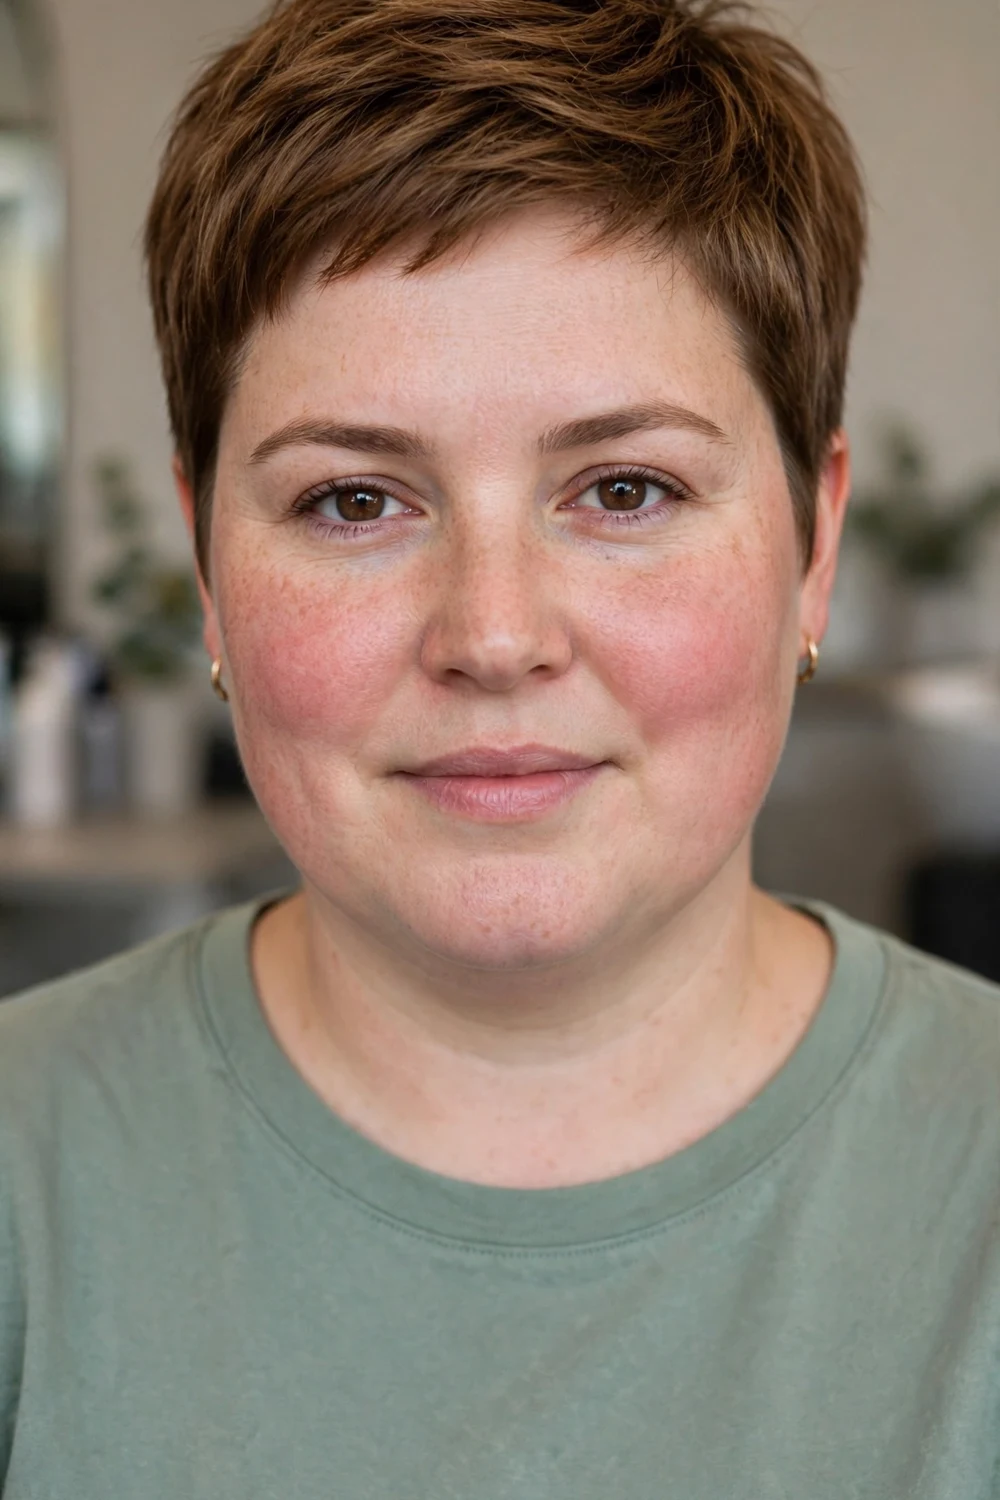
This crop sits close at the sides and back, with soft piecey texture left on top. The short length opens the cheekbones and neck, and the broken texture stops the outline from forming one smooth curve.
It suits straight and lightly wavy hair. Ask for soft edges at the hairline rather than a hard line, and keep a little length at the crown so you can push the pieces in different directions.
Try this: Apply product to dry hair and pinch the top pieces apart with your fingertips. Product on damp hair flattens this crop.
Difficulty: Easy | Cost: $ | Time: 5 minutes
6. Long Layered Pixie with Tapered Sides
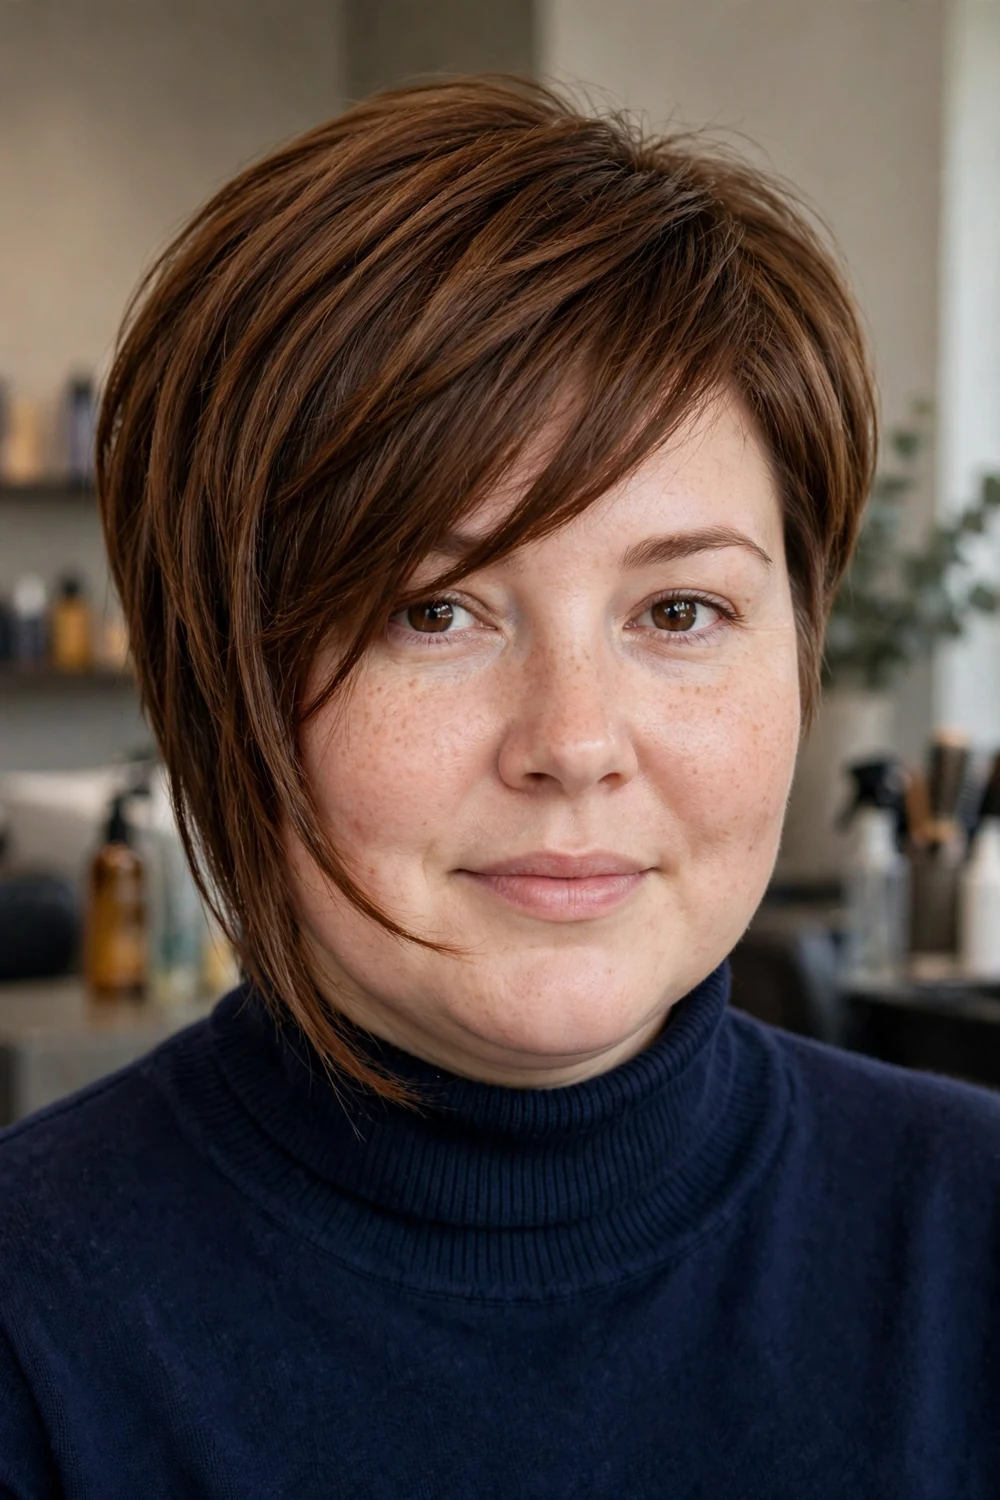
Length stays on top and through the front, while the sides taper close. The contrast draws the eye up and down, and the longer front pieces fall past the fullest part of the cheeks.
Layers should start at the crown and stay light beside the face. This is a steady first pixie if you are coming from a bob, because the front length still gives you something to tuck behind your ears.
Try this: Comb the top slightly to one side while it dries. The off-center direction adds lift and a diagonal at the same time.
Difficulty: Easy | Cost: $ | Time: 5 to 10 minutes
7. Voluminous Undercut Long Pixie with Hidden Sides

A hidden undercut removes bulk under the side sections, and the long top stays full and lifted. From the front the cut reads as a long pixie, and the missing weight underneath keeps the sides from puffing out beside the cheeks.
Thick hair benefits most from the hidden removal. Ask where the undercut starts and ends before the cut begins, so the top still gives full coverage when you wear it down.
Try this: Blow-dry the top up with a round brush, and keep styling product off the clipped sections so they stay clean.
Difficulty: Medium | Cost: $$ | Time: 10 minutes
8. Curly Shaggy Long Pixie with Forward Curls

Natural curls stay longer at the front and crown, with shaggy layers that let them fall forward. The sides taper in, so curl volume sits high and forward instead of spreading wide at cheek level.
Ask for dry shaping, curl by curl, so the length is judged where the curls actually land. Type 2 and type 3 curls carry this shape well with light cream and no heavy oils at the sides.
Try this: Scrunch curl cream into damp curls, then leave them alone while they dry. Handling them mid-dry creates frizz at the crown.
Difficulty: Easy | Cost: $ | Time: 5 to 10 minutes
9. Feathered Long Pixie with Dramatic Side Sweep

Feathered layers run through the top and sweep hard to one side. The sweep crosses the forehead on a long diagonal, and the feathered ends keep the front light beside full cheeks.
Straight to gently wavy hair shows the feathering most clearly. Ask for the sweep to start from a deep part, in line with the outer edge of one eyebrow, for the strongest angle.
Try this: Blow-dry the sweep across first, then lift the roots on the heavy side with your fingers and a light spray.
Difficulty: Easy | Cost: $ | Time: 5 to 10 minutes
10. Wispy Piecey Bang Long Pixie with Angled Ends

Wispy bangs sit in separated pieces instead of one solid fringe, and the ends angle down toward the cheekbones. The broken line gives forehead coverage without adding a straight horizontal band across the face.
Point-cut the bang ends so they stay light. This version suits medium hair that needs softness at the front, and the longer sides can be tucked back on days you want a cleaner outline.
Try this: Press texture cream through the bangs with your fingertips and let a few pieces fall at an angle rather than straight down.
Difficulty: Easy | Cost: $ | Time: 5 minutes
11. Stacked-Back Long Pixie with Jaw-Length Front Pieces
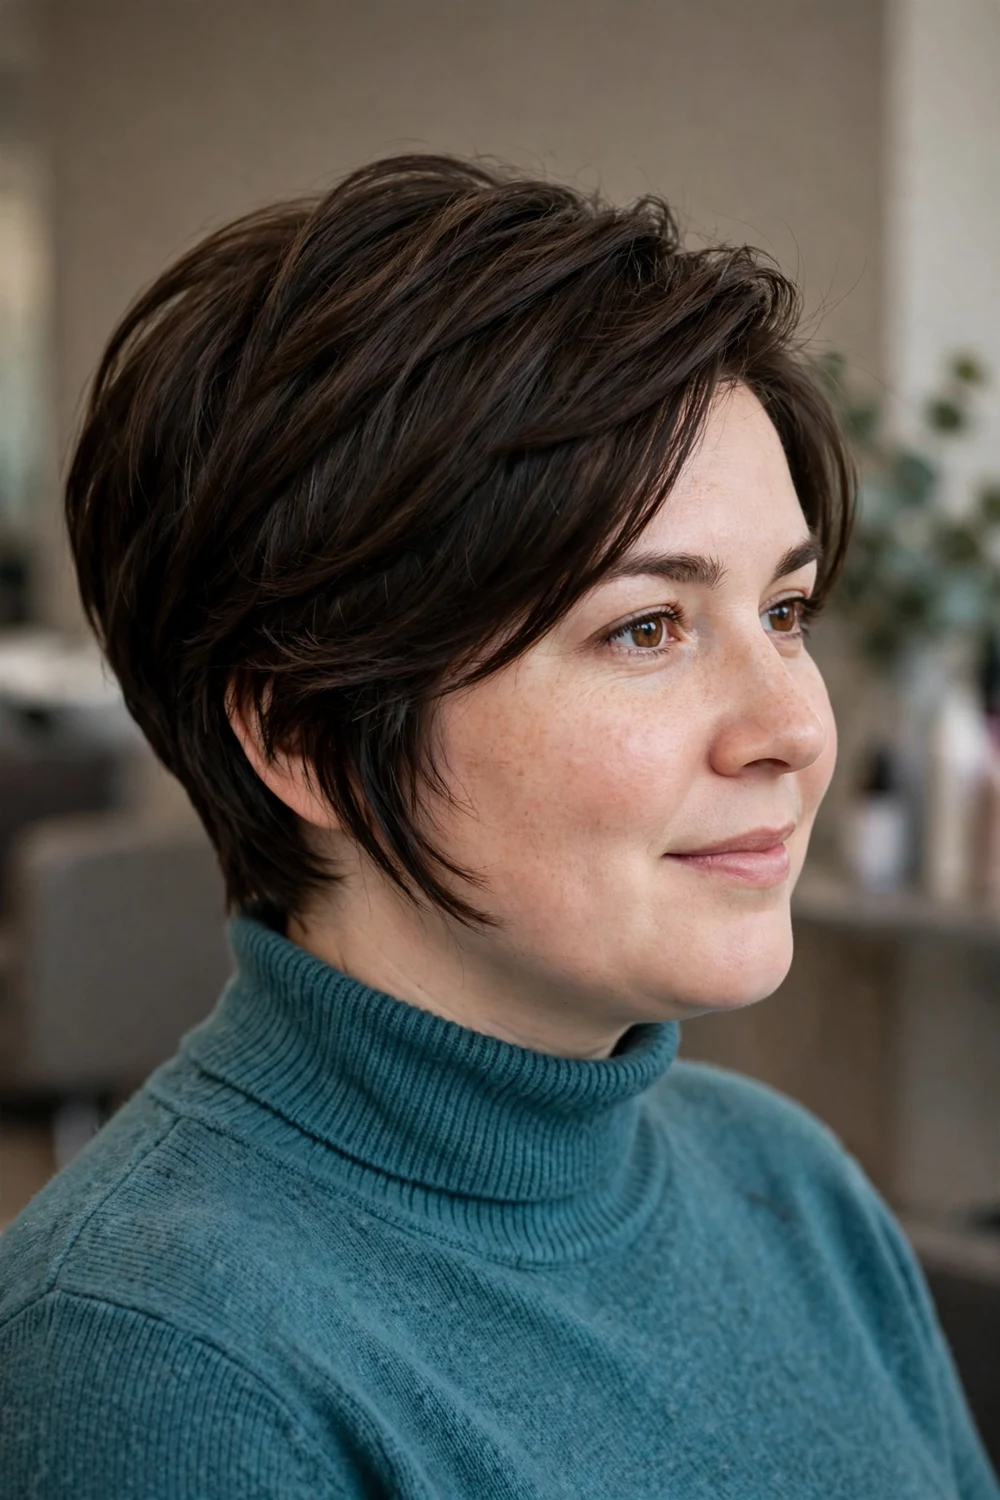
The back stacks in graduated layers that support the crown from behind, and the front pieces reach the jaw. Those front pieces draw the eye down past the cheeks, which is the main shaping work of this cut.
Ask for point-cut ends at the front so the bottom line stays broken. Straight and lightly wavy hair hold the stack best, since strong curl springs out of a graduated back.
Try this: Dry the back downward and the front pieces forward in two separate passes. One direction for the whole head flattens the stack.
Difficulty: Medium | Cost: $$ | Time: 10 minutes
12. Tousled Long Pixie with Dimensional Balayage on Top

Tousled layers run through a longer pixie, and balayage lightens the top and surface pieces only. The lighter crown pulls attention up, while the darker sides stay close and quiet beside the cheeks.
Keep the lightest pieces at the crown and fringe. Light color at the sides would add visual width where this cut is trying to remove it. Balayage grows out softly, so color visits can stay spaced out.
Try this: Scrunch texture spray through dry layers and lift the crown pieces with your fingers instead of brushing them flat.
Difficulty: Medium | Cost: $$ | Time: 5 to 10 minutes
13. Choppy Bang Long Pixie with Razored Layers

Choppy bangs pair with razored layers through the top and sides. The uneven ends break up any rounded outline and give the cut a clear, modern texture from the first day.
Razor work suits straight and wavy hair with medium density. On very fine or very curly hair, ask for point-cutting instead, since razored ends can turn thin on those textures.
Try this: Use light cream on the ends only. Heavy wax clumps choppy pieces back together and hides the texture you paid for.
Difficulty: Medium | Cost: $ | Time: 5 minutes
14. Extended-Front Long Pixie Past the Chin

The front sections are cut longer than the rest and pass the chin, while the back stays cropped. The long front lines run beside the face and past its fullest point, so the outline reads longer from the front.
This is a useful step if you are moving from a bob to a pixie and want to keep length around the face for now. Keep the extended pieces in one layer so they fall as a clean line.
Try this: Blow-dry the front sections down and slightly forward, then tuck one side behind an ear to sharpen the shape.
Difficulty: Medium | Cost: $ | Time: 10 minutes
15. Silver Long Pixie with Polished Side Sweep

Silver color covers a long pixie with a defined side sweep. The metallic tone shows the sweep line clearly, and the diagonal front keeps the focus on the eyes and forehead rather than the cheeks.
Use a purple toning shampoo once a week to keep silver clean, and book a gloss at trims instead of a full color service each time. Keep the sides smooth so the sweep stays the main feature.
Try this: Dry the sweep across with a paddle brush, then add a drop of shine serum to the top only.
Difficulty: Medium | Cost: $$ | Time: 5 to 10 minutes
16. Lifted Quiff Pixie with Tapered Nape
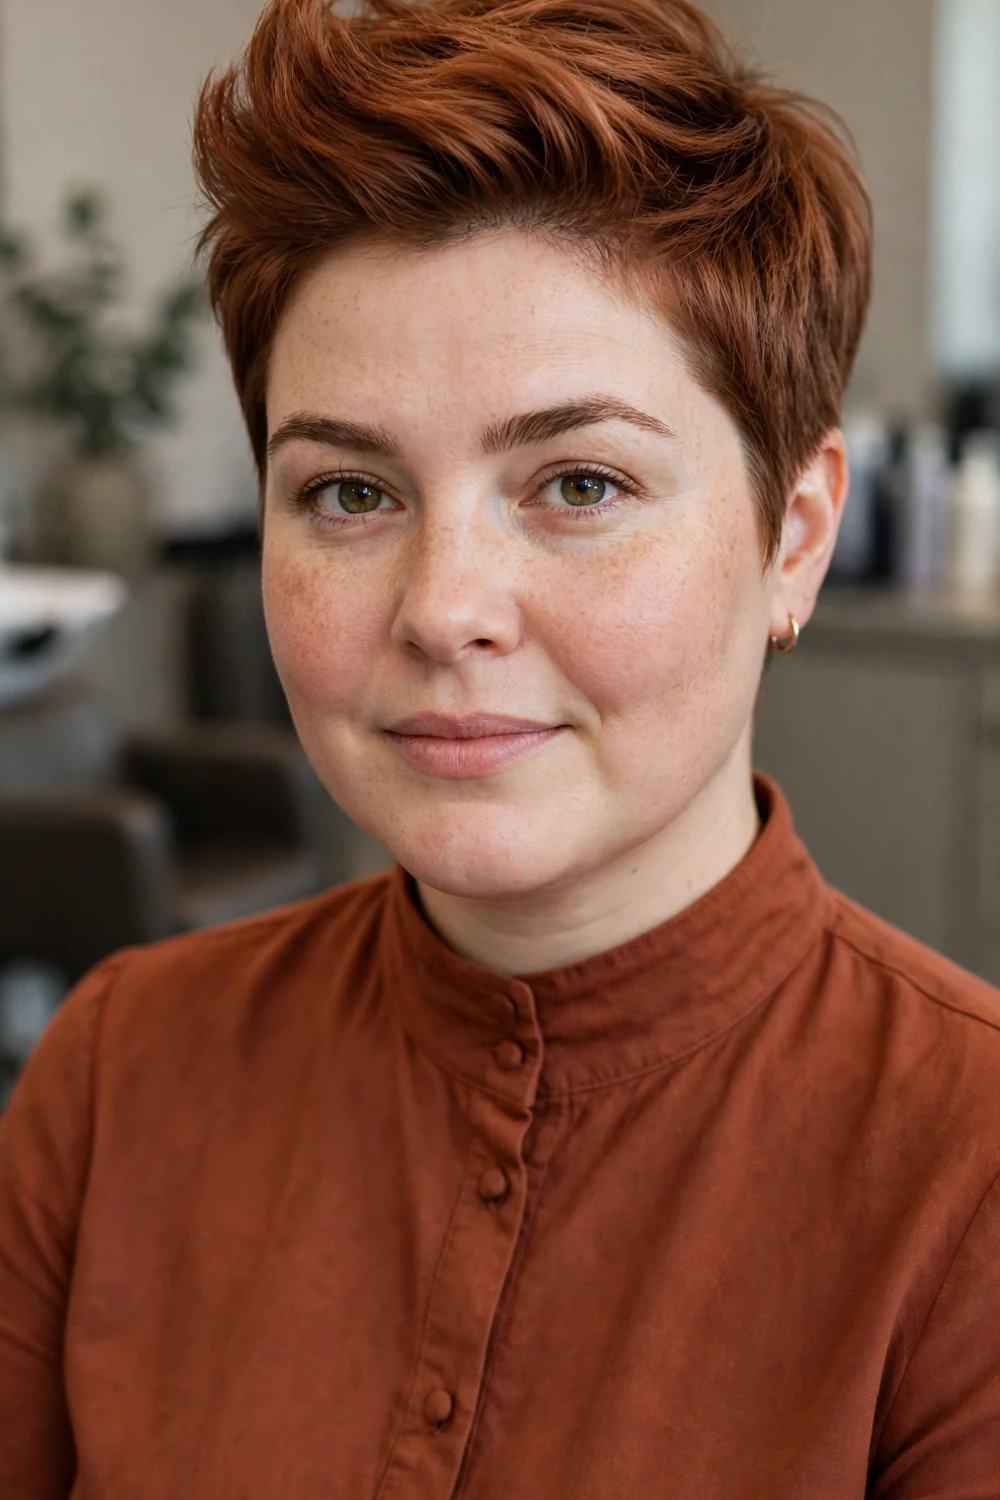
The front section lifts up and back into a quiff, giving this pixie the most crown height on the list. The nape tapers close, so all of the height sits at the front and top where it lengthens the face.
The quiff needs daily styling, around ten minutes with mousse and a dryer. It suits straight and wavy hair that can hold a lifted direction, and it grows out into a long pixie without a hard line.
Try this: Work mousse into damp roots, blow-dry the front straight up, and set it with a light spray once it cools.
Difficulty: Medium | Cost: $ | Time: 10 minutes
17. Sleek Chin-Grazing Pixie with Textured Crown

The sides graze the chin in a sleek finish, and the crown keeps broken texture for lift. The smooth sides lie close beside the cheeks, and the length at the front frames a soft jawline without adding bulk.
Use a smoothing balm on the sides and texture spray only on top. This mix suits straight hair, or wavy hair that is straightened most days, and it reads well in formal settings.
Try this: Flat-brush the sides down while drying, then rough up the crown with your fingers at the end.
Difficulty: Easy | Cost: $$ | Time: 5 to 10 minutes
18. Peekaboo Bang Pixie with One-Sided Sweep
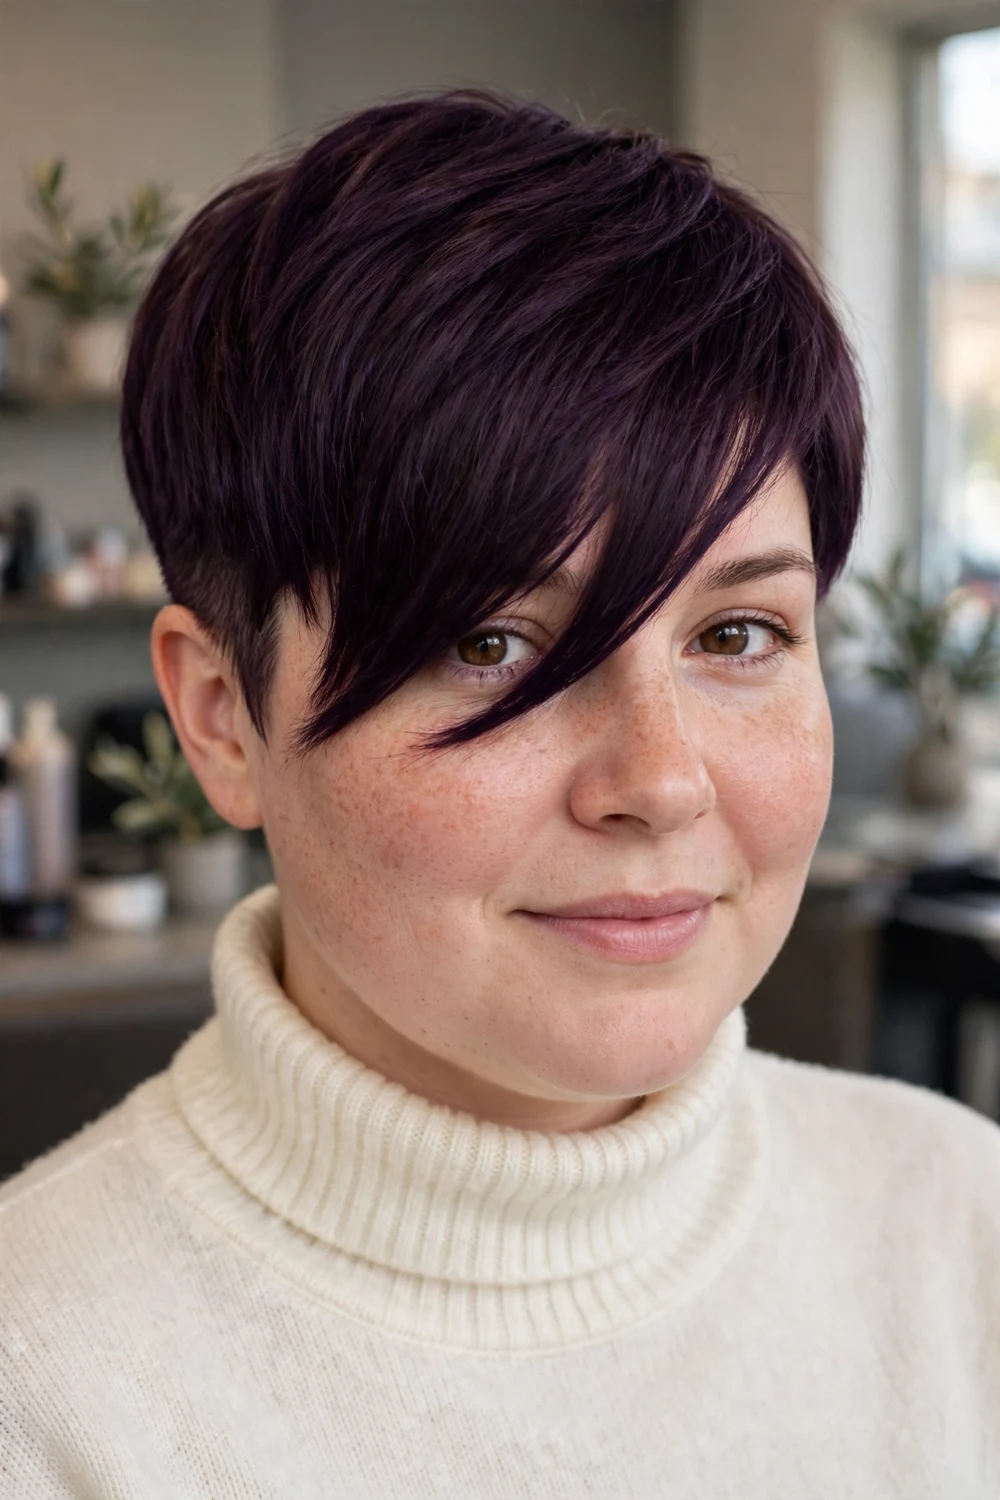
A long bang falls across one eye in a deliberate peekaboo sweep, and the rest of the pixie stays short and close. The covered and exposed sides create strong asymmetry, which shifts attention away from even, full cheeks.
Keep the bang long enough to cross the forehead fully. If it stops mid-forehead, it reads as grow-out instead of a styled sweep. Trim the fringe between full cuts to hold the length.
Try this: Blow-dry the bang across in its final direction and finish with a light spray at the part, not on the ends.
Difficulty: Medium | Cost: $ | Time: 5 minutes
19. Low-Fade Long Pixie with Voluminous Top

A low fade shortens gradually at the temples and nape, and the top stays long and full. The fade narrows the lower outline, and the volume above it gives the face a taller frame.
Ask for a low or mid fade by name. A high fade can expose too much temple and shorten the look. Plan a fade tidy-up about every four weeks to keep the graduation clean.
Try this: Blow-dry the top up and back, and moisturize the faded sections lightly so short hair keeps a clean finish.
Difficulty: Medium | Cost: $ | Time: 10 minutes
20. Rounded Bixie Pixie with Cropped Back Layers
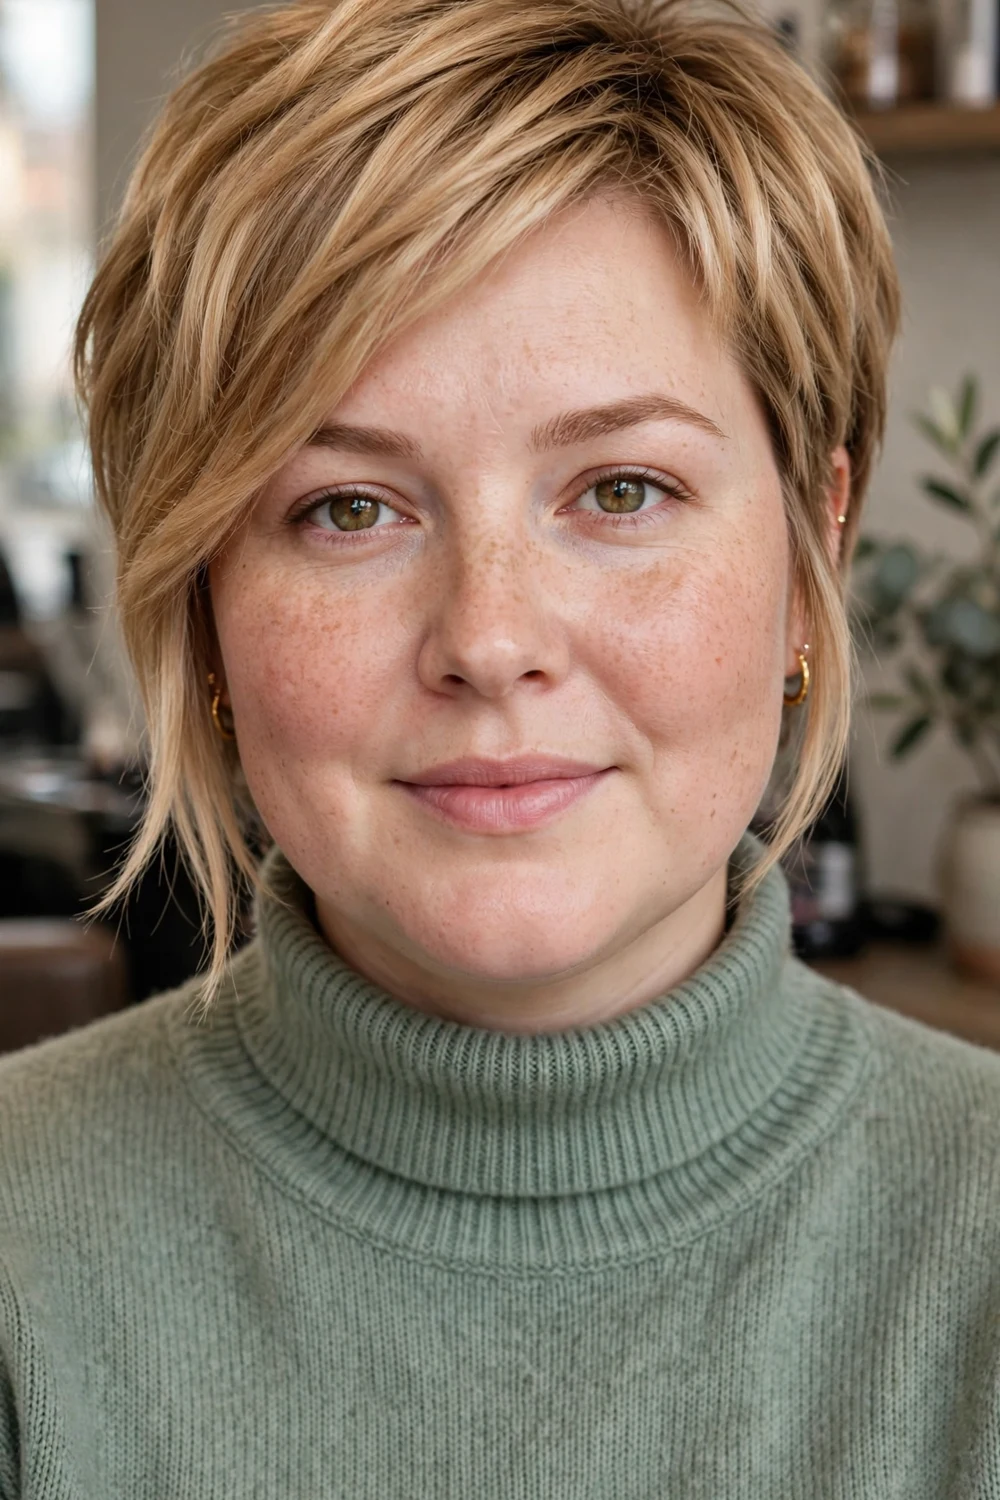
This pixie and bob mix keeps jaw-level pieces at the front and cropped layers through the back. The front length gives coverage beside the jaw, and the cropped back keeps the shape from widening behind the cheeks.
Ask for the longest pieces near the chin and the back layers kept close. It suits women who want more length than a classic pixie but still want a short, shaped back.
Try this: Rough-dry with texture cream and tuck one front piece behind an ear to show the cropped back line.
Difficulty: Easy | Cost: $$ | Time: 5 to 10 minutes
21. Grown-Out Fringe Pixie with Layered Front

The front fringe is left long and layered, angled to sweep across the face, while the back and sides stay cropped. The extended front does the framing work and makes a grow-out stage look planned.
Start the fringe layers at the cheekbone and graduate them down, so no layer ends sit at the widest point. This version needs fewer fringe trims than short bangs, since the length is forgiving.
Try this: Blow-dry the fringe across and down with a flat brush, then separate the ends with a small amount of cream.
Difficulty: Easy | Cost: $ | Time: 5 minutes
22. Korean Feathered Pixie with Long Side Fringe
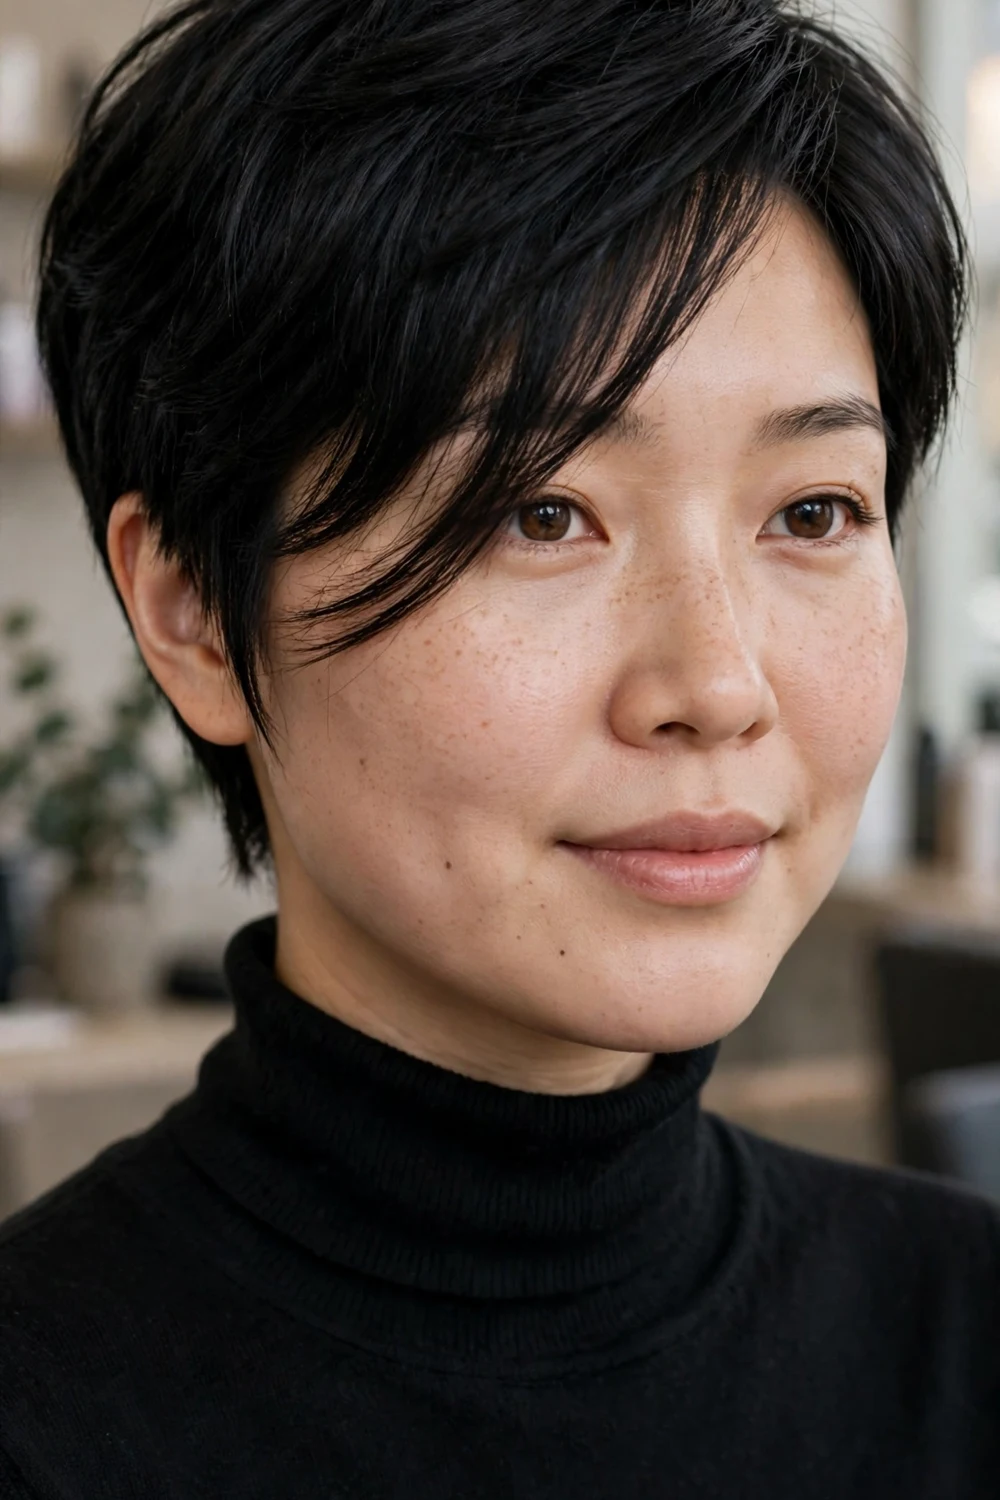
Soft feathered layers give this pixie a light, airy finish, and a long side fringe sweeps across the forehead. The fringe length elongates the face, and the tapered nape keeps the back neat and close.
Feathering suits fine to medium hair that needs movement without bulk. Keep product light, since heavy cream pulls feathered layers flat and removes the airy separation.
Try this: Dry the fringe to the side with a round brush rolled outward, and finish by lifting the crown roots with your fingers.
Difficulty: Easy | Cost: $ | Time: 5 to 10 minutes
23. Money-Piece Highlight Pixie with Deep Side Part
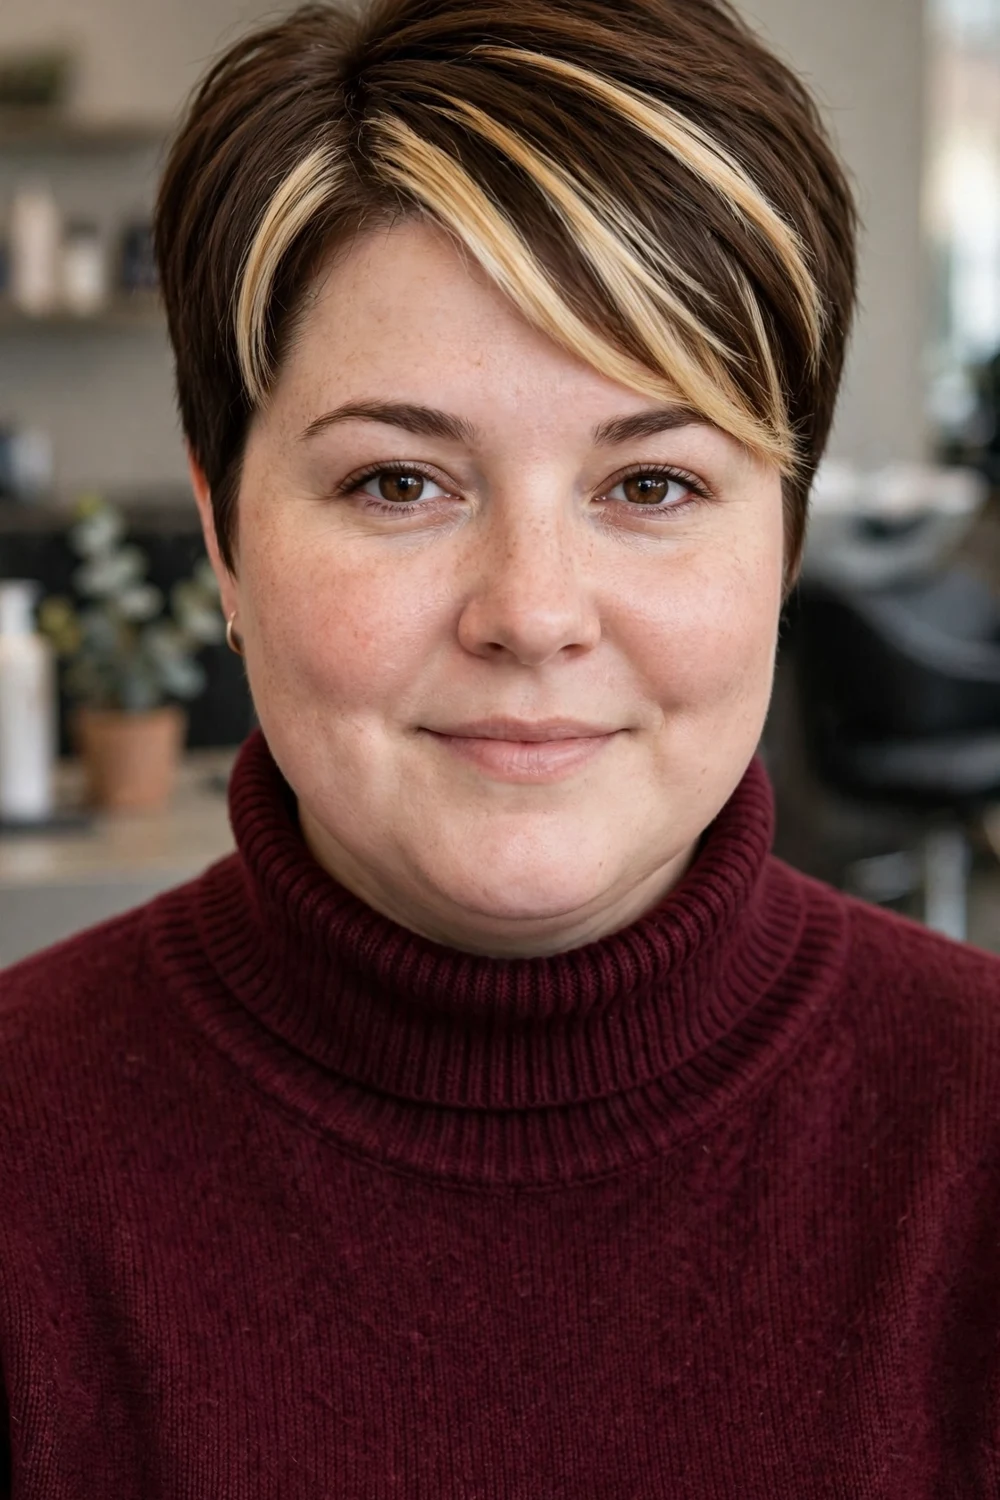
Two brighter front sections frame the face in this pixie, set off by a deep side part. The light pieces catch attention at the forehead and eyes, and the part sends the top across on a diagonal.
Keep the bright pieces soft and close to your base shade. A harsh jump in tone reads as stripes on short hair. Place the part far to one side so the highlight and the diagonal work together.
Try this: Set the part while the hair is wet, dry the heavy side up and over, and smooth the bright front pieces forward.
Difficulty: Medium | Cost: $$ | Time: 10 minutes
Quick Comparison
| Idea | Best for | Trim cycle | Daily styling |
|---|---|---|---|
| Height-First Textured Pixie with Close Cheek Line | Full cheeks needing crown lift | 4 to 6 weeks | About 5 minutes |
| Lavender Asymmetrical Pixie with Sharp Side Part | A strong diagonal and bold color | 4 to 6 weeks, toning at trims | About 10 minutes |
| Shaved Temple Pixie with Lifted Top | A visible shaved detail | 2 to 3 weeks for the temple | About 5 minutes |
| Long Layered Pixie with Tapered Sides | First pixie after a bob | 5 to 6 weeks | 5 to 10 minutes |
| Curly Shaggy Long Pixie with Forward Curls | Natural curls, volume kept high | 5 to 6 weeks | 5 to 10 minutes |
| Extended-Front Long Pixie Past the Chin | Front length past the fullest point | 5 to 6 weeks | About 10 minutes |
The table covers six of the most requested shapes. Shorter trim cycles keep shaved and faded details sharp, while longer front pieces trade a little sharpness for fewer salon visits.
Frequently Asked Questions
Can an edgy pixie work on a fuller face without adding width?
Yes, when the cut keeps height at the crown, keeps the sides close beside the cheeks, and adds one diagonal line from a side part, a sweep, or asymmetry. Width comes from volume at cheek level and from front pieces that stop at the cheekbone, so those are the details to avoid.
How is a chubby face different from a round face for a pixie?
A round face has near equal width and length with its widest point at the cheeks. A fuller face adds full cheeks and a softer jawline, so front pieces that pass the cheeks and reach the jaw or chin matter more, because they frame the jaw as well as narrowing the cheek area.
Which bangs suit a fuller face with an edgy pixie?
Side-swept, angled, wispy, and peekaboo bangs suit a fuller face because they cross the forehead on a diagonal or in separated pieces. A heavy, straight-across fringe adds a horizontal line and is the hardest option to carry.
How often does an edgy pixie for a fuller face need a trim?
Most versions need a trim every four to six weeks. Fades, shaved temples, and hidden undercuts grow out faster and may need a tidy-up at two to four weeks. Longer front pieces can stretch the full cut a little longer because the length hides regrowth.
What should I ask my stylist for at the first appointment?
Bring two or three photos that show the front and the side. Ask for height at the crown, close or tapered sides beside the cheeks, and front pieces that fall past the cheekbone. Agree the trim cycle for any fade or shaved detail before the cut starts.
Final Thoughts
A fuller face does not rule out a short, edgy cut. It asks for placement: height up top, sides kept close beside the cheeks, a diagonal across the front, and front length that passes the fullest point instead of stopping on it. Pick the detail you like most, whether that is a shaved temple, a lavender sweep, or a lifted quiff, and keep the proportions underneath steady. Bring clear photos to your appointment, agree the trim cycle in advance, and the cut will hold its shape between visits.

