

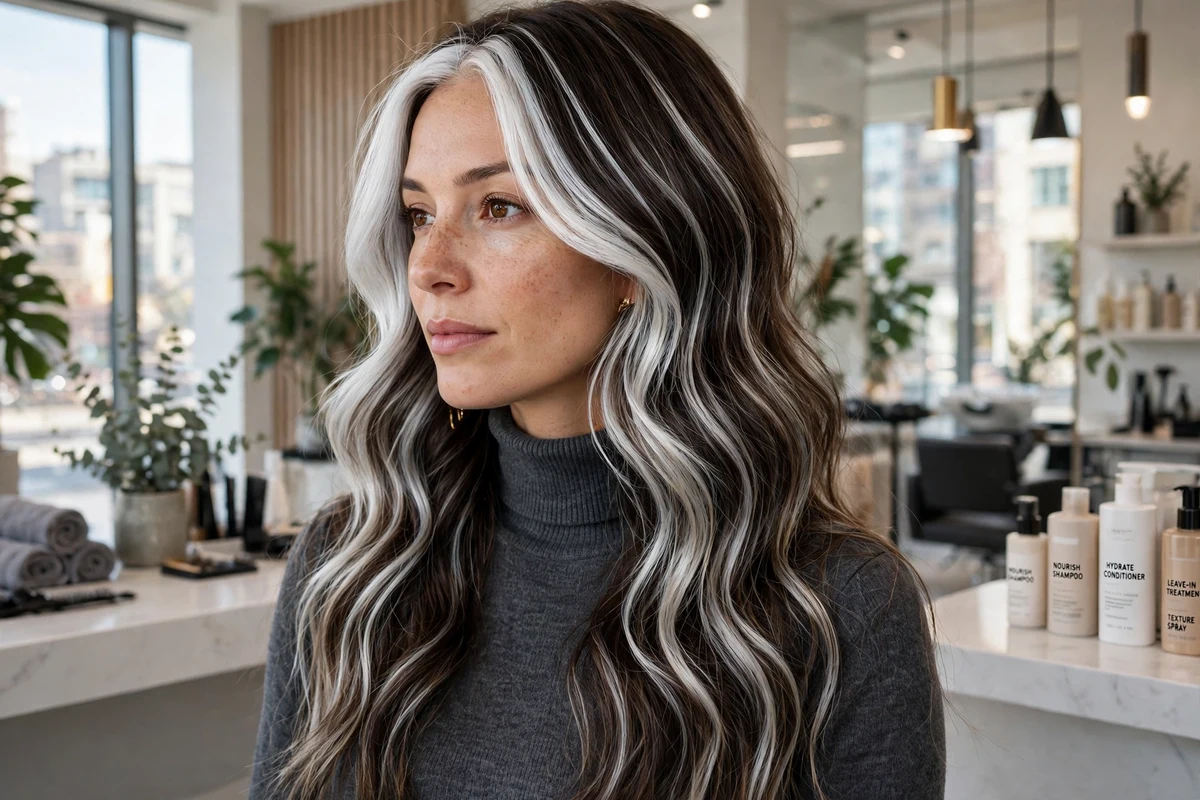
Silver and white work as highlight shades on far more base colours than most people expect. The same icy family that reads soft on blonde hair turns high contrast on black hair, smoky on brunette hair, and cool against red hair. This list treats silver and white as placed colour: streaks, panels, balayage pieces, money pieces, glazes, and hidden underlayers that you choose on purpose and place where you want them.
The list collects 28 silver and white highlight ideas and runs them in a practical order: face-framing and full-head placements first, then balayage and ombre routes, hidden and low-commitment placements, cut-based versions, and the tinted and two-tone finishes. Every idea notes the undertone, who it suits, the technique behind it, and the upkeep it asks for. If you are comparing silver against warmer seasonal shades before you decide, the general fall hair colors guide shows the full colour spread side by side.
Quick Takeaways
- Silver and white are highlight shades here: placed pieces, panels, and balayage over your existing base colour.
- Almost every idea needs pre-lightening first. Dark bases usually need more than one session to reach icy white.
- Cool skin carries icy platinum and blue-leaning silver best. Warm skin suits silver mixed with gold or a softer pewter tone.
- Balayage, shadow roots, dip-dyed ends, and peekaboo placements grow out softly and stretch salon visits the furthest.
- Icy tones fade fastest. Plan a toner or gloss refresh at three to six weeks, depending on the placement.
How to Pick Your Silver or White Highlight
Start with your base colour and your skin undertone. Blonde and light brown hair reaches icy white in one lightening session in most cases, and it carries the palest ideas on this list: icy streaks, micro highlights, and white panels. Medium and dark brown hair reaches silver well, with the strongest results coming from balayage, chunky foils, and two-tone silver and grey sets. Black hair gives the highest contrast of all, so bold silver pieces and a white money piece stand out clearly against it. Cool skin suits icy platinum, blue-tinted silver, and lavender silver. Warm and olive skin suits silver softened with gold, plus pewter and charcoal tones that carry less blue.
Then pick by upkeep. A money piece, dip-dyed ends, or a peekaboo underlayer colours a small share of the head and stays easy to grow out or trim away. Full sets of foils, split dye, and reverse ombre ask for toner visits every four to six weeks. The autumn hair colors roundup shows how these cool shades sit next to the season’s warmer browns and coppers, and the winter hair color ideas list collects the icy shades that suit cold-weather dressing.
| Placement family | Tone | Best starting base | Upkeep |
|---|---|---|---|
| Face-framing (money piece, icy streaks) | Icy white | Any base | Medium |
| Full sets (micro highlights, chunky foils, panels) | Silver to white | Blonde to dark brown | High |
| Balayage and ombre (silver, pewter, shadow root) | Silver to pewter | Brown to black | Low to medium |
| Hidden and ends-only (peekaboo, dip dye) | Bright silver | Any base | Low |
| Tinted silver (opal, lavender, blue, steel glaze) | Cool pastel silver | Pre-lightened hair | High |
1. Icy Platinum Streaks
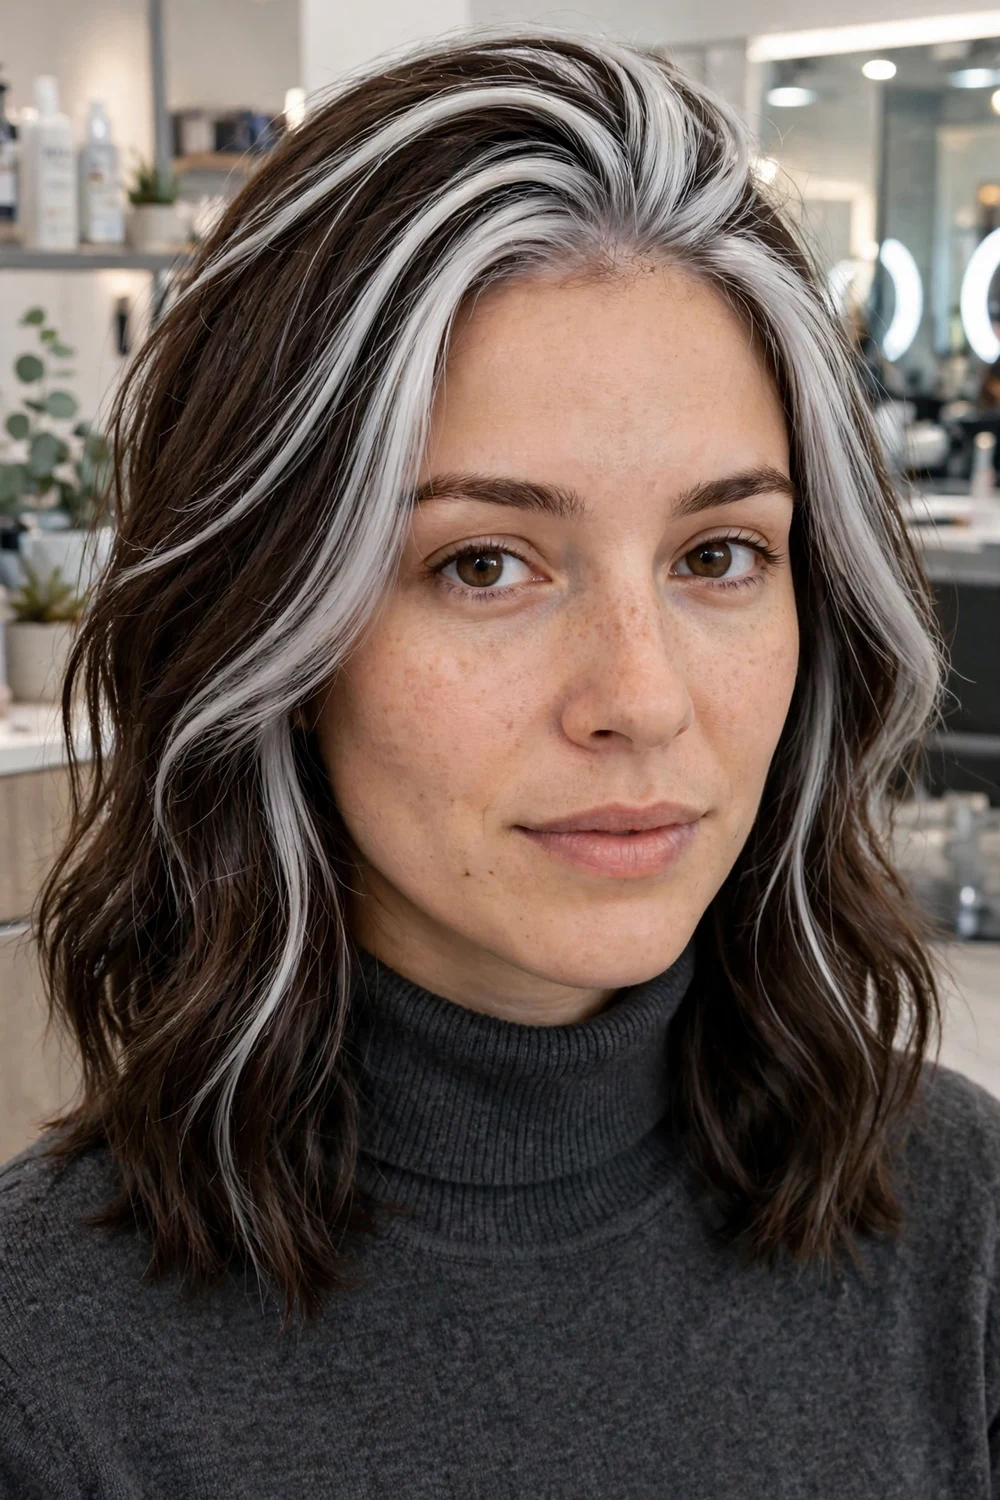
Icy platinum streaks place bright white-silver pieces at the hairline and through the crown. The tone carries no warmth at all, so the contrast against a brown or black base is sharp and clear. Cool skin suits this placement best, and oval and heart-shaped faces get the most from the brightness at the top of the head.
On dark bases, expect two lightening sessions before the streaks reach true icy white. The pieces sit where regrowth shows first, so toner visits land at four to six weeks. A purple shampoo once a week keeps the streaks from picking up yellow between appointments.
Try this: ask for the brightest streaks at the hairline and crown only, and keep the back sections a step softer for a cheaper, faster service.
Difficulty: High · Cost: $$$ (salon)
2. White Money Piece
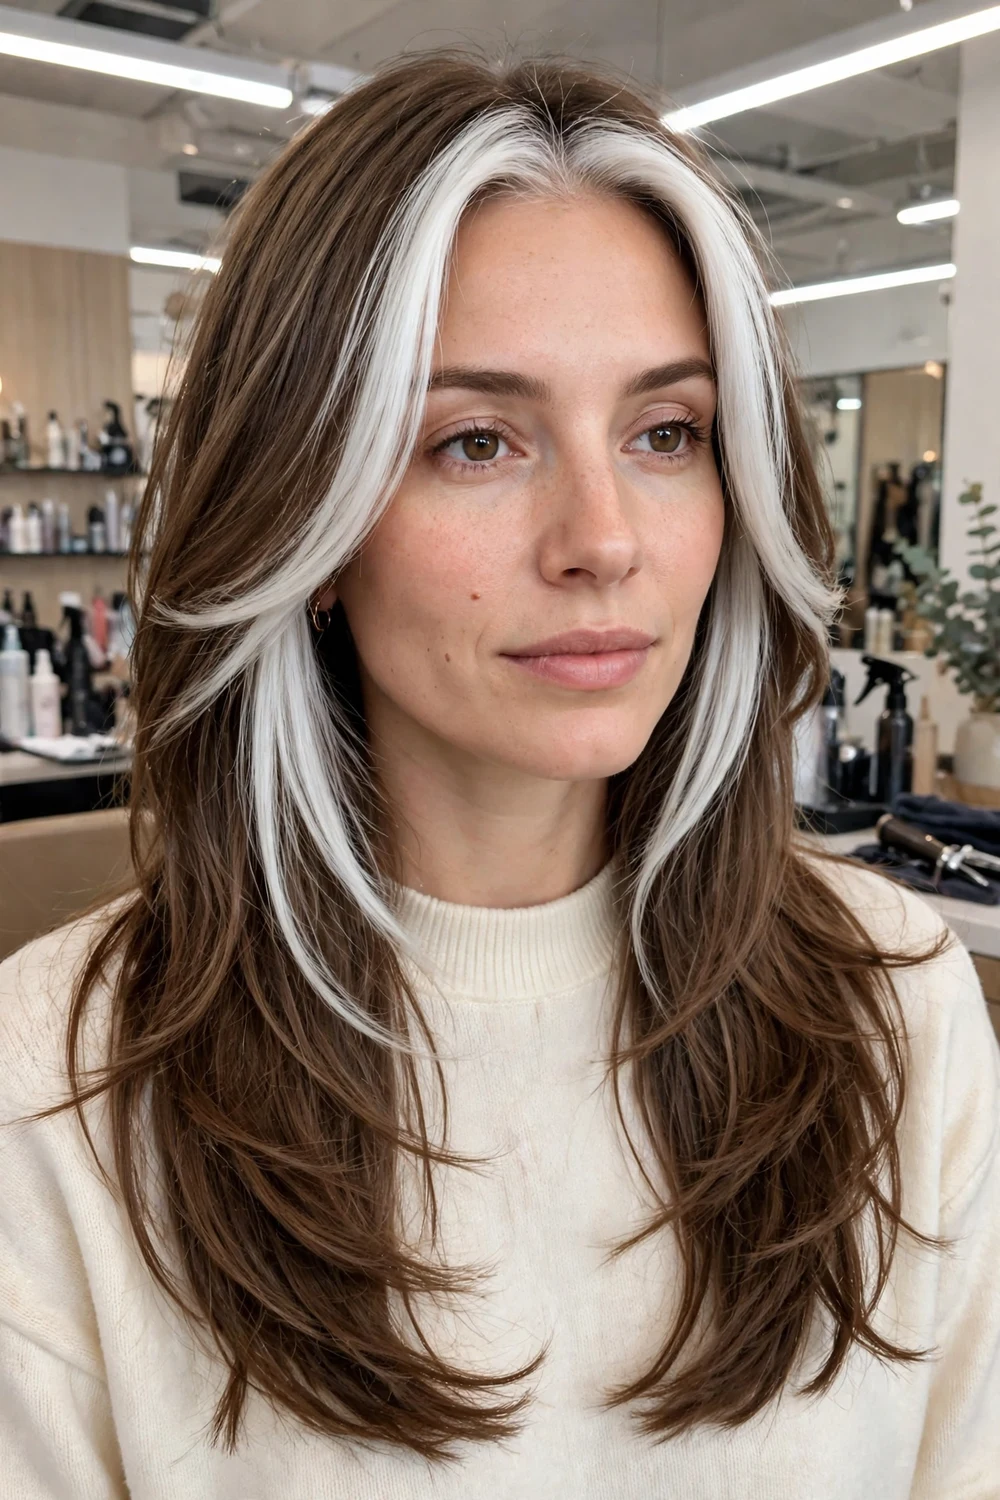
A white money piece colours two wide panels at the front hairline and leaves the rest of the base untouched. It gives the strongest face-brightening effect of any idea on this list for the smallest amount of lightening. Round and square faces suit the vertical panels well, since the bright lines at the front add length.
The panels are the lightest hair on the head, so they fade and pick up yellow first. A mini gloss at four weeks keeps them white, while the rest of your colour keeps its own schedule. Because so little hair is lightened, this is also the standard first step before a bigger silver change.
Try this: ask for the panels slightly uneven in width, one a touch wider than the other, so the frame reads relaxed rather than striped.
Difficulty: High · Cost: $$ (salon)
3. Silver and Gray Highlights on Dark Brown Hair

This set weaves two tones, bright silver and softer grey, through a dark brown base in the same appointment. The two tones catch light at different strengths, so the highlights read layered rather than flat. It is the core silver look for brunettes who want white tones without lightening the whole head.
Ask your colorist to place both tones in one set of foils, with the brightest silver near the face and the grey pieces through the back. The mix keeps the contrast soft as it grows out. Toner at six to eight weeks refreshes both tones at once.
Try this: bring a photo that shows both tones clearly, since a single-tone silver set is the default in many salons.
Difficulty: High · Cost: $$$ (salon)
4. Silver Balayage on Brunette
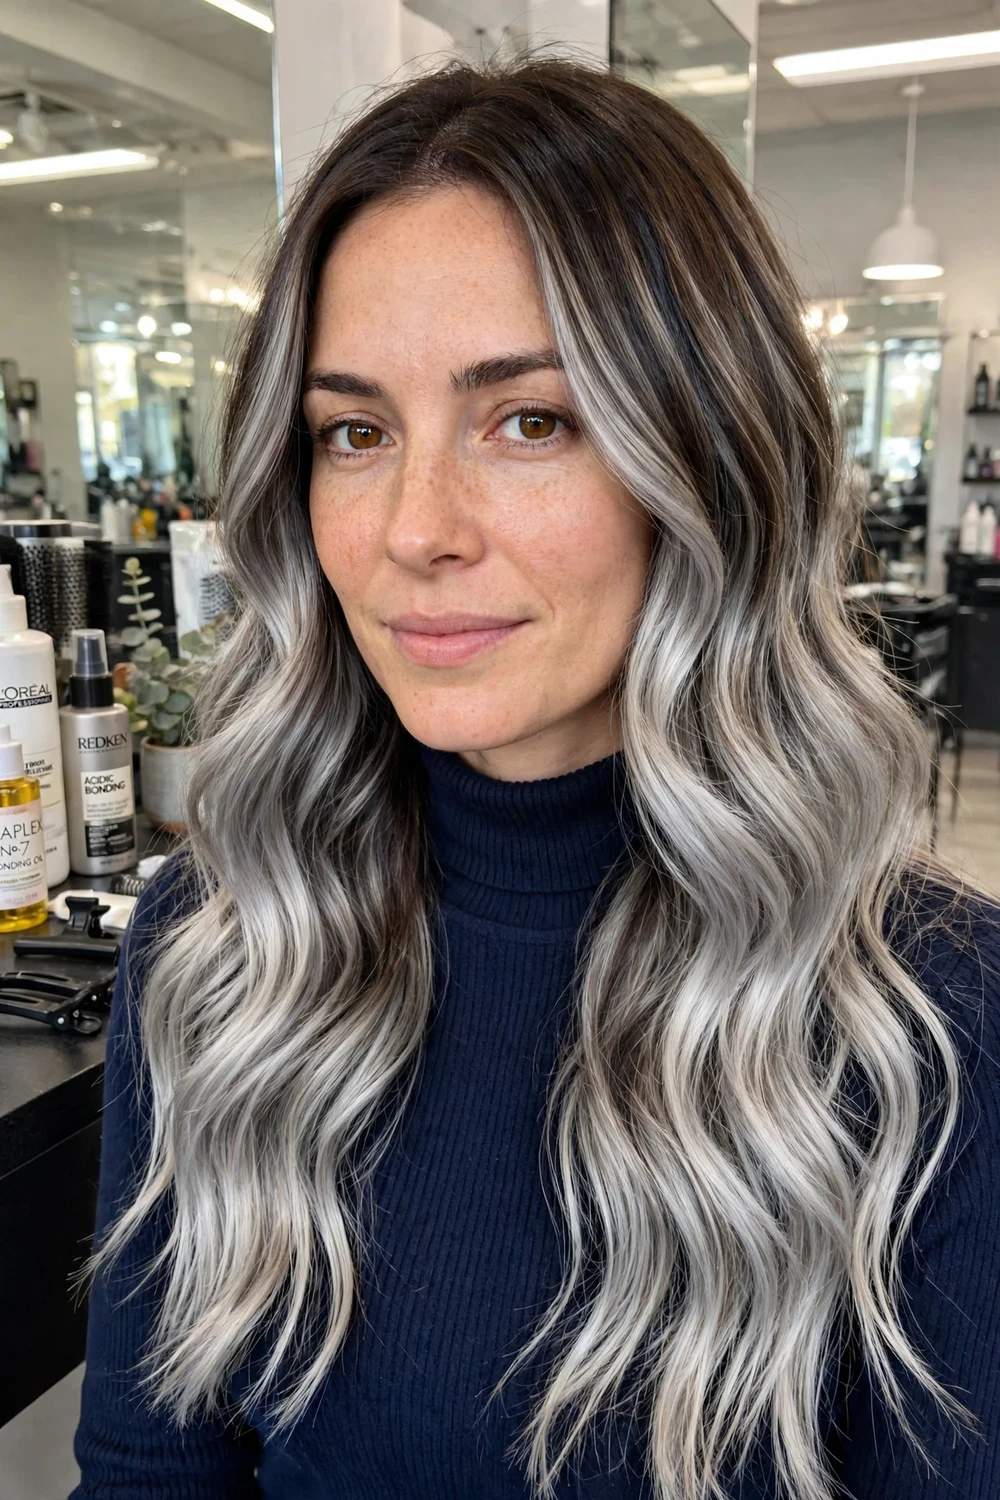
Silver balayage hand-paints silver pieces through a brunette base, keeping the roots dark and building brightness through the mid-lengths and ends. The painted placement brightens the face and adds movement to a flat brunette without a full colour change. It suits medium and warm skin, where a full head of icy foils can feel too stark.
The grow-out is the main draw. Painted pieces leave no hard line at the root, so most wearers refresh the toner at eight to ten weeks. The ends carry the lightest colour and need weekly deep conditioning to stay smooth.
Try this: ask for the silver concentrated on the top layers and around the face, with the underneath left dark for contrast.
Difficulty: High · Cost: $$$ (salon)
5. Silver Balayage on Blonde Hair
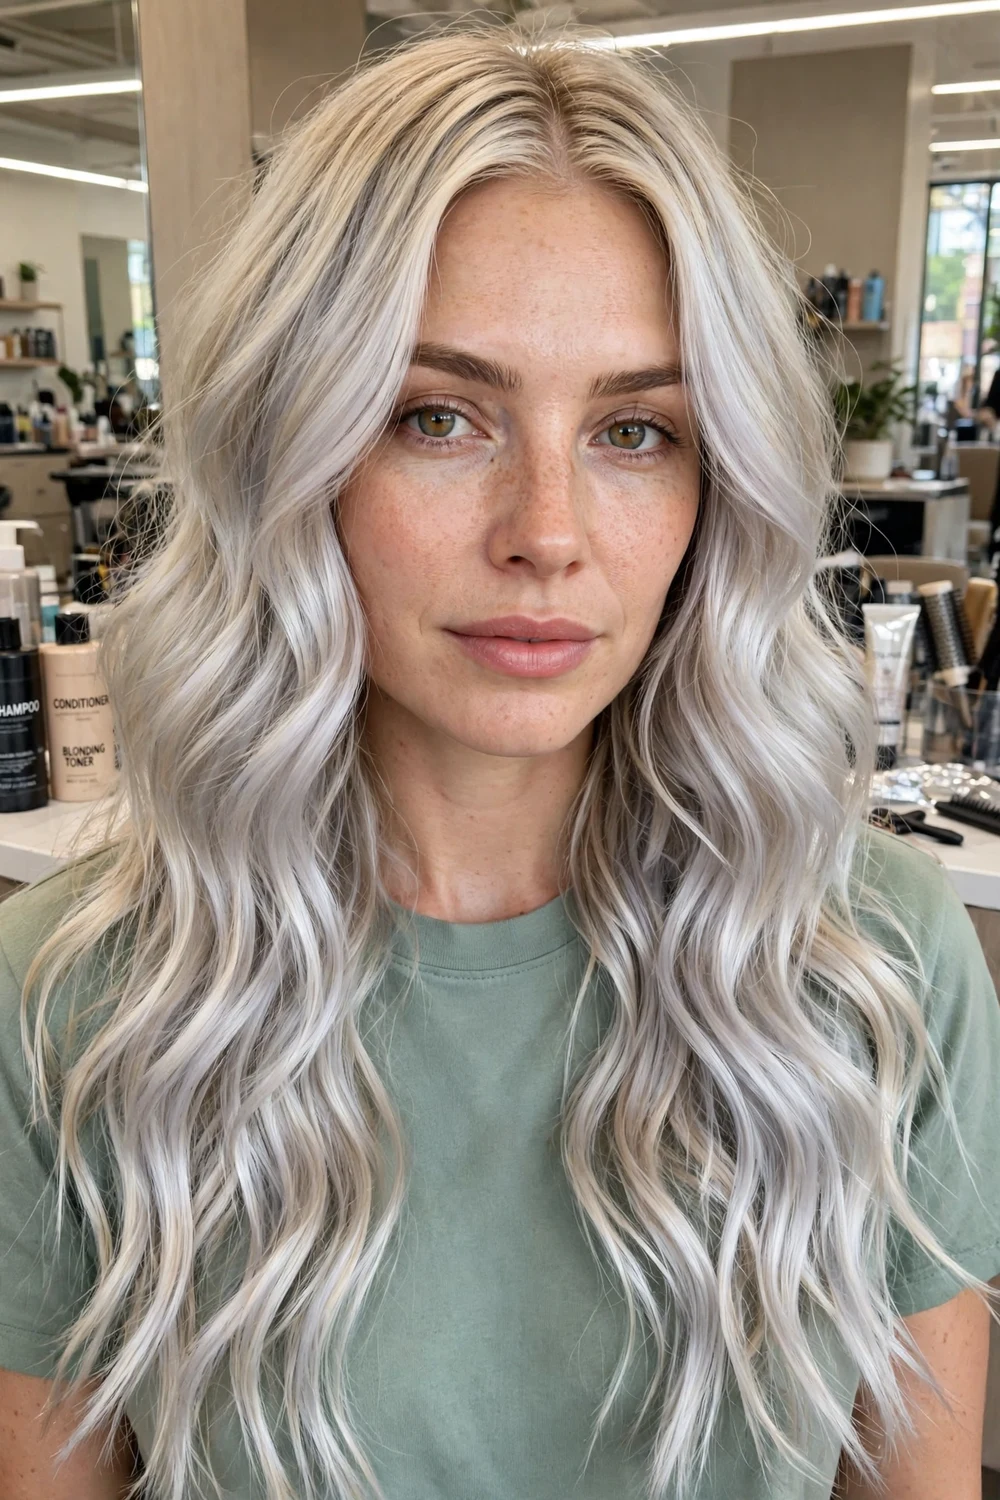
On a blonde base, silver balayage cools the whole look down: pale blonde roots melt into icy silver and white ends, painted in for a soft, lived-in finish. Blondes reach this result faster than any other base, since the hair needs far less lift before the silver toner goes on.
Keep the root area in your natural blonde so regrowth stays invisible. The silver ends fade toward pale blonde over the weeks, which most wearers still like. A silver gloss at six weeks restores the icy tone through the lengths.
Try this: if your blonde has gone warm over summer, this balayage doubles as the correction: ask for the warm mid-lengths toned ash before the silver goes on.
Difficulty: Medium to High · Cost: $$ (salon)
6. Pewter Balayage on Dark Hair

Pewter balayage paints a smoky, darker silver from the mid-lengths down over a dark brown or black base. Pewter sits several steps deeper than icy silver, so it asks for less lift and reads softer against dark hair. Long and oblong faces suit the lower placement, which adds visual weight at the ends.
The lower start point makes regrowth hard to spot, and appointments can stretch to ten weeks or more. Pewter also forgives a missed toner visit better than icy tones do, since the smoky depth hides early fade.
Try this: ask your colorist to stop the painted sections just short of the very tips, so the ends stay soft instead of over-lightened.
Difficulty: Medium to High · Cost: $$ (salon)
7. Fine Silver Micro Highlights
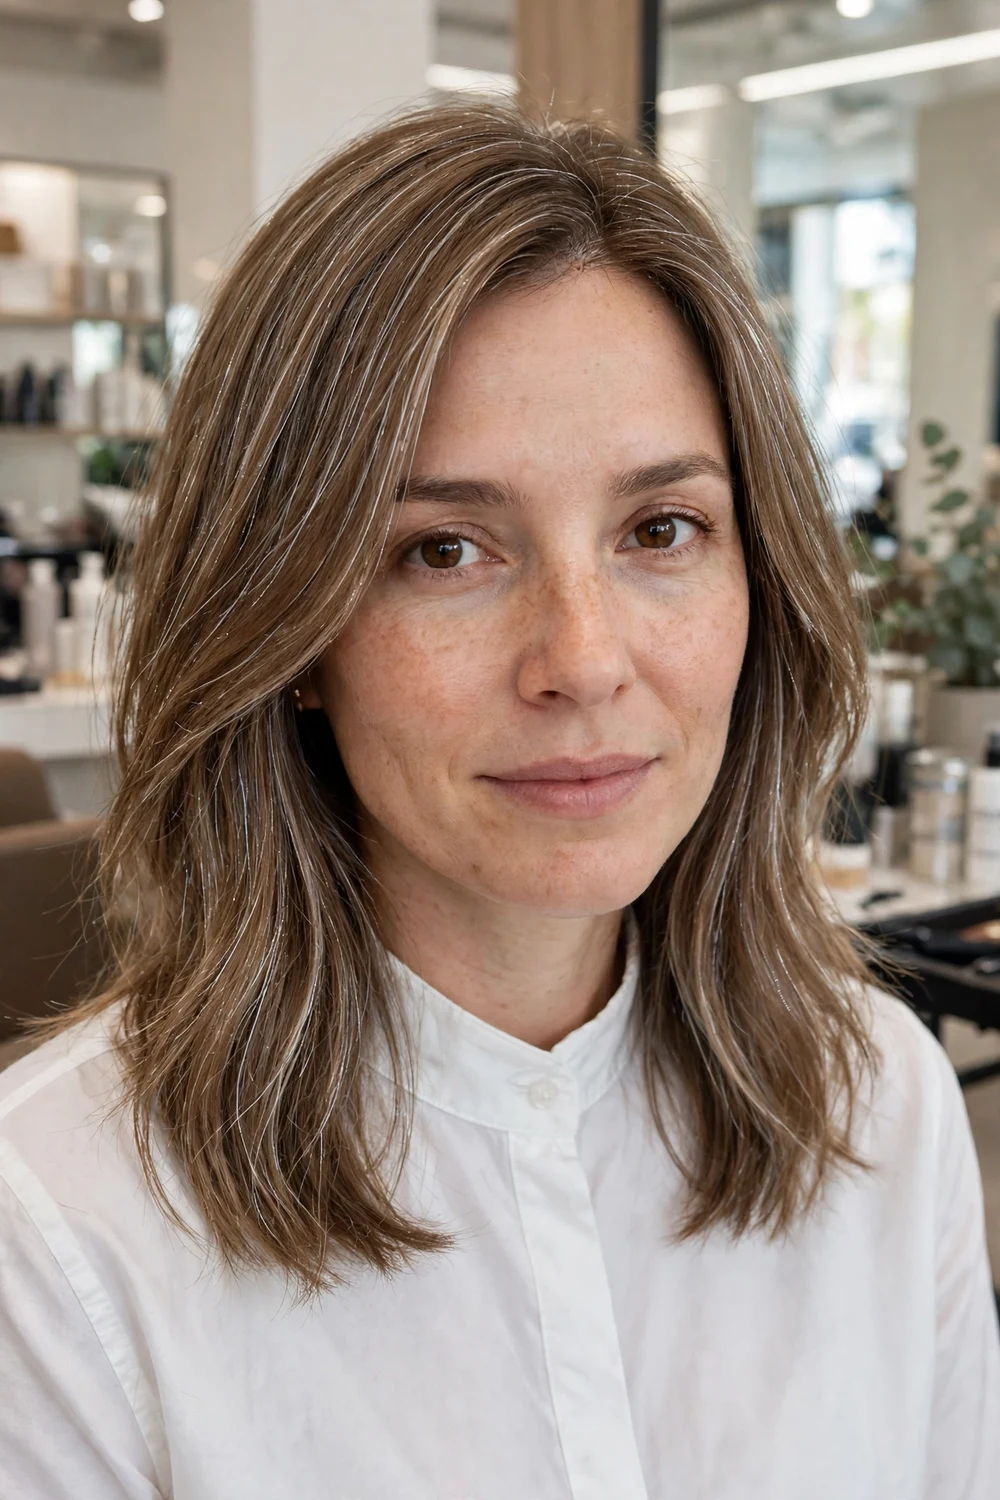
Micro highlights weave tiny, closely spaced silver pieces evenly through the whole head. No single piece stands out. Together they give the hair a soft metallic shimmer that flat single-process colour cannot match. Fine and thin hair gains the most, since the dense small pieces add the look of body and dimension.
The weave takes time in the chair, because each foil holds a very fine section. Grow-out is gentle, though, since there are no wide bands of colour to show a line. A toner refresh at about eight weeks keeps the shimmer even from root to tip.
Try this: ask for the finest weave at the temples, where light hits the face first and the shimmer reads strongest.
Difficulty: High · Cost: $$$ (salon)
8. Chunky Silver Foils
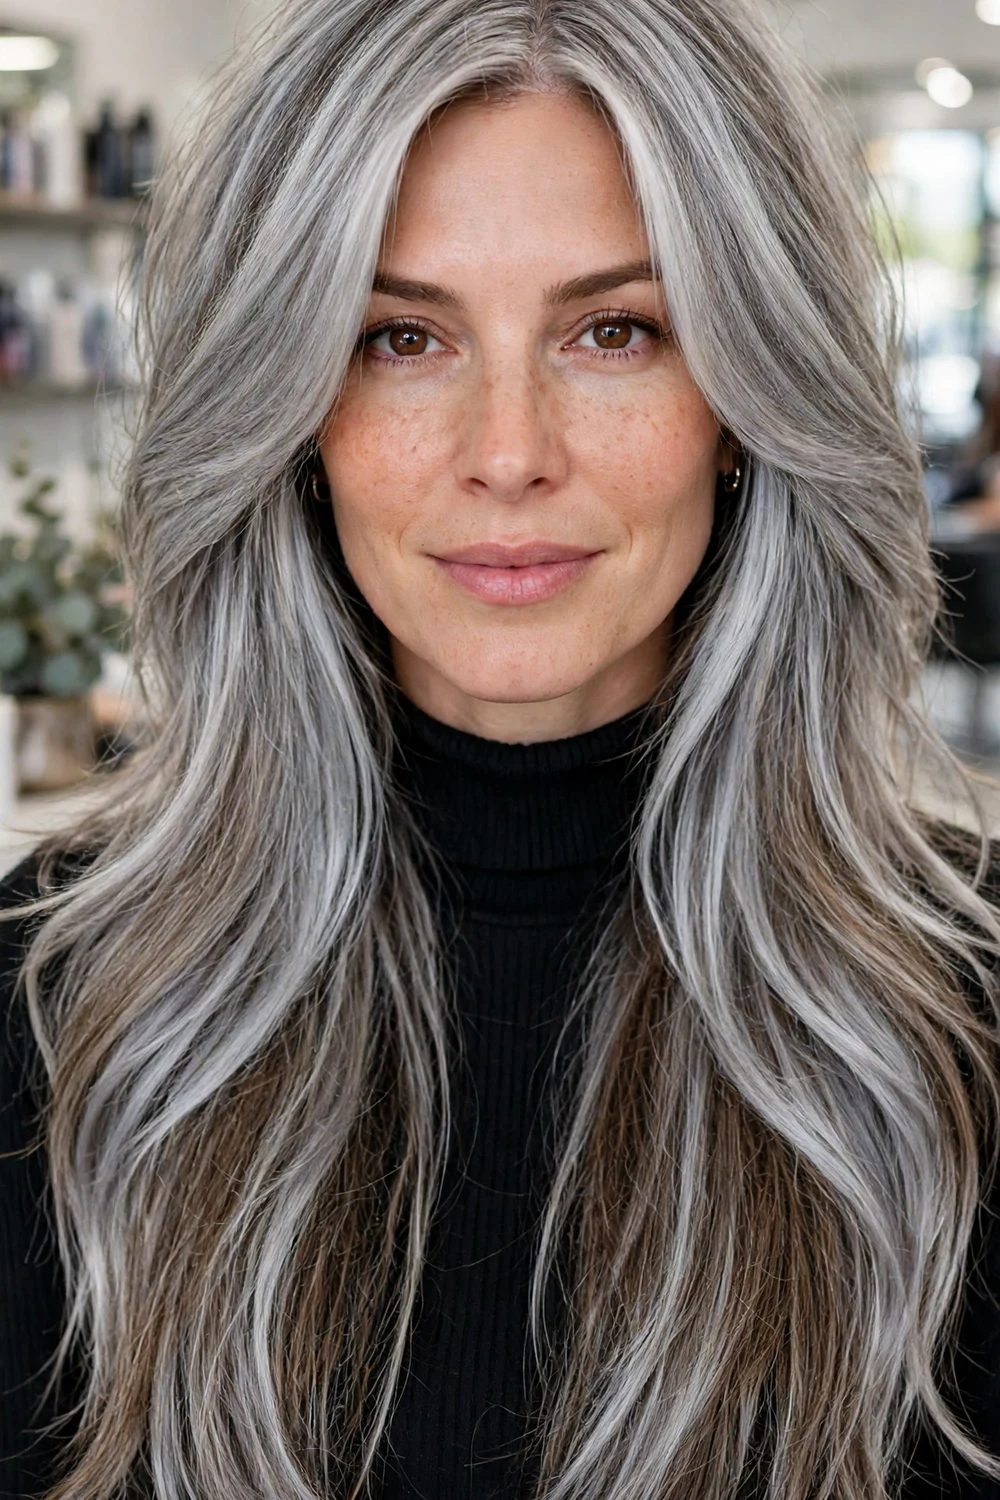
Chunky silver foils place thick, deliberate silver panels through the hair for a bold, graphic contrast. The panel width is the point: each silver section sits several levels lighter than the base, and the gap between the shades is what makes the look work. Medium to thick hair holds the panels best.
On dark hair, wide panels need a strong lift, and a colorist who quotes a very short appointment for this on a dark base is worth questioning at the consultation. Grow-out arrives in blocks rather than a soft blend, so the refresh rebuilds the panel pattern at six to eight weeks.
Try this: place the thickest panels at the top of the head, where the contrast reads strongest in photos and in direct light.
Difficulty: High · Cost: $$$ (salon)
9. Charcoal Silver Ribbons
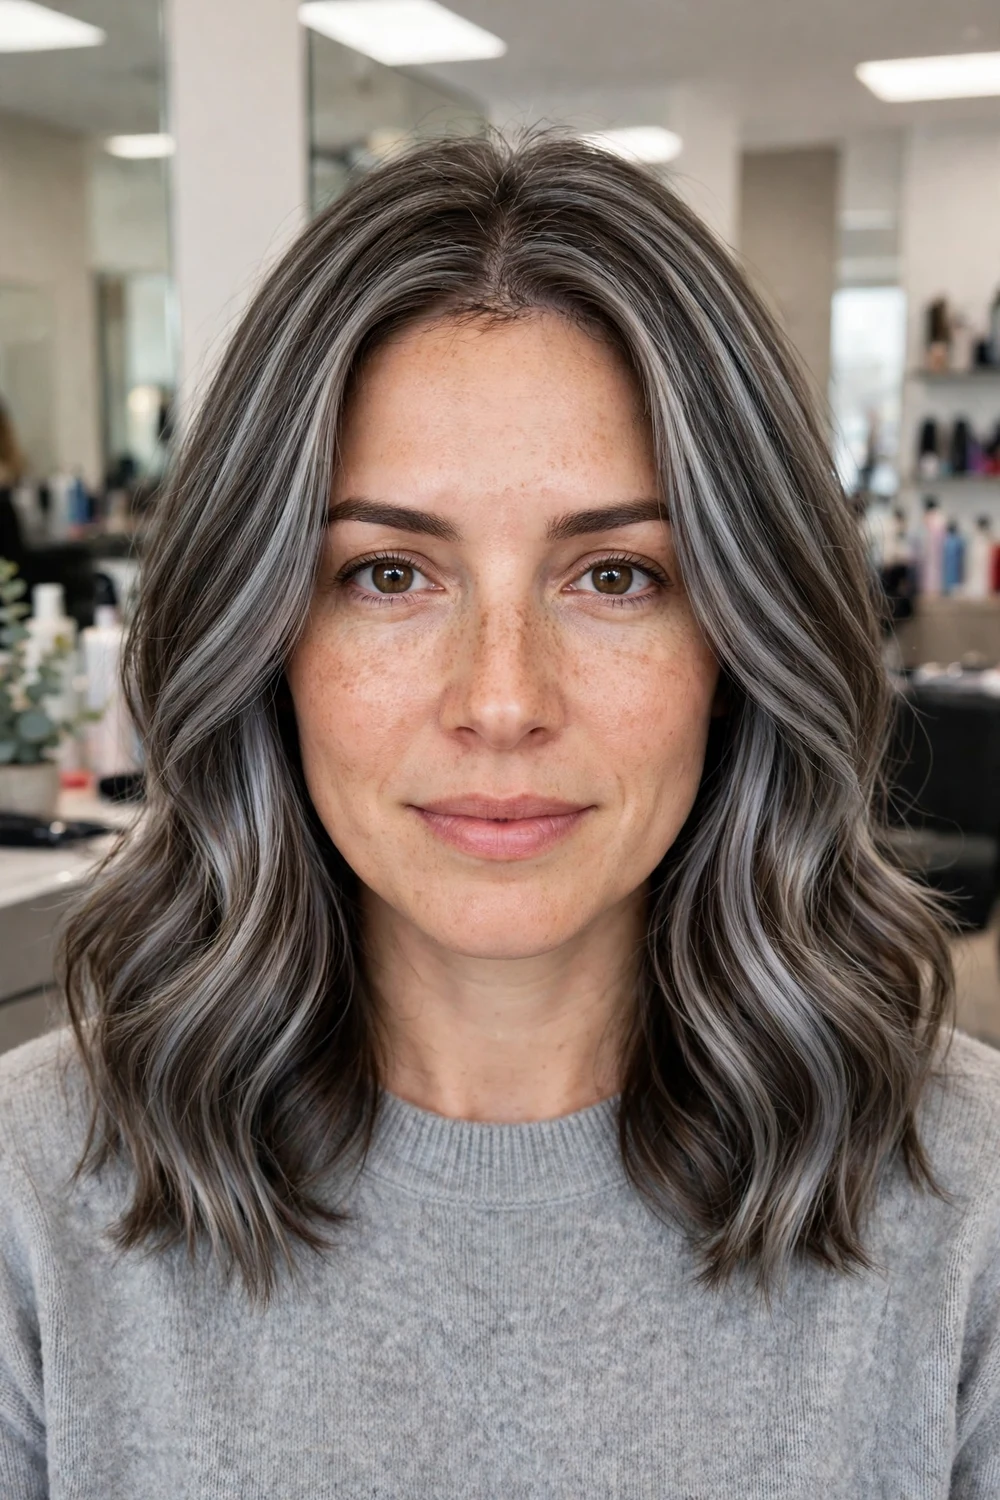
Charcoal ribbons weave gunmetal silver pieces through the mid-lengths only, with roots and ends kept close to your natural colour. The smoky tone shifts between grey and silver as the light changes, and it blends calmly on ash and light brown bases. Square and oblong faces suit the mid-length placement, which adds width at the sides.
Because charcoal sits deeper than bright silver, it needs a lighter lift than the icy ideas on this list. The ribbons also fade slowly and evenly. A gloss at eight to ten weeks is usually the only maintenance between full appointments.
Try this: ask for each ribbon to be combed out precisely at the mid-lengths, so the melt between your base and the charcoal stays clean.
Difficulty: Medium to High · Cost: $$ (salon)
10. Silver Ombre on Dark Hair
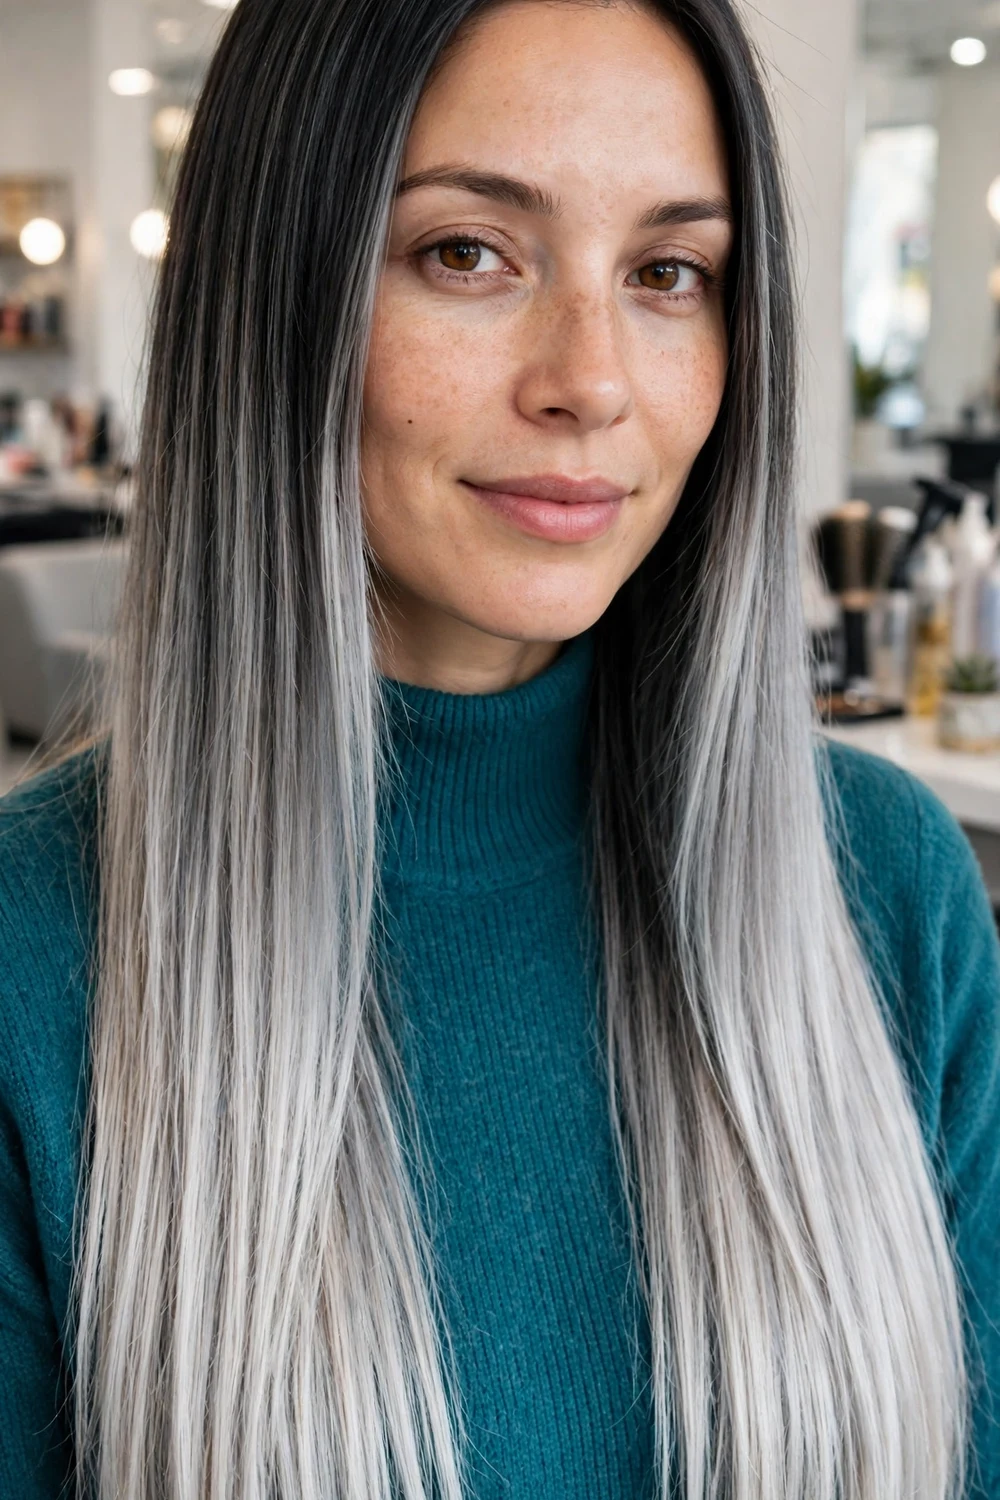
Silver ombre keeps natural dark roots and fades them gradually into silver and white lengths. Where balayage scatters the colour, ombre concentrates it in the bottom half of the hair, so the gradient itself is the feature. Long waves and long straight styles give the fade the room it needs to read clearly.
The untouched roots make regrowth a non-issue, and the gradient can go months between salon visits. The ends are the oldest and lightest hair on the head, so they need weekly deep conditioning and gentle handling when wet. A gloss on the silver section at eight weeks keeps it from fading pale and yellow.
Try this: ask for a slow, gradual fade with no visible line where the dark root ends, and bring a photo that shows how dark you want the top to stay.
Difficulty: High · Cost: $$$ (salon)
11. Reverse Silver Ombre

Reverse silver ombre flips the usual gradient: silver and white sit at the roots and melt into dark ends. On short cuts and bobs the bright root reads at once, without needing length for a gradient to develop. Oval and square faces suit it well, since the brightness at the top draws the eye upward.
This is the highest-upkeep ombre on the list, because the lightened section sits at the root where new growth shows first. Expect a root toner at four to six weeks. The dark ends, by contrast, need almost no care beyond standard colour-safe washing.
Try this: apply purple shampoo to the roots only, and leave the dark ends to your regular colour-safe shampoo, so the two halves keep their contrast.
Difficulty: High · Cost: $$$ (salon)
12. Shadow Root Silver Highlights

Shadow root silver keeps a darker, natural root and melts it into silver mid-lengths and bright silver ends. The dark root anchors the look, stops the brightness from washing out lighter skin tones, and suits every face shape. It is one of the most practical routes into silver for anyone who cannot return to the salon every four weeks.
The melt means regrowth blends into the shadow root instead of showing as a line, so appointments stretch to six to eight weeks. The lightened lengths still need bond care and weekly conditioning, since they carry the full lift.
Try this: ask for the melt to start about two inches from the scalp. A longer shadow root buys you the most extra weeks between visits.
Difficulty: High · Cost: $$$ (salon)
13. Silver Dip-Dyed Ends
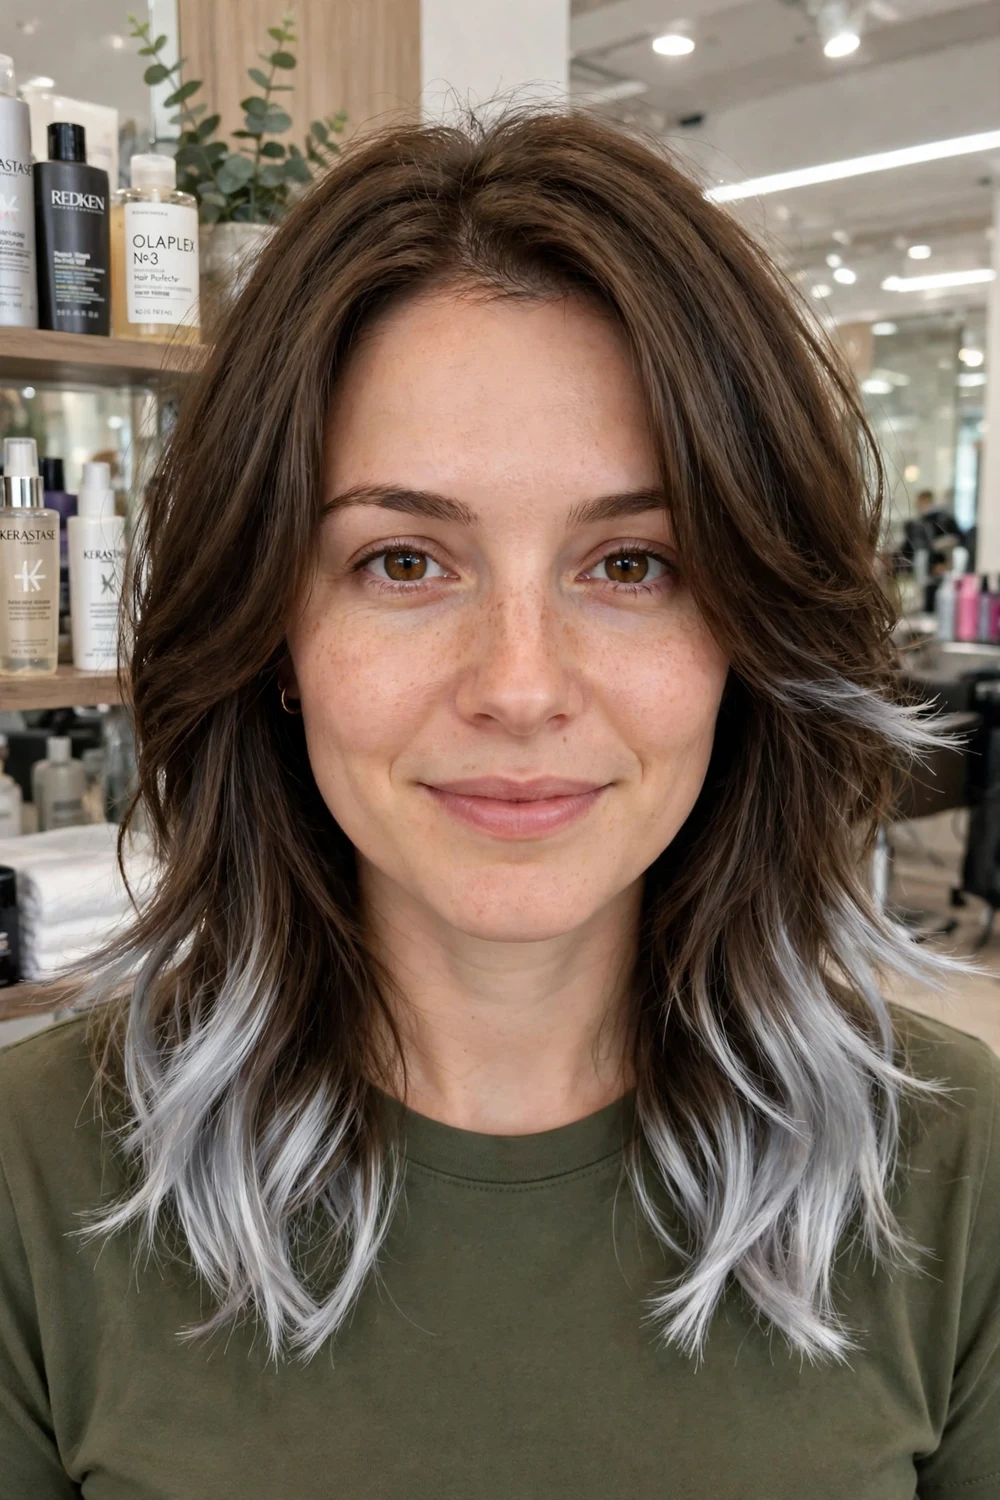
Dip-dyed ends colour only the last few inches of the hair in bright silver and leave the rest of the base alone. It is the smallest silver commitment on this list: no root work, no all-over change, and the colour leaves the head gradually as the hair is trimmed. It works on brown, blonde, and red bases alike.
The service is short and the upkeep is close to zero. If you dislike the result, a trim removes it. If you like it, the same appointment can extend the silver higher next time, toward a full ombre.
Try this: pair the silver ends with a clear gloss over the whole head, so the natural base shines as much as the coloured tips do.
Difficulty: High · Cost: $$ (salon)
14. Peekaboo Silver Underlayer

Peekaboo silver places a bright silver layer underneath the top layer of hair. With the hair down and still, the top colour covers it fully. In motion, in a ponytail, or in an updo, the silver shows through in flashes. It is the standard pick for workplaces with conservative dress codes.
Hidden placement also hides regrowth, so touch-ups can wait eight weeks or more. Book the underlayer as its own service, separate from any top-layer colour, so processing times stay clean and the natural hair above stays unprocessed.
Try this: wear your hair in a high ponytail or a half-up style on days you want the silver visible, and down on days you do not.
Difficulty: High · Cost: $$ (salon)
15. Silver Highlights on Curls

On curly hair, silver is painted onto the outer edge of each curl, following the shape of the coil. The placement lights up the curl pattern itself, so each ringlet shows a bright edge as it moves. Crimped and wavy textures get the same benefit: the texture breaks the silver into many small reflections instead of one flat sheet.
Curly hair runs drier than straight hair, and lightening adds to that dryness, so the care plan matters as much as the shade. Book a deep conditioning treatment at the colour appointment, keep one in the weekly routine at home, and diffuse on medium heat rather than high while the colour is fresh.
Try this: book with a colorist who colours curly hair dry and curl by curl, so the silver lands on the curls as you actually wear them.
Difficulty: High · Cost: $$$ (salon)
16. Silver Highlights on a Bob
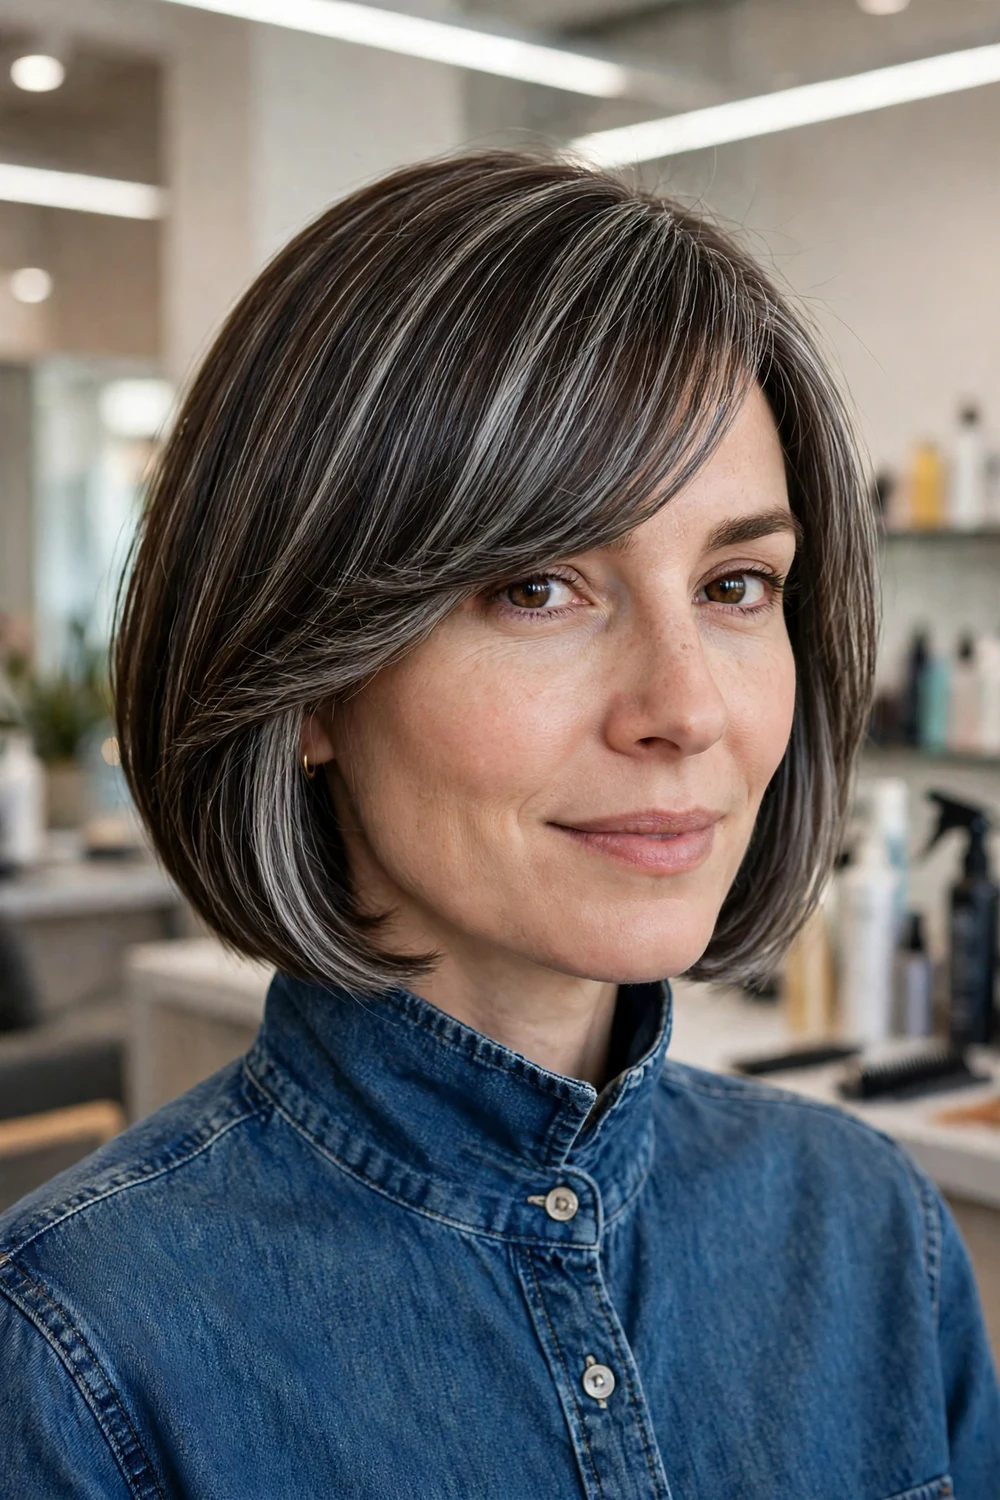
A bob gives silver highlights a clean frame. Side-swept and blunt bobs both work: a touch of silver through the top layer and at the tips adds width and movement, while long bangs carry a few silver pieces right at the face. Short hair also shows the tone honestly, since there is no length for uneven colour to hide in.
Silver dip-dyed tips suit a bob at the shorter end of this idea, and a full fine weave suits a longer bob. Root regrowth sits close to the face on short hair, so plan toner visits at five to six weeks to keep the tone even.
Try this: if your bob has bangs, put two fine silver pieces in the fringe. It is the cheapest way to test silver against your skin before a full set.
Difficulty: High · Cost: $$ (salon)
17. Silver Highlights on a Pixie Cut

A pixie carries silver in two main ways: swept back with product for a windswept silver finish, or cut asymmetrically with one longer, face-framing side in icy silver over darker roots. At this length the cut and the colour are planned together, and nothing about the result hides.
Short hair is the fastest silver to maintain day to day, since morning styling takes minutes. The trade-off is the salon cycle: a pixie needs a cut every four to six weeks anyway, and the colour refresh rides along with the cut appointment.
Try this: keep the sides and nape in your natural darker shade and put the silver only on the longer top section for the strongest shape contrast.
Difficulty: Medium to High · Cost: $$ (salon)
18. Silver Highlights on a Shag Cut
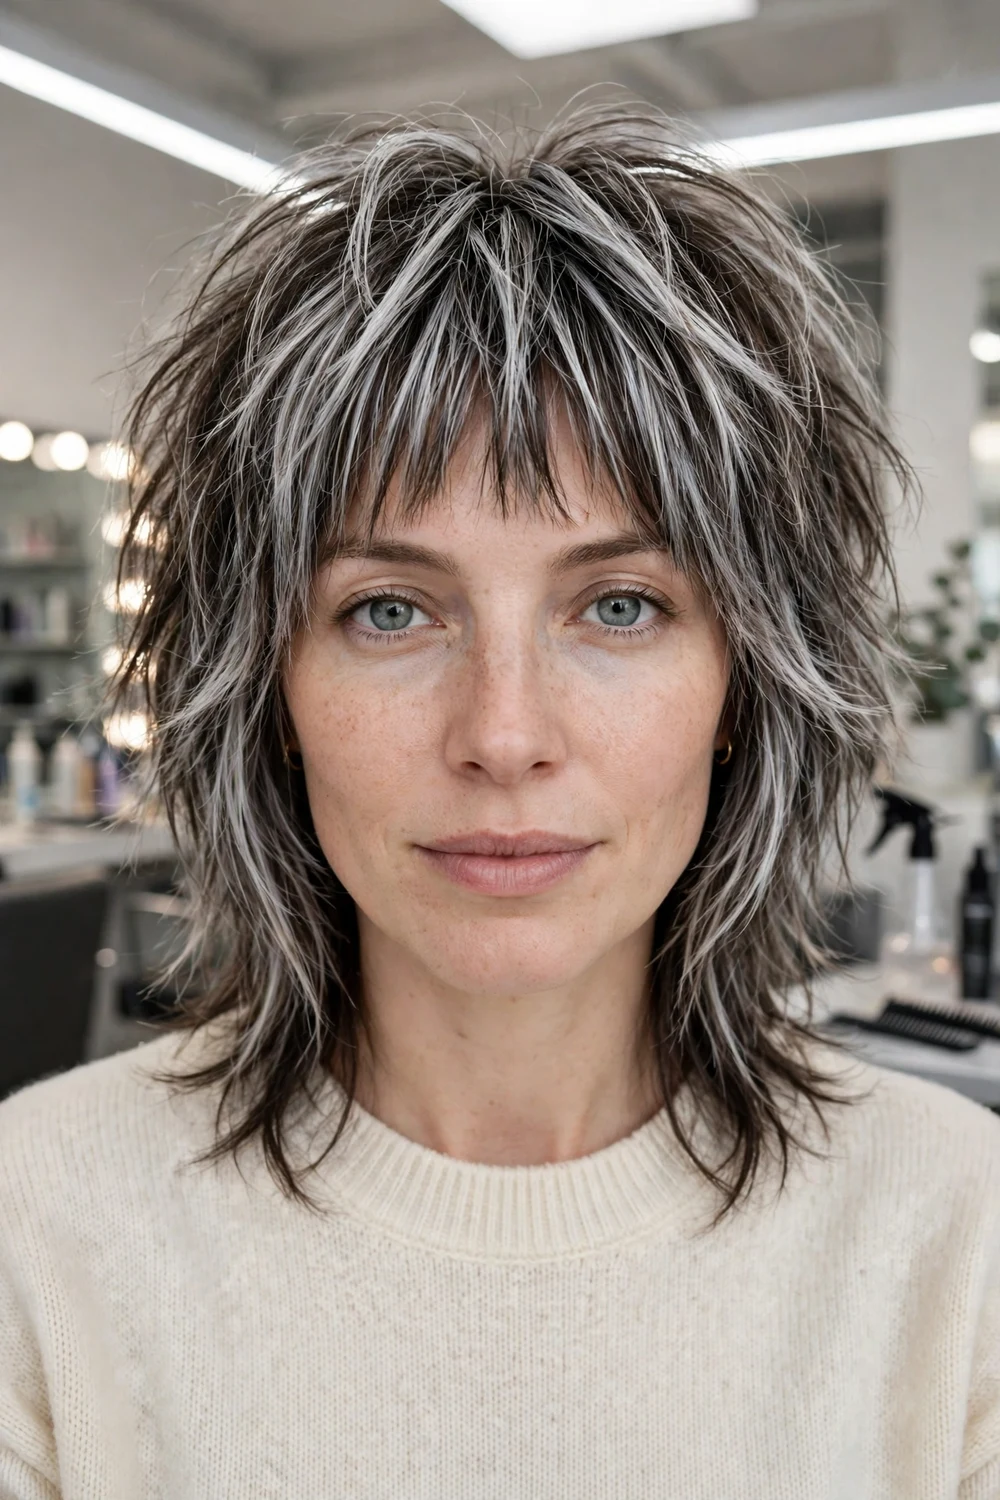
A shag cut gives silver highlights the texture that fine, pale hair often lacks. Choppy layers and a fringe break the silver into pieces that catch light at different angles, so the colour reads dimensional even on straight hair. The fringe softens the face and keeps the cool tone from looking severe.
Ask for the silver woven through the layers rather than placed in wide panels, since wide panels fight the broken-up shape of the cut. The layered grow-out is forgiving, and the style still looks right air-dried and tousled between appointments.
Try this: bring a photo of the shag shape as well as the colour. With this pairing, the cut decides where the highlights can land.
Difficulty: Medium to High · Cost: $$ (salon)
19. Silver and Gold Highlights
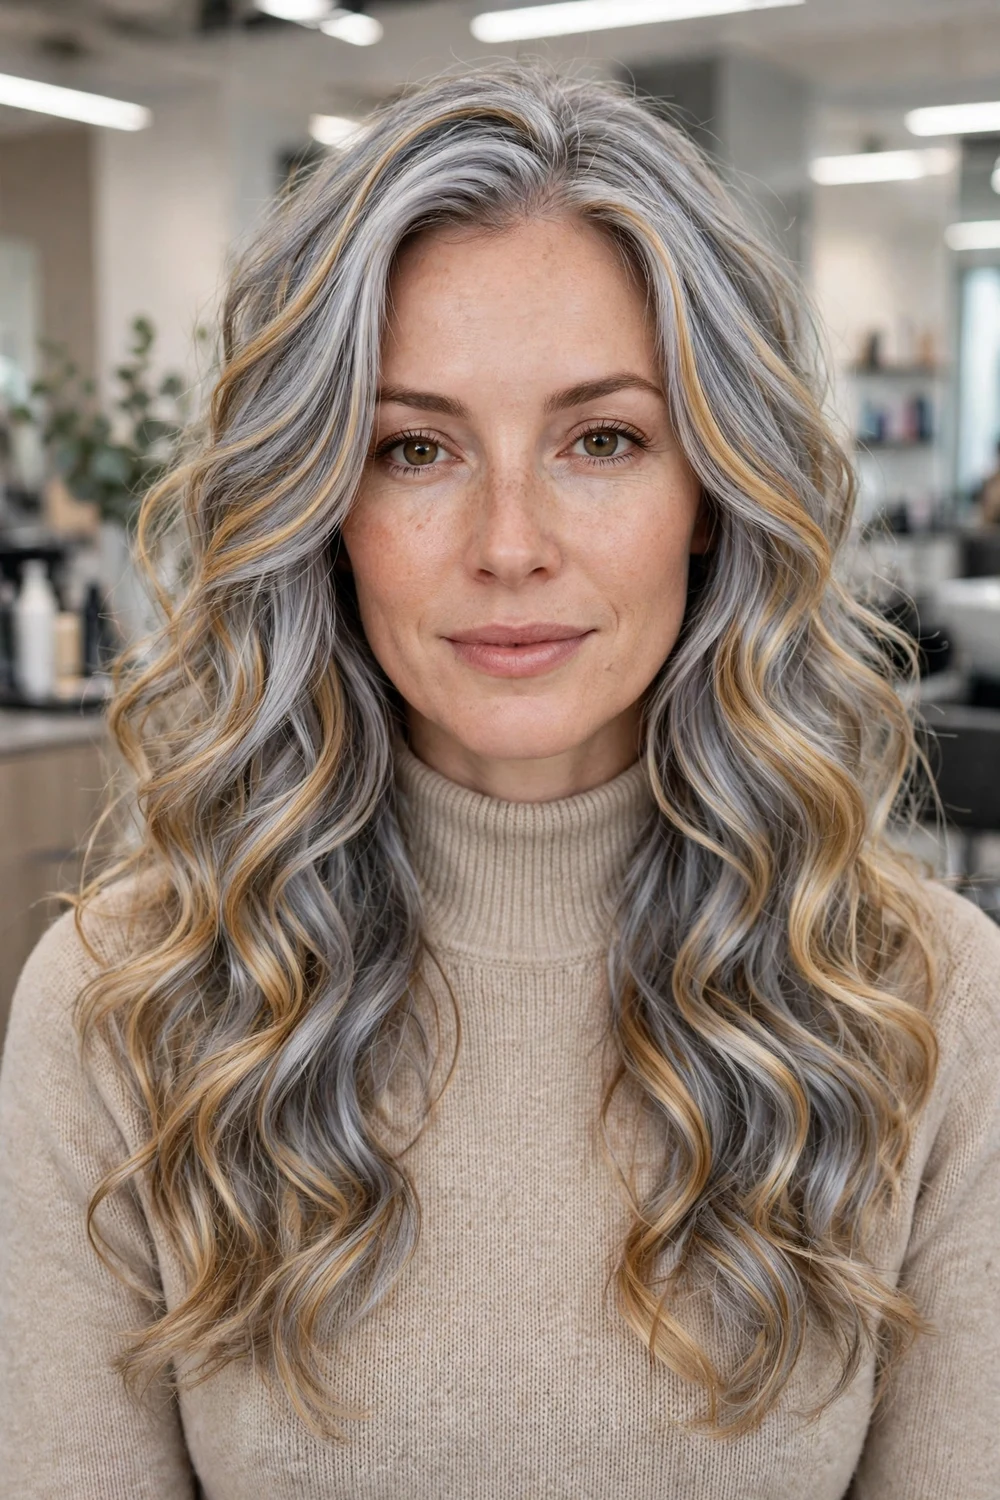
Silver and gold highlights weave the two metallic tones together in one set: cool silver pieces beside warm gold pieces, usually in curls or waves where the two tones can separate and show. A touch of beige warmth inside the silver is also the standard fix for warm and olive skin, where pure icy silver can read harsh.
Ask for a strand test before the full set, since the balance between the two tones decides the whole result. More silver reads cooler and bolder; more gold reads softer and closer to a blonde service. A gloss at six weeks keeps the warm pieces from drifting brassy and the silver pieces from going dull.
Try this: start with a ratio weighted toward your current colour, gold-heavy for blondes and silver-heavy for brunettes, and adjust at the refresh.
Difficulty: High · Cost: $$$ (salon)
20. Opal Silver Highlights

Opal silver layers soft touches of pink, blue, and lavender over a silver base, so the colour shifts as the light around it changes. The effect comes from layered toning over a fully pre-lightened base rather than from a single mixed formula, which is why it photographs differently in every setting.
The base has to reach pale yellow to white before toning starts. On hair lifted only to a golden level, the pastel tones will not show and the result reads as plain silver. The pastel layer fades first, so plan a tone refresh at three to four weeks.
Try this: refresh the pastel tones at home with a small amount of pastel colour mixed into clear conditioner, and keep the mix weak so the silver stays in charge.
Difficulty: High · Cost: $$$ (salon)
21. Lavender-Toned Silver Highlights
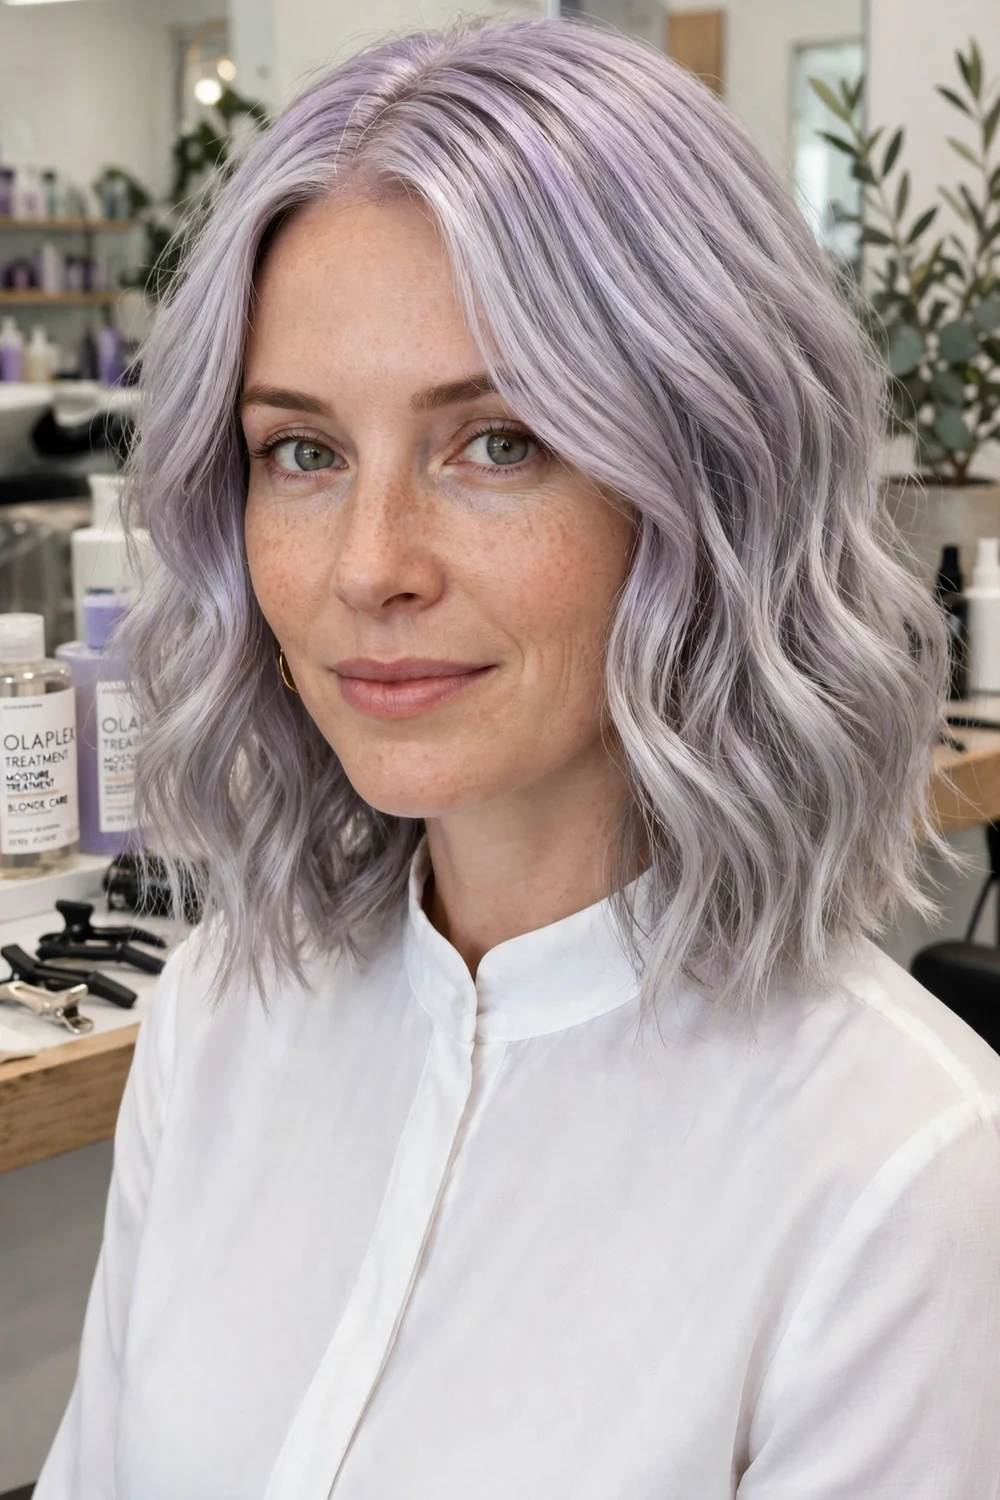
Lavender-toned silver lays a soft lavender glaze over a silver base. The lavender reads as an undertone rather than an obvious colour, which keeps the result wearable in settings where a full pastel shade would feel too loud. Pale and cool skin tones carry it best.
The glaze sits on pre-lightened hair, so the lift underneath follows the same rules as any icy silver. Lavender fades gently toward plain silver over three to four weeks, which gives this idea a soft landing if you decide against refreshing it.
Try this: ask for the lavender mixed weak for the first appointment. You can deepen the glaze at the refresh once you know how it sits on your skin.
Difficulty: High · Cost: $$$ (salon)
22. Blue-Tinted Silver Highlights
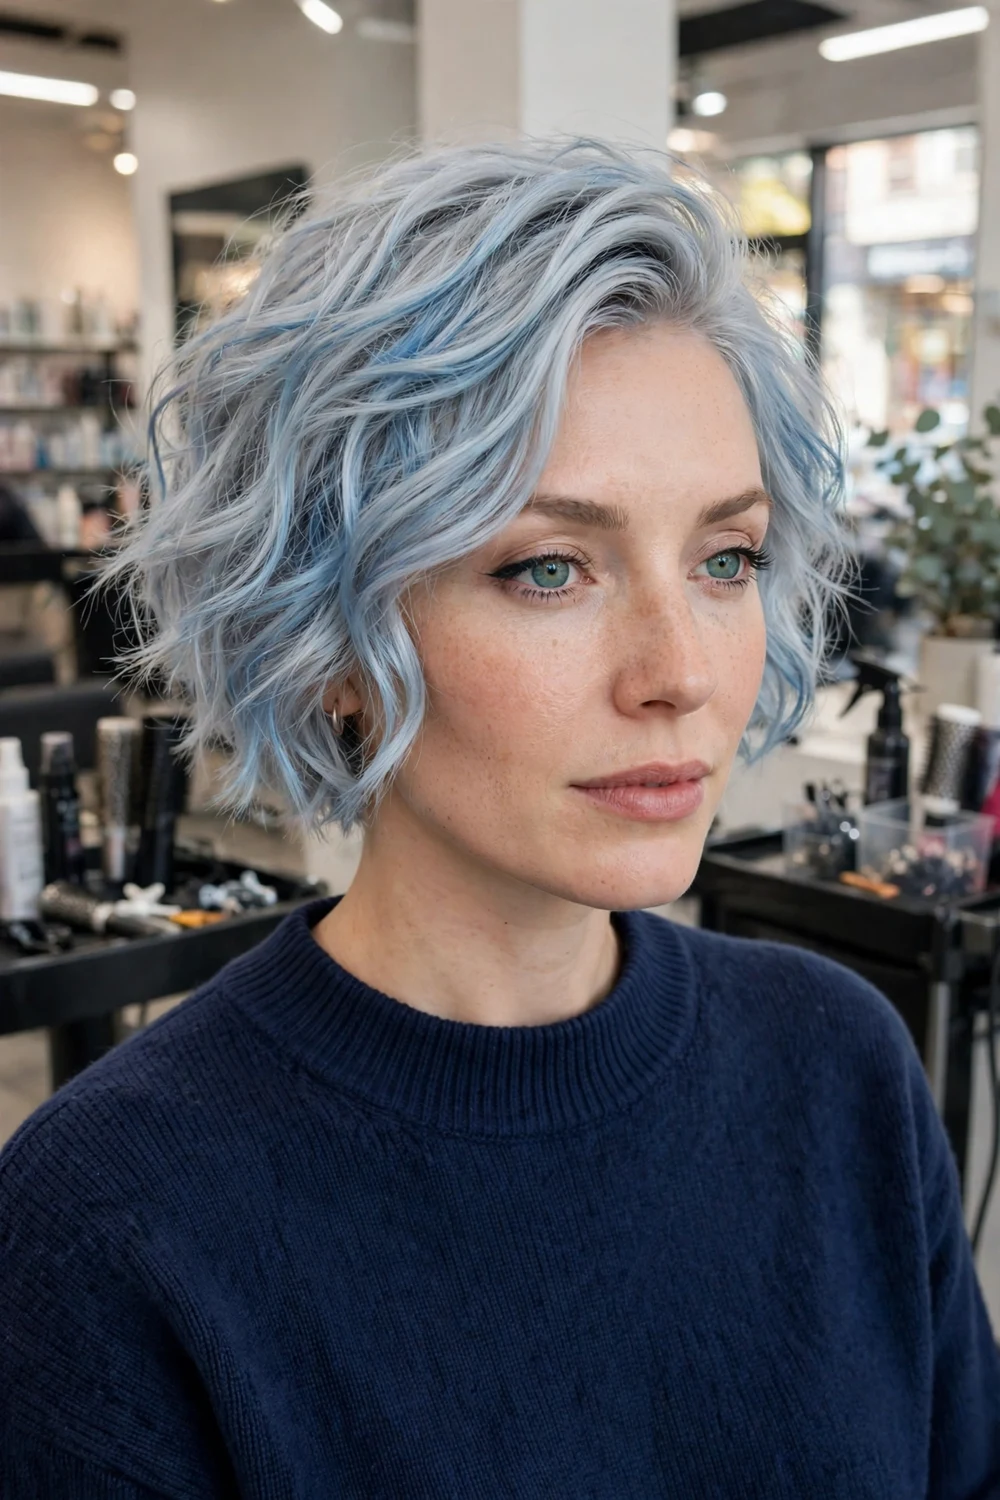
Blue-tinted silver pushes silver toward ice blue, so the tone reads cooler and moodier than plain metal. On wavy hair the blue pools in the curves of the wave and reads as a shift in the light rather than a stripe. Cool skin carries the extra blue best.
A pale, clean base is non-negotiable here: on a warm or yellow base, blue pigment shifts toward green. Blue also rinses out faster than silver, so wash with cold water and expect a tone refresh at three to four weeks.
Try this: bring two reference photos, one in indoor light and one outdoors, since blue-tinted silver changes more between the two than any other idea on this list.
Difficulty: High · Cost: $$$ (salon)
23. Muted Steel Silver Glaze
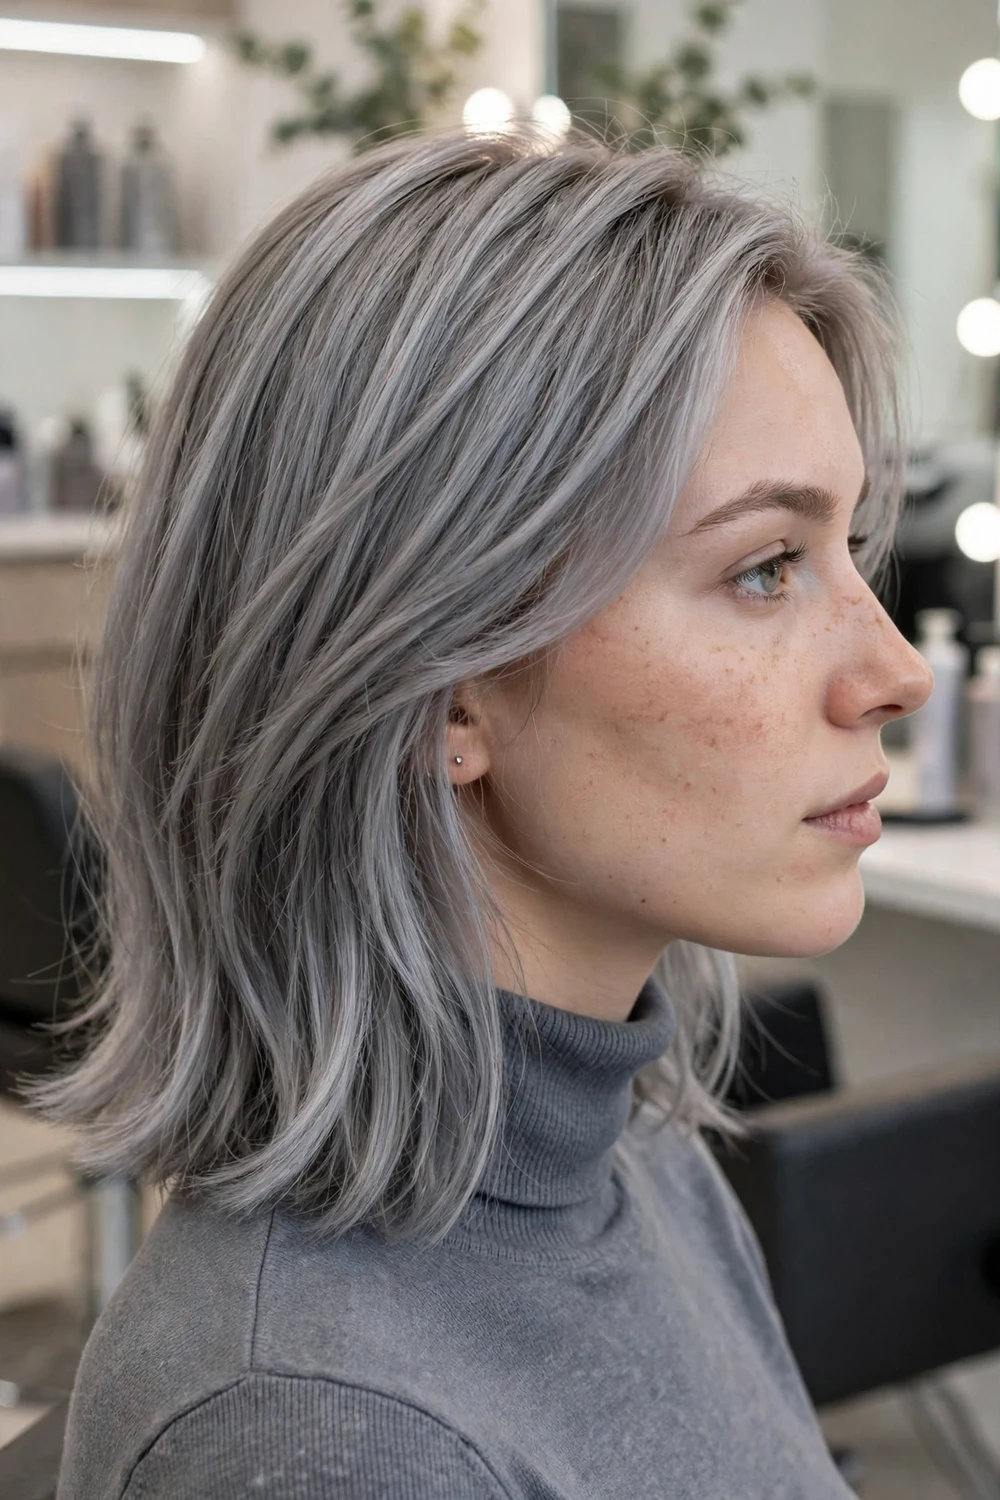
A muted steel glaze lays a soft, matte grey-silver tone over pre-lightened hair or over highlights you already have. Where most silver ideas chase shine, this one goes the other way: low reflectivity and a quiet, even finish. It suits anyone who finds high-shine metallic colour too loud for daily wear.
Because the glaze is a toner service over existing lightness, it adds no new lightening when your hair is already lifted. The matte tone lasts about eight weeks and fades evenly. Finish every wash with a cool rinse, since hot water lifts a glaze faster than it lifts permanent colour.
Try this: use this glaze as a trial run over blonde highlights before booking a full silver foil set, so you can live with a steel tone first.
Difficulty: Medium · Cost: $$ (salon)
24. Silver Highlights on Red and Auburn Hair

Warm red and auburn bases sit at the opposite end of the colour wheel from icy silver, which is exactly why the pairing stands out. Silver pieces over auburn, or a white-blonde ombre through the ends of long auburn hair, give the strongest warm-to-cool contrast on this list. Place the silver lower in the hair if pale tones near the face wash you out.
Red hair lifts unevenly, since the red pigment holds on through the lightening process, so this pairing can take an extra session to reach clean silver. The contrast also means fade shows sooner: the silver ends need a gloss at four to five weeks to stay icy against the red.
Try this: keep the silver in the bottom third of the hair for the first round. The contrast is still clear, and the placement avoids the hardest lift near the roots.
Difficulty: High · Cost: $$$ (salon)
25. Bold Silver Highlights on Black Hair

Black hair gives silver highlights their highest contrast setting. Partial silver highlights through a black base, toned icy with a gloss finish, read clearly from across a room, and darker lowlights can be added back in to keep the dimension layered. Pink, olive, and deep skin tones all carry this contrast well.
Black hair needs the most lift of any base on this list, and reaching clean silver usually takes multiple sessions with conditioning time between them. Keep the highlights nice and icy between visits with a blue toning mask, since black bases pull warm as they lift and fade.
Try this: agree the session plan at the consultation, including how bright the silver should be after session one, so the in-between stage still looks deliberate.
Difficulty: High · Cost: $$$ (salon)
26. White and Brunette Split Dye

Split dye divides the head down the part: icy white on one side, dark brunette on the other. Layers help the look, since the two halves swing and overlap as the hair moves, so the contrast shifts instead of sitting in two flat panels. It is the boldest placement on this list and the one that needs the clearest consultation.
Only the white half is lightened, and it takes the full lift to near white, so it needs more care than the brown side. The part line decides the whole look, so settle its exact position with a reference photo before any colour goes on.
Try this: wash the white side with purple shampoo and the brown side with a standard colour-safe shampoo, using the part as the dividing line in the shower as well.
Difficulty: High · Cost: $$$ (salon)
27. Two-Tone Silver and White Panels

Two-tone panels put the two shades in the keyword side by side: alternating panels of metallic silver and pure white woven through one base. The silver panels carry the shine and the white panels carry the brightness, so the head reads layered even on straight hair worn down. Light and medium brown bases show the pairing most clearly.
Both tones come from the same lightening session, toned separately at the basin, which makes this a single-service route to a two-shade result. The white panels fade first, so the toner refresh at five to six weeks concentrates on those sections.
Try this: keep the panels fine rather than chunky if you want the two tones to blend at a distance and separate only up close.
Difficulty: High · Cost: $$$ (salon)
28. Silver Ribbons on Straight Hair
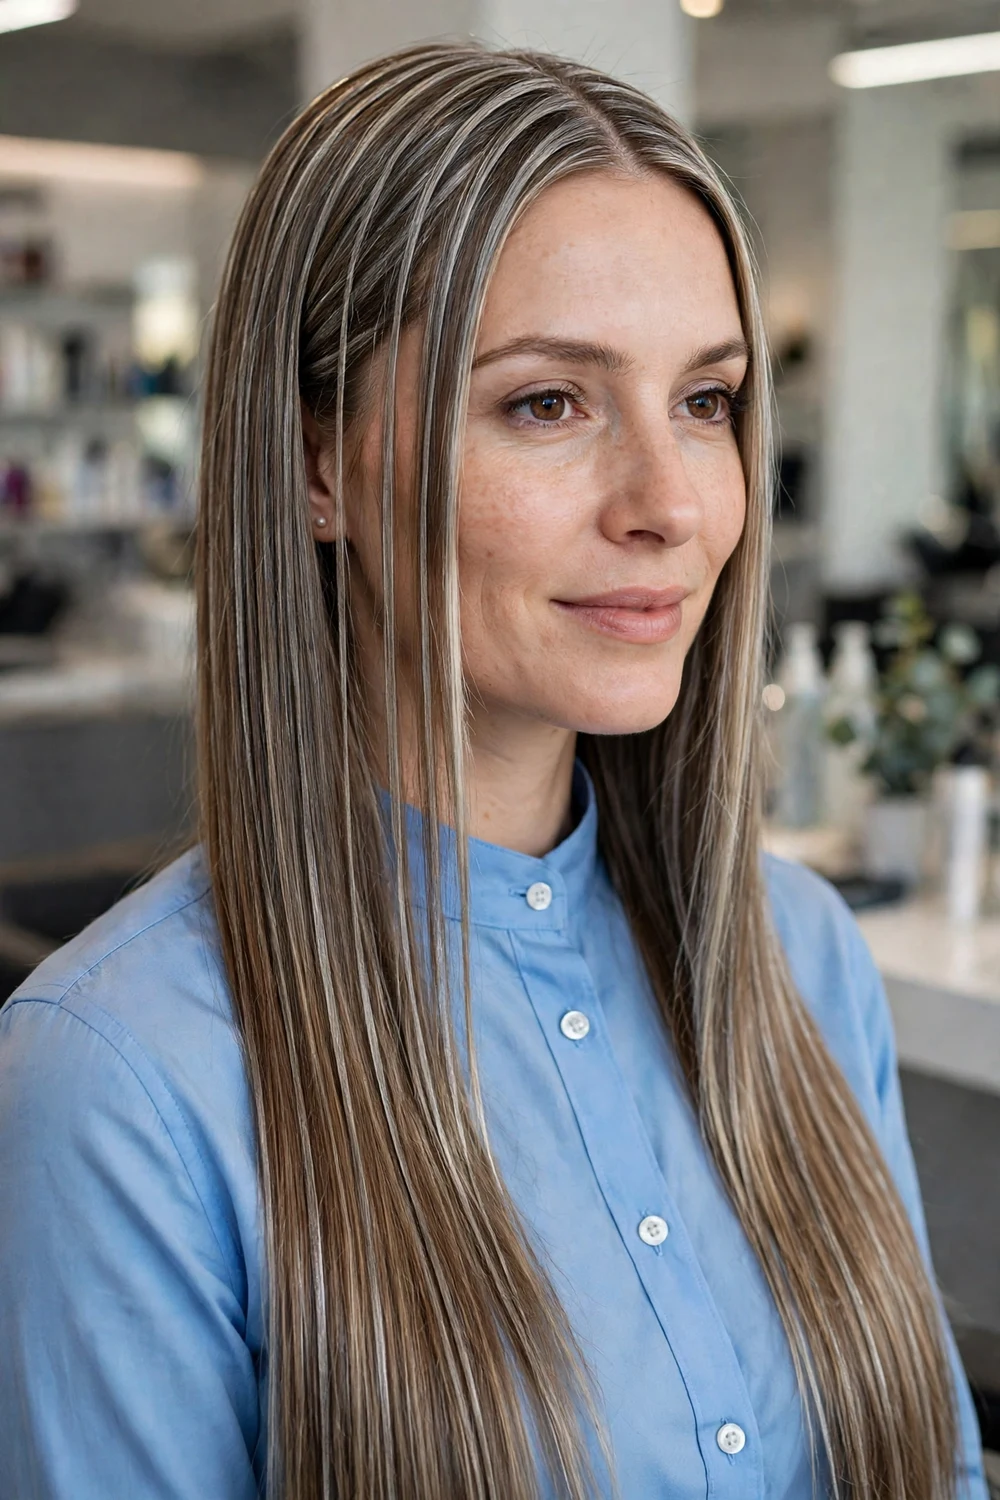
Straight hair shows silver differently from waves: with no curl to break the colour up, fine silver ribbons running from root to tip read as clean, glossy lines. The smooth surface also bounces light back in one sheet, so the silver looks polished and even. Dark blonde and light brown bases suit the fine ribbon width best.
Straight hair shows every uneven patch, so even lifting and even toning matter more here than in any wavy style. Keep heat styling moderate, since freshly lightened ribbons dry out faster than the base around them, and finish with a shine product to keep the surface reflective.
Try this: ask for the ribbons kept fine and even in width from root to tip. On straight hair, one uneven ribbon is visible at a glance.
Difficulty: High · Cost: $$$ (salon)
Frequently Asked Questions
Do silver and white highlights need bleach?
Yes, in almost every case. Silver and white pigment cannot show on unlifted hair, so the highlighted pieces are pre-lightened first and toned silver or white afterwards. Blonde hair usually needs one session. Dark brown and black hair often needs two or more sessions to reach icy white without damage. The one route with no new lightening is a steel or silver glaze over highlights you already have.
How long do silver highlights last before they need toning?
Icy white and tinted silver tones usually need a toner refresh at three to four weeks, since the cool pigment rinses out with every wash. Standard silver foils and streaks hold four to six weeks. Deeper and lower placements last longer in practice: pewter balayage, charcoal ribbons, and shadow root styles can go eight to ten weeks before the tone needs attention, because the grow-out is soft and the fade is less visible.
Which silver highlight shade suits warm skin tones?
Warm and olive skin suits silver softened with warmth: silver woven with gold highlights, or a silver with a touch of beige in the toner. Pewter and charcoal silver also sit well on warm skin, since their smoky depth carries less blue than icy platinum. The shades to approach with care are the bluest ones, blue-tinted silver and the iciest platinum streaks, which can clash with warm undertones.
What is the lowest upkeep silver highlight idea?
Peekaboo silver and pewter balayage tie for the lowest upkeep. The peekaboo underlayer hides its own regrowth under the top layer of hair, and pewter balayage starts low on the head in a deep tone that fades slowly. Dip-dyed ends are close behind, since there is no root work at all and a trim can remove the colour entirely. All three can stretch salon visits to eight weeks or more.
How do I stop silver highlights from turning yellow?
Use a purple or blue toning shampoo once a week in place of your regular shampoo, wash with cool water, and keep washes as infrequent as your hair type allows. Book a gloss or toner refresh at four to six weeks for bright placements. Cover your hair in strong sun and rinse after swimming, since UV light and chlorine both push lightened hair toward yellow.
Final Thoughts
Silver and white highlights work on any base colour once you match the placement to your starting point and your calendar: a white money piece or dip-dyed ends for a first step, silver balayage or a shadow root for a softer grow-out, or chunky foils and a split dye when you want the contrast at full strength. Decide the tone first, icy, smoky, or tinted, then the placement, and the upkeep plan follows from those two choices. If you are still weighing cool silver against its warm opposite before you book, the fall copper hair colors list shows the copper family in the same level of detail.

