


Thin locs changed how I think about locs in general. A set of fine, pencil-thin locs moves like loose hair, dries faster after washing, and opens up styling options that thick locs handle poorly. I have watched friends with fine hair avoid locs for years because they pictured only heavy, thick ropes, and then light up when they saw a sisterlock-size set worn in a bob or a bun.
This list collects 24 thin locs hairstyles for women, running from starter methods and short cuts through buns, updos, twists, and simple ways to wear a mature set loose. Every idea keeps the same two rules in view: the style stays lightweight, and the tension at the root stays low. If you are comparing locs with plaited protective styles before you commit, the braided hairstyles for Black women guide is a useful side read.
Quick Takeaways
- Thin locs are formed from small sections, about pencil width or finer, so each loc weighs less at the root than a traditional loc.
- Short cuts, bobs, and loose updos suit thin locs best, since they keep weight low and tension off the hairline.
- Starter methods matter: comb coils, finger coils, and two-strand twists all lock fine hair gently.
- Retightening every six to eight weeks is the standard rhythm. Tighter schedules add tension fine hair does not need.
- Light products only. Heavy creams build up inside small locs and are hard to wash out.
Thin Locs at a Glance
The table below groups the styles on this list by the job they do, so you can jump to the section that matches your length and your calendar.
| Style group | Best loc length | Typical hold | Tension level |
|---|---|---|---|
| Starter locs (comb coils, finger coils, two-strand twists) | 1 to 4 inches | Permanent base style | Low |
| Short cuts (bob, pixie, fade, undercut) | Ear to chin length | Grows out over 2 to 4 weeks | Low |
| Buns and updos (loc bun, petal buns, halo braid, pompadour) | Chin length and longer | 1 day to 1 week | Low to medium |
| Twists and texture sets (barrel twists, flat twists, twist-out, rollers) | Ear length and longer | 2 days to 2 weeks | Low to medium |
| Finishing touches (beads, cuffs, headwraps) | Any length past the starter stage | Same day, removable | Low |
1. Chin-Length Thin Loc Bob

A chin-length bob is the most requested cut for thin locs, and the reason is weight. Locs that stop at the chin carry little pull at the root, so edges stay calmer between appointments. A blunt bottom line also makes a fine set read fuller, since every loc ends at the same point.
Ask your loctician to size the parts to your density. Smaller parts at the hairline and crown protect the areas that thin first, while slightly larger parts at the back add coverage. The bob holds its shape for weeks and needs a trim only when the ends start to uneven out.
Try this: Book the cut once your locs have settled and hang straight, so the line is measured on settled length rather than starter shrinkage.
Difficulty: Low · Cost: $ (salon)
2. Sisterlocks Pixie Crop
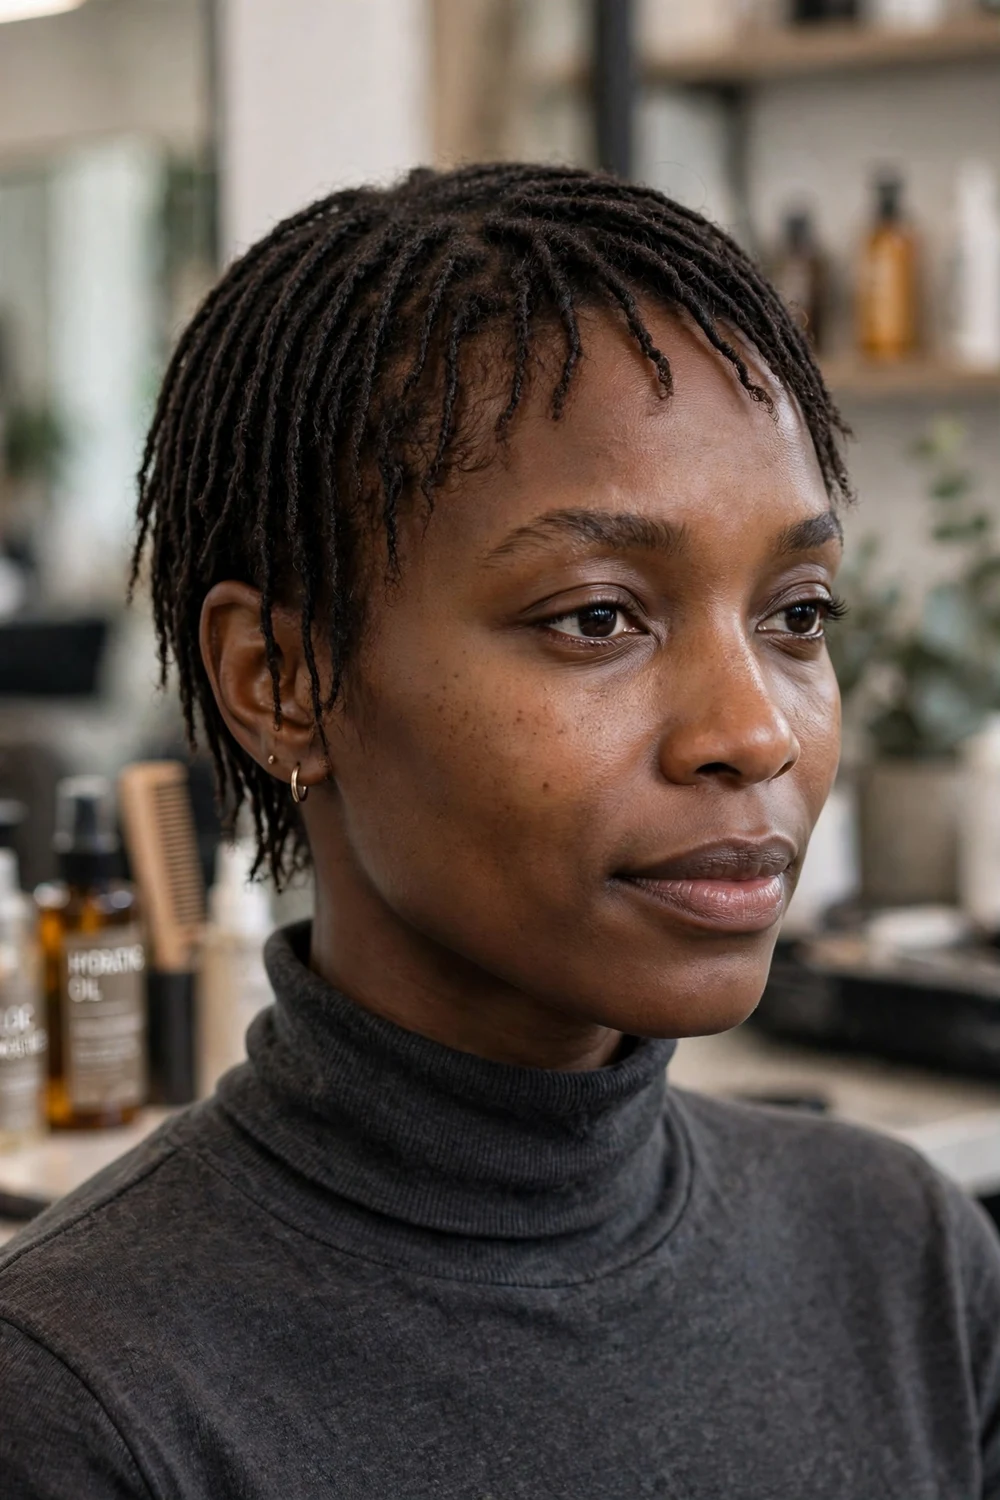
The pixie crop keeps sisterlock-size locs cropped just below the ear. It is one of the lightest options on this list, which suits fine hair and tender edges. The short length also dries fast after washing, a real help in the first year.
Keep the sides and back tapered close, and leave a little more length on top for movement. If you like short cuts in general, the pixie haircuts for curly natural hair guide shows how the same face-framing rules apply to loose hair. Retightening stays on a steady schedule, since short locs show new growth sooner.
Try this: Sleep with a satin scarf from the first night. Short locs rub against pillow cotton and fuzz up faster than longer sets.
Difficulty: Low to Medium · Cost: $$ (salon)
3. Comb Coil Starter Locs
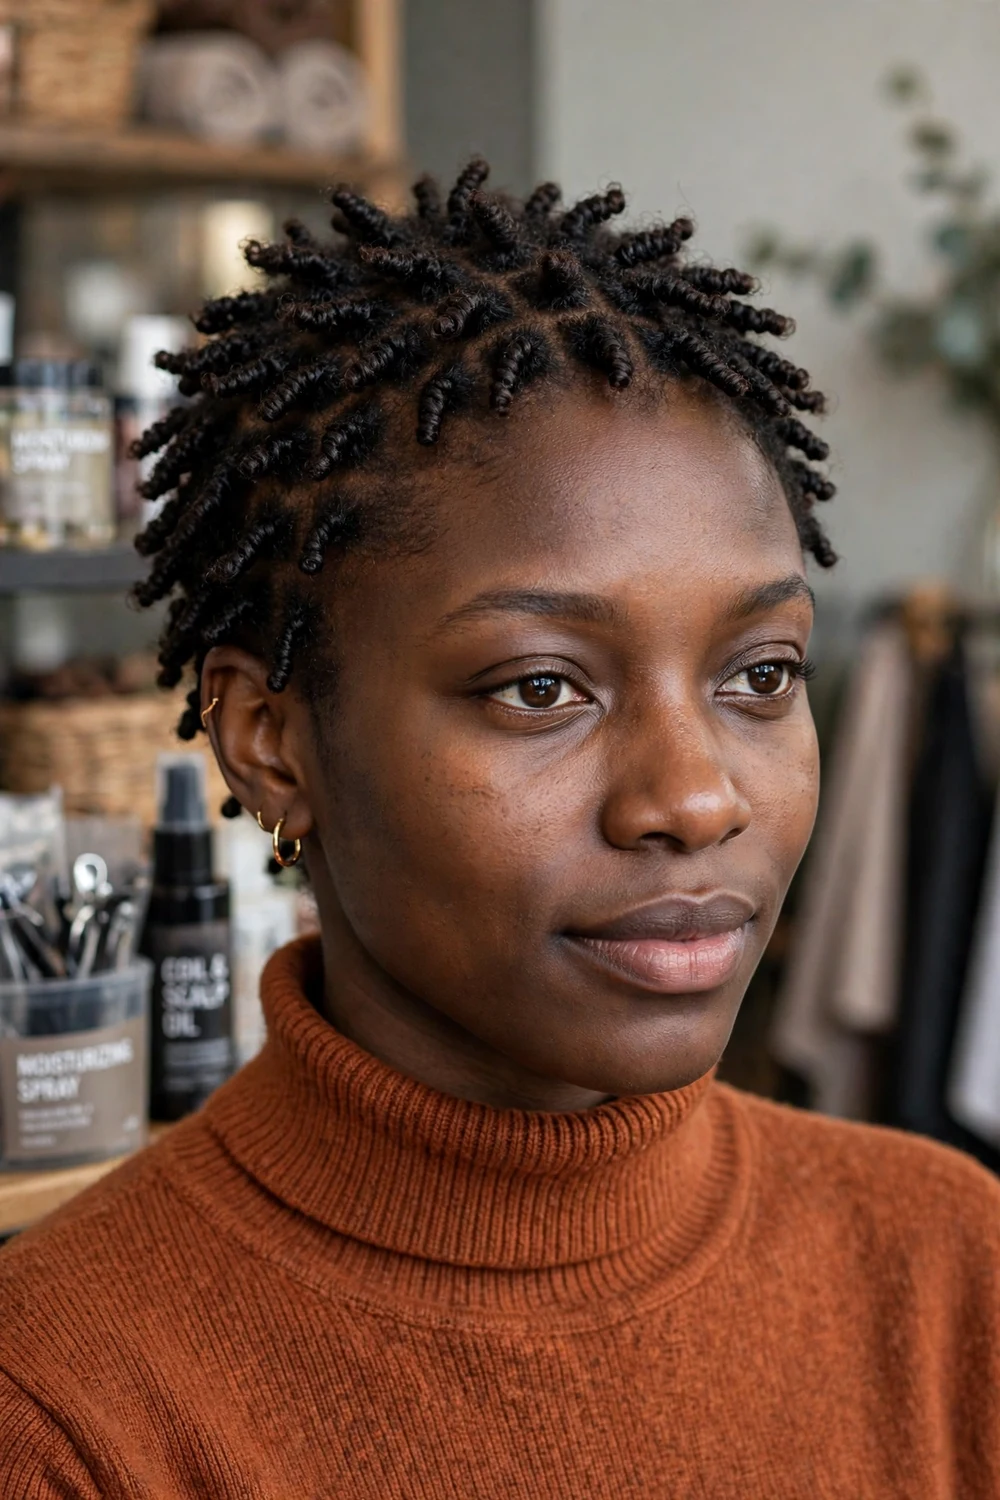
Comb coils start each section with a small comb, twisting the hair into a tight spiral. The coil gives fine hair grip and visible texture in the starter stage, when locs are at their most fragile. Sections stay small and light, so the scalp carries little tension.
Coils loosen as the hair begins to lock, and most sets settle into softer locs within a few months. Wash gently in the early weeks and separate the coils after each wash so they lock as single locs. Palm rolling between appointments keeps the shape tidy.
Try this: Wear a stocking cap or use a mesh cap on wash day in the first month, so the water pressure does not unravel fresh coils.
Difficulty: Low to Medium · Cost: $ (salon)
4. Two-Strand Twist Starter Locs
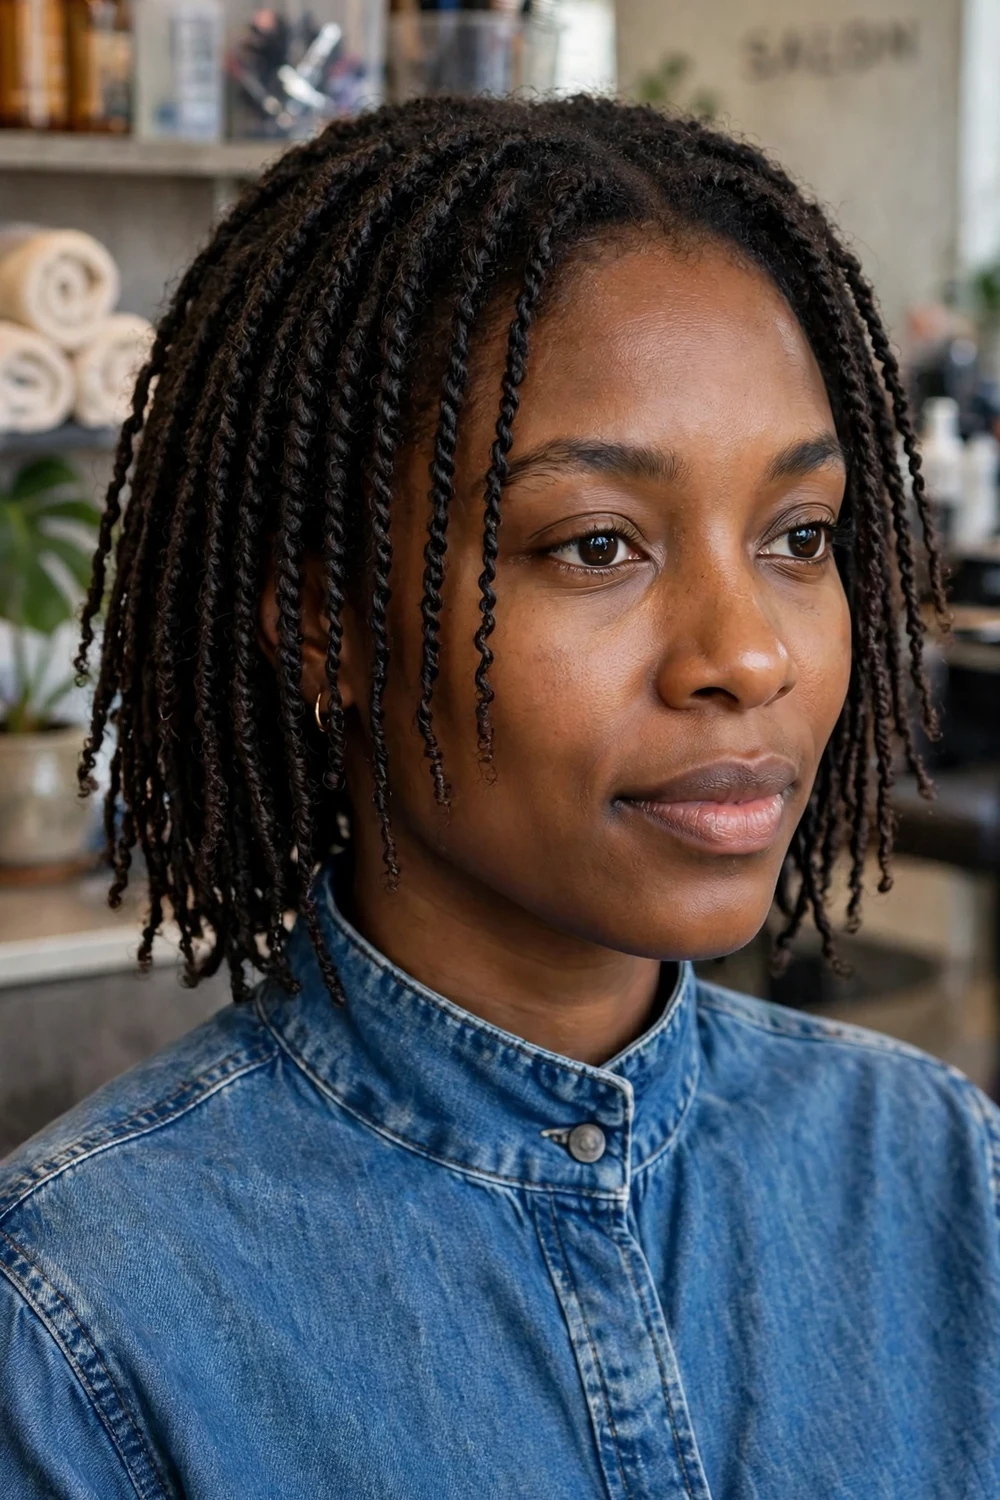
Two-strand twists double each section over itself, so thin hair looks thicker from day one. The twist pattern gives the hair a clear path to follow as it locks, and the method works at home or in a salon chair. Ear length keeps the twists light while they mature.
Twists need patience at wash time. Wash with the twists secured in loose bands, and retwist the roots only, since overworking the lengths causes frizz. As the locs mature, the twist pattern fades and the surface smooths out.
Try this: Take a clear photo of your parting grid on install day. It makes home retwists far easier to match later.
Difficulty: Low · Cost: $ (salon)
5. Finger-Coiled Baby Locs

Finger coils are twisted by hand, section by section, with no tools beyond a comb for parting. The hand method is gentle, so it suits thin hair and hair that has been through color or heat. The soft coils sit close to the scalp and cover sparse areas well.
Baby locs this small need steady care in the first months. Roots are retwisted about every four weeks at first, then the gap can stretch as the locs mature. Keep products light, since heavy creams sit on small locs and attract lint.
Try this: Mist with water only between washes in the first weeks. Added product at this stage mostly builds up.
Difficulty: Low to Medium · Cost: $ (salon)
6. Side-Swept Thin Locs
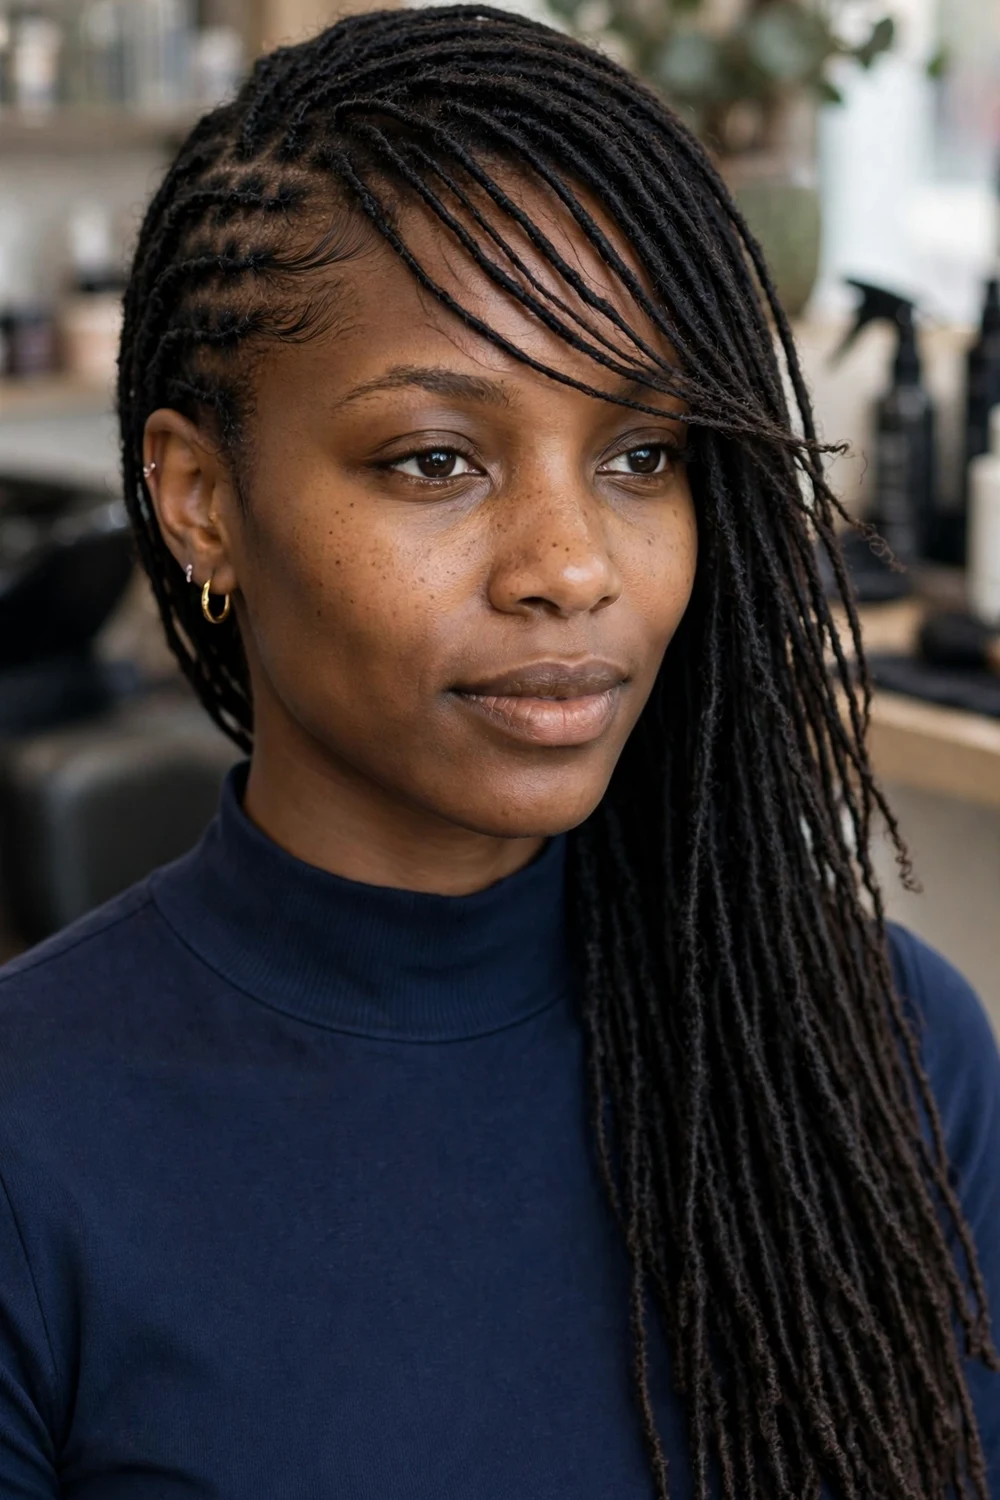
Side-swept locs move the whole set across to one side, with the longer side falling over the forehead. The diagonal line draws the eye across the face and makes a fine set look denser. It takes two minutes and needs no heat and no pins on most lengths.
Train the sweep gradually. Part the locs on your preferred side after each wash, and they will start to fall that way on their own. Keep the pulled-back side loose at the root, since a tight sweep held all day can strain the hairline on that side.
Try this: Switch sides every few weeks. One side worn flat for months can start to look thinner than the other.
Difficulty: Low · Cost: $ (salon)
7. Flat-Twist Loc Updo

Flat twists roll sections of locs back from the hairline and pin them into a low updo at the nape. The style moves weight away from the front edges, the area that thins first for many women. It works on locs as short as a few inches, which makes it one of the earliest updo options in a loc journey.
A loctician can set the twists for an event, and the style holds for several days with a scarf at night. The wider updo hairstyles for Black women collection shows how the same low, pinned finish works across textures. Keep the first twist on each side looser than the rest, so the hairline rests.
Try this: Pin the ends under the last twist instead of adding extra pins. Fewer pins means fewer pressure points.
Difficulty: Medium · Cost: $$ (salon)
8. Barrel Twist Locs
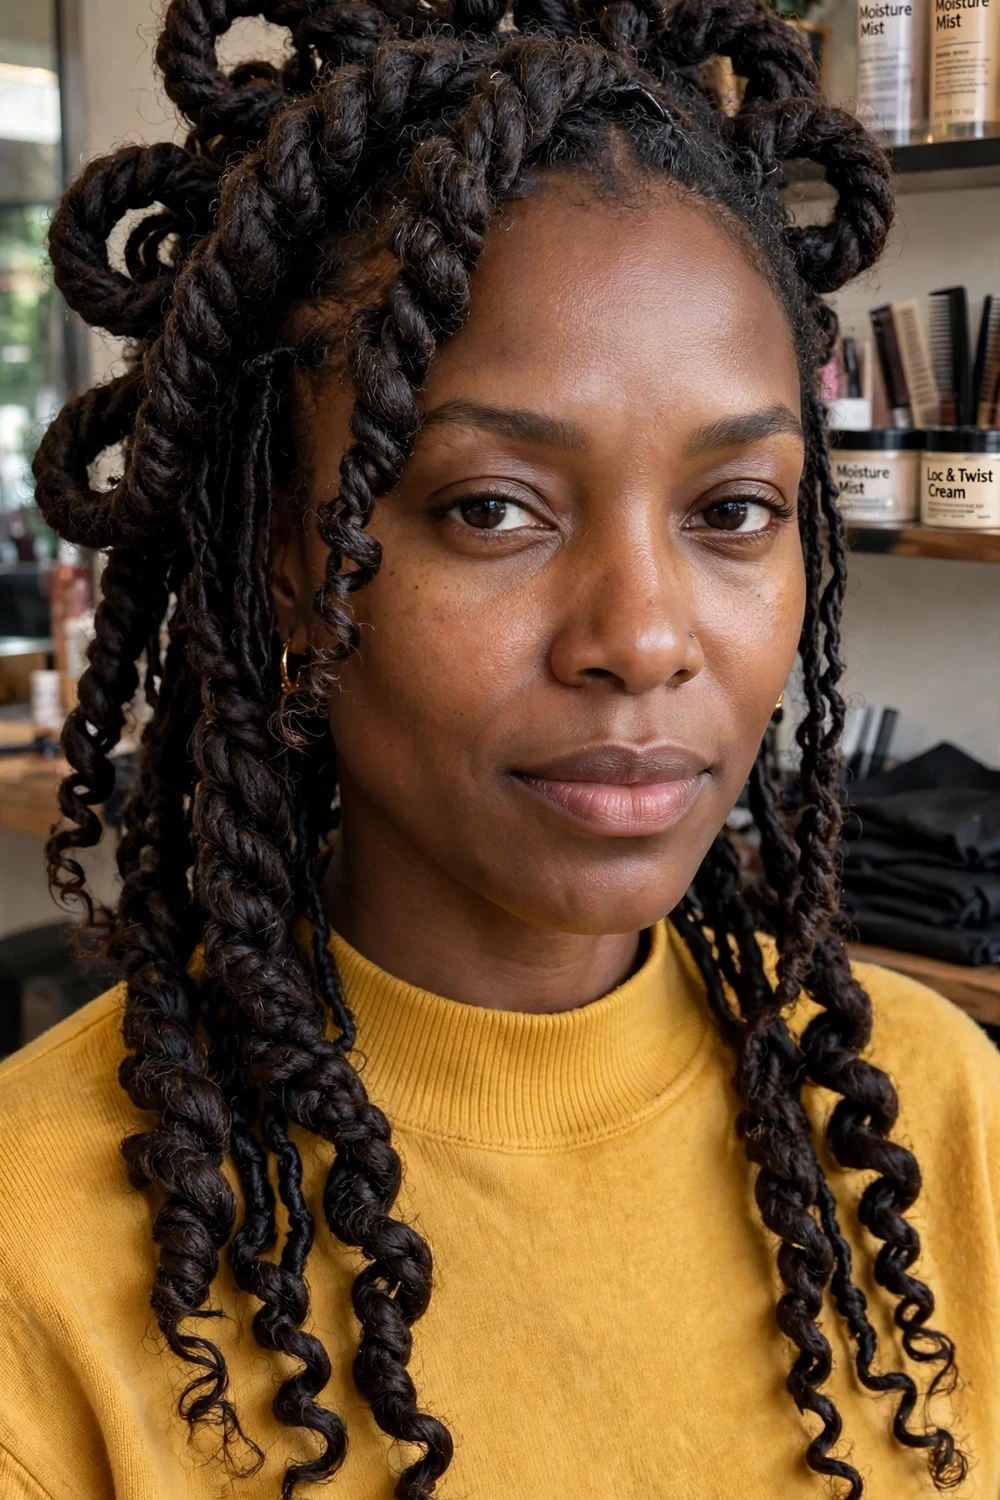
Barrel twists wrap groups of locs around each other in thick rope sections. On thin locs the ropes look full and rounded, and the style holds its shape for one to two weeks. It is a salon style for most people, since the back sections are hard to tension evenly at home.
Ask for the ropes to sit firm at the scalp and softer through the lengths. Ropes pulled tight along the whole head ache by day two and stress the roots. Take the style down as soon as the edges start to lift, and let the scalp rest a few days before the next set.
Try this: Count on about a week of wear for fine locs. Thin ropes unravel sooner than ropes made from thicker locs.
Difficulty: Medium to High · Cost: $$ (salon)
9. Loc Twist-Out Waves
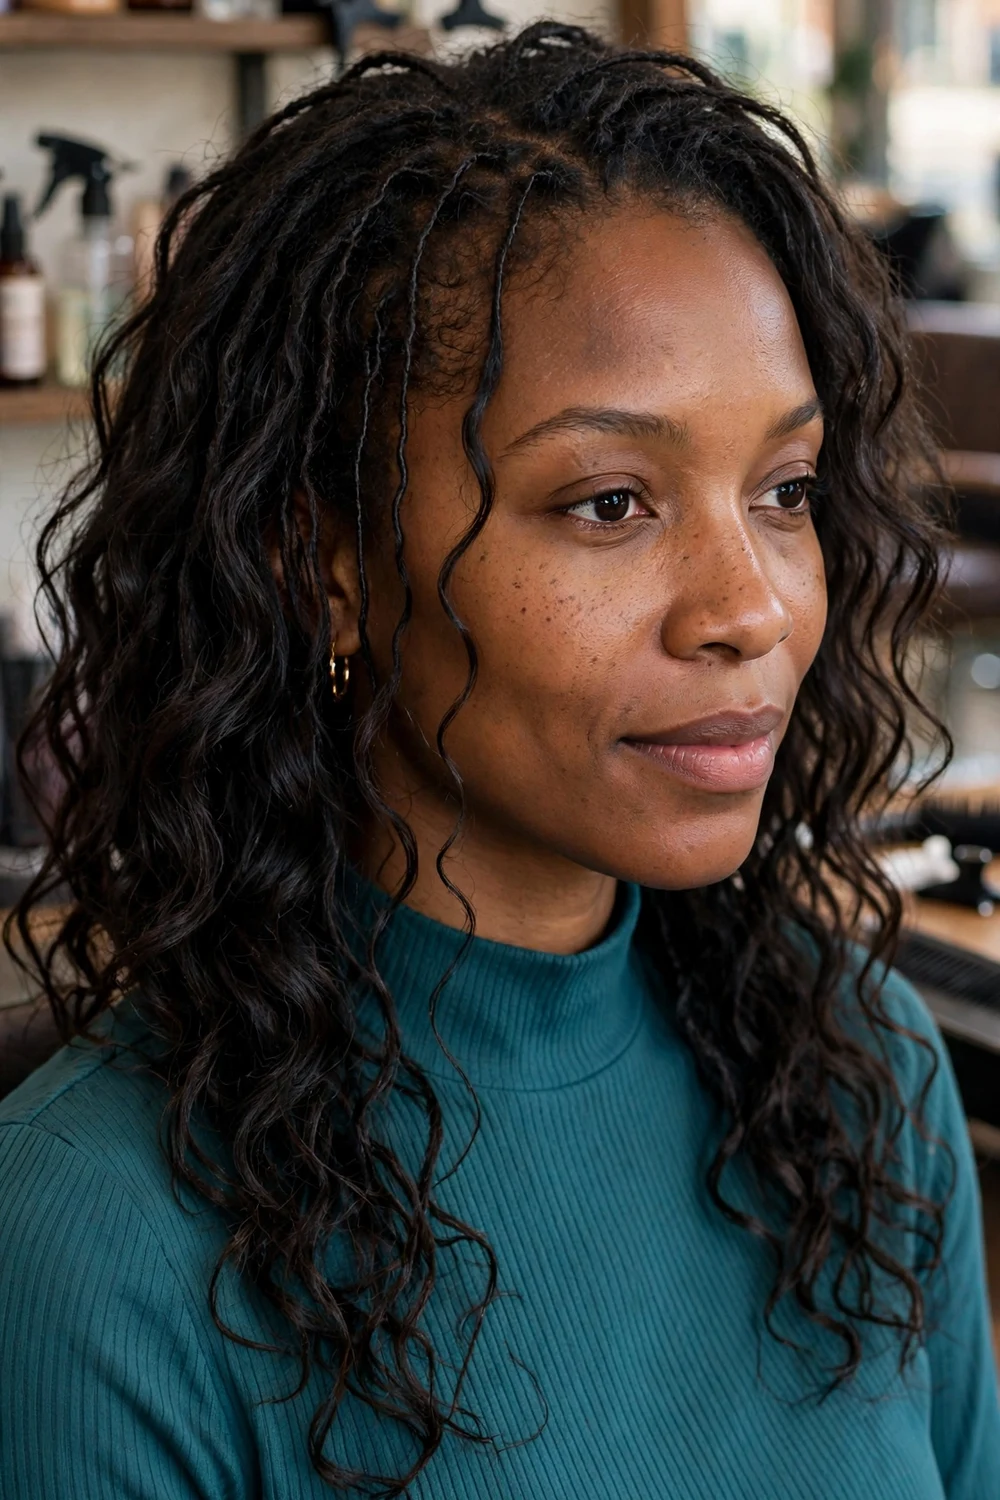
A twist-out starts by twisting groups of locs together, letting them dry fully, then releasing the twists. The result is a soft wave that runs through the whole set and adds the look of fullness with no product weight. It is a handy refresh between retightening appointments.
Dry time decides the result. Twists released while still damp fall flat within hours, so set them in the evening and release them the next morning. Fluff at the roots with your fingers only, since brushes rough up the surface of thin locs.
Try this: Set the twists on wash day while the locs are already damp. You save a full wetting and drying cycle.
Difficulty: Low · Cost: $ (salon)
10. Tapered Loc Fade
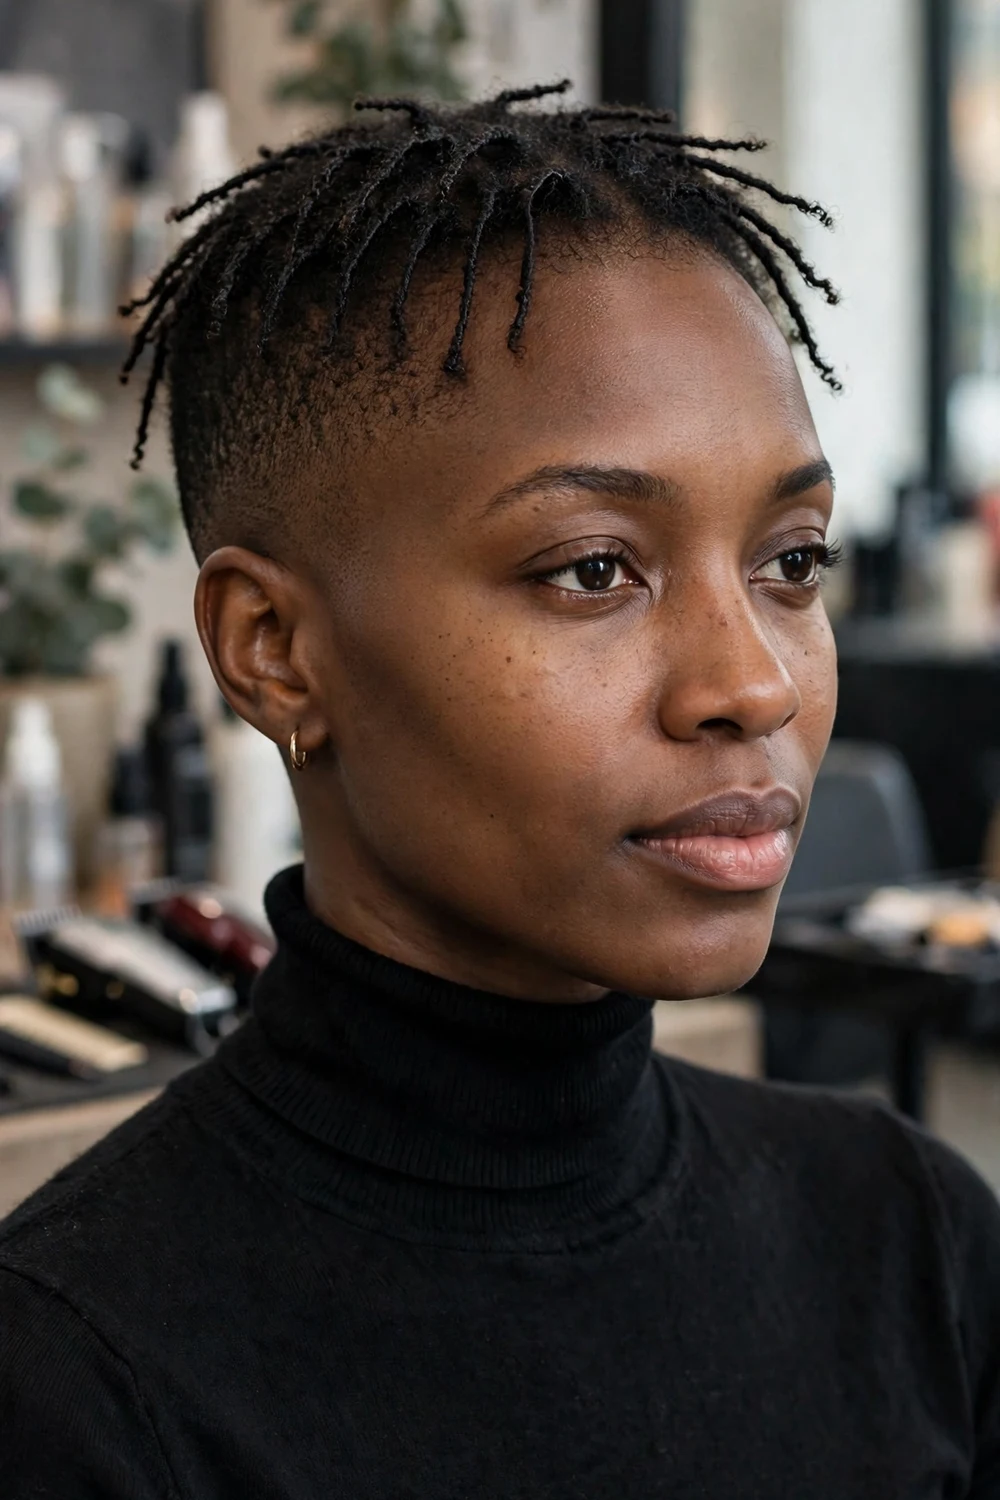
A tapered fade pairs short thin locs on top with sides and a back that graduate down to the skin. Removing length at the perimeter takes away the areas where fine hair looks sparsest, and the contrast makes the top read denser. The cut also cuts daily styling down to almost nothing.
The fade is the upkeep here. It needs a touch-up about every two weeks to stay clean, while the locs on top follow a normal retightening schedule. Tell your barber to leave the hairline natural, since a pushed-back line on thin edges grows out harshly.
Try this: Book the fade and the retightening on the same visit when you can. One chair, one trip, both jobs done.
Difficulty: Low to Medium · Cost: $$ (salon)
11. Undercut Thin Locs
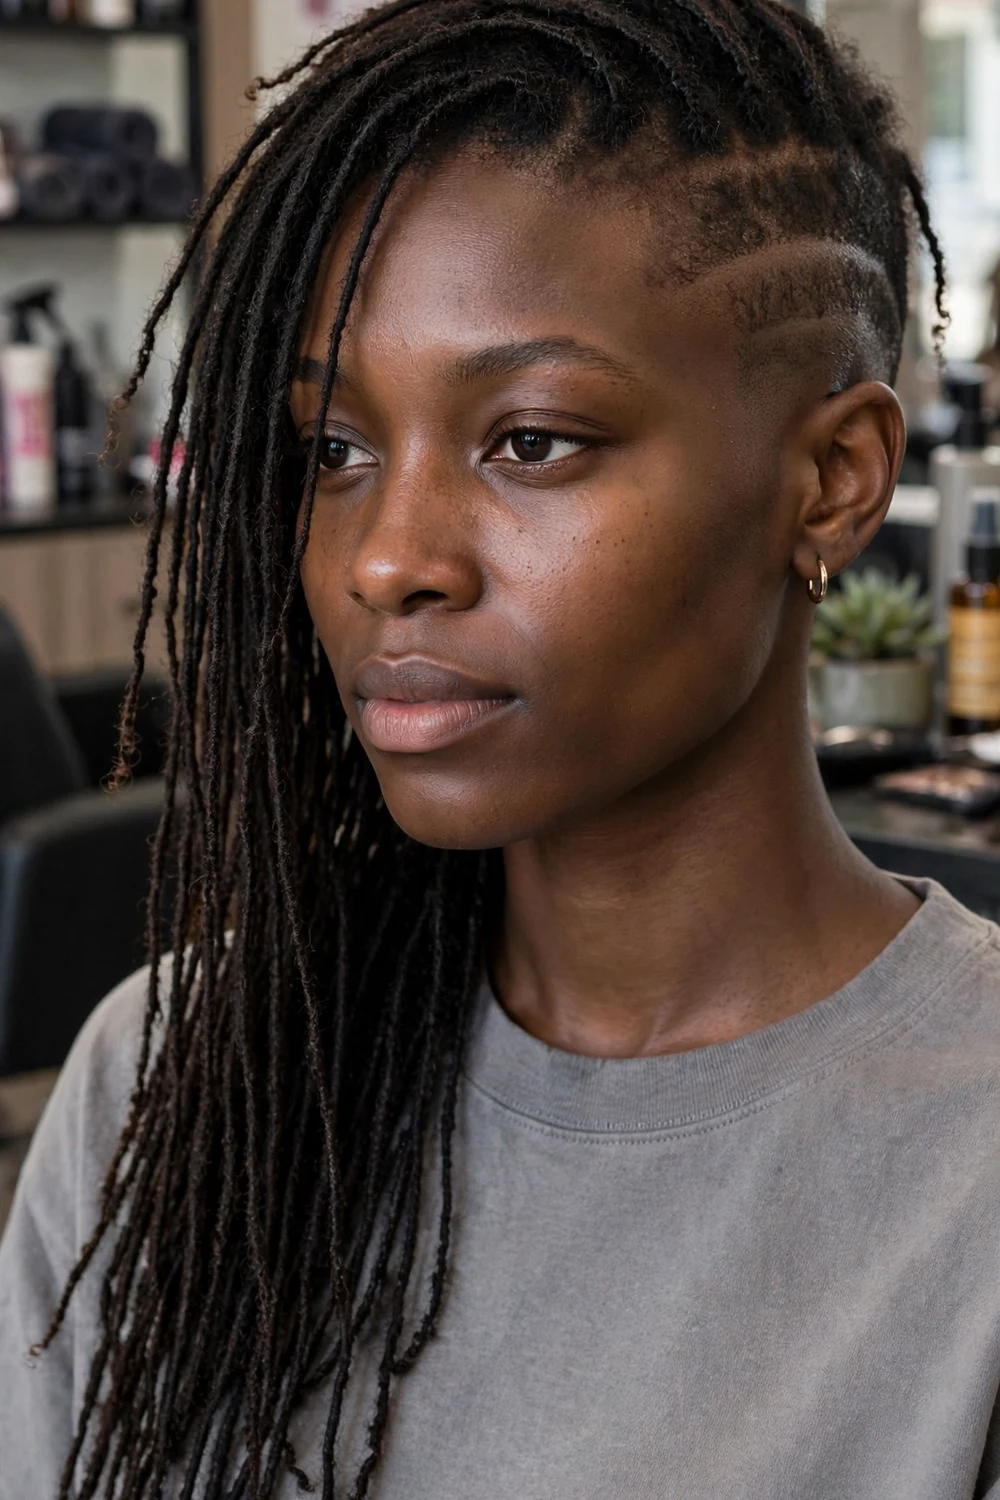
An undercut shaves the sides close and keeps the locs long on top. The style removes weight from the sides, so the remaining locs sit lighter and swing more. It also gives long thin locs a clear shape, since the top section reads as one deliberate block of hair.
Grow-out is the trade-off. Shaved sides need attention every one to two weeks, and the line between the shaved area and the locs needs care so loose hairs do not tangle into the nearest locs. Wear the top locs swept over one side to show the contrast, or pulled back on low-key days.
Try this: Start with a shallow undercut that covers the sides only. You can extend it later, while regrowing an oversized one takes months.
Difficulty: Medium · Cost: $$ (salon)
12. High Loc Ponytail
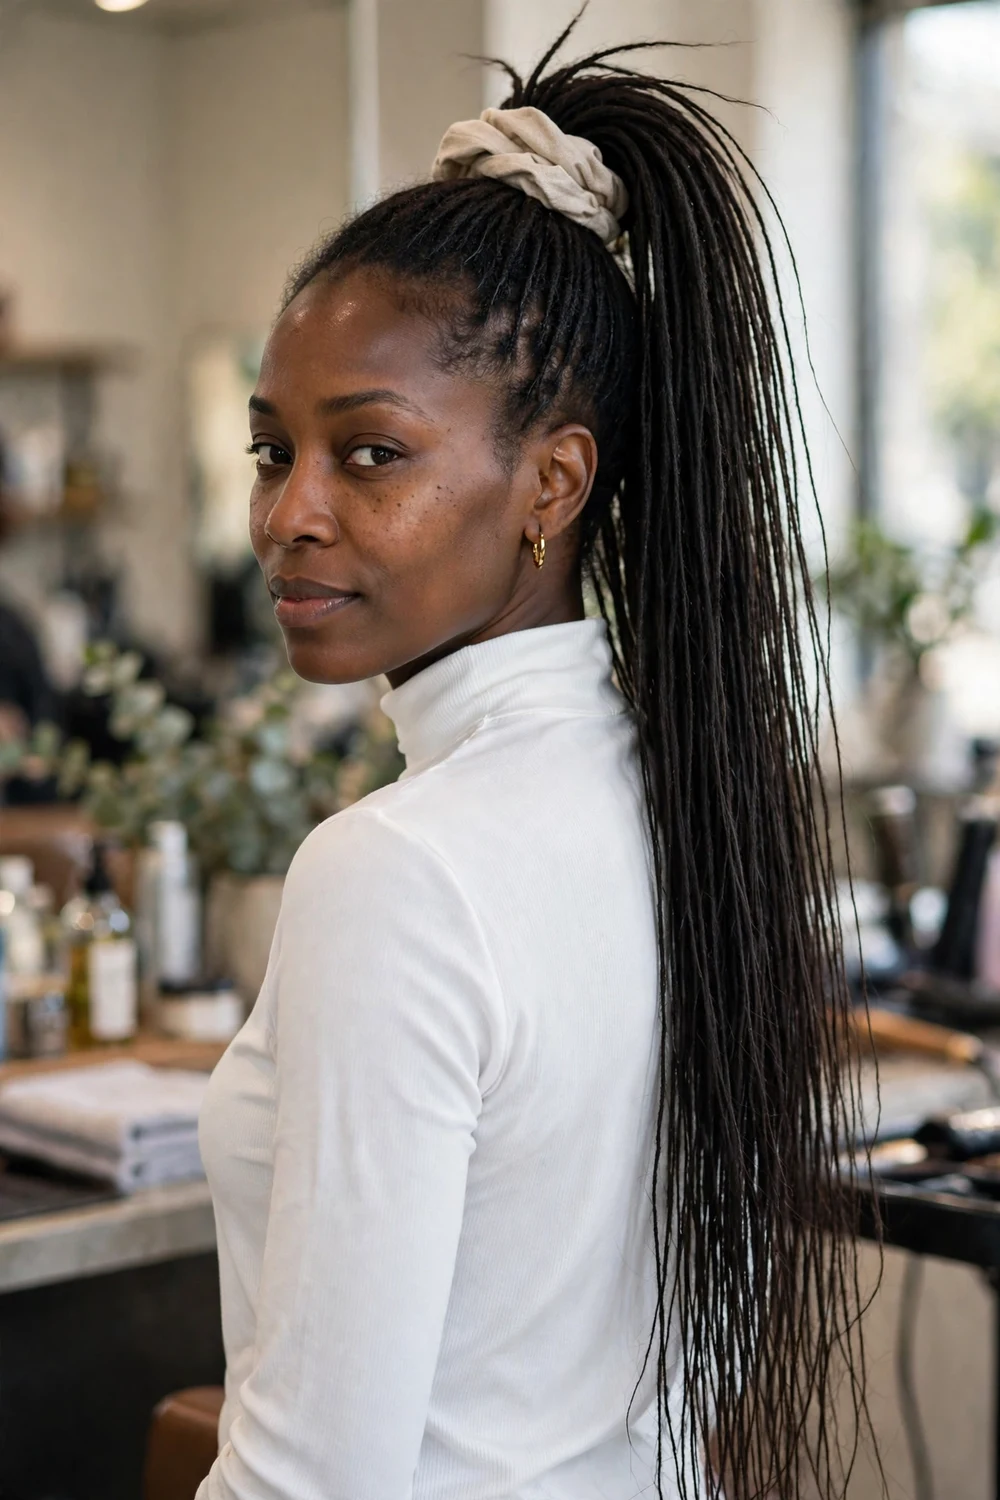
A high ponytail gathers thin locs at the crown and lets them fall down the back. Thin locs suit this style well, since a full set weighs far less than a set of thick locs at the same length. The ponytail clears the neck and face, which makes it a steady pick for workdays and training days alike.
Use a wide, soft band and wrap it loosely. A tight band at the same spot every day wears on the roots at the front and sides. Change the ponytail height by an inch or two between wears, and take it down at night so the scalp rests.
Try this: Loop the band through a satin scrunchie. The satin layer stops the band from snagging on loc surfaces.
Difficulty: Low · Cost: $ (salon)
13. Classic Loc Bun

The classic bun twists the set into a coil at the crown or the nape and pins or bands it in place. It is the most versatile style on this list, since the same bun reads tidy at the office and relaxed with a few locs left loose at the sides. Thin locs coil neatly and stay put with fewer pins than thick locs need.
Build the bun from a loose ponytail base rather than pulling the locs straight into a coil. The base step spreads the weight across more roots. A bun worn in the same spot daily can thin the hairline, so rotate between a high bun, a low bun, and a side bun across the week.
Try this: Tuck the ends in last and pin them under the coil. Ends left sticking out fray and pick up lint.
Difficulty: Low · Cost: $ (salon)
14. Petal Buns
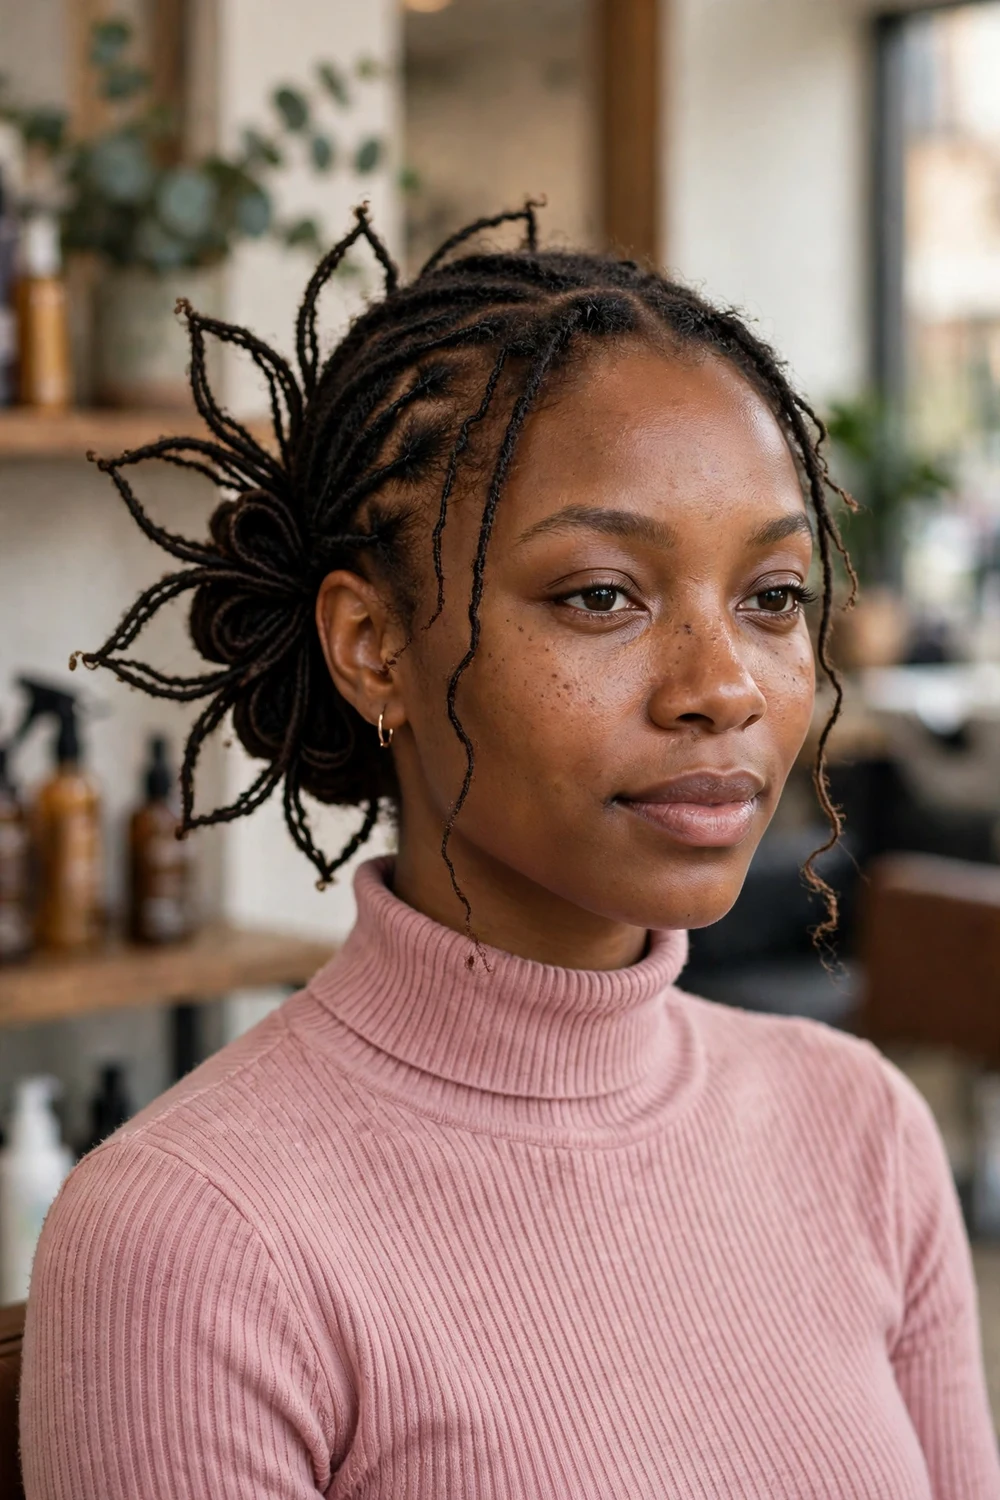
Petal buns fold sections of locs over themselves so each section sits like a petal around a center point, usually a low bun at the back. The folded shapes look detailed and formal, and thin locs fold cleanly where thick locs would resist. Brides and bridesmaids wear this style often.
Plan on a salon visit for a first set, since the back sections need even sizing to read as petals. The style holds for an event day and into the next day with a scarf overnight. Keep the folds pinned at the base only, so no single loc carries the weight of a whole petal.
Try this: Bring a photo of the petal size you want. Small petals read formal, while large petals read soft and romantic.
Difficulty: High · Cost: $$$ (salon)
15. Space Buns
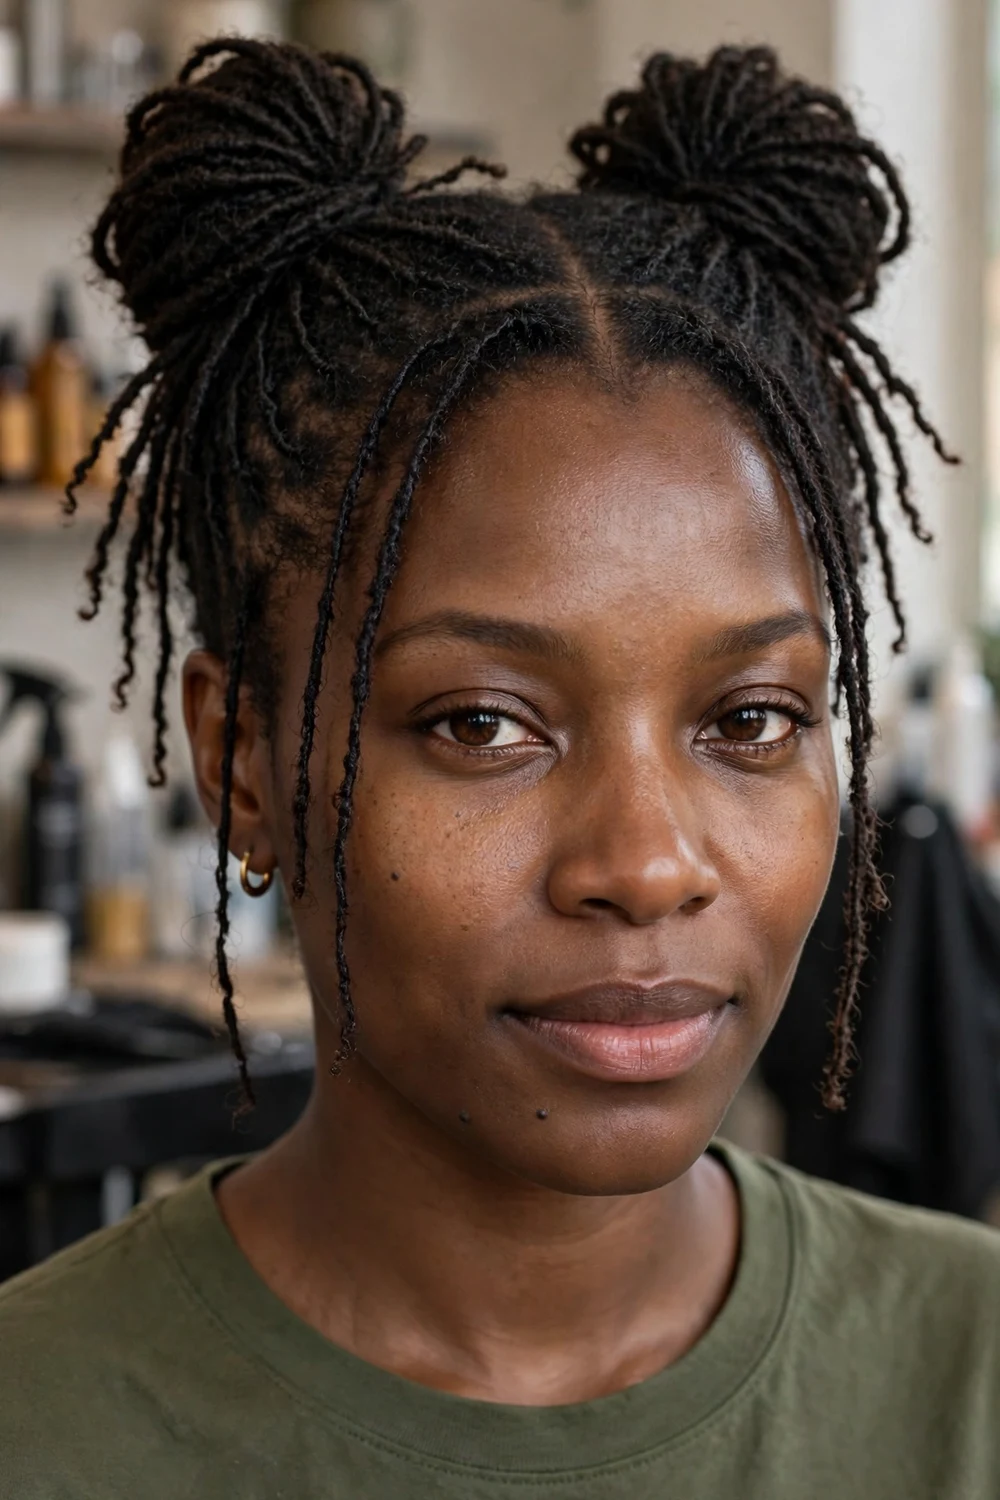
Space buns split the set down the center and coil each half into a bun high on each side. Splitting the weight across two buns halves the pull on any one area, which suits thin locs well. Two front locs left loose frame the face and soften the look.
Keep the center part clean and the two sides even in size, since uneven buns show at a glance. The style takes about ten minutes once the part is set. It holds through a full day, and the coils can come down at night into a wavy twist-out the next morning.
Try this: Set the buns slightly forward of the crown. They photograph better and pull less on the back hairline.
Difficulty: Low to Medium · Cost: $ (salon)
16. Bantu Knots on Locs

Bantu knots section the locs, twist each section, and coil it around itself into a small knot. Worn as a style, the knots sit in neat rows and keep every loc off the neck and shoulders. Taken down after a night of wear, they leave a springy zigzag wave through the set.
Size the sections to the locs you have. Very small knots on thin locs can pull at the root, so medium sections are the safer default. Mist the locs with water before coiling, since damp locs coil smoothly and hold the knot with less force.
Try this: Wear the knots for a day, then release them for the wave. One setting gives you two looks across two days.
Difficulty: Low to Medium · Cost: $ (salon)
17. Half-Up Half-Down Locs

Half-up half-down gathers the top half of the set into a small bun or ponytail and leaves the lower locs loose. The style clears the face while keeping the length on show, and it works at almost every loc length past the chin. It is the style many women land on for photos, since both the up and down parts show.
Gather the top section with your fingers rather than a brush, and secure it loosely. A tight top section pulls the front hairline all day. If your top locs are shorter than the rest, cross two small flat twists at the front instead of forcing a bun.
Try this: Add one cuff or ring to the bun rather than decorating the loose locs. The eye goes to the top, so one accent is enough.
Difficulty: Low · Cost: $ (salon)
18. Halo Braid Loc Crown

A halo braid plaits the locs into one braid that runs around the head close to the hairline. Thin locs plait into a smooth, even braid, and the finished crown keeps every loc secured for a full day. The style suits events and also works as a rest style between retightening appointments.
The braid starts at one side, travels around the head, and tucks its end under the starting point. Readers comparing plaited options can see the same crown logic in short braided hairstyles for Black women. Ask the stylist to braid on the looser side, since a halo sits against the hairline for hours.
Try this: Fluff the braid gently with your fingertips once it is pinned. A slightly softened braid looks fuller on a fine set.
Difficulty: Medium · Cost: $$ (salon)
19. Pompadour Loc Updo

A pompadour updo sweeps the front locs up and back with height at the crown, while flat twists at the sides keep the shape clean. The height at the front adds the look of volume, which thin locs rarely get from worn-down styles. It reads formal and holds well through an evening.
The front section is twisted loosely backward rather than pulled straight back, and that looseness is what creates the height. Pin the twist at the crown and let the back locs fall or coil them into a low bun. Keep gel use light at the hairline, since buildup shows quickly on fine locs.
Try this: Practice the front twist once at home before an event. The second attempt is always faster and sits better.
Difficulty: Medium to High · Cost: $$ (salon)
20. Loc Pigtails
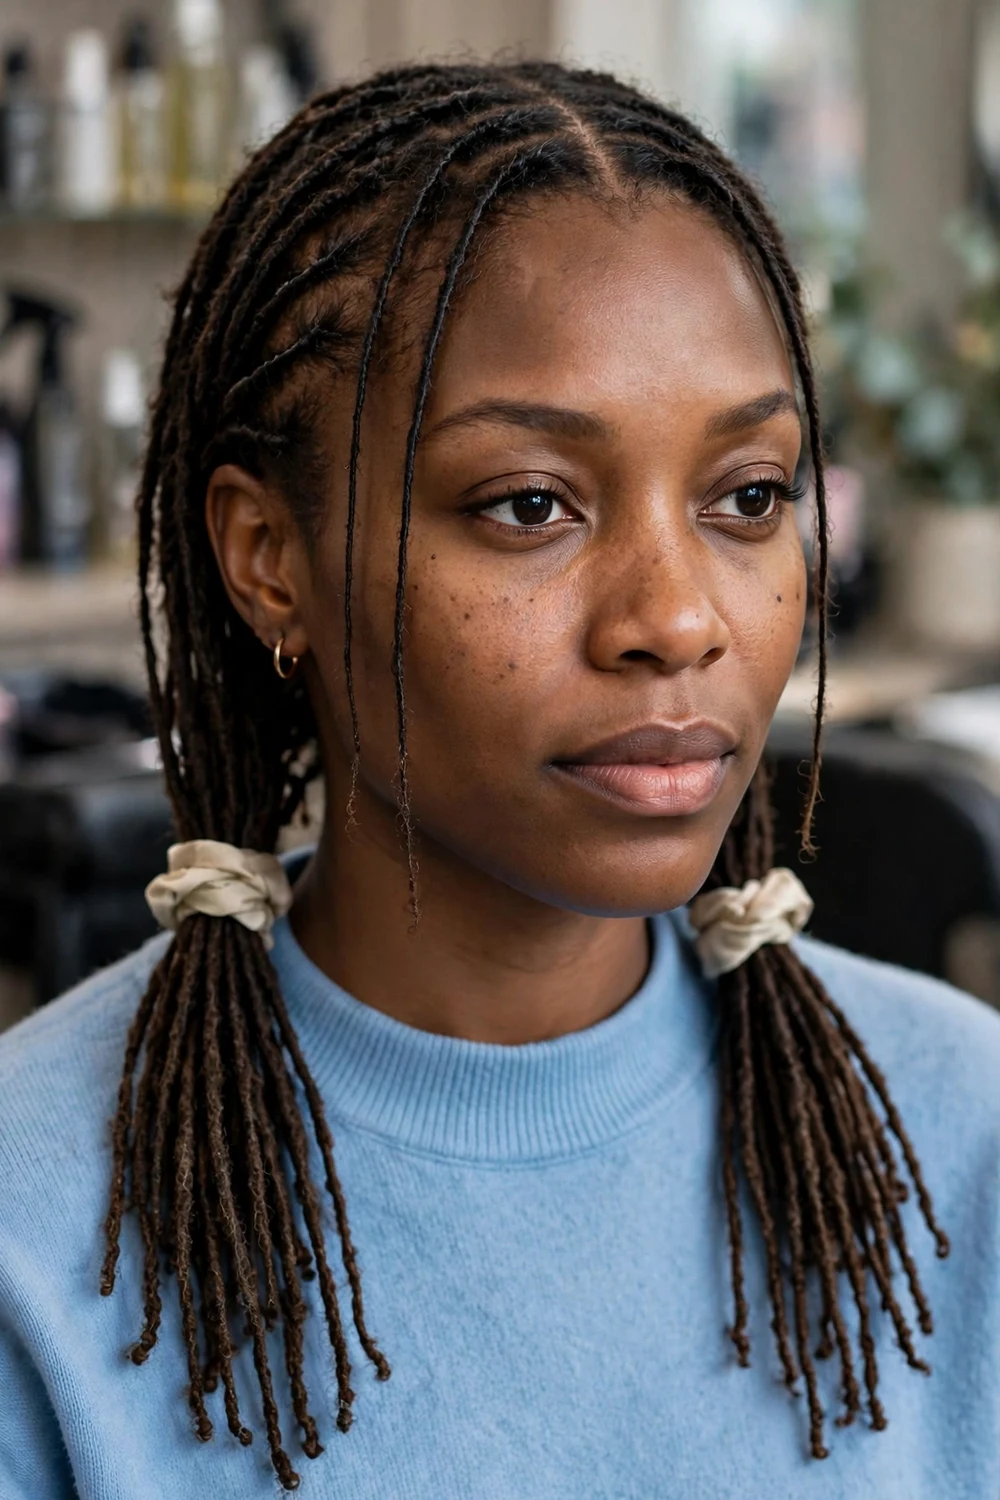
Pigtails part the set in the middle and tie each side low, near the ears or the nape. Two low ties spread the weight across both sides and keep locs away from the face during the day. The style also protects the ends, since the locs rest against clothing less than they do when worn fully loose.
Use soft bands and keep the ties loose enough to slide a finger under. A crisp center part makes the style look deliberate rather than rushed. For shorter sets, tie the pigtails higher and let the ends spray out for a playful finish.
Try this: Cross the two front locs over the part before tying. It hides a grown-out part line between appointments.
Difficulty: Low · Cost: $ (salon)
21. Beaded Thin Locs
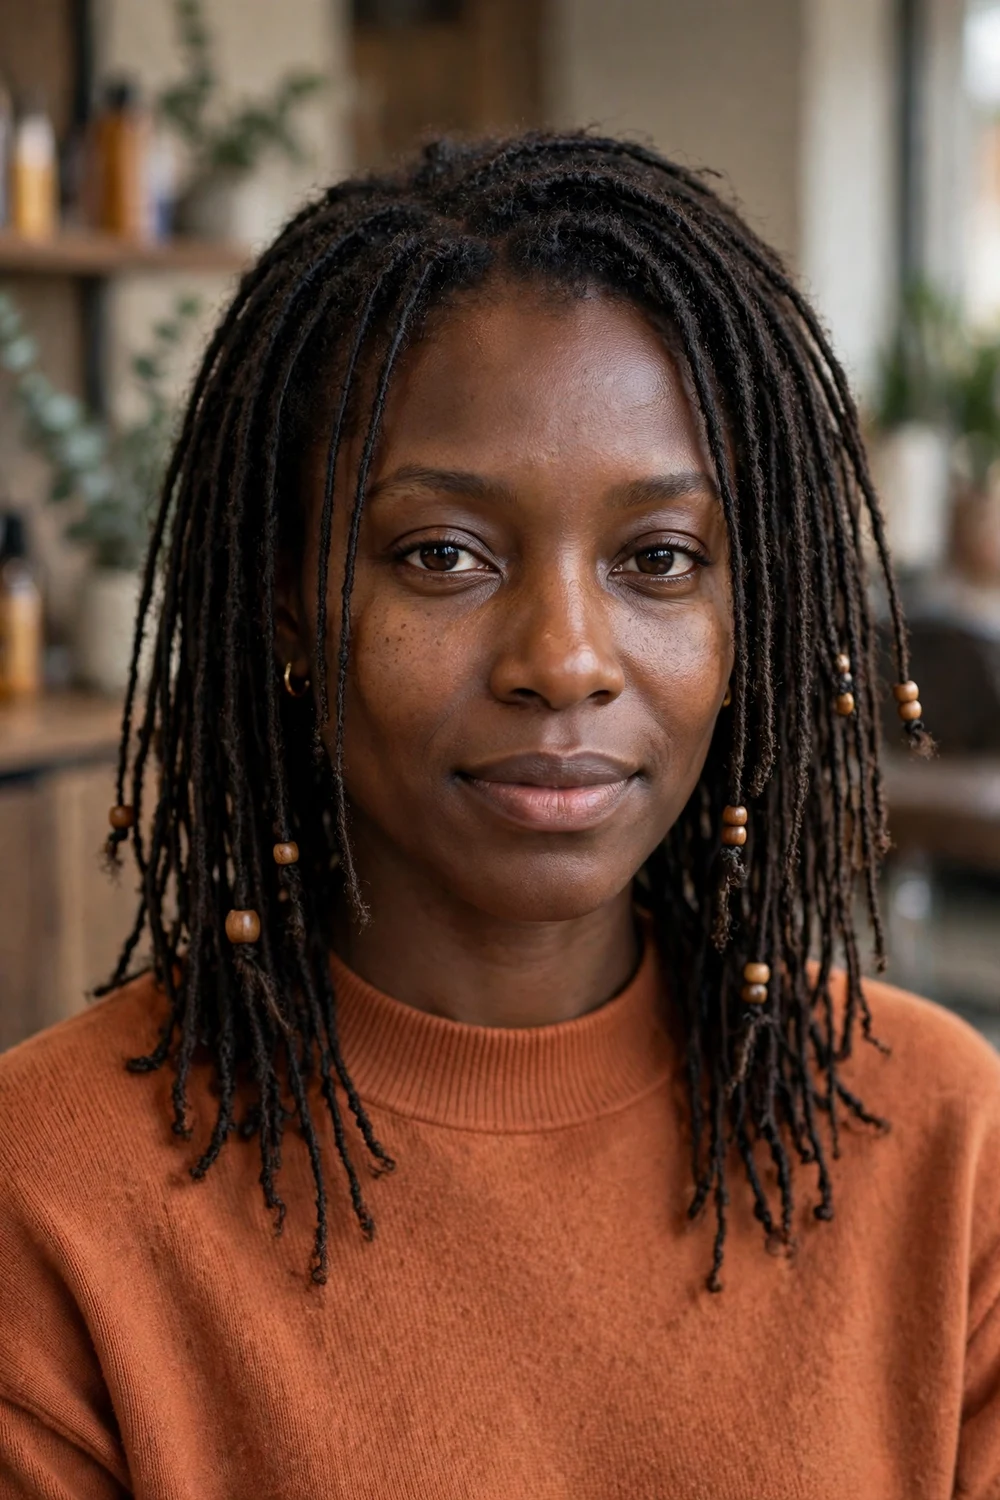
Beads slide onto individual locs and sit at the ends or partway down the shaft. On thin locs, a few wooden or metal beads add movement and a soft clicking sound as the set moves. Beading a handful of locs at the front and sides gives the effect without adding weight across the whole head.
Choose beads with a hole sized to your locs, and slide them on with a small latch hook or a loop of wire. Keep beads away from the hairline, since even light beads add steady pull on the finest roots. Remove them before washing, so water does not sit inside the bead and against the loc.
Try this: Start with five to eight beads on one side. You can add more once you know the weight feels fine.
Difficulty: Low · Cost: $ (salon)
22. Loc Curls with Foam Rollers

Foam rollers set damp locs into loose curls with no heat at all. Small sections of locs are misted with water, wrapped around soft rollers, and left to dry, often overnight. The curls last about two days on thin locs and soften into waves after that.
Soft foam matters here. Hard rollers press lines into fine locs and are rough to sleep on. Wrap each section smoothly and keep the tension even, since a tightly wound roller pulls at the root for hours. A satin bonnet over the rollers keeps them in place through the night.
Try this: Use fewer, larger sections for loose waves and more, smaller sections for springy curls. The section count sets the curl size.
Difficulty: Low to Medium · Cost: $ (salon)
23. Headwrap with Thin Locs

A headwrap gathers the set up and covers part or all of the locs, with a few locs left out at the front to frame the face. Wraps protect locs from sun, wind, and dry indoor air, and they cover a grown-out root area on days when an appointment is still a week away. Thin locs sit flat under fabric, so wraps lie smooth with no bulk at the back.
Choose cotton or satin-lined wraps and tie the knot at the front or side rather than at the nape, where a knot presses during the day. Change the wrap position between wears so the fabric does not rub the same stretch of hairline daily.
Try this: Keep one plain wrap in a color that matches your work clothes. It turns a rushed morning into a finished look in under a minute.
Difficulty: Low · Cost: $ (salon)
24. Free-Hanging Thin Locs with Gold Cuffs

Worn loose, a mature set of thin locs falls like loose hair, moving in single strands rather than in heavy ropes. Gold cuffs clipped onto a few locs catch the light and mark the style as deliberate. This is the base look every other style on this list starts from, and it asks for nothing but clean, moisturized locs.
Loose wear still has rules. Keep cuffs off the finest locs at the hairline, move them every few days so they do not wear a groove into one spot, and tie the set up at night. If you are still choosing a base style before this stage, the guide to different types of braids covers the plaited routes many women wear first.
Try this: Place cuffs at different heights rather than in one row. Staggered placement looks natural and spreads the small extra weight.
Difficulty: Low · Cost: $ (salon)
Frequently Asked Questions
What counts as thin locs?
Thin locs are locs formed from small sections of hair, about the width of a pencil or finer. Sisterlock-size and microloc-size sets sit at the finest end. Because each loc is small, a full set has many more locs than a traditional set, and each loc weighs less at the root.
How often do thin locs need retightening?
Most thin loc sets are retightened every six to eight weeks. Sisterlock-size locs often sit at the shorter end of that range, while larger microlocs can go longer. Retightening more often than every four weeks adds repeated tension at the root, which fine hair handles poorly.
Can thin locs handle updos and buns without breaking?
Yes, when the style is built loose. Thin locs weigh less than thick locs, so buns, ponytails, and updos pull less at the scalp. The risks come from tight bands, styles worn in the same spot daily, and pins that press on one point. Rotate the style position and keep bands wide and soft.
How do I keep thin locs from drying out?
Mist the locs with water, then seal with a small amount of light oil two or three times a week. Wash every one to two weeks with a residue-free shampoo, and sleep with a satin scarf or bonnet. Heavy creams and thick butters sit on small locs and build up inside them, so lighter products work better.
Can I start thin locs on short hair?
Yes. Coily and curly hair can start thin locs with about an inch of length using finger coils or comb coils. Looser textures need closer to two inches so the starter style holds. Starting short also keeps early weight low, which helps thin edges in the first months.
Final Thoughts
Thin locs reward a light hand. Pick a starter method that matches your texture, keep the first styles short and loose while the set matures, and let buns, twists, and wraps do the decorating work later. My honest advice is to choose two or three styles from this list that fit your current length and rotate them, rather than chasing a new look every week. Your edges will thank you, and the set will look neat far more often than it looks stressed.

