

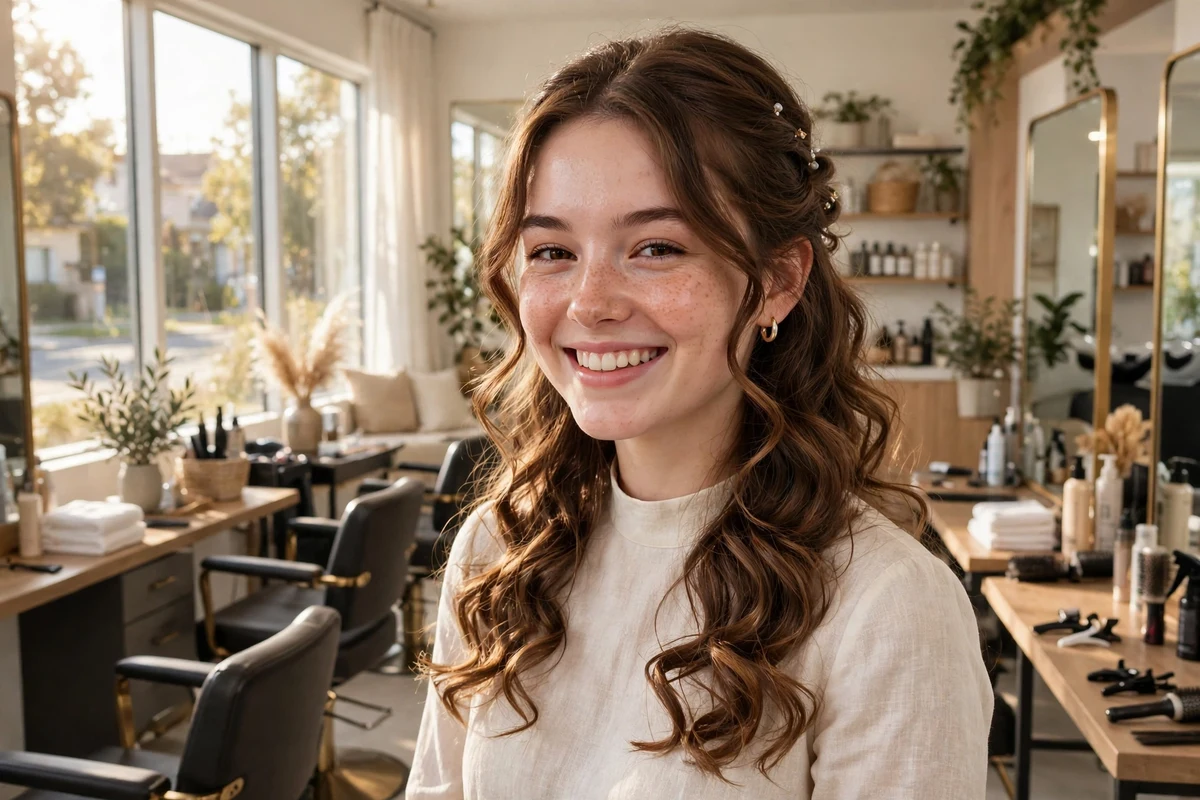
Homecoming hair does not need a salon appointment or a long list of tools. Most of the styles that photograph well at a school dance are built from a few basic moves: a curling iron pass, a twist, a simple braid, or a ponytail with one extra step. This list collects 29 easy homecoming hairstyles that a teen can do at home, alone or with a friend helping on the back sections.
Every idea below lists the hair length and texture it suits, the tools you need, and a time estimate in plain words, so you can match the style to the time you actually have before the dance. If you are comparing these home looks with dressier salon styles, the prom hairstyle ideas roundup covers the same event-hair ground from a more formal angle.
Key Takeaways
- Most of these styles need five tools or fewer: a brush, clear elastics, bobby pins, a curling iron or flat iron, and hairspray.
- Half-up styles and ponytails are the fastest routes. Most take about ten to twenty minutes once your hair is dry.
- Braids and buns hold up best on a dance floor because the hair is pinned or woven instead of hanging loose.
- Second-day hair grips better than freshly washed hair for updos, twists, and braids.
- Do a full practice run at least a day before the dance, with the same tools and accessories you plan to use.
1. Loose Waves with Extra Volume
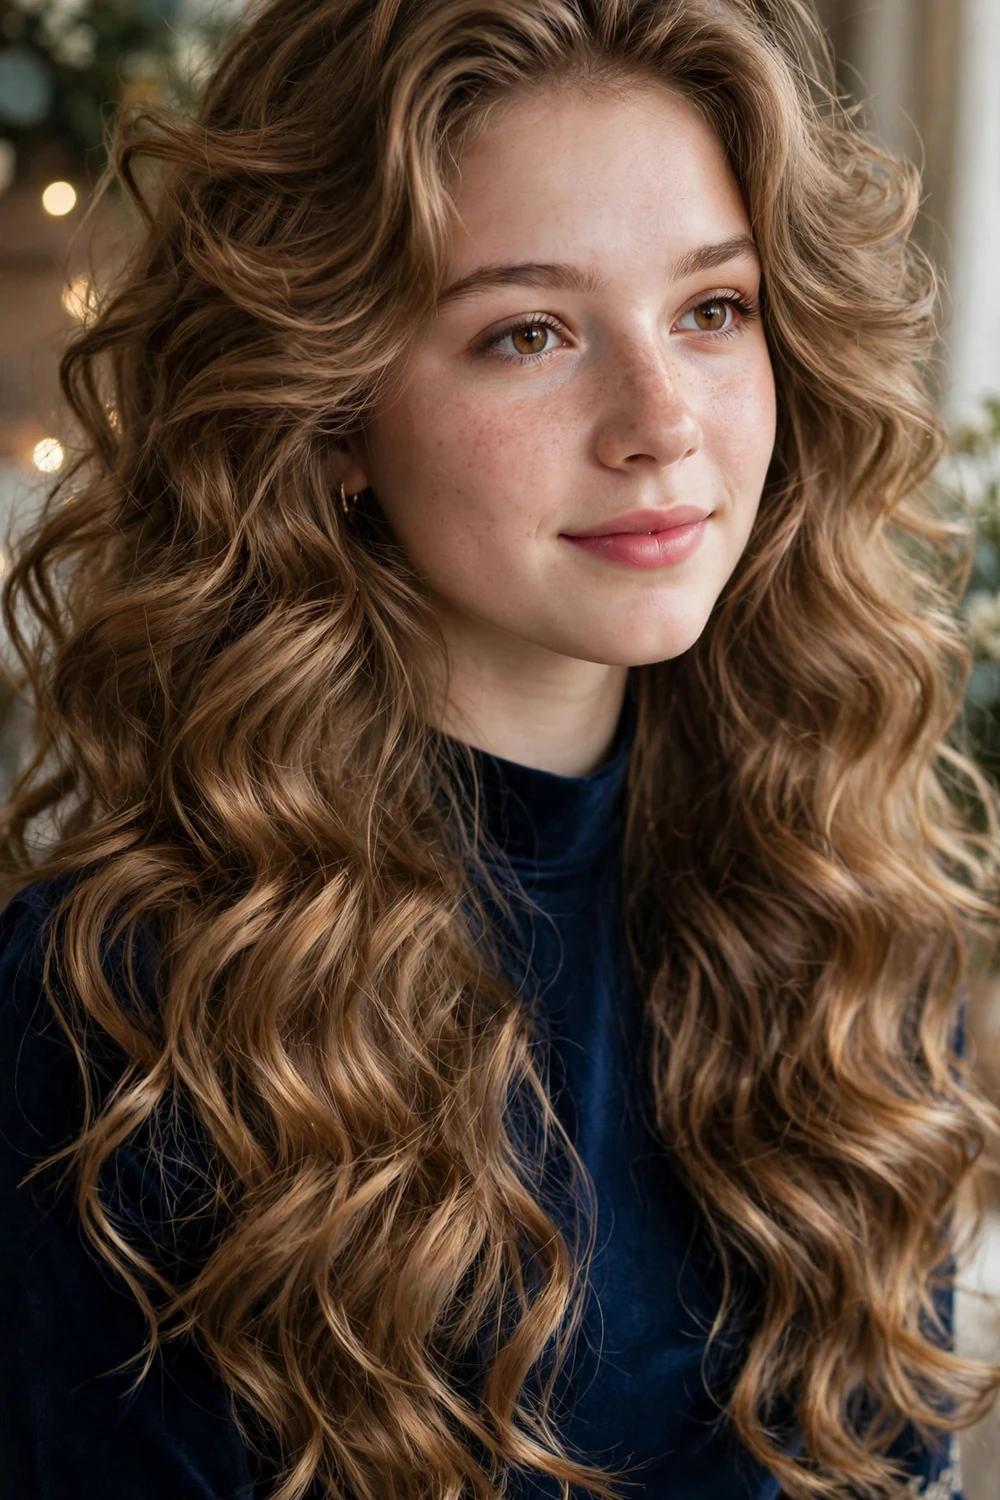
Loose waves are the starting point for half of this list, and they work as a finished style on their own. Curl in sections with a medium barrel iron, curling away from the face on both sides, then brush the curls out with a wide paddle brush so they fall as waves instead of ringlets. Lift at the crown comes from curling the top layer first and letting it cool before brushing.
This suits medium to long hair of any texture that can hold a curl. Plan on about twenty to thirty minutes, most of it in the curling itself. A light mist of flexible hairspray at the end holds the shape without making the waves stiff.
Try this: clip each curl up while it cools. Cooled curls keep their shape hours longer than curls brushed out while still warm.
Difficulty: Low · Cost: $ (salon)
2. Sleek Center Part with a Barrette

For straight hair, the simplest formal finish is a clean center part, flat ironed lengths, and one sparkly barrette clipped above the ear on one side. Run the flat iron in slow passes, then smooth a small amount of shine serum over the top layer. Tuck the front sections behind the ears so the barrette stays visible in photos.
This suits short, medium, and long straight or straightened hair. Plan on about fifteen minutes, plus straightening time if your hair starts wavy or curly. The barrette does the formal work here, so pick one with pearls, crystals, or a bow shape.
Try this: spray hairspray on a clean toothbrush and brush down flyaways along the part instead of spraying your whole head.
Difficulty: Low · Cost: $ (salon)
3. High Ponytail with a Wrapped Base

A high ponytail reads formal when the base is wrapped and the ends are curled. Brush the hair up to the crown, secure it with a strong elastic, then take a thin section from the underside of the tail, wrap it around the elastic, and pin the end underneath. Curl the tail in three or four large sections for movement.
This suits medium to long hair and keeps hair off the neck and shoulders all night. Plan on about ten to fifteen minutes. If your hair is fine, tease the tail lightly at the base before curling so the ponytail looks fuller.
Try this: use two elastics stacked together if your hair is thick. One elastic alone tends to slide down within the first hour.
Difficulty: Low · Cost: $ (salon)
4. Easy Bubble Ponytail
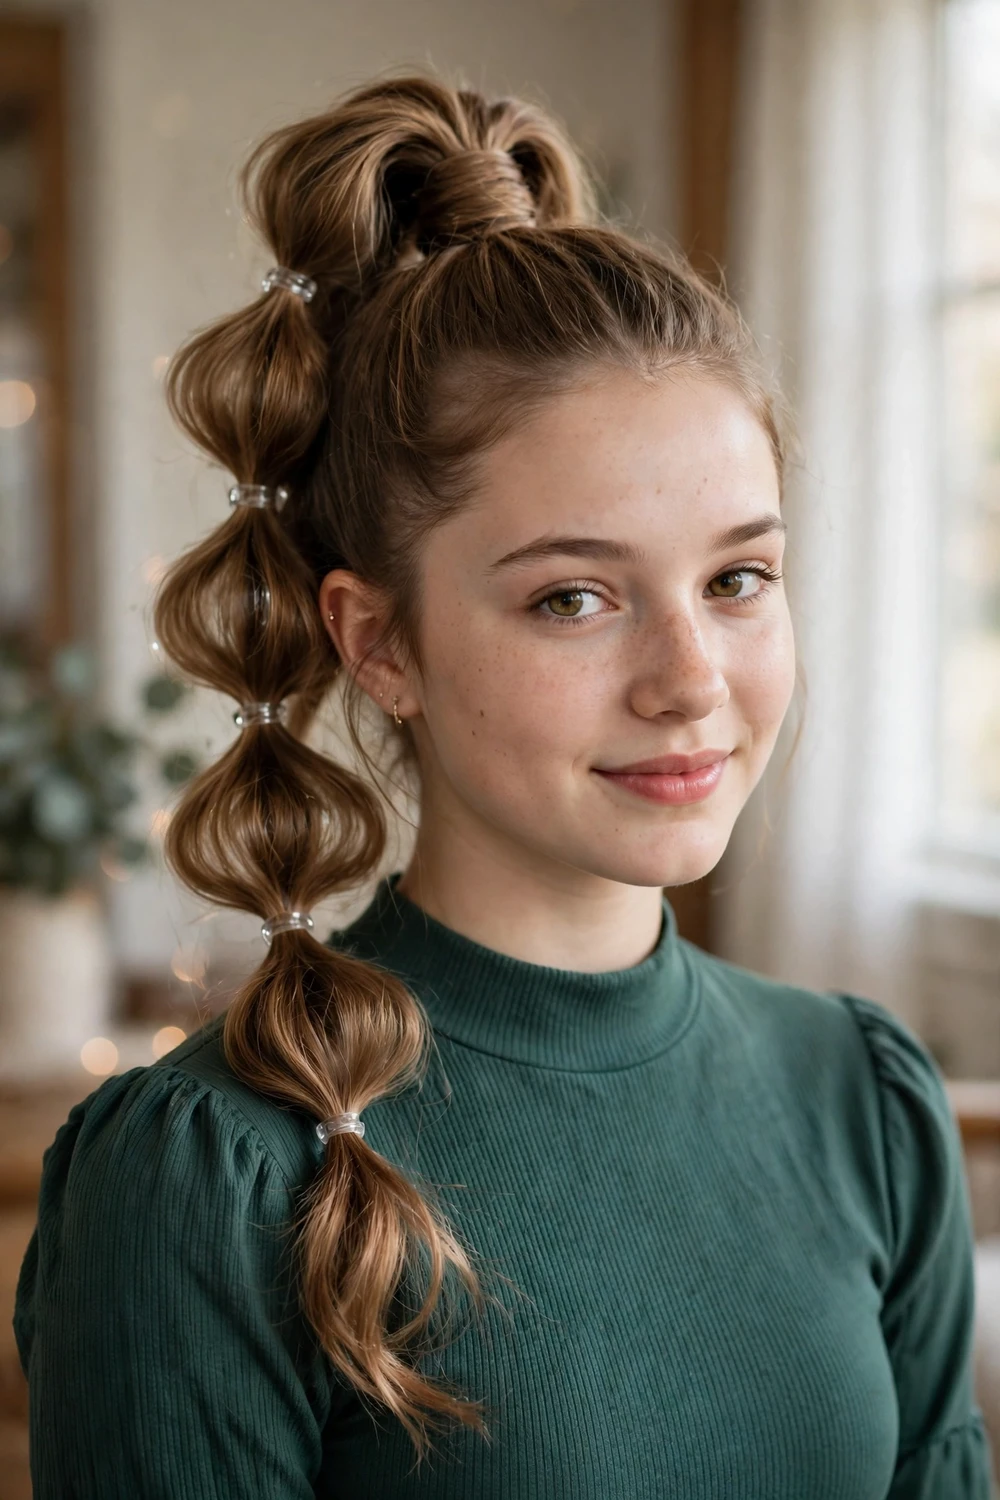
The bubble ponytail looks detailed and takes almost no skill. Start with a high or mid ponytail, then add small clear elastics every two inches down the tail. After each elastic goes on, gently pull the sides of that section outward to round it into a bubble before moving down.
This suits medium to long hair, and longer hair shows more bubbles. Plan on about ten minutes. The style holds well for dancing because every section is anchored, and it works on straight, wavy, or curled hair.
Try this: keep the elastics the same distance apart on both the front view and the back view by checking a hand mirror as you go.
Difficulty: Low · Cost: $ (salon)
5. Twisted Ponytail
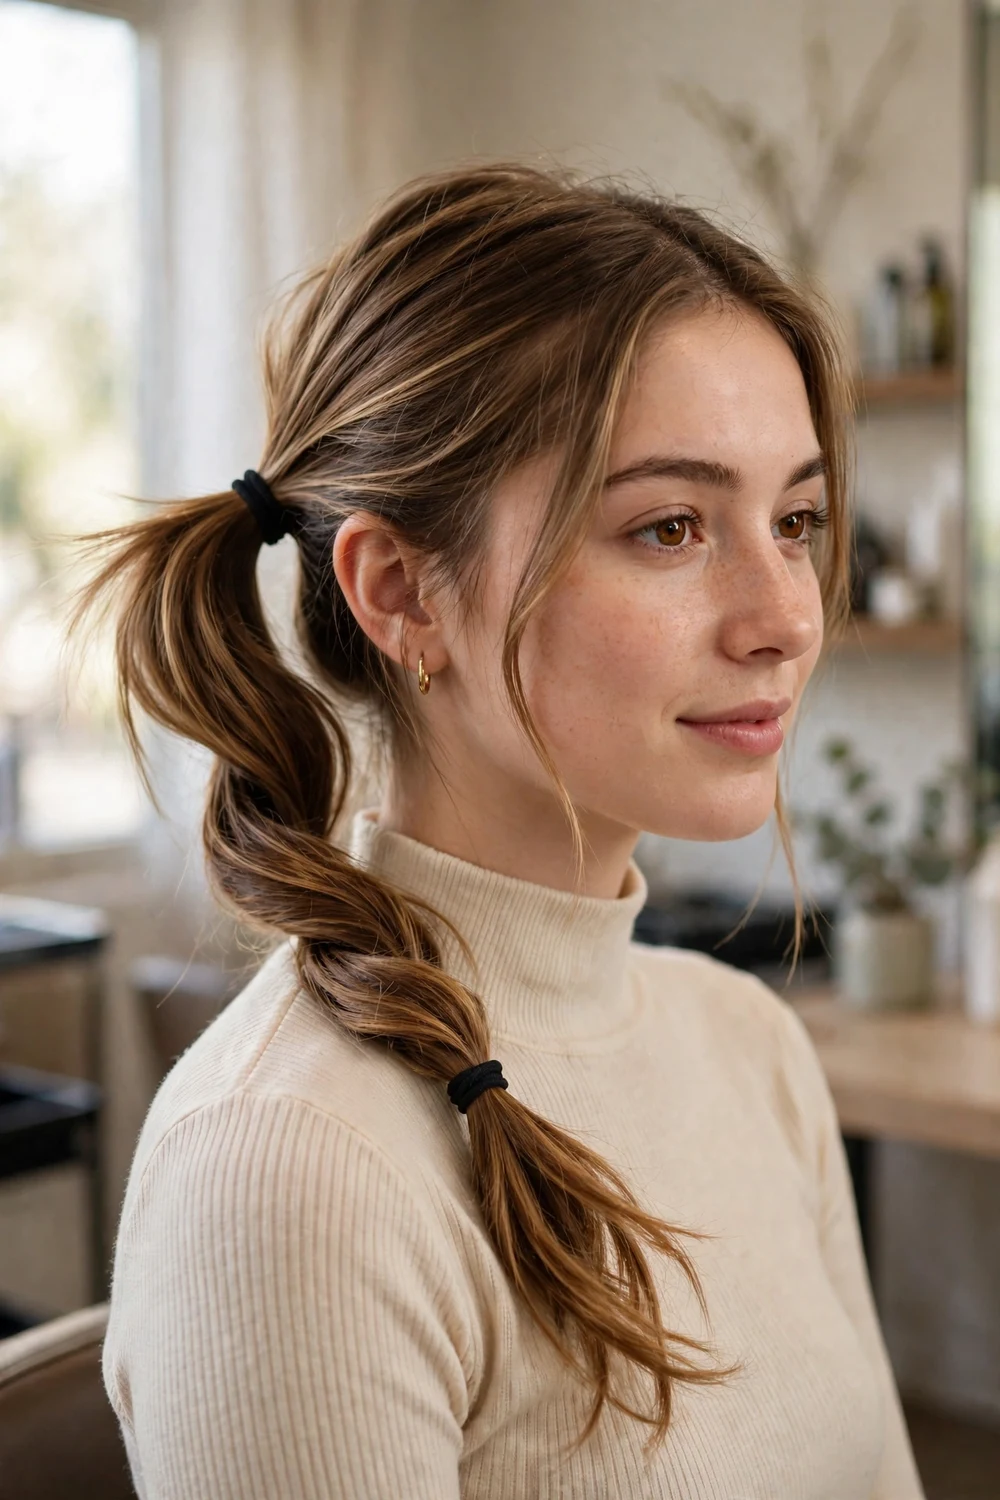
The twisted ponytail uses one move: make a low or mid ponytail, push a small gap in the hair just above the elastic, and flip the whole tail up and through that gap. The hair above the elastic rolls into a neat twist that hides the band. Loosen the twist slightly with your fingers for a softer finish.
This suits medium to long hair and takes about five minutes, which makes it a solid backup plan if a first style falls apart. Add curls to the tail first if you want more texture in the finished look.
Try this: repeat the flip a second time lower down by adding a second elastic and flipping again for a double twist effect.
Difficulty: Low · Cost: $ (salon)
6. Wrapped Low Ponytail
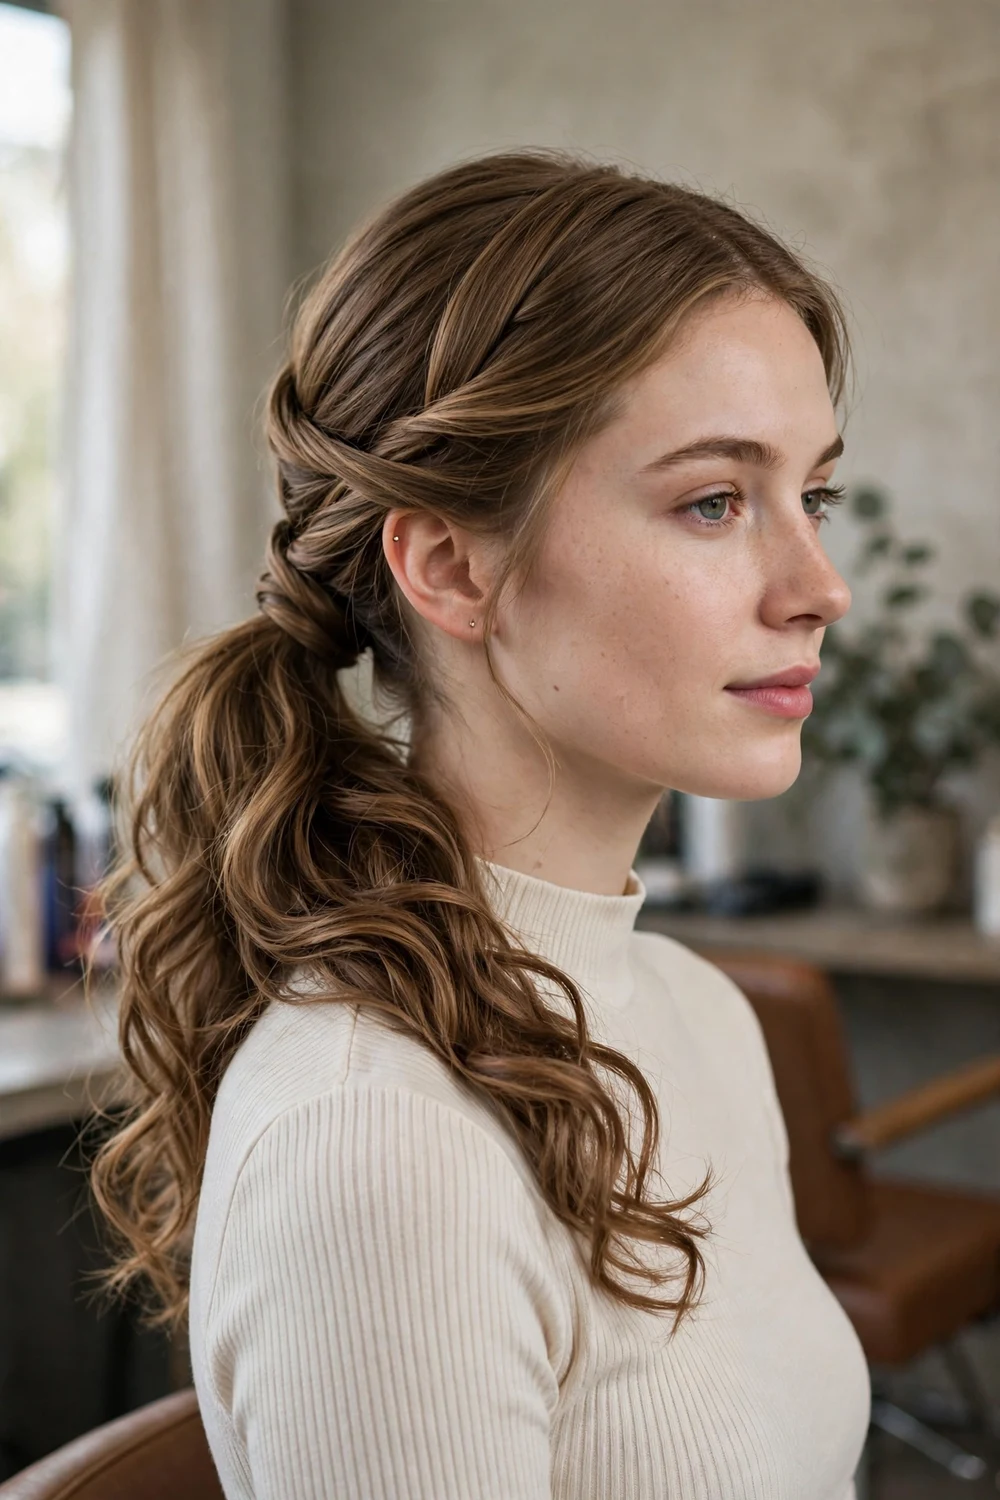
The wrapped low ponytail starts as a plain low ponytail, then two side sections are crossed over the base and pinned underneath in an X shape. The crossing covers the elastic and gives the style a finished, deliberate look from the back, which matters in group photos.
This suits medium to long hair and pairs well with dresses that have detailed backs, since the hair sits low and to the center. Plan on about ten minutes. Curl the tail or leave it straight depending on the dress neckline.
Try this: leave two thin face-framing pieces out before you start, then curl them last so they stay soft.
Difficulty: Low · Cost: $ (salon)
7. Half-Up Twists with Curls

Half-up twists keep hair out of the face while the length stays down. Curl the hair first, then take a section above each ear, twist it toward the back, and pin the two twists where they meet. Cross the pins in an X so they lock against each other instead of sliding.
This suits medium to long hair and every texture that can hold a loose curl. Plan on about twenty minutes including the curling. It is one of the easiest styles to fix mid-evening, since a loose twist can be re-pinned in a bathroom mirror in under a minute.
Try this: hide the pins under a small decorative clip or a bow placed right where the twists meet.
Difficulty: Low · Cost: $ (salon)
8. Half-Up Top Knot with Waves

The half-up top knot takes the top third of the hair, twists it into a small bun at the crown, and leaves the rest in waves. It adds height at the top of the head, which balances a fuller dress skirt. Secure the bun with a small elastic first, then add pins, so the knot does not loosen as the night goes on.
This suits medium to long hair, and it is a kind option for fine hair because the bun only needs the top layer. Plan on about fifteen to twenty minutes including waves. Tease the crown section gently before twisting for more height.
Try this: pull the bun slightly apart after pinning to make it look fuller, then spray just the bun to hold the shape.
Difficulty: Low · Cost: $ (salon)
9. Half Ponytail with a Bow

A half ponytail tied with a ribbon bow is the fastest style on this list. Gather the top half of the hair at the crown, secure it with an elastic, then tie a ribbon in a bow over the elastic. Velvet and satin ribbons in black, white, or a color matched to the dress all work.
This suits medium to long hair worn wavy, curled, or straight. Plan on about five to ten minutes once the hair underneath is styled. The bow covers the elastic completely, so no wrapping step is needed.
Try this: cut ribbon ends at an angle and leave the tails long so they move with the hair in photos.
Difficulty: Low · Cost: $ (salon)
10. Curly Half Ponytail
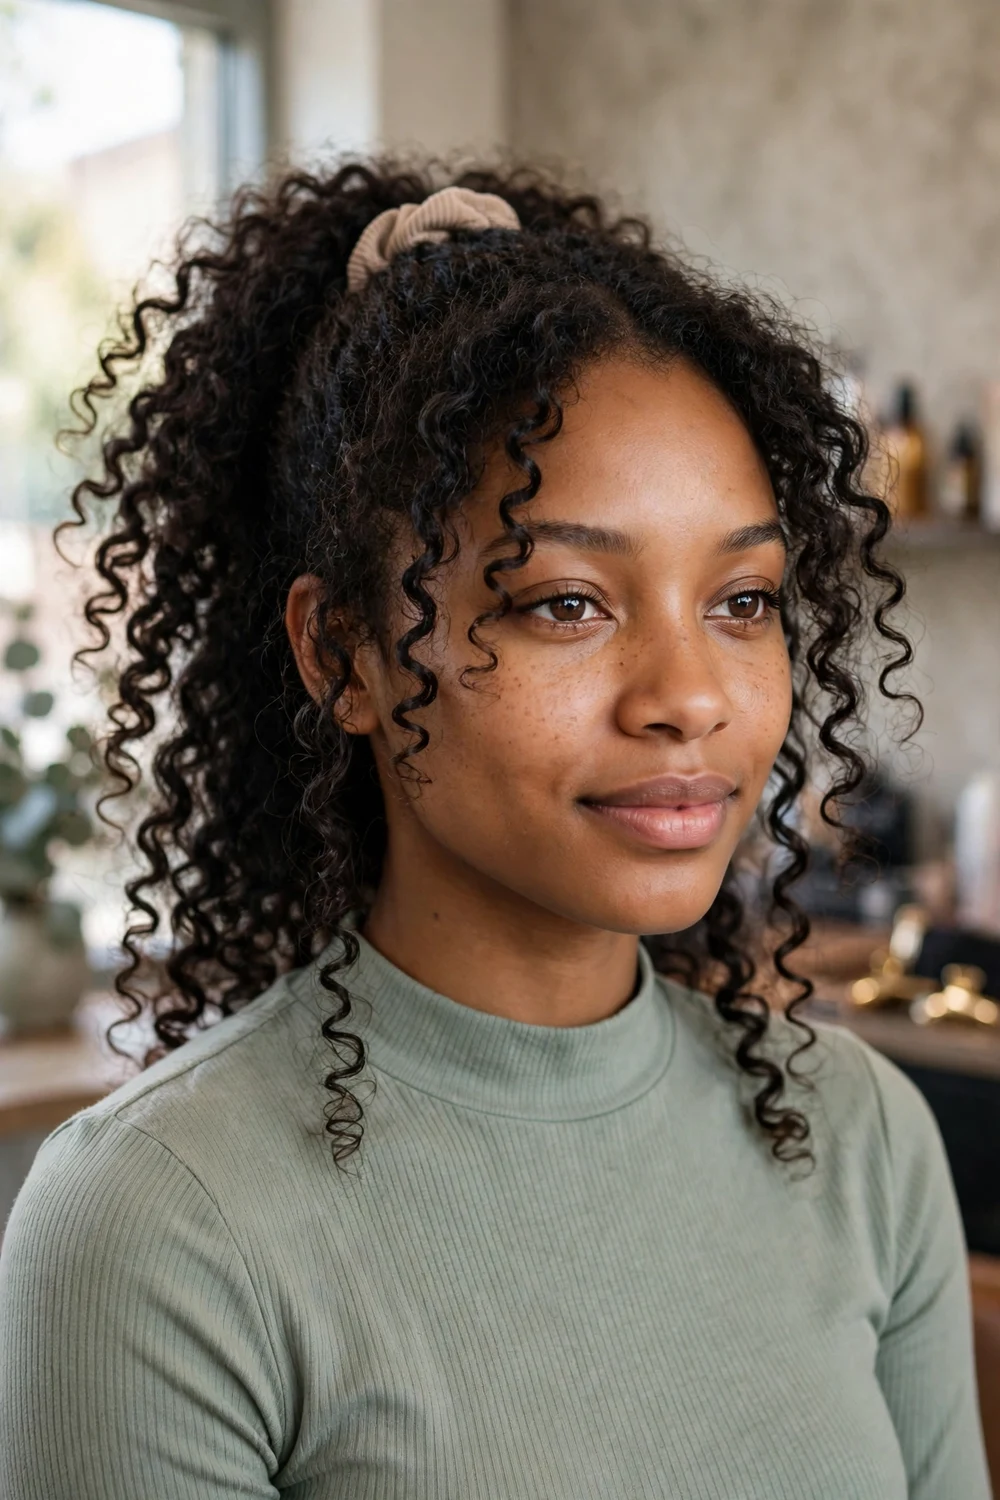
For natural curls, a loose half ponytail works with the texture instead of against it. Gather the top section loosely at the center of the crown, secure it without pulling the curls flat, and let the tail blend into the curls below. Refresh dry curls with a light mist of water and curl cream before styling.
This suits medium to long curly and coily hair. Plan on about ten minutes, since no heat styling is required. Avoid brushing dry curls before this style, because brushing breaks up the curl pattern and adds frizz.
Try this: use a fabric scrunchie or a spiral hair tie instead of a thin elastic to avoid a dent across the curls.
Difficulty: Low · Cost: $ (salon)
11. Low Twisted Chignon

The low chignon is built in three parts. Divide the hair into a center section and two side sections. Twist the center section into a small bun at the nape, then cross each side section over the bun, tuck the ends under, and pin. The crossed sides give the bun its twisted finish.
This suits medium to long hair and reads the most formal of the easy updos on this list. Plan on about fifteen minutes, plus a practice run, since the pinning is at the back of your own head. A hand mirror check from both sides helps catch a loose section early.
Try this: add a decorative clip above the chignon. It draws the eye to the style and hides the top pins at the same time.
Difficulty: Low to Medium · Cost: $$ (salon)
12. Messy Low Bun

The messy low bun is forgiving by design. Curl the hair lightly first, gather it into a low ponytail, twist the tail into a loose bun, and pin it in four or five places. Pull out two thin strands at the front and a few wisps at the nape so the bun looks soft rather than severe.
This suits medium to long hair and works especially well for anyone who finds sleek styles hard to keep smooth. Plan on about fifteen minutes. Because the style is meant to look loose, small imperfections do not need fixing.
Try this: if your hair is very clean and slippery, spray a little texture spray through the lengths before gathering the bun.
Difficulty: Low · Cost: $$ (salon)
13. Sleek High Bun
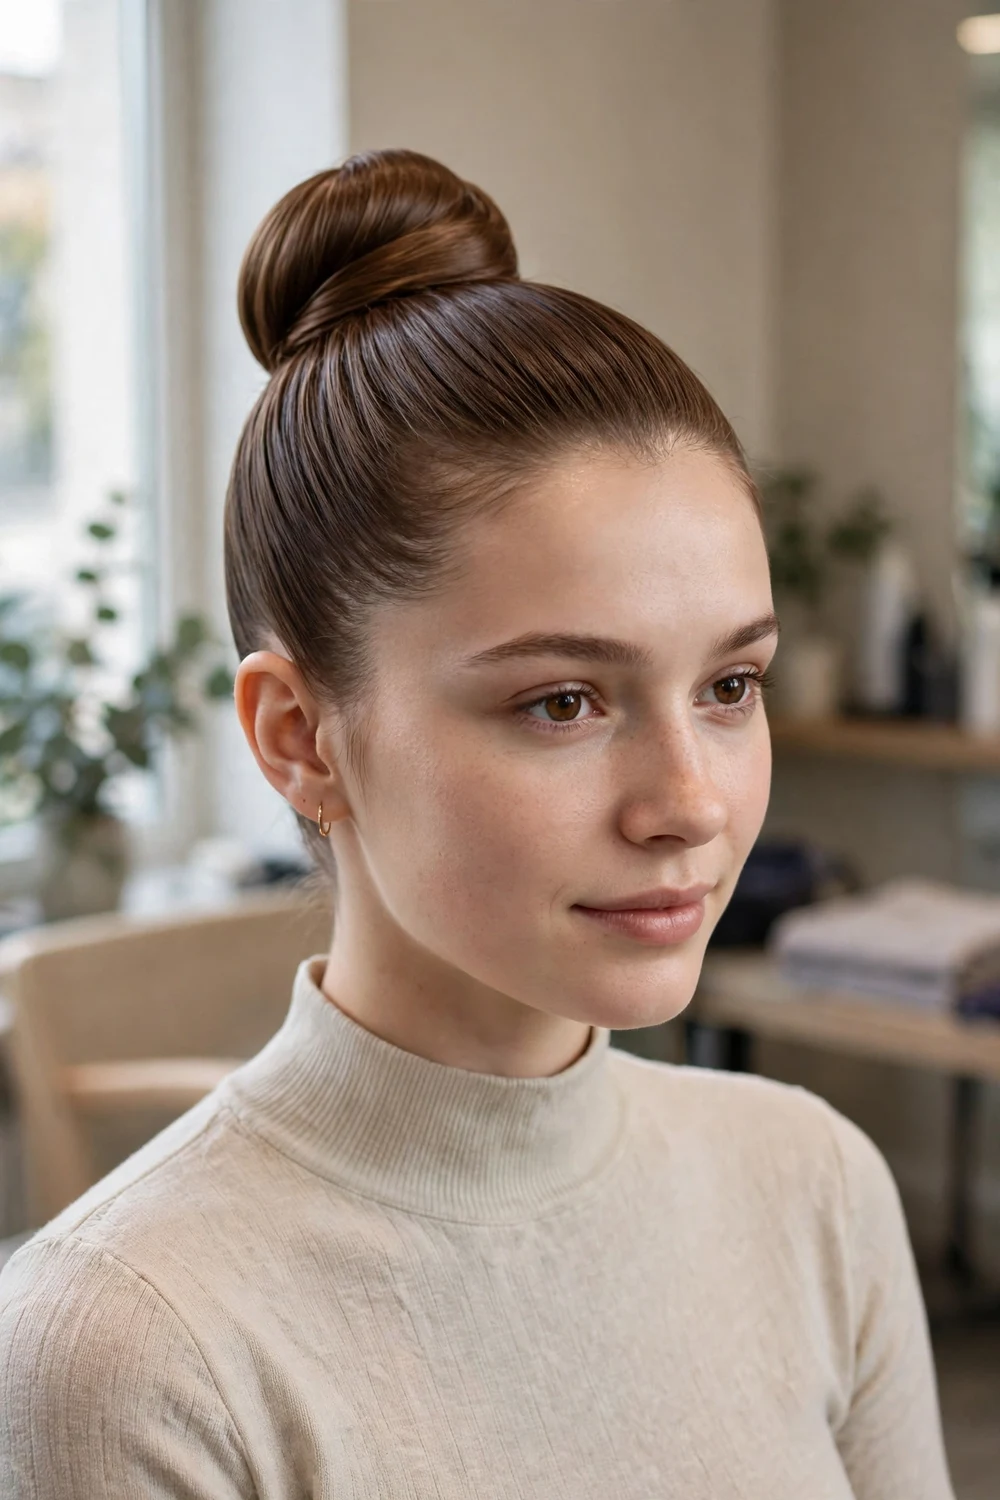
A sleek high bun needs smooth hair and a firm base. Brush the hair into a high ponytail, smooth the top with a bristle brush, then twist the tail around the base and pin the ends underneath. A bun donut underneath the twist adds size for fine hair.
This suits medium to long hair and keeps the whole style off the neck for dancing. Plan on about fifteen minutes. Readers working with shorter lengths can find more pinned styles in the medium hair updo ideas collection.
Try this: finish with a light mist of strong-hold spray from a distance, so the surface stays smooth instead of wet looking.
Difficulty: Low to Medium · Cost: $$ (salon)
14. French Twist with Loose Strands

A French twist gathers all the hair to one side, twists it upward along the back of the head, and pins the fold in a vertical line. Leaving two loose strands at the front keeps the style young and soft. The twist itself is one rolling motion, so the pinning matters more than the twisting.
This suits medium to long hair with some thickness. Plan on about twenty minutes and do a practice run, because this is the hardest style in the bun and twist group. Dressier variations of this shape appear in the formal hairstyles for long hair guide.
Try this: use long twist pins or French pins instead of standard bobby pins. They hold the vertical fold with fewer pins.
Difficulty: Medium · Cost: $$ (salon)
15. Crown Braid

A crown braid follows the hairline all the way around the head. Start behind one ear with a Dutch braid, add hair as you move across the front, around the other side, and along the back, then tuck and pin the tail where it meets the start. The finished braid sits like a band and holds every strand up.
This suits long hair best, since the braid needs enough length to complete the circle. Plan on about twenty-five to thirty minutes, and braid slowly on the far side where you cannot see. It is one of the most dance-proof styles here because nothing hangs loose.
Try this: braid on slightly damp or texture-sprayed hair. The grip keeps the added sections from slipping out mid-braid.
Difficulty: Medium · Cost: $$ (salon)
16. Crown Braid with a Low Bun
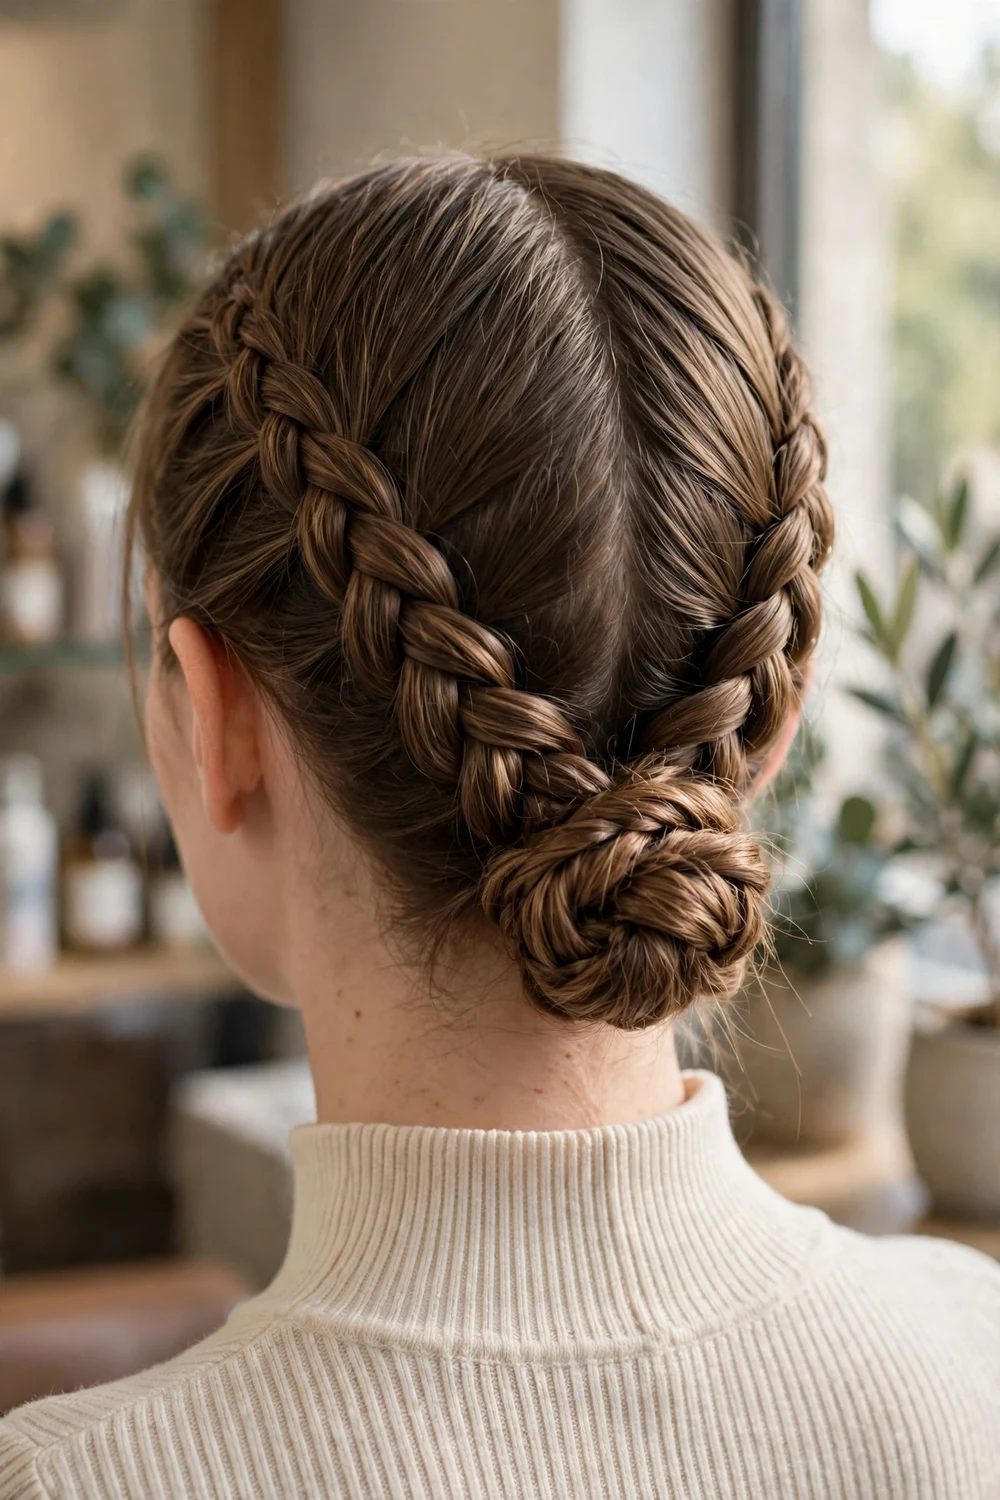
This version splits the work: braid a section from each side of a center part, bring both braids to the back, and gather everything, braids included, into a low bun. The braids frame the top of the style while the bun carries the weight at the back.
This suits medium to long hair and is easier than a full crown braid because each braid is short and in easy reach. Plan on about twenty minutes. It holds well for a full evening since the bun is braced by the braids pinned into it.
Try this: pancake the braids, meaning pull each loop gently outward, before you build the bun, so the braided detail reads clearly.
Difficulty: Low to Medium · Cost: $$ (salon)
17. Double Crown Braids

Double crown braids stack two braids along the hairline. Braid the first along the front hairline from a side part and pin it behind the ear, then braid a second one just behind it the same way. The rest of the hair can stay down, go into a ponytail, or tuck into a low bun.
This suits short to long hair, and it is one of the few braided options that works on a bob because each braid is short. Plan on about fifteen to twenty minutes. It also adds the look of thickness at the front, which helps fine hair.
Try this: keep the two braids close together with almost no gap, so they read as one wide braided band.
Difficulty: Low to Medium · Cost: $$ (salon)
18. Waterfall Braid with Soft Waves

A waterfall braid runs across the back or side of the head and drops a strand at each step, so loose waves fall through the braid like water. Start a French braid at one side, and each time the top strand crosses over, drop it and pick up a fresh strand from above instead.
This suits medium to long hair worn wavy. Plan on about twenty to twenty-five minutes including the waves. The dropped strands need curling after the braid is done if you want the falling pieces to match the rest.
Try this: practice the drop-and-replace rhythm on a friend or a doll head first. The hand pattern is the only hard part.
Difficulty: Medium · Cost: $$ (salon)
19. Fishtail Half Updo
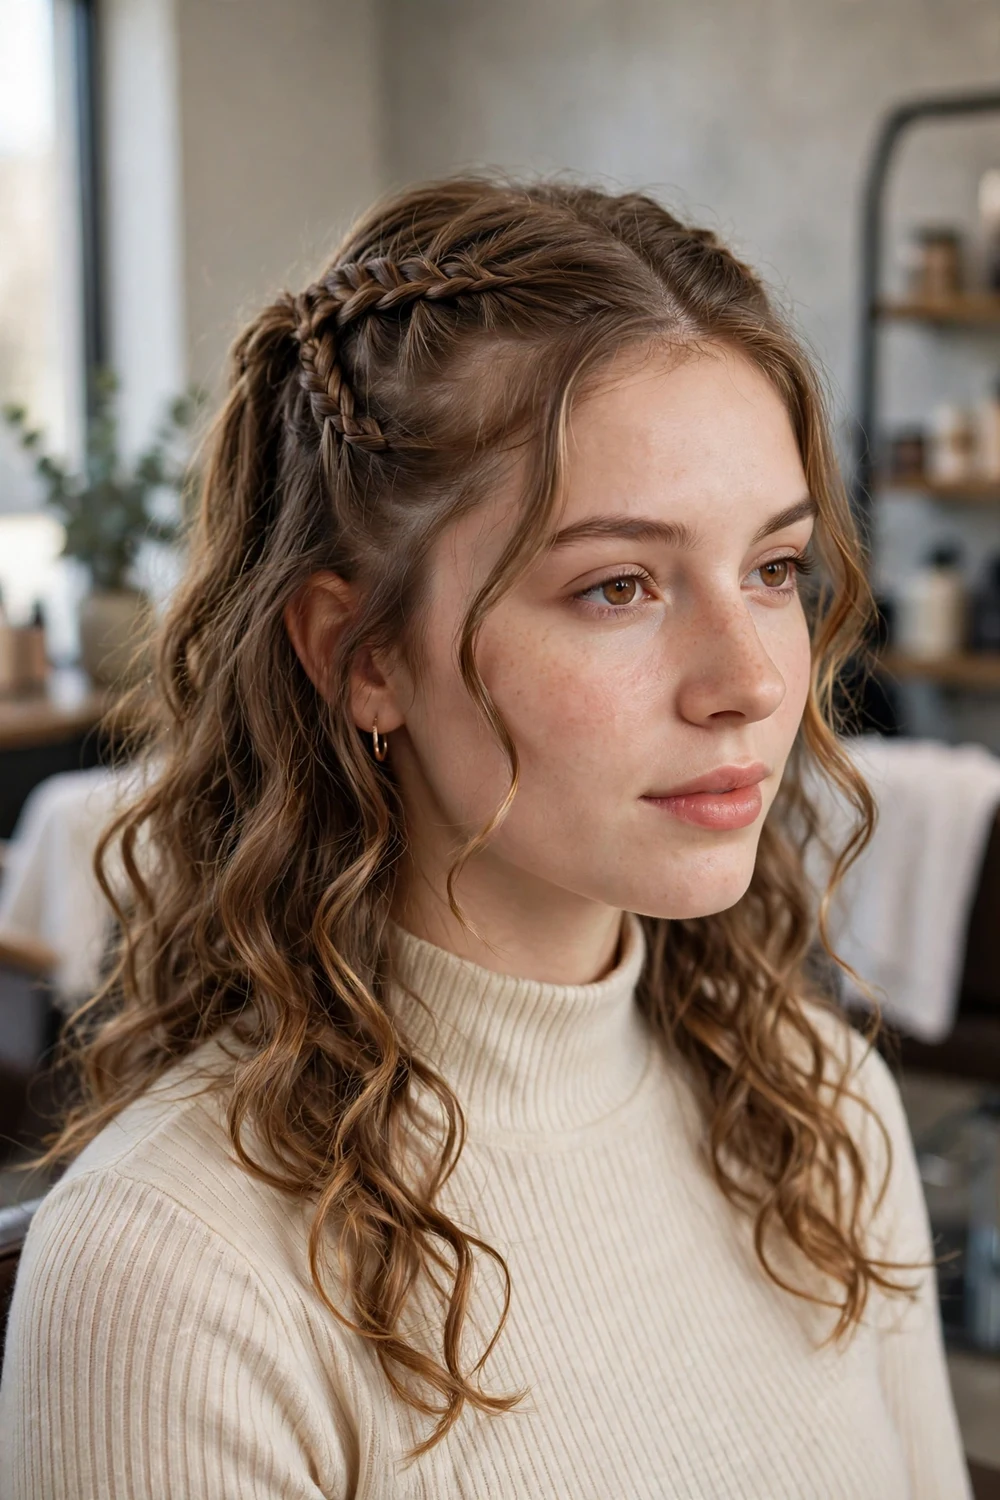
A fishtail half updo uses two small fishtail braids, one above each ear, joined at the back over curled loose hair. A fishtail braid works with two strands: cross a thin piece from the outside of one strand over to the other, then repeat from the opposite side, alternating all the way down.
This suits medium to long hair. Plan on about twenty minutes including curls, since each small fishtail takes a few minutes on its own. Thin pieces give a finer, more detailed braid, so keep the crossed pieces small.
Try this: join the two braids with a clear elastic and cover the join with a small clip, which is faster than pinning them flat.
Difficulty: Low to Medium · Cost: $$ (salon)
20. Side-Swept Fishtail Braid
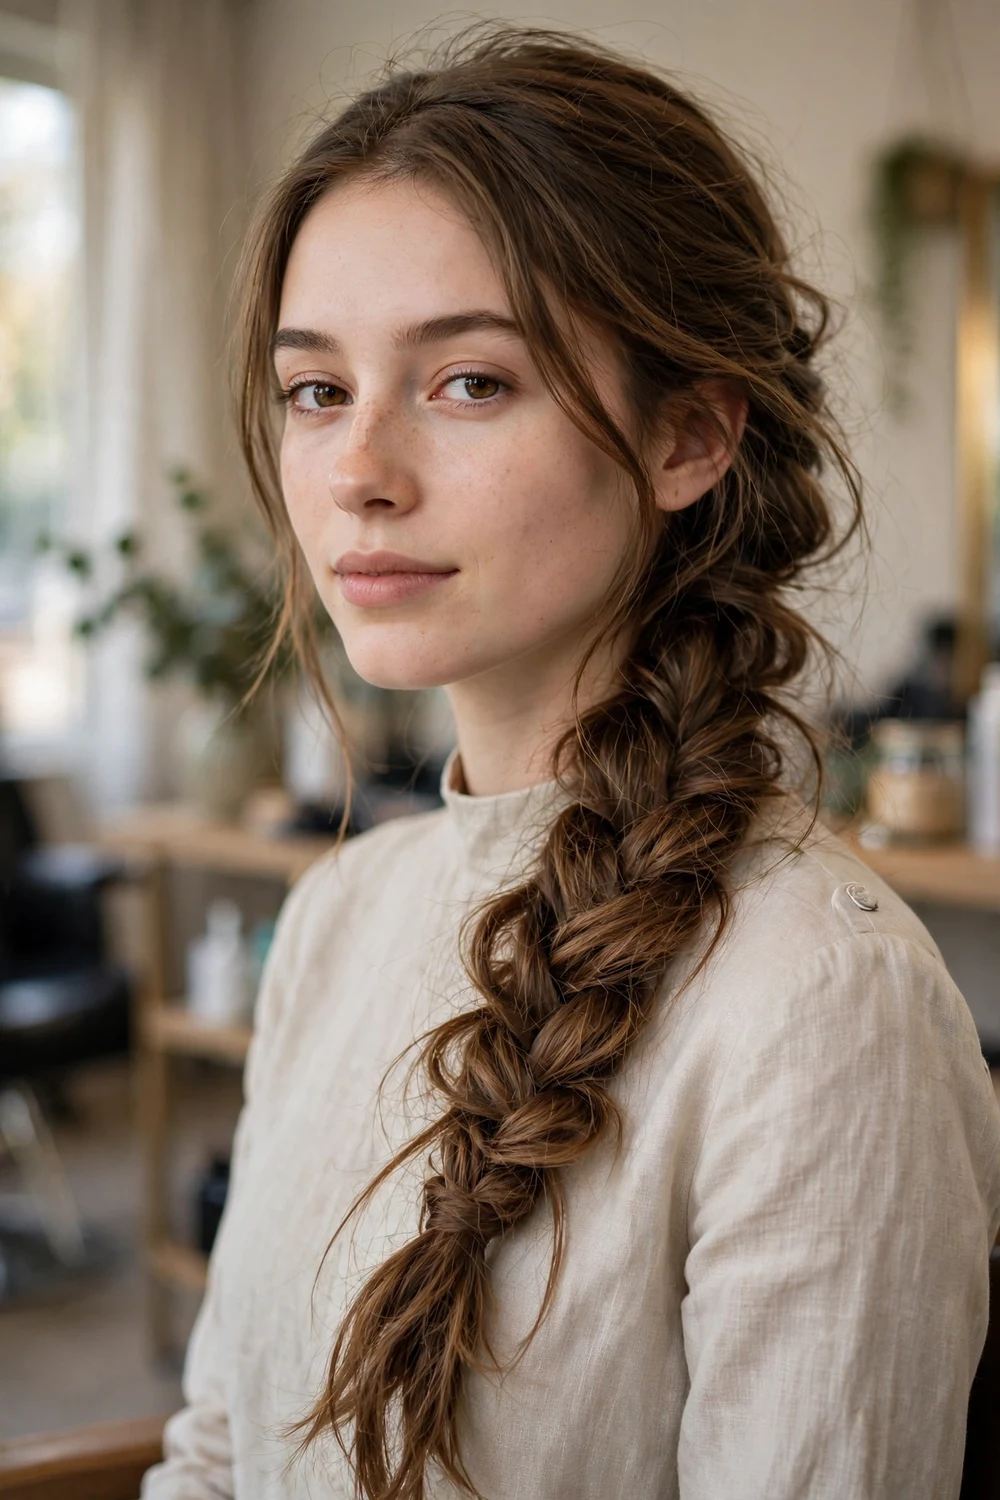
A side-swept fishtail brings all the hair over one shoulder and braids it in the same two-strand fishtail pattern, kept loose. Pull the finished braid apart gently, loop by loop, to widen it. The wide, flat shape is what makes a fishtail read as a formal style.
This suits long hair, since a fishtail shortens the hair as it braids and needs length to spare. Plan on about fifteen to twenty minutes. It pairs well with a dress that has detail on one shoulder, worn on the opposite side from the braid.
Try this: curl the hair before braiding. The curled texture keeps the loosened braid from sliding apart.
Difficulty: Low to Medium · Cost: $$ (salon)
21. French Braid Updo

A French braid updo braids the hair back from the hairline, then coils the remaining tail into a small bun and pins it. The braid keeps the front smooth and off the face, and the pinned tail means no loose ends hang down the back.
This suits medium to long hair and shows off a dress with a detailed back, since the neck and shoulders stay clear. Plan on about twenty minutes. If braiding your own hair backward is hard, braid a single French braid on a friend first to learn the hand positions.
Try this: start the braid slightly loose. A braid begun too tight pulls at the front hairline and gets uncomfortable within an hour.
Difficulty: Medium · Cost: $$ (salon)
22. Pinned-Back Accent Braids

Accent braids are two small braids worked into the front sections on each side of the part, then pinned back while the rest of the hair stays down in waves. Each braid is only a few inches long, so this is the fastest braided option on the list.
This suits short, medium, and long hair, and it works on straight hair too if you skip the waves. Plan on about fifteen minutes including waves, or about five minutes on already styled hair. Small metal cuffs or rings can be clipped onto the braids for extra detail.
Try this: braid the front sections while they are slightly damp, then let them dry in the braid shape for a cleaner finish.
Difficulty: Low · Cost: $ (salon)
23. Side Braid for a Bob
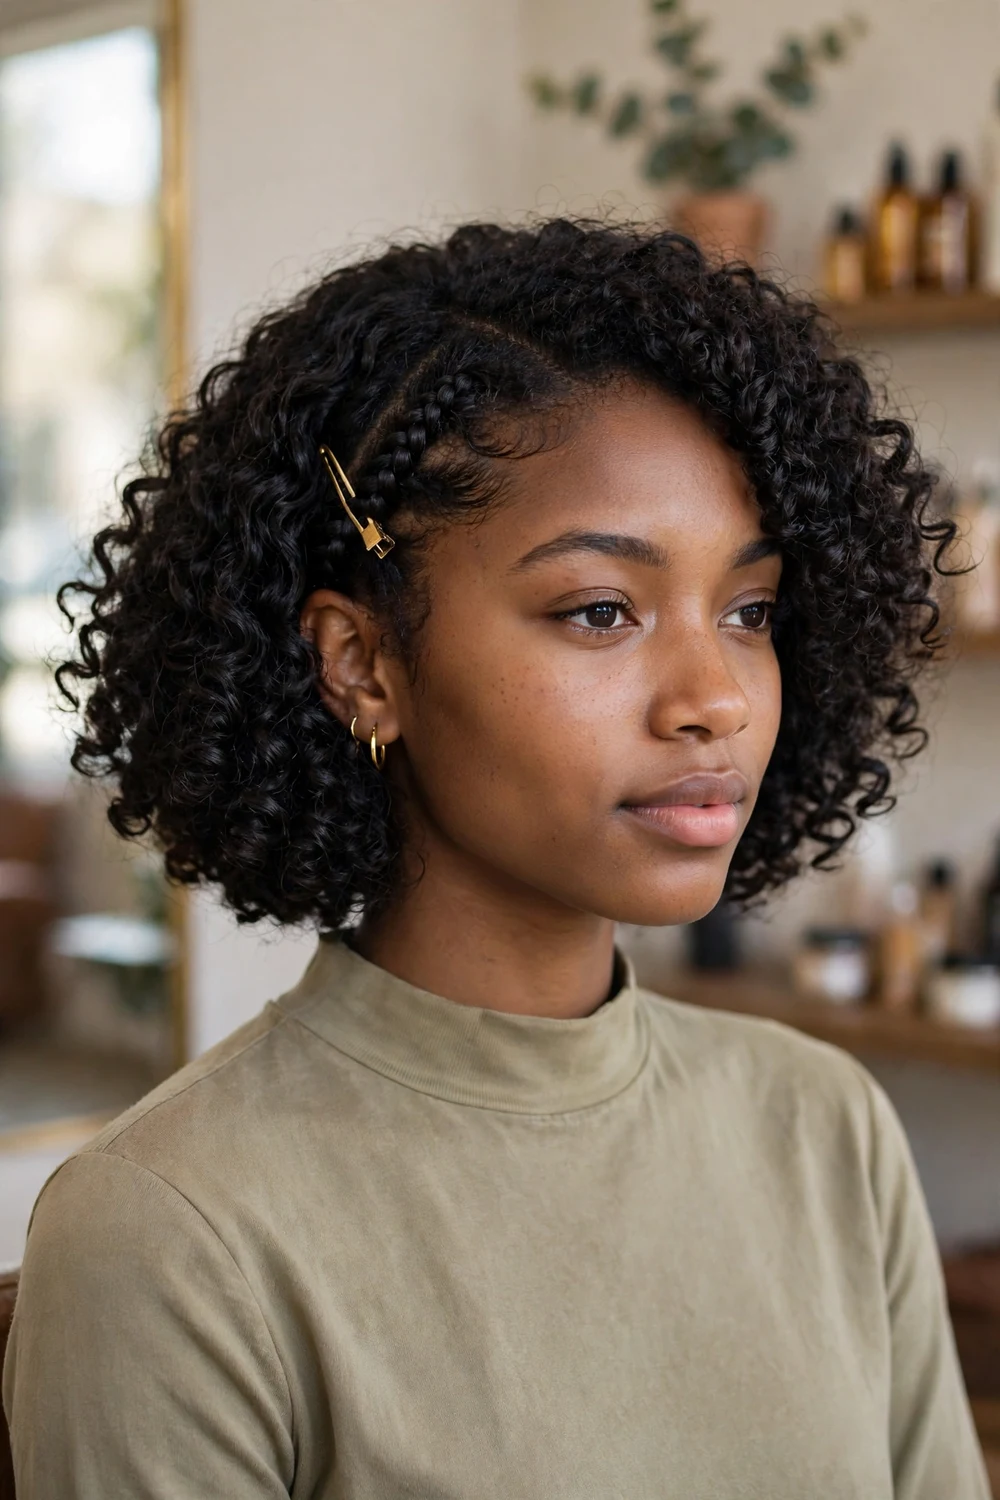
Short hair needs a different plan, and a small side braid is the most reliable one. Curl the bob for volume, then braid a one-inch section above one ear, pin it flat behind the ear, and let the curls cover the pin. The braid reads as a deliberate detail rather than a styling trick.
This suits bobs and lobs, straight or curly. Plan on about fifteen minutes including curling. More short-length options, including pinned styles for pixie cuts, are covered in the quick updos for short hair guide, which focuses only on short lengths.
Try this: place the braid on the side opposite your part. The contrast between the flat braid and the fuller side looks balanced in photos.
Difficulty: Low · Cost: $ (salon)
24. Polished Space Buns
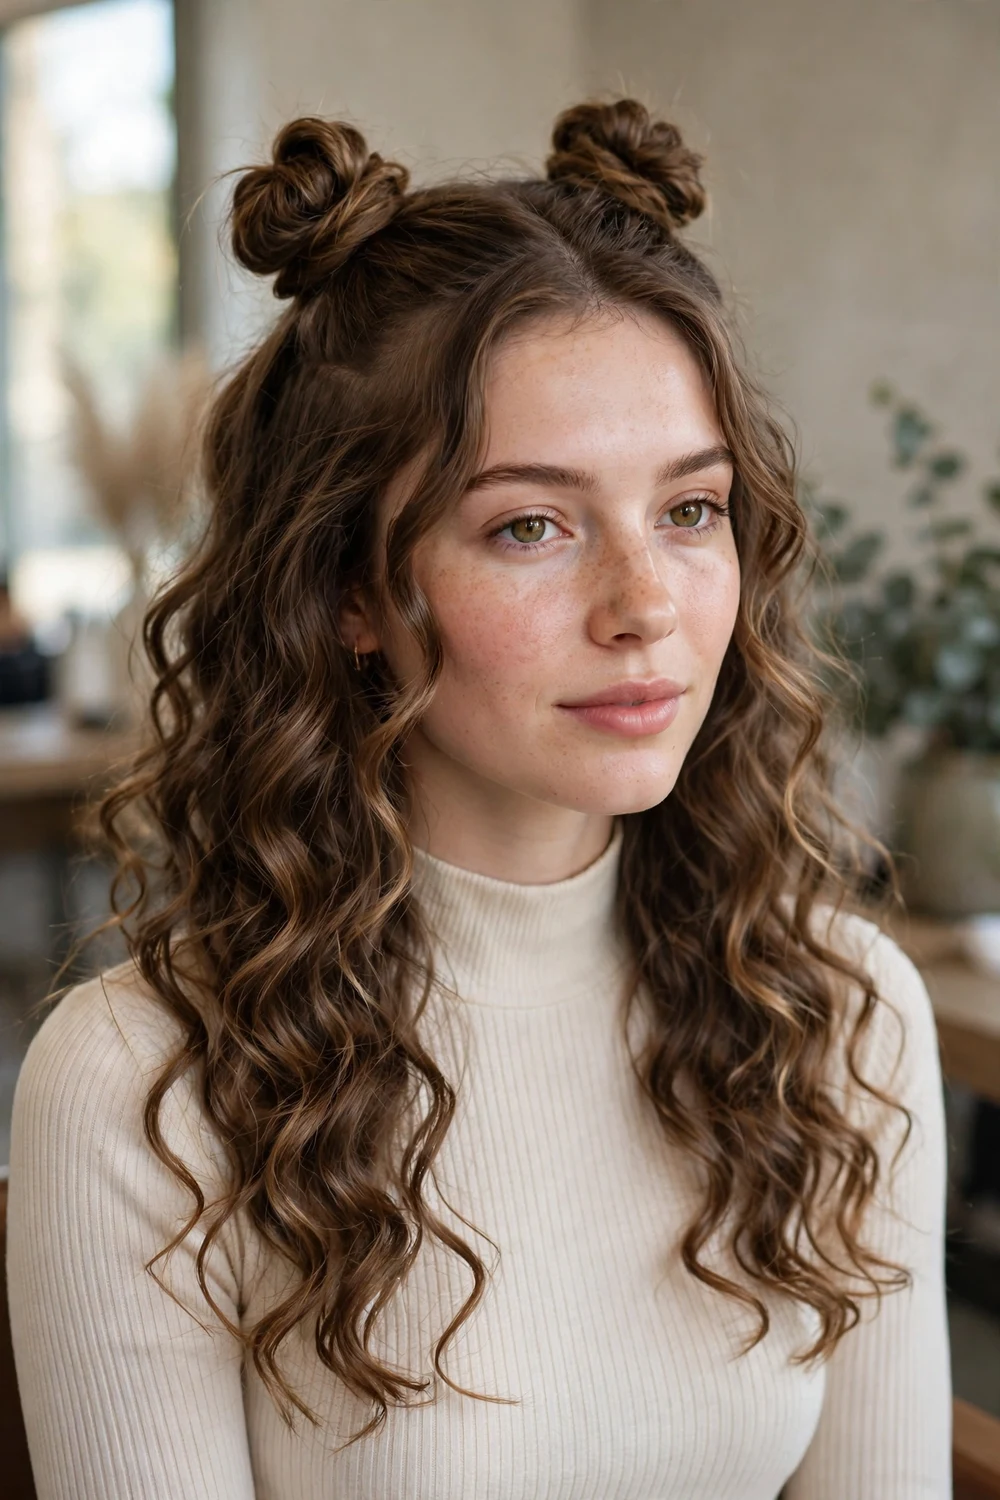
Space buns split the hair down the center part, then twist each side into a bun high on the head. For a dance, the polished version keeps the buns neat, adds curled face-framing pieces, and finishes with a small bow or clip at one bun. Leaving the back lengths down softens the style further.
This suits medium to long hair and a fun, less formal dress code. Plan on about fifteen minutes. Matching the two buns in size is the main task, so check them from the front and adjust the smaller one by pulling it apart slightly.
Try this: build each bun from a small ponytail first. The elastic base keeps both buns at the same height.
Difficulty: Low · Cost: $ (salon)
25. Wavy Bob with a Deep Side Part

A deep side part changes a plain bob into an event style. Move the part about an inch further to the side than usual, curl the hair in large sections, and tuck the smaller side behind the ear with a flat clip or pin. The heavier side falls in a smooth wave across the forehead.
This suits bobs and lobs of any texture that can hold a wave. Plan on about fifteen to twenty minutes. Longer styles built around the same updo family are gathered in the updos for long hair collection if your group is getting ready together and needs options for every length.
Try this: curl the heavy side away from the face and the tucked side toward the back, so the two sides do not fight each other.
Difficulty: Low · Cost: $ (salon)
26. Retro Waves

Retro waves are smooth, even waves with a glossy finish, usually worn with a side part on shoulder length hair. Curl every section in the same direction with a larger barrel, let the curls cool fully, then brush them out in long strokes so they merge into one repeating wave pattern.
This suits short to medium hair best, since long hair pulls the pattern out with its own weight. Plan on about twenty-five minutes, most of it in the cooling and brushing stage. A shine spray at the end gives the finished waves their even sheen.
Try this: clip the brushed waves into their dips with flat clips for five minutes before spraying. The clips set the wave shape in place.
Difficulty: Low to Medium · Cost: $ (salon)
27. Pull-Through Faux Braid
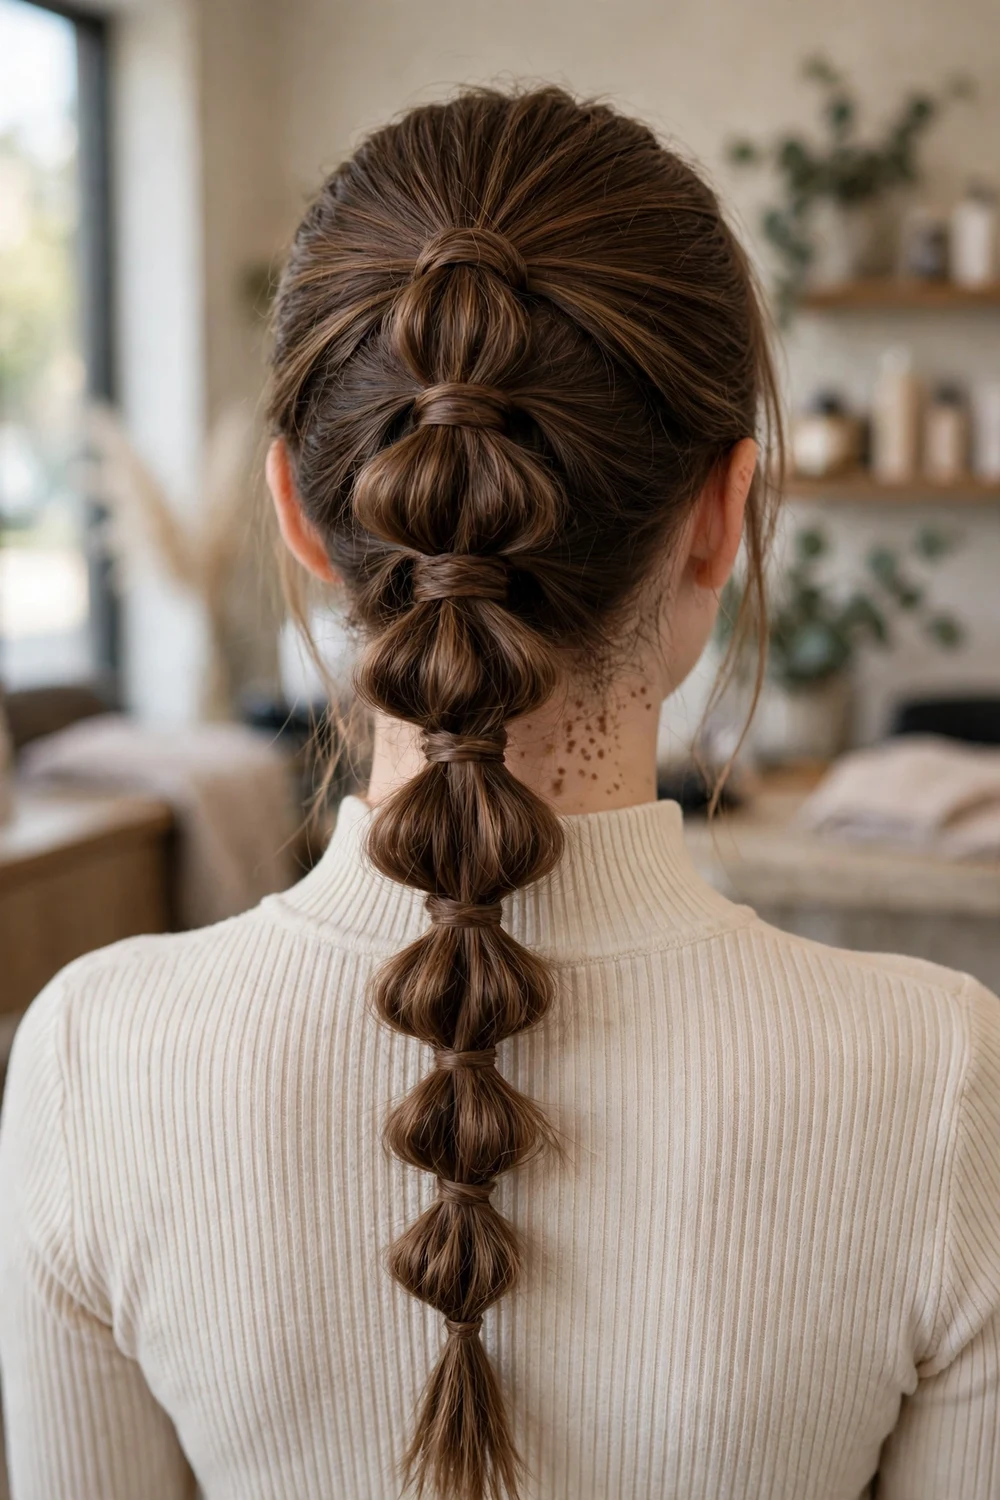
The pull-through braid looks like a thick braid and uses no braiding at all. Make a row of small ponytails down the back of the head, split each ponytail in two, pull the ponytail below up through the split, and repeat. Each loop puffs out into a rounded segment that reads as a braid link.
This suits medium to long hair and anyone who cannot braid their own hair. Plan on about fifteen to twenty minutes. Because every segment is held by an elastic, the style survives a full night of dancing without loosening.
Try this: pull each segment wider as you finish it rather than at the end. Widening early keeps the segments even in size.
Difficulty: Low · Cost: $ (salon)
28. Claw Clip Twist Updo

A claw clip twist gathers the hair into a low ponytail position, twists it upward against the back of the head, folds the ends down, and clamps a large decorative claw clip over the twist. Pearl, tortoiseshell, and metallic clips turn a daily style into an event style.
This suits medium to long hair with enough thickness for the clip to grip. Plan on about five minutes, which makes it the best rescue style on this list if another style fails at the last minute. Test the clip size in advance, because fine hair needs a smaller clip to hold.
Try this: add two crossed bobby pins under the clip as a safety anchor, then remove them if the clip holds firm through a few head shakes.
Difficulty: Low · Cost: $ (salon)
29. Night-Before Heatless Curls

Heatless curls move the work to the night before. Wrap slightly damp hair in sections around a soft fabric belt or a foam curling rod, secure the ends, and sleep on it. In the morning, unwrap each section, separate the curls with your fingers, and finish with a light spray.
This suits medium to long hair and anyone avoiding heat tools. Hands-on time is about fifteen minutes the night before and five minutes in the morning. The curls come out softer and less even than iron curls, so pair them with a half-up twist or accent braids if you want a more finished style.
Try this: wrap on hair that is almost dry rather than wet. Wet hair often stays damp at the core and the curls fall flat.
Difficulty: Low · Cost: $ (salon)
| Style group | Best for | Time needed | Hold for dancing |
|---|---|---|---|
| Waves and straight styles (1, 2, 26, 29) | Any length, photos first | About fifteen to thirty minutes | Medium |
| Ponytails (3, 4, 5, 6) | Medium to long hair | About five to fifteen minutes | High |
| Half-up styles (7, 8, 9, 10, 19) | Medium to long hair, all textures | About ten to twenty minutes | Medium to high |
| Buns and twists (11, 12, 13, 14, 24, 28) | Medium to long hair, detailed dress backs | About five to twenty minutes | High |
| Braids (15, 16, 17, 18, 20, 21, 22, 23, 27) | Long hair, plus short options at 17, 22, 23 | About fifteen to thirty minutes | High |
More Ideas to Explore
Frequently Asked Questions
What is the easiest homecoming hairstyle to do at home?
The half ponytail with a bow and the claw clip twist are the easiest styles on this list. Both take about five to ten minutes, need only an elastic or a clip, and can be redone in a mirror without help. The twisted ponytail is close behind it, since the whole style is one flip through a gap above the elastic.
Should I wash my hair the day of homecoming?
For updos, braids, and twists, hair washed the day before usually holds better, because freshly washed hair is softer and slips out of pins and braids. For loose waves and straight styles, same-day washing is fine as long as the hair is fully dry before any heat tool touches it. If your hair gets oily quickly, dry shampoo at the roots the night before solves both problems.
How do I make my hairstyle last through the whole dance?
Build the style on dry hair, let curls cool before brushing them out, and pin with crossed pins so each pin locks against another. Carry a small kit with extra pins, a spare elastic, and a travel hairspray for quick fixes. Braided and pinned styles hold the longest, while loose waves relax over the evening and end softer than they started.
What hairstyle works best for short hair at homecoming?
A wavy bob with a deep side part, a side braid pinned above the ear, and double crown braids all work on bob length hair. Short hair cannot do most buns and ponytails, so the winning move is texture plus one detail: waves for movement, and a braid, clip, or barrette as the formal element.
How early should I practice my homecoming hairstyle?
Do one full practice run at least a day or two before the dance, using the same tools, products, and accessories you plan to use on the night. Time the practice run so you know your real time, not a guess. If a style fails twice in practice, switch to a simpler backup from this list rather than fighting the same style on the night itself.
Final Thoughts
Pick your homecoming hairstyle by three things: the length and texture you have, the time you will honestly spend, and how much dancing you plan to do. Waves and half-up styles suit a relaxed plan, ponytails suit a tight schedule, and braids and buns suit a long night on the dance floor. Practice once, pack a few spare pins, and choose the style you can rebuild in a mirror without help. That is the one that will still look good in the last photo of the night.

